Microsoft has gone to great lengths to integrate the Internet into every nook and cranny of Windows XP. Links and buttons that spur your modem into a dialing frenzy are everywhere: on the Help screens, in the Search window, and even in the “Send error report to Microsoft?” dialog boxes that appear after program crashes. Once you’ve got your Internet connection working (Chapter 9), you may find that it’s easier to go online than it is not to.
The Internet offers dozens of different features, most of them graced with such unhelpful, invented-by-government-scientists-in-the-sixties names as FTP, Telnet, Gopher, and so on. But a few of the most popular Internet services are both easy to understand and easy to use: the World Wide Web, email, online chatting, video-conferencing, and free phone calls.
You can use whichever software you prefer for these functions. To connect to the Web, for example, experts rave about the free Mozilla Firefox (http://www.mozilla.org). To check your email, use Eudora, Lotus Notes, and so on.
But most Windows XP users wind up using the Internet programs that are built right into the operating system: Internet Explorer, newly enhanced in Service Pack 2,; Outlook Express for email; and Windows Messenger or NetMeeting for chatting, free long-distance “phone” calls, and teleconferencing. This chapter covers all of these programs except Outlook Express, which is described in Chapter 12.
Internet Explorer (or IE, as it’s often abbreviated) is the most famous Web browser on earth, thanks to several years of Justice-department scrutiny and newspaper headlines. Even with Service Pack 2, Windows XP still comes with IE version 6, which you can open in a number of ways:
Choosing its name from the Start menu (either the left column or the All Programs menu).
Clicking its shortcut on the Quick Launch toolbar.
Choosing a Web site’s name from your Start→Favorites menu (that is, if you’ve put favorites there).
Typing a Web address—sometimes called its URL (Uniform Resource Locator) into a window’s Address bar. A Web page URL usually begins with the prefix http://, but you can leave that part off when typing into the Address bar.
Clicking a blue, underlined link on a Windows Help screen.
...and so on.
As you can see in Figure 11-1, the Internet Explorer window is filled with tools that are designed to facilitate a smooth trip around the World Wide Web.

Figure 11-1. The Internet Explorer window offers tools and features that let you navigate the Web almost effortlessly; these various toolbars and status indicators are described in this chapter. Chief among them: the Address bar, which displays the address (URL) of the Web page you’re currently seeing, and the standard set of buttons, which let you control the Web-page loading process.
Navigating the Web requires little more than clicking buttons or those underlined blue phrases, as shown in Figure 11-1.
When you click an underlined link (or hyperlink), you’re transported from one Web page to another. One may be the home page of General Motors; another may contain critical information about a bill in Congress; another might have baby pictures posted by a parent in Omaha. Several hundred million Web pages await your visit.
Around the edges of any Web page, as well as within it, you’ll encounter standard Internet features. For example:
Explorer logo. When this globe is spinning, your PC is still downloading (receiving) the information and graphics on the Web page. In other words, you’re not seeing everything yet.
Button and picture links. Clicking a picture or a button generally takes you to a new Web page.
Text links. Clicking a link takes you to a different Web page (or a different place on the same Web page).
Tip
Text links aren’t always blue and underlined. In fact, modern Web designers sometimes make it very difficult to tell which text is clickable, and which is just text. When in doubt, just move your cursor over some text. If the arrow changes to a pointing-finger cursor, you’ve found yourself a link.
Actually, you can choose to hide all underlines, a trick that makes Web pages look cleaner and more attractive. Underlines appear only when you point to a link (and wait a moment). If that arrangement appeals to you, open Internet Explorer. Choose Tools→Internet Options, click the Advanced tab, scroll down to “Underline links,” select the Hover option, then click OK.
Graphics worth saving. When you see a picture you’d like to keep, right-click it and choose Save Picture As from the shortcut menu. After you name the picture and then click the Save button, the result is a new graphics file on your hard drive containing the picture you saved. (You can also choose Set as Background, which makes the picture part of your desktop image itself.)
Scroll bars. Use the scroll bar to move up and down the page—or to save mousing, press the Space bar each time you want to see more. Press Shift+Space bar to scroll up. (The Space bar has its traditional, space-making function only when the insertion point is blinking in a text box or the Address bar.)
You can also press your up and down arrow keys to scroll. Page Up and Page Down scroll in full-screen increments, while Home and End whisk you to the top or bottom of the current Web page.
Many of Internet Explorer’s most useful controls come parked on toolbars exactly like those described in Chapter 2. You summon or hide these toolbars the same way, too: by choosing their names from the View→Toolbars submenu. Here’s what you’ll find on each.
Tip
Drag the tiny “grab bar” at the left end of a toolbar up or down to rearrange the bars’ vertical stacking order. You can even drop this grab bar halfway across another toolbar, thus placing two toolbars side-by-side on the same horizontal strip.
This toolbar, identified in Figure 11-1, contains the buttons that most people use for browsing most of the time. Some of them lack text labels, but all offer tooltip labels:
Back button, Forward button. Click the Back button to revisit the page you were just on. (Keyboard shortcut: Backspace, or Alt+left arrow.)
Once you’ve clicked Back, you can then click the Forward button (or press Alt+right arrow) to return to the page you were on before you clicked the Back button. Click the tiny black triangle for a drop-down list of all the Web pages you’ve visited during this online session.
Stop button. Click to interrupt the downloading of a Web page you’ve just requested (by mistake, for example). (Keyboard shortcut: Esc.)
Refresh. Click if a page doesn’t look or work quite right, or if you want to see the updated version of a Web page (such as a stock ticker) that changes constantly. This button forces Internet Explorer to redownload the Web page and reinterpret its text and graphics.
Home button. Click to bring up the Web page you’ve designated as your home page (see Section 11.1.8).
Tip
You can rearrange these buttons, delete some, or add additional function buttons, by choosing View→Toolbars→Customize. For details on operating Microsoft’s toolbar-rearrangement window, see Section 2.3.1.
This yellow strip, new in Service Pack 2, lets you know what’s going on with pop-up windows and naughty plug-ins. For details, see Section 10.6.2.2.
When you type a new Web page address (URL) into this strip and press Enter, the corresponding Web site appears. (If only an error message results, then you may have mistyped the address, or the Web page may have been moved or dismantled—a relatively frequent occurrence.)
Because typing out Internet addresses is so central to the Internet experience and such a typo-prone hassle, the Address bar is rich with features that minimize keystrokes. For example:
You don’t have to click in the Address bar before typing; just press Alt+D.
You don’t have to type out the whole Internet address. You can omit the http://www and .com portions by pressing Ctrl+Enter—which makes Internet Explorer fill in those standard address bits for you. To visit Amazon.com, for example, a speed freak might press Alt+D to highlight the Address bar, type amazon, and then press Ctrl+Enter.
Even without the Ctrl+Enter trick, you can still omit the http:// from any Web address, since Internet Explorer adds it automatically. (Most of the time, you can omit the www, too.) To jump to today’s Dilbert cartoon, type dilbert.com and then press Enter.
When you begin to type into the Address bar, the AutoComplete feature compares what you’re typing against a list of Web sites you’ve recently visited. IE displays a drop-down list of Web addresses that seem to match what you’re typing. To spare yourself the tedium of typing out the whole thing, just click the correct complete address with your mouse, or use the down arrow key to reach the desired listing and then press Enter. The complete address you selected then pops into the Address bar.
(To make Windows forget one of the Web sites you’ve visited recently, highlight it in the drop-down AutoComplete list and then press your Delete key. Or, to make Windows forget all of the sites you’ve seen, choose Tools→Internet Options, click the General tab, and then click the Clear History button.)
Tip
IE can also remember user names, passwords, and other information you type into Web page text boxes (forms). You can turn on this feature by choosing Tools→Internet Options, clicking the Content tab, clicking AutoComplete, and turning on the appropriate checkboxes. Or you can just wait for Internet Explorer to invite you to turn it on, via a little dialog box that appears when you first type something into such a form. Having your browser remember the names and passwords for your various Web sites is a great time and memory saver, even though it doesn’t work on all Web sites.
When you want Internet Explorer to “forget” your passwords—for security reasons, for example—choose Tools→Internet Options, click the Content tab, click the AutoComplete button, and then click Clear Forms and Clear Passwords.
Press F4 (or use the drop-down list at the right end of the Address bar) to view a list of URLs you’ve visited during this browsing session. (The list drops down from the Address bar.) Once again, you can click the one you want—or press the up or down arrow keys to highlight one, and the Enter key to select it.
You can also type a plain English phrase into the Address bar. When you press Enter, IE does a Web search for that term and opens up the first Web page that seems to contain what you’re looking for. At the same time, the Search pane appears at the left side of the browser window, offering a list of other Web sites that seem to match your query.
Tip
For more control over which search site Internet Explorer uses, download TweakUI, a free Microsoft utility that comes with Powertoys (which you is described in more detail in Appendix C.1). After installing the Powertoys, choose Start→All Programs→Powertoys for Windows XP→TweakUI. Click Internet Explorer in the list at left, and then click Search.
You’re offered the chance to create little keywords that, when they precede your search term, will direct Windows to a certain search page. You could set up ggl to mean Google, for example. Thereafter you could type ggl llamas into the Address bar to make Internet Explorer search for “llamas” at http://www.google.com.
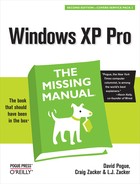
The Favorites menu described in Appendix B.3.7 is one way to maintain a list of Web sites you visit frequently. But opening a Web page listed in that menu requires two mouse clicks—an exorbitant expenditure of energy. The Links toolbar, on the other hand, lets you summon a few, very select, very favorite Web pages with only one click.
Figure 11-2 illustrates how to add buttons to, and remove them from, this toolbar. It’s also worth noting that you can rearrange these buttons simply by dragging them horizontally.
Tip
As shown in Figure 11-2, you can drag a link from a Web page onto your Links toolbar. But you can also drag it directly to the desktop, where it turns into a special Internet shortcut icon. To launch your browser and visit the associated Web page, just double-click this icon whenever you like.
Better yet, stash a few of these icons in your Start menu or Quick Launch toolbar for even easier access. (If you open your My Computer→C: drive→Documents and Settings→[Your Name]→Favorites folder, moreover, you’ll see these shortcut icons for all your favorite links. Feel free to drag them to the desktop, Quick Launch toolbar, Links toolbar, or wherever you like.)
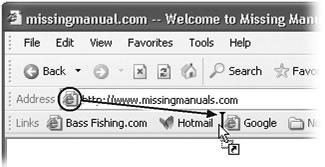
Figure 11-2. Once you’ve got a juicy Web page on the screen, you can turn it into a Links icon just by dragging the tiny Explorer-page icon from the Address bar directly onto the Links bar, as shown here. (You can also drag any link, like a blue underlined phrase, from a Web page onto the toolbar.) To remove a button, right-click it and choose Delete from the shortcut menu.
The status bar at the bottom of the window tells you what Internet Explorer is doing (such as “Opening page...” or “Done”). When you point to a link without clicking, the status bar also tells you which URL will open if you click it.
If you consult this information only rarely, you may prefer to hide this bar, thus increasing the amount of space actually devoted to showing you Web pages. To do so, choose View→Status Bar. (A checkmark appears next to its name in the View menu to indicate that the status bar is showing.)
From time to time, the Explorer bar appears at the left side of your browser window. Choosing commands from the View→Explorer Bar menu triggers a number of helpful lists: Search, Favorites, History, and so on. They’re described in greater detail in Section 2.1.2.
There’s no tidy card catalog of every Web page. Because Web pages appear and disappear hourly by the hundreds of thousands, such an exercise would be futile.
The best you can do is to use a search engine: a Web site that searches other Web sites. The best of them, such as http://www.google.com , consist of little more than a text box where you can type in your desired subject. Then, when you click the Search button (or press Enter), you’re shown a list of Web site links that contain the information you want.
Other popular search pages include yahoo.com, altavista.com, infoseek.com, and hotbot.com. Using the Search panel of the Explorer bar, you can even search several of these simultaneously. That’s handy, because no single search engine “knows about” every Web page on earth.
Tip
If you value your time, you’ll install the Google toolbar, a free, delicious IE enhancer available at http://toolbar.google.com. It blocks pop-ups, fills in forms for you, and best of all, lets you search Google from any Web page.
Internet Explorer is filled with shortcuts and tricks for better speed and more pleasant surfing. For example:
All of the toolbars and other screen doodads give you plenty of surfing control, but also occupy huge chunks of your screen space. The Web is supposed to be a visual experience; this encroachment of your monitor’s real estate isn’t necessarily a good thing.
But if you press F11 (or choose View→Full Screen), all is forgiven. The browser window explodes to the very borders of your monitor, hiding the Explorer bar, status bar, stacked toolbars, and all. The Web page you’re viewing fills your screen, edge to edge—a glorious, liberating experience. Whatever toolbars you had open collapse into a single strip at the very top edge of the screen, their text labels hidden to save space.
You can return to the usual crowded, toolbar-mad arrangement by pressing F11 again—but you’ll be tempted never to do so.
You can adjust the point size of a Web page’s text using the View→Text Size commands (and then pressing F5 to refresh the screen, if necessary). When your eyes are tired, you might like to make the text bigger. When you visit a Web site designed for Macintosh computers (whose text tends to look too large on PC screens), you might want a smaller size.
Internet Explorer has always offered a number of great features when it comes to graphics found online. Right-clicking an image, for example, produces a shortcut menu that offers commands like Save Picture As, E-mail Picture, Print Picture, Set as Background (that is, wallpaper), and Set as Desktop Item (that is, an Active Desktop item, as described in Chapter 8). There was only one problem: Most people never knew these features existed.
In Internet Explorer, therefore, Microsoft tries to make it more obvious that this browser has some smarts with regards to pictures. Whenever your cursor moves over a graphic, a small image toolbar appears, as shown in Figure 11-3. And if it’s a big picture—too big to fit in your browser window—Internet Explorer automatically shrinks it so that it does fit, also as shown in Figure 11-3.
Tip
To turn off IE’s picture toolbar and picture-shrinking feature, choose Tools→Internet Options. Click the Advanced tab, scroll down to the Multimedia heading, and turn off “Enable Automatic Image Resizing” and “Enable Image Toolbar (requires restart).” Click OK, and (if you turned off the toolbar) quit and reopen IE.
Of course, graphics are part of what makes the Web so compelling. But they’re also responsible for making Web pages take so long to arrive on the screen. Without them, Web pages appear almost instantaneously. You still get fully laid-out Web pages; you still see all the text and headlines. But wherever a picture would normally be, you see an empty rectangle containing a generic “graphic goes here” logo, usually with a caption explaining what that graphic would have been.
Figure 11-3. Top left: Internet Explorer automatically displays its image toolbar whenever your cursor points to a graphic. One click on its icons can save a graphic, print it, email it, or open your My Pictures folder to manage your collection. Bottom right: If you click the Expand button, you see the graphic at its regularly scheduled size, which may be much too big for your browser window. Click the Shrink button (circled) to make Internet Explorer do its shrink-to-fit favor for you once again.
To turn off graphics, choose Tools→Internet Options, which opens the Internet Options dialog box. Click the Advanced tab, scroll down halfway into the list of checkboxes, and turn off “Show pictures” (in the Multimedia category of checkboxes; see Figure 11-5). Now try visiting a few Web pages; you’ll feel a substantial speed boost.
And if you wind up on a Web page that’s nothing without its pictures, you can choose to summon an individual picture. Just right-click its box and choose Show Picture from the shortcut menu.
When you find a Web page you might like to visit again, press Ctrl+D. That’s the keyboard shortcut for Favorites→Add to Favorites—but it’s better, because it doesn’t make you slog through a dialog box. The Web page’s name appears instantly at the bottom of your Favorites menu. The next time you want to visit that page, just choose its name.
You can rearrange the commands in your Favorites menu easily enough: Just drag them up and down the open menu (something that doesn’t occur to most Web fans.)
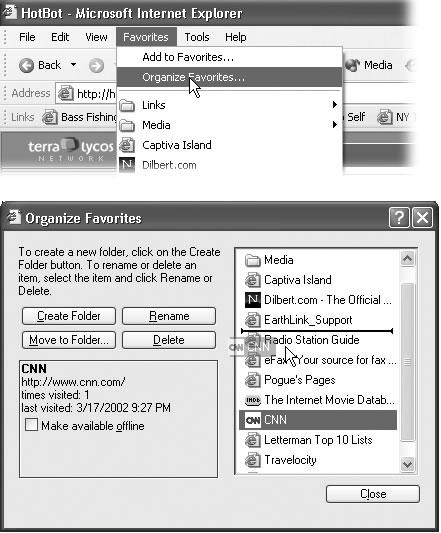
Figure 11-4. Top: To edit the Favorites menu, choose Favorites→Organize Favorites. Bottom: When the Organize Favorites window opens, you can drag names up or down to rearrange the list, as shown. Or click one and then use the buttons at left to rename, delete, or file it in a folder.
If your Favorites pane is open at the left side of the window, you can rearrange them there, too, just by dragging with the Alt key pressed.
For more dramatic management tasks—to edit, rename, or delete your favorites, for example—see Figure 11-4.
You don’t have to be connected to the Net to read a favorite Web page. Using the Offline feature, you can make Internet Explorer store a certain Web page on your hard drive so that you can peruse it later—on your laptop during your commute, for example.
The short way is to choose File→Save As. For greatest simplicity, choose “Web Archive, single file (*.mht)” from the “Save as Type” drop-down list. (The other options here save the Web page as multiple files on your hard drive—a handy feature if you intend to edit them, but less convenient if you just want to read them later.) Name the file and click the Save button. You’ve just preserved the Web page as a file on your hard drive, which you can open later by double-clicking it or by choosing File→Open from within Internet Explorer.
That sweet, simple technique isn’t quite what Microsoft has in mind when it refers to Offline Browsing, however. This more elaborate feature adds more options, such as automatic updating of the page you’ve saved and the ability to click links on that same page.
To store a Web page in this way, follow these steps:
Add the Web page to your Favorites menu or Links toolbar, as described earlier.
Before saving a Web page for offline viewing, you must first designate it as a Link or Favorite.
Right-click the Web page’s name in the Favorites menu or on the Links toolbar; from the shortcut menu, choose “Make available offline.”
The Offline Favorite Wizard appears.
Answer the questions posed by the wizard, clicking Next after each answer.
You’ll be asked, for example, whether or not you want IE to store pages that are linked to the page you’re saving—and how many “levels deep” you want this page-to-linked-page storage to proceed. In other words, if you’re storing a World News page, you’ll probably find nothing but headlines on its home page. When you’re sitting on the train to work with your laptop, you’ll appreciate the ability to click the headlines to open the attached article pages, which are one link “deep.”
On the other hand, be careful. Links to links exponentially increase the amount of disk space IE uses. Increasing the “Download pages __ links deep from this page” number too high could fill your hard drive with hundreds of Web pages and thousands of graphics you never intended to download.
The wizard also asks how often you want this stored page updated when you are connected to the Internet. (If you decline to specify a schedule, you can always update the stored page manually by choosing Tools→Synchronize.)
When you want a page you’ve stored offline, choose File→Work Offline. Then use the Favorites menu or Links toolbar to choose the page you want.
It springs instantly to the screen—no Internet connection required.
The ad banners at the top of every Web page are annoying enough—but nowadays, they’re just the beginning. The world’s smarmiest advertisers have begun inundating us with pop-up and pop-under ads: nasty little windows that appear in front of the browser window, or, worse, behind it, waiting to jump out the moment you close your browser. They’re often deceptive, masquerading as error messages or dialog boxes...and they’ll do absolutely anything to get you to click inside them.
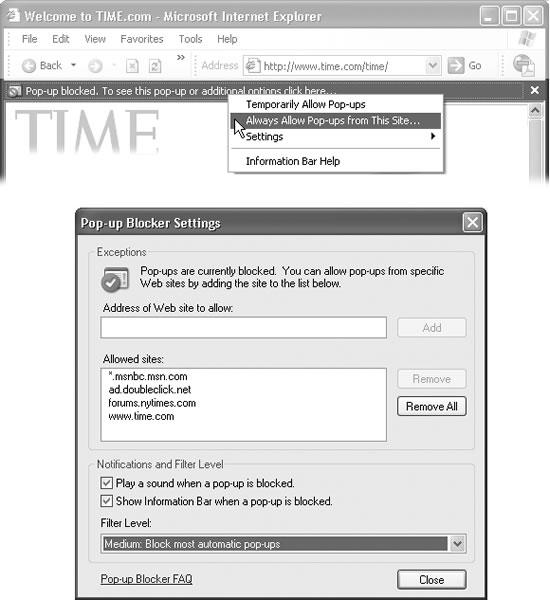
Figure 11-5. Top: If you click the “pop-up blocked” message, you can choose Temporarily Allow Pop-ups, which lets you see what IE is blocking. Or if pop-ups are important on a certain page (like the confirmation screen on a travel-booking site), choose Always Allow Pop-ups from This Site (and then click Yes). Bottom: Later, you can always manage the list of “pop-ups permitted” sites by choosing Tools→Pop-up Blocker→Pop-up Blocker Settings. This dialog box appears, listing all pop-up approved Web sites (and offering a Remove button if you’re having second thoughts). Here, too, you can turn off the “blocked pop-up” sound, eliminate the Information bar, or adjust the level of the pop-up filter (High, Medium, or Low).
Better browsers, like Netscape and Firefox, have superb pop-up blockers—and with an add-on available at http://adblock.mozdev.org , they can even block regular ads and animations. But with Service Pack 2, Microsoft finally got around to adding a basic pop-up blocker right in IE. You won’t have to browse for very long before you see the “Pop-up blocked” message in the yellow Information bar (Figure 11-5).
Tip
If you’ve installed some other company’s pop-up blocker, you can turn off IE’s version by choosing Tools→Pop-up Blocker→Turn Off Pop-up Blocker.
Note that IE blocks only pop-ups that are spawned automatically, not those that appear when you click something (like a seating diagram on a concert-tickets site). And it doesn’t block pop-ups from your local network, or from Web sites you’ve designated as Trusted (choose Tools→Internet Options→Security, click “Trusted sites,” and then click Sites).

Figure 11-6. Peculiar though it may seem, choosing Tools→Internet Options takes you out of Internet Explorer. It opens the Internet Options program in the Control Panel; two of its tabs are shown here. Left: Turning off those annoying blinking animations (highlighted) can save your sanity. Alas, it doesn’t stifle all animations; the jerks of the ad-design world have grown too clever for this option. Right: On the General tab, you should take a moment to designate a new home page and boost the “memory” of the History feature (to 60 days, for example).
Tip
As you can read in Figure 11-5, there is a High setting that blocks all pop-ups, even the ones that appear when you click a link. Even then, you still have a way to see the occasional important pop-up: hold down the Ctrl key as your Web page is loading.
By spending a few minutes adjusting Internet Explorer’s settings, you can make it more fun (or less annoying) to use. To see the most important options, choose Tools→Internet Options (see Figure 11-6).
The first Web site you encounter when IE connects to the Internet is a Microsoft Web site (or Dell, or EarthLink—the point is, you didn’t choose it). This site is your home page. Unless you actually work for Microsoft, Dell, or EarthLink, however, you’ll probably find Web browsing more fun if you specify your own favorite Web page as your home page.
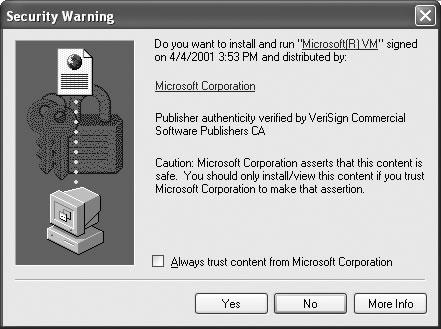
WORKAROUND WORKSHOPMissing in Action: Java
Many Web sites—especially electronic banking, stock trading, and game sites—rely on a programming language called Java to make them look less like ordinary Web sites and more like actual software, complete with stock tickers, interactive animation, and so on.
You can’t see these goodies unless your Web browser understands the Java language. Technically, you need a blob of software called a Java virtual machine. Previous versions of Windows came with this software—but not the original version of Windows XP.
As it turns out, Microsoft had a long-running feud with Sun Microsystems, the company that created the Java language. Sun sued Microsoft, accusing the bigger company of making changes to the Java language. But as everybody knows, it’s not nice to anger Mother Microsoft. Bill Gates’s revenge was swift and terrible: he and his team simply removed Java from Internet Explorer. The original version of Windows XP Pro didn’t let you access Java-based Web sites at all.
Fortunately, Service Pack 1 restored Java, although Microsoft says that it may remove it in a future update. And if you upgraded your PC from an earlier version of Windows, your previous installation of the Java virtual machine will continue to work just fine in Windows XP. Just forget everything you’ve read here.
On the other hand, if you have a new PC, or if you performed a clean installation of Windows XP (a copy that preceded SP1), you’ll have to download the Java virtual machine yourself. There’s not much to it: The first time you visit a Java Web site, you’ll see a message like the one shown here, offering to send you the Java virtual machine software. Just click Yes.
The download is 5 MB, which can take some time if you’re on a dial-up modem. But after the Java virtual machine has been installed, the Java Web sites should be available to you once again.
In the Home Page section of the General tab (Figure 11-6, right), enter the Internet address of a favorite Web site. You might consider one of the Web sites described in the previous section, for example, or Google.
Tip
Instead of typing in a URL into the Address box to specify a new home page, you can also click Use Current. This button means: “Use the Web page I’m looking at right now as my home page in the future.”
If you can’t decide on a home page, or your mood changes from day to day, click the Use Blank button. Some people prefer this setup, which makes IE load very quickly when you first launch it. Rather than wasting time loading some home page you’ve specified, it displays an empty window instead. Once this window opens, then you can tell the browser where you want to go today.
Most Web pages take a long time to appear in your browser because they’re crammed with pictures, which, on the great scale of computer files, are big and slow to download. If you use a modem, Web surfing can be a severe test of patience.
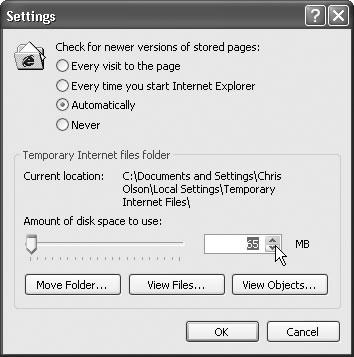
Figure 11-7. To change the size of your cache folder, click the Settings button in the General tab of the Internet Options dialog box (Figure 11-6), and then adjust the number shown here. Enlarging the number makes it possible to store more files, enhancing the odds that when you revisit a Web site you’ve seen before, it will pop up onto the screen quickly. To see the temporary files (if you can even think of a reason to do so), click the View Files button. To view a list of programs you’ve downloaded, click the View Objects button.
Every now and then, you might decide to return to a Web page you’ve already visited, perhaps during a recent Internet session. To help speed the process of loading pages you’ve already seen, Internet Explorer constantly saves the contents of every page visited onto your hard drive. When you revisit a site, the saved file is opened—fast—thus eliminating the time-consuming process of downloading the contents again.
These saved-up Web page files are called cache files. (Cache, pronounced “cash,” is French for “hide.”) IE stashes its cache in the Local Disk (C:)→Documents and Settings→[Your Name]→Local Settings→Temporary Internet Files folder. (The Local Settings folder is generally hidden; see Section 2.2.3.) This folder has a limited, albeit adjustable, capacity (see Figure 11-7). Windows XP deletes older files automatically to make room for new files.
The cache-file scheme is great when it comes to speeding up the reappearance of Web pages you’ve seen before. Unfortunately, it has one significant drawback: If you decide to visit a Web page you’ve seen before, and IE blasts it onto your screen from its saved temporary files folder, then you’re seeing an old version of that page—as it was the last time you visited. Therefore, if that Web page has been updated in the meantime, you’re looking at old news—a particular hazard if it’s a news Web site.
Fortunately, the dialog box shown in Figure 11-7 offers a great deal of control regarding when IE checks a particular Web page for changes made since your last visit. Here are your options:
Every visit to the page. This option forces IE to check every Web page to see if its contents have changed since you last visited. If so, IE loads the updated page from the Internet. Of course, this option slows the process of reopening Web pages, since IE must download all of those pages’ contents anew. Select this option only if you consistently visit Web sites with rapidly changing contents (stock ticker pages, news pages, Madonna hairstyle pages).
Every time you start Internet Explorer. This option divides your Web browsing into two categories: sites you’ve visited during this session of using IE, and sites you visited in previous sessions.
When you select this option, IE checks for new contents only on pages you visited in previous sessions. Revisiting any pages you viewed in the current session (which, of course, are less likely to have changed) produces the stored file. If you think the contents of the Web page may have changed, click the Refresh button on the IE toolbar to reload the page from the Internet.
Automatically. This option, the factory setting, is similar to the previous one, but smarter. It instructs IE to keep an eye on your Web activity, in order to determine a pattern for the type of pages you visit. Most of the time, IE reloads pages from the Internet exactly as described in the previous paragraph—that is, only when you visit a site you’d visited in a previous session. But this time, IE pays attention to individual Web sites: When reloading them from the Internet, what percentage of the time have they actually changed? Eventually, IE stops checking for updates on sites that change infrequently.
Never. This option instructs IE to load the stored, hard drive–based cache files for any Web site you’re revisiting. The program never checks the site’s contents to see if they’ve changed. (Of course, you can always click the Refresh button on your IE toolbar to force the browser to download the latest version of the page.)
This history is a list of the Web sites you’ve visited. It’s the heart of three IE features: AutoComplete, described at the beginning of this chapter; the drop-down list at the right side of the Address bar; and the History list found in View→Explorer Bar (it also appears when you click the unlabeled icon to the right of the Media button; see Figure 11-8). These are all great features if you can’t remember the URL for a Web site that you remember having visited, say, yesterday.
You can configure the number of days for which you want your Web visits tracked. To do so, choose Tools→Internet Options (Figure 11-6); click the General tab. The more days IE tracks, the easier it is for you to refer to those addresses quickly. On the other hand, the more days you keep, the longer the list becomes, which may make it harder to use the list easily and efficiently.
Tip
Some people find it creepy that Internet Explorer maintains a complete list of every Web site they’ve seen recently, right there in plain view of any family member or co-worker who wanders by. If you’re in that category, then turn the history feature off completely. Just click the Clear History button in the General tab, then set the “Days to keep pages in history” to 0. (After all, you might be nominated to the Supreme Court some day.)

Figure 11-8. The History panel (left) appears when you click the tiny History button (the unlabeled button to the right of the Media button) on the Standard toolbar. It offers more details than the History list displayed in the Address bar. Click one of the time-period icons to see the Web sites you visited during that era. Click the name of a Web site to view a list of each visited page within that site—information you don’t get from the drop-down list on the Address bar. You can sort the sites by clicking the View button in the History pane and choosing one of these sorting schemes: Date, Site, Most Visited, Order Visited Today.
To delete an individual Web site from the list, right-click its name and choose Delete from the shortcut menu.
If blinking ads make it tough to concentrate as you read a Web-based article, choose Tools→Internet Options, click the Advanced tab, and then scroll down to the Multimedia heading (Figure 11-6). Turn off “Play animations in web pages” to stifle certain kinds of animated ads. (Take a moment, too, to look over the other annoying Web page elements that you can turn off, including sounds.)
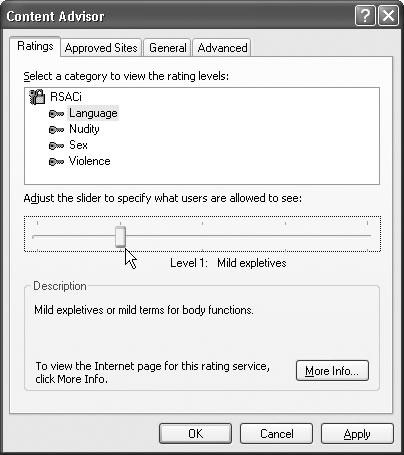
Figure 11-9. The Internet represents ultimate freedom of expression for anybody, causing some parents to think of it as a wild frontier town where anything goes. To protect young eyes, you can use the options in the Content Advisor to control what’s available to your copy of IE. You can also password-protect these settings so nobody else can make changes to them.
The IE Content Advisor is designed to give parents a way to control what their children view on the Web—an especially important feature for home computers. You can specify sites you approve, as well as sites you want to block. If somebody tries to visit a Web site that you’ve declared off-limits using this feature, he’ll see a message saying that the site isn’t available.
To activate the Content Advisor, choose Tools→Internet Options. Click the Content tab, and then click the Enable button. The Content Advisor dialog box, shown in Figure 11-9, presents four tabs, called Ratings, Approved Sites, General, and Advanced.
In theory, you can click a raunchiness category (like Language, Nudity, or Sex) and then move the slider bar to the left or right to loosen or tighten the restrictions. (Hint: You can’t actually drag the slider’s handle. You must click a notch on the slider with your mouse.)
FREQUENTLY ASKED QUESTIONCookie Control
Help! I’m afraid of cookies!
Cookies are something like Web page preference files. Certain Web sites—particularly commercial ones like Amazon.com—deposit them on your hard drive like little bookmarks, so that they’ll remember you the next time you visit. Most cookies are perfectly innocuous—and, in fact, are extremely helpful, because they help Web sites remember you. Cookies spare you the effort of having to type in your name, address, credit card number, and so on, every single time you visit these Web sites.
But fear is on the march, and the media fans the flames with tales of sinister cookies that track your movement on the Web. If you’re worried about invasions of privacy, Internet Explorer is ready to protect you.
Once the browser is open, choose Tools→Internet Options→ Privacy tab. As you’ll see, the slider in this dialog box is like a paranoia gauge. If you drag it all the way to the top, you create an acrylic shield around your PC. No cookies can come in, and no cookie information can go out. You’ll probably find that the Web is a very inconvenient place, because you’ll have to re-enter your information upon every visit, and some Web sites may not work properly.
As you drag the slider down, Windows becomes more permissive. For example, it may welcome only cookies with a published privacy policy (which, presumably, contains a promise not to use your information for secret commercial purposes).
But here’s a simpler, quicker method of disposing with the cookie threat. On the Privacy tab shown here, click the Advanced button, and then turn on “Override automatic cookie handling.” You can now choose how you want the browser to handle two kinds of cookies: first-party cookies (those given to you from the Web site you’re actually viewing) and third-party cookies (those deposited on your hard drive by sites you’re not actually visiting—maybe given to you by an especially evil banner ad, for example).
For best results, then, choose Accept for first-party cookies, and Block for third-party cookies. Or, if you’re especially paranoid, you can choose the Prompt option, in which case Internet Explorer will ask for individual permission to download every single cookie that comes your way.
Finally, note that the Web is crawling with more flexible and more powerful cookie-control programs, including CookieWall. (You can download it from http://www.missingmanuals.com, among other places.)

This slider works by looking for the ratings associated with each Web page, as defined by the Internet Content Rating Association ( http://www.icra.org ). Unfortunately, the Content Rating Association doesn’t actually rate Web sites; Web sites are supposed to rate themselves. As you can well imagine, the resulting Ratings feature isn’t exactly a foolproof (or even half-finished) system.
Tip
The Content Advisor feature comes set to block all Web sites that don’t have a rating—which is to say, 99.99 percent of them. If you do decide to turn on this feature, therefore, consider clicking the General tab and turning on “Users can see sites that have no rating.” Otherwise, Internet Explorer will “protect” you and your kids from virtually the entire Internet—including perfectly innocent sites.
Use the Approved Sites tab to enter the addresses of particular sites you either want to permit or block. (It’s normal for this list to show up empty, since it’s designed to list Web pages you specify.) After you enter a URL, select Always to make the site available to your Web browser, or choose Never to make it unavailable.
The listings in the Approved Sites tab take precedence over the Ratings tab. If you type in a Web address and then click the Always button, your kids will be able to view that site regardless of where it falls in the ratings scheme.
It wouldn’t do you much good to declare certain Web sites off-limits to your kids if, after you’ve gone to bed, they could simply open the dialog box in Figure 11-9 and declare those Web sites available again. Fortunately, you can use the Change Password button to assign yourself a supervisor’s password. Once that’s accomplished, nobody can change the settings or visit a forbidden Web site without knowing the password.
Caution
Caution: Don’t lose this password. There’s no way to recover it, and no way to change your security settings without it.
Turning on “Supervisor can type a password to allow users to view restricted content” makes every restricted site available—if you type in the correct password. For example, you can share the password with the adults in your household. You may also want to use it so that your children will have to explain why they need access to a restricted site. If you buy their explanation, then type the supervisor’s password to permit one-time access to the site.
The Advanced tab is the place to add new rating systems and rating rules as Internet citizens invent them.
Note
Programs like Symantec’s Norton Internet Security and McAfee’s Internet Guard Dog give you finer control over what your browser can supervise on the Web. These products don’t rely on Content Ratings, and they let you define different standards for different users on the computer.