Taskbar toolbars are separate, recessed-looking areas on the taskbar that offer special-function features. You can build your own toolbar, for example, stocked with documents related to a single project. (Somewhere in America, there’s a self-help group for people who spend entirely too much time fiddling with this kind of thing.)
Press Ctrl+Esc. This keystroke selects the taskbar, even though you can’t see it (although you can now see the Start menu).
Press Esc to make the Start menu disappear. (The taskbar is still selected, even though you can’t see it.)
Press Alt+Space bar to bring up a shortcut menu.
Choose Size from the shortcut menu; this changes your mouse pointer into a four-sided shape. Don’t click anything.
Press the arrow key that points toward the center of the screen (from the taskbar’s perspective). As you do, the taskbar reappears.
Resize the taskbar very carefully to avoid repeating all of these steps.
To make a toolbar appear or disappear, right-click a blank spot on the taskbar and choose from the Toolbars shortcut menu (Figure 2-15). The ones with checkmarks are visible now; select one to make the toolbar (and checkmark) disappear.
The Quick Launch toolbar, once you’ve made it appear, is fantastically useful. In fact, in sheer convenience, it puts the Start menu to shame. It contains icons for functions that Microsoft assumes you’ll use most often. They include:
Show Desktop, a one-click way to minimize (hide) all the windows on your screen to make your desktop visible. Don’t forget about this button the next time you need to burrow through some folders, put something in the Recycle Bin, or perform some other activity in your desktop folders. Keyboard shortcut: Windows key+D.
Launch Internet Explorer Browser, for one-click access to the Web browser included with Windows XP.
Windows Media Player, for one-click access to the music and movie player included with Windows XP (see Chapter 7).
The buttons detailed above are only hints of this toolbar’s power, however. What makes it great is how easy it is to add your own icons—particularly those you use frequently. There’s no faster or easier way to open them (no matter what mass of cluttered windows is on your screen), since the taskbar displays your favorite icons at all times.

Figure 2-15. Top: Make toolbars appear by right-clicking a blank area on the taskbar, if you can find one. Bottom: Toolbars eat into your taskbar space, so use them sparingly. If you’ve added too many icons to the toolbar, a >> button appears at its right end. Click it to expose a list of the commands or icons that didn’t fit.
To add an icon to this toolbar, simply drag it there, as shown in Figure 2-16. To remove an icon, just drag it off the toolbar— directly onto the Recycle Bin, if you like. (You’re not actually removing any software from your computer.) If you think you’ll somehow survive without using Windows Media Player each day, for example, remove it from the Quick Launch toolbar.

Figure 2-16. You can add almost any kind of icon (an application, document file, disk, folder, Control Panel, or whatever) to the Quick Launch toolbar just by dragging it there (top); a thick vertical bar shows you where it’ll appear. The only challenge is to find the folder that houses the icon you want to add. If it’s an application, see Section 1.17.2.1 for hints on finding the actual icon of the program in question.
The Desktop toolbar offers quick access to whichever icons are sitting on your desktop—Windows Media Player, Word, and so on. This toolbar also provides quick access to icons that used to appear automatically on previous versions of Windows: My computer, My Network Places, My Documents, Recycle Bin, and Internet Explorer.
When it first appears, the Desktop toolbar may take the form of a >> button at the right end of the taskbar. The button is actually a pop-up menu that lists your desktop stuff. This could be useful if your screen becomes filled with windows, thus obscuring the desktop.
These toolbars are exactly the same as the window toolbars described in Section 2.3.2—except that they appear in the taskbar at all times, instead of in desktop windows.
The floating Language bar, shown in Figure 2-17, automatically appears on your computer’s desktop and in the Toolbars menu when you install either of two components:
Text services. That’s Microsoft’s catch-all phrase for certain text-related add-on software programs: a second keyboard layout, handwriting recognition, speech recognition, or an Input Method Editor (IME), which is a system that lets you input for example, Asian language characters with a standard 101-key keyboard.
Another language. As described in Appendix A, you can install multiple input languages on your computer and, using the Language bar, switch between them when the mood strikes. The language for the operating system doesn’t change—only what characters appear onscreen when you type.
The buttons and options availabel on the Language bar depend on which text services you’ve installed and what application you’re using. Microsoft Excel 2002 accepts speech recognition, for example, but Notepad doesn’t.
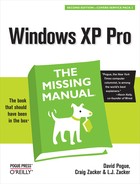
Right-clicking the Language bar displays a shortcut menu where you can change its settings (see Figure 2-17). The shortcut menu lets you minimize the Language bar (Figure 2-17), make it transparent, shorten the bar by hiding its text labels, and so on. Only two of these options aren’t self-explanatory:
Additional icons in taskbar. When you minimize the Language bar, the taskbar shows only the icon for the language you’re currently using (like EN for English, as shown in Figure 2-17.) If you’d like to run the Language bar minimized with all of the installed text-service icons at your disposal, turn on this option and then minimize. Now you can click the text-service icons on the taskbar.
Settings. This option opens the Text Services and Input Languages dialog box, shown in Figure 2-17. In this dialog box, you select the installed input language you want to use when you boot up your computer, the text services that you prefer for each installed input language, and the Advanced keystroke settings for switching between input languages. For example, you can assign Left Alt+Shift+E to change to English (United States).
Figure 2-17. Top left: The floating Language bar. Right-clicking this toolbar displays its shortcut menu. Middle left: The shortcut menu for the Language bar lets you change Language bar settings, such as transparency, vertical (orientation), and minimize. Bottom Left: When you minimize the Language bar, it shrinks down to the taskbar for easier access. Right: The Text Services and Input Languages dialog box appears when you select Settings from the shortcut menu. Here you can change the current input language, set hot keys for language switching, and so on.
To change the look of a toolbar, unlock the taskbar (using its shortcut menu), and then right-click any blank spot within the toolbar. (If the taskbar isn’t unlocked, you won’t see the toolbar’s shortcut menu. When you’re finished making changes to the toolbar, lock the taskbar again if you wish.)
Tip
How much horizontal taskbar space a toolbar consumes is up to you. Drag the perforated border at the left edge of a toolbar to make it wider or narrower. That’s a good point to remember if, in fact, you can’t find a blank spot to right-click.
The resulting shortcut menu offers these choices:
View lets you change the size of the icons on the toolbar.
Open Folder works only with the Quick Launch and Links toolbars (or toolbars you’ve created yourself). It opens a window that lists what’s in the toolbar, so that you can delete or rename the icons. (Of course, you can also delete or rename any icon on these toolbars by right-clicking it and choosing Delete or Rename from the shortcut menu. But the Open Folder command is a better bet when you’re performing more extensive surgery on the toolbar, since you’re able to work in a window that isn’t nearly as claustrophobic as the toolbar itself.)
Show Text identifies each toolbar icon with a text label.
Show Title makes the toolbar’s name (such as “Quick Launch” or “Desktop”) appear on the toolbar.
Close Toolbar makes the toolbar disappear.
Always on Top and Auto-Hide appear on a toolbar’s shortcut menu only when you’ve detached the toolbar, turning it into a floating palette as described in the next section. They make any toolbar as flexible as the taskbar, at least when it comes to hiding itself on cue.
If you turn on Always on Top, then document windows can’t cover up your toolbar. And if you turn on Auto-Hide, a toolbar that you’ve attached to one edge of your screen hides almost completely, until you point to it with your cursor.
You don’t need to keep toolbars on the taskbar; you can move them to any spot on the screen that you find handy, as shown in Figure 2-18. (The taskbar must first be unlocked, as described in Section 2.4.3.) To return the toolbar to its original location, drag its title bar back onto the taskbar.

Figure 2-18. To park a toolbar in a different location, drag upward on the “perforated” handle at the left edge (top). The result is a strange sort of floating toolbar (bottom); it’s now an onscreen, perpetually availabel launcher. (Use tooltips, or choose Show Text from its shortcut menu, to identify the icons.) If you drag the toolbar to an edge of the screen, it glues itself there like a second taskbar.
The Quick Launch area of the taskbar is such a delight that you may actually develop a syndrome called Quick Launch Envy—you’ll find that having only one isn’t enough. You might wish to create several different Quick Launch toolbars, each stocked with the icons for a different project or person. One could contain icons for all the chapters of a book you’re writing; another could list only your games.
Fortunately, it’s easy to create as many different custom toolbars as you like, each of which behaves exactly like the Quick Launch toolbar.
Windows XP creates toolbars from folders; so before creating a toolbar of your own, you must create a folder (unless you already have a folder that’s filled with the stuff you want to toolbarize).
Here’s the easiest way to turn a folder into a toolbar: Just drag the folder icon until your cursor strikes the edge of your monitor (any edge except the one where the taskbar is). When you let go, you’ll see a brand-new toolbar whose buttons list the contents of the folder you just dragged. From here, it behaves just like any other toolbar. You can right-click it to make the icons smaller, you can drag it into the center of the screen to make it a floating palette, and so on.
The drag-and-drop method is new to Windows XP. The old way is still around, however, for people who bill by the hour.
To begin, right-click a blank spot on the taskbar. From the shortcut menu, choose Toolbars→New Toolbar to open the New Toolbar dialog box, as shown in Figure 2-19. Find and click the folder you want, and then click OK.
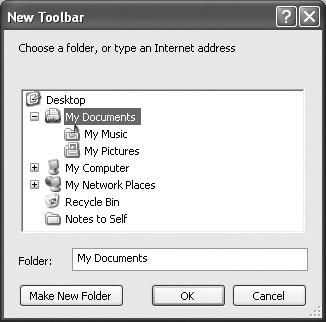
Figure 2-19. The major folders of your computer are displayed in the New Toolbar dialog box. Click the + sign to expand a disk or folder—and continue to expand disks and folders—until you find the folder you’re seeking. Or you can create a new folder for your toolbar anywhere on the hard drive.
Your new toolbar is on the taskbar. Feel free to tailor it as described in the previous discussions—by changing its icon sizes, hiding or showing the icon labels, or adding new icons to it by dragging them from other desktop windows.