
Every operating system needs a mechanism to associate documents with the applications that created them. When you double-click a Microsoft Word document icon, for example, Word launches and opens the document.
In Windows, every document comes complete with a normally invisible filename extension (or just file extension)—a period followed by a suffix that’s usually three letters long. Here are some common examples:
| When you double-click this icon | this program opens it |
|---|---|
| Fishing trip.doc | Microsoft Word |
| Quarterly results.xls | Microsoft Excel |
| Home page.htm | Internet Explorer |
| Agenda.wpd | Corel WordPerfect |
| A home movie.avi | Windows Media Player |
| Animation.dir | Macromedia Director |
Tip
For an exhaustive list of every file extension on the planet, visit http://whatis.com; click the link for “Every File Format in the World.”
Behind the scenes, Windows maintains a massive table that lists every extension and the program that “owns” it. To see this list, choose Tools→Folder Options from the menu bar of any folder window. When the Folder Options box appears, simply click the File Types tab (Figure 5-8).
It’s possible to live a long and happy life without knowing much about these extensions. Indeed, because file extensions don’t feel very user-friendly, Microsoft designed Windows to hide the suffixes on most icons (see Figure 5-9). If you’re new to Windows, and haven’t poked around inside the folders on your hard drive much, you may never even have seen them.

Figure 5-8. Each software program you install must register the file types it uses. The link between the file type and the program is called an association. This dialog box displays the icon for each file type and an explanation of the selected listing. In this example, the box tells you that sound files with the suffix .aiff open in Windows Media Player when double-clicked.
Some people appreciate the way Windows hides the extensions, because the screen becomes less cluttered and less technical-looking. Others make a good argument for the Windows 3.1 days, when every icon appeared with its suffix.
For example, in a single Desktop window, suppose one day you discover that three icons all seem to have exactly the same name: PieThrower. Only by making filename extensions appear would you discover the answer to the mystery: that is, one of them might be called PieThrower.ini, another is an Internet-based software updater called PieThrower.upd, and the third is the actual PieThrower program, PieThrower.exe.
One way to make sense of such situations is simply to look at the window in Details view (right-click in the window and choose View→Details from the shortcut menu).
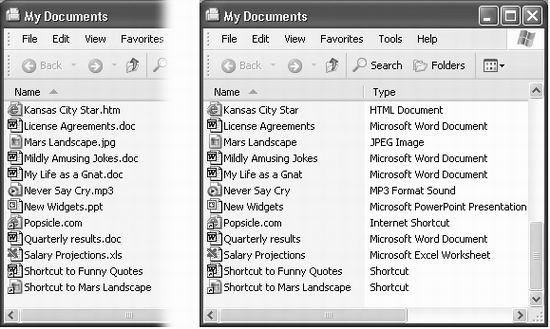
Figure 5-9. Windows lets you see the filename extensions only when it doesn’t recognize them. Right: If Windows recognizes the filename extension on an icon, it hides the extension (look closely at the filenames). Left: You can ask Windows to display all extensions, all the time.
But that’s too easy. To fully breathe in Windows technology, you can instruct Windows to reveal the file suffixes on all icons. To do so, choose Tools→Folder Options from any folder window’s menu bar. In the Folder Options dialog box, click the View tab. Turn off “Hide extensions for known file types,” and then click OK.
Now the filename extensions for all icons appear.
Tip
Even if you prefer to hide most file extensions, you may still want one particular type of document to appear on the screen with file extensions. For example, when working on a Web site, you may want to check whether the suffixes of your Web page documents are .htm or .html.
In these situations, choose Tools→Folder Options in any Desktop window. Click the File Types tab (see Figure 5-8). Scroll down to the file extension you want to make visible, click it, click the Advanced button, and—in the Edit File Type dialog box—turn on “Always show extension.” Click OK, and then click the Close button.
Windows XP comes with several programs (Notepad and WordPad, for example) that can open text files with the extension .txt. And Windows also comes with several programs (Paint, Imaging, Internet Explorer) that can open JPEG picture files with the extension .jpg. So how does it decide which program to open when you double-click a .txt or .jpg file?
Windows comes with its own extension-to-application pairing list, as depicted in Figure 5-8. But at any time, you can reassign a particular file type (file extension) to a different application. Having just bought Photoshop, for example, you might want it to open up your JPEG files, rather than Windows Picture and Fax Viewer.
The long way to perform this reassignment surgery is to use the File Types tab of the Folder Options dialog box shown in Figure 5-8. Click the file type you want to change, click the Change button, and then proceed as shown in Figure 5-10.
Here’s the short way: Right-click the icon of the file that needs a new parent program. In the shortcut menu, you’ll see a command called Open With. As shown at right in Figure 5-10, it may offer a submenu that lists the programs capable of opening the file. If the submenu isn’t offered—or if you bypass these proposals and select Choose Program from the submenu—Windows presents the Open With dialog box shown at left in Figure 5-10. Just find, and double-click, the name of the program you now want to open this kind of file.

Figure 5-10. Left: Windows is prepared to show you a list of every program that can open the mystery file. Scroll through the list of installed programs to select the one you want. By turning on the checkbox at the bottom of the dialog box, you create a file association that will handle similar files (those with the same file extension) in the future. Right: A shortcut to the dialog box shown at left is the Open With→Choose Program shortcut menu.
As you do so, be sure to check the status of the checkbox below the list, which says, “Always use the selected program to open this kind of file.” If that checkbox is on, then all files of this type (.jpg, for example) will open in the newly selected application from now on. If the checkbox is off, then the new application will open only this .jpg file—just this once.
Every now and then, you might try to open a mystery icon—one whose extension is missing, or whose extension Windows doesn’t recognize. In that case, the dialog box shown in Figure 5-11 will appear. Maybe you’ve tried to double-click a document sent to you by a Macintosh fan (many Macintosh files lack file extensions), or maybe you’re opening a document belonging to an old DOS program that doesn’t know about the Windows file-association feature.
In any case, Windows offers you two different buttons:
Select the program from a list. Windows displays a dialog box that looks a lot like the one at right in Figure 5-11. Click the name of the program you want, and then turn on “Always use the selected program to open this kind of file,” if you like.
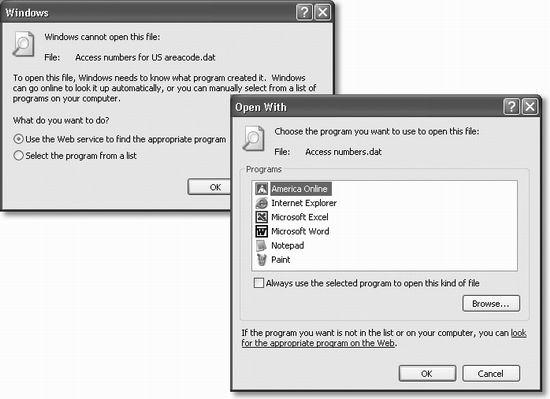
Figure 5-11. Left: Sometimes Windows doesn’t know what to do with an icon you’ve just double-clicked. Right: Use this window to select a program for opening the mystery file. It’s sometimes useful to associate a particular document type with a program that didn’t create it, by the way. For example, if you double-click a text file, and the Open With dialog box appears, you might decide that you want such documents to open automatically into WordPad.
Use the Web service to find the appropriate program. In other words, Windows will take your PC onto the Internet and look up the mystery file extension on the Microsoft Web site.
The File Types tab on the Folder Options dialog box shown in Figure 5-8 provides an excellent display of the icons, file extensions, and descriptions of your various file types. As noted earlier, it also offers the New button, which lets you tell Windows about new file types, and the Change button, which lets you reassign an existing file type to a different program.
At the bottom of the box, though, is an Advanced button. When you click it, the dialog box shown at top left in Figure 5-12 appears. This box contains a few tweaky settings that could come in handy someday. For example:
Change the icon. By itself, Windows doesn’t let you change the icon for just one file. But you can change the icon for a particular file type (JPEG files, for example).
To do so, click Change Icon. Windows offers you a handful of replacement icons for the kind of file you’re editing (Figure 5-12, top right). If you don’t see a good one, click Browse. You’ll be offered a Change Icon dialog box, which you can use to navigate to the folder containing a program that may contain better icons (details in Section 3.3).
Make it open after downloading. If you turn on “Confirm open after download,” files of this type will automatically open, as though magically double-clicked, whenever you download one from the Internet. You might want to turn this option on for compressed file types (.zip, for example), so that they unpack themselves automatically. (But avoid turning on this option for file types that may contain viruses, such as .exe, .vbs, or .bat.)
Change what happens when you double-click it. In the Actions list, you’ll see a list of things that might happen when you double-click an icon: open (open) and printto (print), for example.
Of course, icons almost always open when you double-click them. But by highlighting one of the other Actions listed here (if, indeed, Windows gives you a choice for this file type) and then clicking Set Default, you can establish a new behavior for the file that you double-click. For example, you might want the JPEG files to print automatically when double-clicked. (Well, maybe that’s not such a great example.)
Edit its shortcut menu. When you right-click an icon, Windows displays a shortcut menu containing commands like Open, Print, and so on. If you click the New button, you get the New Action dialog box, where you can add a new command to the shortcut menu of files of this type.
You can’t exactly go wild here, adding shortcut-menu commands like Email to Uncle Joe, Backdate 30 Days, and so on. In fact, all you can really do is add commands—for example, Open in Photoshop—that open the selected file in a certain program. Figure 5-12 (bottom left) illustrates how it’s done.
Tip
Placing an ampersand (&) symbol into the shortcut-menu command, as shown at lower left in Figure 5-12, creates an underlined shortcut key, as shown at lower right.