
Like you, its human sidekick, your computer requires periodic checkups and preventive maintenance. Fortunately, Microsoft has put quite a bit of effort into equipping Windows XP with special tools, all dedicated to the preservation of what Microsoft calls PC Health. Here’s a crash course in keeping your PC—and its hard drive—humming.
As you get more proficient on a PC, pressing Ctrl+Z—the keyboard shortcut for Undo—eventually becomes an unconscious reflex. In fact, you can sometimes spot veteran Windows fans twitching their Ctrl+Z fingers even when they’re not near the computer—after knocking over a cup of coffee, locking the car with the keys inside, or blurting out something inappropriate in a meeting.
Windows XP offers one feature in particular that you might think of as the mother of All Undo commands: System Restore. This feature alone can be worth hours of your time and hundreds of dollars in consultant fees.
The pattern of things going wrong in Windows usually works like this: The PC works fine for a while, and then suddenly—maybe for no apparent reason, but most often following an installation or configuration change—it goes on the fritz. At that point, wouldn’t it be pleasant to be able to tell the computer: “Go back to the way you were yesterday, please”?
System Restore does exactly that: It “rewinds” your PC back to the condition it was in before you, or something you tried to install, messed it up.
Of course, some people will say that this is what backups are for. But System Restore isn’t the same thing; it takes only your operating system back to its previous condition. It doesn’t touch your email, Internet Explorer History or Favorites lists, Web cookies, files in your Windows→Downloaded Program Files folder, My Documents folder, or any standard document types (.doc, .xls, graphics files, and so on).
And besides: if you don’t like your PC after restoring it, you can always restore it to the way it was before you restored it—back to the future.
Tip
If your PC manages to catch a virus, System Restore can even rewind it to a time before the infection—sometimes. Unfortunately, you can’t count on your PC having that function. By the time you discover it, the virus may have infected your documents, which System Restore doesn’t touch. An up-to-date antivirus program is a much more effective security blanket.
System Restore works by taking snapshots of your operating system. In fact, your copy of Windows XP has been creating these memorized snapshots, called restore points, ever since you’ve been running it. When the worst comes to pass, and your PC starts acting up, you can use the System Restore calendar (see Figure 16-2) to rewind your machine to its configuration the last time you remember it working well.
As Figure 16-2 illustrates, Windows XP automatically creates landing points for your little PC time machine at the following times:
The first time you boot up Windows XP.
After every 10 hours of operation.
After every 24 hours of real-world time (unless your PC is turned off all day; then you get a restore point the next time it’s turned on).
Every time you install a new program (provided it uses a recent version of the Microsoft Windows Installer or InstallShield).
Every time the Automatic Update feature (see Section 10.4) updates a component of your operating system.
Whenever you feel like it—for instance, just before you install some new component. (To create one of these manual checkpoints, choose Start→Help and Support. Click “Undo changes to your computer with System Restore.” On the next screen, click “Create a restore point,” and then click Next; name your new checkpoint and click OK.)
Note
When your hard drive is running low on space, System Restore turns off automatically, without notice. It turns itself back on when you free up some space.
As you can well imagine, storing all of these copies of your Windows configuration consumes quite a bit of disk space, especially since the factory setting for the amount of space that System Restore can use is 12 percent of every hard drive. That adds up quickly—on a 60 GB hard drive, that’s 7.2 GB.
Fortunately, you can control exactly how much disk space is dedicated to this function— or turn the function off entirely—as described in Figure 16-1. (Note that turning off System Restore, even momentarily, wipes out all existing restore points.)
Tip
Ever wonder where Windows is storing this backup copy of your operating system? It’s in a folder called System Volume Information that sits in your Local Disk (C:) window. Inside are individual folders for each restore point. (System Volume Information is generally an invisible folder, but you can make it visible following the instructions in Section 2.2. You still won’t be allowed to move, rename, or delete it, however—thank goodness.)
That’s why Windows XP automatically begins deleting restore points after 90 days (or when it’s running out of disk space)—as well as any chance of rewinding your system back that far. That’s also why the System Restore feature stops working if your hard drive is very full.
And that’s also why you should run the System Restore feature promptly when your PC acts strangely.

Figure 16-1. To specify how much disk space System Restore is allowed to use (and therefore how many “rolling back” opportunities you have), open the System program in Control Panel. Click the System Restore tab, and then drag the slider to change the amount of disk space you’re willing to sacrifice for this feature. (If you have several hard drives, you get a Settings button that lets you individually change the limit—or turn off System Restore—for each.) Click Apply and then OK.
Tip
When you value hard drive space more than the opportunity to return your PC to a distant moment of health, you can use an obscure button (Figure 16-3), to delete all but the most recent system restore point. To get there, choose Start→All Programs→Accessories→System Tools→Disk Cleanup. Click the More Options tab, and then click the “Clean up” button in the System Restore section.
If something goes wrong with your PC, here’s how to roll it back to the happy, bygone days of late last week:
Choose Start→Help and Support.
The Help center appears.
Click “Undo changes to your computer with System Restore.” On the next screen, confirm that “Restore my computer to an earlier time” is selected, and then click Next.
Now you see the System Restore calendar (Figure 16-2). The calendar squares containing boldface numbers indicate the days on which Windows memorized your operating system condition.
Click the boldface calendar square closest to the last day you remember your PC working correctly.
Now you see, in the right pane, the restore points that were created on that day, complete with a description.
Click one of the checkpoints listed on the right side, and then click Next.
You’re now warned to close all your documents and programs. Right-click each window button on your taskbar (except the System Restore button, of course), choosing Close from each shortcut menu until System Restore is the only program left running.
Click Next.
Now Windows goes to town, reinstating your operating system to reflect its condition on the date you specified. Leave your PC alone while this occurs.
When the process is complete, the computer restarts automatically, and the message shown in Figure 16-2 (bottom) appears. Welcome back to the past.
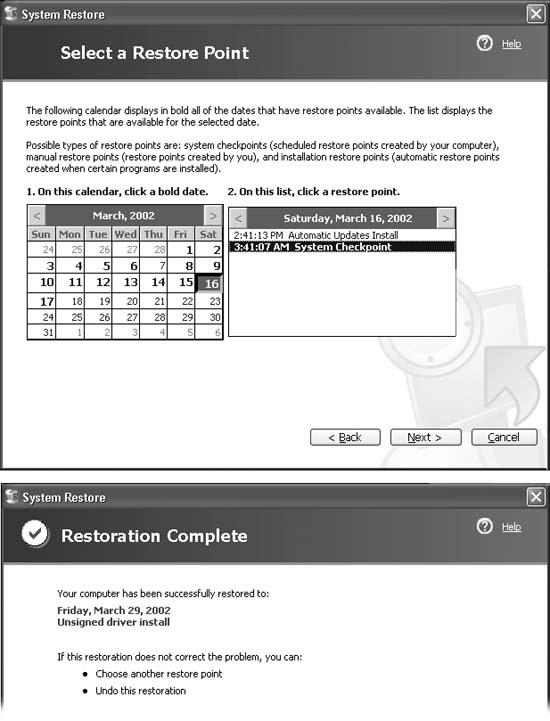
Figure 16-2. Top: To change the month, click the < or > button at either end of the calendar. When you click a calendar square containing a bold number, the pane on the right shows the restoration points available for that date. You may find “Manual Checkpoint,” which is one that you created yourself; “System Checkpoint,” which is one that Windows XP created automatically (a “just in case” restore point); “Update to an unsigned driver,” which means you installed software that Microsoft hasn’t inspected (as described in Section 14.5); “Automatic Updates Install,” which is a Windows patch that XP downloaded and that you approved for installation; and so on. Bottom: After a restart, you’re back in business. This message reminds you that you can even rewind the rewinding, if it didn’t produce the results you were seeking.
Tip
If rewinding your system to the golden days actually makes matters worse, you can always reverse the entire Restore process. To do so, open Start→Help and Support again. Once again, click “Undo changes to your computer with System Restore”—but this time, select “Undo my last Restoration.” Click Next, click OK, click Next, and wait for the process to reverse itself.