If you need more security and flexibility than Simple file sharing affords—or if your computer is part of a corporate domain—then the time has come to tackle Standard file sharing.
The process of sharing a folder is much the same as it is in Simple file sharing, except that there’s an additional step: specifying who else on the network can access the share, and what they’re allowed to do with it.
Note
Before you can create Standard file shares, you must disable Windows XP’s Simple file sharing feature, as described in Section 20.5
After you’ve located the icon of the drive, folder, or printer you want to share, proceed like this:
Right-click the disk or folder icon. From the shortcut menu, choose Sharing and Security.
The Sharing tab of the Properties dialog box opens (see Figure 20-11). If you’ve ever seen this dialog box when using Simple file sharing, you’ll notice that it looks quite a bit different now.
Turn on “Share this folder.”
The other options in the dialog box become active.
Type a name for the shared disk or folder.
This is the name other people will see when they open their My Network Places windows. Windows XP proposes the name of the folder as the share name, which is fine, but you can change it to anything you like.
If you want to limit the number of network users that can access the shared file or folder simultaneously—to avoid slowing down your PC, for example—click “Allow this number of users” radio button, and specify the maximum number of people who can access the share at one time (3 or 5, for example).
If you were to click OK at this point, you would make this item available to everyone on the network. But before leaving the dialog box, take a moment to survey the security options. This, after all, is one of the big advantages of Standard file sharing.
When you make a folder or drive available to the network, you don’t necessarily want to give your co-workers permission to run wild, running roughshod over the files inside it. In many cases, you may prefer to share a folder or drive selectively. If you’re in Accounting, for example, you might want to make the company salary spreadsheet accessible by the other accountants in your workgroup, but off-limits to everyone else in the company.
Fortunately, you can limit people’s access on an individual (or group-by-group) basis, thanks to the Permissions button shown in Figure 20-11.
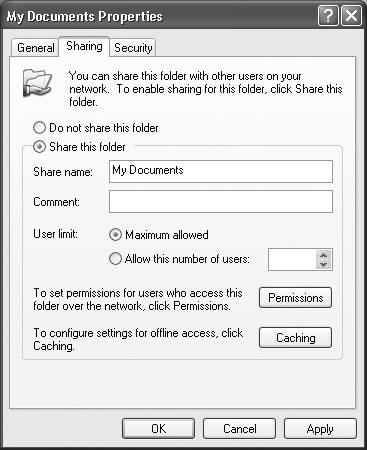
Figure 20-11. The Sharing tab for a disk or folder on a Windows XP domain system. From here, you can share this folder, specify the maximum number of people who can access it at once, and specify who can access the share and to what degree.
When you click it, you get the dialog box shown at left in Figure 20-12. Setting up permissions involves two steps: identifying the person (or group) to whom you’re granting permission, and then specifying how much access you want to grant them.
If you read the discussion of NTFS permissions in Chapter 17, you should at this point be getting a distinct feeling of déja vu. Both the Permissions dialog box and the entire concept of protecting your folders should be familiar.
To put it bluntly, Windows XP Pro offers two separate and overlapping systems for protecting folders. First, there are the NTFS permissions described in Chapter 17; second, there are the share permissions described below. Each system lets you choose which network citizens (or groups of them) may view, make changes to, or have full control over certain folders.
Understanding the ramifications of two separate and overlapping permissions systems involves some serious technical slogging. Here are the most important differences:
NTFS permissions guard a folder no matter how someone tries to get at it: from across the network or seated in person at the PC. Share permissions, on the other hand, govern access only from over the network.
So suppose you’ve got a folder full of confidential files. Hoping to protect them from inspection by your co-workers, you might turn off all forms of access (Figure 20-12)—but all you’ve done is keep people elsewhere on the network out of it. People who sit down at your machine can still rifle through your private file stash.
Nobody can access shared files from across the network unless they have both share permissions and NTFS permissions to those files. Even if somebody has given you Full Access using one permissions system, if the other is set to No Access, you’re out of luck.
NTFS permissions are more flexible than share permissions. For example, there are five or six degrees of NTFS standard permissions, compared with only three levels of share permissions. NTFS permissions can also protect individual files, whereas share permissions affect only entire folders.
If you think maintaining a duplicate set of overlapping permissions is complex and confusing, imagine being a network administrator whose job it is to keep them all straight—not only for each folder on each computer, but for each person on the network. It’s just an overwhelming number of permutations.
As a result, most network administrators simply grant everyone Full Access to network shares, effectively eliminating share permissions as the complicating factor. The administrators then use NTFS permissions to control access to specific files and folders, confident that these settings will correctly protect shared folders and disks both from across the network and in person.
If you’ve read the preceding paragraphs of warning, but you’ve decided to protect certain folders with share permissions anyway, read on. This discussion assumes that you’re poised with the Sharing tab (Figure 20-11) open before you.
Click the Permissions button.
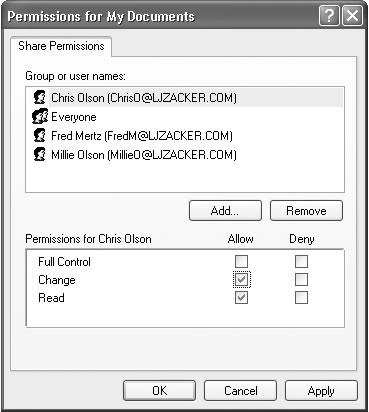
A Permissions dialog box appears (Figure 20-12), a close cousin to the Security tab you use to set NTFS permissions (Section 17.9). The top half lists the people or groups that have been allowed or denied permission to the share; the bottom half tells you how much access the selected person or group has been given.
When you first share a folder or disk, you’ll see only Everyone in this list. If you’re on a workgroup network, you’ll see that Everyone starts out with Full Control permission, on the assumption that security isn’t such a big deal in your household or small business. If you’re using a domain computer, on the other hand, Everyone starts out with only Read permission, which affords more security. More about these permissions settings in a moment.
Tip
When a permission checkbox is selected but also shaded gray, it means that its permissions settings have been inherited from the folder that it’s in.
Now you can start assigning permissions on a person-by-person (or group-by-group) basis. (If the person’s name doesn’t appear here, click Add. The dialog box shown back in Figure 17-20 appears, providing you the delightful opportunity of adding a name to the list by typing it, letter-perfect, into the “Enter the object names to select” box and then clicking OK. The users and groups you selected appear in the “Group or user names” list.)
Note
See Section 17.5.3 for details on groups—and remember that an individual account’s permissions take precedence over group permissions.
Figure 20-12. Top: The Permissions dialog box lets you control how much access each person has to the folder you’re sharing. Using the top list, specify which people (or groups of people) can access your shared folder over the network. Bottom: When you click Add in the box above, this box appears. Click Find Now to locate a person’s name; click the name and then click OK.
Click the name of a person or group in the list. Set the appropriate permissions by turning on the relevant checkboxes.
You have three options. If you turn on Read, this person (or group of people) will encounter a “look, don’t touch” policy when they try to open this folder from across the network. They’ll be allowed to open and read what’s inside (and run any programs they find there), but won’t be able to save changes, rename anything, delete anything, or deposit any new files.
Note
Other people on the network can copy folders and files from a Read folder or disk onto their own computers. From there, they can do whatever they like. But they can’t copy the changed files back to your shared folder or disk.
If you choose Change instead, the people you’ve identified can not only open the shared files, but also edit and even delete them. They can also put new files and folders into the shared folder or disk.
Finally, if you choose Full Control, the selected person or group can run wild, fooling around not only with the contents of the disk or folder, but also with its permissions. They can change whatever permissions settings you make here, and even claim ownership of the folder or disk—they could even lock you out of your own stuff.
Click OK to close the Properties dialog box.
You’ll see that the icon for the resource you just shared has changed. A hand now cradles the icon to help you remember what you’ve made available to your network colleagues.
Sharing files and folders using Standard file sharing may be a lot more trouble than Simple file sharing, but it has its rewards. Only in Standard file sharing, for example, can you interesting scenarios like these:
You can access your files from different computers on the network, but still protect them from interference by other people. To do that, share the file or folder, give yourself the Full Control permission, and deny all permissions to the Everyone group.
Yes, you are also part of the Everyone group—but an individual’s permissions always override any group permissions that may affect that person. As a result, you end up with Full Control over your files, and no one else can even read them. On a home network, you can start working on a document in the bedroom upstairs—and then, when you go downstairs to cook dinner, you can continue working on the kitchen computer while the pasta is boiling. Meanwhile, the kids can be using their own computer, but won’t be able to see what’s in your file or folder.
You can also create a drop box: a folder into which people can deposit documents for your inspection, but which is otherwise off-limits to them.
For example, you might create a drop box so that your fellow employees can leave insurance claim forms they’ve filled out with a word processor. After sharing the folder, you could grant yourself (and other people in your department) Full Control—but you would give everyone else in the company only the Change permission. Now people in other departments can copy their claim forms into the drop-box folder, because they have permission to create new files in it. But because they lack the Read permission, they can’t open the folder to see what’s inside.