It’s a good thing you bought a book about Windows XP. If you hadn’t, you might never have known about one of Windows XP’s most spectacular features: its ability to turn your PC’s built-in fax modem into a fax machine. This feature works like a charm, saves all kinds of money on paper and fax cartridges, and may even spare you the expense of buying a physical fax machine—but it isn’t installed in the standard Windows installation.
Here’s the basic idea: When faxes come in, you can opt to have them printed automatically, or you can simply read them on the screen. And sending a fax is even easier on a PC than on a real fax machine; you just use the regular File→Print command, exactly as though you’re making a printout of the onscreen document.
If this sounds good to you, grab your Windows XP CD-ROM and read on.
To turn on the hidden fax feature, open your Printers and Faxes window (Section 1.5), and then click “Set up faxing” on the task pane on the left side (Figure 13-12, left). After a moment, you’ll be asked to insert your Windows XP Professional CD.
Tip
When the big blue “Welcome to Microsoft Windows XP” screen appears, just click its close button. It’s obscuring the real action in the Configuring Components dialog box behind it.
When the installation is over, you’ll find a new Fax icon in your Printers and Faxes folder (Figure 13-12, right). You’ll also find a few fax utilities in your Start→All Programs→ Accessories→Communications→Fax submenu, which you can read about in the following sections.
Note
Upgrading your PC to Windows XP from an earlier version of Windows enables you to import your old fax collection into the newer software. For instructions, choose Start→All Programs→Accessories→ Communications→Fax→Fax Console. Choose Help→Help Topics, and read the help topics under the first headline (“Fax after upgrading to Windows XP”).

Before you fax, choose Start→All Programs→Accessories→Communications→ Fax→Fax Configuration Wizard (or choose Tools→Configure Fax from the FaxConsole window). You’ll be treated to the Fax Configuration Wizard, whose screens walk you through these steps:
Filling in your own name, email address, fax number, address, and other information. This information will appear on your fax cover sheet, so that the lucky recipient can contact you if the fax didn’t come through. (All of this information is optional.)
Choosing the fax device. This drop-down list is provided solely for the convenience of those rich people who actually have more than one fax modem on their PCs.
There are two useful checkboxes here for everyone, however: Enable Send and Enable Receive. The ability to send faxes is a no-brainer. But not everybody wants their PC to receive faxes; see “Receiving a Fax” in Section 13.7.4.
Specifying your own fax number. Microsoft calls this the TSID (transmitting subscriber identification) information—the name and fax number that will appear on the screen of the receiving fax machine.
Specifying your fax number again. You see this screen only if you indicated that you want your PC to receive faxes. Once again, you’re supposed to enter your name and fax number, which will appear on the screen of the sending fax machine during transmission.
Figure 13-13. If “Use dialing rules” is turned off, then just type the entire fax number, complete with the area code, the number 1 for long distance, and so on, into the second “Fax number” box. Commas, parentheses, and dashes are irrelevant. But if you turn on “Use dialing rules,” you can choose one of the canned dialing setups—complete with calling card information, bizarre local area code dialing procedures, and so on—that you set up as described in Section 9.6.
Choosing a fax destination. Here again, you see this screen only if you’ve declared that you want your PC to receive faxes. Windows gives you the option of having incoming faxes automatically printed, or stored as graphics files in a certain folder. (This option stores a second copy of each fax as a file; each fax is automatically stored in the Inbox of Fax Console, which is described later.)

The final wizard screen displays a summary of the settings you’ve made. Click the Finish button, and you’re all set. You can change the settings at any time, just by running the wizard again.
The one big limitation of PC-based faxing is that you can only transmit documents that are, in fact, on the computer. That pretty much rules out faxing notes scribbled on a legal pad, clippings from People magazine, and so on (unless you scan them first).
If you’re still undaunted, the procedure for sending a fax is very easy. Just open up whatever document you want to fax. Choose File→Print. In the Print dialog box, click the Fax icon (or choose Fax from the Name drop-down list), and then click OK or Print.
Now the Send Fax Wizard appears. This is where you can type in the phone number of the fax machine you’re trying to reach (Figure 13-13)—or click Address Book to select the fax machine of somebody in your address book.
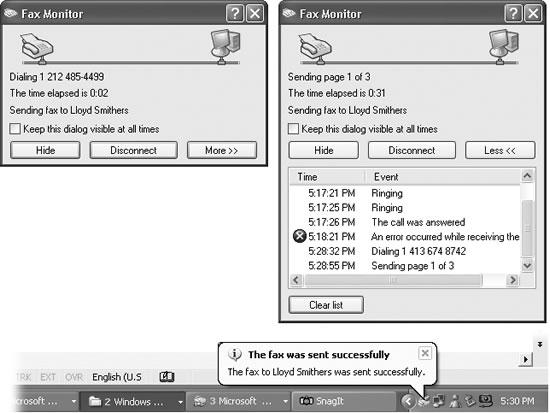
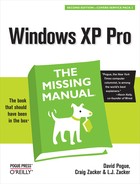
Figure 13-14. Top left: The Fax Monitor keeps you posted during faxing. If you click More>>, you can see a log of all your fax activities (top right). The more you use the fax software, the less you may feel that you need this little window in your face—eventually, you may prefer to continue working while Windows does its faxing in the background. In that case, click Hide. Bottom: After you’ve faxed successfully, you hear a tiny trumpet fanfare and see this message on your notification area.
Click Next. On the second wizard screen, you can opt to precede the fax with a cover page. This screen also gives you a place to type in a subject line and a little note, if you like, which will also appear on the cover page.
When you click Next again, Windows asks when you want the fax sent. Most of the time, of course, you’ll just accept the proposed choice—Now—and click Next. But if you work in an office where the fax line is busy all the time, you can schedule your fax to go out at a specified time (“Specific time in the next 24 hours”) or “When discount rates apply.”

Note
“When discount rates apply” is a lame-duck holdover from the days when long distance companies charged more during business hours. If this still matters to you, however, you must first tell Windows when discount rates apply. To do so, right-click the Fax icon in your Printers and Faxes window; choose Properties. Click the Devices tab, click the Properties button, and use the “Discount rates start” and “Discount rates stop” controls to specify your window of opportunity.
On the final wizard screen, you can simply click Finish to send the fax. However, you may want to click the Preview Fax button to give it a final inspection before it goes forth over the airwaves. When you’re finished looking it over, close the window and then click Finish.
After a moment, a little window appears called Fax Monitor (Figure 13-14). It keeps you posted on the progress of the fax.
Your recipient is in for a real treat. Faxes you send straight from your PC’s brain emerge at the receiving fax machine looking twice as crisp and clean as faxes sent from a stand-alone fax machine. After all, you never scanned them through a typical fax machine’s crude scanner on your end.
Tip
If you just have a few quick words to fax to somebody, you can use the Send Fax Wizard by itself, without first opening a document on your PC. Choose Start→All Programs→Accessories→ Communications→Fax→Send a Fax. Fill in your recipient’s phone number, click Next, and on the Preparing the Cover Page screen, type your memo to the recipient into the Note field. Windows will send only the cover page, complete with your note.
There are several reasons why you may not want your PC to receive faxes. Maybe you already have a stand-alone fax machine that you use for receiving them. Maybe your house only has one phone line, whose number you don’t want to give out to people who might blast your ear with fax tones.
But receiving faxes on the PC has a number of advantages, too. You don’t pay a cent for paper or ink cartridges, for example, and you have a handy, organized software program that helps you track every fax you’ve ever received.
Exactly what happens when a fax comes in is up to you. As noted earlier, you can make this decision by running the Fax Configuration Wizard, or by opening the dialog box shown in Figure 13-15, to change its behavior at any time.
Here are your options (see Figure 13-15):
Manual. This option is an almost-perfect solution if your PC and your telephone share the same phone line--that is, if you use the line mostly for talking, but occasionally receive a fax. From now on, every time the phone rings, a balloon in your notification area announces: “The line is ringing. Click here to answer this call as a fax call” (Figure 13-15, middle).
When you do so, the Fax monitor program appears and downloads the fax. To see it, open your Fax Console program, described in Section 13.7.4 .
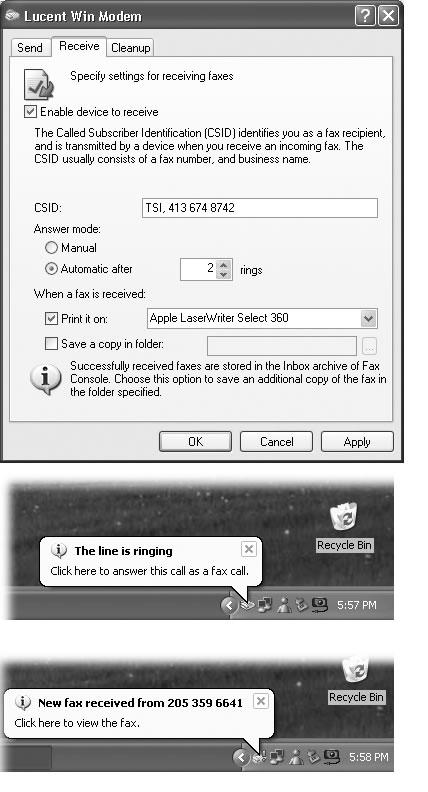
Answer automatically. Use this option if your PC has a phone line all to itself. In this case, incoming faxes produce a telephone-ringing sound, but there’s otherwise no activity on your screen until the fax has been safely received (Figure 13-15, bottom). Once again, received faxes secrete themselves away in your Fax Console program.
Figure 13-15. Top: This dialog box offers all of the options for receiving faxes. Getting here, however, is no picnic. Right-click the Fax icon in your Printers and Faxes window; choose Properties. Click the Devices tab, and then click the Properties button. In the resulting dialog box, click the Receive tab. Middle: If you have only one phone line that your telephone shares, this note will appear every time a call comes in. Most of the time, you’ll just answer the phone, and this message goes away. If you click it, though, your PC treats the call as an incoming fax. Bottom: Once a fax is safely snuggled into your Fax Console program, this note lets you know.
Print it out. If you like, you can direct Windows to print out each incoming fax, using the printer you specify here. Of course, doing so defeats the environmental and cost advantages of viewing your faxes on the screen, but at least you’ve got something you can hold in your hand.
Save a copy in a folder. Ordinarily, incoming faxes are transferred to your Fax Console program, as described next. If you turn on this option, however, you can direct Windows to place a duplicate copy of each one—stored as a graphics file—in a folder of your choice. (Either way, it’s handy to know that these are standard TIFF graphics files that you can email to somebody else—or even edit.)
To look at the faxes you’ve received, you must first launch the Fax Console program. You can get to it by choosing Start→All Programs→Accessories→Communications→ Fax→Fax Console, but your fingers will be bloody stumps by the time you’re finished mousing that deeply into the menu. Fortunately, once you’ve opened the program for the first time, it appears in the lower-left quadrant of your Start menu. From there, you can drag its name to a more convenient location, like the desktop, the Quick Launch toolbar, or the more permanent top left portion of your Start menu.

Figure 13-16. Top: Until you delete them in Fax Console (by selecting them and then pressing the Delete key), your sent and received faxes stay here forever. Some of the toolbar buttons are useful, including Save (turns the fax into a graphics file on your hard drive) and Mail (sends the fax via email). Bottom: Double-click a fax to open it into its own window. Click the little magnifying glass to enlarge your view, or just make the window bigger. Rotate it by clicking one of the two rotate buttons near the center of the toolbar. You can even add notes using the three tools on the far right side.
In any case, Fax Console looks something like an email program, as shown in Figure 13-16. Click the Inbox, for example, to see a list of faxes that have come in—and then double-click one to open it up (Figure 13-16, bottom).
Tip
Another great way to capitalize on the power of your PC for fax purposes is to sign up for J2 or eFax (http://www.j2.com and http://www.efax.com). These services issue you your own personal fax number. And here’s the twist: All faxes sent to that number arrive at your PC as email attachments.
The brilliance of the system, of course, is that you don’t need another phone line for this, and you can get these faxes anywhere in the world, even on the road. And here’s the best part: As of this writing, both of these services are absolutely free. (You might consider reserving a separate email address just for your J2 or eFax account, however, since waves of junk mail are part of the “free” bargain.)