When you’ve had enough of a certain program, and want to reclaim the disk space it occupies, don’t just delete its folder. The typical application installer tosses its software components like birdseed all over your hard drive; therefore, only some of it is actually in the program’s folder.
Instead, ditch software you no longer need using the “Add or Remove Programs” program described above. Click the Change or Remove Programs button at the top left, and then proceed as shown in Figure 5-16.
Tip
If your computer is a member of a workgroup and you’re using Fast User Switching (see Section 17.6.1), don’t delete a program until you’ve verified that it isn’t running in somebody else’s account behind the scenes.
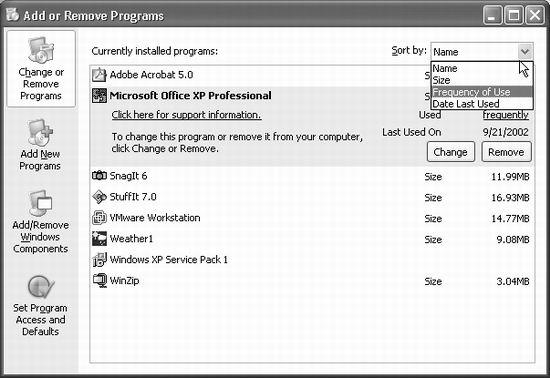
Figure 5-16. To vaporize a program, click its name to reveal its gray, highlighted panel, as shown here, and then click the Remove button. You can use the “Sort by” drop-down menu to sort the list by Frequency of Use or Date Last Used. (Note, though, that Windows doesn’t keep perfect track of all types of programs, especially those that run in the background, so these statistics are likely to be unreliable.)
Even after you uninstall a program, the folder that contained it may still exist, especially if it contains configuration files, add-ons, or documents that you created while the program was still alive. If you’re sure you won’t need those documents, it’s safe to remove the folder (discussed later in this section), along with the files inside it.
Note
Until Service Pack 2 came along, the list in this dialog box was cluttered up with dozens upon dozens of “Windows Hotfixes”—the little security patches that Microsoft sent out weekly or monthly via the Internet just to make your life interesting. In SP2, though, they’re mercifully hidden—at least until you turn on the “Show updates” checkbox at the top of the window. Then a new Windows Updates category appears in the list, revealing the individual hotfixes you’ve installed so far. That’s useful to remember if you suspect one day that a certain patch has broken something on your PC.
That’s the theory of uninstalling Windows programs, of course. In practice, you’ll probably find that the Add or Remove Programs program should more accurately be called the “Add or I’ll-Make-My-Best-Effort-to-Remove-Programs,-But-No-Guarantees” program. A disappointing percentage of the time, one error message or another pops up, declaring that the installation can’t proceed because Windows can’t find this or that component.
Most of the time, it’s not Windows’s fault. The Add or Remote Programs window is simply a list of links, like the All Programs section of your Start Menu. When you highlight an entry and click Remove, Windows just fires up the program’s own uninstaller program. When the uninstaller doesn’t work, thanks to some bug or glitch, the fun begins.
The truth is, the world won’t end if you just leave the crippled program on board your PC. You can join millions of other PC fans who slog along, hard drives corroded with bits of software they can’t seem to remove. Apart from the waste of space and the uneasy feeling that your PC is getting clogged arteries, there’s no harm done.
But if you’d rather wipe the slate clean, start by visiting the Web site of the company that made your program. Dig into its support section to see if the company has provided a fix or any removal instructions. (Some companies discover bugs in their uninstaller utilities just like any other part of their programs, and then release patches—or even special removal tools—that let their customers remove their software.)
If that step doesn’t lead anywhere, you can get serious by eliminating the stubborn bits by hand. Turn off the phone, cancel your appointments for the afternoon, and proceed like this:
Confirm that the program can actually be removed.
It may be that the program isn’t really on your hard drive any more, but its orphaned listing in your Start menu lingers on. (For example, maybe you’ve installed a newer version of a program that overwrote the older version, or maybe you’ve deleted the program’s files by hand.) In this case, follow the procedure described in the box on Section 5.11 to remove the abandoned entry.
Tip
If the program you’re trying to remove doesn’t seem to be listed in the Add or Remove Programs list, look for other versions of the name. For instance, to remove Word, look under “M” for Microsoft Word or Microsoft Office. If it’s still not there, open the program’s folder in your Start menu and look for an Uninstall icon.
Look for an error message.
When you click the Remove button next to a program’s name, do you get an error message? If so, it’s probably complaining about a missing configuration file.
Most of the time, the file that’s missing is the installation log file, a list of the components that were copied to your hard disk when you originally installed the software. If the uninstaller can’t find this log file, it won’t be able to remove the software, at which point it resorts to petty complaining. In that case, the best tactic is to simply reinstall the program, and then try uninstalling again.
If reinstalling still doesn’t work, see the box on the facing page.
Find out where the program is.
As you may know, Windows programs’ real names are rarely as friendly as the names you see onscreen. To you, it’s Start→Microsoft Word; to Windows, it’s c:Program FilesMicrosoft OfficeOffice 11WINWORD.EXE. So before you can eliminate a program, you have to know its secret location.
Most of the time, you can find out the program’s secret location by opening the Start menu, opening the All Programs menu, and finding the program’s listing. Right-click the shortcut, and from the shortcut menu, choose Properties. As you can see in Figure 5-17, the Target box tells you the name and folder location of the culprit. Leave the Properties box open for the moment.
Turn off any auto-loading components.
Far too many Windows programs are designed to load some of their components into memory the moment you turn on the PC, where they stay until you shut down the machine. The problem is that Windows refuses to delete files that are in use, so you have to close any programs that are currently running before you can delete them.
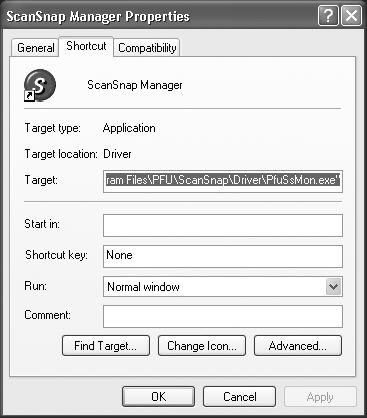
Figure 5-17. As outlined in Section 1.7.2, the path notation shown here identifies where this program sits; each slash indicates a folder within a folder. The name after the final slash identifies the actual program by its real name. In this case, the Target box says C:Pgm FilesPFUScanSnapDriverPfuSsMon.exe. Believe it or not, PfuSsMon.exe is the real name of a program that appears to you as ScanSnap Manager. Instead of trying to remember all these folder names, just click the Find Target button to open a folder window, complete with the program file highlighted.
To see if your subject has an auto-loading bit, choose Start→Run. In the dialog box, type msconfig and press Enter. (Msconfig is a handy little Windows utility—not listed in any menu or available in any store—that lists everything that goes on at startup time.)
As Figure 5-18 shows, the Startup tab in the resulting dialog box lists every program that starts up unbidden when you turn on the PC. Your job is to find any pieces of the program that may be loading when Windows starts, which isn’t always obvious. The easiest way to do this is to look in the center column, Command, for the secret folder name you unearthed in step 3, and turn off the checkbox next to anything that matches.
Note
Don’t go nuts here. Trimming the fat a little doesn’t hurt, but this list includes a few essential Windows programs that the PC requires to start up. If in doubt, leave it alone.
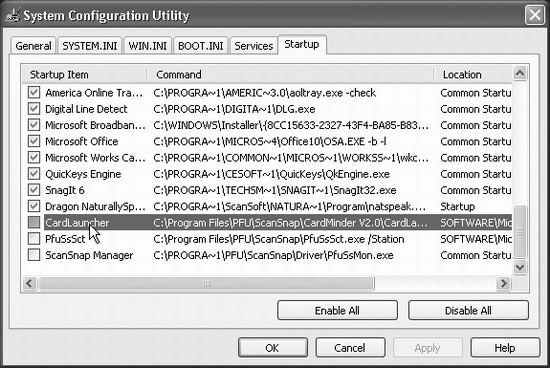
Figure 5-18. In this example, the recalcitrant software bit stuffs two components into your startup process. One of them, you can identify by name (PfuSsSct). The other, you can identify by the path in the Command column (a familiar path).
Click OK when you’re done. If the PC tells you it must be restarted, click Restart. If you receive a “You have used the System Configuration Utility” dialog box when the PC comes to, click OK.
If the gods are smiling, you are now free to delete the program.
Tip
Select View→Details to reveal all the information about the files in the current folder, and then click the Date Modified column header to sort the listing by date. This way, you can more easily find recently changed files.
Delete the files.
Select all the contents of the program’s folder by pressing Ctrl+A, and then drag them into your Recycle Bin. Now didn’t that feel good?
Tip
If Windows Explorer complains that one of the files is still in use, just click OK. Then select everything else, and keep deleting. If anything remains when you’re done, you’ll have to force those programs to close before you can delete them. Right-click an empty area of your taskbar and select Task Manager. Click the Processes tab, and look for the remaining files in the list. When you find the file, highlight it and click End Process. Finally, try to delete the file once again.
Back in the real world, delete the visible scraps of the program from your Start menu and desktop.
For example, drag any unwanted files or folders into your Recycle Bin.
Clean up the mess.
Your final task is to find and eliminate any lingering bits of the stubborn program. For instance, if the recently deceased program is still popping up in the Shortcut menus that appear when your right-click certain files, you’ll have to update your file associations.
The next time you open one of the program’s documents, Windows will complain that it can’t find the program. That’s your opportunity to choose a new program to open those files.