We've seen how you can autodiscover the devices on your network, but you may not want to monitor all of the discovered networks. For example, you may have workstations, test servers, and other systems not worth monitoring. By adding a single device at a time, you can also specify device attributes, including classes, SNMP properties, serial numbers, notes, and more.
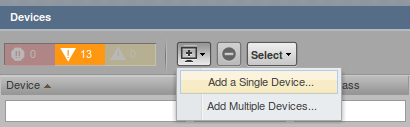
The Add Single Device option is available by clicking on Infrastructure | Devices. See the following screenshot:
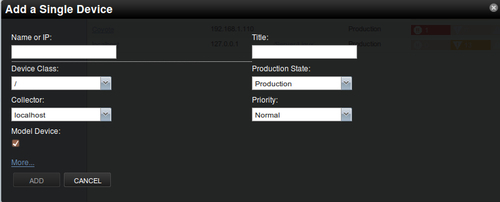
The Add a Single Device window displays as a pop up with the option to add several device attributes:
The advantage of adding devices from this view is that we can add a device with a specific set of properties. The wizard didn't give us this kind of flexibility.
At a minimum, we should enter a Device Name and Device Class. The Device Name identifies the IP address or resolvable hostname, while the Device Class Path sets the monitoring properties we want our device to inherit by default. Device classes are a core concept in Zenoss Core and we will discuss them at length in Chapter 3,
As you look at the Add Single Device window, you will notice there is a More link that displays additional attributes.
The attributes and relations that we specify on the Add Device page have several benefits. We can describe the devices in our inventory and we can actually use Zenoss Core as a way to manage the information about each device. Using the built-in reporting features of Zenoss Core, we can retrieve that information for later use, analysis, or audit.
Some of the fields, such as groups, class, systems, and location, are often referred to as "organizers" because they create hierarchies that help categorize the device inventory. The organizers help us define monitoring properties, categorization, and alerting rules. Alerting rules dictate how administrators are notified when events occur.
The Add Device Options table lists the available attributes we can set when manually adding a device:
|
Add Device Options | ||
|---|---|---|
|
Field name |
Description |
More info |
|
Name or IP |
Specify the IP address or resolvable hostname of the device to be monitored. |
You can rename the device later to anything you want. |
|
Device Class |
Select a class from the drop-down list that describes the device. |
The classes form a hierarchy of monitoring properties where devices inherit the properties of the parent class. |
|
Model Device |
Determines whether or not Zenoss will try to model the device using SNMP, WMI, and SSH. |
Leave unchecked if you know the device doesn't support any of the monitoring protocols. |
|
Collector |
The default collector is localhost. |
The collector defines how Zenoss collects information, including polling intervals. |
|
SNMP Community |
Specify the SNMP community string to try when zendisc discovers the device. |
Leave this field blank if the device doesn't support SNMP. |
|
SNMP Port |
The default SNMP port is 161. |
Zenoss Core will send SNMP get requests to the port specified for the device. |
|
Tag Number |
Text field to record service tag numbers or model numbers for the device. |
This field helps you manage your devices by providing a place to store service-related information. |
|
Serial Number |
Text field to record serial numbers or other identifying information. |
Like the Tag Number, this field enables you to enter information that describes the device. |
|
Production State |
Select the appropriate state of this device: Production (default) Pre-Production Test Maintenance Decommissioned |
Production states provide rules for monitoring, alerting, and display: Production: monitor, alert, and display on dashboard Pre-Production: Excludes alerting and dashboard display Test: Excludes dashboard display Maintenance: Excludes alerting Decommissioned: Do not monitor |
|
Priority |
Select the device's priority: Highest High Normal (default) Low Lowest Trivial |
How important are your devices? Use the priority field to rank how important one device is in relation to the others. |
|
Rack Slot |
Enter the physical location. |
Never let a device hide from you again. |
|
Title |
Enter an alternate name. |
The title will be used throughout the interface to refer to the device. |
|
Comments |
Text field to file notes about the device. |
Enter troubleshooting steps, configuration information, or share a haiku. |
|
HW Manufacturer |
Select the name of the device manufacturer. |
Describe the device. |
|
HW Product |
Select the product name from the drop-down list. The available products are dependent on the selected HW Manufacturer. |
Describe the device. |
|
OS Manufacturer |
Select the operating system information from the drop-down list. |
Describe the device in terms of the operating system. |
|
OS Product |
Select the appropriate operating system version. The available products depend on the selected OS Manufacturer. |
Describe the device in terms of the operating system. |
|
Location Path |
Select a location from the drop-down list. |
The location can describe the device's location in terms of office, city, room, country, or whatever you deem appropriate. |
|
Systems |
Select a Systems organizer from the drop-down list. You can select multiple systems. |
The Systems organizer is a free form classification that helps you describe the device in the context of your organization. |
|
Groups |
Select a Groups organizer from the drop-down list. You can select multiple groups. |
The Groups organizer is a free form classification that helps you describe the device in the context of your organization. |
After we enter the configuration information for the device, click the Add button to schedule the job to run via Zenoss Core's zenjobs daemon. You may check on the status of the job by going to Advanced | Settings | Jobs. Refresh the device list to see the newly-added device.