There may be a couple of different reasons for creating a ZenPack. Perhaps, you want to package a group of custom settings to share with other locations or test environments. Or you may want to contribute a custom monitoring solution to the Zenoss Core community.
To demonstrate the creation and distribution process, we're going to package the bogo_check plugin we installed in Chapter 5, Custom Monitoring Templates. That will give us an opportunity to show you how to distribute preconfigured objects with the ZenPack, as we saw with the HttpMonitor example earlier in this chapter.
And even though we didn't write the bogo_check plugin, it still serves as an excellent programming example for a Nagios compliant plugin. It shows us how we can package a custom script into a ZenPack.
Creating ZenPacks is a three step process:
- Create the ZenPack.
- Add objects and files to the ZenPack.
- Package the ZenPack for distribution.
Please note that even though we're going to walk through an example that adds a custom script, the procedures discussed also apply to users who may only want to create a ZenPack to distribute a report or a set of graphs. Let's get right to it and create the ZenPack:
- From the Advanced menu, navigate to Settings | ZenPacks.
- From the Loaded ZenPacks menu, choose Create New ZenPack to display the Create a new ZenPack dialog box.
- The Create a new ZenPack dialog box asks you to specify a Name according to a Zenoss Core convention. View the following screenshot for an example. Then we'll talk about that convention.
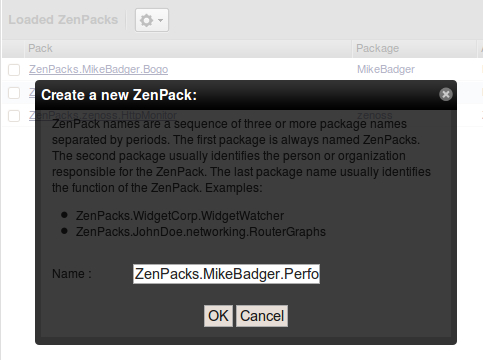
As the dialog box describes, the name consists of three fields separated by periods:
- Field 1: ZenPacks is a default value.
- Field 2: Identify the name or organization of the author (for example, MikeBadger).
- Field 3: Identify the function of the ZenPack (for example, PerformanceMonitorDemo).
The naming convention helps keep ZenPack naming problems to a minimum by creating unique name spaces by the author.
After you name the ZenPack, click OK to create it. The properties (meta data) of the ZenPack will display, as seen in the following screenshot:
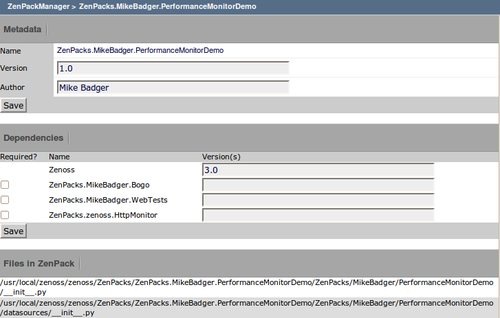
Let's make a few observations about the configuration of the ZenPack. First, you can set the ZenPack Version number and Author in the Metadata section.
The Dependencies section will show you a list of all your installed ZenPacks and allow you to choose one of them as a dependency of your new ZenPack. Obviously, you only choose this option if your ZenPack builds upon functionality contained in another ZenPack.
The meta data and dependency information are displayed on the ZenPack's download page on the Zenoss Core website. It lets users know what they need in order to use your ZenPack.
You will also notice that the ZenPack does not contain any objects. That's our next task.
Now that we have the ZenPack directory structure defined, let's move our bogo_check plugin into the ZenPack directory structure. We'll need to work from the command line as the zenoss user to copy the plugin from the $ZENHOME/Extensions directory where we installed it in Chapter 5, Custom Monitoring Templates, into the correct ZenPack directory.
Remember in the previous section, we discussed that the unique ZenPack naming convention created name spaces that prevent community naming collisions? Well, that unique naming convention creates an ugly directory structure that we need to traverse.
Generally speaking, $ZENHOME/ZenPacks is our root ZenPack directory with directories that correspond to the name of the ZenPack. From there, the directory structure follows the naming convention: ZenPacks, Author, and Description.
In our example, the ZenPack is named ZenPacks.MikeBadger.PerformanceMonitorDemo. If you are using a different example, substitute the name of your ZenPack where appropriate in the following commands.
Here are the steps:
su zenoss
cd $ZENHOME
mkdir ZenPacks/ZenPacks.MikeBadger.PerformanceMonitorDemo  /ZenPacks/MikeBadger/PerformanceMonitorDemo/libexec
cp Extensions/bogo_check.py  ZenPacks/ZenPacks.MikeBadger.PerformanceMonitorDemo  /ZenPacks/MikeBadger/PerformanceMonitorDemo/libexec/
When we modify the monitoring template, we'll find a slightly better shorthand way to reference the bogo_check.py plugin.
As you see, we created a libexec directory to store our plugin because the Zenoss Core Development Guide suggests that we keep our collector plugins in the libexec directory.
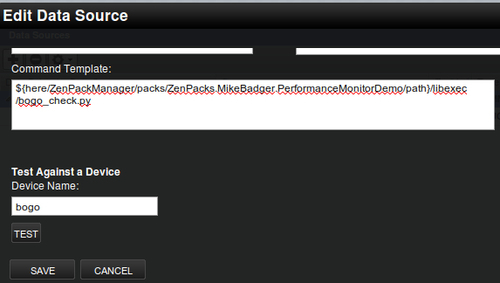
Next we need to update the data source of the Demo monitoring template to the new path of the bogo_check.py plugin:
- Navigate to the Monitoring Templates page and select the bogo/Demo template.
- Select the bogo data source.
- From the Data Source Edit menu, select View and Edit Details to display the Edit Data Source dialog box.
Replace the original command in the Command Template field with the following (replace ZenPackName with the actual name of your ZenPack):
${here/ZenPackManager/packs/ZenPackName/path}/libexec/bogo_check.py
Refer to the following screenshot.
To test the command, enter bogo in the Test Against a Device field. Then click on Test. You should expect an output similar to:
bogo_check CRITICAL datapoint 92 | bogopoint=92%;70;90;0;100
Click on SAVE to update the data source.
You should notice that we didn't specify the absolute path for our command. Instead, we used another TALES expression to reference the path of bogo_check.py file. The TALES expression is ${here/ZenPackManager/packs/ZenPackName/path} where ZenPackName is the actual name of the ZenPack. When Zenoss Core evaluates that expression, the absolute path is substituted.
This is Zenoss' preferred convention and should help prevent broken monitoring templates in future Zenoss Core versions, and it should allow the ZenPack to run regardless of where Zenoss Core is installed on the system.
Note
You can also use the zentestcommand to test the data source against a device from the command line. Here's the equivalent of using Test Against a Device field in the Edit Data Source window:
zentestcommand --device=bogo --data source=bogo
Now that we've updated the Demo monitoring template with the new data source, it's time to add the template to the ZenPack. The Zenoss Core interface makes it easy to add classes, templates, graphs, and reports to our ZenPack. It only requires that we navigate to each object to add them.
Because we just modified the Demo monitoring template, let's add the template to our ZenPack:
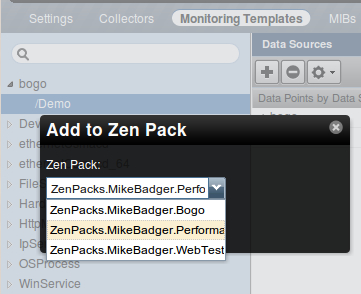
- With the Demo template selected, select Add to Zen Pack from the Actions menu.
- In the Add to Zen Pack dialog box, use the drop-down list to select the name of our ZenPack. See the next screenshot.
- Click on the Submit button to add the template to the ZenPack.
- It doesn't get much easier than that, eh? Repeat the steps for each object, such as the Demo device class, you wish to add to the ZenPack.
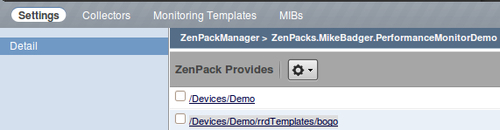
- Want to check your work? Go back to the ZenPack screen in Zenoss Core and click on the ZenPack name to view the settings. Scroll to the bottom and view the ZenPack Provides section. You'll see the name of the objects listed, as seen in the following screenshot:
- We're now ready to package the ZenPack for distribution.
The first step to distributing your ZenPack is to export the ZenPack.
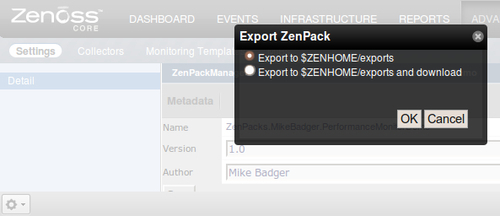
If you didn't choose the option to download the ZenPack, you can retrieve the ZenPack as a Python egg file from $ZENHOME/export.
Our ZenPack is ready to distribute to other users.
When users install an .egg file, they will be unable to update the contents of the ZenPack. If you were watching closely when you added the monitoring template and the device class to the PerformanceMonitorDemo ZenPack, you noticed that HttpMonitor was not an available option, meaning we can't add objects to it.
We can, however, work around this limitation by placing the ZenPack into development mode. Depending on your point of view, this may actually be a feature in that you don't allow users to edit your ZenPack.
ZenPack development mode is a euphemism for copying some source files into the ZenPack's .egg directory. If we browse to the $ZENHOME/ZenPacks directory, and view the contents we can make some observations about the directory names. Refer to the following screenshot:

By looking at the directory names in my ZenPack directory, we know that HttpMonitor is a ZenPack that we installed as a Python egg, as evidenced by the .egg extension of the directory name. The PerformanceMonitorDemo ZenPack we created does not have .egg in its name because that's a ZenPack we created and developed.
Let's assume that we want to add objects to the HttpMonitor ZenPack. To place the ZenPack in development, we must copy the ZenPackTemplate files to our HttpMonitor directory. Copy the following list of files to $ZENHOME/ZenPacks/ZenPacks.zenoss.HttpMonitor-2.0.3-py2.6.egg:
$ZENHOME/Products/ZenModel/ZenPackTemplate/setup.py$ZENHOME/Products/ZenModel/ZenPackTemplate/INSTALL.txt$ZENHOME/Products/ZenModel/ZenPackTemplate/MANIFEST.in$ZENHOME/Products/ZenModel/ZenPackTemplate/README.txt
This is basically the contents of the ZenPackTemplate folder minus the CONTENT directory.
Now, when you choose the Add to ZenPack option from the Actions menu, the HttpMonitor ZenPack will be an option. To preserve your changes, export the ZenPack.