
One of the first questions we need to answer is, "How will I collect information from my devices and services?" Zenoss Core supports the following ways to model (collect data from) the device:
- Simple Network Management Protocol (SNMP)
- Windows Management Instrumentation (WMI)
- SSH/Telnet (for example, Zenoss Plugins)
- Port scan
SNMP gives us the most flexibility and the best device support. WMI lets us access information about services running on Windows servers and can co-exist with SNMP. If we want to monitor Windows event logs, then WMI is a must.
Even if your device supports SNMP, there may be times when you are unable to use it. For example, you're monitoring a remote device that's outside the local network. Zenoss, Inc., distributes a suite of command-line monitors that can be installed on a device via the Zenoss Plugins, and Zenoss Core runs the plugins over an SSH or Telnet session to collect the performance data.
In the unfortunate event that your device doesn't support SNMP, WMI, SSH, or Telnet you will only be able to monitor availability via ping. You may be able to retrieve a list of services to monitor on the device via Zenoss Core's port scan plugin.
Zenoss Core uses SNMP to model the specific characteristics about a device, such as file system utilization, memory usage, or throughput on a network interface. The network devices report data to Zenoss Core via an SNMP agent that runs on each device. The agent on the device communicates with Zenoss Core—the SNMP network management station.
When Zenoss Core requests information from a device using SNMP, it asks the device to send information for a specific characteristic by including an Object Identifier (OID) in the request. For example, the OID 1.3.6.1.2.1.25.1.1.0 contains the system uptime value.
The following screenshot shows a sample transaction between Zenoss Core and a Linux server. Zenoss Core requests the value for an OID and the server responds with the value:
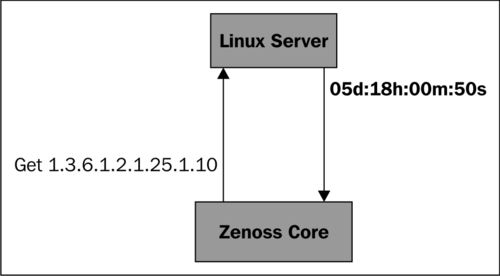
SNMP associates OIDs with a human-friendly variable name via Management Information Bases (MIBs). For example, 1.3.6.1.2.25.1.1.0 is also known as sysUpTime.
OIDs are collected in modules, called Management Information Bases (MIBs). Zenoss Core supplies many of the MIBs that we need to monitor a broad range of devices. However, we can download and install manufacturer-specific MIBs to extend our monitoring functionality. We'll cover adding MIBs in Chapter 8, Settings and Administration including how to know when you need to download a new MIB.
SNMP agents don't always wait to be asked for information. They have the ability to send traps to the network management station as a notification of a system problem. We'll investigate SNMP traps in Chapter 7,
We'll encounter more SNMP as we move through the remainder of the book, but if you'd like to read more SNMP theory, consider the following resources:
- SNMP RFC: http://www.ietf.org/rfc/rfc1157.txt
- Net-SNMP: http://www.net-snmp.org.
Let's take a quick look at the different SNMP versions before we configure our monitored devices.
SNMP comes in three versions: v1, v2c, and v3. SNMP v2c provides support for 64-bit counters, and it can embed multiple requests in one packet, whereas v1 needs to send each SNMP request in a separate packet.
SNMP v3 improves upon the "weak" security model of the v1 and v2c by implementing user authentication and roles. In the earlier versions of SNMP, authentication is done with community strings. It's the equivalent of protecting your childhood fort by asking, "What's the secret word," to everyone who knocks on the door.
Let's manufacture an example and configure a Linux server to respond to any SNMP request that contains the community string of "wildchicken". If the Zenoss Core server queries with a SNMP community string of "public", the Linux server won't respond and Zenoss Core won't collect data from the server.
Throughout the course of the book, we won't dwell on which version of SNMP you should use. Use the version that meets your requirements and your devices' capabilities. As we move through the device management chapter, we'll see how to adjust the SNMP collection options in Zenoss Core. Experiment with different configurations, as necessary.
Now, let's configure SNMP on a Linux host.
If we plan to collect device information from the network using SNMP, we need to install an SNMP agent on all devices that we plan to monitor with SNMP. The SNMP agent on the monitored devices listens for incoming SNMP requests from Zenoss Core and responds to the request appropriately. Although there are other SNMP options, Net-SNMP is widely used and recommended by the Zenoss team.
Net-SNMP also includes a set of utilities, such as snmpwalk, snmpget, and snmptrap that can help us manipulate SNMP values and troubleshoot problems. It won't hurt you to install both packages.
The Net-SNMP package names vary from one distribution to the next, so be sure to check with your distribution if you are unsure of which file you need. Here are a few examples:
- Red Hat users can install the agent and the utilities with the command:
yum -y install net-snmp net-snmp-utils - Ubuntu users can install the agent and utilities with the command:
apt-get install snmpd snmp
Next, we must configure the SNMP agent to process requests and to publish the entire MIB tree. As root, we need to edit the /etc/snmp/snmpd.conf file.
- Before you make any changes, back up the
snmpd.conffile:cp /etc/snmp/snmpd.conf /etc/snmp/snmpd.conf.bak - In the section that begins "First, map the community name into a security name," add the following line and replace
publicwith the value of your community string:com2sec notConfigUser default public
- In the section that begins "Second, map the security names into group names," add:
group notConfigGroup v1 notConfigUser
group notConfigGroup v2c notConfigUser
- In the section that begins "Third, create a view for us to let the groups have rights," add:
view systemview included .1
- In the section that begins, "Finally, grant the 2 groups access to the 1 view with different write permissions," add the following line:
access notConfigGroup "" any noauth exact systemview none none
- Add the following lines to the System Contact Information section using your contact details:
syslocation Unknown (edit /etc/snmp/snmpd.local.conf)
syscontact Root <root@localhost> (configure /etc/snmp/snmpd.local.conf)
- Add the following lines to the Further Information section to send SNMP traps to the Zenoss Core server. Replace the IP address with your Zenoss server IP and use the community string for your network:
trapsink 192.168.1.125 public 162
Tip
Downloading the example code
You can download the example code files for all Packt books you have purchased from your account at http://www.PacktPub.com. If you purchased this book elsewhere, you can visit http://www.PacktPub.com/support and register to have the files e-mailed directly to you.
Your Windows server most likely has WMI and SNMP already installed. However, in the event you need to install one or the other, you can do so through Add or Remove Programs.
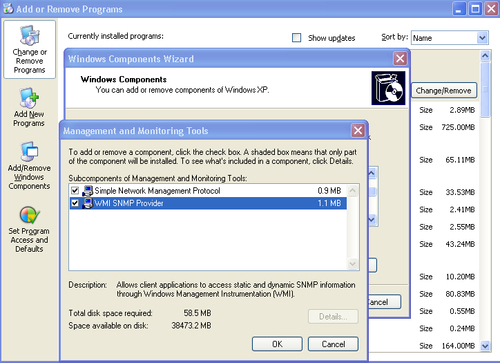
WMI and SNMP are enabled from the Windows Management and Monitoring Tools packages. To install WMI and SNMP (refer to the following screenshot), follow these steps:
- Open the Windows Control Panel.
- Select Add/Remove Windows Components.
- Click on Management and Monitoring Tools and select Details.
- Select Simple Network Management Protocol and WMI.
- Save the changes to install the Windows Components.
After WMI installs, we should confirm that WMI is properly configured:
- From the Windows Start menu, select Run.
- Enter the command
wbemtest. - Select the Connect button.
- Change the Namespace field to
 \HOST
ootcimv2
. - Enter an administrator username and password.
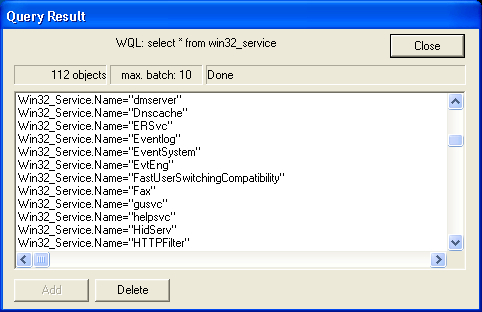
- Click the Query button.
- In the search box, type
select * from win32_serviceto see a list of services as shown in the next screen capture.
The Windows SNMP agent does not return information about the server's CPU, memory, or file system. For these stats, the Zenoss team recommends the free SNMP (not open source) agent from SNMP Informant located at http://www.snmp-informant.com. No configuration is necessary for SNMP Informant.
If the device we plan to monitor does not support SNMP, or if we need to monitor a device behind a firewall on a network far, far away, SSH provides an alternative to SNMP. Zenoss Core also supports Telnet, but we'll work with SSH in our examples.
In order to collect performance data from our device over SSH, the monitored device needs the Zenoss Plugins installed. And the monitored device needs to have an SSH server installed so that it can accept incoming requests from the Zenoss Core server. OpenSSH from openssh.com offers a good solution.
The level of data provided by plugins varies between platforms. For this reason we may not achieve the same level of detail as we do with SNMP; however, SSH modeling provides more detail than a port scan.
As a prerequisite to installing the Zenoss Plugins, the monitored system needs a Python environment installed. This can be installed using your distribution's package manager. If you have setuptools installed, you can install the Zenoss Plugins package from the Cheese Shop (http://pypi.python.org/pypi/) with the following command as root:
easy_install Zenoss-Plug-ins
We can also build the plugins package from source:
- Download the Zenoss Plugins package from http://www.zenoss.com/download/.
- Extract the file.
- From the extracted plugin source directory, run the following commands as root:
python setup.py build
python setup.py install
The setuptools procedure installs zenplugin.py to /usr/bin, which is important because we will need to configure the configuration properties(zCommandPath) of the device or device class to look for the plugins at the correct location. We'll review the configuration properties in Chapter 3,
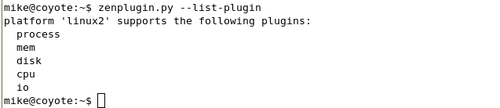
To ensure that the plugin file is working correctly, run the following command on the monitored device:
zenplugin.py –list-plugins
This command outputs the detected platform and the supported plugins as shown in the following screenshot:
Sometimes, the only option we have to model our devices is a port scan. A port scan tries to guess which services are running on a device by connecting to various ports. Port scans provide the least detailed model and may raise security alerts on your network. Consult the security administrators before port scanning devices on the network.
We don't need to make any special provisions on our monitored device if we plan to check the availability of services with port scanning.