Why corner people with your wallet to look at your kid's baby pictures, when you can whip out your iPhone and dazzle them with a finger-tapping slideshow?
iTunes can sync the photos from your hard drive onto the iPhone. If you use a compatible photo-management program, you can even select individual albums of images that you've already assembled on your computer. Your photo-filling options for the iPhone include:
Photoshop Elements 3.0 or later for Windows.
Photoshop Album 2.0 or later for Windows.
iPhoto 4.0.3 or later on the Mac.
Aperture 1.0 or later, Apple's high-end program for photography pros.
Any folder of photos on your hard drive, like My Pictures (in Windows), Pictures (on the Mac), or any folder you like.
The common JPEG files generated by just about every digital camera work fine for iPhone photos. The GIF and PNG files used by Web pages work, too.
Note
You can sync photos from only one computer. If you later attempt to snag some snaps from a second machine, iTunes warns you that you must first erase all the images that came from the original computer.
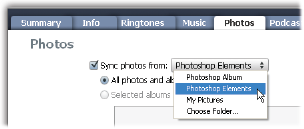
When you're ready to sync your photos, click the Photos tab in iTunes. Turn on Sync photos, and then indicate where you'd like to sync them from (Photoshop Elements, iPhoto, or whatever).
If you want only some of the albums from your photo-shoebox software, turn on their checkboxes. Once you make your selections and click Apply, the program bustles around, "optimizing" copies of your photos to make them look great on the iPhone (for example, downsizing them from 10-megapixel overkill to something more appropriate for a 0.15-megapixel screen), and then ports them over.
After the sync is complete, you'll be able to wave your iPhone around, and people will beg to see your photos.
The previous discussion describes copying photos only in one direction: computer→iPhone. But here's one of those rare instances when you can actually create data on the iPhone so that you can later transfer it to the computer: photos you take with the iPhone's own camera. You can rest easy, knowing that they can be copied back to your computer for safekeeping, with only one click.
Now, it's important to understand that iTunes is not involved in this process. It doesn't know anything about photos coming from the iPhone; its job is just to copy pictures to the iPhone.
So what's handling the iPhone→computer transfer? Your operating system. It sees the iPhone as though it's a digital camera, and suggests importing them just as it would from a camera's memory card.
Here's how it goes: Plug the iPhone into the computer with the USB cable. What you'll see is probably something like this:
On the Macintosh. iPhoto opens. This free photo-organizing/editing software comes on every Mac. Shortly after it notices that the iPhone is on the premises, it goes into Import mode.
After the transfer (or before it, on older iPhone versions), click Delete photos if you'd like the iPhone's cameraphone memory cleared out after the transfer.
Either way, click Import on the Mac screen to begin the transfer.
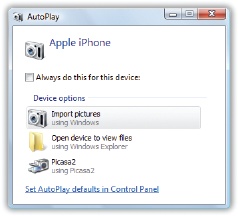
In Windows. When you attach a camera (or an iPhone), a dialog box pops up that asks how you want its contents handled. It lists any photo-management program you might have installed (Picasa, Photoshop Elements, Photoshop Album, and so on), as well as Windows' own cameramanagement software ("Scanner and Camera Wizard" in Windows XP; "using Windows" in Vista).
Click the program you want to handle importing the iPhone pictures. You'll probably also want to turn on Always do this for this device, so the next time, it'll happen automatically.
Then again, some iPhone owners would rather not see some lumbering photo-management program firing itself up every time they connect the phone. You, too, might wish there were a way to stop iPhoto or Windows from bugging you every time you connect the iPhone. That, too, is easy enough to change—if you know where to look.
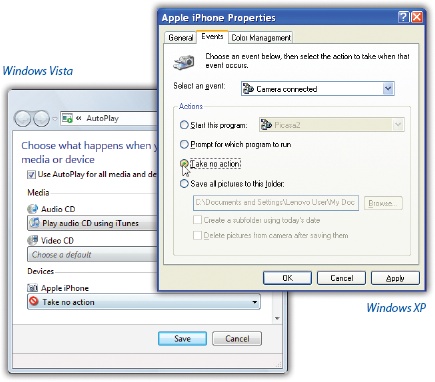
Windows XP. With the iPhone connected, choose Start→My Computer. Right-click the iPhone's icon. From the shortcut menu, choose Properties. Click the Events tab; next, click Take no action. Click OK.
Windows Vista. When the AutoPlay dialog box appears, click Set AutoPlay defaults in Control Panel. (Or, if the AutoPlay dialog box is no longer on the screen, choose Start→Control Panel→AutoPlay.)
Scroll all the way to the bottom, until you see the iPhone icon. From the pop-up menu, choose Take no action. Click Save.
Macintosh. Open Applications→Image Capture. Choose Image Capture→Preferences. Click CDs & DVDs. Where it says When a camera is connected, open:, choose No application. Click OK.
From now on, no photo-importing message will appear when you plug in the iPhone. (You can always import its photos manually, of course.)
Note
No mail messages are transferred to or from the iPhone over the cable. For that sort of magic, you need MobileMe or Exchange service. (See Chapters Chapter 14 and Chapter 15.)