
Adding other types of objects is, in many cases, just as straightforward as adding our text object. If we want our scene to be populated in a way that enabled us to render it, we would have to add a camera and a lamp to make things visible. Adding a camera to the same scene could be done like this (assuming we still have a reference to our active scene in the scn variable):
from Blender import Camera
cam = Camera.New() # creates new camera data
ob = scn.objects.new(cam) # adds a new camera object
scn.setCurrentCamera(ob) # makes this camera active
Note that the Camera object is again different from the actual camera data. A Camera object holds camera-specific data, such as viewing angle, and a Blender object holds data common to all objects, notably its position and rotation. We will encounter cameras again later and see how we can point them and set the view angle.
Lamps follow pretty much the same pattern:
from Blender import Lamp
lamp = Lamp.New() # create a new lamp
ob = scn.objects.new(lamp)
Again, the Lamp object holds lamp-specific data such as its type (for example, spot or area ) or its energy while the Blender object that encapsulates it defines its position and rotation.
This pattern is similar for a Mesh object but the situation is subtly different here because a mesh is a conglomerate of vertices, edges, and faces among other properties.
Like a Lamp or a Camera, a Mesh is a Blender object that encapsulates another object in this case, a Blender.Mesh object. But unlike Blender.Lamp or Blender.Camera objects it does not stop there. A Blender.Mesh object itself may contain many other objects. These objects are vertices, edges, and faces. Each of these may have a number of associated properties. They may be selected or hidden and may have a surface normal or an associated UV-texture.
Beside's any associated properties, a single vertex is basically a point in 3D space. In a Blender.Mesh object any number of vertices are organized in a list of Blender.Mesh.MVert objects. Given a Mesh object me, this list may be accessed as me.verts. An edge is a line connecting two vertices in Blender represented by a Blender.Mesh.MEdge object. Its main properties are v1 and v2, which are references to MVert objects. The list of edges in a Mesh object can be accessed as me.edges.
Beside's any associated properties, a single vertex is basically a point in 3D space. In a Blender.Mesh object any number of vertices are organized in a list of Blender.Mesh.MVert objects. Given a Mesh object me, this list may be accessed as me.verts. An edge is a line connecting two vertices in Blender represented by a Blender.Mesh.MEdge object. Its main properties are v1 and v2, which are references to MVert objects. The list of edges in a Mesh object can be accessed as me.edges.
A MFace object is a like an edge, basically a list of references to the vertices that define it. If we have a MFace object face, this list may be accessed as face.verts.
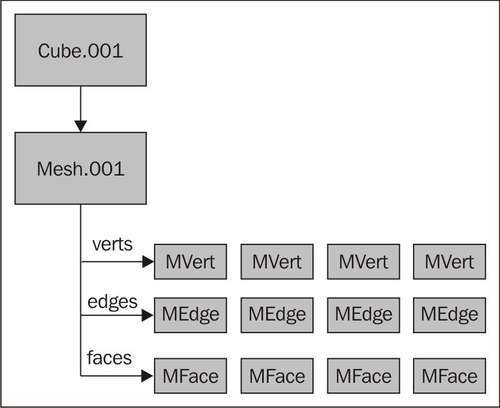
This jumble of objects containing other objects may be confusing, so keep the previous diagram in mind and let's look at some example code to clarify things. We will define a cube. A cube consists of eight vertices connected by twelve edges. The eight vertices also define the six sides (or faces) of the cube.
from Blender import Mesh,Scene
corners=[ (-1,-1,-1), (1,-1,-1), (1,1,-1), (-1,1,-1), (-1,-1, 1), (1,-1, 1), (1,1, 1), (-1,1, 1) ]
sides= [ (0,1,2,3), (4,5,6,7), (0,1,5,4), (1,2,6,5), (2,3,7,6), (3,0,4,7) ]
me = Mesh.New('Cube')
me.verts.extend(corners)
me.faces.extend(sides)
scn = Scene.GetCurrent()
ob = scn.objects.new(me, 'Cube')
Window.RedrawAll()
We start by defining a list of corners. Each of the eight corners is represented by a tuple of three numbers, its x, y, and z coordinates. Next we define a list of tuples defining the faces of the cube. The sides of a cube are squares so each tuple holds four integers—each integer is an index to the list of corners. It is important to get the order of these indices right: if we would list the first side as (0,1,3,2) we would get a twisted or a bow-tie face.
Now we can define a Mesh object and name it Cube (the highlighted part in the preceding code). As noted earlier, the vertices of a Mesh object are accessible as a list named verts. It has an extend() method that may take a list of tuples representing vertex positions to define additional MVert objects in our Mesh.
Likewise, we can add extra faces to the list of faces of a Mesh object by calling the extend() method of faces with a list of tuples. Because all edges of a cube are edges of the faces there is no need to add any edges separately. This is done automatically when we extend() the list of faces.
The Mesh object that we have defined so far can now be embedded in a Blender object that can be added to the active scene. Note that it is perfectly acceptable to have a Mesh object and a Blender Object with the same name (Cube in this case) because different kind of objects in Blender have separate namespaces. In the Blender GUI, names are always prefixed with a two letter prefix to distinguish them. (for example, LA for a lamp, ME for a mesh, or OB for a Blender object)
When creating Mesh objects a great deal of attention is needed to get all the vertices, edges, and faces added and correctly numbered. This is just the tip of the iceberg when creating meshes. InChapter 2, Creating and Editing Objects, we will see what hides underwater.
In the previous sections, we saw that in order to integrate our script in Blender's menu system and help system we had to place the script in the .blenderscripts directory. A fully integrated script can be a big advantage, but this method has a clear drawback: the person who wants to use this script has to put it in the correct directory. This might be a problem if this person does not know how to locate this directory or does not have the permission to place scripts in that directory. That last problem may be overcome by setting an alternative script directory in the User Preferences, but not everybody might be that tech oriented.
A viable alternative is distributing a script as a text within a .blend file. A .blend file can be saved with the script clearly visible in the main window and one of the first comment lines of the script might read Press ALT-P to start this script. This way, the script can be used by anybody who knows how to open a .blend file. An additional advantage is that it is easy to bundle extra resources in the same .blend file. For example, a script might use certain materials or textures or you might want to include sample output from your script. The only thing that is very difficult to do is distribute Python modules this way. You can use the import statement to access other text files but this may pose problems (seeAppendix B). If you have a lot of code and it is organized in modules, you and your users are probably still better off if you distribute it as a ZIP file with clear instructions on where to unpack this ZIP file.
For Pynodes (or dynamic nodes, seeChapter 7) you don't have a choice. Pynodes can refer to only the Python code contained in text files within a .blend file. This is not really a limitation though as these Pynodes are an integral part of a material, and Blender materials can be distributed only within a .blend file. When these materials are linked to or appended their associated nodes and any texts associated with Pynodes are linked to or appended as well, completely hiding from the end user the way a material is actually implemented.
When developing Python programs in Blender it is important to understand what functionality is provided by the API and even more so, what not. The API basically exposes all data and provides functions for manipulating that data. Additionally, the API provides the developer with functions to draw on the screen and to interact with the user interface and windowing system. What the Blender API does not provide is object-specific functionality besides setting simple properties, especially lacking any functions to manipulate meshes on the level of vertices, edges, or faces other than adding or removing them.
This means that very high-level or complex tasks such as adding a subsurface modifier to a Mesh object or displaying a file selector dialog are as simple as writing a single line of code, while functions as essential and seemingly simple as subdividing an edge or selecting an edge loop are not available. That doesn't mean these tasks cannot be accomplished, but we will have to code them ourselves. So many examples in this book will refer to a module called Tools that we will develop in the next chapters and that will contain useful tools from extruding faces to bridging face loops. Where appropriate and interesting we will highlight the code in this module as well but mainly it is a device to squirrel away any code that might detract us from our goals.
The following sections give a short and very high-level overview of what is available in the Blender API. Many modules and utilities will feature prominently in the next chapters as we will develop practical examples. This overview is meant as a way to help you get started if you want to find out about some functionality and do not know where to look first. It is nowhere near a full documentation of the Blender API. For that, check the most recent version of the API documentation online. You can find the link in theAppendix A Links and Resources.
The Blender module serves as a container for most other modules and provides functionality to access system information and perform general tasks.
For example, information such as the Blender version that you are using can be retrieved with the Get() function:
import Blender
version = Blender.Get('version')
Incorporating all externally referred files in a .blend file (called packing in Blender) or saving your current Blender session to a .blend file are other examples of functionality implemented in the top-level Blender module:
import Blender
Blender.PackAll()
Blender.Save('myfile.blend')
Each Blender object type (Object, Mesh, Armature, Lamp, Scene, and so on) has an associated module which is a submodule of the top-level Blender module. Each module supplies functions to create new objects and find objects of a given type by name. Each module also defines a class with the same name that implements the functionality associated with the Blender object.
Note that in Blender, not only the things directly visible in your scene, such as meshes, lamps, or cameras are objects, but also materials, textures, particle systems, and even IPOs, actions, worlds, and scenes.
Many other data items in Blender are not Objects in the Blender sense (you cannot append them from another .blend file or move them about in your scene) but are objects in the Python sense. For example, vertices, edges, and faces within a mesh are implemented as classes: Blender.Mesh.MVert, Blender.Mesh.MEdge, and Blender.Mesh.MFace respectively.
Many modules also have submodules of their own; for example the Blender.Scene module provides access to the rendering context by way of the Blender.Scene.Render module. Among other things, this module defines a RenderData class that allows you to render a still image or animation.
So with what we know now it is possible to draw two slightly different family trees of Blender objects.
The first one illustrates what kind of Blender objects may be contained within or referred to by another Blender object where we limit ourselves to the less abstract objects:

Of course, the diagram above is greatly simplified as we left out some less relevant objects and as it only illustrates a single kind of relationship. There are of course many more types of relationship in a scene, such as parent-child relationships or constraints.
We may contrast the previous diagram with the one that shows in which module a type of object (a class) is defined:

The differences are quite noticeable and are important to keep in mind, especially when looking for specific information in the Blender API documentation. Don't expect to find information on a Curve object in the documentation for the Blender.Object module because a Blender Curve is a specific Blender Object; the Curve class is defined and documented in the Blender.Curve module. In general you can expect the documentation of a class to be in the module of same name.
Besides the Blender module, there is another top-level module called bpy that provides a unified way to access data. It is considered experimental, but it is stable and might be used as a more intuitive way of accessing objects. For example, if we want to access an object called MyObject we normally would do something like this:
import Blender
ob = Blender.Object.Get(name='MyObject')
With the bpy module we might rephrase this:
import bpy
ob = bpy.data.objects['MyObject']
Likewise, to get access to the active scene object we might write this:
import Blender
scene = Blender.Scene.GetCurrent()
Which can be written in an alternative way:
import bpy
scene = bpy.data.scenes.active
Which one to prefer is a matter of taste. The bpy module will be the only way to access data in the upcoming Blender 2.5 but the changes in Blender 2.5 go deeper than just this data access so don't be fooled by the superficial similarity of the module name!
Access to Blender's windowing system is provided by the Blender.Draw module. Here you will find classes and functions to define buttons and pop-up menus and ways to interact with the user. The types of graphical elements that you can display using the Draw module are limited to the commonly used ones and customization is not an option.
More advanced functions are provided in the Blender.BGL module that gives you access to virtually all OpenGL functions and constants, allowing you to draw almost anything on screen and to let the user interact in many different ways.
Finally, there are a number of modules that encapsulate various functionality that do not fit in any of the previous categories:
Blender.Library:Blender allows you to append (that is, import) or link (refer to) objects in another.blendfile. Another way to look at this is that a.blendfile can act as a library where you can store your assets. And because almost anything is an object in Blender, almost any asset can be stored in such a library, be it models, lamps, textures, or even complete scenes. TheBlender.Librarymodule provides script authors the means to access those libraries.Blender.MathutilsandBlender.Geometry:These modules contain among other things, theVectorandMatrixclasses with associated functions to apply all sorts of vector algebra to Blender objects. With the functions provided in these modules you will be able to rotate or shear your object's co-ordinates or calculate the angle between two vectors. Many more convenience functions are provided and these will make many surprise appearances in the examples in this book. Don't worry, we will provide explanations where necessary for people not so at home with vector math.Blender.Noise:Noise is used in generating all the (apparently) random patterns that form the basis of many of the procedural textures in Blender. This module gives access to the same routines that provide the noise for those textures. This might not only be useful in generating your own textures but might for instance be used in the random placement of objects or implementing a slightly shaky camera path to add realism to your animation.Blender.Registry:The data inside scripts, whether local or global, is not stored once a script exits. This can be very inconvenient, for example if you want to save the user preferences for your custom script. TheBlender.Registrymodule provides ways to store and retrieve persistent data. It does not, however, provide any means to store this data on disk, so the persistence is only for the duration of a Blender session.Blender.Sys:To quote this module's documentation:
This module provides a minimal set of helper functions and data. Its purpose is to avoid the need for the standard Python module
osin specialos.path, though it is only meant for the simplest cases.
Blender.Types:This module provides constants that can be used for the type checking of objects. Python's built-in functiontype()returns the type of its argument. This makes it quite easy to check whether an object has a given type when compared to one of the constants in this module.… if type(someobject) == Blender.Types.CurveType : … do things only allowed for Curve objects ...
In this chapter, we have seen how to extend Blender with a full Python distribution and familiarized ourselves with the built-in editor. This enabled us to write scripts that, although simple, were fully integrated in Blenders scripting menu and help system. We covered many subjects in detail including:
- What can and cannot be accomplished with Python in Blender
- How to install a full Python distribution
- How to use to the built-in editor
- How to run a Python script
- How to explore built-in modules
- How to write a simple script that adds an object to a Blender scene
- How to register a script in the Blender scripts menu
- How to document your script in a user-friendly way
- How to distribute a script
In the next chapter, we take this knowledge a step further to create and edit complex objects and we will see how to define a graphical user interface.