Although the New Connection Wizard does an admirable job of trying to simplify the hairy process of accessing the Internet, it’s not always appropriate. Here are a few cases when you may want to arrange your settings manually:
You already have an Internet account.
You have a cable modem or DSL connection.
The New Connection Wizard didn’t find any ISPs with local phone numbers for you, but you’ve heard about a local service—offered by your local PC user group, for example—that sounds just right.
Your PC is connected to a network through which your company provides Internet service.
In each of these cases, you can still use the New Connection Wizard; however, a good deal more typing is required.
If you connect to the Internet via telephone jack, like most of the world, choose Start→All Programs→Accessories→Communications→New Connection Wizard. Make sure that your computer is plugged into a phone jack.
Click Next, “Connect to the Internet,” Next, “Setup my Internet connection manually,” and Next. Now click “Connect using a dial-up modem,” and then Next.
On the following several screens, you’ll be asked to type in a few pieces of information that only your ISP can provide: the local phone number that connects your PC to the Internet, your user name, and your password. (You can call your ISP for this information, or consult the literature delivered by postal mail when you signed up for an ISP account.)
You’ll also be offered these three important checkboxes:
Use this account name and password when anyone connects to the Internet from this computer. This option refers to the Windows XP user accounts feature described in Chapter 17, in which various people who share the same computer keep their worlds of information and settings separate by signing in each time they use the machine. It’s asking you: “Is this the Internet account you want this PC to use no matter who’s logged in at the moment?”
Make this the default Internet connection. Some people have more than one way to access the Internet. Maybe you connect your laptop to a cable modem when you’re at home but dial out using the modem when you’re on the road. Turn on this checkbox if the account you’re setting up is the one you want it to use most often.
Tip
You can always change your mind. In the Network Connections window (Figure 9-3), right-click a connection icon and choose Set as Default Connection from the shortcut menu. On the other hand, if you’re a laptop-toting traveler, you might want to specify a different connection in each city you visit. In that case, right-click the default icon (shown by the checkmark at right in Figure 9-3) and choose Cancel as Default Connection from the shortcut menu. This way, your laptop will never dial away automatically, using some hopelessly irrelevant access number for the city you’re in.
Turn on Internet Connection Firewall for this Connection. Windows XP offers a certain degree of protection from incoming hacker attacks in the form of a personal firewall (see the facing page). Turn this off only if you’ve equipped your PC with other firewall software (or if you have a router, as described in Chapter 18).
When it’s all over, you’ll find that you’ve given birth to a connection icon, as shown at right in Figure 9-4 Once you’ve correctly typed in all of the necessary information, you should be ready to surf.
Tip
If you carry a laptop from city to city—each of which requires a different local Internet number—you might want to create more than one connection icon by plugging in a different local access number each time. (Alternatively, just create one connection icon—and then, in the Network Connections window, right-click it and choose Create Copy.) Another helpful hint: Name each of these connections after the appropriate location (“EarthLink Cleveland,” “EarthLink Stamford,” and so on), so you’ll remember which one to use for which city.
As noted earlier in this chapter, you’re usually spared the hassle of setting up these so-called broadband accounts. The installation person generally handles it for you.
If you ever need to set up such an account yourself for some reason, here’s the procedure:
Choose Start→Control Panel. In Classic view (Section 8.1), double-click Network Connections.
(That’s an alternate route to the Network Connections window shown in Figure 9-3.) If your PC does, in fact, have an Ethernet adapter—a requirement for a cable modem, DSL modem, or network Internet account—you’ll see an icon for it in this window.
Right-click the Local Area Connection icon; from the shortcut menu, choose Properties.
You get the dialog box shown at left in Figure 9-5.
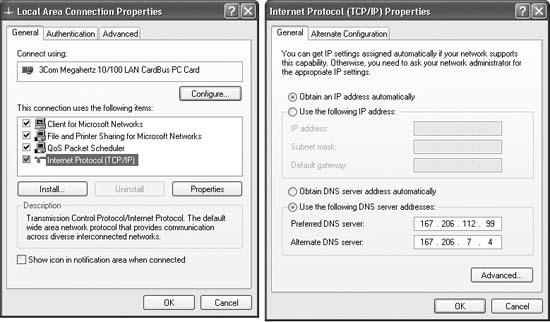
Figure 9-5. Left: In this dialog box, double-click the Internet Protocol (TCP/IP) item that corresponds to your Ethernet card. Right: Your cable or phone company generally configures these settings for you. But if a freak solar eclipse wipes out all of your settings, you can re-enter them here. When you click OK, you should be back online.
Double-click the listing that says Internet Protocol (TCP/IP).
An even more intimidating dialog box now appears, as shown at right in Figure 9-5.
With your cable company, DSL company, or network administrator on the phone, type in your account information.
Most of the time, you’ll be instructed to turn on “Obtain an IP address automatically” and “Obtain DNS server address automatically.” You don’t know how lucky you are—you’ve been saved from typing in all the other numbers in this dialog box. Otherwise, turn on “Use the following IP address” and type in the appropriate numbers. Do the same with “Use the following DNS server addresses.”
Click OK.
As a courtesy, Windows XP doesn’t make you restart the computer in order for your new network settings to take effect.
Upon completing this task, you won’t wind up with a connection icon, as you would if you intended to connect to the Internet using a dial-up modem. Instead, you’re online all the time, 24 hours a day—or at least whenever your cable/DSL/network is working correctly.