Windows’ windows look just fine straight from the factory: all the edges are straight, and the text is perfectly legible. Still, if you’re going to stare at this computer screen for half of your waking hours, you may as well investigate some of the ways these windows can be enhanced for better looks and greater efficiency. As it turns out, there’s no end to the tweaks Microsoft lets you perform.
You can view the files and folders in a desktop window in any of several ways: as small icons, jumbo icons, a tidy list, and so on. Each window remembers its own view settings.
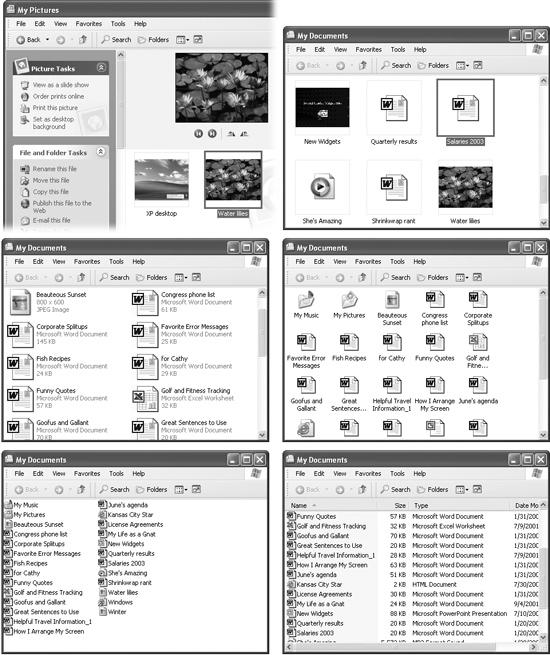
To change the view of a particular open window, choose one of these commands from its View menu (or from the little icon on the toolbar): Filmstrip, Thumbnails, Tiles, Icons, List, or Details. Figure 2-5 illustrates each of these options.
Some of these views are new in Windows XP. Filmstrip view, for example, is a home run for anyone with a digital camera or scanner. It turns the folder window into a slide show machine, complete with Next and Previous buttons beneath an enlarged picture, as well as buttons that rotate the image on the screen. (You get this view automatically when you open your My Pictures folder.)
Figure 2-5. The new Filmstrip view (upper left) creates a slide show right in the folder window. Thumbnails view (upper right) is also good for photos—or anyone who would like a larger target for clicking each icon. (Tip: If you press Shift as you switch to Thumbnails view, you hide the file names. Do it again to bring the names back.) In the new Tiles view (middle left), your icons appear at standard size, sorted alphabetically into vertical columns—with name and file details just to the right. Icons view (middle right) sorts the icons horizontally in rows, displaying only their names. The List view (lower left) packs, by far, the most files into the space of a window. Details view (lower right) is the same as List view, except for the additional columns of information that reveal the size, the icon type, and the date and time the item was last modified.
Tip
In Filmstrip view, try right-clicking inside the large image of your photo. The resulting shortcut menu offers a number of very useful options, including Rotate commands, “Set as Desktop Background,” and “Send To” (which lets you fire the picture off to somebody by email).
As a message may tell you, rotating certain pictures may force Windows to recompress them, sometimes reducing the quality by a fractional amount. In general, the quality loss isn’t visible to the eye, but if you’re concerned, duplicate the file to preserve the original before rotating.
Windows XP starts out arranging the icons alphabetically in two different groups. Folders come first, followed by the list of loose files in a second group.
But you don’t have to be content with an alphabetical list. Windows XP is wildly flexible in this regard, letting you sort a window’s contents in any of 32 ways.
To change the sorting criterion, choose View→Arrange Icons By, and then choose from the drop-down menu. The sorting possibilities listed here depend on which columns you’ve made visible in Details view (described in the next section). Generally, though, you’ll find these options:
Name arranges the files alphabetically.
Type arranges the files in the window alphabetically by filetype, such as Word documents, applications, JPEG files, and so on. (Technically, you’re sorting files by theirfilename extensions [see Section 5.9.1].)
Size arranges files by size, smallest first. (Folders are unaffected; Windows never shows you the sizes of folders in its list views.) In the My Computer window, this option says Total Size and lists your disks by their capacity.
Free Space is an option only in the My Computer window. Needless to say, it shows you how much space is left on each of your disks.
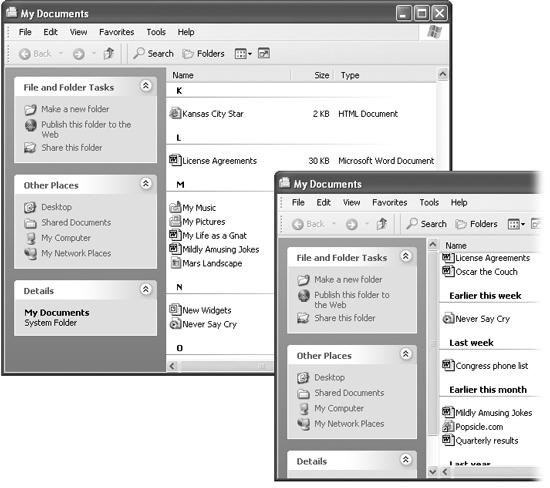
Show in Groups is a fascinating enhancement in Windows XP. In any view except Filmstrip and List, it superimposes headings on your sorted list of icons, making the window look like an index (see Figure 2-6). When sorting the list by size, for example, the headings say Tiny, Small, Medium, and Folders. When sorting by modified date, you see headings called Yesterday, Last week, Earlier this month, and so on. It’s an inspired idea that makes it much easier to hunt down specific icons in crowded folders.
Auto Arrange, availabel only in Icon and Tile views, isn’t actually a sorting method, it’s a straightening-up method. It rearranges the icons so they’re equally spaced and neat. (You can use this command on the desktop, too, which is one way to avoid CWDS [Cluttered Windows Desktop Syndrome].)
Figure 2-6. Show in Groups is a useful new view option (availabel in all views except Filmstrip and List) that superimposes a set of “filing tabs” on any window, with headings that reflect the date, size, name, type, and so on. It’s perfect for scanning a crowded list. These examples show sorting by name (left) and by modified date (right). In the My Computer window, the effect is slightly different: Your folders and disks are listed in headings called, for example, Files Stored on This Computer, Hard Disk Drives, and Devices with Removable Storage.
Align to Grid is slightly different. Whereas Auto Arrange always keeps icons or tiles in a tight, equally spaced clump, Align to Grid snaps dragged icons into position against an invisible underlying grid, even if they’re scattered across the broad space of an open window (instead of clustered together in the upper-left corner). In other words, this feature is generally useful only when Auto Arrange is turned off.
You gotta love Details view. Clearly, Microsoft does: it’s endowed Details view with much more flexibility and power than the other views.
First, there’s the obvious advantage of being able to see the size and date of the objects in neat columns, as shown in Figure 2-5. Second, you can sort the contents by file size, type, or date simply by clicking the appropriate column heading.
Tip
If you click the same column heading again, the sorting order is reversed. For instance, clicking the Date Modified column once places your files into oldest-files-first sequence; a second click puts the newest file first. A small arrow on the column heading points up or down to indicate the order of the sort. (This doesn’t work if “Arrange in Groups” is turned on.)
Third, you can rearrange the column sequence just by dragging their headings horizontally.
Finally, you can manipulate the columns in a number of ways:
To add more columns to the window, providing even more information about each icon, right-click any column heading and choose column names from the resulting drop-down menu. As you’ll quickly discover, many of these column headings are useful only in folders that contain certain kinds of files—Date Picture Taken is for digital photos, Album Title is for music files, and so on.
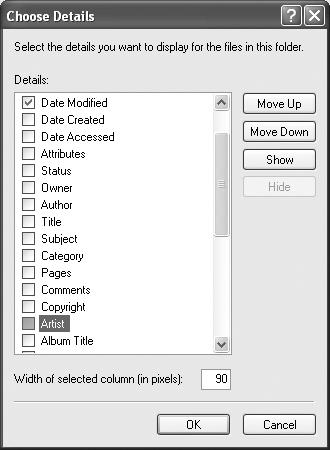
For even more control over the columns, choose View→Choose Details to open the dialog box shown in Figure 2-7. Turn on the checkboxes beside the columns you want. You can even determine their sequence just by clicking a column name, and then clicking Move Up or Move Down (although, as noted above, it’s much easier to drag the column headings in the window yourself).
Once you’ve opened the Choose Details window, you could change the width of a column by editing the number at the bottom in the “Width of selected column (in pixels)” text box—but that’s for geeks. It’s much more natural to adjust column widths just by dragging the vertical divider bar (between column headings) from side to side.
Tip
When adjusting the width of a column, here’s a technique that’s even better than dragging: Double-click the divider between one column name and the next. Doing so automatically expands the column to a width that’s precisely wide enough to reveal the widest item in that column (exactly as in Microsoft Excel).
Figure 2-7. The range of information you can display in the window is robust enough to satisfy even the terminally curious. Some of the characteristics listed here are for specific types of files. For example, you won’t need a column for Audio Formations in a folder that holds word processing documents.
Now that you’ve twiddled and tweaked your system windows into a perfectly efficient configuration, you needn’t go through the same exercises for each folder. Windows XP can immortalize your changes as the standard setting for all your windows.
Choose Tools→Folder Options→View tab. Click the Apply to All Folders button. When Windows XP asks whether you’re sure you know what you’re doing, click Yes.
At this point, all of your disk and folder windows open up with the same view, sorting method, and so on. You’re still free to override those standard settings on a window-by-window basis, however.
And if you change your mind again, seeking to make all of your maverick folder windows snap back into line with the standard settings, choose Tools→Folder Options→View tab and click the Reset All Folders button.
When you double-click a folder, Windows can react in one of two ways:
It can open a new window. Now you’ve got two windows on the screen, overlapping each other. Moving or copying an icon from one into the other is a piece of cake. Trouble is, if your double-clicking craze continues much longer, your screen will eventually be overrun with windows that you must painstakingly close again.
It can replace the original window with a new one. This only-one-window-at-all-times behavior keeps your desktop from becoming crowded with windows. If you need to return to the previous window, the Back button takes you there. Of course, you’ll have a harder time dragging icons between windows using this ethod.
To specify your preference, choose Tools→Folder Options→General tab in any desktop window. In the resulting dialog box, click “Open each folder in the same window” or “Open each folder in its own window,” as you like. Then click OK.
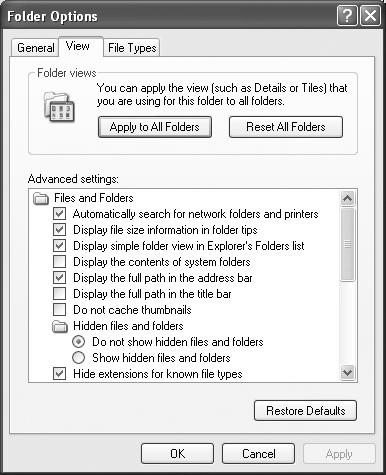
If you choose Tools→Folder Options from any folder window and then click the View tab (see Figure 2-8), you see an array of options that affect all of the folder windows on your PC. When assessing the impact of these controls, “earth-shattering” isn’t the adjective that springs to mind. Still, you may find a few of them useful.
Here are the functions of the various checkboxes:
Automatically search for network folders and printers. When you turn on this checkbox, Windows explores your network every few seconds in hopes of detecting shared folders and network printers that recently have been turned on or off. That way, your Network Places and Printers windows will be up to date when you open them.
Figure 2-8. Some of the options in this list are contained within tiny folder icons. Double-click one of these icons to expand the list and reveal the options within it. For example, you won’t see the “Do not show hidden files and folders” option until you have expanded the “Hidden files and folders” folder icon.
Display file size information in folder tips. A folder tip is a rectangular balloon that appears when you point to a folder—a little yellow box that tells you what’s in that folder and how big it is on the disk. (It appears only if you’ve turned on the “Show pop-up description” checkbox described below.) Talk about tweaky: you turn off this checkbox if you want to see the description but not the size.
Display simple folder view in Explorer’s Folders list. When you’ve turned on this option, clicking a folder in Windows Explorer (Section 3.1.4) expands its listing, showing you its contents. It also simultaneously closes any other folder you’ve previously expanded. (Turning off this option also adds dotted lines that help you see which folders sprang forth from which other folders in the “tree.”)
Display the contents of system folders. When you open certain windows that “belong” to Windows XP itself—the Windows folder or Program Files folder, for example—you see nothing but an enormous, full-window message that says, “These files are hidden.” Microsoft grew weary of answering tech-support calls from clueless or mischievous customers who had moved or deleted critical system files from these folders, rendering their PCs crippled or useless. The company concluded that the simplest preventive measure would be to make them invisible (the files, not the PCs).
This checkbox is responsible for that safety feature. If you consider yourself a cool customer when it comes to power-user techniques like fooling around with important Windows folders, you can turn this box on. You won’t see that “These files are hidden” message any more. (Of course, even if this checkbox is turned off, you can still view the hidden files by clicking the “Show the contents of this folder” link in the task pane of any such window.)
Display the full path in the address bar. This option displays your window’s full folder path in the Address bar (if it’s showing)—for example, C:Documents and SettingsChrisMy DocumentsBills—instead of only the folder’s name (Bills). Turning this option on ensures that you won’t get confused on a hard drive that contains two identically named folders. Seeing the path can be useful when you’re not sure which disk a folder is on. (See Section 1.7.2 for more on folder paths.)
Display the full path in the title bar. Same idea, but this time the path of the open folder or file shows up in the title bar of the window. Unfortunately, you also get the full path in the window’s taskbar button—or more specifically, the first couple words of the path, which usually aren’t helpful. In that case, just point to the taskbar button to see the rest of the pathname appear in a tooltip (if “Show pop-up description” is turned on, as described in Section 2.3).
Do not cache thumbnails. This option refers to the new Thumbnails view, a window view that’s primarily useful for looking at folders full of pictures. When Windows caches such images, it memorizes the little pictures that constitute your thumbnails, so that they’ll appear faster the next time you open the window. You save a tiny bit of memory by turning on this checkbox, but you’ll wait a lot longer every time you open a folder whose contents are in Thumbnails view.
Hidden files and folders; Hide protected operating system files (Recommended). As noted above, Windows XP hides certain files and information that, if deleted or changed by mistake, could cause you hours of troubleshooting grief by damaging the operating system or your programs. (Certain files and folders remain hidden even if you have turned on “Display the contents of System folders.”) Yes, Big Brother is watching you, but he means well.
By changing these settings, you, the confident power user, can make the hidden files and folders appear (they’ll show up with dimmed icons, as though to reinforce their delicate nature). But you’ll have the smoothest possible computing career if you leave these options untouched.
Hide extensions for known file types. Windows XP normally hides the three-letter filename extension on standard files and documents (Word files, graphics files, and so on), in an effort to make Windows seem less technical and intimidating. Your files wind up named Groceries and Frank instead of Groceries.doc and Frank.jpg.
Power users often make these extensions reappear by turning off this option; see Section 5.9.1 for more on this topic.
Launch folder windows in a separate process. This geekily worded setting opens each folder into a different chunk of memory (RAM). In certain rare situations, this largely obsolete arrangement is more stable—but it slightly slows down your machine and unnecessarily uses memory.
Managing pairs of Web pages and folders. For some reason, this new Windows XP option shows up only if you’ve also installed Microsoft Office. This feature affects Web pages that you save to your hard drive (by choosing, in Internet Explorer, File→Save As, and then choosing the “Web Page, Complete” option in the “Save as type” drop-down list). For such a tiny feature, quite a bit of explanation is required.
When saving a Web page in this way, you generally wind up with two separate icons on your desktop: an HTML document that contains the Web page’s code (and the words on the page), plus a similarly named folder full of the graphics (and scripts) that appeared on that page.
The “Show and manage the pair as a single file” option here is a strange but useful one. It means that whenever you move or delete one of these two icons (the HTML document and the graphics folder), the other one automatically accompanies it. The idea, of course, is to help you avoid breaking the connection between these items—for example, leaving the graphics behind when you copy the text file to another disk.
If you turn on “Show both parts and manage them individually,” of course, Windows doesn’t preserve any such link. If you drag or delete the text file, you leave behind the graphics folder.
(The strangest option in all of Windows XP is the final one, “Show both parts but manage as a single file.” It produces exactly the same effect as “Show and manage the pair as a single file.” Go figure.)
Remember each folder’s view settings. Ordinarily, every folder and disk window memorizes its own view setting (the sorting order, plus the view setting, like LIst or Details) independently.
But if you turn off this checkbox, each folder inherits the view setting of the window it’s in. If you open My Documents, for example, and switch it to Tiles view, all the folders inside it will open into Tiles view windows, too. Furthermore, if you change one of those inner folders to Details view, for example, it won’t stick. Instead, it will switch right back to Tiles the next time you open it.
Tip
A reminder: You can set your PC to employ the same view setting all the time (Details view, for example) by turning on this option and then using the Apply to All Folders button described on Section 82.
Restore previous folder windows at logon. Every time you log off the computer, Windows forgets which windows were open. That’s a distinct bummer, especially if you tend to work out of your My Documents window, which you must therefore manually reopen every time you fire up the old PC.
If you turn on this useful checkbox, then each time you log on, Windows XP will automatically present you with whichever windows were open when you last logged off.
Show Control Panel in My Computer.Turn on this checkbox if you’d like to see a Control Panel icon in the My Computer window, as in previous versions of Windows.
Show encrypted or compressed NTFS files in color. This feature won’t make much sense until you’ve read Section 15.3, which explains how Windows XP Professional can encode your files for security, and Section 15.2, which explains how Windows XP (any version) can compact your files to use less disk space.
This option turns the names of affected icons green and blue, respectively, so that you can spot them at a glance. On the other hand, encrypted or compressed files and folders operate quite normally, immediately converting back to human form when double-clicked. In other words, knowing which ones have been affected isn’t particularly valuable. Turn off this box to make them look just like any other files and folders.
Show pop-up description for folder and desktop items. If you point to (but don’t click) an icon, a taskbar button, a found item in the Search program, or whatever, you get a pop-up tooltip—a floating yellow label that helps identify what you’re pointing to. If you find these tooltips distracting, turn off this checkbox.
Use simple file sharing. See Section 20.6 for details on this simplified, but not especially secure, file-sharing system.
