
This advanced control panel is the same one that appears when you right-click your My Computer icon and choose Properties from the shortcut menu (or press Windows logo key+Break key). Its various tabs identify every shred of circuitry and equipment inside, or attached to, your PC.
You can’t change anything on this screen, but that doesn’t mean it’s not useful. Here you can learn:
Which version of Windows XP you have (don’t be surprised if the version number contains far more decimal points than you were taught is legal).
The model name and speed of your PC’s processor chip (such as Pentium 4, 2.6 GHz).
How much memory your PC has—a very helpful number to know, particularly when it comes time to sell your old computer.
You personally will never see whatever you type into the “Computer description” box here. If you’re on a network, however, the blurb you type here is what others see from across the wires. You might use the “Computer description” box to inform your fellow network citizens as to the operating system your PC uses, or what its contents are.
Likewise, the computer description isn’t the same thing as your computer name, which once again comes into play primarily when you, or your co-workers, view your network connections. (Click the Change button to change the computer’s name.)
This dialog box is nothing more than a portal. Its four buttons lead to these four other dialog boxes:

Figure 8-21. If you’re confident about the hardware add-ons that you install—and the stability of their drivers—instruct Windows XP to stop warning you every time an unsigned driver attempts to infiltrate your hard drive (click the top option button). On the other hand, if you want to guarantee the continued stability of Windows XP, click the Block option button, so that such software is never allowed to enter your system.
Add Hardware Wizard. The best way to install the software for a new piece of equipment—a scanner, printer, camera, or whatever—is to use the installation CD that came with it. If you’ve downloaded a driver from the Internet, however, or in certain other circumstances, you can use this wizard to walk you through the installation.
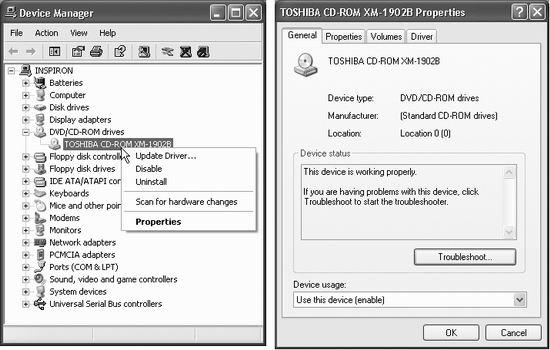
Figure 8-22. Left: The Device Manager dialog box shows you where every dollar of your PC’s purchase price went. Click a + sign to see exactly which CD-ROM drive, floppy circuitry, or other hardware you currently have. Right: Double-clicking a component (or right-clicking it and choosing Properties, as shown at left) lets you read about its specs.
Driver Signing. After years of grief from its customers for having written an “unstable” operating system, Microsoft went to the root of the problem: buggy software drivers. In response, it created the driver signing program, in which the makers of various hardware add-ons can pay Microsoft to test and certify the safety and stability of their drivers. Whenever you install a driver that hasn’t received this Microsoft blessing, a frightening dialog box appears to warn you, as described in Section 14.5.
By clicking this button, you can specify just how sensitive you want your PC to be when it encounters an installer putting an unsigned driver onto your system, as shown in Figure 8-21.
Device Manager. This very powerful dialog box (see Figure 8-22) lists every component of your PC: CD-ROM, Modem, Mouse, and so on. Double-clicking a component’s name (or clicking the + symbol) discloses the brand and model of that component. Many of these items are controllers—the behind-the-scenes chunks of electronics that control the various parts of your computer, with a technical-looking name to match. For much more on the Device Manager, see Section 14.6.
Hardware Profiles. If you’re a laptop owner, your add-on equipment list probably changes from location to location. For example, when you’re at the office, you may connect your laptop to a docking station—and when you’re at 39,000 feet, you probably don’t. The hardware profiles feature lets you switch between these configurations relatively easily. See Section 14.7 for details.
Here’s another dialog box that’s nothing more than a nesting place for five buttons that open other dialog boxes—some of which aren’t “advanced” in the least. Three of these buttons are called Settings, and here’s what they cover:
The Visual Effects tab of the Performance Options dialog box (Figure 8-23) offers a long list of checkboxes that control the little animations and visual accents that define the more modern look and feel of Windows XP. For example, “Animate windows when minimizing and maximizing” makes Windows present a half-second animation showing your window actually shrinking down onto the taskbar when it’s minimized. “Show shadows under mouse pointer” produces a tiny shadow beneath your cursor, as though it were floating a quarter-inch above the surface of your screen.
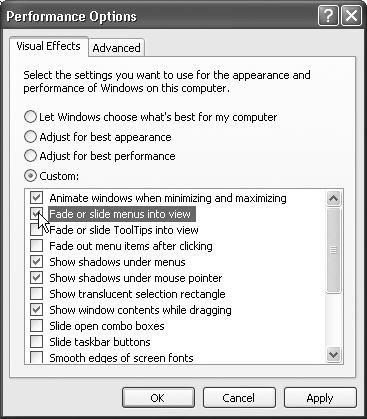
Figure 8-23. Performance means speed. Depending on the speed and age of your machine, you may find that turning off all of these checkboxes produces a snappier, more responsive PC—if a bit less Macintosh-esque. (Leave “Use visual styles on Windows and buttons” turned on, however, if you like the new, softened look of Windows XP.)
All these little animations and shadows look cool, but each saps away a tiny scrap of speed and power. Using this dialog box, you can freely turn off the checkboxes for the features you could do without.
The Advanced tab of this dialog box is far less casual. It controls how Windows XP uses your processor power and memory, and provides a button that opens the Virtual Memory control center for your machine. These are extremely technical settings that you should adjust only with the guidance of a licensed geek.
This screen displays the master list of user profiles. See Section 17.8 for details.
This dialog box contains advanced options related to dual-booting—see Appendix A—and what happens when the system crashes. It also lets you edit the startup options file (boot.ini, beloved by tech-heads everywhere) by clicking the Edit button.
This button opens a dialog box that’s intended solely for the technically minded. It identifies, for example, the path to your Windows folder and the number of processors your PC has. If you’re not in the computer-administration business, avoid making change here.
You may have noticed that whenever a program crashes, freezes, or abruptly quits, Windows XP offers to email a report of the event to Microsoft for the benefit of its debugging teams. Using the Error Reporting dialog box (click the Error Reporting button), you can turn off this frequent attempt to contact the mother ship—or limit the attempts to certain programs.
This dialog box is the control center for the Windows XP System Restore feature, which lets you rewind a balky computer to an earlier date when it was working fine. Details in Chapter 16.
To read about Remote Assistance—the feature that lets a technical help person connect to your PC (via the Internet) to help you troubleshoot—turn to Section 4.3.2.2. This tab contains its master on/off switch, and lets you specify how long one of your “invitations” to such geniuses should remain open.
This tab also offers the on/off switch for Remote Desktop, which lets someone at another computer take control of yours. For the full story, see Chapter 21.