
Before you use Google Earth, you have to download the software to your PC, which you do from earth.google.com. Google offers four different versions of Google Earth:
-
Google Earth (basic), the version for most users that lets you perform a variety of general mapping functions. This version is a free download.
-
Google Earth Plus, which can be purchased for $20. This version includes all the features of the basic version, and adds support for GPS devices (Magellan and Garmin units only), the ability to import spreadsheet data, a variety of drawing tools for annotation purposes, and high-resolution printing.
-
Google Earth Pro, designed for professional and commercial use. This version, which costs $400, includes all the features of Google Earth Plus, augmented with multiple terabytes of detailed aerial and satellite images from cities around the world, the ability to import custom data and blueprints, and use a variety of add-on modules. The add-on modules (which cost $200 apiece) include a Movie Making Module (for creating WMV-format movies of zooms and tours), a Premium Printing Module, a GIS Data Importing Module, a CDT Traffic Counts Module, and an NRB Shopping Center Data Module.
-
Google Earth Enterprise, which offers a variety of on-site deployment solutions for large organizations, including Google Earth Fusion (integrates custom data), Google Earth Server, and Google Earth EC (Enterprise Client). Contact Google for custom pricing.
Which version should you use? For most individuals, the basic (free) version is more than adequate. If you want to interface Google Earth with a GPS unit, spend the twenty bucks for Google Earth Plus. And if you intend to use Google Earth for professional use (commercial real estate, construction and engineering, insurance, intelligence and homeland security, and so on), investigate the much more robust Google Earth Pro or Google Earth Enterprise versions.
For the purposes of this chapter, however, we’ll focus on the basic version of Google Earth.
When you first launch Google Earth, you see a large view of the planet Earth, as well as surrounding navigation and display controls, as shown in Figure 29.1. The major parts of the screen include three panes (Search, Places, and Layers), the main view display, and the navigation controls. You can hide or display certain parts of the interface by checking them on or off in the View menu.
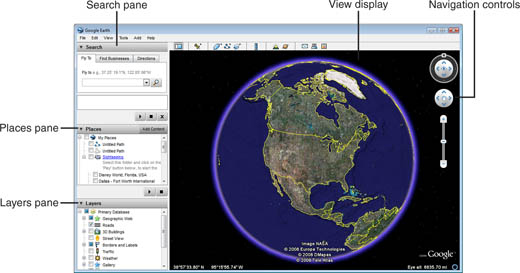
You start your journey through Google Earth from the 3D view of the globe. You can zoom in on any location on the planet, and navigate from place to place around the planet. All it takes is a mastery of Google Earth’s navigation controls.
Of course, since you’re doing three-dimensional navigation, complete with panning, tilting, and rotating, the navigation is a bit more complicated than what you have with a flat web-based Google map. With Google Earth, you can navigate around the 3D globe by using the navigation controls along the right side of the screen, by using your mouse, or by using select keyboard commands. We’ll look at each method in turn.
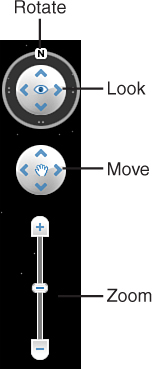
Perhaps the easiest way to navigate Google Earth is with the onscreen navigation controls, shown in Figure 29.2. Just click the appropriate control with your mouse, and you can do the following:
-
Click the Zoom In and Zoom Out buttons (or use the corresponding slider control) to zoom into or out of the map. Clicking Zoom In (+) displays a closer, more detailed view; clicking Zoom Out (-) displays a further away, less-detailed view.
-
Click and drag the Look control to move around from a single vantage point, as if you’re turning your head.
-
Drag the Rotate control (the outer ring of the Look control) to rotate the view. (Rotating clockwise moves north to the right; rotating counterclockwise moves north to the left.)
-
Double-click the North button (the N at the “top” of the Rotate control) to return north to the straight-up position.
-
Click or click and drag the Move control to move your position from one point to another.
Both the Look and Move controls work like a joystick—that is, you can use your mouse to click and hold each control, and then drag your mouse to move or look in the designated direction. It sounds more complicated than it is; these controls are really quite easy to use.
If you’re handy with your mouse, you can use it alone (without the onscreen navigation controls) to zoom around Google Earth.
-
To zoom in to a specific point, double-click on that point in the viewing pane.
-
To generally zoom in, use your mouse’s scroll wheel (if it has one) to scroll toward you. You can zoom in smaller increments by holding down the Alt key on your keyboard while scrolling.
-
You can also generally zoom in by clicking and holding the right mouse button, and then moving your mouse up (away from you).
-
To generally zoom out, use your mouse’s scroll wheel to scroll away from you. You can also click and hold the right mouse button, and then move your mouse down (toward you).
-
To zoom continuously in or out, hold down the right mouse button, briefly move the mouse up (to zoom in) or down (to zoom out), and then quickly release the mouse button. To stop the zoom, click once in the viewer.
-
To move the map in any direction, click and hold the left mouse button, and then drag your mouse in the desired direction.
-
To “drift” continuously in any direction, hold down the left mouse button, briefly move the mouse in the desired direction, and then quickly release the mouse button. To stop the drift, click once in the viewer.
-
To tilt the view, hold down the Shift key on your keyboard and then move the mouse’s scroll wheel up or down. Alternatively, if your mouse has a depressible scroll wheel or middle button, depress the scroll wheel or middle button and then move the scroll wheel up or down.
-
To rotate the view, hold down the Ctrl key on your keyboard and then move the mouse either left or right. Alternatively, if your mouse has a depressible scroll wheel or middle button, depress the scroll wheel or middle button and then move the mouse either left or right.
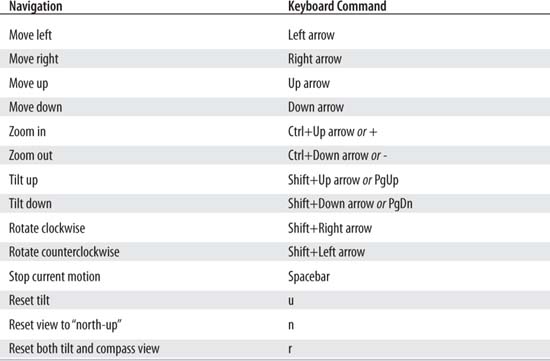
You can also navigate through any Google Earth view by using your computer keyboard. Table 29.1 details the keyboard navigation commands.
Now that you know how to get around in Google Earth, let’s take a quick tour.
Anytime you start Google Earth, the view defaults to the extended zoom of the planet Earth, focused on the continent of North America. This is a great place to start because you can get just about any place you want from here.
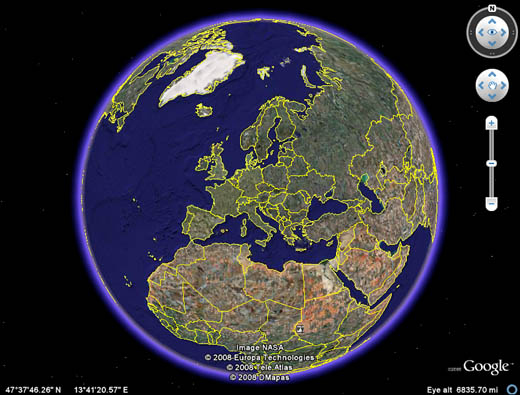
Let’s start by panning east (to the right) until we focus on Europe. Double-click the N button on the Rotate control to put North back at the top, and then click the up-arrow button until Europe is centered onscreen, as shown in Figure 29.3.
Tip
You can make more refined movements (that is, move more slowly) by holding down the Alt key in combination with most of these keyboard commands.
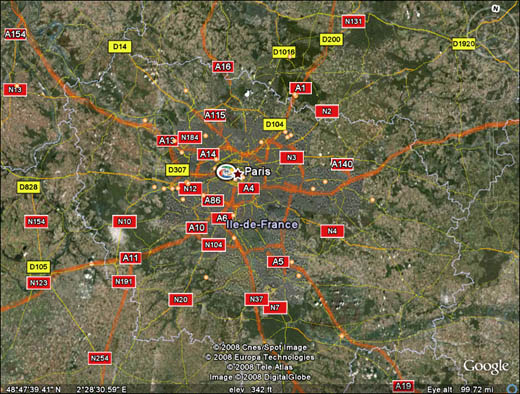
Next, we want to zoom into the map. Click the Zoom In button (or use the zoom slider control) until France fills up the screen; then use a combination of zooming and panning until you see the city of Paris, as shown in Figure 29.4.
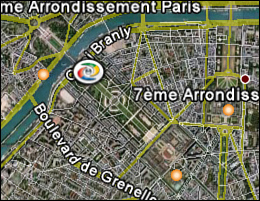
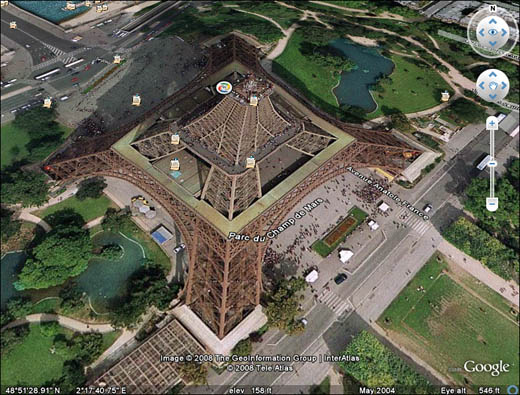
Now zoom further into the city, following the river Seine to the west (left). You’ll notice a grouping placemarks on the map; each placemark denotes a specific location or attraction. When you hover your cursor over a placemark, the name of that location appears. Look for the swirly placemark shown in Figure 29.5; this is the Eiffel tower. Zoom into the Eiffel tower placemark until you get the view shown in Figure 29.6.
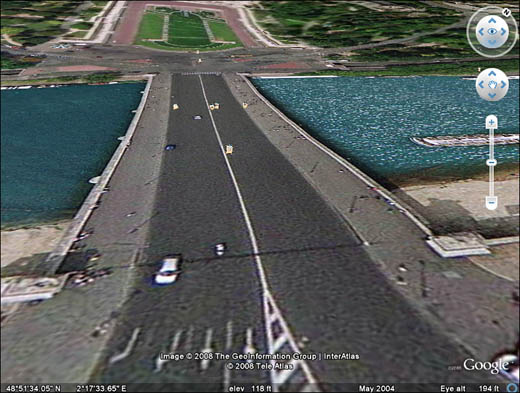
Next, rotate around and zoom in a little more until you’re looking down the bridge beside the tower. As you can see in Figure 29.7, you can make out individual cars on the bridge—pretty neat!
And, to demonstrate how easy it is to navigate directly to placemarked locations, go to the Places pane, open the Sightseeing folder, check the Google Campus placemark, and then click the Play button. After a dizzying spin-and-turn around the globe, you’ll see the Googleplex appear, as shown in Figure 29.8. Feel free to zoom in and see exactly what Google’s world headquarters looks like—up close and personal!

Google Earth offers two options to make its three-dimensional views look even more realistic—by displaying 3D buildings and terrain.
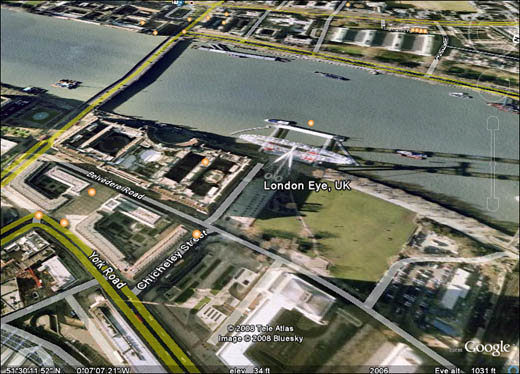
Let’s look at the 3D buildings option first. Start by opening the Places pane and going to the London Eye placemark. Zoom in and tilt the map a little, until you see the view shown in Figure 29.9. That’s the big Ferris wheel by the Thames, although it’s hard to tell from this view. Now check the 3D Buildings option in the Layers pane, and Google Earth will add the blocky 3D structures shown in Figure 29.10—a much more realistic perspective of what this area of London really looks like.

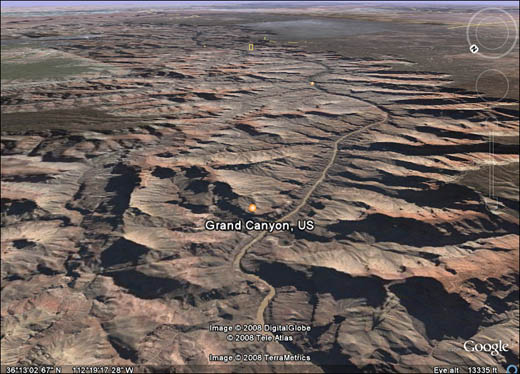
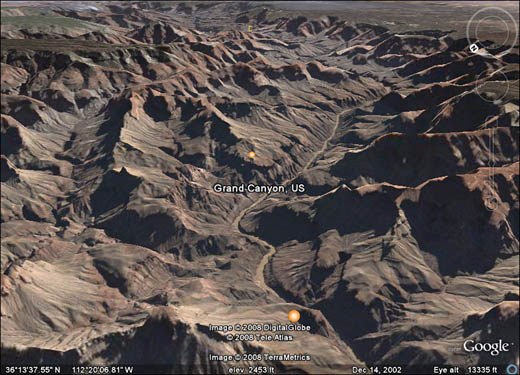
The 3D terrain option is a good one when you’re viewing an area of hilly terrain. You turn this on by checking the Terrain option in the Layers pane. You can see this option at work by going to the Grand Canyon placemark. The view without the 3D terrain function enabled is shown in Figure 29.11; Figure 29.12 shows the much more realistic look with the 3D terrain.
Note
Google Earth has 3D buildings in many major cities—but not all. Turn on this feature when zooming into a city to see what’s available.
Google Earth is quite versatile in terms of what you see onscreen. There are a lot of viewing options, more than we can cover here, but we’ll try to address some of the most popular and useful ones.
Most of Google Earth’s view options are set from within the Options dialog box, shown in Figure 29.13. You open this dialog box by selecting Tools, Options.

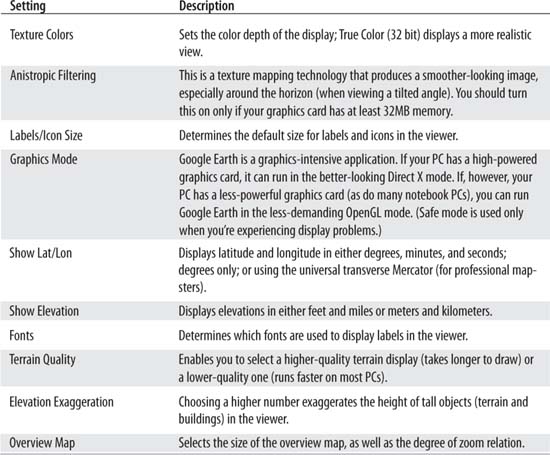
Within the Options dialog box, you want to select the 3D View tab. From here, you can adjust the settings detailed in Table 29.2.
By default, the Google Earth viewer appears in a window within the Google Earth window. To display the viewer full-screen, press the F11 key (or select View, Full Screen). To return to the standard mode, press F11 again.
To overlay a latitude/longitude grid on any Google Earth view, press Ctrl+L (or select View, Grid). This grid tilts along with the overall view tilt.
There’s one more view setting that can help you navigate Google Earth. This is the Overview map, which you switch on by pressing Ctrl+M (or by selecting View, Overview Map). As you can see in Figure 29.14, this shows you where you are in the viewer in relation to the rest of the world. You can double-click anywhere in the Overview map to navigate to that location.
You can save any image displayed in the Google Earth viewer by selecting File, Save, Save Image. You can also print the current image in the viewer by selecting File, Print. Note, however, that the free version of Google Earth prints images only at screen resolution; the $20 Google Earth Plus prints images at a much higher resolution—about 2400 pixels, according to Google.
You know how to zoom and pan around the Google Earth globe—but this isn’t always the easiest way to zoom into a specific location. Fortunately, Google Earth lets you search for places just as you do in Google Maps, and then zoom directly into the desired location.
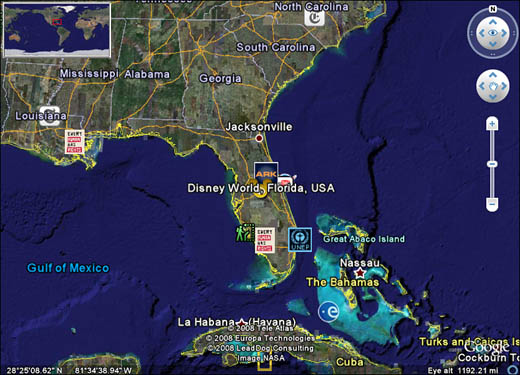
To search for a location, make sure the Fly To tab is selected in the Search pane and then enter the location into the search box. When you click the Search button, Google Earth zooms into the location you entered.
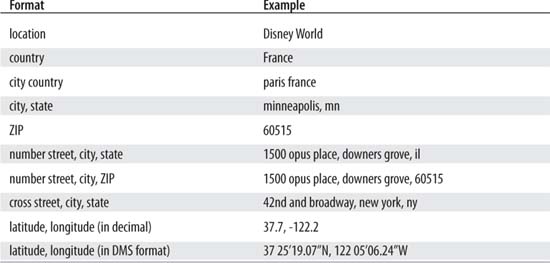
As with Google Maps, Google Earth lets you search using a variety of entry formats. Table 29.3 details the different ways to search for a location:
By the way, Google Earth also lets you search for businesses by using the Find Businesses tab in the Search pane. You can search within the current view, or within any city, state, or country you enter. Items that match your query are pinpointed in the view pane.
You can also use Google Earth to map driving directions, just as you can with Google Maps. The big difference in using Google Earth for this purpose is that your directions are mapped in a 3D view, so you can get more of a bird’s-eye view of where you’ll be driving.
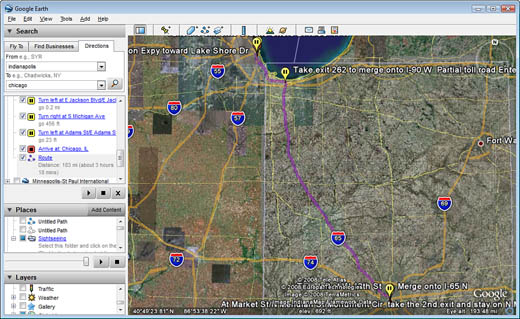
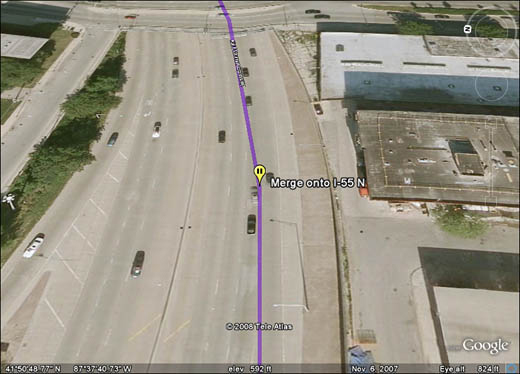
The easiest way to generate driving directions is to select the Directions tab in the Search pane, and then enter your starting (From) and ending (To) addresses. When you click the Search button, your route is mapped onscreen, with each turn placemarked on the map, as shown in Figure 29.15. You can zoom into, rotate, pan, and tilt the map as you like, as well as zoom into any specific direction by double-clicking that placemark. As you can see in Figure 29.16, zooming into a placemark like this gives you a very good idea of what you’ll encounter when you make your trip.
And here’s an even neater feature. Once you have your route displayed onscreen, you can use Google Earth’s tour feature to “fly” the complete route in the viewer. Just select the Route item at the end of the directions listing, click the Play button, and get ready for a wild ride!
To print step-by-step directions for your route, all you have to do is click the Printable View link in the directions listing. This will open a Google Maps web page in a new browser window, with the directions displayed in that window. From this window, click the Print link to print the directions.
To save your route for future use, select File, Save, Save Place As. Confirm or enter a new filename for your trip, and then click the Save button.
One of the things that makes Google Earth so useful is its capability to overlay other data on top of its maps. This data is added in the form of layers; available layers can be enabled via the Layers pane.
You’ve already seen several different types of layers in use. When you enabled the 3D buildings and terrain features, you added these layers to the underlying map. Disable the feature, and the layer is taken away.
There are many other kinds of layers you can add to most Google Earth maps, from roads and geographic features to dining, lodging, and other attractions. See for yourself what’s available—check an option to display that layer, and uncheck the option to hide it.
Many of the layers available in Google Earth contain what are known as places of interest (POI). These are specific locations overlaid on a map, such as ATMs, restaurants, gas stations, and the like.
Caution
Not all layers contain information for all locales. For example, you won’t find 3D building data for the middle of the Nevada desert.
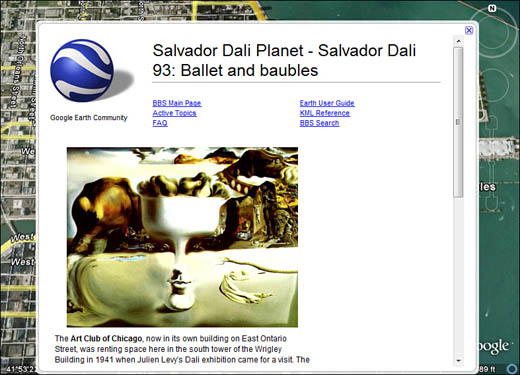
When you click a POI, Google Earth displays an information box for that item, like the one shown in Figure 29.17. Within this info box is information about this location, as well as links to additional information.
Right-click a POI, and you get a pop-up menu that lets you copy or save this location, as well as generate driving directions. Saving the POI puts it in your My Places folder in the Places pane, so you can return to it at any future time. Alternatively, you can copy the POI and then paste it into a specific subfolder in the My Places folder.
About that My Places folder.... This is a folder where you can store any item for future use. You can store pre-existing POIs, as we just discussed, or store custom placemarks that you create yourself.
To mark any place on any Google Earth map as a placemark, follow these steps:
-
Zoom into the location you want to placemark.
-
Click the Add Placemark button on the toolbar navigation panel (or select Add, Placemark).
-
A new, blank placemark is now placed on the map. If the placemark is not in the correct location, use your mouse to drag it around the map as necessary.
-
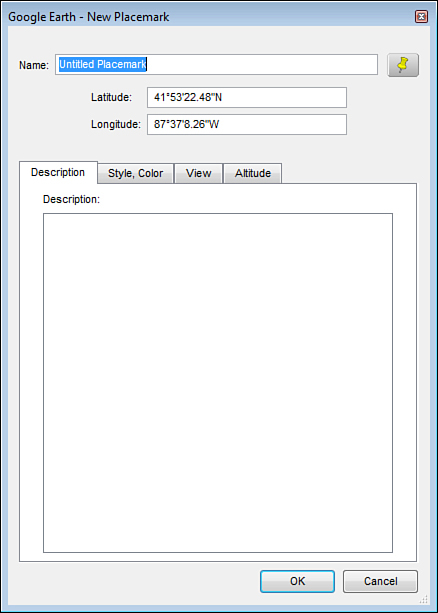
Also appearing at this time is a New Placemark dialog box, like the one shown in Figure 29.18. Enter a new name for the placemark, along with any descriptive text you’d like. You can also click the appropriate tabs to change the style or color of the placemark, as well as additional attributes. When you’re done making your selections, click the OK button.
The placemark is now set on the map, with the name you provided. The placemark is also stored in the My Places folder.
As if using Google Earth normally wasn’t cool enough, the program also includes a built-in flight simulator! That’s right, you can “fly” through Google Earth locations just as you would with a commercial flight simulator game.
To enter Google Earth’s Flight Simulator mode, select Tools, Enter Flight Simulator. This displays the Flight Simulator dialog box shown in Figure 29.19. You can select from two different aircraft, a high-tech F16 fighter jet or an SR22 prop plane. You can also select your starting position, and whether you’re using a joystick or not. Make your selections and then click the Start button.

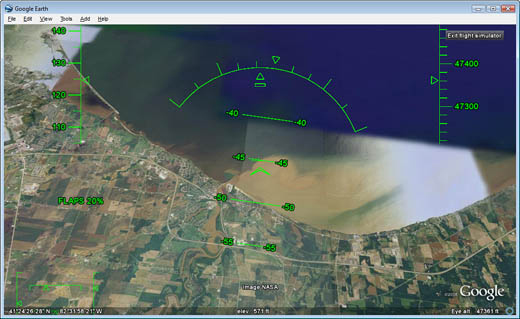
This launches you on your flight, as shown in Figure 29.20. The best way to control your plane is with a joystick, but you can also use your computer keyboard. Good flying!
And here’s something else new and cool about Google Earth—it doesn’t just show you the Earth, it also shows you the sky! That’s right, Google Earth now includes Google Sky, a collection of stellar maps and pictures as seen by the Hubble Space Telescope.
Tip
For a list of Flight Simulator keyboard commands and other instructions, go to earth.google.com/intl/en/userguide/v4/ug_flightsim.html.
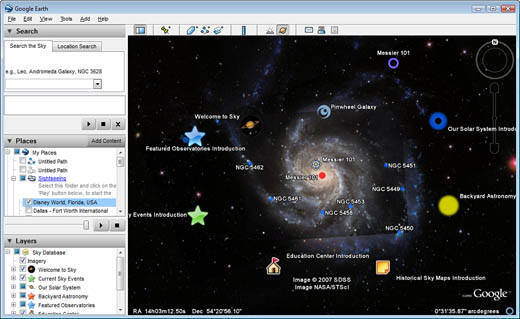
You enter Google Sky by clicking the Sky button on Google Earth’s toolbar or by selecting View, Switch to Sky. As you can see in Figure 29.21, you navigate Google Sky the same way you navigate Google Earth. Sky also has its own layers, and you can search for objects using the normal search box. Click on any interstellar object to learn more about it—or, if you’re well-versed in astronomical science, search for specific objects you want to view. Google Sky makes astronomy fun!
Tip
You can also access a web-based Google Maps version of Google Sky, available at www.google.com/sky.