At first blush, Gmail (mail.google.com) looks a lot like Hotmail and Yahoo! Mail. It’s free, it lets you send and receive email from any web browser, and the interface even looks similar to its competitors.
Note
If Google’s free storage isn’t big enough for you, you can purchase additional storage, starting at 10GB for $20/year and going up to 400GB for $500/year.
Despite the visual similarities, Gmail offers a few unique features that set it apart from the Web-based email crowd. First, Gmail doesn’t use folders. That’s right, with Gmail you can’t organize your mail into folders, as you can with the other services. Instead, Gmail pushes the search paradigm as the way to find the messages you want. This isn’t a surprise, given Google’s search-centric business model. It does take a bit of getting used to, however, especially if you’re a highly organized type. This may be one instance where Google’s reliance on search technology might not be totally practical for the application at hand.
However, Gmail lets you “tag” each message with one or more labels. This has the effect of creating virtual folders, because you can search and sort your messages by any of their labels.
In addition, Gmail groups related email messages in what Google calls conversations. A conversation might be an initial message and all the replies (and replies to replies) to that message. A conversation might also be all the daily emails from a single source that have a common subject, such as messages from subscribed-to mailing lists.
Like all of Google’s Web-based services, Gmail is free; all you have to do is sign up for an account. If you already have an account for any other Google service, that account can serve as your Gmail account. When you sign up for your Gmail account, you get assigned an email address (in the form of name@gmail.com), and you get access to the Gmail inbox page. As of August 2008, Gmail offered 6GB of storage for users.
Commentary
Gmail is a free service; all you have to do is sign up for an account.
Tip
If you’re moving your email from another account to Gmail, check out Google’s Switching to Gmail feature. This lets you import your contact list into Google contacts and announce your new email address to your contacts.
If you already have a Google account, it serves as your Gmail account. When you go to the main Gmail page, just enter your Google account username and password, and you’re ready to go.
If you don’t yet have a Google account, you can sign up for a new Gmail account. Go to the main Gmail page, and click the Sign Up for Gmail link. You’re prompted to enter your name, desired login name, desired password, and a security question. After that, click the Create My Account button.
That’s all there is to it!
After you sign up for your Gmail account, you get assigned an email address (in the form of name@gmail.com), and you get access to the Gmail inbox page, shown in Figure 14.1.
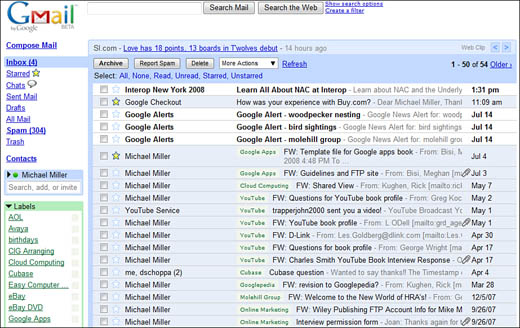
The default view of the Gmail page is the inbox, which contains all your received messages. You can switch to other views by clicking the appropriate links on the left side, top, or bottom of the page. For example, to view all your sent mail, simply click the Sent Mail link on the left; to view only unread messages, click the Unread link at the top or bottom.
Each message is listed with the message’s sender, the message’s subject, a snippet from the message itself, and the date or time the message was sent. (The snippet typically is the first line of the message text.) Unread messages are listed in bold; after a message has been read, it’s displayed in normal, nonbold text with a shaded background. And if you’ve assigned a label to a message (more on this later), the label appears before the message subject.
To perform an action on a message or group of messages, put a check mark by the message(s), and then click one of the buttons at the top or bottom of the list. Alternatively, you can pull down the More Actions list and select another action to perform.
Obviously, the Gmail interface is fairly easy to understand. (If Google does nothing else, it creates simple, easy-to-understand interfaces.) Now let’s get down to brass tacks, and learn how to use Gmail for basic message sending and receiving.
To read a message, all you have to do is click the message title in the inbox. This displays the full text of the message on a new page, as shown in Figure 14.2.
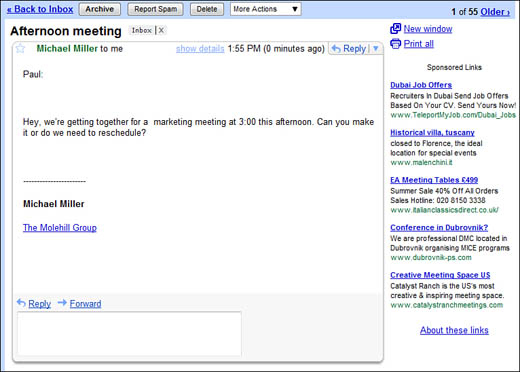
If you want to display this message in a new window, click the New Window link. To print the message, click the Print All link. To return to the inbox, click the Back to Inbox link.
One of the unique things about Gmail is that all related email messages are grouped in what Google calls conversations. A conversation might be an initial message and all its replies (and replies to replies). A conversation might also be all the daily emails from a single source with a common subject, such as messages you receive from subscribed-to mailing lists.
A conversation is noted in the inbox list by a number in parentheses after the sender name(s). If a conversation has replies from more than one person, more than one name is listed.
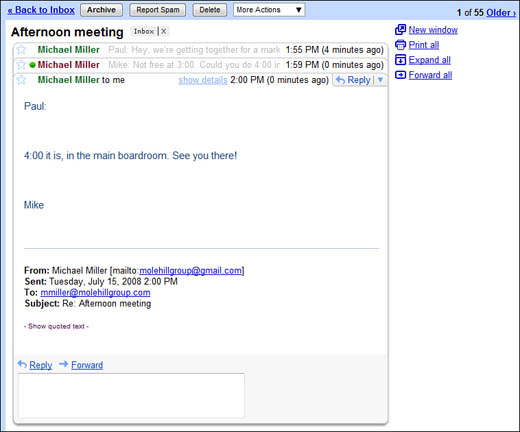
To view a conversation, simply click the message title; as you can see in Figure 14.3, only the most recent message is displayed in full. To view the text of any individual message in a conversation, click that message’s subject. To expand all the messages in a conversation, click the Expand All link. All the messages in the conversation are stacked on top of each other, with the text of the newest message fully displayed.
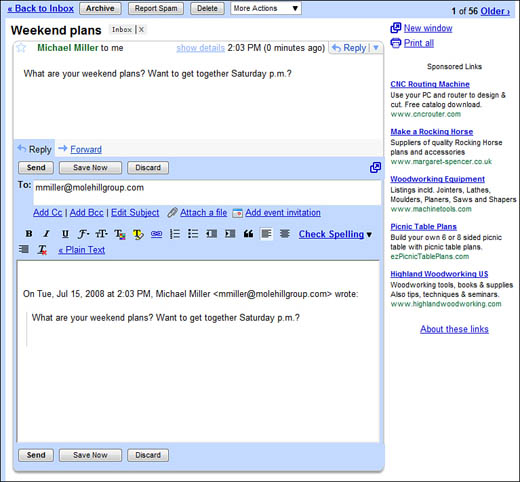
Whether you’re reading a single message or a conversation, it’s easy enough to send a reply. All you have to do is follow these steps:
-
In the original message, click the Reply button. This expands the message to include a reply box, like the one shown in Figure 14.4.
-
The text of the original message is already quoted in the reply; add your new text above the original text.
-
The original sender’s address is automatically added to the To: line, so click the Send button to send the message on its way.
Sometimes you might want to forward a message to a third party, instead of simply replying to the original sender. You do this by following these steps:
-
In the original message, click the down arrow next to the Reply button, and select Forward. This expands the message to include a forward box, like the reply box just discussed.
-
Add the recipient’s email address to the To: box.
-
Enter your message into the main message box.
-
Click the Send button to send the message on its way.
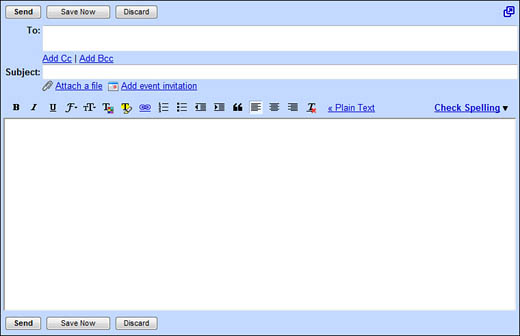
Creating a message from scratch isn’t a whole lot harder than replying to an existing message. All you have to do is follow these steps:
-
Click the Compose Mail link at the top of any Gmail page.
-
When the Compose Mail page appears, as shown in Figure 14.5, enter the recipient’s email address in the To: box. Separate multiple recipients with commas.
-
Enter a subject for the message into the Subject box.
Tip
You can cc (carbon copy) and bcc (blind carbon copy) additional recipients by clicking the Add Cc and Add Bcc links. This expands the message to include Cc or Bcc boxes, into which you enter the recipients’ addresses. (A bcc sends the message to the intended recipients but hides their addresses from the main recipients; a cc displays the recipients’ addresses.)
-
Enter the text of your message in the large text box. Use the formatting controls (bold, italic, font, and so forth) to enhance your message as desired.
-
When you’re done composing your message, click the Send button.
One of the key features of Gmail is its capability to store large amounts of data. You can use this feature to email files to yourself for backup purposes; of course, you can also email files to other users, as you like.
Tip
Gmail provides spell checking for all your outgoing messages. Just click the Check Spelling link and misspelled words are highlighted in yellow. You can then accept or reject the suggested spelling changes throughout your document.
To attach a file to a Gmail message, follow these steps:
-
Compose a new message, as discussed previously.
-
From the new message page, click the Attach a File link.
-
When the Choose File dialog box appears, navigate to and select the file you want to attach, and then click the Open button.
Caution
Although you can send Word documents, Excel spreadsheets, MP3 music files, JPG picture files, and the like, Gmail won’t let you send any executable program files. (These are files that have an EXE extension.) You can’t even send EXE files when they’re compressed into ZIP files. Gmail blocks the transmittal of all EXE files, in an attempt to prevent potential computer viruses.
The file you selected appears under the Subject box on the new message page. To attach another file to this same message, click the Attach Another File link; otherwise, continue composing and sending your message as normal.
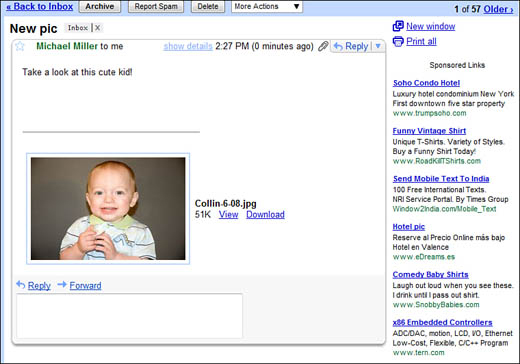
What do you do if someone sends you a file attached to an email message? First, make sure that you’re expecting the attachment, and that it’s not a virus tagging along for the ride. If you’re confident that it’s a legitimate attachment from someone you know and trust, you can opt to either view the attachment (ideal for photos) or save the attachment to your hard drive.
When you receive a message with an attachment, you see a paper clip icon next to the message subject/snippet. To view or save an attachment, follow these steps:
-
Click the message to open it.
-
If the attachment is an image file, the photo appears in the opened message, as shown in Figure 14.6. To view other types of files, or to view a photo in a separate window, click the View link.
-
To save the file to your hard disk, click the Download link. When the File Download dialog box appears, click the Save button, select a location for the file, and then click the second Save button.
There are two ways to delete messages in Gmail:
-
From the inbox page, check the message, and then click the Delete button.
-
From any open message, click the Delete button.
Either of these approaches moves the selected message to the Trash bin. Messages stay in the Trash bin for 30 days; after that, they’re permanently deleted.
As noted previously, Gmail organization is based on Google’s popular search paradigm. That is, to find a specific message in your crowded inbox, you have to search for it.
Tip
You can view the messages in the Trash bin by clicking the Trash link. You can then undelete any message by checking it and then clicking the Move to Inbox button.
For most users, Gmail’s basic search feature quickly and easily finds the messages you’re looking for. All you have to do is follow these steps:
-
Enter one or more keywords into the search box at the top of any Gmail page.
-
Click the Search Mail button.
Caution
Unlike Google’s Web search, Gmail search doesn’t offer automatic stemming, which means that it doesn’t recognize matches to partial strings, plurals, misspellings, and the like. If you search for dog, Gmail doesn’t recognize dogs, dogged, or doggy.
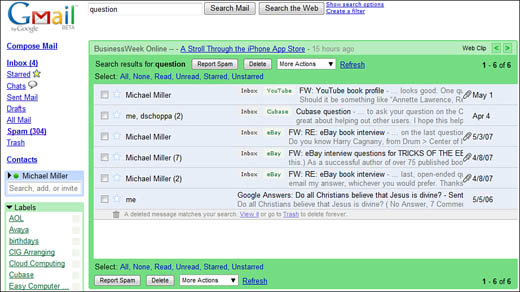
Gmail returns a search results page, like the one shown in Figure 14.7. This page lists messages in which the queried keywords appear anywhere in the message—in the subject line, in the message text, or in the sender or recipient lists. Click a message to read it.
The more messages in your inbox, the more you need to fine-tune your mail searches. Fortunately, Gmail makes this easy with a simple checkbox interface. When you click the Show Search Options link (beside the search box), the top of the Gmail page expands, as shown in Figure 14.8. From here, you can search according to the parameters listed in Table 14.1.

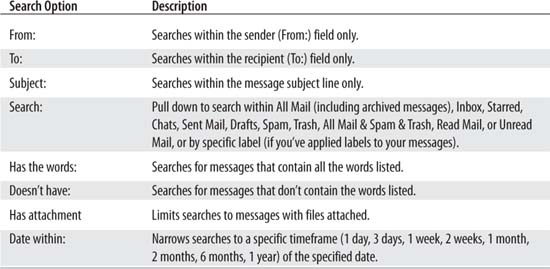
Just enter your keywords into the box(es) next to the criteria you want, and then click the Search Mail button.
If you prefer to do your searching from the search box only, Gmail offers a slew of advanced search operators you can employ. These operators work just like the regular search operators we discussed in Chapter 6, “Getting the Most Out of Google Search,” except that they’re specialized for the task of email searching.
Table 14.2 details the available Gmail search operators.
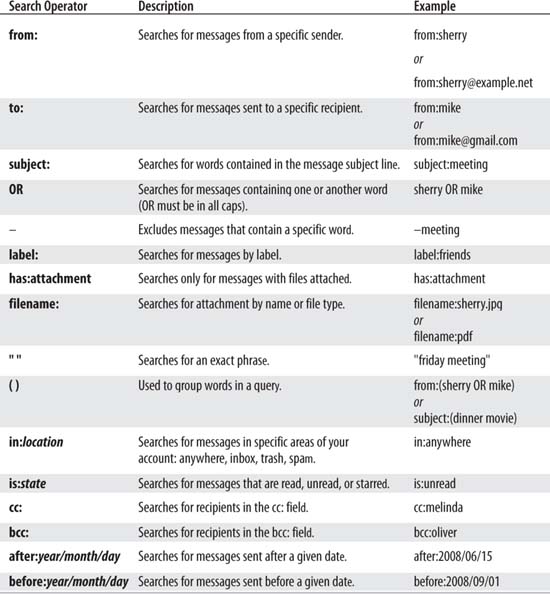
Obviously, you can combine any or all of these operators. For example, to search within a certain date range, combine the after: and before: operators, like this: after:2008/06/15 before:2008/09/01. To search for unread messages from a certain person, enter this query: from:gary is:unread. And so on.
If searching doesn’t get the complete job done for you, Gmail offers a few other ways to organize your messages—short of offering folders, of course. Still, every little bit helps.
If you find a message that you think is more important than other messages, you can “star” that messages. In effect, Gmail “starring” is the same as the “flagging” feature you find in competing email services and programs.
To star a message, just click the empty star next to the message in your inbox. After it is clicked, the star appears in solid colors (a nice shade of gold with a blue border).
The advantage of starring messages is that Gmail lets you display only starred messages, if you like. Just click the Starred link to the left of the message window, and just the starred messages are listed.
Another way to organize your Gmail messages is to assign each message a label, which is akin to attaching metadata to a photo or music file. In Google, this system is supposed to be equivalent to (and superior to) folders, although I’m not so sure. Still, as I said before, every little bit helps.
You can assign one or more labels to every message in your inbox. After they are labeled, you can recall all messages that share a given label—which is kind of like opening a folder.
To assign a label to a message, follow these steps:
-
In the inbox, check the messages that you want to share the same label.
-
Pull down the More Actions list and select New Label. (Or, if you’ve already created a label, select this label from the pull-down list.)
-
If prompted (via a separate dialog box), enter the label you want to apply to the selected message(s).
To apply another label to the same message(s), just repeat this procedure. After the messages are labeled, the label appears before the message’s subject line.
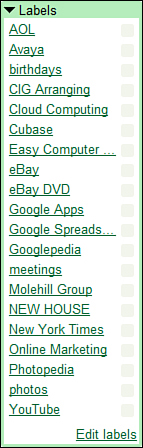
Each of your labels also appears in the Labels box, at the bottom left of the inbox window, as shown in Figure 14.9. To view all messages with the same label, just click the label name in the Labels box; Gmail displays all the messages labeled as such. (You can also use the label: operator in the search box to search for messages with a specific label.)
If you’re a busy little emailer, chances are your inbox will get very large very quickly. This is particularly so with Gmail, because you can’t offload messages from the inbox into folders.
Tip
To edit or delete a label, click the Edit Labels link in the Labels box, and then click either the Rename Label or Remove Label link.
When your inbox becomes too cluttered with messages, Gmail lets you archive older messages. When you archive a message, it moves out of the inbox into a larger store called All Mail. Because all your Gmail searches search the All Mail messages, one strategy is to archive all messages after you’ve read them, thus freeing the inbox for only your most recent messages.
Tip
Given Gmail’s 6GB storage capacity, Google recommends archiving old messages rather than deleting them—just in case you ever need them. It’s kind of a pack-rat approach to email management, but that’s what happens when storage is virtually unlimited and search tools are fairly effective.
To archive one or more messages, follow these steps:
Tip
You can return archived messages to the inbox by clicking the All Mail link, checking the message(s) you want to move, and then clicking the Move to Inbox button.
That’s it; the messages you marked are removed from the inbox, but they remain accessible from the All Mail link or whenever you perform a Gmail search.
Here’s another way to organize your messages—specifically, to manage what happens to them when they arrive in your inbox. Gmail lets you create up to 20 filters that identify certain types of incoming messages and then handle them in a specified manner.
For example, you might want to create a filter that applies a label to all messages with certain words in the subject line. Or maybe star all messages that come from a particular person. Or forward all messages from one sender to another recipient. Or just automatically delete all messages from a particular sender, or on a particular subject.
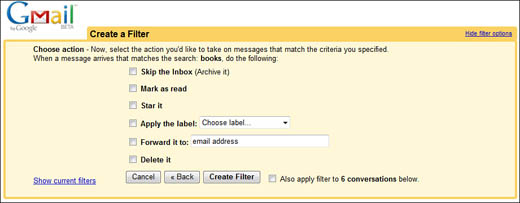
Gmail lets you choose from five different actions for your filters:
Here’s how you create a filter:
-
From the Gmail inbox, click the Create a Filter link (beside the search box).
-
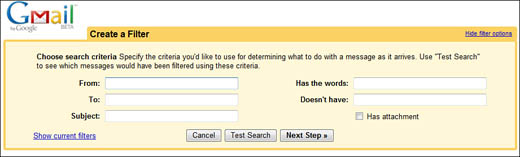
The Create a Filter section, shown in Figure 14.10, appears at the top of the inbox page. Enter the search criteria to identify which messages you want the filter applied to, and then click the Next Step button.
-
When the next page appears, as shown in Figure 14.11, select the action you want the filter to initiate.
-
Click the Create Filter button.
All future messages that match your search criteria (as well as matching messages already in your inbox) will have the specified action performed on them.
Google, like any responsible email provider, offers several features designed to reduce the amount of unwanted spam messages you receive in your inbox, as well as reduce the risk of computer virus infection. These features are applied automatically, but it’s nice to know how they work.
Google applies a variety of internal spam filters to identify spam as it enters the Gmail system, and thus block it from appearing in users’ inboxes. In most cases, you never see the spam; Google blocks it before it ever gets to you.
Sometimes spam makes it past Google’s main filter but then is caught on the receiving end. When this happens, the spam message appears in the Spam section of your inbox. You can view purported spam messages by clicking the Spam link.
If Google happens to route a legitimate message to your Spam list (it happens sometimes), just check the message and click the Not Spam button. This moves the message out of the Spam list and back into your general inbox.
If you inadvertently receive a spam message in your Gmail inbox, you can help train Google’s spam filters by reporting it. You do this by checking the message in your inbox and then clicking the Report Spam button. This action both removes the spam message from your inbox and sends information about the message back to Google.
Gmail also takes steps to protect you from email-borne computer viruses. These viruses typically come as file attachments, even more typically as EXE files attached to email messages.
To that end, Gmail automatically blocks the sending and receiving of all EXE files. It’s a fairly draconian approach; there’s no way around the system to send a legitimate EXE file, so don’t bother trying.
Google also scans all the attached files you send and receive via Gmail, no matter what the file extension. If a virus is found in an attachment, Gmail tries to clean the file (remove the virus); if the virus can’t be removed, you can’t download or send the file.
Every email program or service offers some sort of address book, a list of your most-frequent contacts. Gmail is no exception; its Contacts list lets you store contact information (including but not limited to email addresses) for thousands of people.
It’s easy to add a new person to your Gmail contact list. Just follow these steps:
-
Click the Contacts link on the left side of any Gmail page.
-
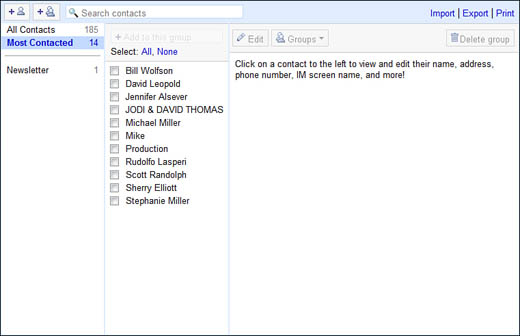
When the Contacts page appears, as shown in Figure 14.12, click the New Contact button—the one with the single person next to the +.
-
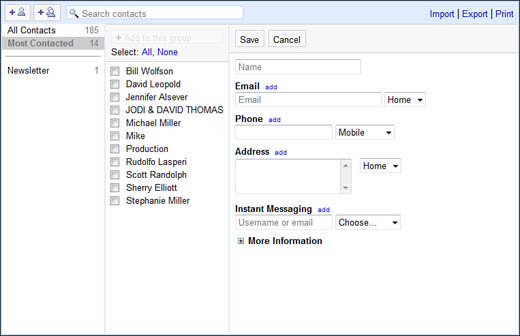
A new panel appears on the Contacts page, as shown in Figure 14.13. Enter the person’s name email address, phone number, and street address into the appropriate blanks.
-
To enter any additional information about this person—title, company, and notes—click the More Information link and proceed as necessary.
-
Click the Save button to create the contact.
If you already have a lot of contacts entered in another email program or service, such as Microsoft Outlook or Hotmail (and you probably do), you can import those contacts into your Gmail Contacts list. All you have to do is export your contacts from the other program or service into a CSV-format file and then import that file into Gmail.
For example, if you’re using Microsoft Outlook as your primary email program, you start by selecting File, Import and Export (within Outlook). Then you use Outlook’s Import and Export Wizard to export your contacts into a comma-separated values (CSV) file.
Tip
You can also add a sender’s email address to your Contacts list whenever you receive a new email message. All you have to do is click the down arrow next to the Reply button and select Add Sender to Contacts List.
After the CSV file is created, you follow these steps to import the contacts into Gmail:
-
From the Gmail inbox, click the Contacts link.
-
When the Contacts page appears, click the Import link.
-
When the Import Contacts dialog box appears, click the Browse button to locate the file you want to import.
-
After you’ve selected the file, click the Import button and proceed as directed.
Your contacts should now appear in Gmail’s Contacts list.
When you click the Contacts link on Gmail’s inbox page, you display the Contacts list. This list has three tabs:
-
Most Contacted displays only those contacts to whom you send the most messages.
-
All Contacts displays all your contacts, even those you never send email to.
-
Groups displays groups of contacts you create.
Click a tab to view the contacts within that tab.
If you have a ton of contacts in your Contacts list, you may need to search for the ones you want to use. To search for a particular contact, go to the Contacts list, enter the name of that contact into the search box, and then press the Enter key. You can search by a person’s first name, last name, or both; you can also search by domain or email address.
Most email programs let you create mailing lists that contain multiple email addresses, which makes it easier to send bulk mailings to groups of people. Gmail also offers a mailing list-like feature, which it calls contact groups. When you want to send a message to all members of a group, you have to select only the group name—not every contact individually.
To create a contact group, follow these steps:
-
From the Gmail inbox page, click the Contacts link.
-
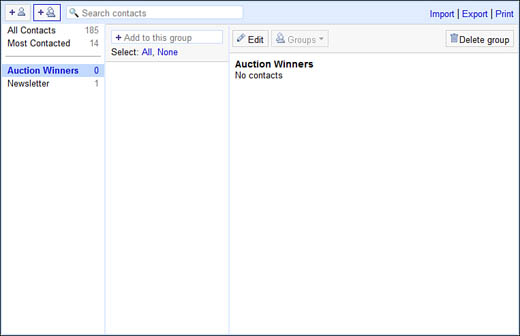
When the Contacts page appears, click the Add Groups button—the one with the two people next to the +.
-
A pop-up window appears, prompting you for the name of the group. Enter the group name and click the OK button.
-
The Contacts page is updated with the new group. Select the group name. The Contacts page changes to show the contacts in this group—currently blank, as you can see in Figure 14.14.
-
Enter the contacts you want included in this group into the Add to This Group box; use commas to separate names.
The whole point of creating contacts and contact groups is to make it easier to send email messages—without having to remember all those email addresses every time. It’s easy to do.
Tip
You can also add contacts to a group from either the Most Contacted or All Contacts tab. Just check the contacts you want to add, click the Groups button, and then select the name of the contact group.
All you have to do is enter the name of a contact group into the To: field when you compose a new message in the normal fashion. When you enter the group name, it’s automatically replaced by the email addresses of all the individual contacts in that group.
Here’s another neat thing about Gmail. Google lets you send your Gmail messages to any POP email program, forward your messages to another email account, and even read email from other accounts in your Gmail window. All these options make it easy to use Gmail in conjunction with Outlook, Outlook Express, Windows Mail, and similar email programs.
Note
POP is short for Post Office Protocol, a technology used to send and receive email from standalone email programs (such as Microsoft Outlook) via web-based email servers.
You can use Gmail to fetch messages from any POP email account. This lets you access your POP email when you’re on the road—or just use the single Gmail interface for all your email management.
Note
You can’t use Gmail to fetch other Web-based email—which means that you can’t integrate Gmail with Hotmail or Yahoo! Mail.
To set up Gmail to work with a POP email account, follow these steps:
-
Click the Settings link (at the top of any Gmail page).
-
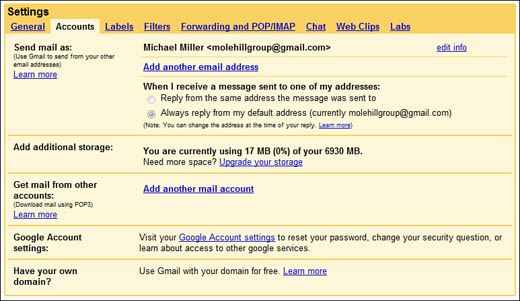
When the Settings page appears, select the Accounts tab, shown in Figure 14.15.
-
In the Get Mail from Other Accounts section, click the Add Another Mail Account link.
-
When the Add a Mail Account window appears, enter the email address you want to add, and then click the Next Step button.
-
When the next screen appears, enter that account’s username, password, and POP server.
-
If you want to leave copies of all messages on the other email server (so that you can also retrieve these messages with your normal email program), check the Leave a Copy of Retrieved Messages on the Server option.
-
To apply a Gmail label to all messages from this account, check the Label Incoming Messages option, and then select a label from the pull-down list.
-
Click the Add Account button.
As soon as this account is set up, Gmail checks it on a regular basis, and new messages appear in your Gmail inbox.
Just as you can check POP email from within Gmail, you can check Gmail from within your POP email program—any program, including Microsoft Outlook, Outlook Express, Windows Mail, Eudora, or Mozilla Thunderbird.
Tip
Because programs like Outlook allow you to put email into folders, this is one way around the lack of support for folders in Gmail. However, keep in mind that any messages moved from your Gmail account into a folder in a separate email client are inaccessible if you access Gmail via the Web.
To do this, you have to enable POP email for your Gmail account. Follow these steps:
-
Click the Settings link (at the top of any Gmail page).
-
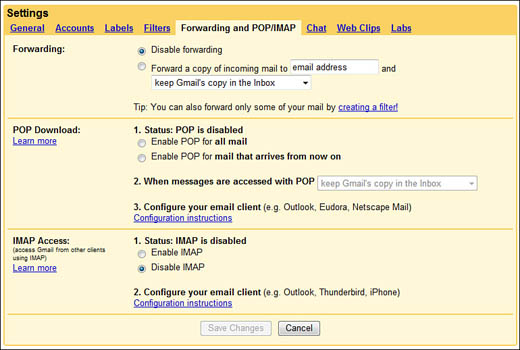
When the Settings page appears, select the Forwarding and POP/IMAP tab, shown in Figure 14.16.
-
In the POP Download section of this page, check the Enable POP for All Mail option.
-
Pull down the When Messages Are Accessed with POP list. Select either Keep Gmail’s Copy in the Inbox (so that all messages are still accessible from Gmail over the Web), Archive Gmail’s Copy (so that all messages are also sent to Gmail’s All Mail list), or Delete Gmail’s copy (so that messages do not appear on the Gmail website).
-
Click the Save Changes button.
-
Open your POP email program and create a new account for your Gmail messages. When prompted, enter pop.gmail.com as the incoming mail server and smtp.gmail.com as the outgoing (or SMTP) mail server.
Tip
If your email client or portable device (such as an Apple iPhone) supports the IMAP protocol, you should use that instead of POP to facilitate two-way email synchronization. Check the Enable IMAP option and then configure your client per Google’s instructions.
From now on, you should be able to retrieve your Gmail messages from your existing POP email program.
You can also forward your Gmail messages to another of your email accounts. This is different from reading your messages in another program, in that copies of your messages are sent to your other email address. You then retrieve these copies of your Gmail messages whenever you check the mail in your other account.
To set up Gmail forwarding, follow these steps:
-
Click the Settings link (at the top of any Gmail page).
-
When the Settings page appears, select the Forwarding and POP/IMAP tab.
-
In the Forwarding section of this page, check the Forward a Copy of Incoming Mail To option.
-
Enter the address of your other email account into the email address box.
-
From the pull-down list, select how you want to handle the original Gmail messages—Keep Gmail’s Copy in the Inbox, Archive Gmail’s Copy, or Delete Gmail’s copy.
-
Click the Save Changes button.
The options discussed in this section and the preceding one are great for when you’re on vacation. You can forward your Gmail to whichever account you read when you’re away from home, or simply use your other email program to read your Gmail messages at your leisure.
Speaking of vacation, Gmail also has a dedicated vacation mode. When you activate vacation mode, anyone who sends you a message automatically gets a response that you’re on vacation.
Here’s how to activate Gmail’s vacation mode:
-
Click the Settings link (at the top of any Gmail page).
-
When the Settings page appears, select the General tab, and scroll down to the Vacation Responder section.
-
Check the Vacation Responder On option.
-
Enter a subject for the messages you want the responder to automatically send out, something along the lines of “I’m on vacation.”
-
Enter the text of your vacation message.
-
If you want only your contacts to receive this vacation message, check the Only Send a Response to People in My Contacts option.
-
Click the Save Changes button at the bottom of the page.
That’s it. With the vacation responder activated, anyone who sends you a message automatically receives your vacation message in reply. When you return from vacation, return to the Settings page and check the Vacation Responder Off option.
If you want to add a personalized signature to the bottom of all your email messages, you don’t have to manually enter that signature every time you send a message. Instead, you can configure Gmail to automatically add the signature. Just follow these steps:
-
Click the Settings link (at the top of any Gmail page).
-
When the Settings page appears, select the General tab.
-
Scroll down to the Signature section, and check the second option (the one below No Signature).
-
Enter your signature into the large text box.
-
Click the Save Changes button.
If you prefer not to include a signature, check the No Signature option.
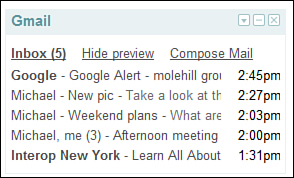
Finally, if you’re a user of Google’s iGoogle personalized home page, you can check your Google inbox directly from iGoogle. As you can see in Figure 14.17, iGoogle includes a Gmail content module that displays the five most recent messages in your inbox, with unread messages in bold. Click the Inbox link to go to the Gmail inbox page, or click the Compose Mail link to create a new Gmail message.