As I just mentioned, Picasa isn’t like Google’s Web-based applications; it’s a software program that you download (for free) from picasa.google.com. The program is actually quite small, so the download isn’t time-consuming at all. Just click the download link (Try Picasa Now), and you’ll be ready to go in no time.
Note
This chapter is based on Picasa version 2.7. As this book was going to press, Google announced the beta release of Picasa version 3, which might be available for general release by the time you read this. New features include a Retouch tool for touching up blemishes and the like, a movie editor, a computer screen-capture utility, watermarks, and improved file management.
The first time you launch the program, Picasa scans your computer for picture files. You can have Picasa scan your entire hard disk, or only the files in your My Documents, My Pictures, and Desktop folders. Obviously, it takes less time to scan these selected folders than it does to scan your entire hard disk; if you’re well organized, select this second option. (If not, well, you might as well have Picasa search everywhere for files you might have haphazardly stored.)
Note
Picasa is available only for computers running Windows 2000, XP, or Vista. Picasa does not run on older versions of Windows or on Apple Macintosh computers—although a Linux version is being tested in Google Labs.
The picture files that Picasa finds are used to create an index within the Picasa program. This picture index is used to organize your photos into visual albums. Most users find that it’s easier to locate pictures from within Picasa’s albums than it is to use the My Pictures or Pictures folder in Windows.
The balance of this chapter is devoted to showing you how to use Picasa to organize and edit your photos. Picasa has so many features that one could write an entire book about it (is my editor reading this?). Page count constraints force me to limit coverage to common tasks that the typical user is likely to perform.
By default, Picasa shows all photos in its picture library, as shown in Figure 25.1. The individual folders in your library are displayed in the left folders pane; the photos within the selected folder are displayed in the main window. You can also use the scroll bars to scroll up and down through all the photos in Picasa’s index.
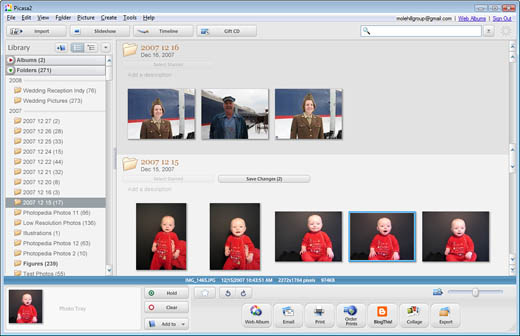
When you select a photo, it’s surrounded by a blue border and displayed as a thumbnail in the Photo Tray at the bottom left of the screen. You can select more than one picture at a time; the thumbnails are then resized to all fit within the Photo Tray.
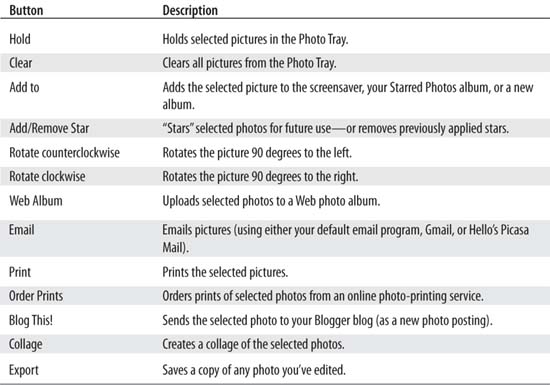
Also along the bottom of the screen are various function buttons. They are described in Table 25.1.
Just above all the function buttons, at the bottom right of the main display, is a zoom slider control. You use this slider to adjust the size of the photos that appear in the main display.
At the top of the Picasa window are four buttons and a search box. The buttons let you import new photos, display the pictures in the selected folder as a slide show, display your photos in an innovative timeline view, or burn selected photos to a “gift” CD. The search box lets you search your hard disk for photos that match specific criteria.
One of the neat things about Picasa is how easy it is to reorganize your photos. You can easily move photos from one folder to another or rename your photos, all from Picasa’s library view.
Picasa displays all your photos in their original folders, with the folders listed in the folder pane. To move a picture from one folder to another, simply drag it from the library window to a new folder in the folder pane. To move all the pictures in the folder to another folder, just drag and drop that folder in the folder pane.
It’s equally easy to rename a photo. Just select the picture you want to rename, and then select File, Rename. When the Rename Files dialog box appears, enter a new name for the file, and click the Rename button. (Alternatively, you can check the options to automatically include the picture’s date and/or image resolution in the filename.)
To rename a group of photos, select all the photos you want to rename, and then select File, Rename. This time when the Rename Files dialog box appears, enter the common name you want all the photos to share. When you click Rename, the photos are renamed accordingly, with each photo having a “–1,” “–2,” and so on appended to the common name.
If you’re like me, not every photo you take is a keeper. Some of my photos are too dark, some are too light, some have a bad color balance, some aren’t composed properly, some are shots of people with really bad red eye—you get the picture. (No pun intended.) The nice thing about taking photos digitally (as opposed to shooting on film) is that fixing bad pictures is a simple matter of moving around the appropriate digital bits and bytes—which is something that Picasa does with aplomb.
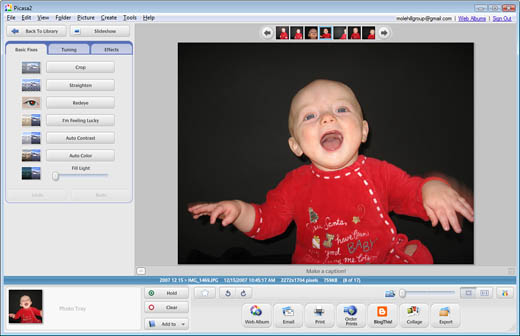
When you want to fix a picture, you start by double-clicking it in the photo library. This displays a large version of the photo in the main window, along with a new control pane on the left side of the window, as shown in Figure 25.2. The control pane has three different tabs: Basic Fixes, Tuning, and Effects. Each tab contains a variety of controls you can use to edit and manipulate the selected picture.
Read on to learn how to perform some of the more common fixes.
If you shoot a lot of photos indoors, chances are you’ll run across a few shots that are underlit—that is, the photos appear too dark. Conversely, shooting outdoors in bright sunlight can result in some photos being too light, or washed out. Fortunately, Picasa can fix both these problems.
Whether your picture is too dark or too light, you can use several different methods to fix the problem. The easiest method, and the first to try, is to select the Basic Fixes tab (shown in Figure 25.3) and click the Auto Contrast button. Nine times out of ten, this will do the trick.
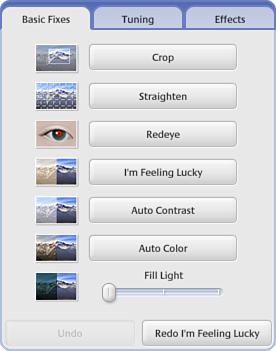
If using Auto Contrast doesn’t fix the problem, try adjusting the Fill Light slider (also on the Basic Fixes tab). Moving the slider to the right lightens the picture as if you shot it with additional fill light; moving the slider to the left removes the fill light and darkens the picture.
Tip
You can undo any change you make by clicking the Undo button in the control pane. Reapply the change by clicking the Redo button.
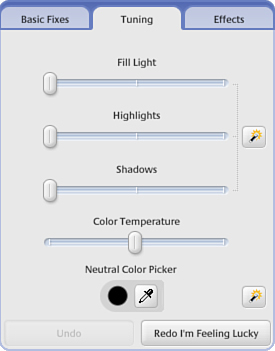
You can make additional adjustments from the Tuning tab, shown in Figure 25.4. From here you can (once again) adjust the Fill Light, as well as Highlights (lightens or darkens only the brightest areas of the picture) and Shadows (lightens or darkens only the darkest areas of the picture). (Color Temperature and Neutral Color Picker are discussed in the next section.)
Another problem with shooting indoors is that you don’t always get the right colors. Shooting under fluorescent lights can turn everything a little green, and shooting under too low a light can give everything a warmish orange cast.
To fix tint problems (when the entire picture looks the wrong color), go to the Basic Fixes tab and click the Auto Color button. If this doesn’t do the trick, go to the Tuning tab and adjust the Color Temperature control. Moving this slider to the left creates a “cooler” picture (more blue), and moving it to the right creates a “warmer” picture (more red).
You might also consider using the Neutral Color Picker on the Tuning tab. Click the eyedropper button, and then click an area in your picture that should be neutral white or black. This adjusts all the other colors to match.
If you need more control over the picture’s tint, go to the Effects tab, shown in Figure 25.5, and click Tint; this displays the Tint control. Click within the Pick Color box, and then move the cursor around the resulting color box until you find the proper tint. Click to confirm your choice.
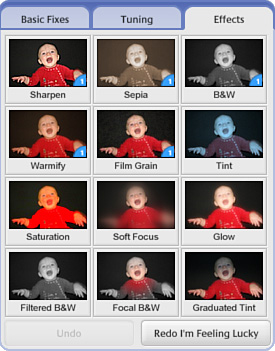
Finally, if a picture has too much (or too little) color, you need to adjust the photo’s color saturation. You do this from the Effects tab. Click the Saturation control, and then adjust the Amount slider to the left (to remove color from the picture) or to the right (to increase the amount of color).
When you shoot indoors with a flash, you sometimes get what is called the “red eye” effect. (You know this one; it’s when your subject looks like the red-eyed spawn of a devil.) Fortunately, Picasa makes removing red eye a snap. Here’s what you do:
-
Select the Basic Fixes tab.
-
Click the Redeye button.
-
When the Redeye Repair control appears, click and drag the mouse cursor over the first eye you want to fix. Picasa automatically removes the red from the selected eye.
-
Repeat Step 3 for the other eye you want to fix.
-
Click the Apply button to confirm the fix.
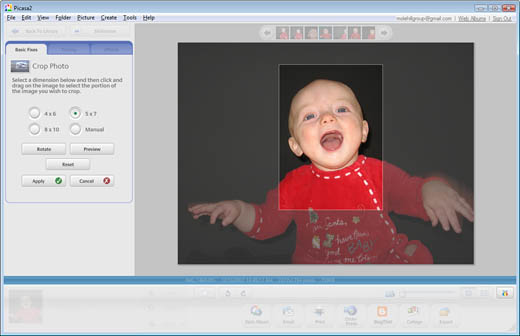
Sometimes, for whatever reason, you don’t properly compose a picture. Maybe your subject isn’t centered; maybe your subject is too far away. Whatever the case, you can crop the photo to put the subject front and center in the picture, using Picasa’s Crop control.
To crop a picture, follow these steps:
-
Select the Basic Fixes tab.
-
Click the Crop button.
-
When the Crop Photo control appears, as shown in Figure 25.6, select what size you want the resulting picture to be: 4×6, 5×7, 8×10, or a custom size (Manual). This fixes the dimensions of the crop area.
-
Click at the top left of the photo, where you want to crop, and keep holding down the mouse button.
-
Drag the cursor diagonally (down and to the right) until you have selected the area you want to remain in the final picture.
-
Release the mouse button.
-
Click the Apply button to confirm the crop.
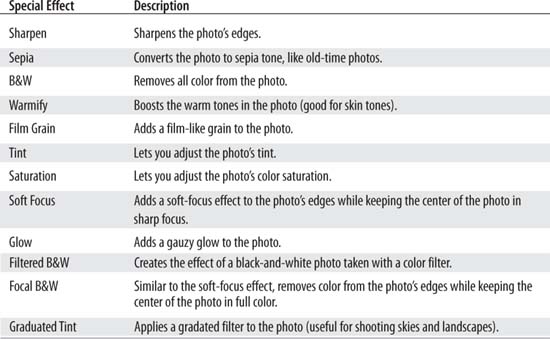
Picasa’s Effects tab not only lets you adjust tint and color saturation, but it also lets you apply a bevy of special effects to your photos. Table 25.2 details the available special effects.
After you’re done editing and adding special effects to your photos, it’s time to save your changes. Picasa always retains your original photo in its original state in case you want to return to it for different editing in the future. Your edited photo is exported (saved) under a new filename.
To save an edited photo, follow these steps:
-
Click the Export button.
-
When the Export to Folder dialog box appears, as shown in Figure 25.7, check the Use Original Size option.
-
Click the OK button.
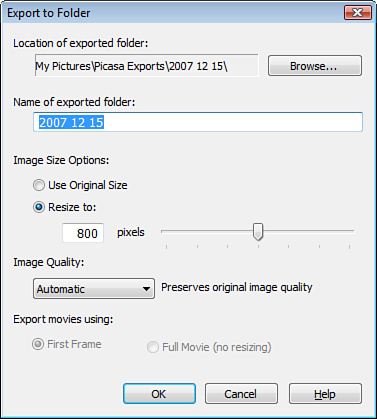
Picasa saves your edited picture in the My Pictures/Picasa Exports folder on your hard disk. Note that Picasa only saves files in the JPG format.
Here’s something else you can do from the Export to Folder dialog box—resize your photos to use on a web page.
If you have a high megapixel camera, and you’re shooting at the highest quality setting, you’re creating some very large photos, too large to fit comfortably on a web page. You don’t want photos any wider than 800 pixels on a web page—and probably a lot smaller than that. For this reason, you should resize your photos to make them small enough for Web use.
Picasa lets you resize any photo when you export it. All you have to do is check the Resize To option in the Export to Folder dialog box, and then adjust the slider to a new width (in pixels). You can also enter a custom width in the corresponding box. It’s that easy.
There are many ways to share your digital photos. You can make photo prints (either on your own printer or using a photo printing service), email the photos, or burn them onto a picture CD. Picasa lets you do all these tasks, quite easily.
To print one or more photos on your photo printer, follow these steps:
-
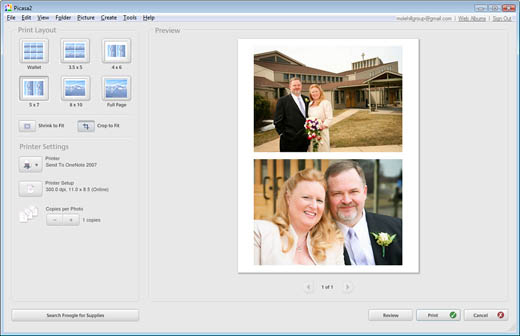
From the photo library, select the photo(s) you want to print.
-
Click the Print button.
-
The Picasa window changes to the one shown in Figure 25.8. Select the print size or layout you want. You can select from 12 wallet-sized prints, four 3.5×5 prints, two 4×6 prints, two 5×7 prints, one 8×10 print, or a full-page print.
-
Select whether you want the photo shrunk or cropped to fit the print area.
-
If the correct printer isn’t selected, click the Printer button and select a different printer.
-
If you need to configure your printer for printing, click the Printer Setup button and proceed from there.
-
Select how many copies you want to print.
-
Click the Print button.
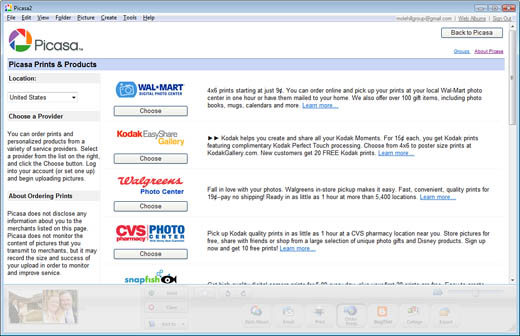
If you don’t have a photo printer, or you prefer more-professional prints, Picasa lets you send your photos to an online photo-printing service. Your photos are sent over the Internet to the print service; your prints are mailed to you when completed.
To send one or more photos to a print service, select the photo(s) in the photo library and then click the Order Prints button. When the Picasa window changes to the one shown in Figure 25.9, click the button for the service you want to use, and then follow the specific onscreen instructions from there.
These days, many people share their photos via email. To that end, Picasa lets you quickly and easily email photos to your friends and family. Just follow these steps:
-
In Picasa’s photo library, select the photo(s) you want to send.
-
Click the Email button.
-
When the Select Email dialog box appears, select which email service you want to use to send your photo(s).
Tip
If you like, you can have Picasa automatically resize photos you send via email to make for faster uploading/ downloading. All you have to do is Select Tools, Options from the main Picasa window; when you see the Options dialog box, select the E-Mail tab. In the Output Options section, use the slider to select an output size (anything less than 800 pixels wide is safe), and then check the xx Pixels, As Above option for the When Sending Single Pictures selection.
-
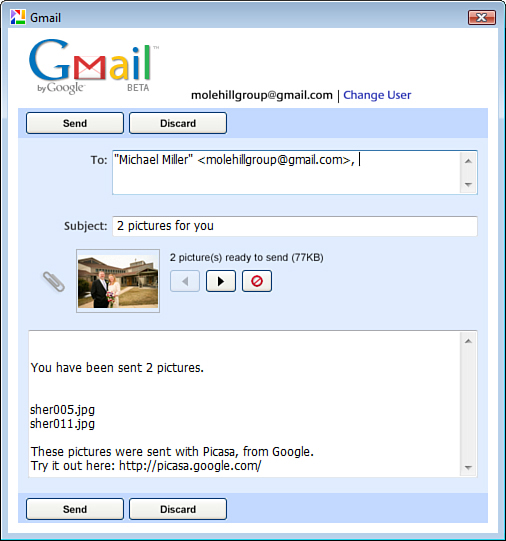
If you select Gmail, you see the Gmail dialog box, shown in Figure 25.10. (If you select another option, you see that application’s send email screen.) Enter the name of the recipient into the To: box, and then click the Send button.
Another way to share your photos with others is to burn and distribute a CD or DVD containing those photos. Picasa makes this a relatively painless process, all things considered. Just follow these steps:
-
In Picasa’s photo library, select the photos you want to burn to CD or DVD.
-
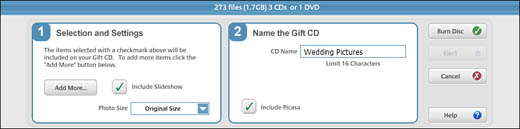
Click the Gift CD button (above the library window). The bottom of the window changes, as shown in Figure 25.11.
-
If you want to include an automatic slide show for your photos, check the Include Slideshow option.
-
To include the pictures at less than their original size, pull down the Photo Size list and select a new size.
-
Enter a name for the disc into the CD Name box.
-
If you want to include a copy of the Picasa program on the disc, check the Include Picasa option.
-
Insert a blank CD or DVD into your PC’s CD/DVD drive, and then click the Burn Disc button.
When you want to share your photos with lots of different people, the easiest way to do that is online, via a photo-sharing site. Google has its own photo-sharing site, tied into the Picasa application; this site is called Picasa Web Albums (picasaweb.google.com).
To post a photo or group of photos online, select those photos within Picasa, and then click the Web Album button. If this is your first time to use this feature, you’re prompted to sign in or create a new account. You can use your normal Google Account or create a separate account just for Picasa Web Albums.
Note
Picasa Web Albums replaces Google’s previous Web-based photo service, Hello, which is now defunct.
Tip
You can also upload pictures directly from the Picasa Web Albums website. Just click the Upload Photos button on the main page, and fill in the blanks from there.
Picasa connects to the Web Album website and displays the dialog box shown in Figure 25.12. You can add these photos to an existing album or create a new album. If you choose the latter option, give the album a title and description (optional). You should also choose an upload setting; in most instances, the Optimized setting works best. You should also select whether your album should be public (for all to see) or unlisted (viewable by invitation only). Click OK to upload the photos.

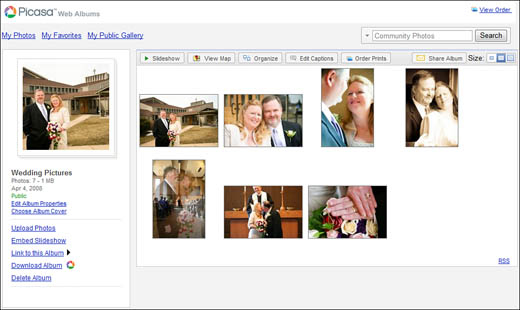
When the upload is complete, you see a Completed dialog box. To view your uploaded photos, click the View Online button. This opens a new web browser window with your photo album displayed, like the one shown in Figure 25.13. From here you can click any photo to view it larger. You can also order prints of any photo; just select the photo and click the Order Prints button.
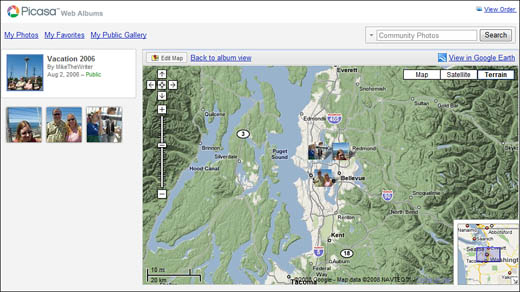
Picasa also lets you map your photos—that is, create a Google Maps mashup that pinpoints where each photo was taken. You do this after you use the Picasa program to upload your photos, from the Picasa Web Albums website. Just open a photo album and click the View Map button, and you’re prompted to enter a location for your photos. After you do so, the website displays a map page with all of that album’s photos thumbnailed on the left, as shown in Figure 25.14. To place a photo on the map, use the mouse to drag the thumbnail and drop it on a specific location. Click the Done button when you’re done mapping your photos. (Visitors can view your photos on a map by clicking the View Map button when they visit your album.)
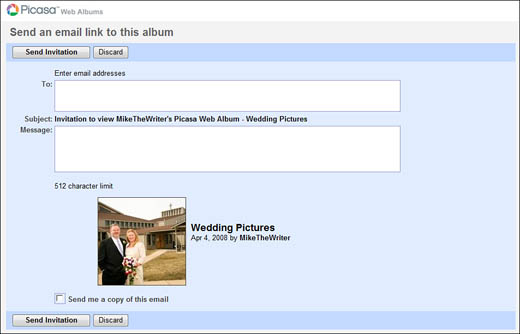
To share an album with friends and family, open the album and click the Share Album button. This displays the page shown in Figure 25.15. Enter the recipients’ email addresses, along with a personal message, and then click the Send Invitation button. The recipients receive an email inviting them to view the album, along with a link to the album.
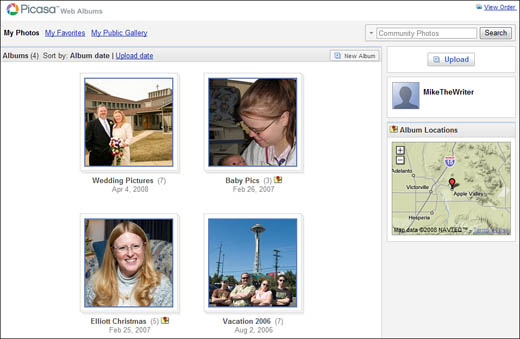
To return to all your online photo albums, go to picasaweb.google.com. After you sign in, you see a page like the one shown in Figure 25.16; click an album to view the photos in that album.
Google also offers a version of Picasa Web Albums for mobile phone users, which lets you view your stored photos on your Web-enabled cellular phone. Point your phone’s web browser to picasaweb.google.com/m/ and sign in, and you see your web albums displayed in a list, as shown in Figure 25.17. Click an album to view the photos within.