
Task 9.2: Reviewing the Audit Logs
Once you have completed the implementation of an audit policy, you must implement a standard monitoring routine. This is often a huge challenge. Audit logs are recorded in the Security log in Event Viewer and can record thousands of events each day, or even each hour. You may have many systems to monitor, and this easily becomes an overwhelming task. Many organizations acquire third-party software to retrieve, analyze, and report on audited events for a network environment. These software tools are essential in many cases, and can cost just a little—or a lot.
Securing your audit logs is a major concern as well. The employee agreement for all network administrators should include a requirement that every log must be saved to a specified archive location, and failure to properly save a log (like clearing the log without saving it) should be grounds for termination. Highly restrictive permissions should be placed on these log files to allow only a rare few, highly trusted administrators access to this content. In many industries, regulatory compliance laws require the secure retention of these logs for many years and may require proof that the log files have not been altered since they were generated. (Integrity validation is typically accomplished with the use of hashing algorithms, like MD5, SHA1, or SHA2.) You should know what these requirements are for your organization.
Scenario
You are an administrator in an Active Directory environment. You are concerned about actual and attempted access to a folder on a system that contains sensitive documents. You have implemented an Object Access audit policy to log these accesses, including Read, Modify, Create, and Delete access to the file and folder content for authenticated users.
You must now establish a routine to identify unauthorized access attempts to determine if and when this attack occurs.
Scope of Task
Duration
This task should take 30 minutes.
Setup
You implemented an audit policy on authenticated users that tracks Read, Modify, Create, and Delete access to the file and folder content in the STUFF folder.
The audited events are being written to the Security log in the Event Viewer application, on the server holding the sensitive content. Completion of Task 9.1 is required before beginning this exercise.
Caveat
Auditing can easily overwhelm a system, a network, and your administrators. Thousands of events can occur on a system every hour. The system can become so busy recording all the event details that resources available to service actual client requests become scarce. If you are using a collection and analysis application, these thousands of events—for numerous systems—must be sent over the network to the central database for storage and analysis. None of this activity does you any good unless a responsible human is involved to interpret the output, and react if necessary. The monitoring of event logs can consume most, if not all, of an administrator’s time.
Auditing should be configured only if you intend to regularly review the information that will be generated from the audit policy for the purposes of violation detection, and for identifying corrective actions that need to be implemented to further secure the sensitive content.
Procedure
For this task, you will create a new user in the domain. You will then configure permissions on the STUFF folder to deny access to the new user. You will create some content in the STUFF folder as the Administrator, who has sufficient permissions to create content.
Next you will log on to the system as the new user and attempt to access the STUFF folder. Of course, you should receive Access Denied errors. This should trigger Failed Access events in the Security log.
Finally, you will log on as the Administrator and open Event Viewer. You will see many events in the log. You will build a filter to view successful accesses, and another filter to view only failed accesses to the STUFF content.
Equipment Used
For this task, you must have:
- Windows Server 2003 domain controller system
- Windows XP Professional system, a member of the domain (the system that holds the sensitive data from Task 9.1)
- Domain Administrator access
- Completion of Task 9.1
Details
Creating a New User Account
1. Log on to the Windows Server 2003 domain controller system as the Domain Administrator.
2. Select Start ⇒ Programs ⇒ Administration Tools ⇒ Active Directory Users And Computers (ADUC).
3. In the left pane, expand the domain. Click on the container named Users.
4. In the left pane, right-click on the container named Users and select New ⇒ User.
5. Type the name BoBo2 in the First Name and User Logon Name fields. Click Next.
6. Enter the password Password1 in both the Password and Confirm Password fields. Clear the User Must Change Password At Next Logon check box and enable the Password Never Expires check box. Click Next.
7. Click Finish to confirm the creation of the new user BoBo2.
8. Log off the Windows Server 2003 domain controller system.
Configuring Permissions on the XP Professional System
1. Log on to the Windows XP Professional system as the Domain Administrator.
2. Launch Windows Explorer.
3. In the left pane, expand the folders as necessary to locate the folder named STUFF.
4. Select the STUFF folder.

In Task 9.1, you configured a folder named STUFF with an audit policy for Object Access, Success, and Failure.
5. Right-click on the STUFF folder and select Properties.
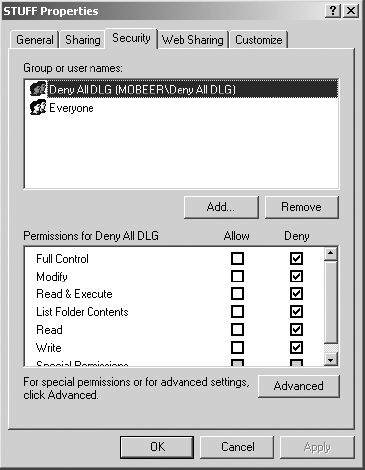
6. On the Security tab, click Add to configure deny permissions for BoBo2.
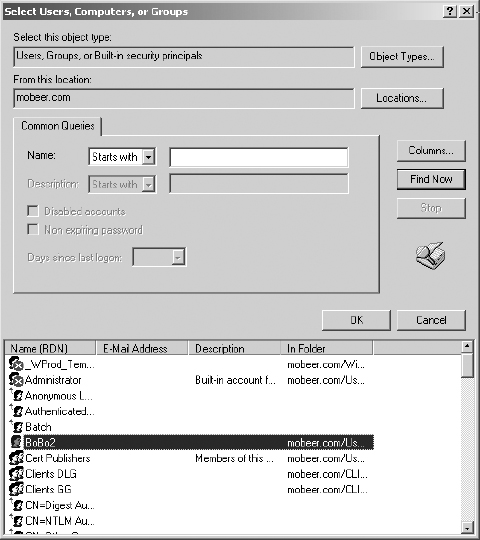
7. In the Select Users, Computers, Or Groups dialog box, click Advanced.
8. Click Find Now to display domain users, computers, and groups.
9. Select BoBo2 from the Name (FQDN) list. Click OK.
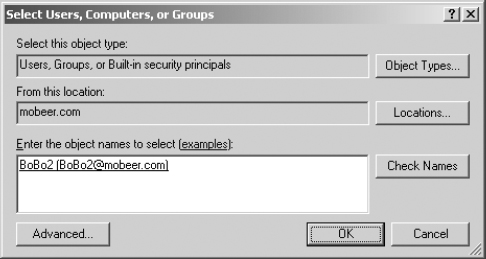
10. Click OK in the Select Users, Computers, Or Groups dialog box to add BoBo2 to the discretionary access control list (DACL) for the STUFF folder.
11. On the Security tab of the STUFF Properties dialog box, with BoBo2 selected in the top pane, enable the Deny check box for Full Control in the bottom pane. This denies all access to BoBo2 for any content in the STUFF folder.
If you have completed Task 5.5 on this system, you could have placed BoBo2 into the Deny All GG that was created in that task to accomplish the same level of restrictive permissions.
12. Click OK to close the STUFF Properties dialog box.
Triggering the Audit Policy on the STUFF folder for Audit Success
1. While logged in to the Windows XP Professional system as the Domain Administrator, in the right pane of the STUFF folder in Windows Explorer, right-click on white space and select New ⇒ Folder. Name the folder AdminStuff.
2. Double-click on the AdminStuff folder. In the right pane, right-click on white space and select New ⇒ Text Document. Name the document AdminStuff.txt.
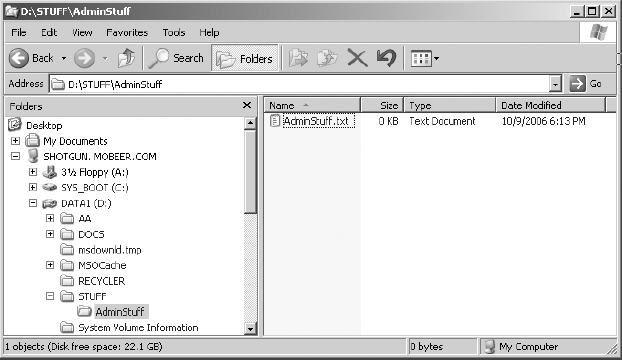
3. Edit the contents of AdminStuff.txt with the Notepad application. Save the changes and exit Notepad.
4. Create two more documents: AdminStuff2.txt and AdminStuffDel.txt. Edit and save these documents.
5. Delete AdminStuffDel.txt.
6. Close the Explorer application and log off the XP Professional system.
Triggering the Audit Policy on the STUFF Folder for Audit Failure
1. Log on to the Windows XP Professional system as BoBo2, with the password Password1.
2. Launch Windows Explorer.
3. In the left pane, expand the folders as necessary to locate the folder named STUFF.
4. Select the STUFF folder. You should receive an Access Denied error.
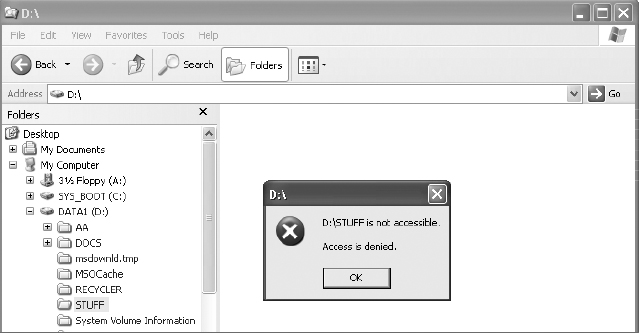
5. Click OK to clear the Access Denied error.
6. Select other folders on the system, and try to select the STUFF folder again. You should receive an Access Denied error again.
7. Click OK to clear the Access Denied error.
8. Log off the XP Professional system as BoBo2.
Reviewing the Security Log (Audit Log) on the XP Professional System
1. Log on to the Windows XP Professional system as the Domain Administrator.
2. Select Start ⇒ Run. Type Eventvwr in the Open field and click OK to launch the Event Viewer application.
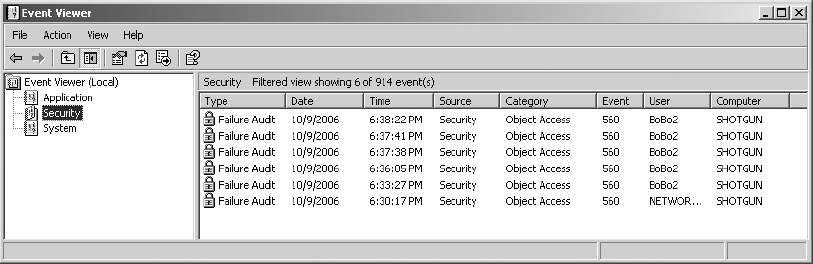
3. In the left pane, select the Security log. Notice that in the example there are already 914 events in this newly configured log.
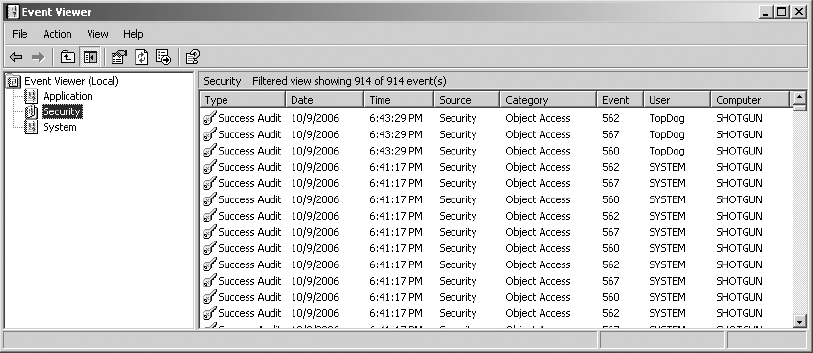
Your system will show a different number and different types of events.
You’ll notice that the object access Event IDs are 560, 562, and 567. By correlating the timestamps, you should also notice that these three Event IDs represent a single access event, like a read or a write or a delete. This could take some time to review and interpret, especially after logging events for a long period of time.
4. In the left pane, right-click on the Security log and select Properties. Select the Filter tab.
5. Disable the Information, Warning, Error, and Failure Audit check boxes. In the User field, enter the username TopDog, the administrator for the domain.
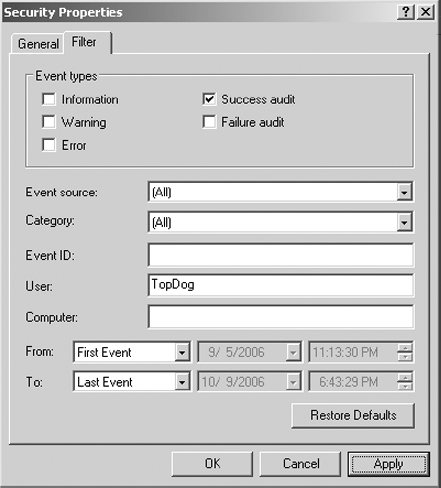
6. Click OK to apply the filter and view the filtered Security log.
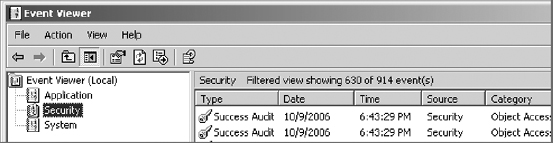
Notice that this filter still only knocks down the number of events by about one-third in the example. Your results may be different.
7. In the left pane, right-click on the Security log and select Properties. Select the Filter tab. This time add the Event ID of 560.
8. Double-click on the top event. In the graphic, notice the upper portion. This shows a Success Audit, Object Access for the user TopDog, and that TopDog was accessing the object from the computer named SHOTGUN. (In this case, TopDog was logged on locally to the resource server.) Your events should look similar, but with different times and names.
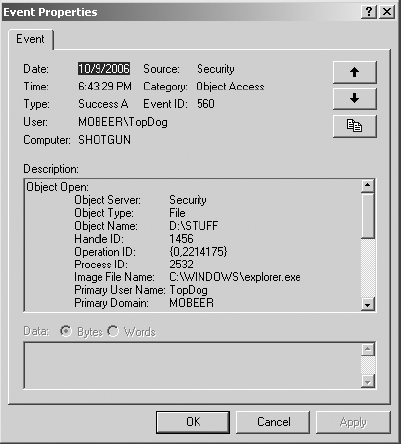
9. Notice the Description field. It shows that the object was accessed by the explorer.exe application, and the user accessed the D:STUFF folder.
10. As you scroll down, you will see that the access type was listing the contents of the STUFF directory.
11. Select the down arrow in the upper-right corner of the Event Properties dialog box to scroll down the list of 560 events for TopDog. Review the details of several of these events. Locate the DELETE event where you deleted the AdminStuffDel.txt file.
12. In the left pane, right-click on the Security log and select Properties. Select the Filter tab. This time change the Event ID to 567. Click OK to apply the filter.
13. Double-click on the top event. Select the down arrow in the upper-right corner of the Event Properties dialog box to scroll down the list of 567 events for TopDog. Review the details of several of these events. Locate a WriteData event where you saved one of the AdminStuff.txt files.
Notice the time selection, and the From and To filters. These would help you isolate for a specific time period.
14. In the left pane, right-click on the Security log and select Properties. Select the Filter tab. This time disable Success Audit, enable Failure Audit, change the Event ID to 560, and clear the User field.
15. Click OK to apply the filter.
16. Double-click on the top event. Select the down arrow in the upper-right corner of the Event Properties dialog box to scroll down the list of the Failure Audit events with the Event ID of 560. Review the details of several of these events.
These would be indications of users who were trying to access content that they should not be accessing. Fortunately, permissions stopped their access, but perhaps it might be a good idea to pose a question or two to their supervisor, or to them (BoBo2 in this case) directly, just to let them know that you know. Repeated incidents could be cause for reprimand, or even termination. Document these incidents and the warnings issued to the users in case you need to justify more serious punishment for repeat offenders.
17. In the left pane, right-click on the Security log and select Properties. Select the Filter tab. This time, enable all settings: Information, Earning, Error, Success Audit, and Failure Audit, and clear all the fields below by clicking the Restore Defaults button.

Failure to reset the filter could easily cause misinterpretation of the event logs by hiding critical events. Be sure this filter gets reset to its original default.
18. Close Event Viewer.
Criteria for Completion
You have completed this task when you have generated some audit events, both success and failure, interrogated the Security log in the Event Viewer application, applied several filters to isolate the types of events you were looking for, and then reset the Security Log filter to its original default settings.