
Task 6.8: Implementing an IPSec VPN Using AES
First introduced in Microsoft Windows Vista and in Microsoft Windows Server 2008 is the Windows Firewall with Advanced Security. This implementation of the Windows personal firewall introduced a significant improvement in the IPSec VPN. Earlier versions of Windows that implemented IPSec (Windows 2000 through Windows XP) used triple Data Encryption Standard (3DES) as its strongest encryption. Windows Vista, Windows 7 and Server 2008 use the newer, stronger Advanced Encryption Standard (AES), with three different key lengths to choose from. AES is currently considered “uncrackable.”

If you’re interested in the nitty-gritty of how AES works, see “Keep Your Data Secure with the New Advanced Encryption Standard,” at http://msdn.microsoft.com/msdnmag/issues/03/11/AES/.
Scenario
You are the administrator of a Microsoft Windows environment and must secure sensitive, point-to-point communications between a computer in the Research and Development department and the high-security server that remains strongly protected inside the corporate data center.
Further, you must validate that the communications are truly secured using the strongest encryption by performing a sniffer trace to prove the encryption of frames between the two computers.
Scope of Task
Duration
This task should take 60 minutes.
Setup
You will first test connectivity between the two computers and show that, currently, data flow over this channel is unencrypted. Then you will need to configure the Windows Firewall with Advanced Security on the source and destination computers. You will configure a point-to-point IPSec VPN Connection Security Rule to utilize AES-256. Finally you will verify that the channel is now fully encrypted by performing a network analyzer (sniffer) trace.
Caveat
Utilizing stronger encryption algorithms places a larger load on the CPU of the two computer systems involved in the VPN. All outbound frames must be encrypted, and all inbound frames must be decrypted. System performance will degrade while this channel is active.
The VPN encrypts only data while in transit. It does not secure data while in storage (also called “data at rest”). If you need to secure sensitive data at rest, you must implement an additional encryption component in the security scheme of the system.
Procedure
You will test connectivity between source and destination computers by copying an ASCII text file from one computer to the other. In this task, you will see Windows Vista as the source computer and Windows Server 2008 as the destination computer. Further, you will record this file transfer by running a sniffer on the source computer. This will show the plain-text contents of the copied file. You may need to download and install a sniffer from the Internet. Instructions will be provided for this.
Next you will configure the IPSec VPN in Transport mode (end-to-end) using the Windows Firewall with Advanced Security on the source and destination computers. As part of this configuration, you will review the strengths of the cryptographic standards that are available, and select the strongest cipher available, AES-256.
Finally, you will copy the same file from one computer to the other while running the sniffer trace to verify the effectiveness of the VPN tunnel.
Equipment Used
For this task, you must have:
- Two computer systems, one with Windows Vista and one with Windows Server 2008 installed
- Administrator access on both systems
- Network analyzer software installed on one of the systems
- Internet connectivity
Details
Download and Install the Wireshark Sniffer on the Source Computer
1. Power up both computers. They must be able to connect to each other.
2. Log on to the source computer, in this case the Windows Vista system, as the Administrator.
3. Launch Internet Explorer.
4. Enter the following URL into the address bar:
http://www.wireshark.org/download.html
5. Download the appropriate and latest version of Wireshark for your source computer.
6. Install Wireshark on the source computer following the instructions provided by the software provider.
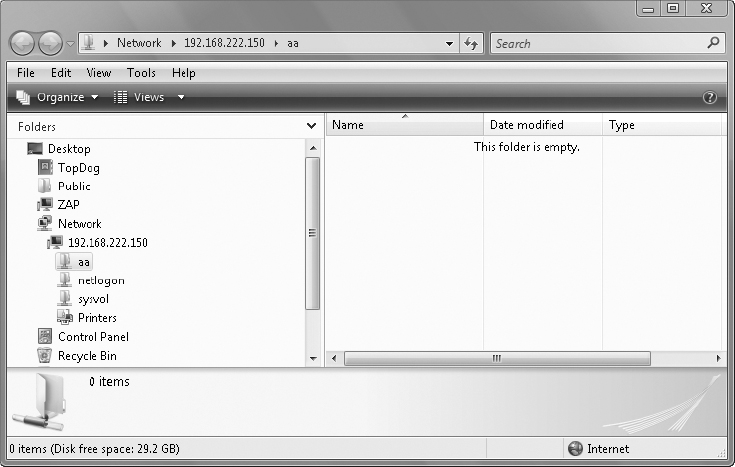
Create a Share on the Destination Computer
1. Log on to the destination computer, in this case the Windows Server 2008 system, as the Administrator.
2. Launch Windows Explorer (not Internet Explorer).
3. Create a new folder on the C: drive named AA.
4. Right-click the new AA folder and select Properties.
5. Select the Sharing tab. Click the Advanced Sharing button.
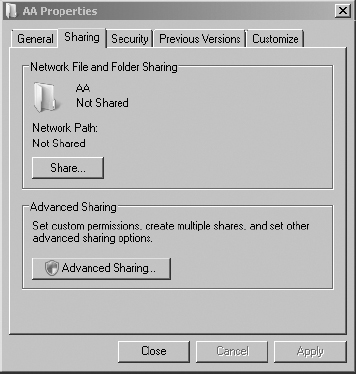
6. Enable the Share This Folder check box.
7. Click the Permissions button.

8. Click the Add button.
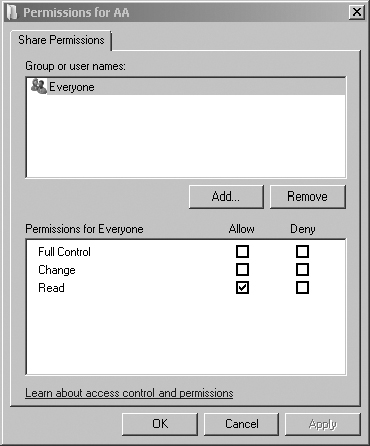
9. Click the Advanced button.
10. Click the Find Now button.
11. Select Authenticated Users from the list. Click the OK button twice.
12. Select Authenticated Users in the Group Or User Names list, and click the Change check box under Allow in Permissions For Authenticated Users. The Read setting should already be enabled by default.
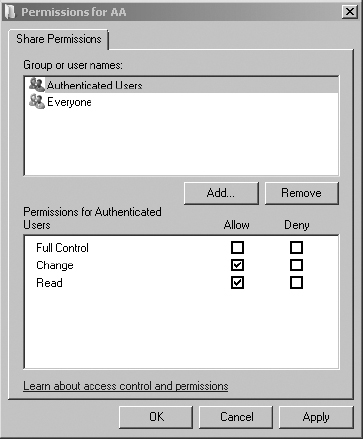
13. Click OK twice. Then click Close to enable the shared folder with the proper permissions.
Test Connectivity and View Captured Data
1. On the source computer, open a command window by clicking Start ⇒ Run and typing CMD. Then click OK.
2. Test connectivity between the two computers by executing the ping command: ping <IP Address of the Destination computer>.
You can identify the IP address of each computer by launching a command window on each computer and typing the command ipconfig.
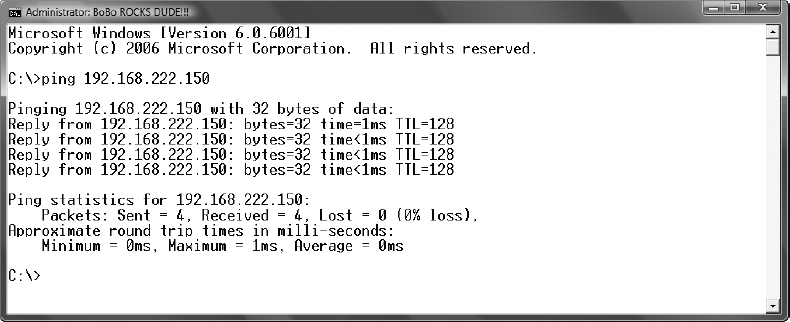
In this case, the source computer, which runs Windows Vista, has the IP address 192.168.222.20, and the destination computer, which runs Windows Server 2008, has the IP address 192.168.222.150.
3. On the source computer, connect to the shared folder on the destination computer by clicking Start ⇒ Run, and typing \>IP Address of the Destination Computer<AA.
Then click OK. (In our example, the command is \192.168.222.150AA.)
You may be prompted for the credentials of an authenticated user on the destination computer to establish the connection.
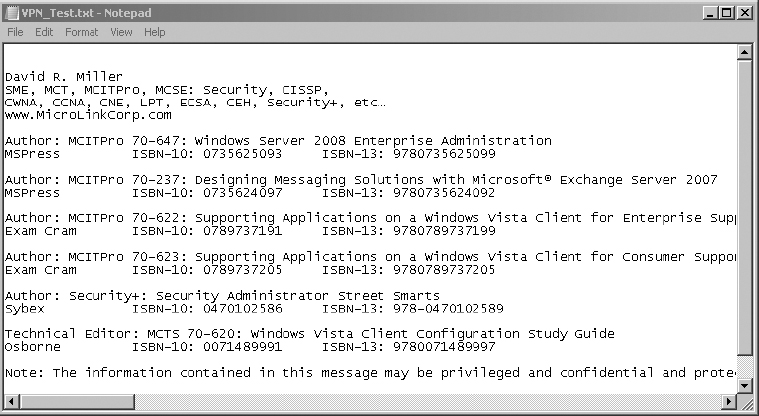
4. On the source computer, open Notepad. Type something that you will recognize later. Save the file as VPN_Test.txt to the desktop.
Notepad creates ASCII text files that are easy to read when captured by a network analyzer.
5. Launch the Wireshark Network Analyzer. Arrange items on your desktop so that you can see the Wireshark Network Analyzer, the new file VPN_Test.txt, and the AA folder on the destination computer.
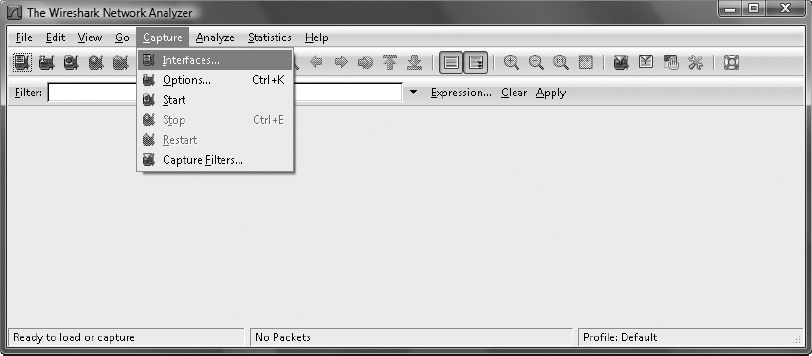
6. In the Wireshark Network Analyzer application window, select Capture ⇒ Interfaces from the menu.
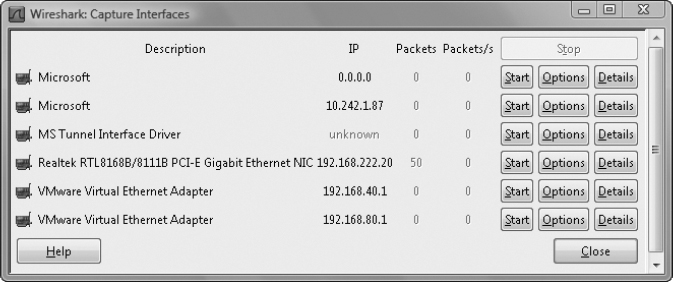
7. Adjacent to the interface that provides the connection to the destination computer, click the Start button to begin the capture. In this case, it is the interface with the IP address 192.168.222.20.
8. Drag and Drop the VPN_Test.txt file into the AA folder that is shared on the destination computer.
9. In the Wireshark Network Analyzer application window, select Capture ⇒ Stop from the menu.
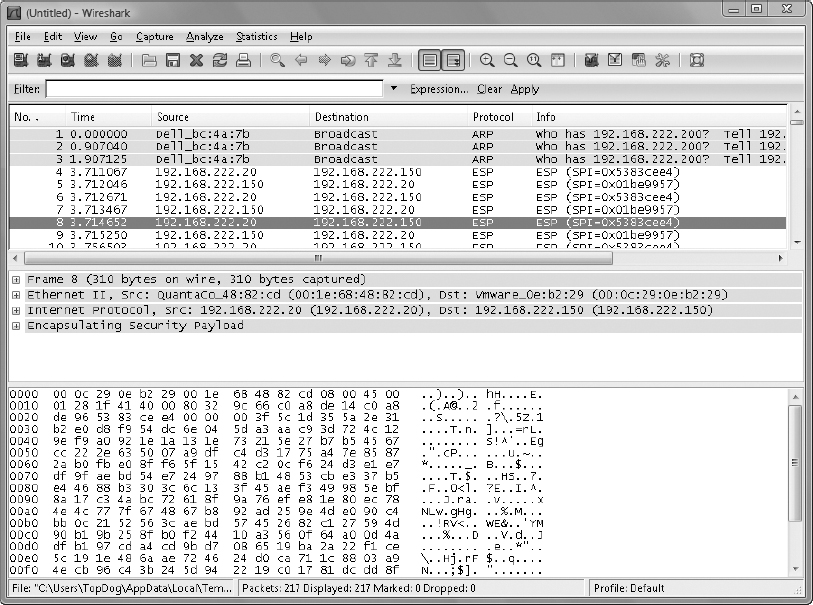
10. In the Wireshark Network Analyzer application window, review the captured frames. Identify the frame that carried the ASCII data. This frame will be an SMB (Server Message Block) or SMB2 protocol frame, and is often labeled “Write Request” in the Info column. The readable data that you typed into the file earlier should be present in the lower window.
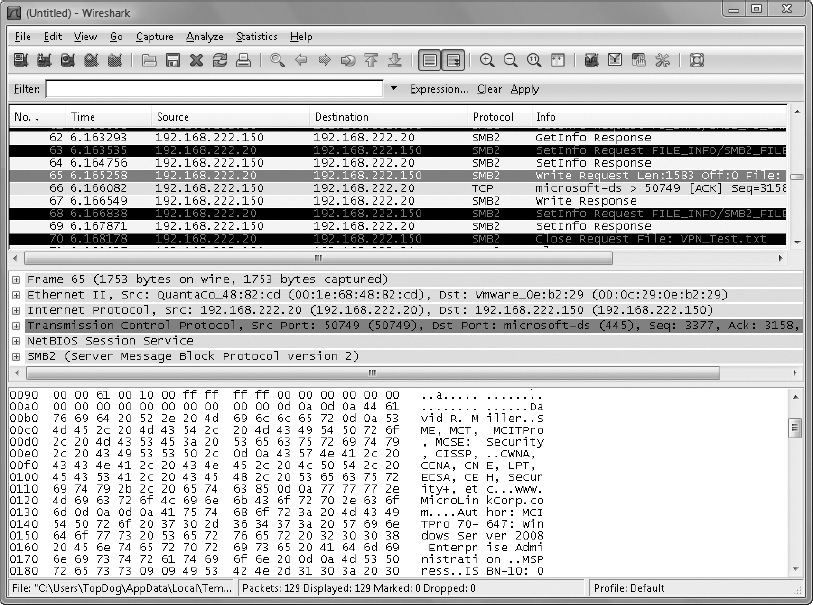
Notice frame 65 in the preceding graphic. This frame carried the ASCII text data in the demonstrated file transfer from source computer to destination computer.
11. Spend some time reviewing this capture. Much can be learned from analyzing captures like this one. Notice all the SMB2 protocol frames. This task shows the inherent insecurity of using unencrypted data communications.
12. Save your plain-text capture by selecting File ⇒ Save As from the Wireshark Network Analyzer menu. Name the capture PlainText and save it to the desktop.
Configuring the IPSec VPN
1. On the source computer, click Start ⇒ Programs ⇒ Administrative Tools ⇒ Windows Firewall With Advanced Security.
This procedure must be performed on both the source and destination computers. The only difference will be a reversal of the IP addresses when configuring the destination computer.
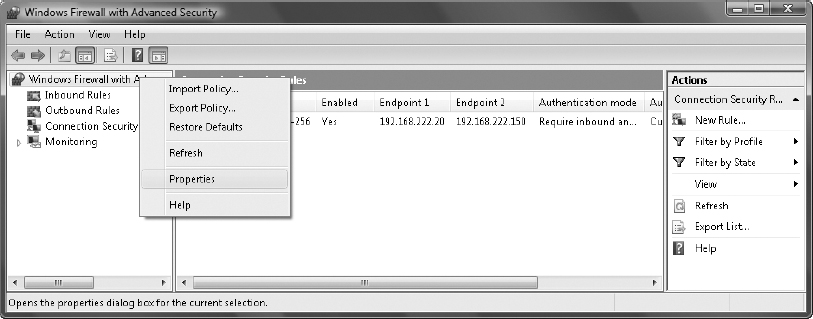
2. Right-click on Connection Security Rules in the left pane, and select New Rule.

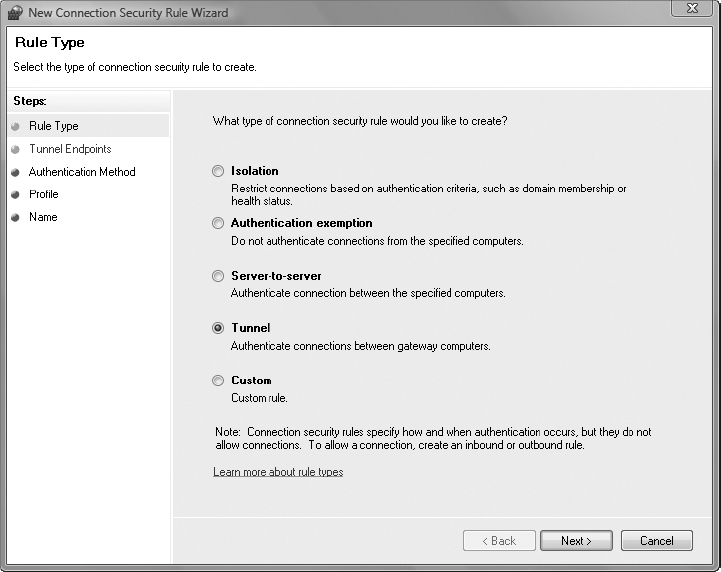
3. In the resulting wizard, on the Rule Type screen, select the Tunnel option. Click Next.
4. Use the IP address of the source computer for the IPv4 address line referring to Endpoint 1, and use the IP address of the destination computer for the IPv4 address line referring to Endpoint 2.

5. To populate the Which Computers Are In Endpoint 1? field, click the Add button and enter the IP address of the source computer in the This IP Address Or Subnet field.

6. To populate the Which Computers Are In Endpoint 2? field, click the Add button and enter the IP address of the destination computer in the This IP Address Or Subnet field.
7. Click Next.
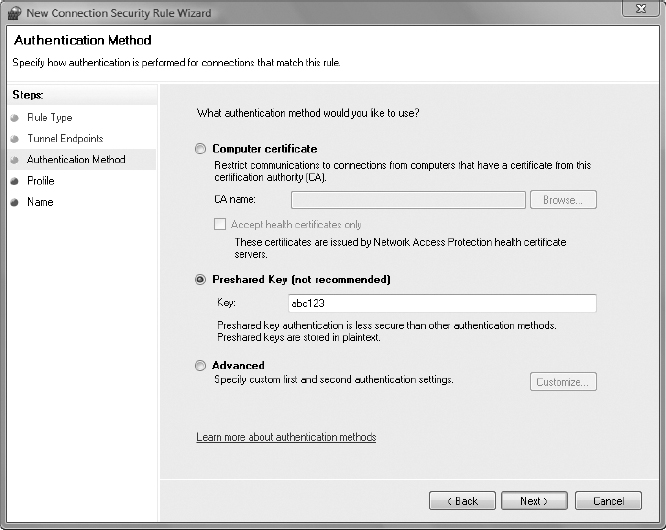
8. To keep this task simple, you will use the Preshared Key to authenticate the endpoints of the IPSec VPN tunnel to each other. Notice that this is not recommended for production but is intended for initial setup and testing purposes. For production, a Public Key Infrastructure (PKI) using X.509 digital certificates should be used for strong, mutual authentication of the endpoints. Select Preshared Key (Not Recommended) and enter the key abc123.
9. Click Next.
10. Apply the rule to all three firewall profiles by enabling the Domain, Private, and Public check boxes. Click Next.

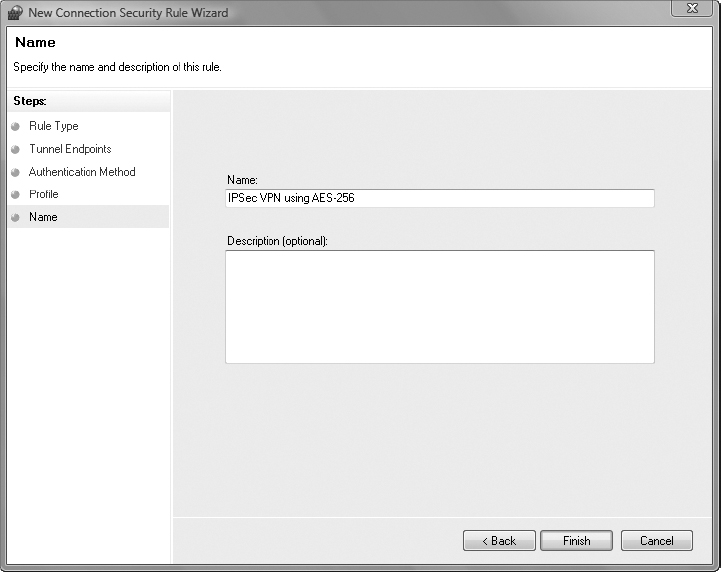
11. Name the new Connection Security Rule IPSec VPN using AES-256. Enter a description if desired. Click the Finish button.
12. Double-click the new Connection Security Rule IPSec VPN Using AES-256 to view its properties.
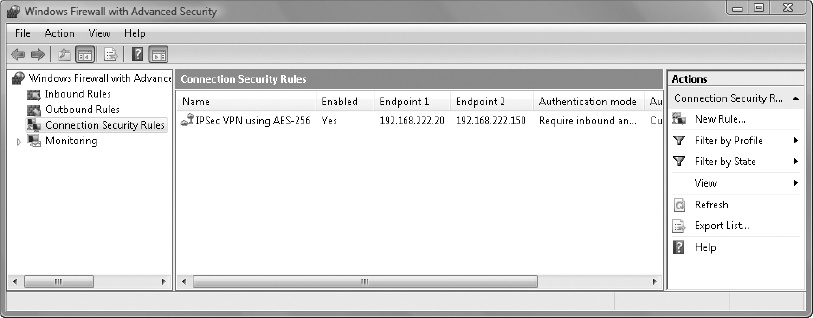
13. Review the settings, then close the IPSec VPN Using AES-256 Connection Security Rule properties.
Configuring the IPSec VPN to Use AES-256
1. In the left pane, right-click Windows Firewall With Advanced Security and select Properties.
2. Select the IPSec Settings tab and click the Customize button.

3. In the Data Protection section, select Advanced, and then click the Customize button.

4. Enable the check box Require Encryption For All Connection Security Rules That Use These Settings.

5. In the Data Integrity And Encryption pane, click the Add button.
6. In the Integrity And Encryption Algorithms window, select the following settings:
- Protocol: ESP (Recommended)
- Encryption Algorithm: AES-256
- Integrity Algorithm: SHA1 (Default)
Also set the Key regeneration settings to 15 (minutes) and 25,000 (KB, which is 25 MB).
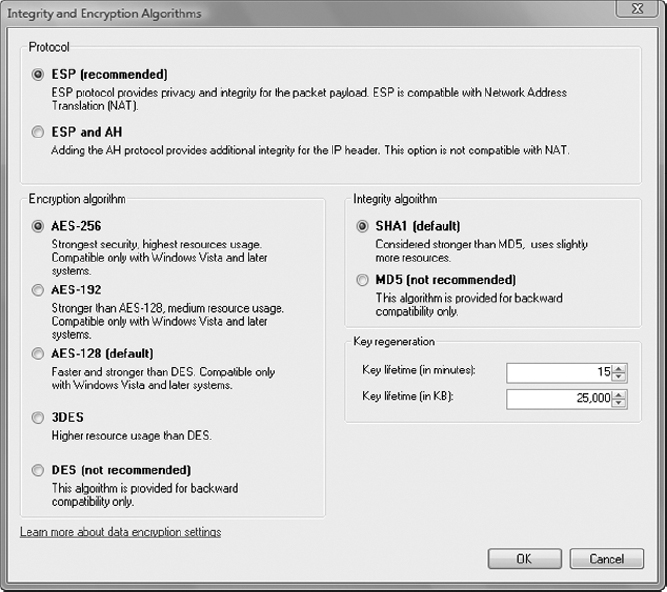
These settings represent a high level of security. The performance of the computers using these settings will degrade, based on the amount of information flowing through this IPSec VPN.
7. Click OK.
8. Remove the AES-128 and 3DES VPN configurations, leaving only the new IPSec VPN configuration.

9. Click OK three times to implement the new IPSec VPN standard.
10. Repeat this same process (“Configuring the IPSec VPN” steps 1 through 13, and “Configuring the IPSec VPN to Use AES-256,” steps 1 through 9) on the destination computer, only reversing the Endpoint IP addresses. All other settings must remain the same.
Validating the IPSec Encryption for Data in Transit
1. On the source computer, connect to the shared folder on the destination computer by clicking Start ⇒ Run and typing \>IP Address of the Destination Computer<AA. Then click OK. (In this case, the command is \192.168.222.150AA).
You may be prompted for the credentials of an authenticated user on the destination computer to establish the connection.
2. Launch the Wireshark Network Analyzer. Arrange items on your desktop so that you can see the Wireshark Network Analyzer, the new file VPN_Test.txt that was used earlier, and the AA folder on the destination computer.
3. In the Wireshark Network Analyzer application window, select Capture ⇒ Interfaces from the menu.
4. Adjacent to the interface that provides the connection to the destination computer, click the Start button to begin the capture. In this case, it is the interface with the IP address 192.168.222.20.
5. Drag and drop the VPN_Test.txt file into the AA folder that is shared on the destination computer. You will need to confirm the overwrite of the original.
6. In the Wireshark Network Analyzer application window, select Capture ⇒ Stop from the menu.
7. In the Wireshark Network Analyzer application window, review the captured frames. This time, what you see between source and destination computers is only the ESP (Encapsulated Security Payload) protocol, the encrypted IPSec packet protocol. You do not see the SMB2 protocol between the source and destination computers. Further, as you interrogate each frame, you cannot identify the ASCII data contained within the file that was copied from source to destination because it is encrypted with AES-256.
You might be able to make an educated guess about which frames carried the content of the file being copied, based on the number of bytes in the frame. However, the data remains completely unreadable in the sniffer trace (capture).
8. On the destination computer, open the newly copied file. Notice that it is not encrypted and is fully readable. IPSec VPNs encrypt content only while in transit, not while at rest.
9. To ensure continued network functionality, remove the new connection security rules in Windows Firewall With Advanced Security on the source and destination computers.
Criteria for Completion
You have completed this task when you have successfully constructed an IPSec VPN using AES-256 and then verified the encryption by capturing a file transfer with a network analyzer.