
Ports represent services available on a system, such as File And Printer Sharing, Domain Name System (DNS), and Windows Internet Name Service (WINS). These services provide a good benefit to clients and the network infrastructure as a whole. Ports are also the path into the system for an attacker. To harden a system against attackers, you want to close all ports except those that are required to provide the desired services on a system.
Task 2.1 covered how to manage services. You learned how to view which services are running, how to disable and stop those services, how to lock down the services by managing who can make changes to the services, and how to continuously stop unwanted services from running. This is a big first step in managing ports.
The next step in managing ports is to install, enable, and configure the firewall service on your systems.
Scenario
You are configuring a new system to be used as a workstation with limited file and print sharing and a personal website. You must reduce the attack surface of the system by implementing Windows Firewall and configuring it correctly to close unnecessary ports.
Scope of Task
Duration
This task should take about 60 minutes.
Setup
For this task you will need a Windows XP workstation with Service Pack 2 (SP2).

Windows Firewall was provided in Windows Server 2003 SP1 and in Windows XP SP2. Workstation-class operating systems allow for a maximum of 10 inbound connections to the server service.
To perform testing of open ports using a port scanner, you will need a second Windows XP system. You will need to make sure the following application is installed on this system:
- Nmap port scanner (Windows binaries). The latest version as of this writing is nmap-5.50-setup.exe. Available at http://nmap.org/download.html.
Caveat
Although you want to close any unnecessary ports, ports are opened to provide a benefit to users. Enabling Windows Firewall and closing ports will reduce the utility of a system, and many potentially desirable features of a system will no longer function.
You must proceed cautiously and test the system to ensure the desirable features are still functional while making sure that you’ve closed as many ports as you can.
Procedure
You will implement Windows Firewall and close ports that aren’t required for the given functional requirements of a system. You will then test the system, both internally and externally, and confirm that you’ve achieved the desired results.
Equipment Used
For this task, you must have:
- A Windows XP SP2 system with Internet Information Services (IIS) web services installed and started
- A Local Administrator account
- Nmap port scanner for Windows
- A second Windows XP SP2 system with the Nmap port scanner for Windows installed
Details
The following sections guide you through the configuration of Windows Firewall. This firewall closes all inbound ports except those you allow. You will configure the firewall to allow file and printer sharing (ports 137, 138, 139, and 445) and HTTP (port 80) for the personal web server. Then you will test the system to identify ports that the system is utilizing and the applications associated with the open ports. You will then use a port scanner (Nmap) to interrogate the system from an external vantage point.
Configuring Windows Firewall on XP SP2
1. On the Windows XP SP2 system, right-click on My Network Places and select Properties. If there is no icon on the desktop, you can go to the Control Panel and launch Network Connections.
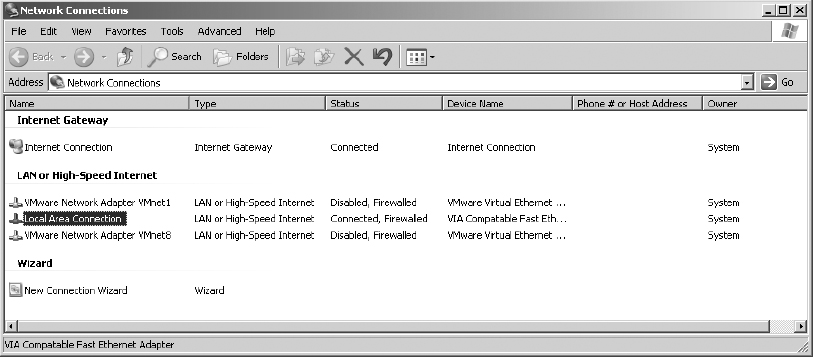
2. Right-click on Local Area Connection and select Properties. Select the Advanced tab and click Settings.
3. On the General tab of the Windows Firewall dialog box, if Firewall is not enabled, select On (Recommended).

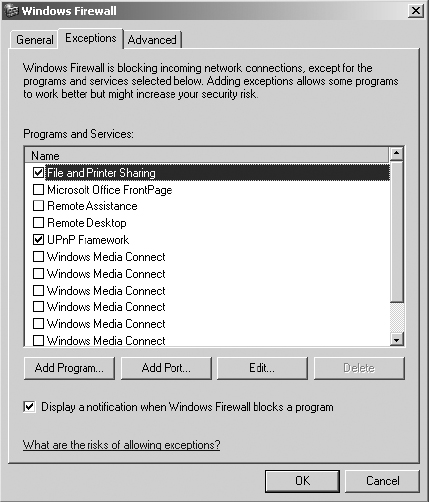
4. Select the Exceptions tab.
Exceptions are ports on the firewall that are open to unsolicited inbound frames. These inbound frames are trying to reach services provided on the system behind the firewall. If there is no exception for a port, the firewall simply rejects the unsolicited inbound frame. Your Exceptions tab may contain different entries than the ones shown here. These entries are the by-product of the installation of applications and services that are recognized by Windows Firewall.

Changing the configuration of Windows Firewall may cause some services and applications to fail. Further, it may leave your system vulnerable to attack. If you are not sure of the proper configuration for the firewall, do not make any changes to the firewall.
5. Notice that File And Printer Sharing is enabled, as is UPnP (Universal Plug and Play) Framework. Highlight File And Printer Sharing and click Edit.
Notice that Windows File And Printer Sharing utilizes UDP port 137 (NetBIOS Name Service), UDP port 138 (NetBIOS Datagram Service), TCP port 139 (NetBIOS Session Service), and TCP port 445 (Microsoft Directory Services). These services are required to support File And Printer Sharing for NetBIOS/SMB (Microsoft and Samba) clients. By default, ports that are opened are available to receive inbound frames from any source. To restrict allowed inbound frames to one or a few systems, you can change the scope of the exception.
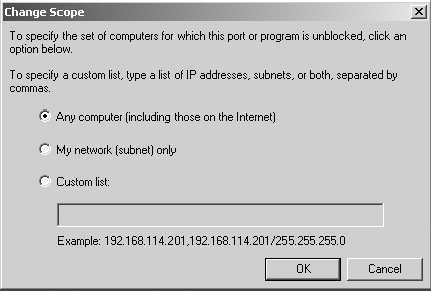
6. In the Edit A Service dialog box, click Change Scope.
You can restrict allowed inbound frames to My Network (subnet) only or produce a custom list of IP addresses and ranges.
Leave the default Any Computer setting and click Cancel in the Change Scope dialog box.
Click Cancel again in the Edit A Service dialog box.
7. Highlight other entries on the Exception list of Programs And Services and examine the details by clicking Edit.
To identify applications and services related to port numbers, check out the excellent reference tool Port Authority: www.grc.com/PortDataHelp.htm.
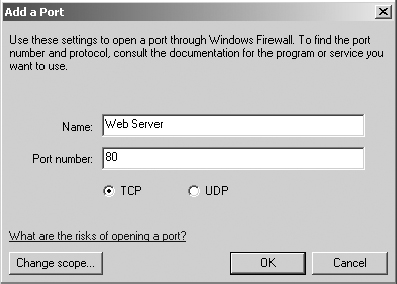
8. Notice that (at least in our example) there is no exception for the web service. It is currently being blocked by this firewall. To add an exception, select Add Port.
9. In the Add A Port dialog box, enter the following information:
- Name: Web Server
- Port Number: 80
Enable TCP and click OK.

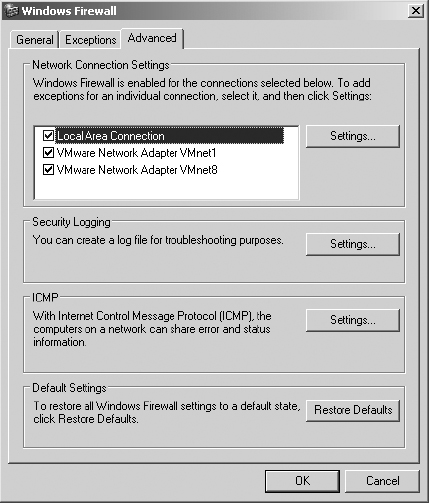
10. Select the Advanced tab in the Windows Firewall dialog box. On this tab you can enable or disable the firewall on any of the network interfaces in the system, configure the logging details for the firewall, allow or drop ICMP frames (used for the PING application—which is good—but also used in many attacks—which is bad!), and reset the firewall to its default configuration, just in case you’re not sure what damage you may have done.
11. Click OK to close the Windows Firewall properties dialog box.
You have now enabled and configured Windows Firewall. You have also enabled inbound frames for Windows File And Printer Sharing, UPnP, and web services. Next, you’ll test the system for open ports.
Testing Open Ports
1. Open a command window by selecting Start ⇒ Run, typing CMD, and clicking OK.
2. Open Netstat, a command-line tool that interrogates the system for open ports, connections, and protocol usage. Simply type netstat /? at the command prompt. You should see the following:
C:>netstat /?
Displays protocol statistics and current TCP/IP network
connections.
NETSTAT [-a] [-b] [-e] [-n] [-o] [-p proto] [-r] [-s] [-v]
[interval]
-a Displays all connections and listening ports.
-b Displays the executable involved in creating each
connection or listening port. In some cases well-known
executables host multiple independent components, and in
these cases the sequence of components involved in
creating the connection or listening port is displayed.
In this case the executable name is in [] at the bottom,
on top is the component it called, and so forth until
TCP/IP was reached. Note that this option can be time-
consuming and will fail unless you have sufficient
permissions.
-e Displays Ethernet statistics. This may be combined with
the -s option.
-n Displays addresses and port numbers in numerical form.
-o Displays the owning process ID associated with each
connection.
-p proto Shows connections for the protocol specified by
proto; proto may be any of: TCP, UDP, TCPv6, or
UDPv6. If used with the -s option to display per-
protocol statistics, proto may be any of: IP, IPv6,
ICMP, ICMPv6, TCP, TCPv6, UDP, or UDPv6.
-r Displays the routing table.
-s Displays per-protocol statistics. By default, statistics
are shown for IP, IPv6, ICMP, ICMPv6, TCP, TCPv6, UDP,
and UDPv6; the -p option may be used to specify a subset
of the default.
-v When used in conjunction with -b, will display sequence
of components involved in creating the connection or
listening port for all executables.
interval Redisplays selected statistics, pausing interval
seconds between each display. Press CTRL+C to stop
redisplaying statistics. If omitted, netstat will
print the current configuration information once.
3. At the command prompt, type netstat -a -n -o.
This command displays all open ports and connections, places them in numeric or alphabetic order, and shows the process ID (PID) that opened the port. Your results should look something like this:
C:>netstat -a -n -o
Active Connections
Proto Local Address Foreign Address State PID
TCP 0.0.0.0:21 0.0.0.0:0 LISTENING 3984
TCP 0.0.0.0:80 0.0.0.0:0 LISTENING 3984
TCP 0.0.0.0:135 0.0.0.0:0 LISTENING 1060
TCP 0.0.0.0:443 0.0.0.0:0 LISTENING 3984
TCP 0.0.0.0:445 0.0.0.0:0 LISTENING 4
TCP 0.0.0.0:2268 0.0.0.0:0 LISTENING 3984
TCP 0.0.0.0:2869 0.0.0.0:0 LISTENING 1472
TCP 127.0.0.1:1047 0.0.0.0:0 LISTENING 672
TCP 192.168.222.201:139 0.0.0.0:0 LISTENING 4
TCP 192.168.222.201:445 192.168.222.218:3274 ESTABLISHED 4
TCP 192.168.222.201:1161 192.168.222.200:3268 CLOSE_WAIT 3740
TCP 192.168.222.201:2256 192.168.222.218:445 ESTABLISHED 4
UDP 0.0.0.0:445 *:* 4
UDP 0.0.0.0:500 *:* 824
UDP 0.0.0.0:1025 *:* 1252
UDP 0.0.0.0:1026 *:* 1252
UDP 0.0.0.0:1425 *:* 1252
UDP 0.0.0.0:3456 *:* 3984
UDP 0.0.0.0:4500 *:* 824
UDP 127.0.0.1:123 *:* 1188
UDP 127.0.0.1:1027 *:* 824
UDP 127.0.0.1:1041 *:* 768
UDP 127.0.0.1:1075 *:* 1600
UDP 127.0.0.1:1160 *:* 3740
UDP 127.0.0.1:1269 *:* 2752
UDP 127.0.0.1:1419 *:* 2416
UDP 127.0.0.1:1577 *:* 3204
UDP 127.0.0.1:1900 *:* 1472
UDP 127.0.0.1:2165 *:* 2908
UDP 127.0.0.1:2229 *:* 660
UDP 127.0.0.1:2302 *:* 3292
UDP 127.0.0.1:2373 *:* 1884
UDP 127.0.0.1:2383 *:* 556
UDP 127.0.0.1:2603 *:* 1212
UDP 192.168.222.201:123 *:* 1188
UDP 192.168.222.201:137 *:* 4
UDP 192.168.222.201:138 *:* 4
UDP 192.168.222.201:1900 *:* 1472
4. Review some of these port numbers on the Port Authority website: www.grc.com/PortDataHelp.htm.
5. Launch Task Manager by right-clicking on the taskbar and selecting Task Manager. Select the Processes tab. Then choose View ⇒ Select Columns.
6. Enable the following columns:
- PID (Process Identifier)
- CPU Usage
- CPU Time
- Memory Usage
- User Name
- Base Priority
Click OK.

7. Click on the PID column title to sort ascending by the process ID.
By comparing the PID value in the results from the netstat command to the PID value in Task Manager, you can identify which processes opened which ports, as well as who launched the process. This may help you identify desirable versus undesirable processes and ports that your system is running. Don’t worry if you don’t know how these processes were launched; we’ll cover that later in this phase.

These “Testing Open Ports” processes, Steps 1 through 7, have given you a look at the processes and ports that the system has available—a sort of self-perspective from behind the firewall. Next you’ll take a look at how the system appears from outside the firewall from an external system looking at the firewall.
1. On the second XP system, if you haven’t already downloaded Nmap version 5.50 (or the latest version), download it from the website referenced earlier into a folder on the hard drive. A reference guide for Nmap is available at http://nmap.org/book/man.html.
2. Install Nmap.
3. Open a command window.
4. At the C: prompt, enter nmap.
This command will show you a quick summary of switches to use with Nmap. If you get an error message that nmap is not a recognized command, change your focus to the nmap installation directory, specified during the Nmap installation.
5. At the C: prompt, enter nmap -sS -O <IP Address of the first XP system>.
The command is case sensitive. This command tells your machine to run a port scan on the first XP system, utilize the Stealth Scan mode, and attempt to identify the operating system. Here is the result of this scan on our system, named Shotgun, IP address 192.168.222.201:
C:>nmap -sS -O 192.168.222.201
Starting Nmap 4.11 ( http://www.insecure.org/nmap )
at 2006-08-22 15:10 Eastern Standard Time
Warning: OS detection will be MUCH less reliable because you did
not find at least 1 open and 1 closed TCP port
Interesting ports on shotgun (192.168.222.201):
Not shown: 1677 filtered ports
PORT STATE SERVICE
80/tcp open http
139/tcp open netbios-ssn
445/tcp open microsoft-ds
MAC Address: 00:0C:76:C0:21:BE (Micro-star International CO.)
Device type: general purpose
Running: Microsoft Windows NT/2K/XP
OS details: Microsoft Windows XP SP2
Nmap finished: 1 IP address (1 host up) scanned in 25.567 seconds
Notice that Ports 139 and 445 are open to support File And Printer Sharing and port 80 is open to support the website. No other ports are shown to be available externally because of the firewall. If other ports are open, identify their source(s) and determine whether they are desirable or undesirable. If undesirable, disable the application(s) and service(s) related to these ports, and reconfigure your Windows Firewall as necessary to block these ports correctly.
Criteria for Completion
You have completed this task when you have enabled and configured Windows Firewall in your XP SP2 system; configured services through the firewall; tested the system internally for services, ports, connections, and protocols; and tested the system from an external XP system by running a port scanner against the firewall.