
Data loss occurs all the time from many different causes, including hardware failure, operating-system bugs, application bugs, errors and omissions, and power problems, to name a few. Disaster-recovery preparation and procedures should be a routine part of every administrator’s concerns and activities. The ability to recover lost data must exist.
Scenario
You are responsible for the protection of mission-critical information. You need to be prepared to recover corrupted or lost data files from any day within the last week. You must establish a backup routine to satisfy these concerns.
Scope of Task
Duration
This task should take 45 minutes.
Setup
Your critical data is on a file server, but you have no tape drive. You plan to perform the backups to the local system on a daily basis. You will manually copy those backups to a remote server over the network to provide for a remote copy.
Caveat
The process of backing up data can consume massive amounts of system and network resources. The performance of the backup server will degrade substantially during the backup process. Backups are usually performed overnight while the system and network resources are at their lowest levels of consumption.
Backups must be tested regularly to confirm their validity and recoverability. Stepping through the paces of performing the backups may be useless unless you are certain that your data can be restored. You should be performing test restores on a regular basis.
Procedure
For this task, you will identify the data sets that are mission-critical and perform an initial, manual backup. This collection of content for backup is referred to as the catalog. You will then configure this backup to run, overnight, on a daily basis.
Equipment Used
For this task, you must have:
- Windows Server 2003 system
- Administrator or Backup Operator access
- Multiple files and/or folders identified as critical and requiring backup
Details
Assembling the Catalog
1. Log on to the Windows Server 2003 system as the Administrator.
2. Launch Explorer by right-clicking the Start button and selecting Explore.
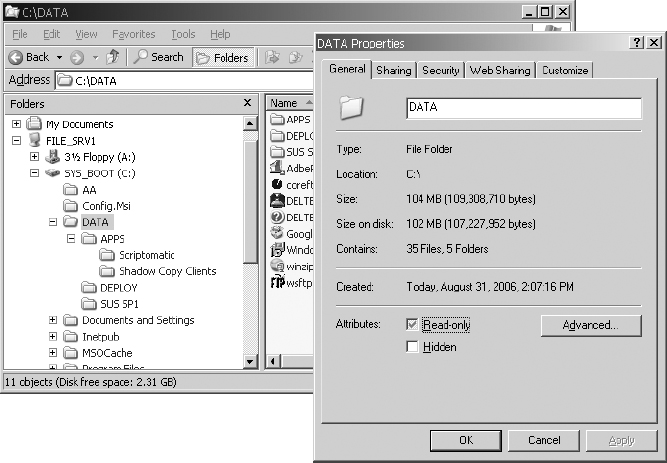
3. Identify the critical data set requiring backup. Right-click on each of the data folders and select Properties to determine the approximate size of the backup.

Since you will be backing up to the local drive, be sure you have sufficient free drive space to record the backup. If you have enough free space, you will also be backing up the system state data, which will additionally require approximately 500–600 MB.
4. Once you have determined the files and folders to contain in the backup, minimize or close Explorer.
5. Launch NT Backup by selecting Start ⇒ Programs ⇒ Accessories ⇒ System Tools ⇒ Backup.
6. In the Backup Or Restore Wizard, deselect the Always Start In Wizard Mode check box, and select the Advanced Mode, underlined in blue to present the Backup Utility Advanced Mode.
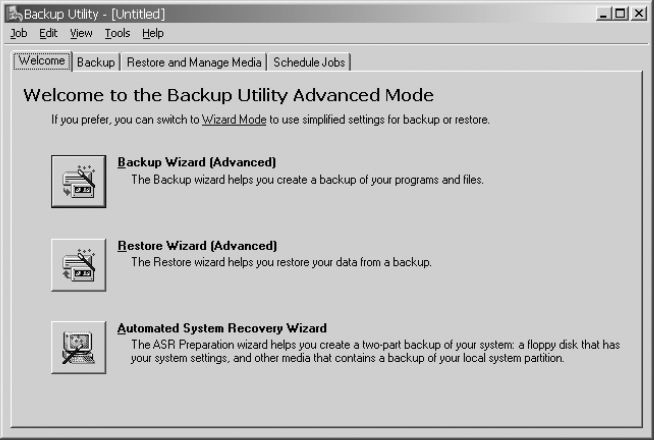
7. On the Backup Utility Advanced Mode screen, select the Backup tab.
8. In the Backup Utility, expand the drive where your data set resides. Add content to the catalog by checking the box to the left of the file(s) and/or folder(s) you want to add to the catalog.
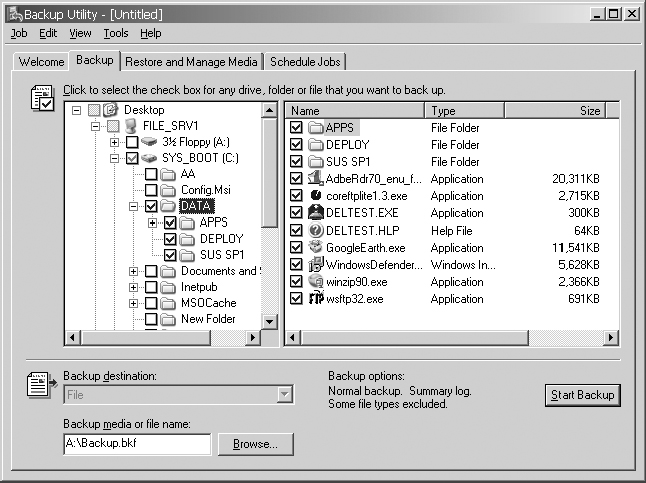
9. Scroll toward the bottom of the left pane and select System State.

Only select System State if your system has sufficient free space for the additional 500–600 MB required.
Initializing the Backup
1. Toward the bottom of the Backup Utility, at the Backup Media Or File Name field, click Browse. Clear the Insert A Disk message by clicking Cancel.
2. In the Save As dialog box, select your computer name and select a drive with sufficient free space for the backup.
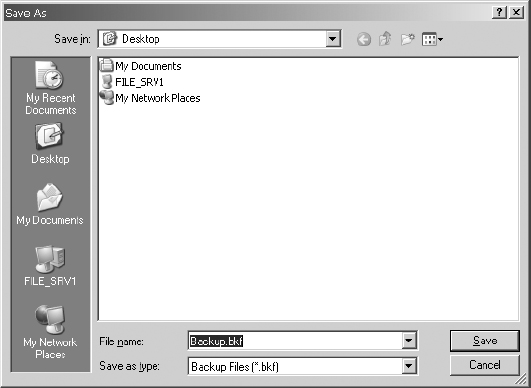
In our example, the computer name is FILE_SRV1.
3. Once the correct drive is selected, create a new folder called BACKUP by clicking the New Folder button in the upper-right corner. It looks like a folder with a sparkle on it.
4. Name the folder BACKUP and then click the white space beside the new folder to set the name.
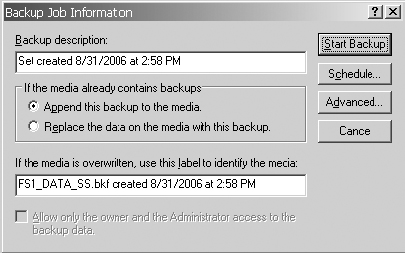
5. Double-click on the new folder BACKUP. In the File Name field below, enter the backup filename (something like FS1_DATA_SS.bkf). This stands for the computer name, FILE_SRV1; DATA to identify that this backup contains a data backup; and SS to identify that this backup also includes the system state data for FILE_SRV1.
6. Click Save.
7. In the Backup dialog box, click Start Backup.
8. Review the Backup Job Information dialog box. Accept the default information and click Advanced.
9. Review the settings in the Advanced Backup Options dialog box.
This dialog box is where you would select Verify Data After Backup. Choosing this option will approximately double the time to complete the backup, and it usually reports errors because some files have changed since the last time they were backed up. This dialog box is also where you select the backup type from the drop-down list.
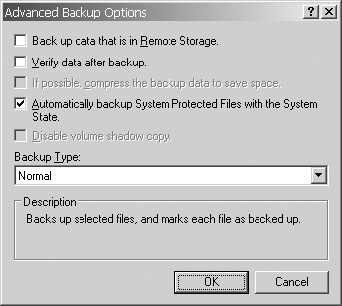
10. Leave the default settings, and click OK to close the Advanced Backup Options dialog box.
11. Click Start Backup in the Backup Job Information dialog box. You will be presented with the Backup Progress dialog box during the backup, and a message will appear when the backup has completed.
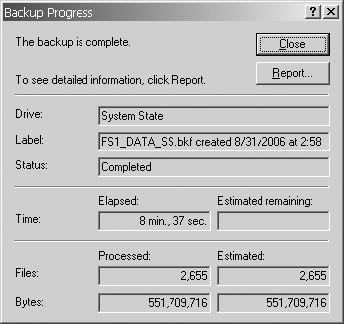
12. Click Report to view the report in Notepad.

13. When you are done reviewing the report, close Notepad.
Setting Up the Scheduled Daily Backup
1. In the Backup Utility, on the Backup tab reselect the files and/or folders you wish to have backed up.
Again, be aware of the free disk space required for the backup, and in this case, the multiple backups if you allow this task to run. Only select System State if your system has sufficient free space for the additional 500–600 MB required in each backup.
2. Once you have your catalog selected and the Backup Media Or File Name field defined correctly, click Start Backup.
3. In the Backup Job Information dialog box, click Schedule.
4. You will be prompted to save your selections. Click Yes.
5. Name your selection script something like FS1_DATA_SS.bks and click Save.
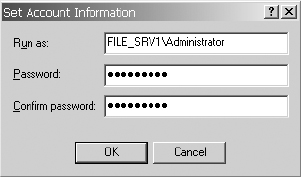
6. Next you will be prompted to set credentials on the scheduled backup job. The credentials you supply must have the rights to back up files and folders, such as an Administrator or a member of the Backup Operators group. Enter the proper credentials; you must enter the password twice.
7. In the Scheduled Job Options dialog box, enter a job name and click Properties.
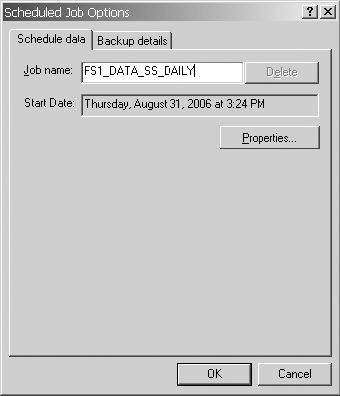
Feel free to review the Backup Details tab as well.
8. From the Scheduled Task drop-down list, select Daily. In the Start Time field, specify a time when the server and resources will have the lowest demand. Select Schedule Task Daily Every 1 Day(s).
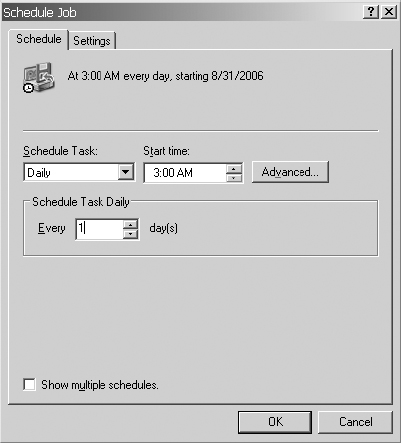
Feel free to review the Advanced settings and the Settings tab as well.
9. Click OK in the Schedule Job dialog box.
10. Click OK in the Schedule Job Options dialog box.
11. To review the scheduled jobs, select the Schedule Jobs tab in the Backup Utility.
You may want to disable this scheduled job if you do not need this backup to run daily. This job will continue to consume system resources, especially disk space.
Disabling the Scheduled Daily Backup
1. In the Backup Utility, on the Schedule Jobs tab, click the backup icon on any of the days that the backup job is scheduled to run on. The cursor turns into the Link Select icon (a pointing finger by default) as you move over the backup icon. This should open the Scheduled Job Options dialog box.
2. Click Properties.
3. Clear the Enabled (Scheduled Task Runs At Specified Time) check box at the bottom of this dialog box, and click OK twice.
Clearing the Enabled (Scheduled Task Runs At Specified Time) check box keeps the details of the scheduled job intact, but does not launch the scheduled backup job.
Criteria for Completion
You have completed this task when you have performed a manual backup, reviewed the backup log, scheduled a daily backup, and disabled the daily backup job.