
Task 6.3: Configuring the VPN Client
In Task 6.2, you initialized and configured the VPN server. The server would be connected to the corporate LAN, behind a firewall. The firewall, actually the Network Address Translation (NAT) server component of the firewall, would be configured to forward all inbound VPN connections to the internal VPN server.
No server service is useful until it has clients. That goes for VPN servers as well.
Scenario
You are the administrator of a Microsoft Windows Active Directory environment and have workers who telecommute. You must configure the client systems to access resources securely over the Internet.
This task requires the completion of Task 6.2, “Configuring the VPN Server.”
Scope of Task
Duration
This task should take 20 minutes.
Setup
You will configure the client side of the VPN.
Caveat
The encryption process demands large numbers of CPU clock cycles. This will cause noticeable degradation in the performance of both the VPN server and the VPN client systems.
Procedure
For this task, you will configure the VPN client to connect to the VPN server you configured in Task 6.2. You will then confirm the connection on the VPN server.
Equipment Used
For this task, you must have:
- Windows XP Professional system
- Administrator access
- Connectivity to the VPN server configured in Task 6.2
Details
Configuring the VPN Client
1. Log on to the Windows XP Professional system as the Administrator.
2. Select Start ⇒ Programs ⇒ Accessories ⇒ Communications ⇒ New Connection Wizard.
3. Click Next on the first page of the New Connection Wizard.
4. Select Connect To The Network At My Workplace. Notice the reference to the VPN in the description. Click Next.

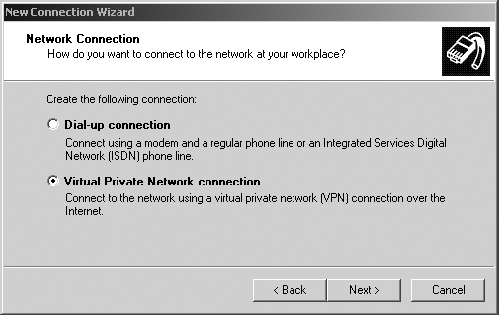
5. On the Network Connection screen, select Virtual Private Network Connection and click Next.
6. On the Connection Name screen, type the description VPN for your VPN connection. Click Next.
7. On the VPN Server Selection screen, type the name or IP address for your VPN server. Click Next.
8. On the Connection Availability screen, select My Use Only as the Create This Connection For option. Click Next.

9. On the Completing The New Connection Wizard screen, select the check box to add a shortcut to your desktop and click Finish to complete the wizard.
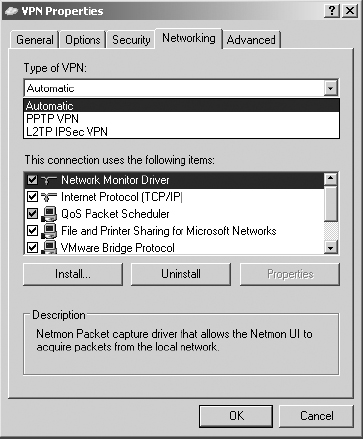
10. Launch the VPN connection from the desktop icon. Select Properties and then select the Networking tab.
11. From the Type Of VPN drop-down on the Networking tab, select PPTP VPN. Click OK to close the Properties dialog box.
Connecting the VPN Client to the VPN Server
1. In the Connect VPN dialog box, type the name of the account you granted dial-in permissions to in Task 6.2.
2. Type the password for this account.
3. Select Me Only for the option Save This User Name And Password For The Following Users.

4. Click Connect. You should see a dialog box that details the process of the authentication and then the registration of your computer on the (remote) network.
5. You are now connected to the VPN server. All communications between this client system and the VPN server system are encrypted.
Confirming the VPN Connection
1. Log on to the VPN server as the Administrator.
2. If it’s not already running, launch RRAS by selecting Start ⇒ Programs ⇒ Administration Tools ⇒ Routing And Remote Access.
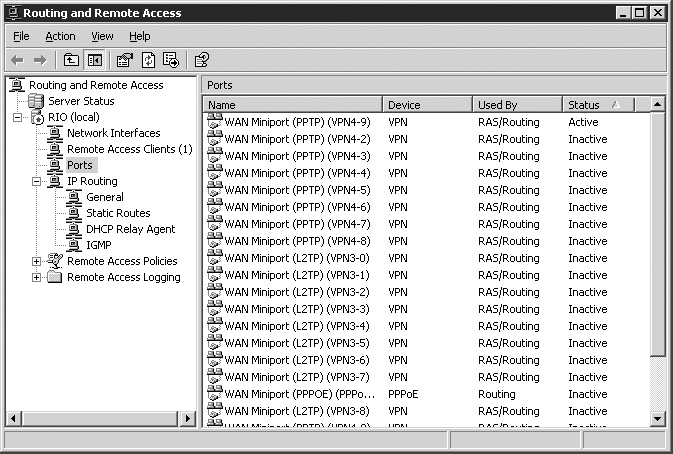
3. Expand server_name (local) as necessary. Select Ports.
4. In the right pane, click once or twice on the column title Status to see the active connection on the PPTP port.
5. In the left pane, notice that there is currently one Remote Access Client. Select Remote Access Clients in the left pane.
6. You should see your inbound VPN connection in the right pane. Right-click on the VPN client connection in the right pane and select Disconnect.
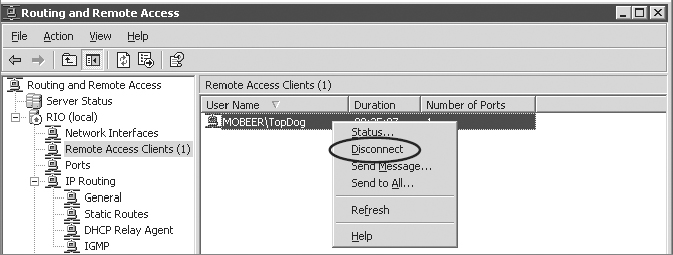

Notice that you can disconnect this VPN client or send the client a message.
Criteria for Completion
You have completed this task when you have configured a VPN client and successfully connected to the VPN server, then confirmed the connection by viewing the Ports and Remote Access Clients properties of the RRAS/VPN server.