
Task 6.4: Implementing Secure Remote Administration
It has become routine practice to perform administrative tasks from the comfort of your own office, rather than sitting in the cold, cluttered, noisy server room. This is made possible by remote administration tools, and one of the most prevalent is the Remote Desktop Protocol (RDP).
RDP is an extension of Terminal Services (TS). It allows for a maximum of two inbound connections for administrative purposes. Terminal Services limits the number of inbound connections by the number of client access licenses you purchase and activate.
RDP uses the same port as TS, port 3389, and is automatically encrypted using 128-bit RC4. This can be further strengthened by implementing the newer RDP over SSL. RDP over SSL still uses port 3389 and requires a digital certificate on the TS server. For even stronger security, you can implement mutual authentication by requiring a digital certificate on the TS client as well.
RDP has been available as long ago as Windows NT 4 and can be used on both server and client operating systems.
Scenario
You are the administrator of a Microsoft Windows environment and need to perform administrative tasks on remote XP Professional computers.
Scope of Task
Duration
This task should take 30 minutes.
Setup
Remote Desktop must be enabled on the target remote system. This system will be the RDP server.
There are several considerations regarding the status and configuration of the user account that will be performing the remote administration. The client system must be configured correctly to implement the RDP connection to the RDP server.
Caveat
RDP access to a system is a fine thing for an administrator who doesn’t have physical access to a system, or who prefers to work in the comfort of their own office instead of the server room. It is also a fine thing for an attacker. This is the attacker’s remote doorway into your systems. Allowing RDP connections to any system increases the vulnerability of those systems and should be carefully considered prior to implementation.
Procedure
You must configure the target XP Professional system to allow for remote administration.
Once enabled, members of the Local Administrators group (or Domain Administrators group if the system is a domain member) already have Remote Administration access. If the remote administration account is not an administrator, their account must be added to the local Remote Desktop Users group.
In addition, every remote administration user account must have a password (the password cannot be blank) in order for RDP to allow the connection.
Finally, you must configure the RDP client to make the connection to the target RDP server.
Equipment Used
For this task, you must have:
- Windows XP Professional system
- Windows XP Professional or Server 2003 system (target system)
- Administrator access
Details
Configuring the RDP Server
1. Log on to the Windows XP Professional or Server 2003 target system as the Administrator. This system will be the RDP server.
2. Right-click on My Computer and select Properties. (You can find My Computer in the Control Panel as well by selecting the System applet.)
3. Select the Remote tab.
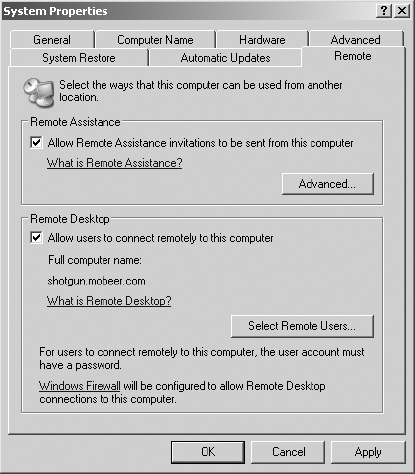
4. In the Remote Desktop section, enable the Allow Users To Connect Remotely To This Computer check box.

Notice the statement regarding the password requirement for remote users.
5. Click the Select Remote Users button. The resulting dialog box is where you would add nonadministrator user accounts to enable them for remote administration purposes on this target RDP server.
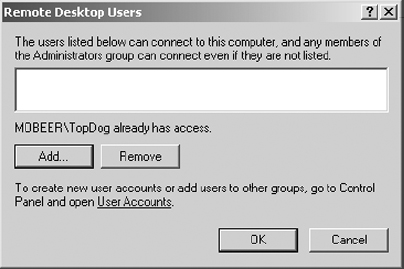
Notice the statement regarding members of the Administrators group already having access through RDP. Since you will be using an Administrator account to perform the remote administration, you do not need to add any accounts to this dialog box.
6. In the Remote Desktop Users dialog box, click Cancel. Click OK to close the System Properties dialog box.
Configuring the RDP Client
1. Log on to the Windows XP Professional system you will use for remote administration as the Administrator. This system is not the target system and will be the RDP client.
2. Select Start ⇒ Programs ⇒ Accessories ⇒ Communications ⇒ Remote Desktop Connection.
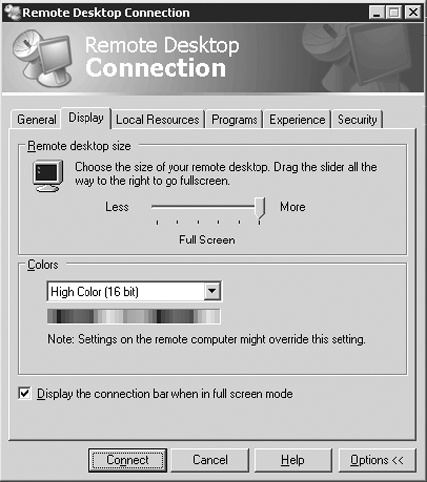
3. Select the Display tab. This is where you configure the display quality.
Increasing the display quality could degrade the performance of the RDP connection. Decreasing the number of colors typically provides the greatest improvement on the performance of the RDP connection.
4. Select the Local Resources tab. This is where you connect your local resources (sound, keyboard, and local devices) to the remote system inside the RDP session.
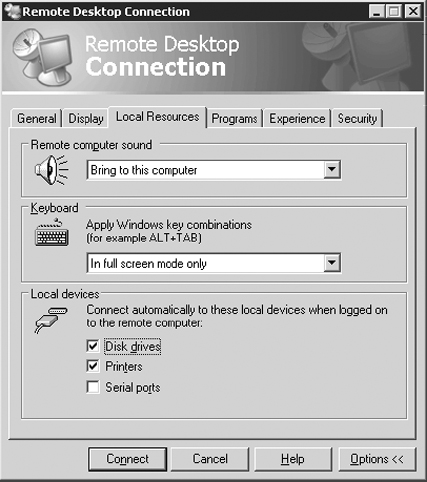
5. Enable the Disk Drives check box in the Local Devices section of the Local Resources tab.

You should connect your local drives to the remote system only if you trust the remote system. This connection could provide access for the transfer of viruses or other malware between the two systems.
The Programs tab is used to configure an application to launch automatically when the RDP connection is initialized. This tab could be used to launch administrative tools (such as the backup utility) on the remote system, for example.
6. Select the Experience tab. From the drop-down list, select the appropriate connection type that exists between the RDP client and the RDP server.
Selecting a connection type that exceeds the actual connection performance may degrade the performance of the RDP session.

7. Select the Security tab. This is where you would configure the SSL component if you had implemented it correctly on the RDP server. Since this was not configured in this task, select No Authentication in the Authentication drop-down list.
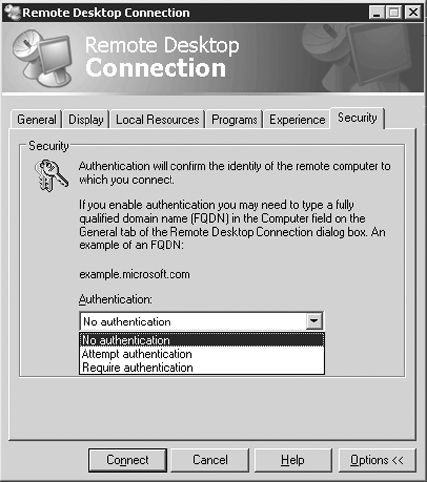
Implementing authentication would require a digital certificate on the RDP server and could be strengthened further by implementing a digital certificate on the RDP client as well.
8. Select the General tab.

Complete this tab as follows:
- Computer: Type the name of the RDP server.
- User Name: Type the name of the administrative account you plan to use for the RDP session.
- Password: Type the password for the administrative account you plan to use for the RDP session.
- Domain: Type the domain name that the RDP server and client are members of. If they are not members of a domain, leave this field blank.
- Enable the Save My Password check box.
9. Click the Save As button to record your settings. Save the RDP client configuration to the desktop and assign it the name RDP_Server.rdp, where RDP_Server is the name of your own RDP server.

Launching the RDP Connection
1. On the General tab of the Remote Desktop Connection dialog box, click Connect.
2. You should receive a warning regarding the risks associated with connecting your local disk drives to the remote system. Click OK to clear the warning message.
3. You should now be presented with a session on the remote system, the RDP server. You are logged on locally to this system and are functioning as if you were sitting at the local console of the remote system.
4. You can use the controls at the top of the window to display or minimize the RDP session.
From here you can now run any applications and/or administrative utilities on the remote system.
5. Click the Start button and select to disconnect the RDP client.
6. Confirm the disconnection to close the RDP session.
Criteria for Completion
You have completed this task when you have configured the RDP server and the desired user account for the remote administration. You must also have configured the RDP client and initiated, then terminated, the RDP session.