
Chapter 3
Understanding the Pro Tools Windows
IN THIS CHAPTER
![]() Looking at the Transport window
Looking at the Transport window
![]() Examining the Mix window
Examining the Mix window
![]() Discovering the Edit window
Discovering the Edit window
Recognizing that recording is a complex process, Pro Tools gives you three distinct windows in which to work: Transport, Mix, and Edit. Each window performs a certain set of functions and gives you control of a specific set of details. These are outlined in this chapter. These windows are the heart and soul of Pro Tools. The more comfortable you are navigating them, the easier life will be as you create your masterpieces.
Tackling the Transport Window
At its most basic level, the Transport window — see Figure 3-1 — acts like the transport mechanism of a tape deck that moves the tape past the record and playback heads: It controls the digital processes that correspond to recording, playing, stopping, rewinding, and so on. On a deeper level, however, it also offers a host of other functions. This section details all the Transport window’s functions.

FIGURE 3-1: The Transport window acts like tape-deck controls.
Adjusting the Transport window
Some people salivate at the thought of information overkill, while others live by the maxim, “Less is more.” Pro Tools is smart enough to accommodate both schools of thought. In case you don’t want all the information (and the accompanying clutter) present in the Transport window as shown in Figure 3-1, you can show or hide parts of it as you choose. You can find the commands for paring down the size of the Transport window under the View menu at the top of the main Pro Tools window. Just choose View ⇒ Transport and then choose from the options listed — Counters, MIDI Controls, Synchronization, Track Collaboration (if you’re working on a collaboration project), Output Meters, and Expanded — as shown in Figure 3-2.
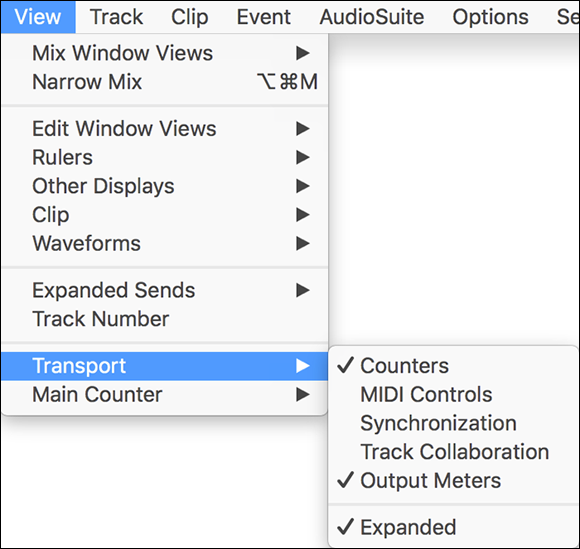
FIGURE 3-2: Adjust the Transport window from the View menu.
Basic controls
The upper-left portion of the Transport window is home to your basic, traditional transport controls. If you honed your recording skills on a tape deck, you’ll be right at home. Taking a look at Figure 3-3, you’ll find (going from left to right) the following:
 Online: Engaging this button allows you to control record and playback with an external device. Before you can use this feature, you need to connect your device and specify its synchronization settings in Pro Tools. (Check out the Synchronization section of the Pro Tools Reference guide that came with your software for details on how to do this.)
 Return to Zero: Clicking this button takes you back to the beginning of the session. You can also press Return/Enter if you prefer to use your keyboard instead of the mouse.
 Rewind: Clicking this button “rewinds” the session in one of two ways, providing a fine-tuned control that’s really hard to get with the mechanics of a tape deck:
- Click Rewind and hold down the mouse button. The session rewinds until you release the mouse button. One cool thing about this way of rewinding is that when you release the Rewind button, a marker is placed in the song, and all you have to do to rewind back to that point is hit the Stop button. The session goes right back to that point. (This is great if you want to check the same spot several times — for example, to make sure that new guitar part comes in right on cue.)
- Click the button. Each click rewinds the session a prescribed amount, depending on the time-scale setting displayed in your main counter (more about that in the next section). For example, if you have your main counter set up to display bars (measures) and beats, clicking the Rewind button moves the session back one bar of music. If you have min:seconds or samples showing in the display, the session moves back in one-second increments.
 Stop: Clicking Stop simply stops the session. (You can get the same thing done much faster, though, by pressing the spacebar on your keyboard — no fumbling with the mouse required.)
 Play: Clicking the Play button starts the session. Simply clicking the Play button (or pressing the spacebar) starts playback; clicking the Record button first and then the Play button starts recording, as long as you have a track enabled to record. Book 3, Chapter 3 covers this in detail.
 Fast Forward: To move quickly through the session, just use the Fast Forward button. You can use Fast Forward one of two ways:
- Click Fast Forward and hold down the mouse button. The session fast-forwards until you release the mouse button. Depending on whether you were playing the session when you press and hold the button or the session was stopped, releasing the Fast Forward button can either return you to play mode or stop the session at that point.
- Click the button. Each click forwards the session a prescribed amount based upon the time scale setting displayed in your main counter (see the next section). For example, if you have your main counter set up to display bars and beats, clicking the Fast Forward button moves the session forward one bar of music. If you have min:seconds or samples set in the display, the session moves forward by one-second increments.
 Go to End: Clicking this button takes you to the end of the session. If you don’t want to use your mouse, you can also press Option+Return (Mac) or Ctrl+Enter (PC).
 Record: Clicking the Record button readies your session to record any enabled tracks. (Book 3, Chapter 4 talks about this more.) You need to have at least one track enabled for this function to work. You’ll be alerted if you don’t. If you don’t want to use the mouse, you can ready recording by pressing ⌘ +spacebar (Mac) or Ctrl+spacebar (PC). To actually record, you need to click the Play button after clicking Record.
In addition to readying recording, you can toggle through the different Record modes by pressing the Control key while you click with your mouse (Mac) or right-click (PC). These Record modes are covered in detail in Book 3, Chapter 4, but here is an overview:
- Nondestructive: This Record mode is indicated (rather subtly) by not showing an icon in the Record button; it doesn’t delete any previous takes (a recorded performance) on that track.
Destructive: This mode — indicated by a small D in the center of the Record button — records over the track, destroying any previous takes as it does so.
 Don’t use this mode unless you absolutely don’t want the previous take, because it’s gone forever if you do so.
- Loop: This mode — indicated by a loop graphic inside the Record button — allows you to repeatedly record over a selected section of your track (called, curiously enough, a loop). It’s a handy function if you have a section that may need more than one try to get right because when you’re done recording a take, it returns you to the start of the looped section and begins recording over again. Each loop through the section is saved and added to your track’s playlist where you can choose the best one later.
- Quick-punch: This mode is indicated by a P in the center of the Record button. Quick-punch allows you to automatically punch in and out of a section of a song. For example, if your bass player just laid down a killer part except for two lousy notes, you can rerecord just those notes on the fly by punching in (start recording) just before the notes and punching out (stop recording) right after them.

FIGURE 3-3: The Basic controls.
Counters
The Counters section of the Transport window tells you where you are in the session. This section contains only the main counter for your session.
 If the Counters section isn’t visible, choose View ⇒ Transport ⇒ Counter (to see the main counter) — or View ⇒ Transport ⇒ Expanded (to see the rest of the counters listed in this section). Figure 3-4 shows how the Transport window looks with both these options selected.
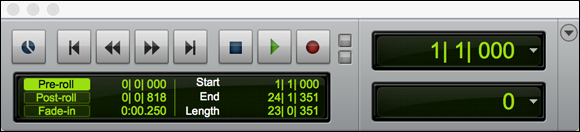
FIGURE 3-4: The Counters and Expanded sections.
The Counters section of the Transport window is home to the main counter, which is located in the center of the window and shows where you are in the session. There is a drop-down menu located to the right of this counter where you can choose the format — bars:beats, min:seconds, samples — to be displayed. Simply click the white triangle and choose the format you desire.
Expanded
The Expanded section of the Transport window shows a secondary counter for your session as well as additional goodies to help you get around your session. These include pre- and post-roll setting; a transport master selector for synchronizing Pro Tools with other devices; and start, end, and length times for selections. These are all shown in Figure 3-4.
The Expanded section of the Transport window contains the following display extras:
- Secondary counter: Below the main counter is a secondary counter for your session. You can select the format displayed by opening the drop-down menu to the right of the counter. Again, your choices are bars:beats, min:seconds, and samples. This lets you have two different counters displayed at one time, which is handy if you want to see where you are in your session in two different formats, such as min:seconds and bars:beats.
Pre-roll: Pre-roll allows you to choose an amount of time that the session plays before the timeline of your session begins or wherever you have the Start cursor. This is useful if you use a click track (the equivalent of an electronic metronome) or want to do some punch recording; whoever’s playing can use it to get used to the tempo before you start to record. (See the “MIDI controls” section, later in this chapter, for more on using a click track. See Book 4, Chapter 3 for more on punch recording.)
You choose the amount of your pre-roll by clicking in the value in the Pre-roll counter and then either typing a new value or (with the mouse button held down) scrolling up or down. Engage the Pre-roll function by clicking the Pre-roll button next to the counter.
Post-roll: Post-roll is pretty much like Pre-roll except that in this case (surprise, surprise), you tack on a specified amount of time after the session ends (or wherever the timeline End point is set).
You choose the length of your post-roll by clicking in the value in the Post-roll counter and typing a new value — or, with your mouse held down, scrolling up or down. Engage the Post-roll function by clicking the Post-roll button next to the counter.
- Fade In: Fade In begins the sound of your session with a fade in. This can make the sound less jarring than having it start it full volume. You set in increments of 1/1,000 of a second. The default is 250ms (milliseconds).
- Start: Use the Start counter to set the beginning of a range within which you can play or record. You choose this starting point by clicking in the counter window and then typing in the value, or clicking and holding with your mouse (scrolling up or down to get the value you want).
- End: The End counter shows you where the play or record range ends. You can choose this endpoint by clicking in the counter window and then typing in the value, or clicking and holding with your mouse (scrolling up or down to get the value you want).
Length: The Length counter shows the length of the play range created with the Start and End counters. Like with the other counters, you can type in a value by clicking in the counter window first, or you can click and hold your mouse button while you scroll up or down.
 Typing in a value other than what is shown after you set the Start and End counter changes the placement of the End counter.
MIDI controls
The MIDI controls section is located on the right side of the Transport window. (If it’s not showing in your Transport window, choose View ⇒ Transport ⇒ MIDI Controls.) The MIDI Controls section, as shown on the right side of Figure 3-5, includes the following.

FIGURE 3-5: The MIDI controls section of the Transport window.
 Wait for Note: Clicking this button lets Pro Tools know it should wait to start recording until it receives a musical note from a MIDI device. This allows you to ensure that your first note is precisely at the beginning of the recorded section.
 Metronome Click: Clicking this button turns on and off the metronome signal sent through the MIDI out of your MIDI interface.
Double-clicking this button opens the Click/Countoff Options dialog box (see Figure 3-6) where you can choose various Click parameters, including when the click sounds, what note it transmits, and what MIDI port (output) it uses.
 Countoff: Clicking this button turns on and off a specified count-off of the length chosen at the bottom of the Click/Countoff dialog box (see Figure 3-6). (Double-clicking the Countoff button opens this dialog box.) You can set the countoff to sound only during recording or during both recording and playback. You type in the length of this count-off in the Bars text box in the Click/Countoff Options dialog box. This number shows up in the Countoff button after the dialog box is closed.
 MIDI Merge: With this selector, you can either merge your recorded MIDI data with existing MIDI data on the record-enabled track or erase the existing data and replace it with the new stuff. Engaging the button lets you merge data.
 Conductor: Clicking this button turns on the tempo map defined in the Tempo line of the Edit window. (See “Examining the Edit Window,” later in this chapter, for more on the Tempo line.) You create this map by double-clicking the Meter button (described next).
Alternatively, you can disable this button and choose a tempo by manually entering it (more about choosing the tempo in a minute).
 Meter: This button shows you the time signature for the present section of the session. Double-click the time signature, and a dialog box opens, allowing you to specify time signature (meter), tempo, and start point for these values. With this dialog box, you can set up a tempo map, which is a scheme describing tempo changes for your entire song, no matter how complex. (Book 3, Chapter 4 details how to create a tempo map.)
 Note: When the Conductor button is not engaged, the Note icon tells you what value note the metronome is sounding. Click this icon, and a drop-down menu opens, letting you choose the value from whole notes to sixteenth notes.
 Tempo: With the Conductor button engaged, this box simply shows you what tempo the current section of the session is in. With the Conductor button disabled, you can manually enter any tempo you like. You can do this in two ways:
- Type it in. Click in the box where the tempo is displayed, type in a number (in beats per minute), and then press Return/Enter. The metronome and counters play at this tempo.
- Slide it in. Adjust the horizontal slider located under the Conductor, Meter, and Tempo buttons to choose your tempo. Slide to the right, and you get a faster tempo; slide left for a slower one.
- Tap it in. By pressing the T key on your keyboard to the tempo you want, you can set Pro Tools to a tempo without having to know exactly how many beats per minute you want. (This is a great feature for people who aren’t comfortable with metronome numbers.)
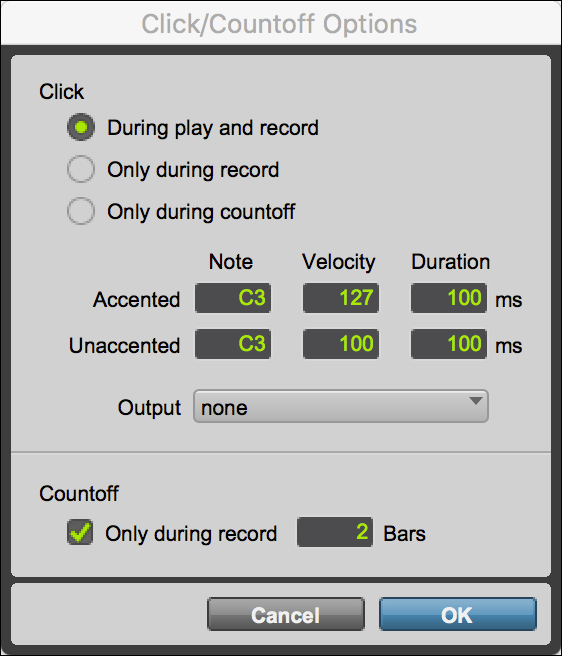
FIGURE 3-6: Choose click and countoff settings for your session.
Synchronization
The synchronization section is located on the right side of the Transport window. (If it’s not showing in your Transport window, choose View ⇒ Transport ⇒ Synchronization.) The synchronization section, as shown on the right side of Figure 3-7, includes the following:
- Online: Engaging this button allows you to control record and playback with an external device. Before you can use this feature, you need to connect your device and specify its synchronization settings in Pro Tools. (Check out the Synchronization section of the Pro Tools Reference guide that came with your software for details on how to do this.)
- Generate MTC: Engaging this button allows your session to generate MIDI time code to control the synchronization of other MIDI devices used in your session.

FIGURE 3-7: Choose a Synchronization option to control the timing of other devices from your session.
Track collaboration
When you’re working on a collaboration project, the Track Collaboration section is located on the right side of the Transport window. (If it’s not showing in your Transport window, choose View ⇒ Transport ⇒ Track Collaboration.) The track collaboration section, as shown on the right side of Figure 3-8, includes the following:
- Invite User: Clicking this button opens a window to allow you to invite someone in your contacts list to your collaboration.
- Show Artist Chat: Clicking this button opens a chat window. This icon will turn green when you have a message from a collaborator.
- Collaboration Alerts: This icon turns orange when you have ownership of a track and a collaborator wants to take ownership.
- Upload Changes: This button will be green when you make any changes to the project. Click the button to send your changes to the cloud or engage the Auto button below to make this process automatic.
- Download Changes: This button will be green if another collaborator has made and changes to the project. Click the button to update your project or engage the Auto button below to automatically keep up to date on changes.
- Download Shared Tracks: This button will be green if there are tracks in your project collaboration that are not in your session. Click to download the tracks. You can also engage the Auto button below to automatically download any tracks as they are available.
- Cloud Storage Usage: This meter shows you how much storage you’re using in your cloud storage account on Avid’s site.

FIGURE 3-8: The Track Collaboration view lets you manage your collaborations in your Pro Tools Project.
Output meters
The output meters section is located on the right side of the Transport window. (If it’s not showing in your Transport window, choose View ⇒ Transport ⇒ Output Meters.) This section, as shown on the right side of Figure 3-9, shows the output level for your session.

FIGURE 3-9: The Output Meters view shows the level of the audio in your session.
Examining the Edit Window
The Edit window, as shown in Figure 3-10, is where you’ll do most of your work. Here, everything is set up in a timeline so you can see what’s happening in the session while it plays. This window contains a variety of tracking information, including inputs and outputs, sends, inserts, and automations data. The Edit window also has the tools you need to do audio and MIDI data editing, such as creating, arranging, and editing specific regions of an audio track.
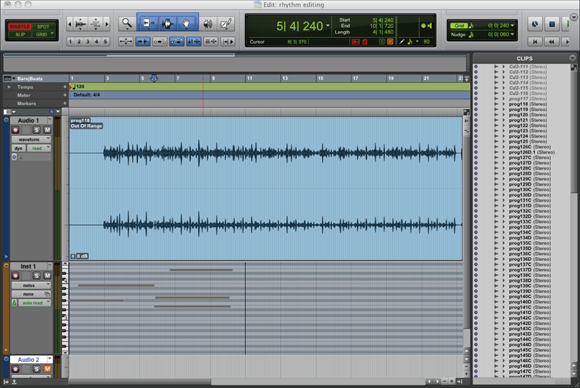
FIGURE 3-10: The Edit window shows a timeline of all your session data.
The list is almost endless. Don’t fret though; everything you need to know to use this window effectively is in this section.
Taking a look at track controls
Each track, whether audio or MIDI, is shown in the Edit window. These run horizontally underneath the Timeline section of the window. Figure 3-11 gives you a close-up view of the track section of the Edit window.

FIGURE 3-11: The track section of the Edit window shows information on each track in the session.
Basic controls
On the far left of the track section of the Edit window are some basic controls. These include the following:
- Track Name: Double-click this button (which shows the name of the track) to open a window where you can the track’s name and also add some comments. (All comments show up in the Comments section of the expanded Edit window or in the Mix window.)
- Playlist selector: Click and hold this button to open a drop-down menu that allows you to choose from edit playlists. (See Book 4, Chapter 1 for more on editing playlists.)
- Record Enable: Click this button to enable the track for recording.
- Input Monitoring (audio and VCA master tracks only): This button engages the Input Monitoring feature for the track.
- Solo: Clicking this button solos a track — turns off the rest of the tracks — in a mix.
- Mute: Clicking this button turns off this track.
- Track View selector: Click and hold this button to open a menu that lets you choose different views in the Timeline section of the track in the session. Your options include Blocks, Analysis, Warp, Waveform, Volume, Mute, and Pan.
- Track Height selector: Clicking this arrow opens a drop-down menu from which you choose the height of the track data display. You choices include Micro, Mini, Small, Medium, Large, Jumbo, Extreme, and Fit to Window. You can also click the ruler on the right side of the track control section to choose your track height. The options are the same.
- Automation Mode selector: Click and hold this button to open a menu that lets you choose from various automation modes, including Off, Read, Touch, Latch, and Write. Each of these display modes shows the waveform in the background and the setting for the automation data in the foreground. (Book 6, Chapter 6 has more on automation modes and how to use them.)
- Track Freeze: This button freezes and unfreezes the audio on a track. Freezing audio processes the audio and plug-ins for the track, freeing up computer power that can be used on other tracks. It is also useful when you are collaborating with other people who my not have the plug-in you used on the track.
- Elastic Audio Plug-in Selector: Click and hold this button to choose an Elastic Audio plug-in for the track.
- Voice selector: Clicking this button turns the track on and off. Click and hold this button to choose between Dyn (the track is heard if it has data in it) and Off (the track doesn’t sound, even if it has an audio or MIDI file attached to it). Because Pro Tools allows you to have a maximum of 128 active voices (at 44.1 or 48 kHz), you can use this selector to keep a track from occupying one of those voices.
Optional windows in the track section
You can enhance your Edit window view by adding information from the Mix window for each track. Just choose View ⇒ Edit Window Views ⇒ All from the main menu, and you’ll end up with something that looks like Figure 3-12. This is a handy feature if you have only one monitor and you want to be able to see the comments, inserts, sends, and I/O settings (or any combination) for each track without having to open the Mix window. (Not sure what inserts, sends, and I/O settings actually are? Don’t worry. I detail those in the “Managing the Mix Window” section, later in this chapter.)

FIGURE 3-12: The expanded view of the channel strip in the Edit menu.
One of the really cool things in this section of the expanded window is that you can actually open a channel strip for an individual track by clicking the small fader icon located to the right of the output selector in the I/O settings window. Click the icon again, and the channel strip disappears. Figure 3-13 shows the channel strip after it’s called up from the Edit window. (This feature is so handy that I rarely use the Mix window anymore.)

FIGURE 3-13: Click the little fader icon at the bottom of the I/O settings window, and a channel strip pops up.
Examining edit modes
Editing in Pro Tools is done on regions. Regions are representations of the audio or MIDI files stored on your hard drive. What makes editing this way so powerful is that when you change a region, you aren’t actually changing the audio file itself. (There are some exclusions to this, which are covered in Book 5, Chapters 3, 4, and 5.) Instead, you’re changing only how Pro Tools plays it back.
When you want to move regions around in Pro Tools, you have four edit modes in which to work: Shuffle, Spot, Slip, and Grid, as shown in Figure 3-14. These are located in the upper-left corner of the Edit Window. The following list describes each of these modes.
- Shuffle: In this mode, you can shuffle a region and place it automatically at the end of the nearest region. For example, if you want to move the second bar of a four-bar phrase to the last bar, all you have to do is create a separate region for each bar, grab it by clicking it with the Grabber tool, and move it over to the end. (Book 5, Chapter 1 explains, in detail, how to do this.) The third bar moves over to replace the second; the original second bar snaps right to the end of the fourth bar. This mode is handy for shuffling regions while making sure that you don’t have any overlap or dead space between them.
- Spot: You can use this mode to designate the exact timeline placement of a region you want to move. When you click a region using the Grabber tool with Spot mode active, a dialog box pops up, asking you to enter the start point. Do so and click OK; the selected region is placed right where you want it.
- Slip: Use this mode to move regions anywhere you want with your mouse by selecting them any of the ways described in Book 5, Chapter 1. You can have regions overlap or leave space between them, for instance.
- Grid: This mode enables you to move regions to a time grid — user-defined divisions of your session. You can set the time grid’s scale by choosing Tools ⇒ Grid Value in the main Edit window. You can choose from two types of grids: Absolute and Relative. I detail these in Book 5, Chapter 1.
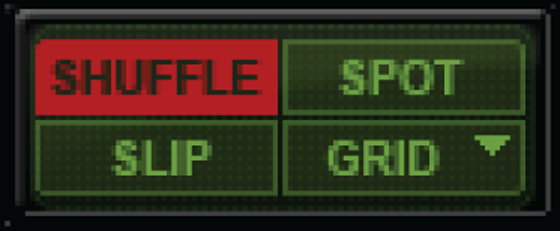
FIGURE 3-14: The four edit modes in Pro Tools.
For more detailed information on these edit modes, check out Book 5, Chapter 1.
Taking a look at Track Collaboration tools
If you’re working in a collaboration project, the Track Collaboration section in the Edit window is located immediately to the right of the edit mode controls. Like with the controls in the Transport window (see Track Collaboration earlier in this chapter), the track collaboration section in Edit window, as shown in Figure 3-15, includes the following:
- Invite User: Clicking this button opens a window to allow you to invite someone in your contacts list to your collaboration.
- Show Artist Chat: Clicking this button opens a chat window. This icon will turn green when you have a message from a collaborator.
- Collaboration Alerts: This icon turns orange when you have ownership of a track and a collaborator wants to take ownership.
- Upload Changes: This button will be green when you make any changes to the project. Click the button to send your changes to the cloud or engage the Auto button below to make this process automatic.
- Download Changes: This button will be green if another collaborator has made and changes to the project. Click the button to update your project or engage the Auto button below to automatically keep up to date on changes.
- Download Shared Tracks: This button will be green if there are tracks in your project collaboration that are not in your session. Click to download the tracks. You can also engage the Auto button below to automatically download any tracks as they are available.
- Cloud Storage Usage: This meter shows you how much storage you’re using in your cloud storage account on Avid’s site.
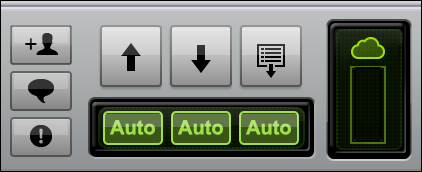
FIGURE 3-15: The Edit window includes Track Collaboration tools.
Zeroing in on Zoom controls
The Zoom controls (see Figure 3-16) are located next to the Edit Mode selectors. Use these buttons to fit a good working view of your audio and MIDI regions into your screen by specifying horizontal and vertical zoom (as the following list makes clear).
- Horizontal Zoom: These outer two Zoom buttons control the horizontal zoom of the timeline as well as all audio and MIDI tracks and regions. Clicking the left button narrows the view; clicking the right button lengthens it.
- Vertical Zoom: These two center Zoom buttons control vertical zoom for audio and MIDI: The button for audio is at center-left, and the one for MIDI is at center-right. Clicking the arrow at the top of either button increases the height of the display; clicking the arrow at the bottom decreases the height.
- Zoom Presets: At the bottom of the Zoom Controls section are five easily programmable presets. On a Mac, you simply ⌘ -click any one of the five buttons to assign your present setting to that button. On a PC, a Ctrl-click does the trick. The Zoom settings are saved, and you can recall them by clicking the assigned preset number.
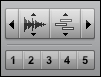
FIGURE 3-16: The Zoom controls.
Elucidating edit tools
Pro Tools has some powerful editing features, easily accessible from the Edit toolbar, found next to the Zoom controls at the top of the Edit window. Figure 3-17 shows you what the toolbar icons for these tools look like, and the following list tells you what the tools can do for you.
- Zoomer: The Zoomer tool does much the same thing as the Horizontal Zoom tool, with a handy editing advantage: It zooms right to the point that you click with your mouse or the area you click and drag across. You can choose between Normal and Single zoom (check out Book 5, Chapter 3 for more).
- Trim: This tool lets you change the size of a region by clicking the beginning or end of the region and then sliding it to where you want it. You can choose among Standard, TCE, and Loop options (Book 5, Chapter 3 details these options).
- Selector: Use the Selector tool to highlight a spot within a region so you can cut, paste, or do whatever you want with it. All you have to do is click and drag the mouse over the section you want to select.
- Grabber: In general terms, the Grabber tool lets you grab a region to move around your session. It has three options (which you can view if you click and hold the mouse button with the pointer over the tool): the Time, Object, and the Separation tools. (Note: Whichever tool you used last is the default tool until you select the other.) You can explore these further in Book 5, Chapter 3.
- Time: The Time Grabber tool lets you select an entire region and then move it anywhere within (that is, and between) tracks. You simply click the region with your mouse, hold down the button, and then drag the region to where you want it.
- Separation: The Separation Grabber tool lets you move a portion of a region within or between tracks. To select a portion to move, use the Selector tool described earlier in this list.
- Scrubber: Use the Scrubber tool to listen to a region without having to play the entire track. To use this tool, click the region and drag it forward to hear the audio play forward. Drag the mouse back along the region to hear the audio play backward. This tool is handy when you want to locate a specific note in the audio region.
- Pencil: Use the Pencil tool to redraw audio waveforms (great for drawing over clipped notes, for example); to do MIDI editing, such as inserting or deleting notes; or draw automation settings, among other things. (Book 5, Chapter 3 explains waveform editing in detail.) Clicking and holding this button opens a pop-up menu that offers seven Pencil types (as shown in Figure 3-18) as well as the Customize Note Duration option to use. (For more on custom note durations, see Book 5, Chapter 5.)
- Smart Tool: This tool combines the functions of the Standard Trimmer, Selector, and Grabber tools. It changes how the cursor works according to where you are within a region, automatically becoming the appropriate tool for that section. This keeps you from having to constantly switch tools as you work. (Ah, progress.)
- Zoom toggle: This button lets you toggle between two zoom settings. To go to a saved zoom state, simply engage this button. If you don’t like the setting, make a change to the horizontal or vertical zoom, and it will be saved if the zoom toggle button is engaged. Then to switch to the previous zoom state, disengage the toggle.
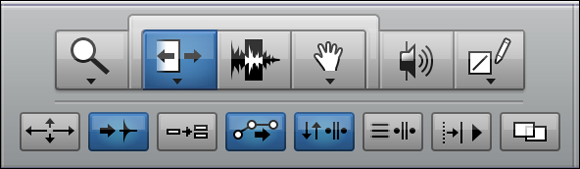
FIGURE 3-17: Pro Tools Edit tools provide lots of editing power.
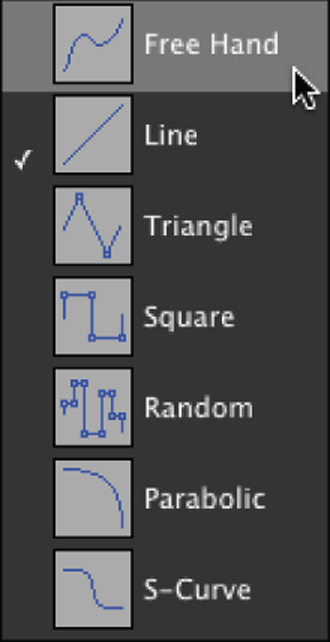
FIGURE 3-18: The Pencil tool has five pencil-shape options.
Looking at counter displays
The Edit window has two distinct counter displays; for each display, you have a choice among five different formats — bars and beats, minutes and seconds, timecode, feet+frames, and samples — for showing where you actually are in the session. You choose your format from a drop-down menu that you access by clicking the small arrow located to the right of the display, as shown in Figure 3-19. This is a handy feature for being able to see where you are in your session. For example, I find that having my main counter set to bars and beats — and the secondary counter set to minutes and seconds — helps me keep track of where I am in the session and how that relates to the actual length of the tune. This is especially important if I have a tune that has to conform to a certain time limit (because I prefer to work in beats and bars).
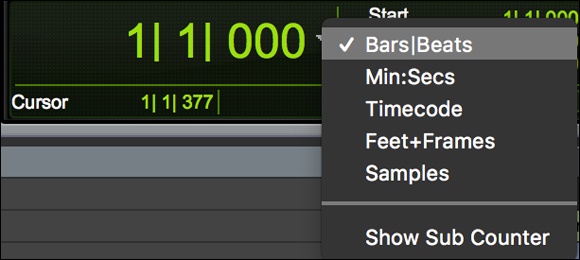
FIGURE 3-19: The counter displays can be set to show different formats.
Evaluating the Event Edit area
Next to the counter displays are the Event Edit displays. (See Figure 3-20.) These displays show the start point, end point, and length of a selected region in the same format as the main counter display. (See the previous section for more on counter displays.) If you choose a specific MIDI note to examine, another window opens that shows you the pitch, note velocity, and release velocity of that note.
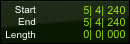
FIGURE 3-20: The Event Edit displays.
You can use the display to choose particular regions by clicking in the window and typing in the values you want. Press Return/Enter to activate the selection.
Instead of typing start points and end points into the Event Edit display, you can use the blue arrows in the Rulers section of the Edit window to choose your start point and end point, as shown in Figure 3-21. Click and drag each arrow to where you want it. You can also use the Selector tool and click and drag across the area you want to select. Book 5, Chapter 2 explains these options in detail.

FIGURE 3-21: Select start and end points.
Additional Navigation Controls
Right beneath the edit tools are another variety of useful tools: navigation tools that get you around Pro Tools. The following list gives you the goods on what each tool can do for you:
 Track View: The track view settings can be accessed by clicking on the icon located at the upper-left corner above your tracks. Use the Track View tool to choose different view formats for the Track section (the leftmost column) of the Edit window. Clicking the down arrow calls up a drop-down menu from which you can choose Comments, Mic Preamps, Instrument, Insets, Sends, I/O, Real-Time Properties, Track Color, All, or Minimal.
 Ruler View: The Ruler View selector is located next to the Bars/Beats timeline title in the upper-left corner of the Timeline section of the Edit window. Use the Ruler View tool to choose different view formats for the Ruler section, which is the section running horizontally along the top of the Edit window. Clicking the down arrow calls up a drop-down menu, where you can choose to see Bars:Beats, Minutes:Seconds, Timecode, Timecode 2, Samples, Markers, Tempo, Meter, Keys, All, or Main Ruler Only. The selection(s) you make here appear in the Timebase ruler section of the Edit window. (Check out the “Rulers rule!” section later in this chapter for details on the Timebase ruler.)
 Linearity Display Mode: Click the Linearity Display Mode button, located above the first track listed in the Edit Window (to the right of the Track View selector) to choose how the Edit window shows your session timescale. You have two options:
- Linear Sample Display: You see your session in samples.
- Linear Tick Display: You see your session in bars and beats.
 Tab to Transients: The Tab to Transients button, when engaged, allows you to press the Tab key on your keyboard and move from transient to transient in the highlighted audio track. (A transient, by the way, is the loud initial attack that first attracts your attention to a sound.) You can find this button below the Edit tools in the upper section of the Edit window. I love this feature for separating drum loops from a track. I simply engage this button, locate my cursor close to the start of my loop, and press the Tab key to go right at the start of the section I want to cut. Without this feature, I’d be messing around for quite a while, finding the exact start point of the part I want to separate.
 Keyboard Focus: Clicking the Command Keyboard Focus buttons toggle the Keyboard Focus option on and off. These buttons are located in the upper-right of the Groups, Clips and Track section of the Edit window.
What is the Keyboard Focus option, you ask? Well, here’s the short answer: This option allows you to use your keyboard to perform shortcuts; for example, you can select regions from the MIDI or audio lists (see the “Looking at lists” section later in this chapter), perform an edit, or enable or disable groups. For the long answer — as in, How do you actually use keyboard shortcuts? — these shortcuts are interspersed throughout the book for each command as I describe them.
 Link Timeline and Edit Selection: By default, the Timeline and Edit selections are linked so that if you choose a section to edit, the Timeline start and end times coincide with the start and end times of this selection, as shown on the left in Figure 3-22. Sometimes you want to be able to have a Timeline setting remain unchanged as you select a different place to edit, as on the right in Figure 3-22. (In this case, click the Link Timeline and Edit Selection button once to turn linking off; click again to turn linking back on.)
 Link Track and Edit Selection: When you have the Link Track and Edit Selection option engaged, making a selection in a track also highlights the track itself. This allows you to select several tracks and make adjustments to these tracks, such as adding them to a group or toggling the track view.
 Mirrored MIDI Editing: The Mirrored MIDI Editing function lets you globally edit all MIDI regions with the same name. This means that if you have a MIDI region that you use more than once per song and you want to change them all, clicking this button lets you make the change only once instead of for each time the region exists in your session.
 Automation Follows Edit: When engaged, the Automation Follows Edit button includes automation data in any edits to audio or MIDI data.
 Insertion Follows Playback: The Automation Follows Edit button has session playback follow the timeline insertion point.
 Layered Editing: The Layered Editing function ensures that, when you overlap clips while editing, the overlapped areas aren’t erased.
 Grid Value: This display shows the value for the Edit window’s grid — the boundary lines for your session. The grid boundary value appears in the same format as the main time scale — bars:beats, min:seconds, or samples — unless you choose otherwise from the drop-down menu, where you also choose the boundary resolution for the grid itself. This is a great function when you want to move regions around in a tune and have them align to certain locations. For example, if I move drum grooves, I can have them snap right to the beginning of a bar by setting the grid value to 1 measure and moving the region close to the start of the measure.
 Nudge Value: The Nudge Value display shows the setting for the distance that a region is moved with each press of the plus and minus keys on your keyboard. Clicking the down arrow calls up a drop-down menu, as shown in Figure 3-23, where you can choose this nudge value. Note that you can choose a number of different ways how your distances are to be measured — Bars:Beats, Min:Secs, Samples, or Regions/Markers.
 Cursor: The Cursor display tracks where your cursor is in the Timeline as well as the location of the sound wave in the selected track. (See Figure 3-24.) The cursor display is located below the time counter.
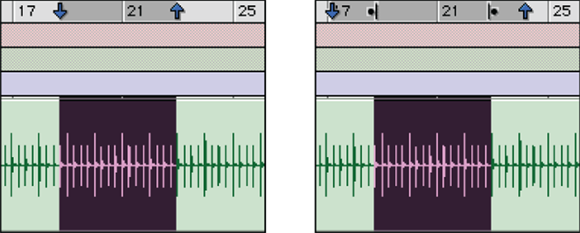
FIGURE 3-22: The Link Timeline and Edit Selection button, turned on (left) and turned off (right).

FIGURE 3-23: Use the drop-down menu for the grid and Nudge Value display windows to assign your value.
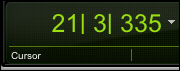
FIGURE 3-24: The Cursor display tells you the location of the cursor in the session.
Looking at lists
In the humdrum world, it’s hard to get excited about laundry lists and shopping lists. In the world of Pro Tools, however, lists are something to crow about because they can help you keep track of your tracks, audio regions, MIDI regions, and groups.
The lists for your tracks, edit groups, audio files, and MIDI files are displayed on either side of the Edit window. To keep track of — and/or manipulate — any of these lists, you’re going to want to familiarize yourself with one more list of features:
- Show/Hide Tracks: The Show/Hide Tracks list lets you choose which tracks get displayed in your Edit and Mix windows. As shown in Figure 3-25, you can choose to show all tracks, hide all tracks, to show/hide only those tracks you already selected, or to restore previously shown tracks. This menu is opened by clicking and holding over the Tracks title at the left side of the Edit window. (Refer to Figure 3-10.) If the Show/Hide section of the window isn’t visible, click the double arrows at the far lower left of the Edit window. The Show/Hide and Edit Groups (see the next bullet) section appear.
- Edit Groups: In Pro Tools, you can group selected tracks and perform an edit on them all at the same time. This is called working with an Edit Group. These groups are displayed in the Edit Groups list; clicking the name of the group toggles the enabling of a group on and off. You can also create, delete, modify, or suspend groups by clicking and holding the Edit Groups title at the top of the groups list and then choosing an option from the drop-down menu that appears, as shown in Figure 3-26.
Clips: The Clips list in Pro Tools contains representations of the audio and MIDI files associated with your session. The Clips list shows all the audio and MIDI regions that are part of your session. You can do a host of things to these clips, such as renaming, clearing, exporting, and compacting.
These functions are performed by opening the drop-down menu shown in Figure 3-27. To open this menu, click and hold the Clips title at the top of the Clips list. If the Clips list isn’t open in your session, click the double arrow at the bottom-right corner of the Edit window to open it.
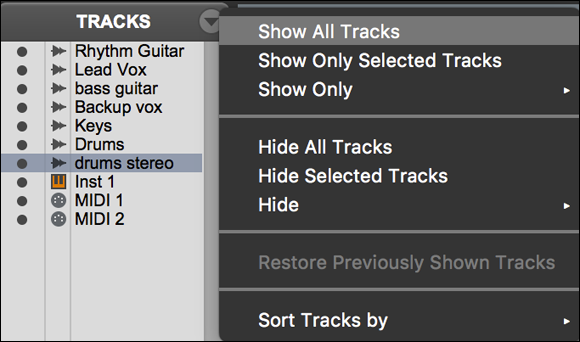
FIGURE 3-25: Choose which tracks to display in the Edit and the Mix windows.
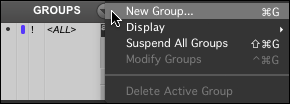
FIGURE 3-26: The Edit Groups list drop-down menu.
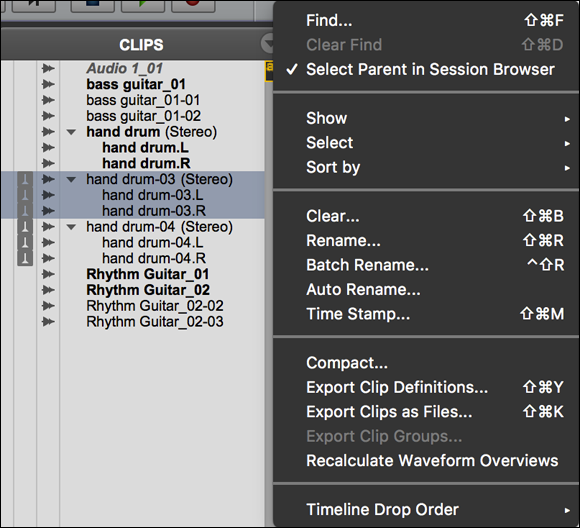
FIGURE 3-27: The Audio Regions list pop-up menu has many useful functions.
Rulers rule!
Lists hover discretely to the left or right of the Edit window. Rulers (as you might expect) lord it over the top of the Edit window and are masters of all they survey.
In Pro Tools-speak, rulers are actually referred to as Timebase rulers; they show you where you are within the session (see Figure 3-28). The Timebase Rulers section of the Edit window also lets you view the time, tempo, meter, and markers of a session. The following list gives details on the four timelines.
- Time: You have a choice between the now-familiar formats of Bars:Beats, Min:Secs, and Samples. By default, this timeline shows the same time format as the main counter, but it’s easy to change to one of the other formats. Just choose View ⇒ Rulers and then choose the format you want included in the Timebase Rulers section, as shown in Figure 3-29.
Tempo: The Tempo timeline shows you all the tempos and tempo changes in your section. But there’s more! With the Tempo timeline, you can quickly change the tempos in the session by clicking the plus sign to the right of the Tempo title all the way to the right side of the figure. Doing so opens the Tempo Meter Change dialog box, where you can enter a new tempo for the session. Book 3, Chapter 4 goes into detail about creating Tempo changes in your session via the Tempo Editor.
If you don’t plan on having any tempo changes and really don’t want to see the Tempo timeline, you can hide it by choosing View ⇒ Rulers from the main menu and then deselecting the Tempo option.
Meter: This timeline shows the meters (time signatures) contained in your session. To change the meter, click the plus icon to the right of the Meter title all the way to the right side of the figure. This opens the Tempo Meter Change dialog box.
If you prefer not to see this timeline, you can hide it by choosing View ⇒ Rulers from the main menu and then deselecting the Meter option.
Key: The Key timeline shows the musical key signature of the sections of your session. Here, you can change the key of your song. Clicking the + sign on the right of the key title opens the Key Change dialog box (seen in Figure 3-30). Here you can make any changes to the key signature of your session.
If you prefer not to see this timeline, you can hide it by choosing View ⇒ Rulers ⇒ Key Signature from the main menu and then deselecting the Key Signature option.
Markers: The Markers timeline shows the position of session markers. (For more on session markers, see Book 5, Chapter 2.) Clicking the plus icon to the right of the marker’s name opens a dialog box where you can enter your marker information, as shown in Figure 3-31.
Markers are great for quickly locating sections of your tune. For example, placing a marker at the start of the verses and choruses can make moving between them a breeze. You can even use markers in Pro Tools to recall visual settings (such as track height and zoom settings) or record and playback options (such as pre- and post-roll times) as well as enabling grouped tracks for speedy editing.
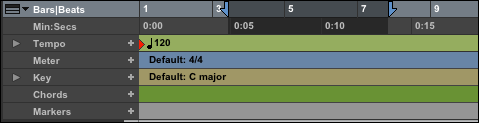
FIGURE 3-28: The Timebase Rulers section shows where you are in the session.
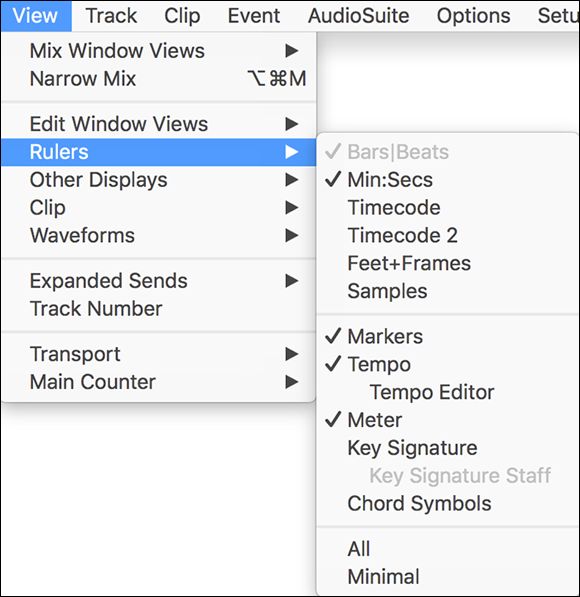
FIGURE 3-29: View different rulers from the Rulers submenu.
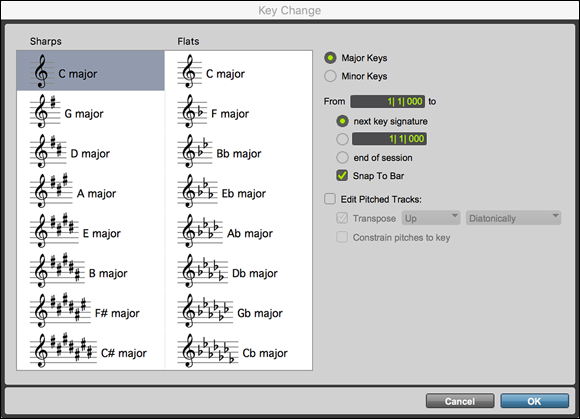
FIGURE 3-30: You can change the key signature in your session from the Key Change dialog box.
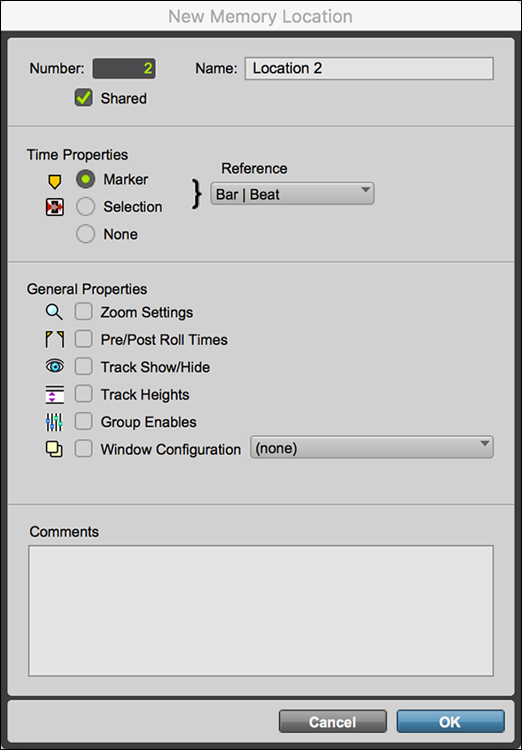
FIGURE 3-31: The New Memory Location dialog box lets you set and define marker locations.
Managing the Mix Window
The Mix window is like a standard mixer, housing channel strips of each track type available in Pro Tools. Not only do these track types include audio, MIDI, auxiliary, VCA master, and master tracks (as shown in Figure 3-32), but you can also choose various views of the channel strips, from a basic view to expanded views showing comments, inserts, and sends. Moreover, in addition to all your channel strips, the Mix window can list all the tracks in your session, along with any grouped tracks you may have created.

FIGURE 3-32: The Mix window is like a regular hardware mixer.
I know this sounds like a lot to keep track of (so to speak), but don’t worry. The upcoming sections fill you in on all you need to know to keep things straight.
Checking out channel strips
Each track in the Mix window has its own channel strip, and these channel strips perform the same kinds of tasks you’d see channel strips doing in a hardware mixer, such as volume control, panning, effects sends and inserts, mute and solo switches, automation, input and output routing, and enabling recording. The Mix window can handle pretty much any kind of track you can imagine, including the track types covered in the next few sections.
Audio track
Your audio track is your basic meat-and-potatoes track, the main building block in your sonic universe. Getting the audio track to do exactly what you want takes a lot of work. Pro Tools is well aware of this fact, and therefore provides you with a full-featured tool palette so you can take care of business. More specifically, the audio track’s channel strip contains the following tools (as shown from top to bottom in Figure 3-29):
- Input: Clicking the Input button opens a drop-down menu where you can choose the sound source that feeds the track. It can either be a physical input from your hardware interface, or it can be a bus (an internal signal path; see Book 2, Chapter 2 for more on buses). The hardware you use (Eleven Rack, Mbox, or whatever) determines the number of inputs you have to choose from.
- Output: This button controls the output of the track — where the sound goes when it leaves the track. Like the input selector button (see the preceding bullet), clicking it opens a menu that lets you choose from either the hardware outputs of your interface or any of 32 buses (internal signal paths) available in Pro Tools 10 (versions SE, MP, HD and HDX offer different numbers of buses).
- Automation Mode: In Pro Tools, automation means having certain mix parameters — such as volume, panning, mute, send level, and insert level — adjust dynamically throughout the session. Use this button to choose between the different automation modes, including Off, Read, Touch, Latch, or Write. (Book 6, Chapter 6 details these automation modes.)
- Panning: Use the dial to pan your track to the left or right in the stereo field, which is sort of the audio equivalent of a movie scene. (For more on panning, see Book 6, Chapter 1.)
- Panning Display: This display shows you your track’s panning position — its place left, right or center, in the stereo field.
- Input Monitoring: Engaging this button allows you to hear your input signal for the track.
- Solo and Mute: Clicking these buttons either solo or mute the track. (For more on soloing/muting, see Book 6, Chapter 1.)
- Record Enable: Clicking the Record Enable button enables the track for recording. When enabled, this button flashes red.
- Voice Dyn/Off: This selector lets you choose between
- Dynamic: The track plays if data is present.
- Off: The track does not play.
- Volume fader: This is the control for setting the volume of the audio contained in this track.
- Velocity meter: This display, located to the right of the Volume fader, shows you the volume (velocity, in Pro Tools-speak) of the track while the music plays. Any notes above digital 0 show in red at the top of the display.
- Group: A little letter is present if this track is grouped with others. The letter itself tells you which group the track is a part of. If the letter is capitalized, the track belongs to more than one group. You can make changes to the group by clicking the icon to open a dialog box.
- Track Type: This icon shows you what type of track it is. In Figure 3-33, the small waveform lets you know that this is an audio track.
- Numerical Volume: This display shows you the volume of the track in decibels.
- Track name: This tells you the name of the track. You can change the name at any time by clicking the name and typing in a new one.
- Delay Compensation: When delay compensation is enabled (choose Options ⇒ Delay Compensation), this section shows you any delay compensation that is being applied to the track.
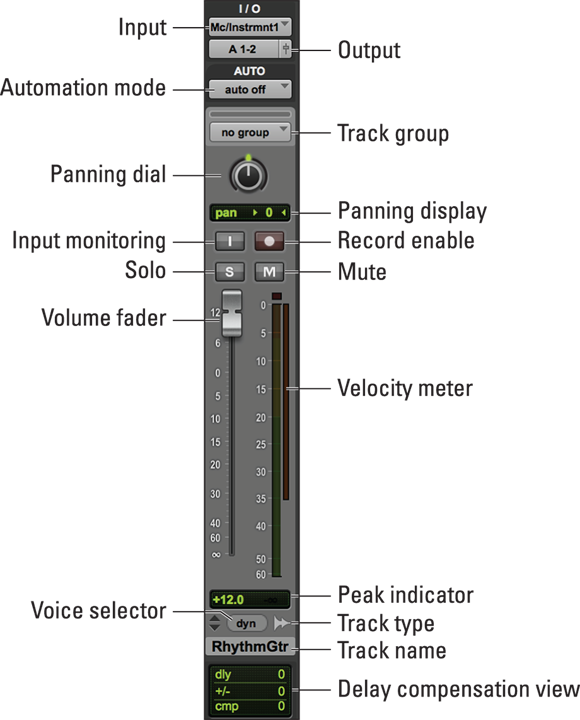
FIGURE 3-33: The Audio Track channel strip has many features.
MIDI track
The MIDI track, as shown in Figure 3-34, shares many of the features of the audio track, but some important differences exist, as the following list makes clear:
- Input: The Input button lets you choose the MIDI input feeding this track. Clicking the button opens a drop-down menu from which you can choose the MIDI port and channel(s) that you want to receive MIDI data from.
- Output: The Output button lets you choose the physical MIDI output that you want to assign the track to — any of the 16 MIDI channels (or choose All).
- Patch select: This button (located below the channel fader) lets you change the sound that comes out of your MIDI hardware when a note is played. Clicking this button opens the MIDI Patch Select dialog box, in which you enter the program number or name of the sound to want the track to play. This lets you change sounds throughout the session.
- Track type: This MIDI track icon looks like a MIDI port.
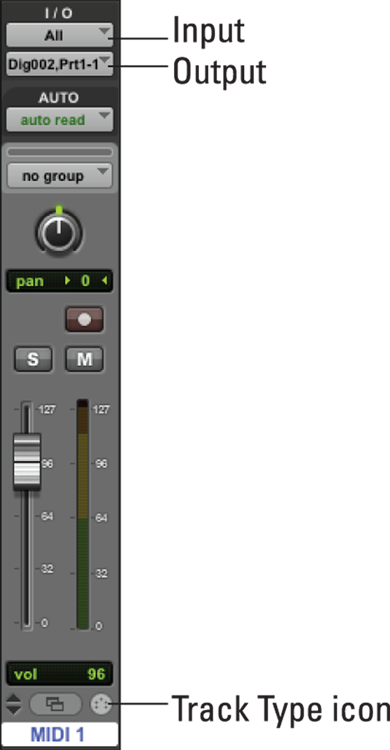
FIGURE 3-34: The MIDI Track channel strip lets you control the MIDI track easily.
Instrument track
The instrument track, as shown in Figure 3-35, is a blend of the audio and MIDI tracks. Here’s how it lays out:
- Instruments Section: You can open this section of the Instrument Track channel strip by choosing View ⇒ Mix ⇒ Instrument. This expands the top of the mix window to include controls for choosing your instrument source. You can see this at the top of Figure 3-35. You have the following options here:
- MIDI Input selector: Use this Input button to choose the MIDI input feeding this track. Clicking the button opens a drop-down menu from which you can choose the MIDI port and channel(s) from which you want to receive MIDI data.
- MIDI Output selector: Use this Output button to choose the MIDI output to which you want to assign the track — any of the 16 MIDI channels (or choose All).
- MIDI volume: Clicking this icon brings up the MIDI fader with which you can adjust the velocity traveling through the MIDI port.
- MIDI Velocity meter: This tiny meter shows you a visual representation of the velocity of the MIDI in the track.
- MIDI Mute button: This mutes the MIDI data from triggering your device.
- MIDI Pan slider: This pans your MIDI data left or right.
- Inserts: These function just like inserts for audio tracks except you can also choose an instrument from the drop-down menu to create the sound if you want to use a software synthesizer. (See Book 4, Chapter 1 for more on software synthesizers.)
- Sends: Just like with audio tracks, you assign sends to the sounds coming from the track.
- Input: The Input button functions the same as an audio track where you select the hardware inputs for this track. This allows you to have a MIDI device connected through the Instruments section tools at the top of the channel strip while also having the audio outputs of the device, such as a synthesizer, input into this track.
- Output: Use the Output button to choose the physical audio output to which you want to assign the track: the same as with an audio track.
- Patch select: This button (located below the channel fader) lets you change the sound that comes out of your MIDI hardware (connected via the Instrument section listed above) when a note is played. Clicking this button opens the MIDI Patch Select dialog box, in which you enter the program number or name of the sound to want the track to play. This allows you to change sounds throughout the session.
- Track type: This instrument track icon looks like five notes of a music keyboard.

FIGURE 3-35: The instrument track is a blend of an audio and a MIDI track.
Auxiliary input track
An auxiliary input track is a track that you can use for grouped audio — or for MIDI tracks, effects sends, submixes, alternative mixes, monitor mixes, and so on. Auxiliary tracks are similar to audio tracks and have the same functions except that you don’t have a Record Enable button because these tracks don’t actually contain any audio. Instead, they are used only for routing other tracks through them. The Track Type icon is a blue down arrow. Figure 3-36 shows a typical auxiliary track’s channel strip.

FIGURE 3-36: The Auxiliary Track channel strip is used for effects sends, sub-mixes, and monitor mixes.
VCA Master track
The VCA Master track lets you control the signal level (volume) of groups of tracks. There are no input or output selectors. Instead, you choose a group to control. Your controls are limited to volume, input monitoring, record enable, mute, and solo. Figure 3-37 shows the VCA Master channel strip.

FIGURE 3-37: The VCA Master channel strip is used for controlling the volume of groups.
Master Fader track
The Master Fader track lets you control where your other tracks are sent. This track’s channel strip is much simpler than the others; all it really does is add the other tracks. The features include just the outputs, automation modes, fader and velocity display, and the Groups button.
The Track Type icon for a Master Fader track is a sigma (∑). Figure 3-38 shows a Master Fader Track’s channel strip.

FIGURE 3-38: The Master Track channel strip controls the master track functions.
Stereo and mono
Each of the tracks can either be in monaural or stereo. Stereo tracks differ from mono tracks: They have two panning dials and two velocity displays showing. Figure 3-39 shows a stereo track on the right next to a mono track (on the left).

FIGURE 3-39: A stereo track’s channel strip (on the left) looks very similar to a mono track (on the right).
Expanding the channel strips view
You can add three additional views to your channel strips by choosing View ⇒ Mix Window Views from the main menu and then choosing Comments, Inserts, and/or Sends. Figure 3-40 shows you what you can expect to see, and the next few sections tell you the particulars for each view.

FIGURE 3-40: Channel strips can be expanded to include views for comments, inserts, and sends.
Comments view
With this option, you can add comments to each track by just clicking the Comments box and typing your comments. This can be helpful for keeping track of info, such as microphones used, edits performed, or anything that can keep you organized while mixing.
Inserts view
The Inserts view section of the channel strip displays any inserted DSPs (Digital Signal Processors) that you have for each track — usually effects such as compression or delay. Click the arrows in the window to open a drop-down menu where you can choose from the plug-ins in your system. Figure 3-41 shows a typical list of these inserts. (Book 6, Chapters 4 and 5 have more on inserted effects.)
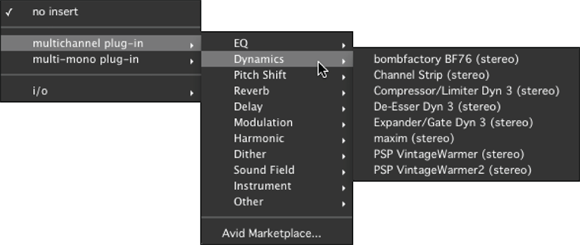
FIGURE 3-41: The Insert drop-down menu lets you choose your inserted effect.
Sends view
The Sends View section of the channel strip lets you choose an effect bus to send your track’s signal to. Clicking the arrows opens a pop-up menu (as shown in Figure 3-42) where you choose the bus or interface output to send your track’s signal. (If you use outboard effects, see Book 6, Chapter 5 for more details.)
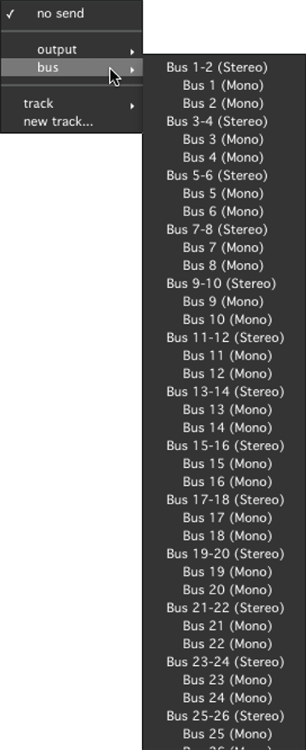
FIGURE 3-42: Use the Sends window to pick where to send your track’s signal for effects processing.
Looking at lists: The Mix Window variant
Plenty of lists appear in the “Examining the Edit Window” section (earlier in this chapter), but Pro Tools list-making capabilities crop up in the Mix window as well. Aside from containing all the channel strips for your project, the Mix window can also be set to list all the tracks in your session — as well list any groups you created with those tracks. These lists show up on the left side of the Mix window, as shown in Figure 3-43.
FIGURE 3-43: The Show/Hide Tracks list and Groups list allow you to organize your tracks in the Mix window.
Show/Hide Tracks list
Going from top to bottom, the first list to the left of the Mix window is the Show/Hide Tracks list. Each track of your session is listed in this list. With this list, you can show or hide each track by simply selecting or deselecting it in the list window. When you hide a selected track, the channel strip disappears from the Mix window. This makes it easy to work with individual tracks or groups of tracks by keeping your Mix window uncluttered. To show a hidden track, click that track’s name in the Tracks list and watch it reappear.
Groups list
The Groups list lets you create and manage grouped tracks — tracks that you assigned together so that you can edit them together. To create groups of tracks, hold down the Shift key down and then click the names of the tracks in each channel strip to highlight them. After they’re highlighted, click and hold the Edit Groups title. When a drop-down menu appears, choose New Group; when a dialog box appears, enter a name for your new grouped track. After you create a few groups, you can show or hide them in any combination you want.
Working with Window Configurations
A window configuration is a saved setup of the various Pro Tools windows in the size order and arrangement you choose. You can have a window configuration for when you record new tracks, when you edit, when you mix, and when you master. In fact, in Pro Tools, you can create and save up to 99 different window configuration variations. This is handy for speeding up your work because you simply choose a configuration you want instead of having to open and close windows or resize them while you work.
As a long-time Logic user, this is one feature that I always missed when I worked in Pro Tools. Now that Pro Tools has added window configuration, I can move from window setup to window setup like I used to in that other program. This makes me happy, and I’m sure that after you get a few window configuration setups in your sessions, you’ll be happy (and more productive) too. The following sections help you do this.
Creating window configurations
Creating a window configuration is easy. Here are the steps:
Arrange the various windows in your session how you’d like to have them saved.
This can include the Edit, Mix, Transport, plug-in, and any other window that Pro Tools lets you open and move around in your session.
Choose Window ⇒ Configurations ⇒ New Configuration.
The New Window Configuration dialog box opens, as shown in Figure 3-44. Choose the options you want within this dialog box. (See the following bulleted list for details about all the options in this dialog box.)
Click OK or press Return/Enter.
The New Window Configuration dialog box closes, and your settings are saved.
FIGURE 3-44: Use the New Window Configuration dialog box to save your new window setup.
From the New Window Configuration dialog box, choose which properties of the windows you arranged in your session to save. These include the following:
- Number: This is the number of your window configuration. By default, the next available number is entered into this box, but you can put any number that you like between 1 and 99.
- Name: This is the name of your window configuration. Enter a descriptive name. I usually enter a name that represents the purpose of the configuration, such as Audio editing or Tracking.
- Window Layout: Selecting this radio button stores the arrangement of all your open windows.
- Include Edit, Mix, and Transport Display Settings: Selecting this check box saves all the display settings for each window, such as whether Inserts show in the Mix window.
If you choose to not select the Window Layout radio button, you can choose from the options in the Filter View drop-down menu. These include
- Edit Window Display Settings: Choosing this option saves all window display settings for the Edit window. These include
- Rulers, including the main ruler (which is always shown)
- Track list width and height
- Groups list and Regions list width
- Track columns that are shown, such as Comments, Inserts, and Sends
- The Tempo Edit display
- Transport controls
- Mix Window Display Settings: Selecting this option stores the display settings for the Mix window, including
- Track list width and height
- Groups list width
- Mixer view (narrow or wide)
- Track rows that are shown, such as Sends, Inserts, and Comments
- Transport Window Display Settings: Choosing this option stores the display settings for the Transport window. These include
- Counters
- MIDI controls
- Expanded view
- MIDI Editor Settings: This option stores the display settings for the MIDI Editor window, both targeted and untargeted.
- Score Editor Settings: This option includes display settings for Score window displays.
- Comment: You can enter comments about your window configuration in this field, such as reminders or descriptions of your settings.
Recalling window configurations
After you have window configurations saved, you can recall them easily. My favorite way is to use keyboard shortcuts. Here’s how:
- Press period (.) on the numeric keypad section of your keyboard.
- Type the number of the window configuration you want to open.
Press the asterisk (*) in the numeric keypad section of your keyboard.
Your desired window configuration opens.
You can also select a saved window configuration by choosing Window ⇒ Configurations ⇒ configuration name.
Managing window configurations
You can easily manage your window configurations from the Window Configurations List window. You open the Window Configuration List window by choosing Window ⇒ Configurations ⇒ Window Configuration List. You can also open this window by pressing ⌘ +Option+J (Mac) or Ctrl+Alt+J (PC).
The window shown in Figure 3-45 opens.

FIGURE 3-45: Use the Window Configurations List to manage window configurations.
Window Configurations List window
The Window Configurations List window has many features that help you work with your window configurations to make the most of them. Here’s a quick rundown of the window:
- Name: This is the name of your window configuration. You enter the name when you create a new window configuration. You can also change the name by double-clicking it to open the Edit Window Configuration dialog box (more on this in the next section, “Editing window configurations”).
View filter icons: Use these icons to filter the window configurations that you see in the list. The icons also help you see at a glance what windows are included in each configuration in the list. These icons are
 Window Layout: This icon appears in your window configuration when you choose to save the location and size of all the open windows in your configuration.
 Edit Window Settings: This icon lets you know that the Edit windows are stored in your configuration.
 Mix Window Settings: This icon tells you that the Mix windows are stored in your configuration.
 Score Window Settings: This icon lets you know if there are any score window settings in your configuration.
 Transport Window Settings: This icon lets you know that the Transport windows are stored in your configuration.
 MIDI Window Settings: This icon lists any MIDI window settings that are stored in a configuration.
You select these icons when you create or edit your window configurations. I detail this process in the next section.
- Comments: You can enter comments in this section to remind you of what is in the window configuration.
Window Configurations drop-down menu
You can easily manage your window configurations from the drop-down menu. Figure 3-46 shows this menu.
FIGURE 3-46: Use the drop-down menu to manage your window configurations.
Here’s a rundown of this menu and what it can do for you:
- View Filter: This menu lets you show or hide window configurations with the following settings:
- Show Icons: This shows or hides the icons in the Window Configurations List window.
- View Configs with Window Layout: This shows only those window configurations that were created with Window layout settings.
- View Configs with Edit Window Settings: This shows only those window configurations that were created with Edit window layout settings.
- View Configs with Mix Window Settings: This shows only those window configurations that were created with Mix window layout settings.
- View Configs with Transport Window Settings: This shows only those window configurations that were created with Transport window layout settings.
- View All: This shows all your window configurations.
- Show Comments: Select or deselect this option to show or hide, respectively, the comments section in the Window Configurations List window.
- New Configuration: Selecting this option opens the New Window Configuration dialog box, where you can create a new configuration.
- Update “Name”: If you made any changes to the layout of your current configuration, choose this to save them in your existing setup.
- Edit “Name”: Selecting this option opens the Edit Window Configurations dialog box, where you can make changes to the options you chose when you created the configuration. The Edit Window Configuration dialog box is the same as the New Window Configuration dialog box (except for the title).
- Clear “Name”: Choosing this option clears the active window configuration without removing its slot in the list.
- Delete All: Selecting this option deletes all your window configurations.
- Insert Slot before “Name”: Choosing this option inserts a slot before your current window configuration and changes the number of all the following configurations if necessary.
- Delete “Name” Slot: Choosing this option deletes your current window configuration along with its slot, and renumbers all the following window configurations.
- Auto-Update Active Configuration: Selecting this option automatically updates your current window configuration as you make changes to it.
Editing window configurations
You can edit window configurations by opening the Edit Window Configurations dialog box. Just follow these steps:
- If it isn’t already open, open the Window Configurations List window by choosing Window ⇒ Configurations ⇒ Window Configurations List.
- Click the window configuration that you want to edit in the Window Configurations List window.
Choose Edit “Name” from the Window Configurations List drop-down menu.
The Edit Window Configuration dialog box opens.
Make the changes you want to make and then click OK or press Return/Enter.
The dialog box closes, and your edits are saved.
Updating window configurations
Many times, while I’m working, I find a better way to have my window configuration, so I want to update it. You can do this manually or automatically:
- Manually: Make any changes to arrangement of your windows and then choose Window ⇒ Configurations ⇒ Update Active Configuration.
- Automatically: Choose Window ⇒ Configurations ⇒ Auto-Update Active Configuration. Now, whenever you make a change, your active configuration is saved.
Deleting window configurations
Here’s how to delete a window configuration:
- Open the Window Configuration List window by choosing Window ⇒ Configurations ⇒ Window Configuration List.
- Select the configuration you want to delete by clicking it.
Choose Delete “Name” from the Window Configuration List drop-down menu.
Your configuration is deleted, and your remaining configurations are renumbered to fill the space occupied by the configuration you just deleted.
If you want to keep the slot occupied by the window configuration after you delete, simply choose Clear “Name” instead of Delete “Name” from the Window Configuration List drop-down menu. This is handy when you want to put a new window configuration in its place.