
Chapter 4
Preparing to Record
IN THIS CHAPTER
![]() Understanding record modes
Understanding record modes
![]() Allocating disk space
Allocating disk space
![]() Setting levels
Setting levels
![]() Monitoring track inputs
Monitoring track inputs
![]() Creating click tracks
Creating click tracks
After you get your mics set up — see Chapter 3 of this mini-book for more on that — and before you actually start to record, you can still do a few things to make the process easier and to optimize the performance of your system. This chapter covers all you need to do before you actually start to record. For starters, this includes understanding and using Record modes and dealing with disk allocation.
This chapter also shows you how to enable your tracks to record, set your levels to give you the best sound possible, and manage your monitoring setup to perform at your best. To top it off, this chapter guides you through setting up a click track, song tempo, and meter map so when it comes time to edit your audio (not that your performances need editing), you’ll be able to do it quicker and with less effort. If you’re not sure what click tracks, tempo maps, and meter maps are, don’t worry. By the time you finish this chapter, you’ll be throwing these terms around like a seasoned sound engineer.
Recognizing Record Modes
Pro Tools offers the following four Record modes: Non-Destructive, Destructive, Loop, and QuickPunch. You can choose the mode you want by selecting the mode from the Options section of the main menu (choose Options ⇒ QuickPunch) or by Control-clicking (Mac) or right-clicking (PC) the Record button in the Transport window. All this clicking cycles you through the four Record modes.
Each Record mode has its place, and knowing which one to use for a given situation can help you greatly in the efficiency department. These different modes are detailed in the following sections.
 You can see which mode you’re in by looking at the Record button in the Transport window. The modes are designated, as shown in Figure 4-1.
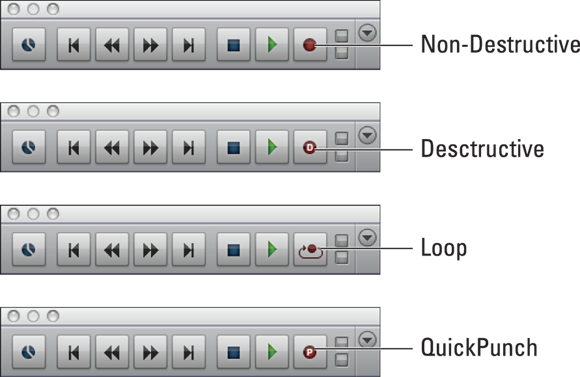
FIGURE 4-1: Record mode icons on the Record button.
Non-Destructive Record mode
Non-destructive recording is the default setting in Pro Tools. Whenever you record in this mode, a new audio file is created without erasing any previous files or clips. This new file gets added automatically to the Audio Clips list, where it resides with other recorded files. (This list is located on the right side of the Edit window. If it’s not visible, click the double arrow at the bottom right of the Edit window.)
Destructive Record mode
Recording in Destructive Record mode erases any and all previously recorded audio clips found on that particular track, which basically mirrors the way traditional analog tape recorders work. This can be handy for keeping your hard drives from becoming full quickly, but you don’t get a chance to use a previous take after you recorded over it. Because Non-Destructive Record mode is the default mode (see the preceding section), you need to select Destructive Record mode from either the Options menu (choose Options ⇒ Destructive from the main menu) or Control-click (Mac) or right-click (PC) the Record button in the Transport window until the D icon appears on the Record button, as shown in Figure 4-1.
Loop Record mode
Loop recording consists of choosing a start and end point on a track and having this section play over and over again while you record and rerecord. Each time the loop runs, it creates a new audio clip. That way, you can record a difficult section of a song as many times as you want and still have all the takes available for review later on. To enable Loop Record mode, chose Options ⇒ Loop Record or Control-click (Mac) or right-click (PC) the Record button in the Transport window until the Loop Record icon appears in the Record button. (Refer to Figure 4-1.)
To create a loop to record to, follow these steps:
Enter the start point for your loop in the Start field of the Transport window.
The Transport window runs along the top of the Edit window. Its (many) features are discussed in detail in Book 2, Chapter 3.
- Enter the end point for your loop in the End field in the Transport window.
(Optional) If you want a pre-roll, enter an amount of time for it to run, using the Pre-Roll field of the Transport window.
A pre-roll, by the way, is a section of your song before where you actually start recording that plays when you hit the Record button. A pre-roll happens only before the first time through the loop. After that, the loop runs the same way each time through: from start point to end point and then back to the start point.
To find out how to review a bunch of audio clips you recorded using loops, check out the section on auditioning takes in Chapter 5 of this mini-book.
QuickPunch Record mode
QuickPunch Record mode is great for manually adding a corrected musical phrase on the fly — punching in (starting to record) and punching out (stopping the recording process) onto record-enabled tracks while the song plays. Of course, you can punch in and out in Destructive and Non-Destructive modes (by selecting start and end points), but QuickPunch is designed for use on the fly: You can punch in and out up to 100 times during each pass of the song. To select QuickPunch Record mode, choose it from the Options menu (choose Options ⇒ QuickPunch from the main menu) or Control-click (Mac) or right-click (PC) the Record button in the Transport window until the QuickPunch icon (a little P; refer to Figure 4-1) appears on the Record button.
Using QuickPunch also ensures that you can constantly hear the audio while the punch in and punch out happen, seamlessly switching between monitoring the already-recorded track and monitoring the input source for the track being punched.
By default, Pro Tools switches automatically from the recorded material to the fresh input when the punch is enabled, and then back again when the punch is disabled. If you don’t want this feature and prefer hearing your input source before and after the punch (as well as during the punch), choose Track ⇒ Input Only Monitoring from the main menu. (This is detailed in the “Monitoring Your Tracks” section, later in this chapter.)
Dealing with Disk Allocation
Recording and playing back audio tracks is a hard-drive-intensive process. To make this process as smooth as possible, set up your hard drive for the best possible (optimized) disk allocation to specify where your tracks get stored.
Basically, optimizing in this context means to allow your tracks to record to more than one hard drive.
To allocate a specific hard drive on which to record a track, choose Setup ⇒ Disk Allocation from the main menu to open the Disk Allocation dialog box (as shown in Figure 4-2). From this dialog box, you can manually choose the hard drive that each audio track is recorded to by clicking and holding the track name (a drop-down menu opens) and selecting one of the drives from the list. All the drives in your computer will show up in this list. Or you can select the Use Round Robin Allocation for New Tracks check box, in which case, Pro Tools distributes the tracks serially to more than one hard drive. All your files are placed in a folder created for the session by Pro Tools.

FIGURE 4-2: The Disk Allocation dialog box lets you choose where your audio files record to.
To designate a different folder to which to record your tracks, check the Custom Allocation Options check box and then click the Change button. Select the folder from the dialog box that appears.
 If you want to record audio to the system drive, bear in mind that audio takes up a big honkin’ lot of space, which can compromise system performance. Choose the system drive to record only if you have no other options — say, if you have only one hard drive in your system or all your other drives are full.
Enabling Recording
When you enable recording for a track, you’re ready to go. But before you click that ol’ Record Enable button, check out what I have to say about the ins and outs of enabling recording, using Latch mode, and running Record Safe mode. Doing so might help you avoid some common pitfalls.
Record-enabling
Enabling a track for recording (the audio buzzwords are record-enabling) is easy: Just click the Record Enable button for that track in the Edit or the Mix window (see Figure 4-3). The track will stay in Record mode until you either click another track’s Record Enable button or you toggle out of Record mode (by clicking the track’s Record Enable button one more time).
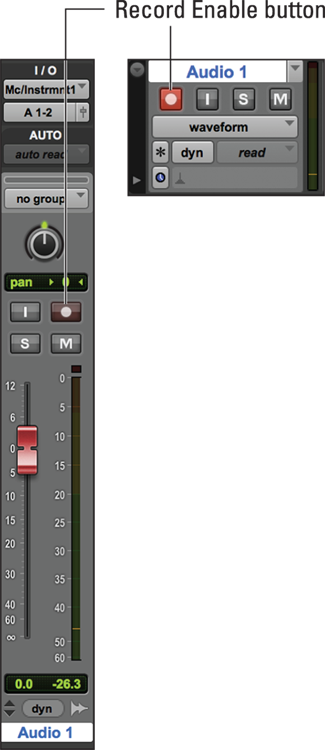
FIGURE 4-3: The Record Enable button in the Mix window (left) and the Edit window (right) arms the track for recording.
You can keep a track in Record mode when you move on and enable other tracks. To do so, just engage the Latch mode (see the next section) or hold down the Shift key while you select your other track(s).
Aside from simply clicking the Record Enable button, you are free to use keyboard shortcuts to enable all tracks or selected tracks. These are done the following ways:
- To record-enable all tracks: Option-click (Mac) or Alt-click (PC) the Record Enable button of any track.
To record-enable selected tracks: Shift-click each track to select multiple tracks and then Shift+Option-click (Mac) or Shift+Alt-click (PC) the Record Enable button on one of the selected tracks. You can select grouped tracks to enable by highlighting the group in the Edit Groups list (located in the lower left of the Edit window) and then Shift+Option-clicking (Mac) or Shift+Alt-clicking (PC) a Record Enable button on one of the tracks in the group.
This step is a timesaver only if you already have some tracks selected and you want to record-enable them. If your tracks aren’t already selected, Shift-clicking the Record Enable button on each track is much faster.
After you have one or more tracks enabled for recording, you can click Record and then Play to start recording. (Chapter 5 of this mini-book has more on the intricacies of recording.)
Using Latch Record Enable mode
With Pro Tools, you have the option of latching — or unlatching — your Record Enable buttons. In Latch Record Enable mode, you basically “lock” down record-enabling so that when you enable recording on one track and then move to enable recording on another track, the first track stays in Record Enable mode. This allows you to consecutively enable more than one track.
With Latch Record Enable mode off, when you enable one track and then go to enable another track, the first track turns off and is no longer record-enabled.
Now that that’s straight, here’s how you actually turn Latch Record Enable mode on and off:
- Choose Setup ⇒ Preferences from the main menu.
From the Preferences dialog box that appears, click the Operation tab.
The Operation view of the Preferences dialog box appears.
Select the Latch Record Enable Buttons check box to turn it on.
This check box is located in the upper right of the window, as shown in Figure 4-4.

FIGURE 4-4: Select the Latch Record Enable Buttons check box to choose more than one track to record-enable.
Running Record Safe mode
Record Safe mode does for your tracks what Write Protect features used to do for a floppy disk or a Zip disk in the olden days: namely, make it impossible for you to record-enable a track. This is a truly helpful feature that has saved me from accidentally recording over an already great track. To put a track into Record Safe mode, ⌘ -click (Mac) or Ctrl-click (PC) the track’s Record Enable button. (Remember: You can find the Record Enable button in the Edit window or the Mix window; refer to Figure 4-3.) If you clicked correctly, the Record Enable button will gray out, as shown in Figure 4-5. To reverse this procedure, ⌘ -click (Mac) or Ctrl-click (PC) the button again.

FIGURE 4-5: Using Record Safe mode disables the Record Enable button.
If you want, you can put more than one track at a time in Record Safe mode. Here’s how:
- Placing selected tracks in Record Safe mode: ⌘ +Option+Shift-click (Mac) or Ctrl+Alt+Shift-click (PC) the Record Enable button for one of the selected tracks. This step assumes that you have tracks already selected; Shift-click the track names in the Edit or the Mix window to select them. If the tracks aren’t already selected, ⌘ -clicking (Mac) or Ctrl-clicking (PC) the track’s Record Enable button for each track is much quicker.
- Placing all tracks in Record Safe mode: ⌘ +Option-click (Mac) or Ctrl+Alt-click (PC) the Record Enable button on any track.
To toggle either selection off, just repeat whatever click combination you used to get the multiple tracks selected in the first place.
Setting Levels
One of the most important parts of getting good recordings is to get your recording levels just right. Too low, and your instrument sounds thin or weak; too much level and you risk clipping (distorting) the signal.
In order to get a signal into Pro Tools, you need to
- Record-enable a track.
- Have the Input selector set to the hardware input your instrument or microphone is plugged in to.
Book 2, Chapter 2 has more on inputs in general and Input selectors in particular.
After you do this, you can set the recording level in Pro Tools by
Using the preamp trim knob in your audio interface: You can plug your microphone or your electric guitar or bass directly into the input and adjust the trim knob until you get a good signal showing in the track’s level meter. (Good here means peaks that don’t rise above the yellow. See the “What’s a good level to record at?” sidebar.)
 Condenser mics need phantom power to function. You can turn on phantom power to the channels with preamps by engaging the switch on the back panel of the interface.
Using the Line In inputs in your interface and adjusting the output level of your instrument via the instrument’s volume control: If you use Line In inputs, your instrument needs to be at line level. This means that you can plug your synthesizer directly into these inputs. However, if you want to use a microphone or an electric guitar or bass, you need to boost the signal beforehand.
For microphones, this involves using an external preamp and plugging your mic into the preamp and the preamp into your audio interface. For an electric guitar or bass, you need a direct box (or a preamp with a direct box connection). You place this device between your guitar’s output and the audio input. Make adjustments to your signal level at this device, using the device’s gain control.
The Volume fader for the track has no control over the Input level. It controls only the playback and monitoring level. If you want to adjust the Input level, you need to make the adjustments on your interface or preamp. (Check your owner’s manual if you’re not sure how to do this.)
Adjust the level of your input until you get a reading of the highest notes somewhere in the middle of the yellow range in the track’s level meter.
Setting a Record Range
When you record in Pro Tools, you can start and stop your session while you record, or you can set a recording range so the Pro Tools starts and stops the recording process for you. This can be useful if you have your hands full with instruments and you don’t want to take the chance that you’ll miss your desired start or stop point by doing it by hand.
You can set the recording range by using one of these methods:
- Type a start and end time into the Start and End fields of the Transport window. For a detailed look at the Transport window, check out Book 2, Chapter 3.
- Select a range in the ruler or in a track’s playlist.
- The ruler method: Simply adjust the two blue arrows along the timeline until you have the Beginning arrow and the End arrow where you want them.
The track playlist method: This is when you set beginning and end times by dragging across the record range with the Selector tool.
 Note: You must have the Link Timeline and Edit Selections turned on. This is done either by choosing Options ⇒ Link Timeline and Edit Selections from the main menu or by clicking the Link button in the Edit window. (The Link button, as shown here in the margin, is on the long, black toolbar right above the timeline in the Edit window. Book 2, Chapter 3 tells you more about it.) To turn Link Timeline and Edit Selections off again, click the Link button again or choose Link Timeline and Edit Selections from the Options menu.
Of course, if you don’t want to preset the recording range — letting the clips fall where they may, as it were — don’t select either of these options and just let the playing start wherever it is and run to the end.
You can also set a pre-roll and post-roll time in the Transport window. You use pre-roll and post-roll settings to designate an amount of time for the song to play before (pre-roll) or after (post-roll) the actual recording happens. This can help you get into the groove of the song before you need to start worrying about how well you’re playing.
Monitoring Your Tracks
To record effectively, you need to hear what you’re doing. This is monitoring. Managing your input monitoring in Pro Tools involves setting up your monitor configuration and output and balancing between lowest latency (the delay between input and output of the sound) and system performance. These areas are detailed in this section.
Setting up monitoring
To set up your monitoring, you first need to choose the output of the tracks you want to monitor so they match the main outputs on your system. Do this by selecting the outputs in each track’s Output selector, located above the Pan control in the Mix window. (Book 2, Chapter 3 has more than you’d ever need to know about Output selectors and Mix windows.)
Choosing a monitor mode
Pro Tools has two monitor modes: Auto Input monitoring and Input Only Monitoring. (More on what these terms actually mean in a minute.) You can select between these two options by checking or unchecking Track ⇒ Set Record Tracks to Input Only from the main menu. (See Figure 4-6.)
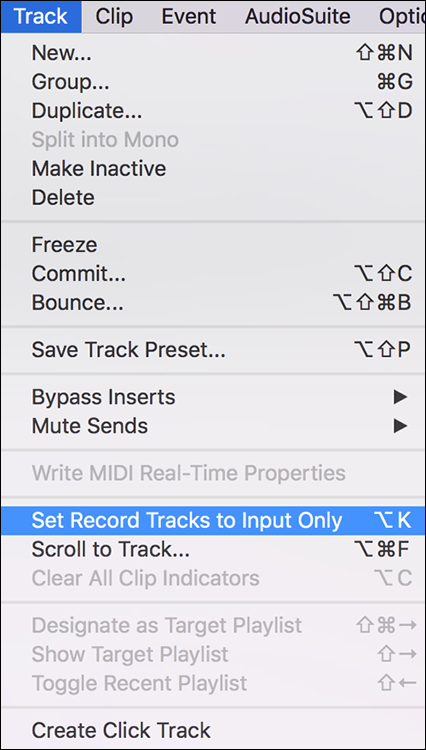
FIGURE 4-6: You can choose to monitor input only from the Track menu.
Auto Input Monitoring mode
In Auto Input Monitoring mode, you hear your previously recorded audio (if any exists) on a record-enabled track right up until the point you start to record. After recording has begun, you hear the input source while it’s being recorded. After the recording is done, Pro Tools switches you back to hearing the previously recorded stuff. This is useful for doing punch recording, where you start and stop recording while the session plays. This is the default setup for Pro Tools and is active when you don’t have Input Only Monitoring checked in the Track menu.
Input Only Monitoring mode
In Input Only Monitoring mode, you hear only the input source through your monitors, regardless of whether other stuff is recorded on that track. When this mode is enabled, the Record button in the Transport window is green. When this mode is not enabled, the Record button is red. To enable this, choose Track ⇒ Input Only Monitoring.
Linking and unlinking Record and Playback faders
You have the option of “linking” the fader on your tracks when in Record Enable or Playback mode (meaning that moving the fader in one mode moves it the same distance in the other mode) or “unlinking” them (so you can maintain separate fader levels in each mode). If you opt for the unlinking option, Pro Tools remembers where your fader was set in both Record Enable mode and Playback mode and returns the fader to its position when you switch between these modes.
Unlinking your Record and Playback faders allows you to set the level differently for playback and record. This can be useful for punch recording because you can adjust both the recorded stuff and your input source independently and have the same relative levels between your previously recorded track and the input in the mix. Otherwise, your input source might be too loud or too soft in comparison.
To link Record and Playback faders, follow these steps:
- Choose Setup ⇒ Preferences from the main menu.
Click the Operation tab at the top of the Preferences dialog box that opens.
The Preferences dialog box presents you with its Operation face.
- Select or clear the Link Record and Play Faders check box located in the column on the right, as shown in Figure 4-7, depending which way you want to work.
- Click OK.
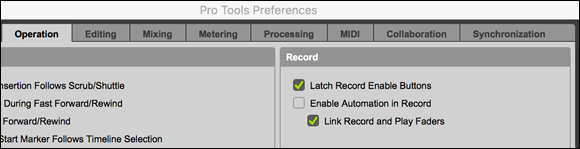
FIGURE 4-7: The Link Record and Play Fader check box.
Adjusting monitoring latency
All digital systems have some latency — delay between the input of the audio and its output. Latency used to be a big deal in computer-based systems because to record more than a couple of tracks at once, you had to set your system — usually by using a high H/W (hardware) buffer size — resulting in painfully noticeable latency. This lag made it hard for many musicians to record because they heard a distracting delay in their headphones while they recorded.
Nowadays, latency isn’t such a big deal because computers are often powerful enough to be able to handle a lower buffer size while recording. You can lower the buffer size in the Playback Engine dialog box, as shown in Figure 4-8. (To access the Playback Engine dialog box, just choose Setup ⇒ Playback Engine from the main menu.) Depending on your audio interface, you have the choice between 32, 64, 128, 256, 512, and 1024 samples. The lower the number, the lower the latency.
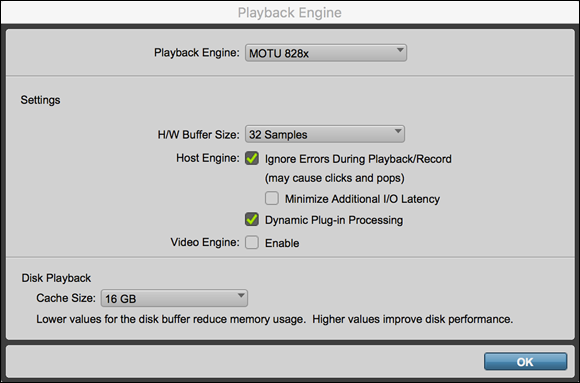
FIGURE 4-8: Use H/W Buffer Size settings to control the latency your system produces.
For most recordings, you can get by with either 256-sample or 128-sample settings. When recording at 44.1 kHz, this represents only about a 4- and a 6-millisecond (ms) delay, respectively. This is equivalent to standing three or six feet away from your instrument/amp/speaker. As little as this is, you may find that high a buffer size distracting with headphones on — and may want to go lower when you record percussive instruments. Personally, I choose 32 whenever I can and will accept 64 if I get a lot of errors while recording. When mixing lots of tracks with a bunch of plug-ins, you want to adjust this to a higher setting — such as 512 or even 1024 — depending on the speed of your processor.
Using low-latency monitoring
If you want the least amount of latency possible and you don’t mind not hearing reverb or other effects through your headphones, go for the low-latency monitoring option: Just choose Options ⇒ Low Latency Monitoring from the main menu. (See Figure 4-9.)
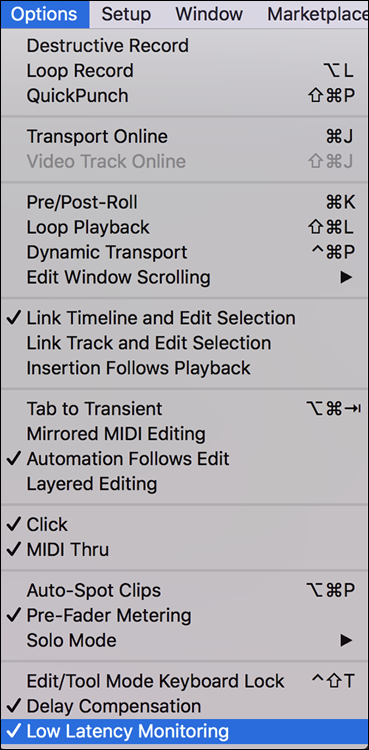
FIGURE 4-9: The Low Latency Monitoring option is located on the Options menu.
Low-latency monitoring bypasses the internal mixer in Pro Tools and sends the input’s sound back out without processing it. This reduces latency, but it also limits what you can do. Here are some of the “strings attached” that come with low-latency monitoring:
- Low-latency monitoring applies only to outputs 1 and 2 on your hardware. Any tracks set to another output can’t be monitored this way, so you must choose outputs 1 and 2 as your outputs for the track you want to monitor.
- None of the plug-ins that you have routed to tracks 1 and 2 can be heard in this mode.
- Tracks set to record from an internal bus (a submix, for example) can’t be monitored this way. You can use this mode only for tracks that use a hardware input.
- Tracks that you’re recording to won’t show up in the levels at the Master Fader channel.
Creating a Click Track
A click track is basically a metronome that you can listen to while recording to ensure that you stay in time with the session. Recording to a click track can have many advantages, including being able to match the song’s sections to particular bars or beats within the session. It also makes finding edit points and performing certain edits much easier. I always spend a few minutes setting up a click track for my songs, and I recommend that you give it try, too. This is especially important of you want to use Beat Detective or Real Time Elastic Audio on these tracks later.
There are two ways to create a click track in Pro Tools: the easy way, and the potentially better-sounding way (assuming you have an external device that creates a nice sound, such as a drum machine). I cover both in case you can’t stand the sound of the Click plug-in that’s created in the easy way.
Getting a click track the easy way
You can create a click track in your session in just one step: Choose Track ⇒ Create Click Track. This places a track in your session with the click plug-in already inserted. Check out Figure 4-10.
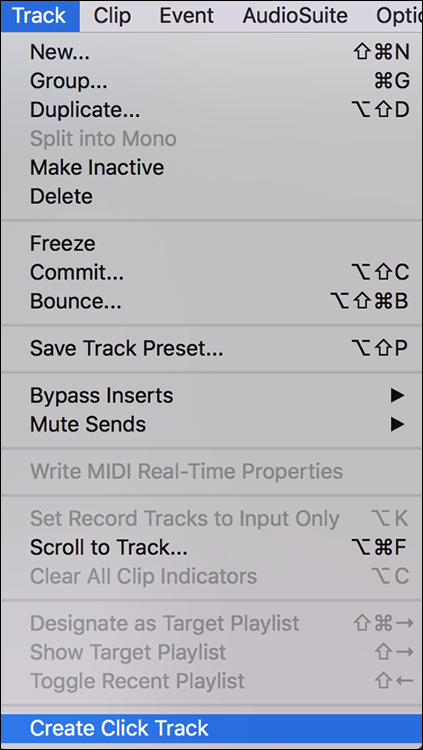
FIGURE 4-10: Choosing Track ⇒ Create Click Track creates a track with the click inserted.
The only other thing you may need to do to get this click going is to assign an output to this track if you haven’t set your default output setting in the I/O Setup dialog box (Book 3, Chapter 3 covers this). To assign your output, click and hold the Output selector for click track and drag to the physical output you want for your click. This is usually the main outputs for your session.
From here, you can follow the steps in the “Setting the tempo,” “Choosing the meter,” and “Enabling a click track” sections later in this chapter.
Getting a click track the hard way
If you have an external drum machine or synthesizer, you may want to perform a few extra steps so that the click you hear is something you want to hear (the click plug-in that comes with Pro Tools is hard for many people to tolerate). This involves several steps that are outlined in the following sections.
Configuring your external device
To play a click track using an external device in Pro Tools, you need to designate a device for creating the sound. This can be an external MIDI sound module (such as a drum machine or synthesizer).
To configure the click-track device, follow these steps:
If you’re using an external MIDI device for your click, connect the device to a MIDI port connected to your computer.
Some audio interfaces come with MIDI ports, but others don’t. If your interface has MIDI ports, you’re good to go. If it doesn’t, however, you have to get a separate MIDI interface. (Book 4, Chapter 1 can get you up to speed on this.) As well, if you use the Click plug-in, you don’t need to use your MIDI ports.
 Double-click the Click button in the Transport window.
 In the Click/Countoff Options dialog box that appears (see Figure 4-11), open the Output drop-down menu to choose the device that will play your click.
Be sure to choose the port and MIDI channel that your device is connected to.
Select when you want the click to be played by selecting one of the radio buttons at the top of the window.
You can select among During Play and Record, Only During Record, and Only During Countoff.
- Using the appropriate fields, enter the MIDI note, velocity, and duration for the accented and unaccented notes of the click.
(Optional) Select whether you want a countoff only during record and then enter the number of bars you want in the Bars field.
Selecting the Only During Record check box means that there will be no countoff when you play back the track. If you don’t want any countoff at all, type in 0 in the Bars field.

FIGURE 4-11: Use the Click/Countoff Options dialog box to configure your click track device.
Even with your device configured, you still won’t get any sound out of your click track until you enable it in your session. The next section shows you how to do this.
Connecting an external device to sound a click
Follow these steps to connect your external MIDI device to sound the click:
- Connect the audio output of your external MIDI device to an audio input of your MIDI hardware.
- Create a new mono audio track by choosing Track ⇒ New from the main menu or by pressing ⌘ +Shift+N (Mac) or Ctrl+Shift+N (PC).
When the New Track dialog box opens, use the drop-down menus to choose a single mono Audio track and then click Create.
Your track appears in the Edit and Mix windows and in the Audio Clips list located at the right side of the Edit window.
Why mono? Well, it’s annoying to hear the clicking in only one ear. Mono puts it in both ears, nice and clear.
- Using the Input selector for your new track in the Edit or the Mix windows, select the input that corresponds to the input your device is connected to.
- Set the output to the main stereo outputs of your session, using the Output selector for your new track in the Edit or the Mix windows.
Record-enable the track by clicking the Record Enable button in the Edit or the Mix windows.
Your click track plays according to your choice in the Click/Countoff dialog box.
Setting the tempo
Whether you created your click track the hard or easy way, you still need to set your session tempo to get the click to pulse at the tempo you want to play to. Here’s how you do this:
Disengage the Tempo Ruler Enable button in the expanded Transport window (choose View ⇒ Transport ⇒ Expanded).
The little Conductor guy turns gray. If it’s already gray, then leave it alone.
- Double-click in the tempo box in the expanded section of the Transport window (as shown in Figure 4-12).
Type the tempo number you want and click Return/Enter.
Your tempo is set.

FIGURE 4-12: Use the Expanded Transport Window to choose the tempo of your session.
Another way to change the tempo is to follow Step 1, and then click and drag the slider located below the tempo setting left or right to get to the tempo you want. Release your mouse button when you set the tempo.
Choosing the meter
You also need to set the meter for the session. You do this using the Meter Change dialog box. You call up the dialog box by double-clicking the Meter button in the expanded Transport window (or choose View ⇒ Rulers ⇒ Meter then click on the plus (+) sign next to the meter ruler bar). The Meter Change dialog box appears, as shown in Figure 4-13. The Meter Change dialog box gives you the following parameters to adjust:
- Snap to Bar: Select this check box to align any meter events with the first beat in the nearest bar.
- Location: The number you enter in this field determines the beginning of the meter (time signature) event. For songs with only one time signature, you enter 1/1/000 (bars/beats/ticks).
- Meter: In these fields, type the meter that you want to use (4 in the top field and 4 in the bottom field for common time, for example).
- Click: From this menu, you choose the note value for the clicks played in each measure. Choosing 1/4 note (a quarter note) gives you four clicks in a 4/4 measure.

FIGURE 4-13: Use Meter Change view to designate the meter in your session.
Enabling a click track
Even an electronic equivalent of a metronome has to be set in motion to do any good. After you set up your click track to do its job, you have to enable it so it will run while you’re recording.
You can enable your click track by
- Choosing Options ⇒ Click from the main menu.
- Clicking the Click button in the MIDI section of the Transport window.
When Click is engaged, this button is blue.
You can engage the countoff by clicking the Countoff button in the MIDI section of the Transport window. This button displays the number of bars that the countoff is set for, and shows as blue when it’s engaged.
Setting up tempo and meter events
If your song has any tempo or meter changes, you can set up a map of these changes (events). You might want to do this if you have complex songs with several different time signatures or tempos. This makes sure that your click track follows these changes so that you can stay in time, too. This section shows you how.
Creating new tempo or meter events
Tempo and meter events are changes to your tempo or meter throughout the song. You can make changes to the tempo or meter anywhere within the song, and the placement of these events throughout the session constitutes the tempo and meter maps. The easiest way to create new tempo or meter events is to type in the location of the change of tempo or meter in the Location field within the Tempo or Meter Change dialog boxes. You can also select your locations by doing the following:
Click the Tempo or Meter ruler bar in the Edit window where you want your tempo or meter change to happen.
Book 2, Chapter 3 gives you all the details on both the Tempo and Meter ruler bars.
- Open the Tempo or Meter Change dialog box by clicking the appropriate plus sign to the right of the label Tempo or Meter.
- (Optional) In the Tempo or Meter Change dialog box, select the Snap to Bar check box if you want the tempo or meter event to start at the beginning of the nearest bar.
- Type in the tempo or meter you want to use for that section.
Click OK.
A triangle icon (green for tempo and yellow for meter) appears at the location of this tempo or meter change.
You can use these steps to create more changes in tempo or meter (events) anywhere within the session. When you create these events, Pro Tools creates a map of them within your session with the little icons.
Editing tempo and meter events
When your tempo or meter events are in place, you can move, delete, copy, or paste them. The following list tells you how:
- Moving a tempo or meter event: You can move the location of tempo or meter events easily by dragging the corresponding triangle along the ruler to where you want it. Alternatively, you can double-click the triangle to open the Tempo/Meter Change dialog box, where you can use the Location field to set a specific location.
- Deleting an event: To delete an event, Option-click (Mac) or Alt-click (PC) over the triangle of the event you want to remove.
- Copying an event: To copy a tempo or meter event, follow these steps:
Set the Edit mode to Grid and the grid resolution to 1 bar.
Doing so ensures that you select the beginning of a bar. (Book 4, Chapter 1 details how to work with Edit modes and grid resolutions.)
Press ⌘ (Mac) or Ctrl (PC) and click and drag from the beginning to the end of the event you want to copy.
You can select more than one contiguous event by continuing to drag across the events you want to select.- Choose Edit ⇒ Copy from the main menu or press ⌘ +C (Mac) or Ctrl+C (PC) to copy the events.
- Pasting an event: To paste an event that you’ve already copied, follow these steps:
- Click the place in the ruler bar where you want to paste the event(s).
- Choose Edit ⇒ Paste from the main menu or press ⌘ +V (Mac) or Ctrl+V (PC).