
Chapter 5
Recording Audio
IN THIS CHAPTER
![]() Recording a track
Recording a track
![]() Recording multiple tracks
Recording multiple tracks
![]() Playing back audio
Playing back audio
![]() Recording additional tracks
Recording additional tracks
Recording audio is what Pro Tools does best. (Well, that and editing it. See Book 5.) This chapter guides you through recording single and multiple tracks from analog and digital sources — as well as playing back all that stuff. In this chapter, you also discover the home recordist’s best way to create full-blown songs: overdubbing, or adding tracks to those you already recorded. I guarantee that you’ll use overdubbing a lot, so I spend a fair amount of time getting you up to speed on the best (and easiest) ways to overdub in Pro Tools.
Recording Tracks
Recording audio tracks in Pro Tools requires that you first choose your Record mode, create a track, set levels, enable recording, and turn on a click track (if you’re using one). These steps are all covered in detail in the previous chapter in this mini-book, but you’ll also find a basic overview of these topics in this section.
After you have all these steps taken care of, you’re ready to record some audio. The following sections lead you through recording a single track or multiple tracks, undoing or canceling takes (recorded performances), recording additional takes, auditioning takes, and using playlists to organize and choose which takes to listen to.
Recording a single track
Most home recordists tend to record a single track at a time. (After all, most human beings can play only one instrument at a time.) Recording to a single track — whether mono or stereo — requires the following basic steps. (Steps 1–6 are explained in detail in Chapter 4 in this mini-book.)
- Open a session or create a new session.
- Create a new audio track by choosing Track ⇒ New.
- Assign an input and output to your new track from the Input and Output drop-down menus, found in the Controls section of the track.
- Record-enable the track.
Set your recording level.
 Be sure that your monitor speakers are turned off or all the way down if you’re recording in the same room as your monitors because the microphone might create feedback (an obnoxious hum or squeal) if it’s too close to your speakers. My advice: When recording, use headphones to monitor your playing.
- Enable the click track and pre-roll (if you’re using those features).
Click the Return to Zero button in the Basic Controls section of the Transport window, as shown in Figure 5-1.
This ensures that you start recording at the beginning of the session.
Click the Record button in the Basic Controls section of the Transport window, as shown in Figure 5-1.
The Record button blinks red.
 Clicking Record doesn’t actually start the recording process; it only gets Pro Tools ready for recording.
 To record by using keyboard shortcuts for Step 8, you can use any of the following methods:
 - Press ⌘ +spacebar (Mac) or Ctrl+spacebar (PC).
- Press the numberpad 3 key — that is, if you’ve set your system so your Numeric Keyboard mode is linked to Transport. (Linking your numeric keyboard to Transport is easy; just choose Setup ⇒ Preferences from the main menu to access the Preferences dialog box, click the Operation tab, and then select the Transport radio button in the Numeric Keypad section.)
Click the Play button in the Basic Controls section of the Transport window (refer to Figure 5-1).
Only after you click Play does Pro Tools actually start recording; the Record button glows a nice red while recording (not that you’ll be watching it as you play).
When you’re done recording, click the Stop button in the Basic Controls section of the Transport window or press the spacebar on your keyboard.
This take appears in the Audio Clips list as a new clip.
The Audio Clips list is on the right side of the Edit window. If this list isn’t showing, click the double arrow at the bottom-right corner of the Edit window.
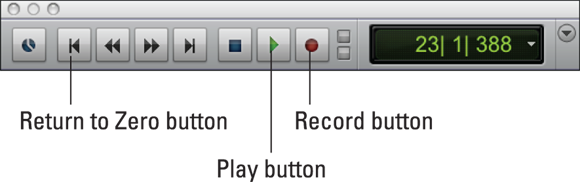
FIGURE 5-1: Use the Basic Controls to record.
Managing multiple tracks
Sometimes you want to record more than one track at a time — say, when you stereo-mic an instrument, when you record drums using several mics, or even when you want to record a few musicians at a time. Recording multiple tracks at one time follows much the same procedure as if you were recording a single track: The only difference is that you use one of the following methods to choose multiple tracks:
- Select the Latch Record Enable Buttons option in the Operation tab of the Preferences dialog box, and then click each track’s Record Enable button. To call up the Preferences dialog box, choose Setup ⇒ Preferences from the main menu.
- Record-enable noncontiguous tracks. Press and hold the Shift key while you click each track’s Record Enable button.
- Select all the tracks in your session. Option-click (Mac) or Alt-click (PC) the Record Enable button on any track.
- Record-enable a selected track. Option+Shift-click (Mac) or Shift+Alt-click (PC) the Record Enable button on the selected track.
Chapter 4 in this mini-book has more on these options.
Recording multiple tracks at once takes a toll on your system. A normal and common symptom of this load is a delay between the time you click the Play button and when the recording actually starts.
You can eliminate this delay by letting your system “warm up” first. This is done by following these steps:
- Click the Record button.
Press and hold Option (Mac) or Alt (PC) while you click the Play button.
The Record and Play buttons flash.
Click the Play button when you’re ready to record.
Pro Tools starts recording immediately, with no delay.
- When you’re done recording, click the Stop button.
Using pre- and post-rolls
A pre-roll or post-roll is a designated amount of time that the session plays before or after (respectively) the recording starts or stops. I’m a big fan of pre- and post-rolls (well, at least of pre-rolls). For example, setting a pre-roll for two or three bars lets me get into the groove of a song before the recording actually starts. You can set pre- and post-rolls several ways, as the following sections make abundantly clear.
Using the Pre-Roll and Post-Roll fields in the Transport window
To set the pre- and post-roll values in the Transport window, do the following:
Choose View ⇒ Transport ⇒ Expanded from the main menu.
The Pre-Roll and Post-Roll fields appear beneath the basic transport controls.
Click in the Pre-Roll Counter field in the Transport window and type in the length you want, as shown in Figure 5-2.
This field appears onscreen in the same format as the main counter. (In Figure 5-2, the format is bars and beats.)
- Press Return/Enter.
Click in the Post-Roll Counter field and type in your desired value.
This value, too, displays in the format selected for the main counter.
- Press Return/Enter.
Click the Pre-Roll and/or Post-Roll button in the Transport window to enable it.
The buttons are labeled Pre-Roll and Post-Roll and are to the left of the counter fields used in Steps 2 and 4.
All enabled buttons are highlighted.
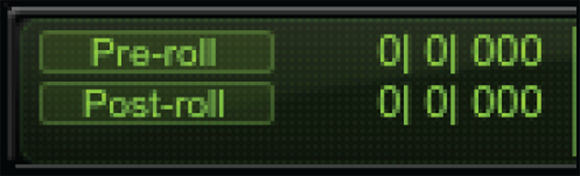
FIGURE 5-2: Clicking the Pre-Roll or Post-Roll field lets you enter a value for the pre/post roll.
Using the Pre-Roll and Post-Roll flags in the ruler bar of the Edit window
The Pre- and Post-Roll flags are located along the Timebase ruler in the Edit window (this is located above the track section). The flags are colored gray when they are disabled and green when they are enabled. Follow these steps to set the pre-roll and post-roll amounts using the flags in the ruler bar:
Press ⌘ +K (Mac) or Ctrl+K (PC) or choose Options ⇒ Pre/Post-Roll from the main menu to enable Pre-Roll and Post-Roll flags on the ruler of the Edit window.
The flags turn green to alert you that the pre- and post-roll functions are enabled.
- If you want the flag to snap to the grid, click the Grid button in the upper-left of the Edit window to select the Grid Edit mode. Otherwise use any other Edit mode.
- Click and drag the Pre- and Post-Roll flags on the ruler to where you want them.
If you want the same value for both the pre- and post-rolls, you can press Option (Mac) or Alt (PC) while you drag one of the flags. The other flag follows along while you move one.
Setting pre-rolls and post-rolls within a track’s playlist
Playlists are the clips contained in a track and are located in the middle of the Edit window to the right of the track controls. Playlists most often display the waveform for the audio in the clips but can be set to display other things, such as automation views. In addition to all the other neat things you can do with a playlist, you can also enable and disable pre- and post-rolls. Just do the following:
- Choose Options ⇒ Link Timeline and Edit Selection from the main menu.
 Click the Selector tool and drag along your track where you want the recording to start and stop.
This selects your record range.
Option-click (Mac) or Alt-click (PC) the track’s playlist where you want to put the pre-roll.
This both turns on the pre-roll and sets its location, as shown in Figure 5-3.
Option-click (Mac) or Alt-click (PC) the track’s playlist where you want to put the post-roll.
This both turns on the post-roll and sets its location.
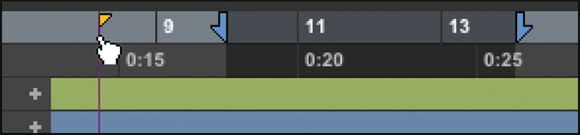
FIGURE 5-3: Setting the pre- or post-roll flag.
To turn off the pre-roll from within a track’s playlist, Option-click (Mac) or Alt-click (PC) near the start point of the record range you selected. To turn off the post-roll, Option-click (Mac) or Alt-click (PC) near the end point of the record range you selected.
Playing Back Your Tracks
After you record a track, you’ll most likely want to listen to it to make sure that it sounds the way you want. Pro Tools offers you many ways to play back a track. In the following sections, I guide you through a few of the many options for playing back audio clips.
Playing recorded tracks
After you record a track and click the Stop button, you can hear the track by turning off the Record Enable button (click it to make the light disappear, as shown at left in Figure 5-4) and then clicking the Play button (shown at right in Figure 5-4). You can adjust the volume by moving the channel’s fader up and down.

FIGURE 5-4: Disable Record Enable (left) and then click Play (right) to hear a track.
If you use the Auto Input Monitoring option from the Track menu, you don’t need to disable the Record Enable button. All you have to do is return to the beginning of the session (press the Return to Zero button in the Transport window) and then click the Play button in Basic Controls section of the Transport window. Pro Tools switches automatically to play back the recorded track. When you click Record and then click Play to record another take, Pro Tools switches your monitoring back to the input.
Before you play back a track, make sure that the fader is turned down most of the way because too-high volume can ruin your ears or speakers. You can slowly bring it up as the session plays to get the volume you want.
If you have Link Timeline and Edit Selection selected under the Options menu, you can play back your recorded track from anywhere in the session by clicking the Timebase ruler where you want to start — using the Selector tool in the Edit window — and then clicking Play. You can also use the Rewind and Fast Forward buttons to move through the session, but this tip makes getting around much faster and easier.
Setting scrolling options
Pro Tools lets you decide how you want the track material and Timebase ruler data to move (scroll) in Edit window as a session is playing or recording. You can choose between the following by choosing Options ⇒ Scrolling, and then choosing an option, as shown in Figure 5-5.
- No Scrolling: With this option selected, the Edit window remains where it is as the session plays. You can still move through the session by sliding the scroll bar at the bottom of the window while the session plays.
- After Playback: Enabling the After Playback option keeps the Edit window static while the session plays and immediately takes you to the current location of the song after the session stops.
- Page: Page scrolling during playback keeps the cursor visible at all times as the session plays. When the cursor moves from left to right, the window moves right.
Continuous: This keeps the cursor in the middle of the Edit window, moving the Timeline across your screen.
This is the option I generally choose because I can easily keep track of where I am in the session at all times.
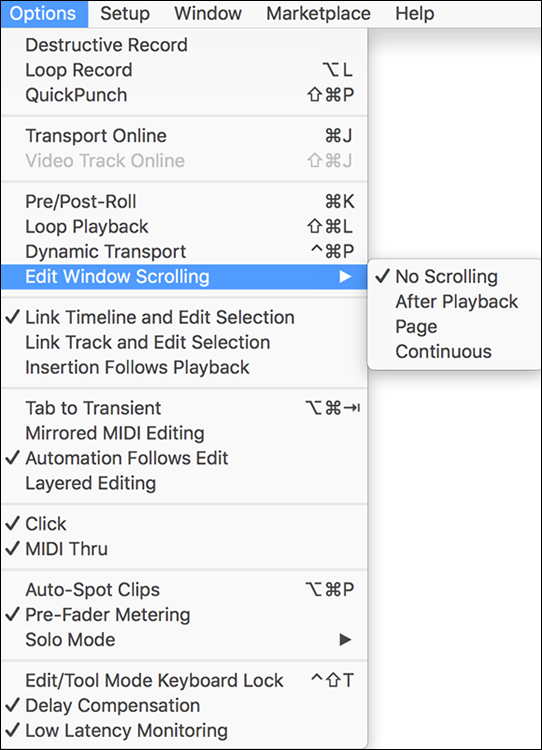
FIGURE 5-5: You can set the Edit window to scroll three different ways.
Listening to playback loops
If you want to hear a specific section of a session over and over — to find unidentifiable sounds, for example — you can create a playback loop. You set this up by choosing Options ⇒ Loop Playback from the main menu, as shown in Figure 5-6. Or, you can press Shift+⌘ +L or Control-click the Play button (Mac), or press Ctrl+Shift+L or right-click the Play button (PC).

FIGURE 5-6: Use Loop Playback of the Options menu to create a loop.
Next, set the start and end points of the loop. You have several ways to designate the start and end points, including:
- Using the Start and End fields in the Expanded section of the Transport window: Click in the Start and End fields and type in the Start and End points of your loop.
- Selecting a range in the track’s playlist or Timebase ruler (the timeline near the top of the Edit window): Make sure that you have the Link Timeline and Edit Selection option selected in the Options menu. Then, using the Selector tool, choose the range you want to loop, either in a track or along the Timebase ruler, by dragging the Selector from the Start to End point.
- Dragging the playback markers in the Timebase ruler (timeline): With the Selector tool, click and drag the playback markers (also called Start and End Point markers). These are the blue arrows — or red if you have any tracks record-enabled — at the beginning and end points of your loop. You can move the markers either together or individually.
- Using memory locators: Memory locators are user-assigned markers in the song. (This option is covered in detail in Book 5, Chapter 4.)
Click the Play button in the Basic Controls section of the Transport window to listen to the loop.
Using the Scrub feature
The Scrub feature in Pro Tools — located in the Edit window — works just like rocking the tape back and forth against the playback head of a reel-to-reel tape machine. (A what?) Um, okay. If you don’t recall that bit of 20th-century technology, just trust me: Scrubbing was a way of listening to tiny snippets of a recorded track by moving the tape only a little. You can listen to a track by moving the cursor back and forth across the spot you want to hear. You can hear it forward or backward (in case you want to check the secret backward message … just kidding). This is useful when finding a specific note in the track — the hit of a snare drum, for instance. One of the great things about the Pro Tools Scrub feature (compared with other recording programs) is that you can scrub at any speed by simply moving the cursor at different speeds.
To scrub a track, follow these steps:
Click the Scrubber button from the top of the Edit window, as shown in Figure 5-7.
The Scrubber button looks like a mini-speaker emitting sound.
- Click and drag over the waveform in a track to hear it played.
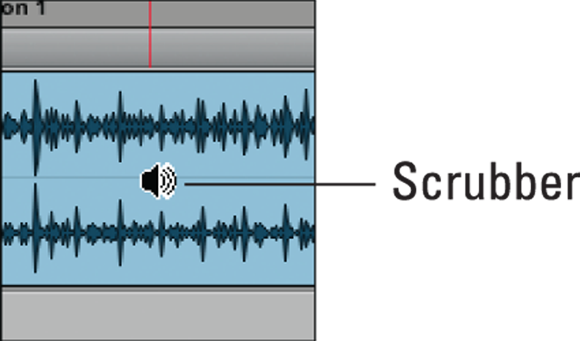
FIGURE 5-7: Use the Scrubber tool to listen to a specific point in a track.
You can scrub two adjacent tracks at once by dragging the Scrubber at the boundary between the two tracks.
Doing Additional Takes
Chances are that your first attempt at recording a track wasn’t as good as you’d like. No problem. You can just do another take. This process is the same as recording your first one, but Pro Tools offers some options that can make it easy and fun to get the “perfect” performance. These include loop recording, punching in and out, and sometimes (if you’re really on the fly) using the Pro Tools QuickPunch feature. Of course, you can always just record the whole thing over again if you want. All these options are covered in the following sections.
Starting over from scratch
Sometimes the best way to get it right is to start over. To record another take of the entire session, click the Return to Zero button in the Basic Controls section of the Transport window to return to the beginning of the session. Then follow the steps in the “Recording a single track” section, earlier in this chapter.
If you record in Destructive mode, any additional takes that you record onto a track will erase the previous one. So, if you want to make sure that you have a particular take for later, first make sure you’re not using Destructive mode when you record over any existing takes on a track. Or you can create a new playlist for that track before you record your next take. (See the “Recording to playlists” section, later in this chapter, for more on how to do that.)
Punching in and out
If you like some of your initial take and want to record over only part of it, you can set points to start and stop this “recording over” within the session. This is punching in and out.
Punching in to or out of a track involves (first) setting a start point and an end point. You can do that in one of several ways, as I detail in the next few sections.
Before you create your start and end points for a punch, you need to decide where those points are going to be. To make this decision, you most likely need to play the track back so you can hear where you want to punch. If you’re not sure how to do this, the “Playing Back Your Tracks” section earlier in this chapter gives you the details on this process.
Using the Start/End fields in the Transport
To set the start and end points in the Transport window, follow these steps:
- Select the Expanded view option of the Transport window by choosing View ⇒ Transport ⇒ Expanded from the main menu.
Click in the Start field in the Basic Controls section of the Transport window and type in the beginning of the punch section you want.
This field appears in the same format as that of the main counter. (In Figure 5-8, it’s bars and beats.)
- Press Return/Enter.
Click in the End field and type in the end of the range.
This field, too, appears in the format selected for the main counter (as in Figure 5-8).
Press Return/Enter.
You’re now ready to perform a punch. Check out the “Performing the punch” section, later in this chapter, for steps on how to actually perform the punch.

FIGURE 5-8: Setting your punch range.
Selecting a section of a track’s playlist
The playlist section of the Edit window contains all the clips for the track. You can make a selection within this playlist by following these steps:
Choose Options ⇒ Link Timeline and Edit Selection from the main menu.
This ensures that when you make your selection in a track’s playlist, the Start and End Point markers in the Timebase ruler follow along.
With the Selector tool, click and drag over the section in your track you want to record over, as shown in Figure 5-9.
This highlights the selection and positions the start point at the beginning of your selection and the end point at the end.
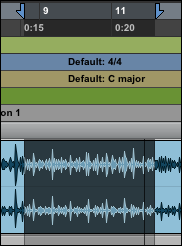
FIGURE 5-9: Selecting a track segment from a track’s playlist is as simple as clicking and dragging it.
You’re now ready to perform a punch. Go to the “Performing the punch” section later in this chapter for steps on how to actually perform the punch.
Dragging the Start and End Point markers along the ruler bar
The Start and End Point markers are located along the Timebase ruler in the Edit window and appear as up and down arrows — up for punch out, and down for punch in. The flags are colored blue when no tracks are record-enabled and red when one or more tracks are record-enabled. Setting Start and End Point markers in the Ruler bar consists of these steps:
Choose Options ⇒ Link Timeline and Edit Selection from the main menu.
This makes sure that when you drag the markers along the ruler bar, the corresponding section in the track’s playlist is selected as well.
- If you want the markers to snap to the grid, click the Grid button in the upper-left of the Edit window to select the Grid Edit mode; otherwise use any other Edit mode.
- With the Selector tool, click and drag the Start and End Point arrows to where you want them, as shown in Figure 5-10.
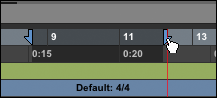
FIGURE 5-10: Drag the arrows to set your punch range.
You’re now ready to perform a punch. The following section lays out steps on how to actually perform the punch.
If you want to select the entire length of the session, double-click one of the arrows.
Performing the punch
After you set the start and end points for your punch (whether in or out), you can record to that section by doing the following:
Set and enable a pre-roll by clicking in the Pre-Roll field in the expanded Transport window (choose View ⇒ Transport ⇒ Expanded to get there) and typing in the amount of pre-roll you want.
After you do this, you can hear the previously recorded track before the punch-in happens.
Set and enable a post-roll by clicking in the Post-Roll field in the expanded Transport window (choose View ⇒ Transport ⇒ Expanded to get there) and typing in the amount you want for your post-roll.
Doing so lets you hear how your punch fits in with the previously recorded track.
- Choose Non-Destructive or Destructive Record mode.
- Non-Destructive Record mode is the default mode and is active if you have a Record button without any icon in it.
With Destructive Record mode selected, a small D is visible in the center of the Record button in the Transport window. Select Destructive Record mode by choosing Options ⇒ Destructive Record from the main menu.
Use Destructive Record mode only if you’re really sure you don’t want to keep the previous take in the selected section.
Click the Record Enable button for the track you want to record onto.
The button blinks red.
Click the Record button.
The Record light flashes red.
Click the Play button when you’re ready to record.
The session starts at the pre-roll time, the Record button flashes red, and you hear the previously recorded track until the pre-roll is over. The monitoring switches to the input source, and the Record light stops flashing but remains red.
When you hit the end of the recording range, the session stops playing, or — if you have the post-roll enabled — stops recording. At that point, the Record button starts flashing again, and the monitoring switches back to the recorded clip until the end of the post-roll period. When the session reaches that point, it stops playing.
Loop recording
Loop recording lets you choose a section of the song to record repeatedly. This option makes it easy to try a bunch of takes without having to start and stop manually each time through the section. Loop recording can be done a bunch of ways. I describe one in Chapter 4 in this mini-book, but here’s another:
Choose Options ⇒ Link Timeline and Edit Selection from the main menu.
This ensures that when you make a selection in either the Timebase ruler or within a track’s playlist, both are selected.
- Click the Selector tool at the top of the Edit window to select it.
- With the Selector tool, click and drag across the section of the track that you want to record over.
- Record-enable the track by clicking the Record Enable button in the Track Controls section of the Edit window.
- Select the Loop record mode by choosing Options ⇒ Loop Record, pressing Option+L (Mac) or Alt+L (PC), or by Control-clicking (Mac) or right-clicking (PC) the Record button in the Basic Controls section of the Transport window until the Loop Record icon shows up.
- Click the Record button in the Basic Controls section of the Transport window to prepare the session to record.
- Click Play in the Basic Controls section of the Transport window to start recording.
If you designated a pre-roll, it will happen only before the first time through the loop. After that, the loop goes from start point to end point, back to the start point, and so on.
Using QuickPunch
If you have sections that you want to replace in a track (say, a bunch of guitar counter points to support the lead vocal) and you want to record the new parts in just one pass of the session, you can use QuickPunch mode.
Setting up for QuickPunch requires these steps:
- Click the Return to Zero button in Basic Controls section of the Transport window to return to the beginning of the session.
- Record-enable the track(s) you want to fix by clicking the Record Enable button for each track in the Track Controls section of the Edit window.
Set the Record mode to QuickPunch by choosing Options ⇒ QuickPunch, Control-clicking (Mac) or right-clicking (PC) the Record button, or pressing ⌘ +Shift+P (Mac) or Ctrl+Shift+P (PC).
The QuickPunch (P) icon appears in the Record button.
Click the Play button to start the session.
The Record button flashes while the session plays, and you hear the previously recorded track in the monitors.
Click the Record button when you want to punch in.
The Record button stops flashing and recording starts immediately. Monitoring switches from what’s recorded to what’s coming in; you hear the input source.
Click the Record button again to stop recording.
The button begins flashing again, and monitoring switches back to the recorded track.
You can repeat this procedure up to 100 times per session. (Probably enough to fix that pesky track, eh?)
Overdubbing: Recording additional tracks
Overdubbing is adding tracks to those already recorded. This process is the mainstay of the home recordist’s recording repertoire because it allows you to play all (or as many as you want) of the instruments in your song. You can start with the drum tracks, add some bass guitar, then some rhythm guitar, and later the lead vocals, and so on.
Overdubbing is similar to recording your first track except that you have to be able to hear the other tracks and synchronize to them while you play. The main things to be concerned about when you overdub are:
- Creating a monitoring mix: Take some time to create a mix of the previously recorded tracks that you can hear as you record so you have a blend that inspires you to perform your best. Depending on your system, you might not be able to add any effects to your mix, but getting the right balance between instruments can really help your recording. (Check out Book 6 for more on mixing.)
- Getting into the groove: Make sure that you have the least amount of latency in your system when overdubbing; otherwise, it can really mess up the groove. Chapter 4 of this mini-book covers this in detail — and it’s especially important for instruments with a fast attack and decay, such as drums and percussion, because they sound awful when they’re slightly out of time.
With the Avid (and second-generation Digidesign) Mbox Mini and Mbox, you get a Zero-LatencyMonitoring setup that lets you monitor the input of the Mbox while hearing the output of your recorded tracks, which reduces the latency to, well, zero (almost). To set up your Mbox monitoring to record without hearing latency, follow these steps:
Click the Mute button located in the Track Controls section of the Edit window to mute the track you’re overdubbing onto.
This keeps you from hearing the track as it comes back out of the system.
Click the Mono switch on the Mbox.
This allows both the input and the recorded tracks to play through both speakers. If this switch isn’t depressed, you hear the input in one ear only.
Adjust the Mix knob on the front of the Mbox to blend your input with the tracks playing in the session.
You need to do this when the session is playing and you’re playing your instrument at the same time so you can hear both the recorded tracks and your input. Try a test run-through to get a balance before you actually record.
Recording to playlists
Whenever you have material recorded to a track, it exists within the Edit window as a playlist. This playlist contains all the clips (representations of the actual audio on your hard drive) that are currently in a track. One of the nice things about Pro Tools is that you can create a bunch of separate playlists for a track and swap them in and out of the track. Whichever of a track’s playlists is in the Timebase ruler section of the Edit window is the one that is heard when your session is playing back.
Playlists are handy for keeping all your takes organized, and they also let you record additional takes on a track even when you’re using Destructive Record mode. You can create a new playlist by clicking the little arrows next to the track’s name in the Track Controls section of the Edit window. This opens a drop-down menu for a track, as shown in Figure 5-11.

FIGURE 5-11: Use the playlist drop-down menu for a track to create a new playlist.
To record to this playlist, follow the steps in the “Recording a single track” section, earlier in this chapter.
Auditioning takes
After you record a bunch of takes of a track, you can audition them to see which one you prefer: from the Audio Clips list, from the Take List drop-down menu, and from the track’s playlist. You can also set preferences for viewing takes of a track, and you can audition takes from multiple tracks at once. All these options are covered in this section.
Auditioning from the Audio Clips list
You can take clips from the Audio Clips list, located at the right side of the Edit window (if this list isn’t visible, click the double arrow at the bottom-right corner of the Edit window) and drag them directly into a track’s playlist (the clips that represent the audio for a track), located to the right of the Track Controls section of the Edit window.
- Click the Grabber button in the Edit window to select the Grabber tool.
Click the current take in the track’s playlist, as shown in Figure 5-12.
The playlist in a track consists of all the clips that you can see in the session.
Press ⌘ (Mac) or Ctrl (PC) and click another take in the Audio Clips list.
The Audio Clips list is located on the right side of the Edit window. If it’s not visible, click the double arrow at the bottom-right corner of the window to expand the Edit window.Drag the track from the Audio Clips list onto the playlist, as shown in Figure 5-13.
The clip is placed in a track and is ready to play.
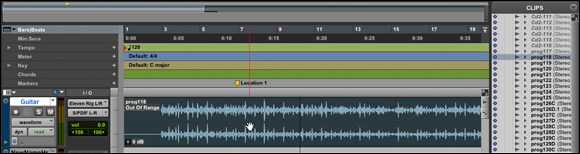
FIGURE 5-12: Use the Grabber tool to select the take you want to replace.

FIGURE 5-13: Click and drag the take you want from the Audio Clips list onto the track.
Auditioning from the Takes List drop-down menu
You can audition your takes by opening a drop-down menu that has a list of all the takes for a punch or loop recording session. This option lets you freely switch the takes while the session plays. This section outlines the procedures.
- Click the Selector button in the Edit window to choose the Selector tool.
Select a take within a track’s playlist (the clips located to the right of the track name) and ⌘ -click it (Mac) or Ctrl-click it (PC) to open the Takes List drop-down menu, as shown in Figure 5-14.
You can also click the precise Start point of the punch or loop range in the track’s playlist or along the Timebase ruler without first selecting the track.
Choose the take you want to hear from the Takes List drop-down menu.
This take replaces the previous one and is placed at its correct position in the session.
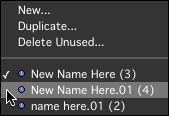
FIGURE 5-14: The Takes List drop-down menu.
You can follow the steps for both of these approaches if you want to audition more takes.
From the Takes List drop-down menu, you can choose and change takes even while the session is playing.
The different takes are listed in the order they were recorded. If you start moving them around, though, you can identify them by the time stamp created when you recorded each take.
Choosing from a track’s playlist
The track’s playlist contains the clips located in a track. The playlist is located to the right of the Track Controls for each track and represents the audio data for the track. To audition tracks from a track’s playlist, click in the little arrows next to the track’s name in the Track Controls section of the Edit window to open the playlist drop-down menu and then choose the playlist to play, as shown in Figure 5-15. The name of the track changes to the name in the chosen playlist.
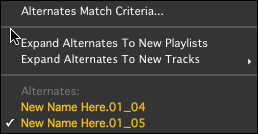
FIGURE 5-15: Choose a clip to play from the playlist drop-down menu.
Matching take criteria
You can use the “Alternates Match Criteria” in the Takes List dialog box (as shown in Figure 5-16 to choose which takes get listed in the Takes List drop-down menu to help you keep your various takes organized. This can be helpful if you’re punching in a lot — and/or if you’re punching in on multiple tracks at a time.
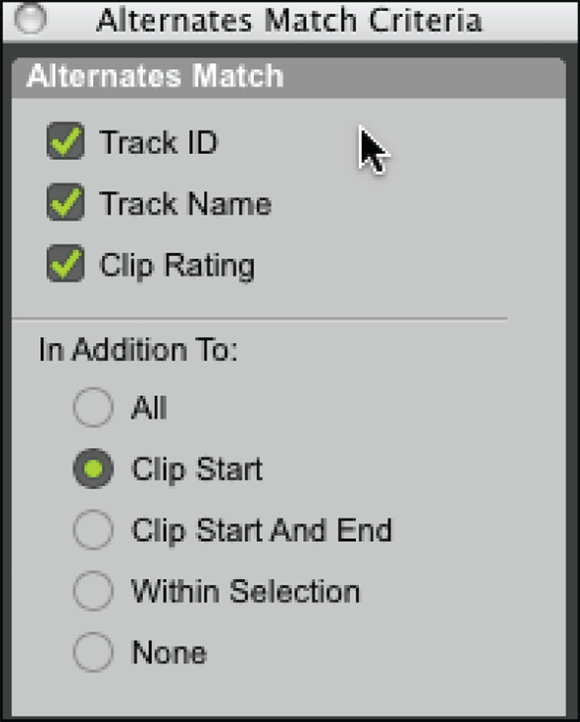
FIGURE 5-16: The Alternates Match Criteria Takes List options.
You can access this dialog box by choosing Alternates Match Criteria from the Takes list (follow the steps in the “Auditioning from the Takes List drop-down menu” section earlier in the chapter to get to this window).
The Alternates Match Criteria options include the following:
- Track ID: Takes recorded to the same track are considered matching.
- Track Name: This includes takes with the same track or name.
- Clip Rating: This option includes takes that have the same rating. This option only works, of course, if you’ve rated your takes. You can rate a take or clip by highlighting it (click it with the Selection tool) and choosing Clip ⇒ Rating ⇒ rating#. Your choices for a rating are None, 1, 2, 3, 4, 5.
- In Addition To Match Options: You can add other criteria to your match to narrow the field. These include.
- All: This option includes takes that include the current location of the cursor — as well as takes that fall either partly or entirely within the current time range of the selection in the Edit window.
- Clip Start: This option includes takes with the same start time as the clip that has the current cursor location or is presently selected.
- Clip Start and End: This option includes takes with the same start and end times.
- Selection Range: This includes takes that fit entirely within your selection range in the Edit window.
- None: This is the default and when you choose this no other criteria other than the main ones above (Track ID, Track Name, and/or Clip Rating) apply.
Auditioning takes from multiple tracks at one time
If you want to audition takes from multiple tracks at once — for example, when recording drums to several tracks at a time — follow these steps:
- Select both the Take Clip Name(s) That Match Track Names and the Take Clips Lengths That Match options in the “Matching Start Time” Takes List section of the Edit tab of the Preferences dialog box. (See the previous section.)
- Click the Selector button in the Edit window to choose the Selector tool.
- With the Selector tool, drag across all the tracks for the range you want to replace, as shown in Figure 5-17.
⌘ -click (Mac) or Ctrl-click (PC) one of the tracks within that selected clip.
The Takes List drop-down menu appears. Takes that match the preferences set in Step 1 show up in the list.
- Choose a clip (take) from the list.
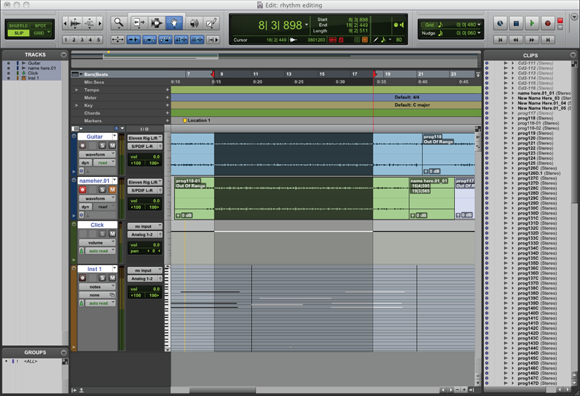
FIGURE 5-17: To select multiple tracks on which to audition takes, drag across the tracks you want.
Getting Rid of Unwanted Takes
If you have a take (recorded performance) that you don’t like, you can get rid of it in one of several ways. You can cancel the take while you’re recording, undo the take after you’ve recorded it, or clear the audio clip that contains the take from the Audio Clips list. All these options are detailed in the following sections.
Canceling your performance
Canceling a performance is handy when you’re in the middle of recording and you know you’re not going to keep the take. (For example, the mail arrived, causing the dog to go ballistic in the middle of your vocal.) To cancel a performance, simply press ⌘ +. (period; Mac) or Alt+. (period; PC). This stops the session and clears the audio clip created for this take with one stroke.
You can’t use this command if you record in Destructive Record mode.
Undoing your take
If you already stopped recording and you know that you don’t want to keep your latest try, you can undo the take by choosing Edit ⇒ Undo Record from the main menu (as shown in Figure 5-18) or by pressing ⌘ +Z (Mac) or Ctrl+Z (PC).

FIGURE 5-18: Undo a take from the main menu.
If you used QuickPunch mode, only the last punch will be undone. If you used Loop Record mode, on the other hand, all the looped passes will be undone. And if you used Destructive Record mode, your previous take will already have been erased when you recorded — so undoing the last take will leave you with nothing on that track.
Clearing the file from the Audio Clips list
After hearing a few of your takes, if you decide that you want to get rid of one or more of them, you can clear the take(s) from the Audio Clips list. The following steps show how:
Click the clip you want to get rid of in the Audio Clips list to highlight it.
To select more than one clip to clear, press and hold the Shift key while you click each clip.
Choose Clips ⇒ Clear from the main menu (see Figure 5-19) or press Shift+⌘ +B (Mac) or Ctrl+Shift+B (PC).
Your selected takes are deleted.

FIGURE 5-19: Choosing Clips ⇒ Clear from the main menu gets rid of a selected take.