chapter 2
The Visible Computer
“People who think they know everything really annoy those of us who know we don’t.”
—BJARNE STROUSTRUP, CREATOR OF THE C++ PROGRAMMING LANGUAGE
In this chapter, you will learn how to
■ Describe how computing devices work
■ Identify common connectors and devices on typical computer systems
■ Discuss features common to operating system software
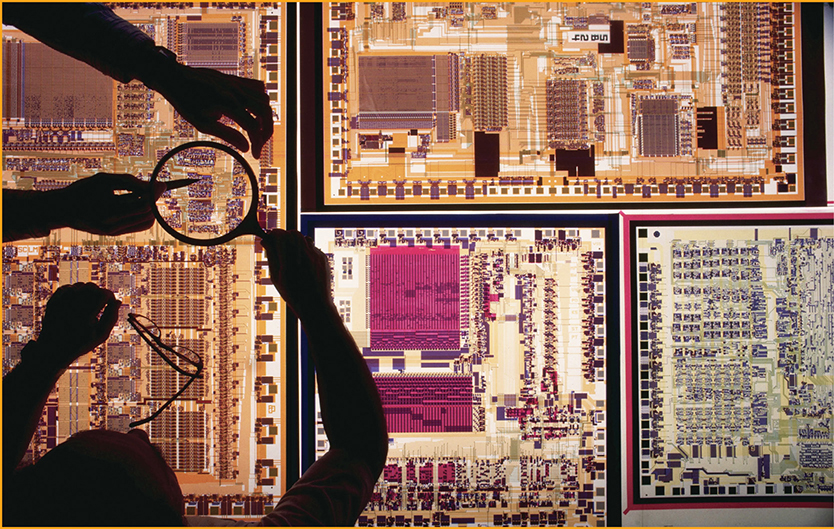
Charles Babbage didn’t set out to change the world. He just wanted to perform mathematical calculations without worrying about human error, something all too common in his day. Babbage was a mathematician in the nineteenth century, a time well before anyone thought to create electronic calculators or computers (see Figure 2.1). When he worked on complex math, the best “computers” were people who computed by hand. They solved equations using pen or pencil and paper.
• Figure 2.1 Charles Babbage, father of the computer
Babbage dreamed of machines that would calculate mechanically, making sure the results were always right. Although his ideas were ahead of his time, inventors in the mid-twentieth century picked up the concepts and created huge calculating machines that they called computers.
This chapter explores how computing devices work. We’ll look first at the computing process, then turn to hardware components common to all devices. The chapter finishes with a discussion about software, exploring commonality among all operating systems and specific functions of application programming.
Historical/Conceptual
■ The Computing Process
In modern terms, a computer is an electronic device that can perform calculations. The most common types use special programming languages that people, known as computer programmers, have written and compiled to accomplish specific tasks.
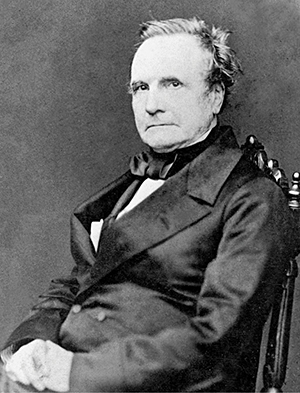
When most people hear the word “computer,” they picture general computing devices, machines that can do all sorts of things. The typical personal computer (PC) running Microsoft Windows is used for various tasks (see Figure 2.2). You can use it to manage your money and play games, for example, without doing anything special to it, such as adding new hardware.
• Figure 2.2 A typical desktop PC
Here are some other general-purpose computing devices:

Plenty of other devices do specific computing jobs, focusing on a single task or set of similar tasks. You probably encounter them all the time. Here’s a list of common specific-purpose computers:
■ Internet of Things thermostat
■ Digital watch
■ Router
■ Wi-Fi picture frame
■ Xbox Series X
■ Roku
■ Point of sale (POS) system (see Figure 2.4)
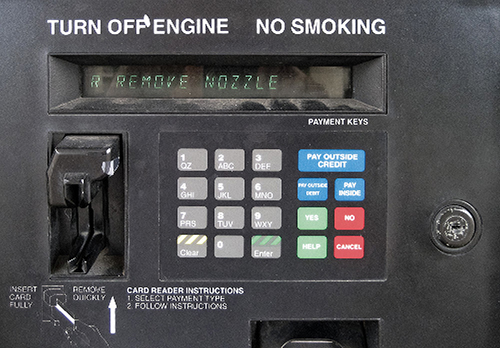
• Figure 2.4 A point of sale computer in a gasoline pump
This list isn’t even close to complete! Plus, there are computers inside a zillion other devices. Here are some:
■ Modern refrigerators
■ Every automobile built since the mid-1990s
■ Airplanes
■ Boats
■ Mall lighting systems
■ Zambonis
■ Home security alarms
You get the idea. Computers help the modern world function.
Modern computer techs need to know how different types of computing devices work so they can support the many devices used by their clients. This diversity is also reflected in the CompTIA A+ exams.
If the list of devices to support seems overwhelming, relax. The secret savior for modern techs is that computing devices function similarly to each other. Once you know what a device should enable a user to do, you’ll be able to configure and troubleshoot successfully.
The Computing Parts
A modern computer consists of three major components:
■ Hardware
■ Operating system
■ Applications
The hardware is the physical stuff that you can touch or hold in your hand. With a smartphone, for example, you hold the phone. On a typical personal computer, you touch the keyboard or view images on the monitor.
The operating system (OS) controls the hardware and enables you to tell the computer what to do. The operating system often appears as a collection of windows and little icons you can click or touch (see Figure 2.5). Collectively these are called the user interface (UI), which means the software parts with which you can interact. The UI that offers images or icons to select (as opposed to making you type commands) is called a graphical user interface (GUI).
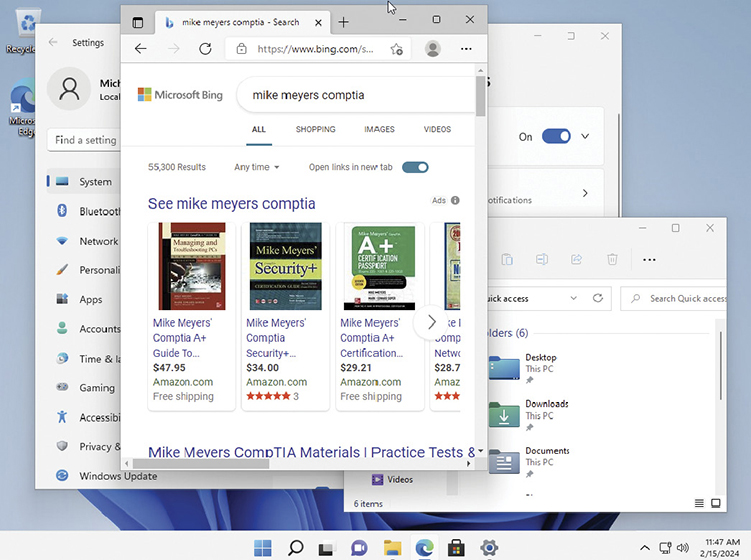
• Figure 2.5 The Microsoft Windows 11 operating system
An application (app), or program, enables you to do specialized tasks on a computer, such as
■ Type a letter
■ Send a message from your computer in Houston to your friend’s computer in Paris
■ Wander through imaginary worlds with people all over the world
Very simple computing devices might have an operating system with only a few features that give you choices. A digital camera, for example, has a menu system that enables you to control things like the quality of the picture taken (see Figure 2.6).
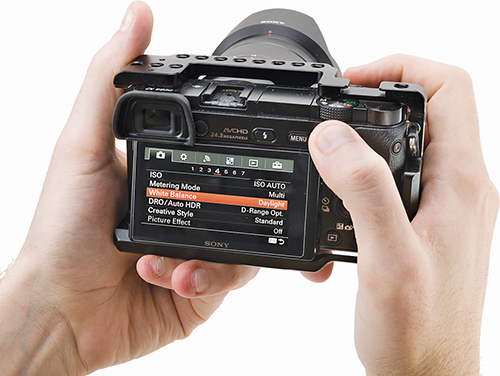
• Figure 2.6 Changing settings on a digital camera
More complicated devices offer more choices. A Samsung Galaxy Z Fold phone, for example, does some cool things right out of the box, way more than just phone calls! But all smartphones also have access to an online store with massive selections of applications. Just download the applications (known as apps) to do all sorts of things that Samsung didn’t include (see Figure 2.7).
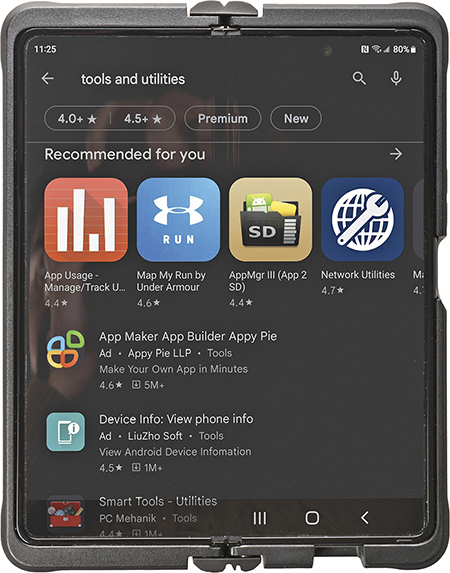
• Figure 2.7 Google Play store
Finally, multipurpose computers like the typical Windows PC or macOS computer offer applications to help you do everything from write a book on CompTIA A+ certification to talk with someone on the other side of the world, with full audio and video (see Figure 2.8).

• Figure 2.8 Video call with Apple’s FaceTime
Stages
At the most basic level, computers work through three stages, what’s called the computing process:
■ Input
■ Processing
■ Output
You start the action by doing something—clicking the mouse, typing on the keyboard, or touching the touchscreen. This is input. The parts inside the device or case take over at that point as the operating system tells the hardware to do what you’ve requested. This is processing.
In fact, at the heart of every computing device is a central processing unit (CPU), usually a single, thin wafer of silicon and tiny transistors (see Figure 2.9). The CPU handles the majority of the processing tasks and is, in a way, the “brain” of the computer.
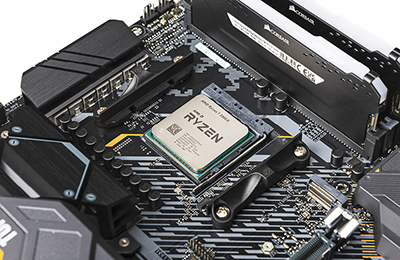
• Figure 2.9 An AMD Ryzen CPU installed on a motherboard

Once the computer has processed your request, it shows you the result by changing what you see on the display or playing a sound through the speakers. This is output. A computer wouldn’t be worth much if it couldn’t demonstrate that it fulfilled your commands! Figure 2.10 shows the computing process.

• Figure 2.10 The computing process
Modern computing devices almost always have two other stages:
■ Data storage
■ Network connection
Data storage means saving a permanent copy of your work so that you can come back to it later. It works like this. First, you tell the computer to save something. Second, the CPU processes that command and stores the data. Third, the computer shows you something, such as a message saying that the data is stored. Any work that you don’t save is lost when you turn the computer off or exit the application.
Most computing devices connect to other devices to access other resources. A network connection often describes how one computer connects to one or more other computers. And it doesn’t just apply to a couple of office computers. Every smartphone, for example, can connect to the Internet and play a video from YouTube (assuming you have a signal from a cell tower and a data plan).
At this point, students often ask me a fundamental question: “Why should I care about the computing process?” The answer to this question defines what makes a good computer technician. Here’s my response.
Why the Process Matters to Techs
Because the computing process applies to every computing device, it provides the basis for how every tech builds, upgrades, and repairs such devices. By understanding both the components involved and how they talk to each other, you can work with any computing device. It might take a couple minutes to figure out how to communicate with the device via input, for example, but you’ll quickly master it because you know how all computing devices work.
Breaking It Down
The whole computer process from start to finish has a lot of steps and pieces that interact. The more you understand about this interaction and these pieces, the better you can troubleshoot when something goes wrong. This is the core rule to being a great tech. We’ll turn to our knowledge of these “steps and pieces” as we tackle troubleshooting scenarios throughout the book, remembering the essential question a tech should ask when facing a problem: What can it be? Or, in slightly longer fashion: What could cause the problem that stopped this device from functioning properly?
1101
■ Computing Hardware
Later chapters examine specific computing hardware, such as CPUs and mass storage devices. CompTIA expects competent techs to know what to call every connector, socket, and slot in a variety of computing devices. Rather than describe all of those briefly here, I decided to create a photo walkthrough naming points of interest and the chapters that discuss them.

This section serves as a visual introduction to the components and connections. Plus, it should work great as a set of study sheets for memorizing names just before taking the CompTIA A+ 1101 exam. The images that follow indicate the chapters where you’ll find information about a component or connection standard.
Figure 2.11 shows a typical desktop PC. The input and output devices should be familiar to most.
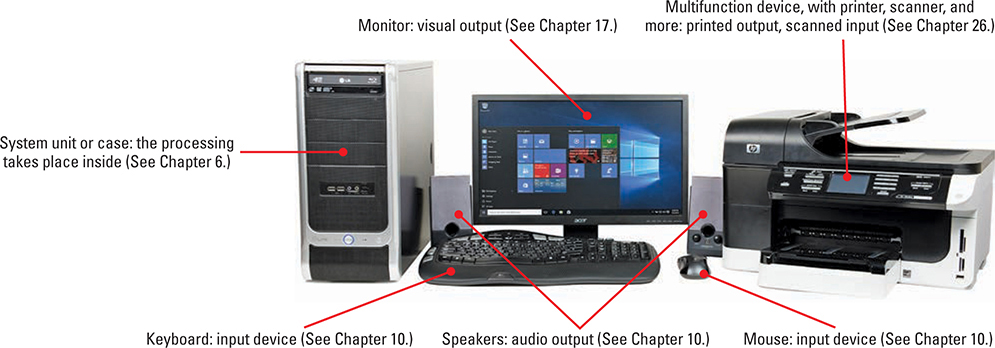
• Figure 2.11 Desktop PC with common peripherals
Figure 2.12 shows the back of a PC’s system unit, where you’ll find the many connection points called ports. Some ports connect to output devices such as monitors. Other ports are exclusively used for input devices. Most (such as the universal serial bus, or USB) handle both input and output.
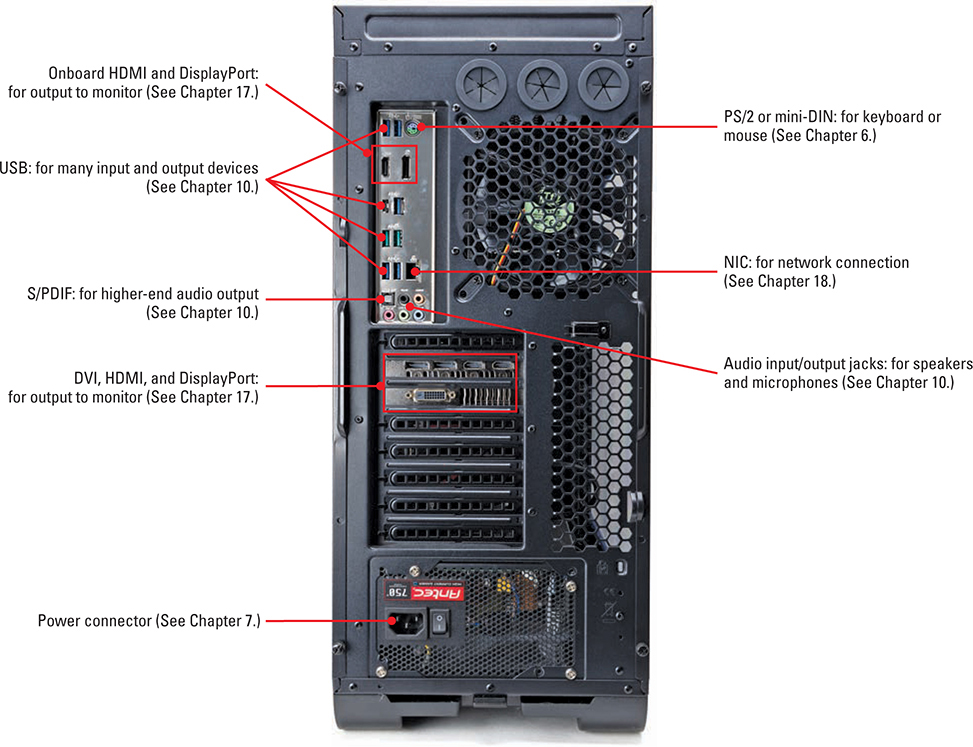
• Figure 2.12 The business end of a desktop PC
Figure 2.13 reveals the inside of a PC case, where you’ll find the processing and storage devices. Hiding under everything is the motherboard, the component into which everything directly or indirectly connects.
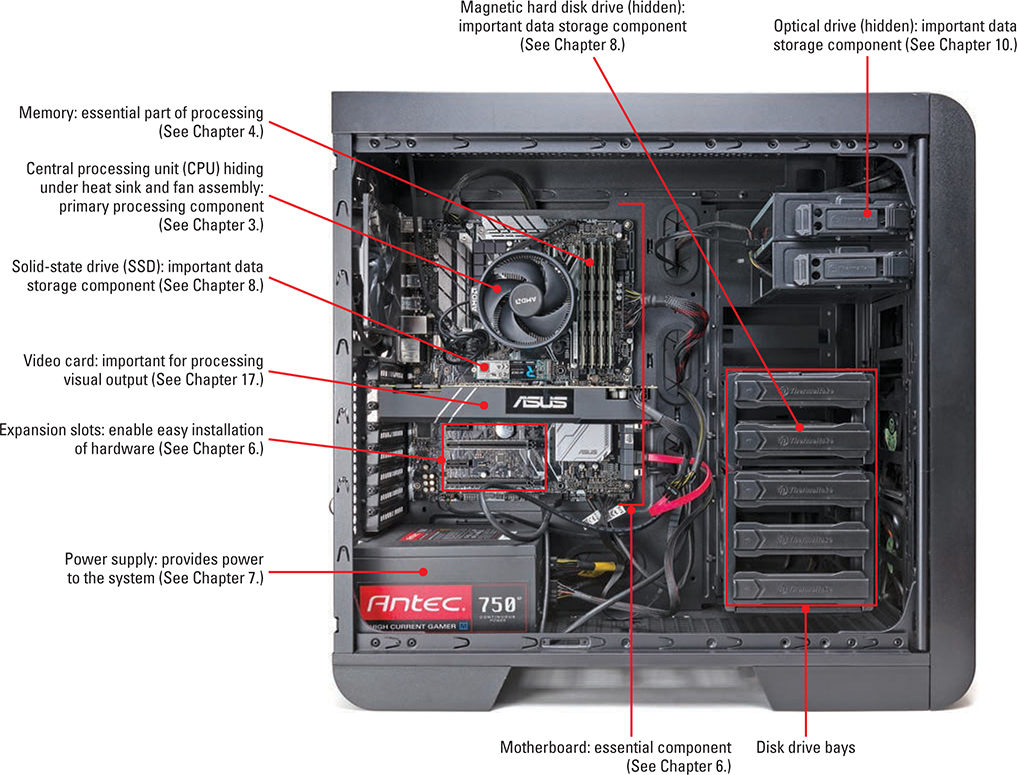
• Figure 2.13 Inside the system unit
Figure 2.14 shows a clamshell-style laptop—in this case an Apple MacBook Pro. The portable nature of the device calls for input and output devices built into the case—some variation from the typical PC displayed earlier, therefore, but all the standard computing component functions apply. Chapter 23 goes into a lot of detail about each component displayed here.
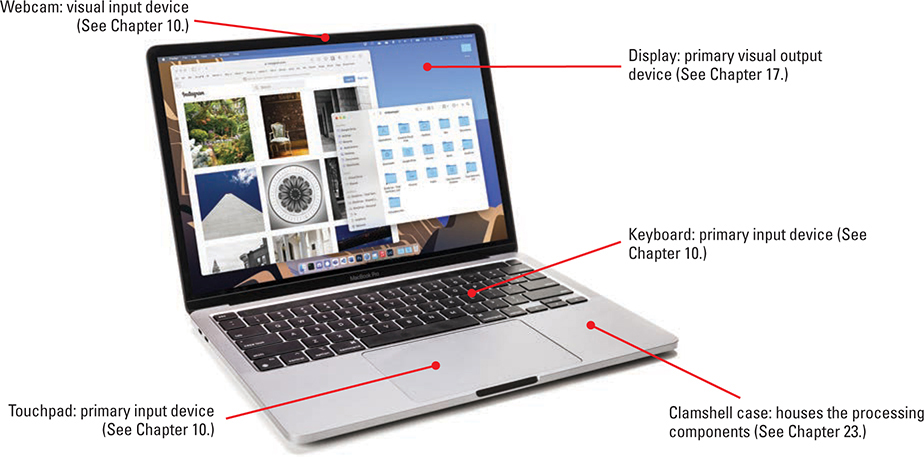
• Figure 2.14 Laptop (a MacBook Pro)
Figure 2.15 shows the side of a laptop with three different connection types.

• Figure 2.15 Ports on an older laptop
Figure 2.16 shows a tablet computer, an Apple iPad. Note that the screen has a touch interface, which makes it both an input and output device.
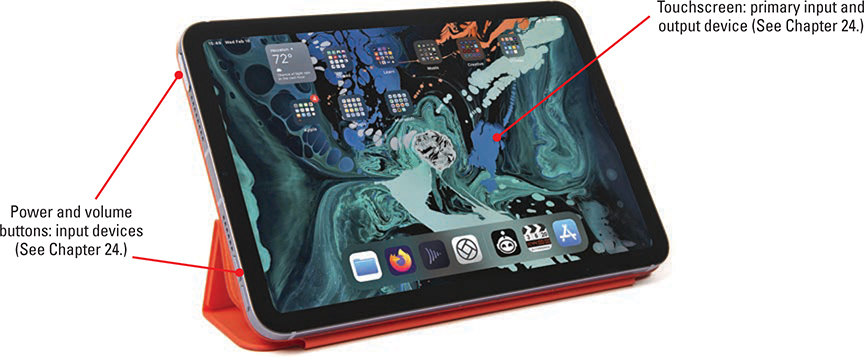
• Figure 2.16 Tablet computer (Apple iPad Mini)
We could continue with any number of computing devices in the same picture show, but at this point the uniformity of computing component functions should be clear. They all work similarly, and, as a competent tech, you should be able to support just about any customer device. Let’s turn now to a feast of software.
![]()
1102
■ Computing Software
Any premade set of binary instructions that a CPU can read and react to is software. All applications are software. Operating systems such as Microsoft Windows or Apple’s iOS running on your iPhone are also software. Care and feeding of your computer’s software is important work. Reflecting that importance, the CompTIA A+ 1102 exam covers a lot of software, mostly operating system tools. You’ll need to know how to install and support applications, of course, as that’s an essential role for a CompTIA A+ tech.
The exam explores four workstation operating systems, Microsoft Windows (versions 10 and 11 only), Apple macOS, Linux, and Google Chrome OS. Note that the exam covers common Linux features, but not distribution-specific features. The book follows this pattern as well.
In addition to the workstation operating systems, the CompTIA A+ 1102 exam covers three smartphone/tablet operating systems: Google Android, Apple iOS, and Apple iPadOS.
Common Operating System Functions
All OSs are not created equal, but every OS provides certain functions. Here’s a list:
■ The OS communicates, or provides a method for other programs to communicate, with the hardware of the PC or device. Operating systems run on specific hardware. For example, if you have a 32-bit CPU, you need to install a 32-bit version of an operating system. With a 64-bit CPU, you need a 64-bit OS (Chapter 3 explains 32- vs. 64-bit processors).
■ The OS creates a user interface (UI)—a visual representation of the computer on the monitor that makes sense to the people using the computer.
■ The OS enables users to determine the available installed programs and run, use, and shut down the programs of their choice.
■ The OS enables users to add, move, and delete the installed programs and data.
■ The OS provides a method to secure a system from all sorts of threats, such as data loss or improper access.
All operating systems enable you to use programs, but the formats vary so widely that you can’t just install any program on any OS. Programmers do extra work to build separate versions of a program that can run on more than one OS. This is one example of what the CompTIA A+ 1102 exam calls compatibility concerns between OSs. The software your users need can restrict the list of acceptable OS choices, and the OS choice limits available software. This can also affect how well users on multiple operating systems can collaborate!
Another common compatibility concern is whether a specific OS can communicate with a given piece of hardware. A device that works well with one OS may work poorly or not at all with another! One OS may need no extra software to work with a device, while another OS might need a special program installed to control it. Likewise, brand-new hardware may not work well on any OS until the OS receives updates to support the new hardware.
Almost every chapter in this book explores the interaction of OS and hardware. Chapter 11 examines adding and removing programs. Many security features show up in multiple chapters, such as Chapter 13 and Chapter 27. The rest of this chapter focuses on the user interface and the file structures.
User Interfaces
This section tours the various operating system desktop styles/user interfaces. Like the hardware tours earlier, this section serves a double purpose. First, you need to know the proper names for the various UI features and understand their functions. Second, it serves as a handy quick review section before you take the CompTIA A+ 1102 exam.
Windows
Figure 2.17 shows the standard interface for Windows 11, a traditional multipurpose computer. Windows uses a graphical user interface primarily, so you engage with the mouse or other pointing device and click on elements. The background is called the Desktop. The open apps are File Explorer—the file browser in Windows 11—and the Microsoft Store for purchasing apps, games, movies, and so on.

• Figure 2.17 Windows 11 with apps open
Other visible items are as follows:
■ Click the Start button to get access to applications, tools, files, and folders.
■ The pinned applications enable you to launch a program with a single left-click.
■ The taskbar shows running programs.
■ The notification area shows programs running in the background. Many techs also call it the system tray.
Interacting with the Windows interface involves using a mouse or touchpad to move the cursor and either left-clicking or right-clicking the icons to achieve different goals. Left-clicking selects an item; double left-clicking opens an item. Right-clicking opens a context menu from which you can select various options. Figure 2.18 shows the context menu for the Zoom app (for video conferencing) that’s running in the background. (Most people refer to a left-click simply as a click. This section makes the left/right distinction clear, so you learn how to access tools properly.)

• Figure 2.18 Context menu
The CompTIA A+ exams include two versions of Windows: Windows 10 and Windows 11. They function quite similarly to each other, but the user interface is different. One of the most immediate visible differences is the center-aligned Start menu and pinned apps in Windows 11, unlike the traditional left-aligned taskbar in Windows 10 (see Figure 2.19). Note that these are just the defaults. In Windows 10, you can move the taskbar to any screen edge you want. In Windows 11, you are stuck with the taskbar on the bottom of the screen, but you can left align the Start menu and pinned apps if you prefer the classic Windows look.
• Figure 2.19 Windows 10 desktop showing left-aligned taskbar and open Start menu
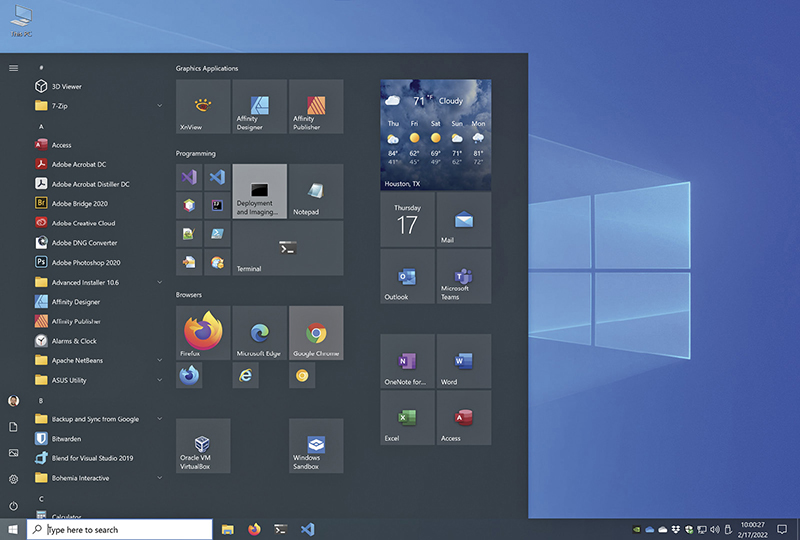
The Start menu—the go-to place for launching applications in Windows—differs a lot between Windows 11 and Windows 10. In Windows 11, clicking the Start button or pressing the Windows logo key on the keyboard brings up a menu that has a “Type here to search” box, pinned apps, and recommended files (see Figure 2.20). The last of those are simply the six most recent files you opened so the entries change frequently.

• Figure 2.20 Results of clicking the Start menu or pressing the Windows logo key in Windows 11
The Start menu has one more trick up its sleeve for us techs. Pressing WINDOWS LOGO KEY + X on the keyboard or right-clicking the Start menu brings up the Quick Link menu (see Figure 2.21). This extremely handy menu gives us quick access to most of the utilities and apps we need to keep Windows running smoothly.

• Figure 2.21 Accessing the Quick Link menu by right-clicking the Start menu
Fortunately, most of the time we are not fixing Windows, but using it to get work done. One feature Windows has to help us stay productive takes advantage of widescreen monitors with the side-by-side apps feature. Select an open application and press WINDOWS LOGO KEY + LEFT ARROW and the application will pin to the left half of the monitor. Any other open applications will appear as smallish icons on the right so you can quickly pin your choice to the right half of the monitor (Figure 2.22). Do the reverse with another application, and it’ll pin to the right half of the monitor. With apps like Microsoft Word, where each document opens in a unique window, side-by-side apps make it easy to compare two documents.
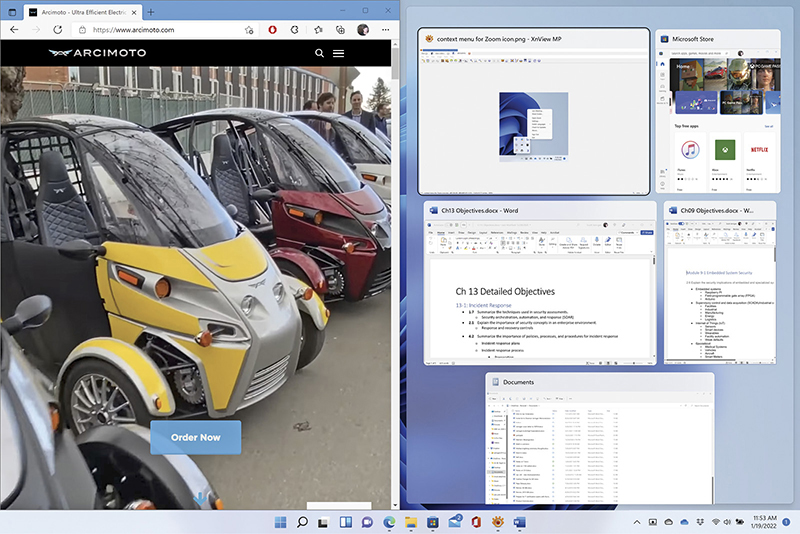
• Figure 2.22 Edge browser pinned left; other running apps ready to be pinned right
 Tech Tip
Microsoft Store
The Microsoft Store enables you to acquire and download Windows apps directly from Microsoft. Microsoft has updated the Microsoft Store many times, tying it together with its Xbox gaming system, for example. The Microsoft Store is the place to get touch-first apps, meaning programs designed specifically with touchscreen interfaces in mind.
macOS
The macOS operating system interface offers similar functions to those found on Windows. The background of the main screen is called the Desktop, and running along the bottom of the desktop is the Dock, which holds your running and pinned applications (very similar to the Windows taskbar). Along the top of the screen is probably the most distinctive feature of macOS, the menu bar. The menu bar is divided into a few sections, with the Apple and app menus taking up the left side, and the status menus (similar to the Windows notification area) taking up the right. Figure 2.23 shows the typical macOS interface.
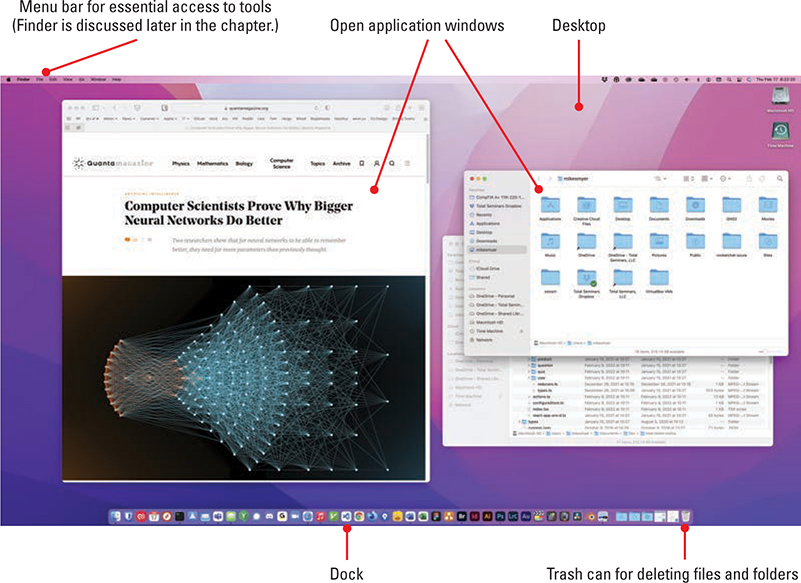
• Figure 2.23 macOS
Pressing the Mission Control button on an Apple keyboard (see Figure 2.24) brings up a feature, called Mission Control, that lets you see all your open apps at a glance and quickly switch between them, as shown in Figure 2.25. You can also access Mission Control by pressing and holding the CONTROL/CTRL key and then pressing the UP ARROW key.
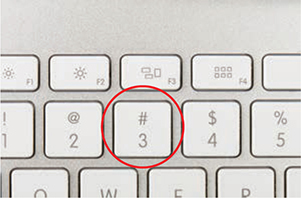
• Figure 2.24 Mission Control button on keyboard

• Figure 2.25 Mission Control showing three open apps and four Desktops
The macOS interface supports Spaces—essentially multiple Desktops—that can have different backgrounds and apps but keep the same Dock. You can optimize your workflow, for example, by putting your primary program full screen on Desktop 1 and putting your e-mail client on Desktop 2 (see Figure 2.26). New messages won’t disturb you when working, but you can access the second Desktop easily when you want with Mission Control. Press and hold the CONTROL key and press the RIGHT ARROW and LEFT ARROW keys to scroll through Spaces.
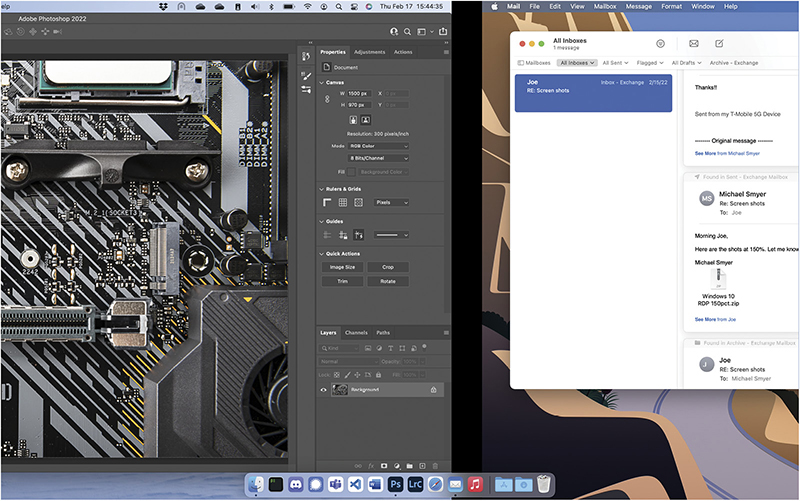
• Figure 2.26 Switching between multiple Desktops
Linux
Linux is a popular, free, open source operating system that’s been around since the mid-1990s. Over the years, there have been hundreds of different versions or distributions (distros) of Linux. The reason for all the distro versions depends on what a distro is needed to do. Unlike Windows or macOS, different Linux distros offer a variety of user interfaces, called desktop environments (DEs). They offer similar functions to those in Windows or macOS. Figure 2.27 shows a popular Linux distro, Ubuntu Linux, with the GNOME desktop and notes the various features. Frequently used utilities and applications are locked on the Dock on the left side of the screen. Most distros give you options for Web browsing, e-mail, accessing files and folders, and so on.

• Figure 2.27 Ubuntu Linux desktop environment
Command-Line Interface
Long before there were pretty GUIs with their mice pointers and icons, operating systems used a command-line interface (CLI). Although the CLI is an old concept, every operating system still has at least one, and for good reason: the CLI works when the GUI just can’t do the job. The CLI is a tech’s best friend, and you must learn to be comfortable working in the CLI. Chapter 15 is devoted to the command line, but let’s look at one example of what the command line can do—in this case, using Windows.
On Windows, the default CLI is called PowerShell. To access it, open the Quick Links menu (right-click the Start button) and select Windows Powershell (or Windows Terminal in Windows 11). A new window will open with a prompt patiently waiting for you to conjure some command-line magic (see Figure 2.28).

• Figure 2.28 A PowerShell prompt in Windows 11
At the command prompt, type dir and press ENTER. The dir command-line utility displays all the files and folders in a specific directory—probably your user folder for this exercise—and displays folder and filenames as well as other information. (A directory is the same thing as a folder.) The dir command is just one of many command-line tools. You’ll learn much more about dir in Chapter 15.
macOS has a superb CLI called Terminal. The Terminal CLI looks like the Windows CLI but the commands are different. On a Mac, the dir command doesn’t work. You need to type ls to see the contents of a folder in Terminal (see Figure 2.29).
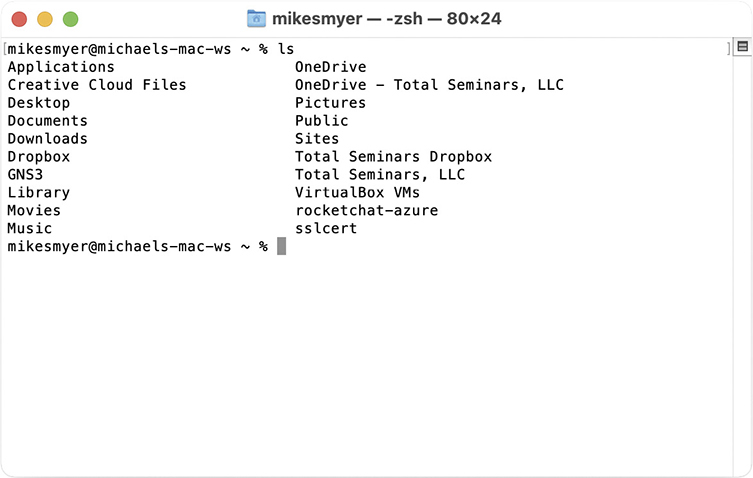
• Figure 2.29 Running the ls command in Terminal
Linux is even more dependent on the CLI. You can be a pretty good tech with Windows or a macOS and not know much about the CLI. Not so in Linux. The command line in Linux (also called Terminal) is an essential tool. You can get there in most distros by pressing CTRL-ALT-T. (See Chapter 15 for a lot of details about essential Linux commands.)
File Structures and Paths
Knowing where to find specific content—files and the folders in which they reside—helps techs help users do their day-to-day tasks more efficiently. Almost every operating system stores files in folders in a tree pattern. The root of the tree is the drive or disk, followed by a folder, subfolder, sub-subfolder, and so on, until you get to the desired file. The drive or disk gets some designation, most usually a drive letter nomenclature that looks like “C:”. Chapter 9 goes into gory detail on how modern operating systems implement systems for storing data.
Windows
Windows has important folders that help organize programs and documents. They sit in the root directory—where the operating system is installed—and vary depending on the version of Windows. The following sections walk through the locations of important folders.
Windows File Explorer enables you to browse and select files and folders stored on all the storage locations available to the computer. Figure 2.30 shows File Explorer displaying the contents of the Documents folder in Windows 10. Note the title of the window is Documents. The tool, regardless of the title, is File Explorer.

• Figure 2.30 File Explorer
The default file and folder view in Windows has a couple of notable features that you can see in Figure 2.30. Note the “July 15” file? That green X icon says Windows recognizes the file as a Microsoft Excel spreadsheet, which means almost certainly the actual filename is July 15.xlsx. The .xlsx is the file extension, hidden by default, that tells the OS which application to use with the file. This pairing of application with file extension is called file association.
Note also that Figure 2.30 has the View tab displayed—that’s the ribbon at the top of the window. To change the default view, make changes here. Accessing the File Explorer Options—CompTIA’s term for Folder Options in File Explorer—enables you to make changes in default behavior with the tool. To get to Folder Options in Windows 11, in the toolbar, click the three horizontal dots next to the View menu option and select Options. In Windows 10, select the View tab and click Options. Both paths open a similar dialog box (see Figure 2.31).
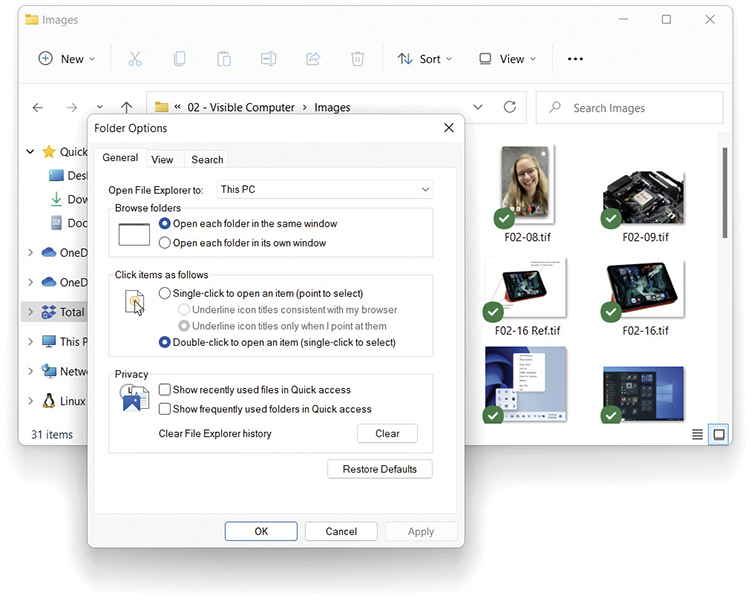
• Figure 2.31 Windows 11 Folder Options, General tab
On the General tab (General options in CompTIA speak), you can set the default folder to display each time File Explorer opens. You can change whether a folder opens in the same window or a separate window. You can change the click feature to open a folder on a single click rather than the default double click. You can adjust privacy settings here and clear the File Explorer history to cover your tracks.
The View tab (see Figure 2.32), which CompTIA calls View options, presents Advanced settings where you can Show hidden files, folders, and drives. (File Explorer hides them by default.) You can toggle file extensions on here (deselect Hide extensions for known file types.) You have many options here. Experiment!
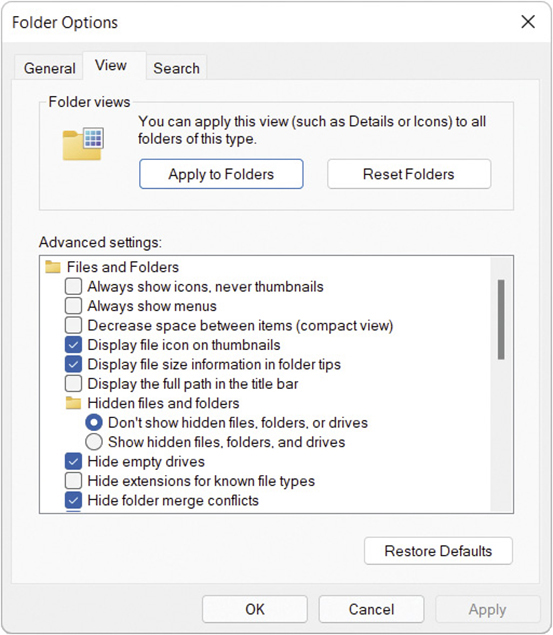
• Figure 2.32 Windows 11 Folder Options, View tab
The folder structures that follow here use standard formatting for describing folder structures. This is what you’ll see on the CompTIA A+ 1102 exam and in almost any OS. Windows hides the “” characters at the beginning to make it prettier. File Explorer might show something like “Local Disk (C:) > Users > Mike.” This translates in proper fashion as C:UsersMike.
C:Program Files By default, most programs install some or all of their essential files into a subfolder of the Program Files folder. If you installed a program, it should have its own folder in here. Individual companies decide how to label their subfolders. Installing Photoshop made by Adobe, for example, creates the Adobe subfolder and then an Adobe Photoshop subfolder within it.
C:Program Files (x86) The 64-bit editions of Windows create two directory structures for program files. The 64-bit applications go into the C:Program Files folder, whereas the 32-bit applications go into the C:Program Files (x86) folder. The separation makes it easy to find the proper version of whatever application you seek.
Personal Documents Windows uses subfolders in the C:Users folder to organize files for each user on a PC. Figure 2.33 shows the default folders for a user named Mike. Let’s quickly survey the ones you most likely need to know for the CompTIA A+ exams:
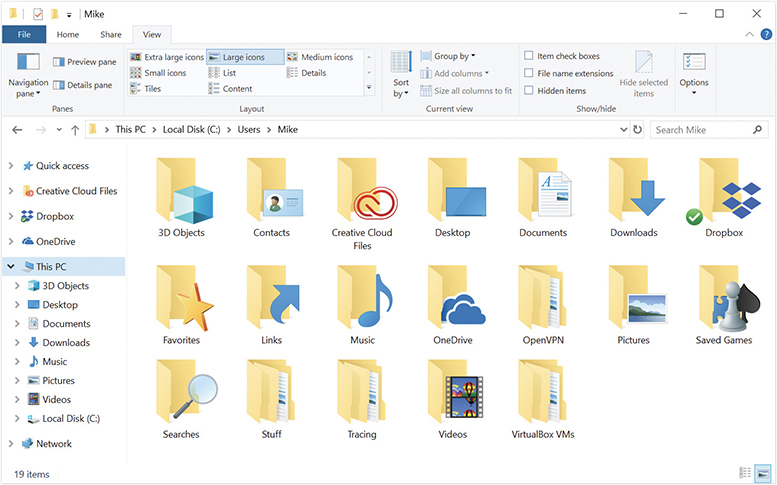
• Figure 2.33 File Explorer in Windows 10 viewing Mike’s folders
■ C:UsersMikeDesktop This folder stores the files on the user’s Desktop. If you delete this folder, you delete all the files placed on the Desktop.
■ C:UsersMikeDocuments This is the Documents or My Documents folder for that user. (Only Windows 7 uses My Documents. The others use Documents.)
■ C:UsersMikeDownloads Microsoft’s preferred download folder for applications to use. Most applications use this folder, but some do not.
■ C:UsersMikeMusic This is the default location for music you download. My guess is that more people have music in iTunes, but that’s just me.
■ C:UsersMikePictures Pictures is the default location for images imported into the PC, although the Pictures library can (and does) draw from many folder locations.
■ C:UsersMikeVideos Videos is the default location for movies and homebrewed videos imported into a PC.
macOS
Finder holds the keys to files and folders in macOS. Figure 2.34 shows Finder open to display Mike’s Users folder. Note that, although its style differs from the Windows screen shown in Figure 2.33, it has functionally similar folders. These are the default locations for files on the Desktop, in Documents, Downloads, Music, Pictures, and so on. Each user account on the Mac will have a unique Users folder that is inaccessible by other users on that computer.
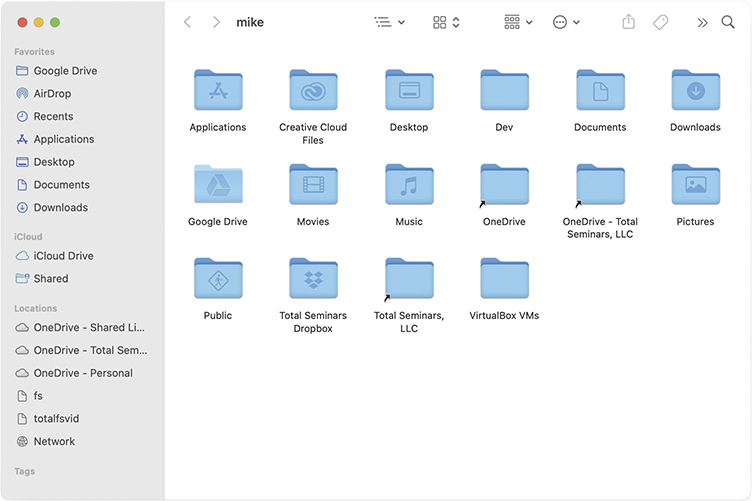
• Figure 2.34 Mike’s Users directory in Finder
Linux
Ready to be shocked? Not surprisingly, Linux uses pretty much the same structure for user organization (see Figure 2.35). I guess once something seems logical to enough people, there’s no reason to add confusion by changing the structure. The only major difference is the name: Linux uses the Home folder, rather than the Users folder.
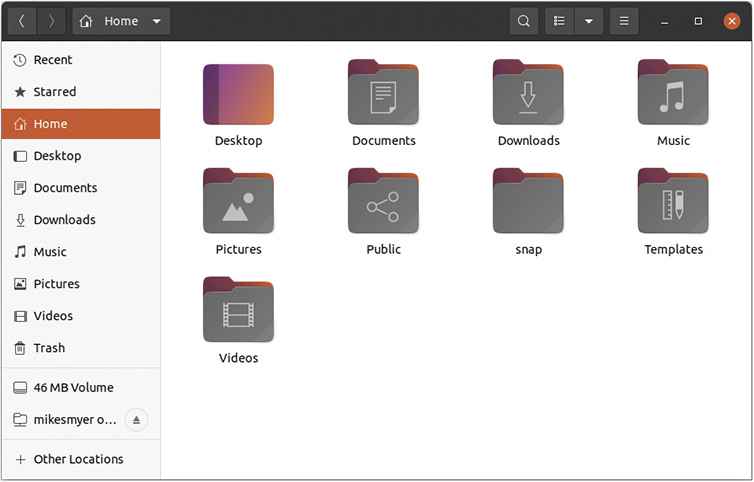
• Figure 2.35 Mike’s Home directory in File Manager
The Tech Utility Launch Points
Every OS has two or three locations (I like to call them tech utility launch points) for some, most, or all of their tech-specific utilities. This section shows you how to access those areas, primarily so that we don’t have to repeat the steps to get to them when accessing them many times throughout the book. Just refer to this section if you have difficulty remembering how to arrive at a place later on. Also, CompTIA will test your knowledge on how to access these tool locations, with specific steps. Use this section for the last-minute cram before taking the exams.
Windows
Microsoft has refined and changed Windows with every version. For example, Windows 10 and Windows 11 modifications included aspects to tech tools such as their location and level of importance. These changes often trigger strong opinions among techs of all ages on such details. Despite these opinions, Microsoft does a fine job innovating and advancing their technology and will continue to do so. Techs will simply need to keep up with new updates and tools so they keep their knowledge and skills current with each new version.
Windows offers many tech tool areas, including Settings, Control Panel, and Administrative Tools. A lot of tools appear to be standalone tools, but they’re specialized manifestations of a toolset called the Microsoft Management Console. Let’s look at all these now.
Settings Settings provides a central location and a consistent interface for most of the important tech tools in Windows (see Figure 2.36). Introduced way back with Windows 8, Settings is slowly taking over many utilities from the venerable Control Panel.
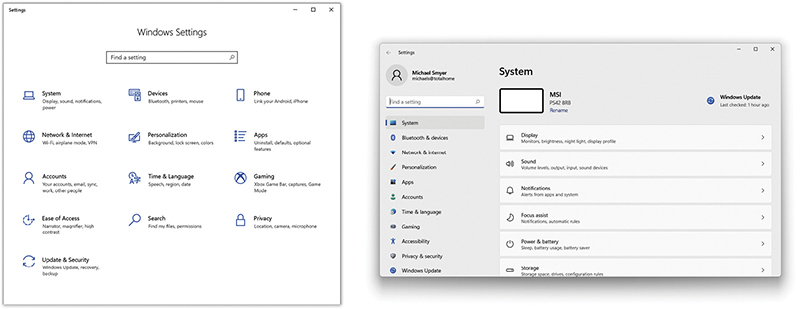
• Figure 2.36 Settings app in Windows 10 (left) and Windows 11 (right)
Control Panel The Control Panel, an ancient but still used launch point, handles many of the maintenance, upgrade, and configuration aspects of Windows.
The Control Panel opens in Category view by default, which displays the icons in groups like Hardware and Sound, as shown in Figure 2.37. This view requires an additional click (and sometimes a guess about which category includes what you need), so many techs use Classic view.
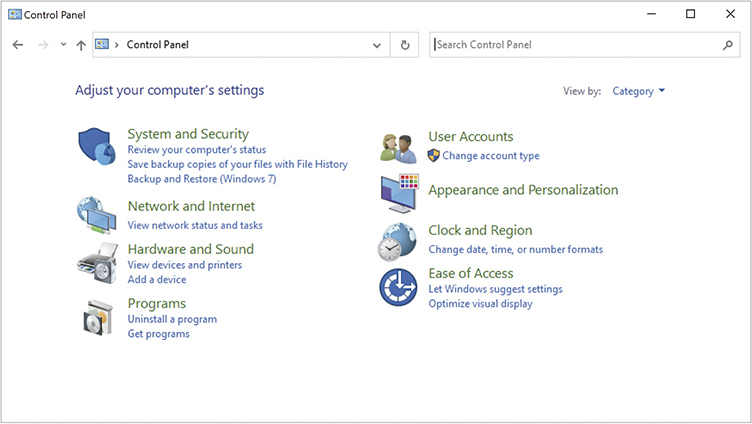
• Figure 2.37 Windows 10 Control Panel Category view
Administrative Tools (renamed Windows Tools in Windows 11) is one example of the many powerful utilities found in the Control Panel. The Administrative Tools utility enables you to set up hard drives, manage devices, test system performance, and much more (see Figure 2.38).
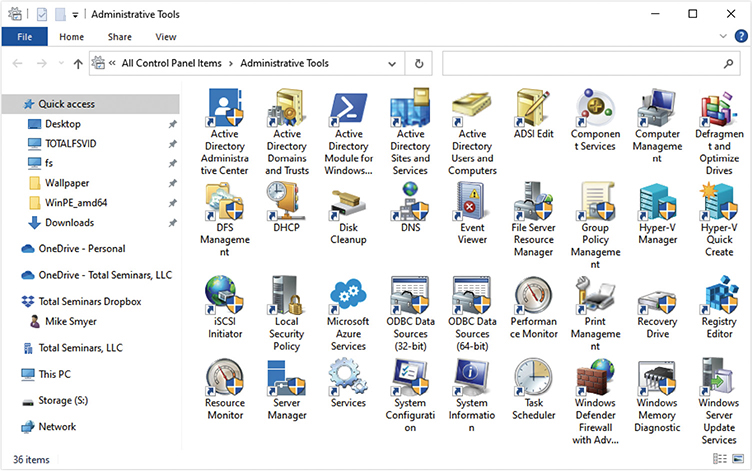
• Figure 2.38 Administrative Tools open showing many utilities
Tech Tip
Device Manager
Device Manager enables you to examine the state of all the hardware and drivers in a Windows computer. As you might suspect from that description, techs spend a lot of time with this tool. You’ll see Device Manager referenced many more times both in this book and during your career as a PC tech.
The CompTIA A+ 1102 exam specifically assumes Classic view with large icons, so you should do what every tech does: switch from Category view to Classic view. In Control Panel, select either Large icons or Small icons from the View by drop-down list for a similar effect. Figure 2.39 shows the Windows 11 Control Panel in Large icons view.
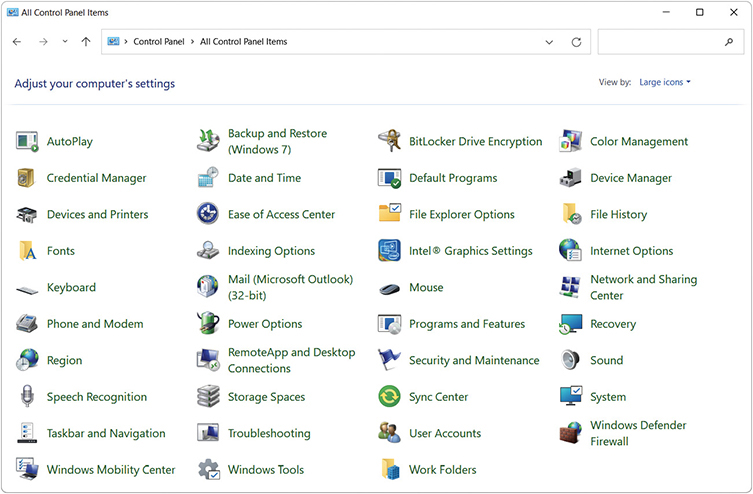
• Figure 2.39 Windows 11 Control Panel Large icons view
Many programs, called applets, populate the Control Panel. The names and selection of applets vary depending on the version of Windows and whether any installed programs have added applets. But all versions of Windows have applets that enable you to control specific aspects of Windows, such as the appearance, installed applications, and system settings. You will get details on each applet as we put them into use over the course of this book.
macOS
macOS has two key launch points for techs: the System Preferences app and the Utilities folder. You can access both quickly.
System Preferences To access System Preferences, click the Apple icon (top-left corner of screen) and select System Preferences from the Apple menu to open the app (see Figure 2.40). From System Preferences you have access to almost all settings you will need to administer a macOS system.
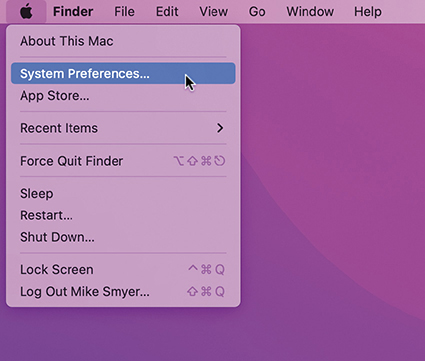
• Figure 2.40 Accessing System Preferences
Utilities Folder The second launch point is the Utilities folder, located neatly in the Applications folder. Because of its importance, Apple provides a quick shortcut to access it. With the Finder in focus, click Go on the menu bar and select Utilities (see Figure 2.41). Alternatively, use the hot-key combination: COMMAND-SHIFT-U. The Utilities folder gives you access to the tools you need to perform services on a Mac beyond what’s included in System Preferences, including Activity Monitor and Terminal. The latter is the command-line interface for macOS that we already touched on, a very powerful tool for techs that we explore in detail in Chapter 15.

• Figure 2.41 Accessing the Utilities folder
Linux
Linux lacks the handy, one-stop launch points available in Windows and macOS. Instead, the various desktop environments have their own launch points. Here are the locations of the launch points for common desktop environments KDE Plasma Desktop and Gnome 3.
KDE Plasma Desktop The most common launch point in KDE Plasma Desktop is the System Settings app. To access System Settings, open the Application Launcher by clicking the button in the lower left of the screen. From the launcher, either search for System Settings or click Applications then the Settings category. From here, open the System Settings application (see Figure 2.42).
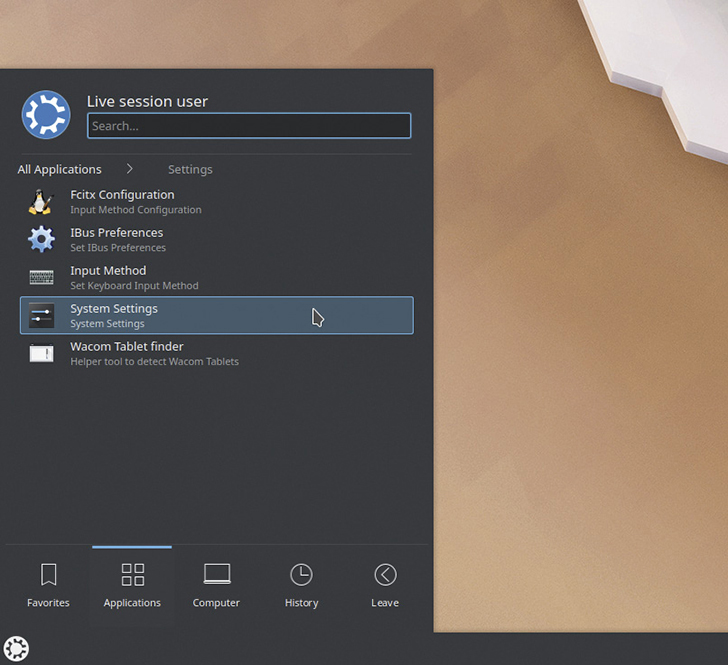
• Figure 2.42 Accessing KDE’s System Settings
Gnome 3 The main utility launch point in Gnome 3 is the System menu, shown in Figure 2.43, which you access by clicking the downward-pointing triangle on the menu bar. From here, you can access the Settings app and log out or shut down/restart the computer.
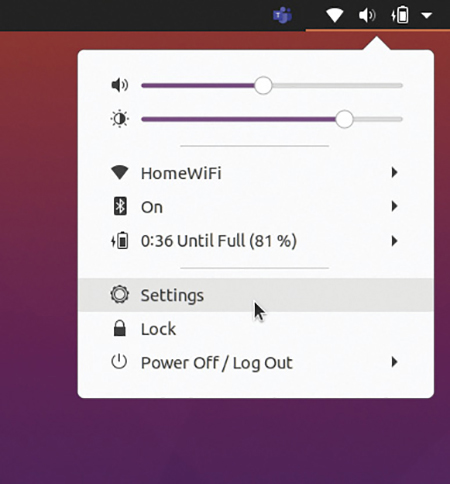
• Figure 2.43 Accessing Gnome 3’s System menu
Smartphone OSs
Your smartphone’s OS also has utility launch points, just not as many as a traditional desktop like Windows or macOS. For instance, Figure 2.44 shows the iOS Settings app—the first place to go to configure anything on your iOS phone. Android phones also use a launch point called Settings.
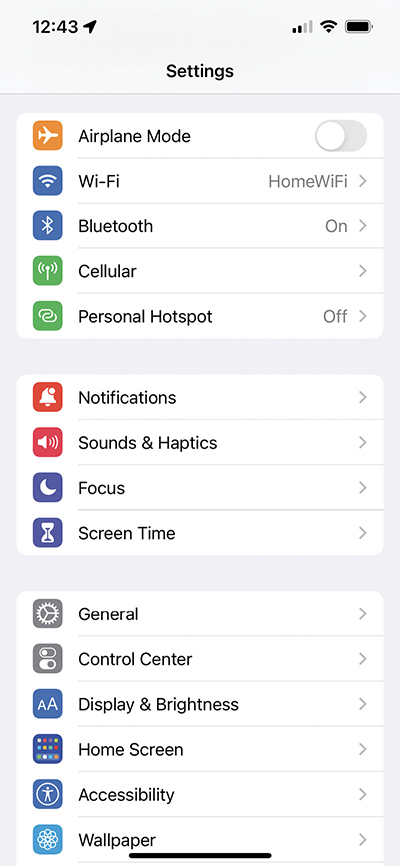
• Figure 2.44 Apple iOS Settings app
Chapter 2 Review
■ Chapter Summary
After reading this chapter and completing the exercises, you should be able to describe how computing devices work, identify common connectors and devices on typical computer systems, and discuss features common to operating system software.
Describe how computing devices work
■ Computing devices come in all shapes and sizes today. General computing devices dot desktops and café tables around the world. Smartphones grace many pockets and purses. Specific computing devices strap on joggers’ armbands, occupy math students’ desks, and register the amount and cost of the gas at the pump. Regardless of the scope of the devices, they have the same components.
■ A modern computer consists of hardware, an operating system, and applications. Hardware is the stuff you can touch or hold in your hand. The operating system controls the hardware and enables you to tell the computer what to do. Applications (or programs) enable you to do specialized tasks on a computer.
■ Computers work through several stages, e.g., the three most basic are input, processing, and output. Input is what you do. Processing is how the computer responds. Output is what you see on the computer display or hear through the speakers. Other stages include data storage (saving your work) and network connection (connecting a computer to one or more other computers).
Identify common connectors and devices on typical computer systems
■ Computing devices have many peripherals for input and output, such as keyboards and mice, monitors, speakers, headphones, and so on. These devices connect to a variety of ports, such as USB, DVI, HDMI, and more.
■ A glance inside a general-purpose computer, such as a desktop PC, shows many of the processing components, such as the motherboard, CPU, RAM, hard drive, and video card.
Discuss features common to operating system software
■ The OS communicates with the hardware of the computer and provides a user interface. The OS enables users to determine the available installed programs and to add, move, and delete the installed programs and data. The OS provides a method to secure a system.
■ The user interface for every operating system enables a user to interact with the OS. Left-clicking selects an object, for example, whereas right-clicking reveals a context menu.
■ Windows offers a Desktop environment. The Start screen/menu is more compact and not full screen.
■ The macOS interface relies on the Desktop experience, with a complex Dock that has pinned apps, running programs, and utilities. Mission Control enables you to switch readily between apps, windows, and spaces.
■ Windows has a complex file structure. Applications are normally stored in the Programs folder. Each user’s personal information is stored under their name in the Users folder.
■ macOS and Linux distros follow a similar file structure pattern. macOS has User folders for individual user accounts. Linux uses the term Home rather than Users, but functionally it’s the same as Users in macOS.
■ Every OS has two or three areas such as the Control Panel, System Tools, and the command-line interface for tech-specific utilities. You can access all from the Start menu. In Windows you’ll find yourself needing Control Panel or System as well as others.
■ macOS has two go-to places for system setup and configuration: System Preferences and Utilities. Access the former through the Apple menu; access the latter through Finder.
■ The many distros of Linux vary in what tools they use and the path to those tools. One essential tool is Terminal, the command-line interface. Many have a settings application that is very similar to System Preferences in macOS, but its name and location vary.
■ Key Terms
Administrative Tools
applet
application
command-line interface (CLI)
computer
computing process
context menu
Control Panel
data storage
Desktop
desktop environment (DE)
Device Manager
distribution (distro)
Dock
drive letter
file association
File Explorer
file extension
Finder
graphical user interface (GUI)
hardware
input
Mission Control
multiple Desktops
network connection
notification area
operating system (OS)
output
personal computer (PC)
pinned application
processing
root directory
Settings app
side-by-side apps
Spaces
Start button
Start menu
System Preferences
system tray
taskbar
user interface (UI)
Utilities
Windows logo key
■ Key Term Quiz
Use the Key Terms list to complete the sentences that follow. Not all terms will be used.
1. The term _______________ refers to the software parts of the operating system with which you can interact.
2. Computers work through three basic stages, what’s called the _______________.
3. You can access frequently used applications in macOS by clicking their icons on the _______________.
4. Ubuntu is a distinct ______________ of the Linux operating system.
5. Using a(n) _________________ involves clicking icons and buttons instead of typing out commands.
6. The _______________ utility in macOS enables you to switch easily among applications, windows, and Spaces.
7. You can use _______________ in Windows to access files and folders.
8. The _______________ enables a tech to perform most of the maintenance, upgrade, and configuration aspects of Windows.
9. _______________ enables you to set up hard drives, manage devices, test system performance, and much more.
10. You can access the ________________ tool from the permanent Apple menu to administer a Mac.
■ Multiple-Choice Quiz
1. What is the standard main screen/user interface used in all versions of Windows?
A. Control Panel
B. Dock
C. Taskbar
D. Desktop
2. How do you open an application in Windows?
A. Left-click its icon.
B. Right-click its icon.
C. Left double-click its icon.
D. Right double-click its icon.
3. What is the term for the graphical look and feel of a Linux distro?
A. Desktop environment
B. DE
C. Version
D. VE
4. What version(s) of Windows are covered on the CompTIA A+ 220-1102 exam? (Choose all that apply.)
A. Windows 7
B. Windows 10
C. Windows Server 2022
D. Windows 11
5. What application is used to update individual apps that are included with Windows 10 and 11?
A. Windows App Store
B. Play Store
C. Windows Update
D. Microsoft Store
6. In macOS, what is the primary app for changing system settings?
A. Control Panel
B. Settings
C. System Preferences
D. System Control
7. What macOS feature is essentially multiple desktops?
A. Charms
B. Desktop
C. Mission Control
D. Spaces
8. Which of the following is a well-known Linux distribution?
A. Ubuntu
B. Brownstone
C. Trinidad
D. Haswell
9. What KDE feature is essentially the Start button?
A. Metro UI
B. Application Launch
C. Terminal
D. GNOME 3
10. The user, Mike, has downloaded files with his Web browser. Where will they be stored by default?
A. C:Downloads
B. C:MikeDesktopDownloads
C. C:UsersMikeDownloads
D. C:UsersMikeDesktopDownloads
11. 32-bit programs are installed into which folder by default in a 64-bit edition of Windows?
A. C:Program Files
B. C:Program Files (x32)
C. C:Program FilesWinsOld
D. C:Program Files (x86)
12. Which macOS feature is functionally equivalent to Windows File Explorer?
A. Finder
B. Dock
C. Quartz
D. File Manager
13. Which of the following paths would open Computer Management in Windows 10/11?
A. Right-click the taskbar and select Computer Management from the context menu.
B. Right-click the Start button and select Computer Management from the context menu.
C. Right-click anywhere on the Desktop and select Computer Management from the context menu.
D. Press the WINDOWS LOGO KEY + L combination to open Computer Management.
14. What feature of macOS is the equivalent of the command-line interface in Windows?
A. Dock
B. Spaces
C. Terminal
D. Unity
15. What Windows app in Windows 10/11 combines many utilities into a unified tool?
A. Settings
B. Control
C. Command Center
D. Control Center
■ Essay Quiz
1. After exploring methods to access the Settings and Administrative Tools in Windows 10/11, write a short essay describing your go-to methods for accessing each one. Why did you choose this particular path?
2. A local donut shop has decided to license franchises and therefore needs a central office with computers for all the users. In such a scenario, recommend the best operating system and write a short essay defending your choice.
3. In a short essay, identify a single feature you think is common among all four workstation operating system families (Windows, macOS, and Linux). Describe a single user interface that combines what you consider the best of all features.
Lab Project
• Lab Project 2.1
Feeling brave? Linux distributions are free to download and install. Ubuntu is extremely user friendly. When you download Ubuntu Linux and burn it to a DVD, you can boot to the disc and (without installing) run the OS right from the disc. Try before you take the plunge. If you’re new to computers, do not do this Lab Project without consulting a very experienced tech. Here are the steps:
1. Go to https://www.ubuntu.com.
2. Download the latest copy of Ubuntu Linux. You will download a file in .iso format—that just means it’s a precise copy of a disc as a single file.
3. Burn the .iso file to a DVD using the built-in Windows or macOS tools.
4. Reboot the system, selecting to boot to the optical disc.
5. When prompted, select Live Preview rather than Install to Hard Drive.