chapter 4
RAM
“The memory be green.”
—WILLIAM SHAKESPEARE, HAMLET, ACT I, SCENE 2
In this chapter, you will learn how to
■ Identify the different types of DRAM packaging
■ Explain the varieties of RAM
■ Select and install RAM
■ Perform basic RAM troubleshooting
Whenever people come up to me and start professing their computer savvy, I ask them a few questions to see how much they really know. In case you and I ever meet and you decide you want to “talk tech” with me, I’ll tell you my first two questions now so you’ll be ready. Both involve random-access memory (RAM), the working memory for the CPU.
1. “How much RAM is in your computer?”
2. “What is RAM and why is it so important that every PC has enough?”
Can you answer either of these questions? Don’t fret if you can’t—you’ll know how to answer both before you finish this chapter. Let’s start by reviewing what you know about RAM thus far.
 Cross Check
Dynamic and Random Access
You encountered DRAM in Chapter 3, so see if you can answer these questions: What makes DRAM dynamic? What does random access mean?
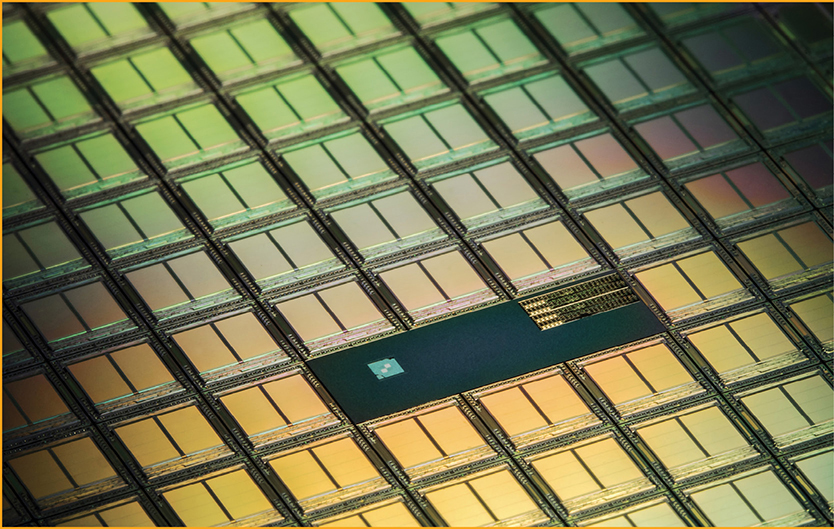
When not in use, programs and data are held in a mass storage device such as a solid-state drive (SSD), USB thumb drive, optical drive, or some other device that can hold data while the computer is off. When you load a program in Windows, your PC copies the program from the mass storage device to RAM and then runs it (see Figure 4.1).
• Figure 4.1 Mass storage holds programs, but programs need to run in RAM.
You saw in Chapter 3 that the CPU uses dynamic random-access memory (DRAM) as RAM for all PCs. Just like CPUs, DRAM has gone through evolutionary changes over the years, resulting in improved DRAM technologies such as SDRAM, RDRAM, and DDR RAM. This chapter starts by explaining how DRAM works and then discusses the types of DRAM used over the past several years and how they improve on the original DRAM. The third section, “Working with RAM,” goes into the details of finding and installing RAM. The chapter finishes with troubleshooting RAM problems.
Historical/Conceptual
■ Understanding DRAM
As discussed in Chapter 3, DRAM functions like an electronic spreadsheet, with numbered rows containing cells and each cell holding a one or a zero. Now let’s look at what’s physically happening. Each spreadsheet cell is a special type of semiconductor that can hold a single bit—one or zero—by using microscopic capacitors and transistors. DRAM makers put these semiconductors into chips that can hold a certain number of bits. The bits inside the chips are organized in a rectangular fashion, using rows and columns.
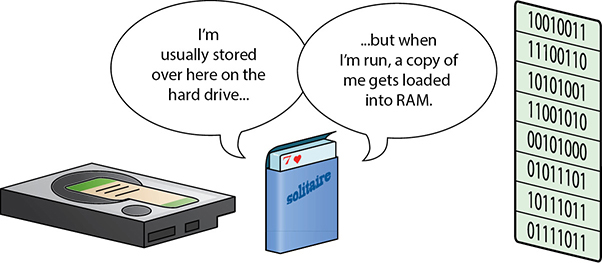
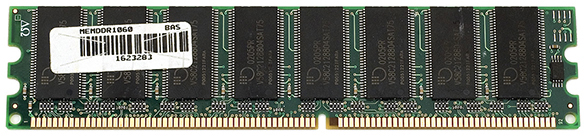
Each chip has a limit on the number of lines of code it can contain. Think of each line of code as one of the rows on the electronic spreadsheet; one chip might be able to store a million rows of code while another chip might be able to store over a billion lines. Each chip also has a limit on the width of the lines of code it can handle. One chip might handle 8-bit-wide data while another might handle 16-bit-wide data. Techs describe chips by bits rather than bytes, so they refer to ×8 and ×16, respectively. Just as you could describe a spreadsheet by the number of rows and columns—John’s accounting spreadsheet is huge, 48 rows × 12 columns—memory makers describe RAM chips the same way. An individual DRAM chip that holds 1,048,576 rows and 8 columns, for example, would be a 1M × 8 chip, with “M” as shorthand for “mega,” just like in megabytes (220 bytes). It is difficult, if not impossible, to tell the size of a DRAM chip just by looking at it—only the DRAM makers know the meaning of the tiny numbers on the chips (see Figure 4.2), although sometimes you can make a good guess.
• Figure 4.2 What do these numbers mean?

Organizing DRAM
Because of its low cost, high speed, and ability to contain a lot of data in a relatively small package, DRAM has been the standard RAM used in all computers—not just PCs—since the mid-1970s. DRAM can be found in just about everything, from automobiles to automatic bread makers.
The PC has very specific requirements for DRAM. The original 8088 processor had an 8-bit frontside bus. Commands given to an 8088 processor were in discrete 8-bit chunks. You needed RAM that could store data in 8-bit (1-byte) chunks, so that each time the CPU asked for a line of code, the memory controller chip (MCC) could put an 8-bit chunk on the data bus. This optimized the flow of data into (and out from) the CPU. Although today’s DRAM chips may have widths greater than 1 bit, all DRAM chips back then were 1 bit wide, meaning only sizes such as 64 K × 1 or 256 K × 1 existed—always 1 bit wide. So how was 1-bit-wide DRAM turned into 8-bit-wide memory? The solution was quite simple: just take eight 1-bit-wide chips and use the MCC to organize them electronically to be eight wide (see Figure 4.3).
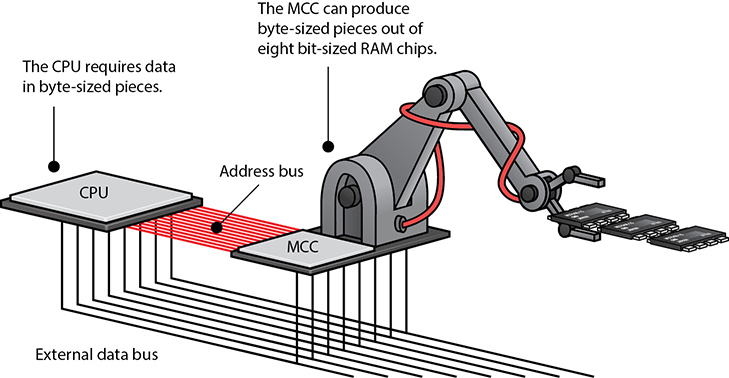
• Figure 4.3 The MCC accessing data on RAM soldered onto the motherboard
Cross Check
Riding the 8088 Bus
You first saw the Intel 8088 CPU in Chapter 3, and now it pops up again. Which components inside the 8088 handle the data once the CPU gets it from RAM? How does the CPU know when the data is complete and ready to take?
Practical DRAM
Okay, before you learn more about DRAM, I need to clarify a critical point. When you first saw the 8088’s machine language in Chapter 3, all the examples in the “codebook” were exactly 1-byte commands. Figure 4.4 shows the codebook again—see how all the commands are 1 byte?
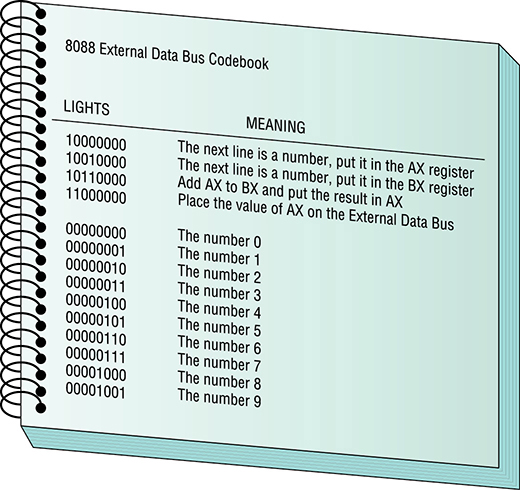
• Figure 4.4 Codebook again
Well, the reality is slightly different. Most of the 8088 machine language commands are 1 byte, but more complex commands need 2 bytes. For example, the following command tells the CPU to move 163 bytes “up the RAM spreadsheet” and run whatever command is there. Cool, eh?
1110100110100011
The problem here is that the command is 2 bytes wide, not 1 byte. So how did the 8088 handle this? Simple—it just took the command 1 byte at a time. It took twice as long to handle the command because the MCC had to go to RAM twice, but it worked.
So, if some of the commands are more than 1 byte wide, why didn’t Intel make the 8088 with a 16-bit frontside bus? Wouldn’t that have been better? Well, Intel did. Intel invented a CPU called the 8086. The 8086 predates the 8088 and was absolutely identical to the 8088 except for one small detail: it had a 16-bit frontside bus. IBM could have used the 8086 instead of the 8088 and used 2-byte-wide RAM instead of 1-byte-wide RAM. Of course, they would have needed to invent an MCC that could handle that kind of RAM (see Figure 4.5).
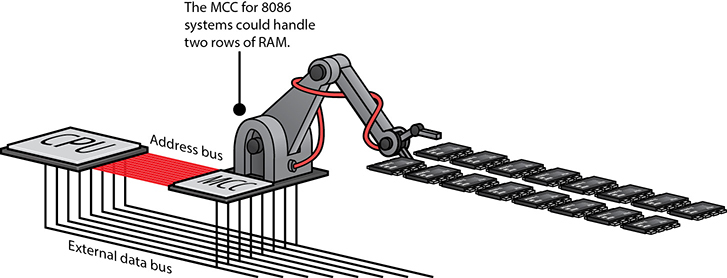
• Figure 4.5 Pumped-up 8086 MCC at work
Why did Intel sell the 8088 to IBM instead of the 8086? There were two reasons. Nobody had invented an affordable MCC or RAM that handled 2 bytes at a time. Sure, chips had been invented, but they were expensive, and IBM didn’t think anyone would want to pay $12,000 for a personal computer. So IBM bought the Intel 8088, not the Intel 8086, and all our RAM came in bytes. But as you might imagine, it didn’t stay that way for long.
DRAM Sticks
As CPU data bus sizes increased, so too did the need for RAM wide enough to fill the bus. The Intel 80386 CPU, for example, had a 32-bit data bus and thus the need for 32-bit-wide DRAM. Imagine having to line up 32 one-bit-wide DRAM chips on a motherboard. Talk about a waste of space! Figure 4.6 shows motherboard RAM run amuck.
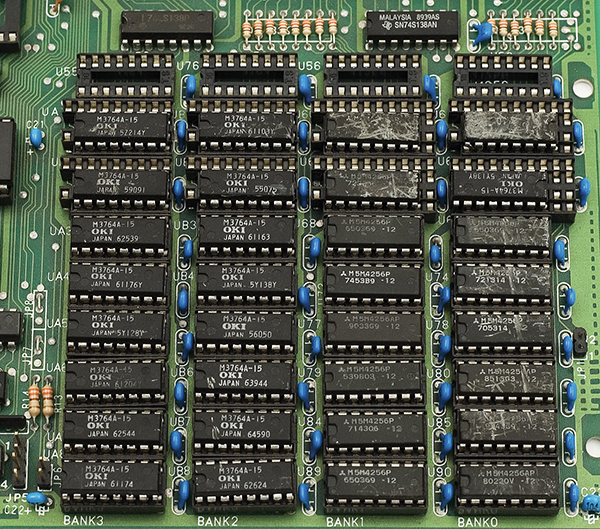
• Figure 4.6 That’s a lot of real estate used by RAM chips!
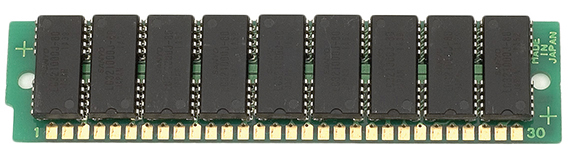
DRAM manufacturers responded by creating wider DRAM chips, such as ×4, ×8, and ×16, and putting multiples of them on a small circuit board called a stick or module. Figure 4.7 shows an early stick, called a single inline memory module (SIMM), with eight DRAM chips. To add RAM to a modern machine, you need to get the right stick or sticks for the particular motherboard. Your motherboard manual tells you precisely what sort of module you need and how much RAM you can install.
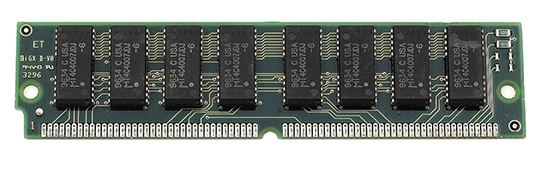
• Figure 4.7 A 72-pin SIMM
Modern CPUs are a lot smarter than the old Intel 8088. Their machine languages have some commands that are up to 64 bits (8 bytes) wide. They also have at least a 64-bit frontside bus that can handle more than just 8 bits. They don’t want RAM to give them a puny 8 bits at a time! To optimize the flow of data into and out of the CPU, the modern MCC provides at least 64 bits of data every time the CPU requests information from RAM.
Modern DRAM sticks come in 32-bit- and 64-bit-wide data form factors with a varying number of chips. Many techs describe these memory modules by their width, so we call them ×32 and ×64. Note that this number does not describe the width of the individual DRAM chips on the module. When you read or hear about by whatever memory, you need to know whether that person is talking about the DRAM width or the module width. When the CPU needs certain bytes of data, it requests those bytes via the address bus. The CPU does not know the physical location of the RAM that stores that data, nor the physical makeup of the RAM—such as how many DRAM chips work together to provide the 64-bit-wide memory rows. The MCC keeps track of this and just gives the CPU whichever bytes it requests (see Figure 4.8).
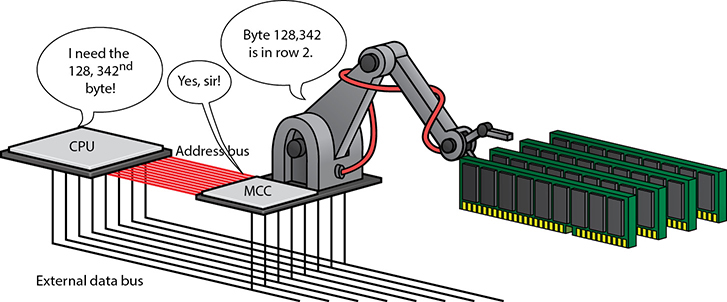
• Figure 4.8 The MCC knows the real location of the DRAM.
 Try This!
Dealing with Old RAM
Often in the PC world, old technology and ways of doing things are reimplemented with some newer technology. A tech who knows these ancient ways will have extra opportunities. Many thousands of companies—including hospitals, auto repair places, and more—use very old proprietary applications that keep track of medical records, inventory, and so on. If you’re called to work on one of these ancient systems, you need to know how to work with old parts, so try this.
Obtain an old computer. Ask your uncle‚ cousin‚ or Great Aunt Edna if they have a PC collecting dust in a closet that you can use. Failing that, go to a secondhand store or market and buy one for a few dollars.
Open up the system and check out the RAM. Remove the RAM from the motherboard and then replace it to familiarize yourself with the internals. You never know when some critical system will go down and need repair immediately—and you’re the one to do it!
Consumer RAM
If modern DRAM modules come in sizes much wider than a byte, why do people still use the word “byte” to describe how much DRAM they have? Convention. Habit. Rather than using a label that describes the electronic structure of RAM, common usage describes the total capacity of RAM on a stick in bytes. John has a single 8-GB stick of RAM on his motherboard, for example, and Sally has two 4-GB sticks. Both systems have a total of 8 GB of system RAM. That’s what your clients care about. Having enough RAM makes their systems snappy and stable; not enough RAM means their systems run poorly. As a tech, you need to know more, of course, to pick the right RAM for many different types of computers.
■ Types of RAM
Development of newer, wider, and faster CPUs and MCCs motivates DRAM manufacturers to invent new DRAM technologies that deliver enough data at a single pop to optimize the flow of data into and out of the CPU.
SDRAM
Most modern systems use some form of synchronous DRAM (SDRAM). SDRAM is still DRAM, but it is synchronous—tied to the system clock, just like the CPU and MCC, so the MCC knows when data is ready to be grabbed from SDRAM. This results in little wasted time.
SDRAM made its debut in 1996 on a stick called a dual inline memory module (DIMM). The early SDRAM DIMMs came in a wide variety of pin sizes. The most common pin sizes found on desktops were the 168-pin variety. Laptop DIMMs came in 68-pin, 144-pin (see Figure 4.9), or 172-pin micro-DIMM packages, as well as the 72-pin, 144-pin, or 200-pin small-outline DIMM (SO-DIMM) form factors (see Figure 4.10). With the exception of the 32-bit 72-pin SO-DIMM, all these DIMM varieties delivered 64-bit-wide data to match the 64-bit data bus of every CPU since the original Pentium.
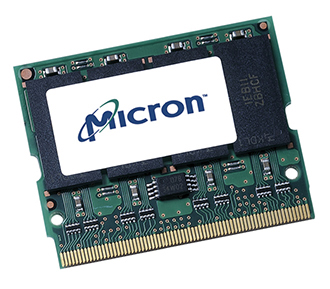
• Figure 4.9 144-pin micro-DIMM (photo courtesy of Micron Technology, Inc.)
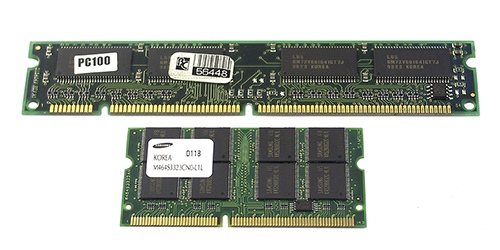
• Figure 4.10 A (168-pin) DIMM above a (144-pin) SO-DIMM
To take advantage of SDRAM, you needed a PC designed to use SDRAM. If you had a system with slots for 168-pin DIMMs, for example, your system used SDRAM. A DIMM in any one of the DIMM slots could fill the 64-bit bus, so each slot was called a bank. You could install one, two, or more sticks and the system would work. Note that on laptops that used the 72-pin SO-DIMM, you needed to install two sticks of RAM to make a full bank, because each stick only provided half the bus width.
SDRAM was tied to the system clock, so its clock speed matched the frontside bus. Five clock speeds were commonly used on the early SDRAM systems: 66, 75, 83, 100, and 133 MHz. The RAM speed had to match or exceed the system speed, or the computer would be unstable or wouldn’t work at all. These speeds were prefixed with a “PC” in the front, based on a standard forwarded by Intel, so SDRAM speeds were PC66 through PC133. For a Pentium III computer with a 100-MHz frontside bus, you needed to buy SDRAM DIMMs rated to handle it, such as PC100 or PC133.
DDR SDRAM
AMD and many major system and memory makers threw their support behind a new RAM technology, double data rate SDRAM (DDR SDRAM). DDR SDRAM basically copied a proprietary memory solution developed by Rambus, doubling the throughput of SDRAM by making two processes for every clock cycle. This synchronized (pardon the pun) nicely with the Athlon and later AMD processors’ double-pumped frontside bus. DDR SDRAM could not run as fast as RDRAM (DDR SDRAM’s more expensive and less popular predecessor)—although relatively low frontside bus speeds made that a moot point—but cost only slightly more than regular SDRAM.

DDR SDRAM for desktops come in 184-pin DIMMs. These DIMMs match 168-pin DIMMs in physical size but not in pin compatibility (see Figure 4.11). The slots for the two types of RAM appear similar as well but have different guide notches, so you can’t insert either type of RAM into the other’s slot. DDR SDRAM for laptops come in either 200-pin SO-DIMMs or 172-pin micro-DIMMs (see Figure 4.12).
• Figure 4.11 DDR SDRAM
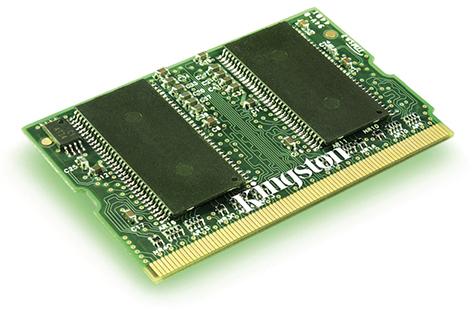
• Figure 4.12 172-pin DDR SDRAM micro-DIMM (photo courtesy of Kingston/Joint Harvest)
![]()
Following the lead of AMD and other manufacturers, the PC industry adopted DDR SDRAM as the standard system RAM. In the summer of 2003, Intel relented and stopped producing motherboards and memory controllers that required RDRAM.
One thing is sure about PC technologies: any good idea that can be copied will be copied. One of Rambus’ best concepts was the dual-channel architecture—using two sticks of RDRAM together to increase throughput. Manufacturers released motherboards with MCCs that support dual-channel architecture using DDR SDRAM. Dual-channel DDR motherboards use regular DDR sticks, although manufacturers often sell RAM in matched pairs, branding them as dual-channel RAM.
Dual-channel DDR requires two identical sticks of DDR, and they must snap into two paired slots. Many motherboards offer four slots (see Figure 4.13).
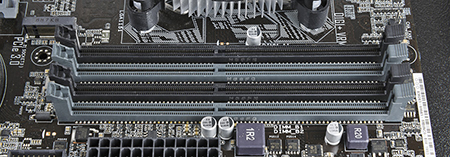
• Figure 4.13 A motherboard showing four RAM slots. By populating the same-colored slots with identical RAM, you can run in dual-channel mode.
1101
Current motherboards use one of three speeds of RAM, DDR3, DDR4, and DDR5. Let’s start with DDR3.
DDR3
DDR3 boasts higher speeds, more efficient architecture, and around 30 percent lower power consumption than DDR2 RAM. Just like its predecessor, DDR3 uses a 240-pin DIMM, albeit one that is slotted differently to make it difficult for users to install the wrong RAM in their system without using a hammer (see Figure 4.14). DDR3 SO-DIMMs for portable computers have 204 pins. Neither fits into a DDR2 socket.
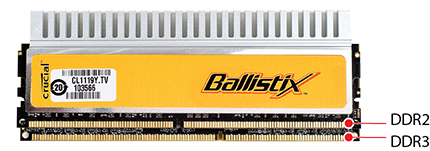
• Figure 4.14 DDR2 DIMM on top of a DDR3 DIMM
In addition to having an impressive 8-bit buffer for bandwidth, some DDR3 (and later) modules also include a feature called XMP, or Extreme Memory Profile, that enables power users to overclock their RAM easily, boosting their already fast memory. DDR3 modules also use higher-density memory chips, up to 16-GB DDR3 modules. AMD’s version of XMP is called AMP, for AMD Memory Profile.
Some motherboards that support DDR3 also support features called triple-channel memory architecture or quad-channel memory architecture, which work a lot like dual-channel, but with three or four sticks of RAM instead of two. More recently, Intel and AMD systems have switched back to dual-channel, although there’s plenty of systems out there using triple- or quad-channel architectures.
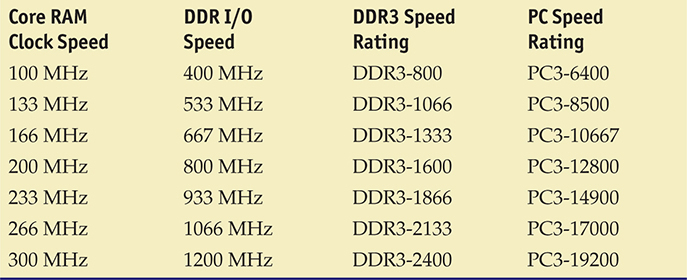
Table 4.1 shows common DDR3 speeds. Note that DDR3 I/O speeds are quadruple the clock speeds, whereas DDR2 I/O speeds are only double the clock. This speed increase is due to the increased buffer size, which enables DDR3 to grab twice as much data every clock cycle as DDR2 can.
Table 4.1 DDR3 Speeds
DDR4
DDR4 arrived on the scene in late 2014 with much fanfare and slow adoption, although it’s the mainstream channel memory architecture now. DDR4 offers higher density and lower voltages than DDR3 and can handle faster data transfer rates. In theory, manufacturers could create DDR4 DIMMs up to 512 GB. DIMMS running DDR4 top out at 64 GB, compared to the 16 GB max of DDR3, but run at only 1.2 V. (There’s a performance version that runs at 1.35 V and a low-voltage version at 1.05 V too.)
DDR4 uses a 288-pin DIMM, so DDR4 DIMMs are not backward compatible with DDR3 slots. DDR4 SO-DIMMs have 260 pins that are not compatible with DDR3 204-pin SO-DIMM slots. Some motherboard manufacturers have released boards that offer support for both DDR3 and DDR4 by providing both slot types.
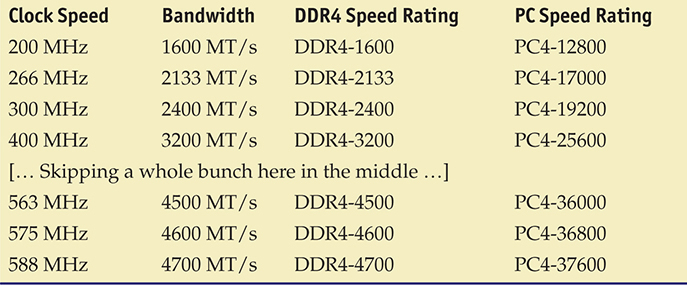
With DDR4, most techs have switched from bit rate to megatransfers per second (MT/s), a way to describe the number of data transfer operations happening at any given second. For DDR4, the number is pretty huge. To determine DDR4 bandwidth, multiply the clock speed in MHz by 8. The result is not only the bandwidth in MT/s but also the DDR4 speed rating. To determine the PC speed rating, multiply the DDR4 speed rating by 8 again. Table 4.2 shows some DDR4 speeds and labels.
Table 4.2 Standard DDR4 Varieties
DDR5
In 2017, channel memory architecture manufacturers began working on a successor to DDR4, and in 2020, they launched the first commercially available DDR5 DRAM chip. Much like previous upgrades to DDR, DDR5 boasts the potential for doubled bandwidth, decreased power consumption, and quadrupled DIMM capacity. The highest currently available bandwidth at the time of writing is 7200 MT/s. Power consumption is more efficient as well, with the voltage per DIMM decreasing to 1.1 V from 1.2 V. Power management is handled by an onboard circuit known as a power management integrated circuit, or PMIC, as opposed to DDR4 that was managed by the motherboard. The range of available DIMM sizes has gone from a maximum of 64 GB all the way up to a whopping 256 GB. As with previous improvements in DDR technology, DDR5 is not backward compatible with DDR4. DDR5 DIMMs have 288 pins, like DDR4 (see Figure 4.15), while SO-DIMMs slightly increase the pin count from 260 to 262.
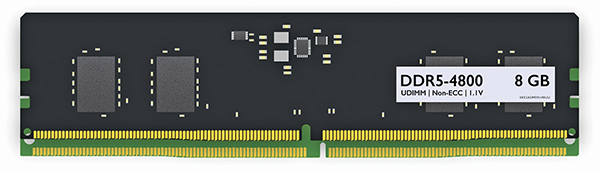
• Figure 4.15 DDR5 (top) vs. DDR4 (bottom) pin comparison
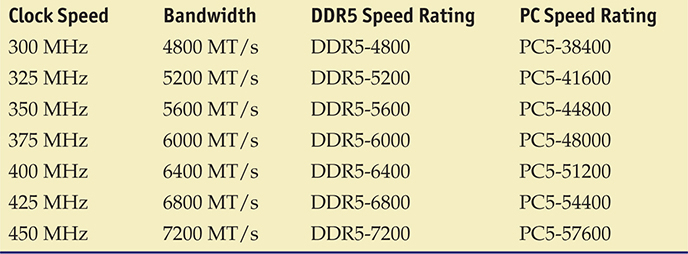
To determine the bandwidth of DDR5 RAM, take the channel memory architecture clock speed in MHz and multiply by 8. This number is both the bandwidth in MT/s and the DDR5 speed rating. To find the PC speed rating, multiply the DDR5 speed rating by 8 again. Table 4.3 shows the bandwidth and speed ratings for some varieties of DDR5 RAM.
Table 4.3 Standard DDR5 Varieties
While DDR5 hasn’t quite achieved a high enough bandwidth to double that of the fastest DDR4 DIMMs yet, it’s important to remember DDR4 also took time to reach its maximum potential after its initial release. Channel memory architecture manufacturers announce new DDR5 breakthroughs fairly regularly, and although DDR5 has yet to be widely adopted, there is no reason to think that it won’t eventually find the same success as its DDR forebears.
RAM Variations
Within each class of RAM, you’ll find variations in packaging, speed, quality, and the capability to handle data with more or fewer errors. Higher-end systems often need higher-end RAM, so knowing these variations is of crucial importance to techs.
Double-Sided DIMMs
Every type of RAM stick comes in one of two types: single-sided RAM and double-sided RAM. As their name implies, single-sided sticks have chips on only one side of the stick. Double-sided sticks have chips on both sides (see Figure 4.16). Double-sided sticks are basically two sticks of RAM soldered onto one board. There’s nothing wrong with double-sided RAM sticks other than the fact that some motherboards either can’t use them or can only use them in certain ways—for example, only if you use a single stick and it goes into a certain slot.

• Figure 4.16 Double-sided DDR SDRAM
Latency
Different types of RAM respond to electrical signals at varying rates. When the memory controller starts to grab a line of memory, for example, a slight delay occurs; think of it as the RAM getting off the couch. After the RAM sends out the requested line of memory, there’s another slight delay before the memory controller can ask for another line—the RAM sat back down. The delay in RAM’s response time is called its latency.
If two types of RAM have the same speed rating, RAM with a lower latency (such as CL17) is slightly faster than RAM with a higher latency (such as CL19) because it responds more quickly. The CL refers to clock cycle delays. The 17 means that the memory delays 17 clock cycles before delivering the requested data; the 19 means a 19-cycle delay. Because it’s measured in clock cycles, CL is relative to the clock speed of the RAM—a 19-cycle delay takes up more real-world time at a lower clock speed than it will at a higher clock speed.
Back when DDR2 and DDR3 were the latest and greatest, these latency numbers were a big deal. Gamers and other PC enthusiasts paid a handsome premium for lower-latency RAM. (See Figure 4.17.) When DDR4 debuted, its relatively high CL numbers made enthusiasts question the memory companies, afraid it would be too slow. In real-world tests, DDR4’s higher clock speeds result in latencies in line with the older DDR3. It’s still worth looking at latency when you go memory shopping, but it’s a lot less important than it used to be.
• Figure 4.17 Ancient RAM stick
From a tech’s standpoint, you need to get the proper RAM for the system you’re working on. If you put a high-latency stick in a motherboard set up for a low-latency stick, you’ll get an unstable or completely dead PC. Check the motherboard manual or RAM manufacturer’s Web site and get the quickest RAM the motherboard can handle, and you should be fine.
Today’s PCs that need to watch for RAM errors use a special type of RAM called error correction code RAM (ECC RAM). ECC is a major advance in error checking on DRAM. ECC detects and corrects any time a single bit is flipped, on-the-fly. It can detect but not correct a double-bit error. The checking and fixing come at a price, however, as ECC RAM is always slower than non-ECC RAM.
ECC DRAM comes in every DIMM package type and can lead to some odd-sounding numbers. You can find DDR3 (see Figure 4.18) or DDR4 RAM sticks, for example, that come in 240-pin, 72-bit versions. Similarly, you’ll see a 200-pin, 72-bit SO-DIMM format. The extra 8 bits beyond the 64-bit data stream are for the ECC. All DDR5 DIMMs have a variant of ECC built right into the chip itself, which protects against bit-flips in the chip. This differs from classic ECC, which protects against bit-flips in transit. DDR5 DIMMs are also available with or without classic ECC functionality.
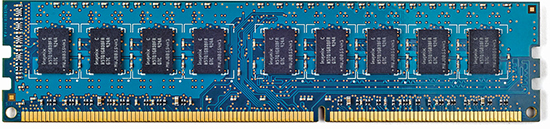
• Figure 4.18 Stick of ECC DDR3 with nine memory chips
You might be tempted to say, “Gee, maybe I want to try this ECC RAM.” Well, don’t! To take advantage of ECC RAM, you need a motherboard designed to support ECC. Only expensive motherboards for high-end systems use ECC. The special-use-only nature of ECC makes it fairly rare in desktop systems. Plenty of techs with years of experience have never even seen ECC RAM.
Registered and Buffered Memory
When shopping for memory, especially for ECC memory, you are bound to come across the terms registered RAM or buffered RAM. Either term refers to a small register installed on some memory modules to act as a buffer between the DIMM and the memory controller. This little extra bit of circuitry helps compensate for electrical problems that crop up in systems with lots of memory modules, such as servers and big professional workstations.
The key thing to remember is that a motherboard will use either buffered or unbuffered RAM (that’s typical consumer RAM), not both. If you insert the wrong module in a system you are upgrading, the worst that will happen is a blank screen and a lot of head scratching.
■ Working with RAM
Whenever people ask me what single hardware upgrade they can do to improve their system performance, I always tell them the same thing—add more RAM. Adding more RAM can improve overall system performance, processing speed, and stability—if you get it right. Botching the job can cause dramatic system instability, such as frequent, random crashes and reboots. Every tech needs to know how to install and upgrade system RAM of all types.
To get the desired results from a RAM upgrade, you must first determine if insufficient RAM is the cause of system problems. Second, you need to pick the proper RAM for the system. Finally, you must use good installation practices. Always store RAM sticks in antistatic packaging whenever they’re not in use, and use strict ESD handling procedures. Like many other pieces of the PC, RAM is very sensitive to ESD and other technician abuse (see Figure 4.19).
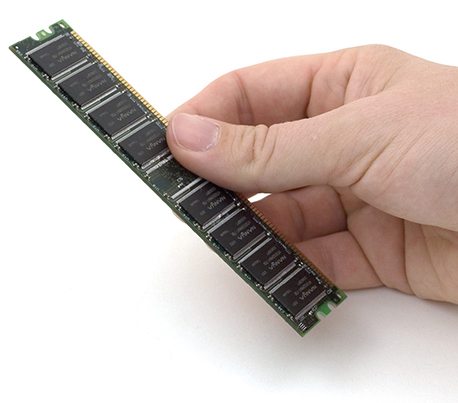
• Figure 4.19 Don’t do this! Grabbing the contacts is a bad idea!
Do You Need More RAM?
Two symptoms point to the need for more RAM in a PC: general system sluggishness and excessive hard drive accessing. If programs take forever to load and running programs seem to stall and move more slowly than you would like, the problem could stem from insufficient RAM.
A friend with an older Windows system complained that her PC seemed snappy when she first got it but now takes a long time to do the things she wants to do with it, such as photograph retouching in Adobe Photoshop. Over the years, new applications and updates to her existing operating system and applications piled up until her system, with only 4 GB of RAM, was woefully insufficient for her tasks—she kept maxing out the RAM and thus the system slowed to a crawl. I replaced her single 4-GB stick with a pair of 8-GB sticks and suddenly she had the speedy workstation she desired.
Another common example of RAM-related sluggishness, and one that most of us have encountered at some point in time, is related to Web browser tabs. Over the years, Web browsers have become more complex, incorporating new features, plug-ins, and additional security measures, among other additions. As a result, they have become more resource intensive, and Web browsing habits that had no effect on your system’s performance five years ago will bring that same system to its knees today. As with the previous example, adding more RAM will almost certainly fix the problem.
Excessive hard drive activity when you move between programs points to a need for more RAM. Every computer has the capability to make a portion of your hard drive look like RAM in case you run out of real RAM.
Virtual Memory
Computers use a portion of the hard drive (or solid-state drive) as an extension of system RAM called virtual memory. The operating system uses part of the available drive space to save a page file or swap file. When a computer starts running out of real RAM because you’ve loaded too many programs, the system swaps less-used programs from RAM to the page file, opening more space for programs currently active. All versions of Windows, macOS, and Linux use virtual memory. Let’s use a typical Windows PC as an example of how paging works.
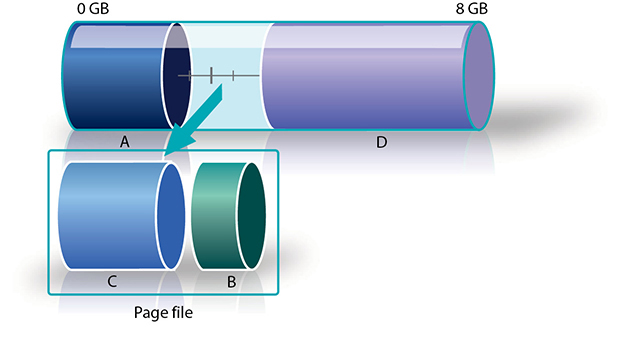
Let’s assume you have a PC with 8 GB of RAM. Figure 4.20 shows the system RAM as a thermometer with gradients from 0 to 8 GB. As programs load, they take up RAM, and as more and more programs are loaded (labeled A, B, and C in the figure), more RAM is used.
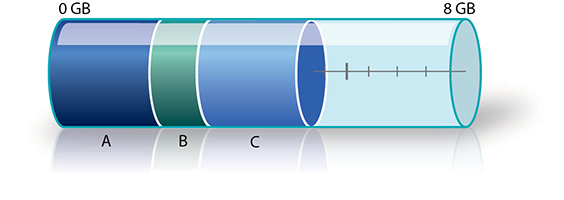
• Figure 4.20 A RAM thermometer showing that more programs take more RAM
At a certain point, you won’t have enough RAM to run any more programs (see Figure 4.21). Sure, you could close one or more programs to make room for yet another one, but you can’t keep all of the programs running simultaneously. This is where virtual memory comes into play.
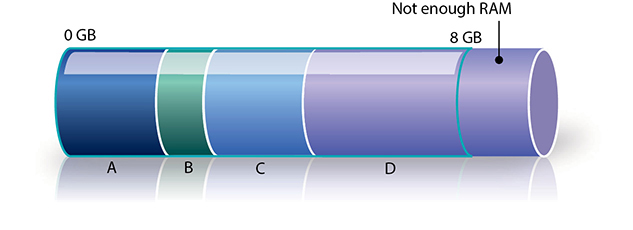
• Figure 4.21 Not enough RAM to load program D
Windows’ virtual memory starts by creating a page file that resides somewhere on your hard drive. The page file works like a temporary storage box. Windows removes running programs temporarily from RAM into the page file so other programs can load and run. If you have enough RAM to run all your programs, Windows does not need to use the page file—Windows brings the page file into play only when insufficient RAM is available to run all open programs.
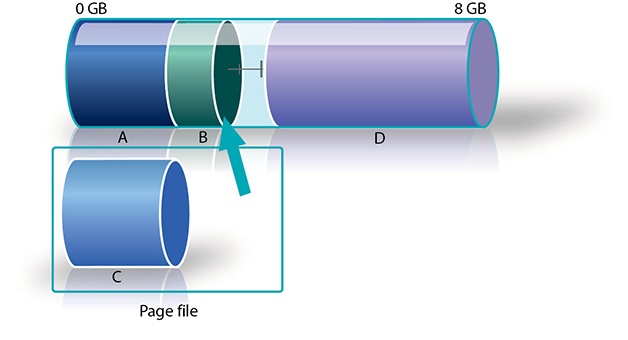
To load, Program D needs a certain amount of free RAM. Clearly, this requires unloading some other program (or programs) from RAM without actually closing any programs. Windows looks at all running programs—in this case A, B, and C—and decides which program is the least used. That program is then cut out of or swapped from RAM and copied into the page file. In this case, Windows has chosen Program B (see Figure 4.22). Unloading Program B from RAM provides enough RAM to load Program D (see Figure 4.23).
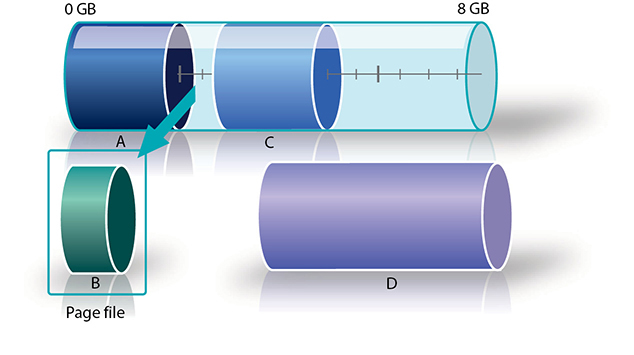
• Figure 4.22 Program B being unloaded from channel memory architecture
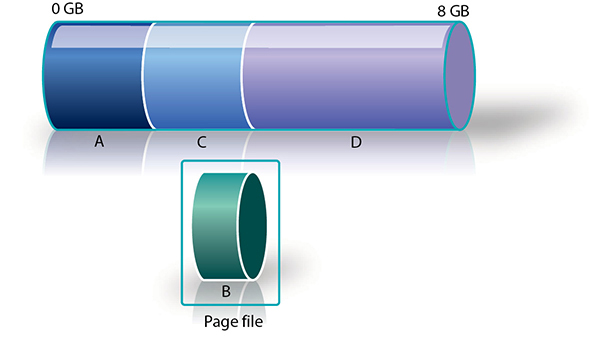
• Figure 4.23 Program B stored in the page file, making room for Program D
It is important to understand that none of this activity is visible on the screen. Program B’s window is still visible, along with those of all the other running programs. Nothing tells the user that Program B is no longer in RAM (see Figure 4.24).
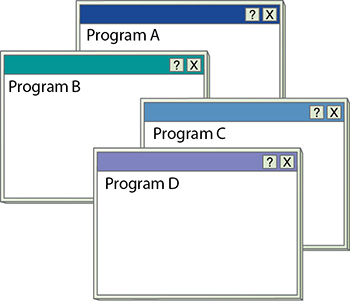
• Figure 4.24 You can’t tell whether a program is swapped or not.
So what happens if you click on Program B’s window to bring it to the front? The program can’t actually run from the page file; it must be loaded back into RAM. First, Windows decides which program must be removed from RAM, and this time Windows chooses Program C (see Figure 4.25). Then it loads Program B into RAM (see Figure 4.26).
• Figure 4.25 Program C is swapped to the page file.
• Figure 4.26 Program B is swapped back into RAM.
Swapping programs to and from the page file and RAM takes time. Although no visual clues suggest that a swap is taking place, the machine slows down quite noticeably as Windows performs the swaps. Page files are a crucial aspect of Windows operation.
Windows handles page files automatically, but occasionally you’ll run into problems and need to change the size of the page file or delete it and let Windows re-create it automatically. The page file is pagefile.sys. You can often find it in the root directory of the C: drive, but again, that can be changed. Wherever it is, the page file is a hidden system file, which means in practice that you’ll have to play with your folder-viewing options to see it.
If Windows needs to access the page file too frequently, you will notice the hard drive access LED going crazy as Windows rushes to move programs between RAM and the page file in a process called disk thrashing. Windows uses the page file all the time, but excessive disk thrashing suggests that you need more RAM.
System RAM Recommendations
Microsoft sets very low the minimum RAM requirements listed for the various Windows operating systems to get the maximum number of users to upgrade or convert, and that’s fine. Microsoft recommends a minimum system requirement of 1 GB of RAM for 32-bit versions of Windows, 2 GB of RAM for 64-bit versions, and 4 GB of RAM for Windows 11, which is only available in a 64-bit version. I think that results in dreadfully sluggish computers. Here are my recommendations:
■ 32-bit Windows (8/8.1/10) 2 GB to get by; 4 GB for best results
■ 64-bit Windows (8/8.1/10/11) 8 GB to get by; 16 GB for a solid machine; 32+ GB for any machine doing serious, processor-intensive work
The latest versions of macOS require a minimum of 4 GB of RAM. Like Windows, however, the 64-bit-only OS does much better with a lot more RAM. I would go with 8 GB at a minimum, 16 GB for good performance, and more for peak performance.
Linux RAM requirements and recommendations depend entirely on which distribution (distro) is being used. The mainstream distros, like Ubuntu, have requirements similar to Windows and macOS, but many distros get by on very minimal system requirements.
Determining Current RAM Capacity
Before you go get RAM, you obviously need to know how much RAM you currently have in your PC. Windows displays this amount in the System Control Panel applet (see Figure 4.27). You can also access the screen with the WINDOWS-PAUSE/BREAK keystroke combination on standard keyboards.
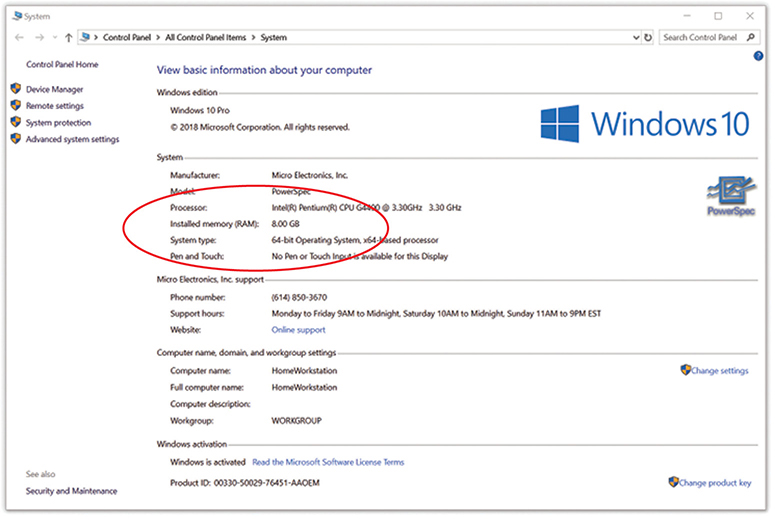
• Figure 4.27 Mike’s Windows 10 system only has 8 GB of RAM.
Windows also includes the handy Performance tab in the Task Manager (as shown in Figure 4.28). The Performance tab includes a lot of information about the amount of RAM being used by your PC. Access the Task Manager by pressing CTRL-SHIFT-ESC and selecting the Performance tab.
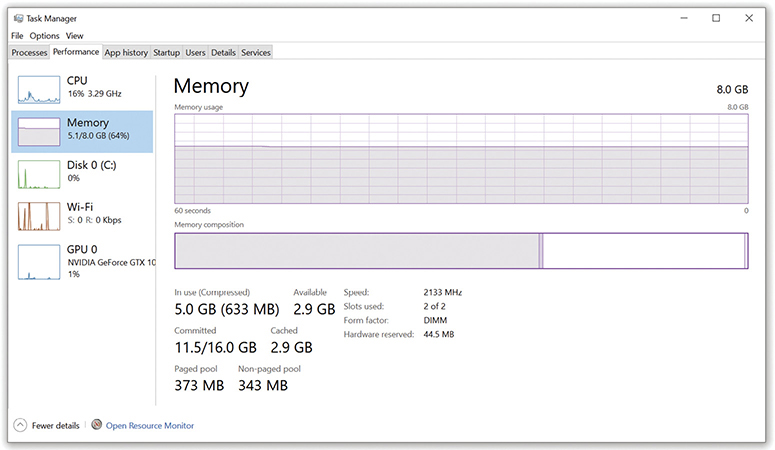
• Figure 4.28 Performance tab in Windows 10 Task Manager
Getting the Right RAM
To do the perfect RAM upgrade, determine the optimum capacity of RAM to install and then get the right RAM for the motherboard. Your first two stops toward these goals are the inside of the case and your motherboard manual. Open the case to see how many sticks of RAM you have installed currently and how many free slots you have open.
Check the motherboard book or RAM manufacturer’s Web site to determine the total capacity of RAM the system can handle and what specific technology works with your system.
You can’t put DDR4 into a system that can only handle DDR3 SDRAM, after all, and it won’t do you much good to install a pair of 8-GB DIMMs when your system tops out at 8 GB. Figure 4.29 shows the RAM limits for an ASUS-brand motherboard.
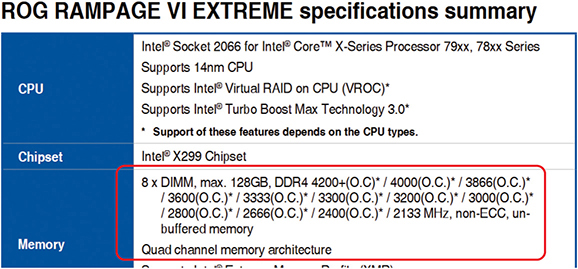
• Figure 4.29 The motherboard book shows how much RAM the motherboard will handle.
Mix and Match at Your Peril
All motherboards can handle different capacities of RAM. If you have three slots, you may put a 4-GB stick in one and an 8-GB stick in the other with a high chance of success. To ensure maximum stability in a system, however, shoot for as close as you can get to uniformity of RAM. Choose RAM sticks that match in technology, capacity, speed, and latency (CL).
Mixing Speeds
With so many different DRAM speeds available, you may often find yourself tempted to mix speeds of DRAM in the same system. Although you may get away with mixing speeds on a system, the safest, easiest rule to follow is to use the speed of DRAM specified in the motherboard book, and make sure that every piece of DRAM runs at that speed. In a worst-case scenario, mixing DRAM speeds can cause the system to lock up every few seconds or every few minutes. You might also get some data corruption. Mixing speeds sometimes works fine, but don’t do your tax return on a machine with mixed DRAM speeds until the system has proven to be stable for a few days. The important thing to note here is that you won’t break anything, other than possibly data, by experimenting.
Okay, I have mentioned enough disclaimers. Modern motherboards provide some flexibility regarding DRAM speeds and mixing. First, you can use DRAM that is faster than the motherboard specifies. For example, if the system needs PC-19200 DDR4, you may put in PC-25600 DDR4 and it should work fine. Faster DRAM is not going to make the system run any faster, however, so don’t look for any system improvement.
Second, you can sometimes get away with putting one speed of DRAM in one bank and another speed in another bank, as long as all the speeds are as fast as or faster than the speed specified by the motherboard. Don’t bother trying to put different-speed DRAM sticks in the same bank with a motherboard that uses dual-channel DDR.
Installing DIMMs
Installing DRAM is so easy that it’s one of the very few jobs I recommend to non-techie folks. First, attach an antistatic wrist strap or touch some bare metal on the power supply to ground yourself and avoid ESD. Then swing the side tabs on the RAM slots down from the upright position. Pick up a stick of RAM—don’t touch those contacts—and line up the notch or notches with the raised portion(s) of the DIMM socket (see Figure 4.30). A good hard push down is usually all you need to ensure a solid connection. Make sure that the DIMM snaps into position to show it is completely seated. Also, notice that the one or two side tabs move in to reflect a tight connection.

• Figure 4.30 Inserting a DIMM
Your motherboard should detect and automatically set up any DIMM you install, assuming you have the right RAM for the system, using a technology called serial presence detect (SPD). RAM makers add a handy chip to modern sticks called the SPD chip (see Figure 4.31). The SPD chip stores all the information about your DRAM, including size, speed, ECC or non-ECC, registered or unregistered, and other more technical bits of information.
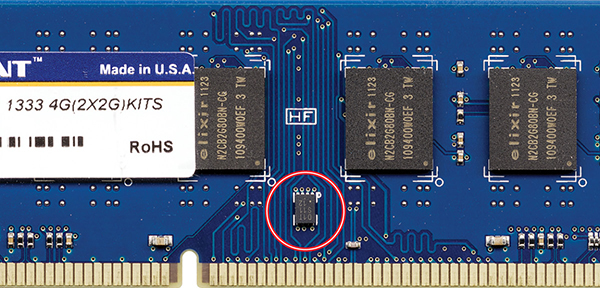
• Figure 4.31 SPD chip on a stick
When a PC boots, it queries the SPD chip so that the MCC knows how much RAM is on the stick, how fast it runs, and other information. Any program can query the SPD chip. Take a look at Figure 4.32 with the results of the popular CPU-Z program showing RAM information from the SPD chip.
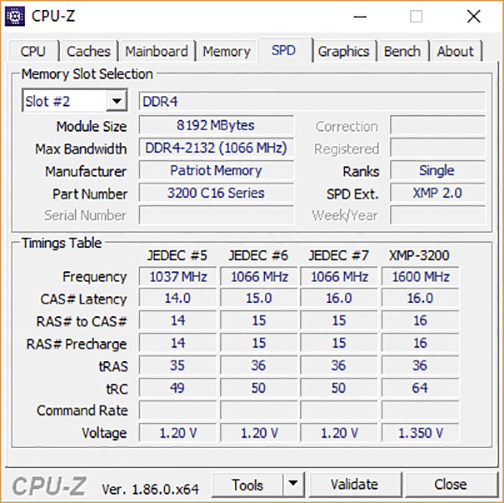
• Figure 4.32 CPU-Z showing RAM information
All new systems count on SPD to set the RAM timings properly for your system when it boots. If you add a RAM stick with a bad SPD chip, you’ll get a POST error message and the system will not boot. You can’t fix a broken SPD chip; you just buy a new stick of RAM.
Installing SO-DIMMs in Laptops
It wasn’t that long ago that adding RAM to a laptop was either impossible or required you to send the system back to the manufacturer. Long ago, laptop makers used expensive, proprietary, custom-made RAM packages that were hard to handle. Wide acceptance of SO-DIMMs solved these problems for a time—until ultra-thin laptops started turning up with soldered-on RAM. Most larger laptops still provide relatively convenient access to their SO-DIMMs, making it easy to add or replace RAM.
Access to RAM usually requires removing a panel or lifting up the keyboard—the procedure varies among laptop manufacturers. Figure 4.33 shows a typical laptop RAM access panel. You can slide the panel off to reveal the SO-DIMMs. Slide the pins into position and snap the SO-DIMM down into the retaining clips (see Figure 4.34).
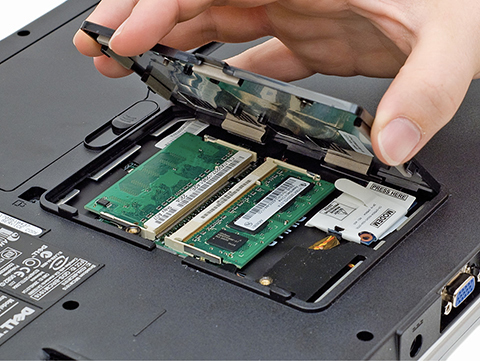
• Figure 4.33 A RAM access panel on a laptop

• Figure 4.34 Snapping in a SO-DIMM
Before doing any work on a laptop, turn the system off, disconnect it from the AC wall socket, and remove all batteries. If you are working on a laptop with a built-in battery, consult the service manual and look for a service mode, or similarly named, procedure. Enabling this mode will cut off power from the installed battery, making the laptop safe to work on. Finally, as always, use an antistatic wrist strap to keep ESD from damaging the system.
■ Troubleshooting RAM
“Memory” errors show up in a variety of ways on modern systems, including system lockups, page faults, and other error screens. These errors can indicate bad RAM but often point to something completely unrelated. This is especially true with intermittent problems. Techs need to recognize these errors and determine which part of the system caused the memory error. Then they need to follow up with various testing methods.
System lockups and page faults (they often go hand in hand) in Windows can indicate a problem with RAM. A system lockup is when the computer stops functioning. A page fault is a milder error that can be caused by memory issues but not necessarily system RAM problems. Certainly page faults look like RAM issues because Windows generates frightening error messages filled with long strings of hexadecimal digits, such as “KRNL386 caused a page fault at 03F2:25A003BC.” Just because the error message contains a memory address, however, does not mean that you have a problem with your RAM. Write down the address. If it repeats in later error messages, you probably have a bad RAM stick. If Windows displays different memory locations, you need to look elsewhere for the culprit.
Every once in a while, something potentially catastrophic happens within the PC, some little electron hits the big red panic button, and the operating system has to shut down certain functions before it can save data. This panic button inside the PC is called a non-maskable interrupt (NMI), more simply defined as an interruption the CPU cannot ignore. An NMI manifests as a proprietary crash screen. In Windows 10, for example, the crash screen is what techs call the Blue Screen of Death (BSoD)—a bright blue screen with a scary-sounding error message on it (see Figure 4.35).

• Figure 4.35 Blue screen of death
Windows 10/11 display a blue screen with a sad face and the words to the effect of Windows has a problem. Restart the machine. A macOS machine might display a spinning rainbow wheel sometimes called the Spinning Pinwheel of Death (SPoD) or, more likely, will simply restart.
Bad RAM sometimes triggers an NMI, although often the culprit lies with buggy programming or clashing code. The BSoD/SPoD vary across Windows and macOS versions and operating systems, and it would require a much lengthier tome than this one to cover all the variations. Suffice it to say that RAM could be the problem when that delightful blue screen or pinwheel appears.
Finally, intermittent memory errors can come from a variety of sources, including a dying power supply, electrical interference, buggy applications, buggy hardware, and so on. These errors show up as lockups, general protection faults, and page faults, but they never have the same address or happen with the same applications. I always check the power supply first.
Once you discover that you may have a RAM problem, you have a couple of options. First, several companies manufacture hardware RAM-testing devices. Second, you can use the method I use—replace and pray. Open the system case and replace each stick, one at a time, with a known-good replacement stick. (You have one of those lying around, don’t you?) This method, although potentially time-consuming, certainly works. With PC prices as low as they are now, you could simply replace the whole system for less than the price of a dedicated RAM tester.
Third, you could run a software-based tester on the RAM. Because you have to load a software tester into the memory it’s about to scan, there’s always a small chance that simply starting the software RAM tester might cause an error. Still, you can find some pretty good free ones out there. Windows 7 and later include the Windows Memory Diagnostic tool, which can automatically scan your computer’s RAM when you encounter a problem. If you’re using another OS, my favorite tool is the open source Memtest86+ (https://www.memtest.org). The Memtest86+ software exhaustively checks your RAM and reports bad RAM when it finds it (see Figure 4.36).
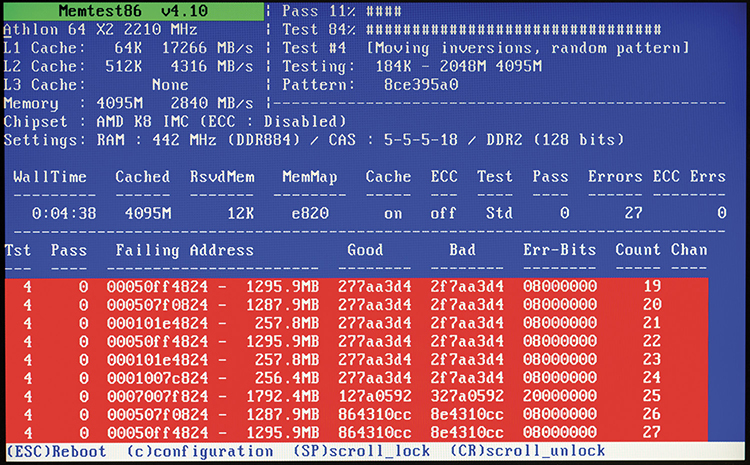
• Figure 4.36 Memtest86+ detecting failing RAM
Chapter 4 Review
■ Chapter Summary
After reading this chapter and completing the exercises, you should understand the following about RAM.
Identify the different types of DRAM packaging
■ The sticks of RAM snapped into your motherboard are DRAM. Think of DRAM as a spreadsheet in which each cell holds a one or a zero. Each cell represents a single bit. The number of columns and rows is finite.
■ If a chip contains 1,048,576 rows and 8 columns, it can be described as a 1M×8 chip. A chip containing 2,097,152 rows and 16 columns can be described as a 2M×16 chip.
■ DRAM needs to be able to fill the data bus. A 1M×8 DRAM chip is only 8 bits wide and would provide the CPU with only 8 bits of data. You would need eight of the 1M×8 chips to fill a 64-bit data bus.
■ DRAM chips are soldered to a circuit board called a stick or module, and when these chips are combined, a single stick can fill the data bus. Modern DRAM sticks come in 64-bit-data varieties.
Explain the varieties of RAM
■ Synchronous dynamic random-access memory in its original and later forms is tied to the system clock. The CPU, memory controller, and RAM all work in tandem with the clock pulse. This results in little wasted time when the CPU requests data from RAM.
■ SDRAM came in sticks called dual inline memory modules (DIMMs). SDRAM DIMMs came in a variety of pin sizes, with 168 pins being the most common for desktop systems. SDRAM DIMMs were 64 bits wide so that they matched the 64-bit data bus of modern CPUs. DIMMs snapped into slots on the motherboard. Each DIMM was 64 bits, so snapping in a single DIMM filled the data bus; therefore, each slot was called a bank.
■ SDRAM was advertised by capacity and speed. The capacity was measured in megabytes or gigabytes. The speed was measured in MHz (the DDR speed rating) or MBps (the PC-speed rating).
■ RAM speed must match or exceed that of the system. For example, DDR-400 runs at 200 MHz (the double data rate speeds it up to DDR-400 instead of DDR-200), so the motherboard must run at 200 MHz, too.
■ Double data rate SDRAM (DDR RAM) is faster than regular SDRAM because it doubles the throughput. Desktop PCs use 184-pin DDR DIMMs, whereas laptops use either 200-pin small-outline DIMMs (SO-DIMMs) or 172-pin micro-DIMMs. DDR RAM modules have notches that differ from regular SDRAM, so DDR RAM only snaps into DDR slots on a motherboard.
■ Dual-channel DDR improves upon DDR by using the DIMMs in pairs. For systems to use dual-channel DDR, the motherboard and memory controller must support dual-channel DDR RAM, and the DDR DIMMs must be identical.
■ DDR3 boasts higher speeds, more efficient architecture, and consumes around 30 percent lower power. With 8-bit buffer, DDR3 boasts impressive bandwidth over older RAM. Some chipsets that support DDR3 also support triple-channel or quad-channel memory architecture, which work a lot like dual-channel but with three or four sticks of RAM instead of two.
■ DDR4 raises the performance and capacity bar over DDR3, plus offers even lower power consumption. DDR4 uses a 288-pin DIMM that cannot plug into any previous RAM slot. DDR4 SO-DIMMs have 260 pins.
■ DDR5 once again brings increased performance, capacity, and power efficiency over DDR4. Maximum DIMM capacity is quadrupled and potential bandwidth doubled, making for a very robust improvement. DDR5 DIMMs have 288 pins like DDR4, while DDR5 SO-DIMMs have an additional 2 pins, bringing their total count up to 262. Neither are backward compatible with DDR4.
■ RAM modules are either single-sided or double-sided. Single-sided sticks have chips on only one side, whereas double-sided sticks have chips on both sides. Most RAM is single-sided.
■ Latency refers to the time lag between when the memory controller starts to fetch data from RAM and when RAM actually sends out the requested data. Another lag occurs when the memory controller asks for the next line from RAM. RAM with a lower latency—such as CL17—is faster than RAM with a higher latency—such as CL19—because it responds more quickly. Check your motherboard documentation and get the lowest-latency RAM your system will support.
■ Error correction code (ECC) RAM improved upon parity RAM by being able to fix single-bit errors on-the-fly. ECC RAM is always slower than non-ECC RAM due to the overhead of the correcting code. Only high-end motherboards and memory controllers can use ECC RAM. DDR5 DIMMs also include an ECC variant built into the chips themselves, which allows for correction of bit-flips on the chip.
■ Registered (buffered) RAM features an additional register on the module to act as a buffer between the DIMM and the memory controller. You’ll only find this feature on high-end systems. Buffered RAM does not work in non-buffered RAM motherboards.
Select and install RAM
■ Operating systems use a portion of the hard drive as an extension of system RAM, through what’s called virtual memory. Virtual memory is a portion of an HDD or SSD set aside as a page file or swap file.
■ Disk thrashing is excessive hard drive activity symptomatic of insufficient RAM. It occurs when Windows repeatedly uses up all available RAM space and has to move data not immediately needed out of the RAM into the page file, and then swap the data back into RAM when it is needed by the program.
■ You must know what type of RAM (such as DDR3, DDR4, or DDR5) your motherboard accepts before you purchase a RAM upgrade. You also need to know the maximum amount of RAM your motherboard supports and the maximum supported per slot.
■ Microsoft recommends a minimum system requirement of 1 GB of RAM for 32-bit versions of Windows (8/8.1/10) and 2 GB of RAM for 64-bit versions. Windows 11 only comes in a 64-bit version and requires a minimum of 4 GB.
■ Though not required, it is good practice to make sure all sticks of RAM in any system are as close to identical as possible. Matching your RAM modules in technology, capacity, speed, and manufacturer lessens the chance of problems and incompatibility.
■ The serial presence detect (SPD) chip on modern DIMMs automatically supplies all the information about the RAM to the system, such as the size, speed, ECC or non-ECC, registered or unregistered, and other details.
■ To install SO-DIMMs in a laptop, you must remove a panel on the underside of the laptop or remove the keyboard to find the RAM slots. The SO-DIMM slides into the slot and snaps down into position. Unplug the laptop and remove the battery before attempting a RAM upgrade, and protect the components from ESD by wearing an antistatic wristband.
Perform basic RAM troubleshooting
■ Symptoms of bad RAM include system lockups, page faults, and other error screens. However, other failing components can cause similar problems. If RAM testing software or hardware shows a fault at the same hexadecimal value (such as A5F2:004EEAB9) after you’ve run it a couple of times, you have a bad RAM stick. Replace it.
■ Page faults result in error screens such as “KRNL386 caused a page fault at 03F2:25A003BC.” The process that caused the page fault (in this case, KRNL386) may change, but if the hexadecimal address is the same across numerous error screens, you probably have bad RAM.
■ A non-maskable interrupt (NMI) results in a proprietary crash screen, such as the Blue Screen of Death, sad face, or Spinning Pinwheel of Death. Although crash screens are often blamed on bad RAM, they are more often caused by buggy application code.
■ If you suspect you have bad RAM and you don’t have a hardware RAM-testing device, swap one of the sticks in your system with a known-good stick. If the system works, you’ve found the bad stick. If the system still has errors, replace the stick you removed and swap a different stick for the known-good stick. Another option is to use a software RAM tester such as the Windows Memory Diagnostic tool or Memtest86+.
■ Key Terms
bank
blue screen of death (BSoD)
buffered RAM
DDR3
DDR4
DDR5
disk thrashing
double data rate SDRAM (DDR SDRAM)
double-sided RAM
dual-channel memory architecture
dual inline memory module (DIMM)
dynamic random-access memory (DRAM)
error correction code RAM (ECC RAM)
latency
memory controller chip (MCC)
module
non-maskable interrupt (NMI)
page fault
page file
proprietary crash screen
quad-channel memory architecture
registered RAM
serial presence detect (SPD)
single inline memory module (SIMM)
single-sided RAM
small-outline DIMM (SO-DIMM)
spinning pinwheel of death (SPoD)
stick
swap file
synchronous DRAM (SDRAM)
triple-channel memory architecture
unbuffered RAM
virtual memory
Windows Memory Diagnostic
■ Key Term Quiz
Use the Key Terms list to complete the sentences that follow. Not all terms will be used.
1. The most recent version of DDR SDRAM is __________________.
2. If the LED for your hard drive stays on most of the time, your computer is suffering from __________________, a sure sign you need to add more memory.
3. A special kind of memory module for laptops is called a(n) __________________.
4. Memory that makes two data accesses during each clock tick is called __________________.
5. A(n) __________________ is an interruption the CPU cannot ignore.
6. Unlike regular DRAM, __________________ enables error checking and correcting.
7. The time lag between when the memory controller starts to fetch a line of data from RAM and when the RAM actually starts to deliver the data is known as __________________.
8. Systems automatically detect new RAM by polling the module’s __________________ chip.
9. __________________ uses a portion of the HDD or SSD as an extension of your physical RAM.
10. Memory chips are soldered to a small circuit board called a(n) __________________ or a(n) __________________.
■ Multiple-Choice Quiz
1. How might an NMI manifest on a Windows system?
A. Blue Screen of Death.
B. Spinning Pinwheel of Death.
C. Interrupt of death.
D. NMIs only happen on macOS systems.
2. Silas has an AMD-based motherboard with two sticks of DDR3 RAM installed in two of the three RAM slots, for a total of 8 GB of system memory. When he runs CPU-Z to test the system, he notices that the software claims he’s running single-channel memory architecture. What could be the problem? (Select the best answer.)
A. His motherboard only supports single-channel memory architecture.
B. His motherboard only supports dual-channel memory architecture with DDR2 RAM, not DDR3.
C. He needs to install a third RAM stick to enable dual-channel memory architecture.
D. He needs to move one of the installed sticks to a different slot to activate dual-channel memory architecture.
3. If you upgrade your memory but notice that Windows Settings does not reflect the additional memory, what should you do?
A. Remove the RAM and try to reinstall it.
B. Restart the computer.
C. Return the memory because it’s probably bad.
D. Go to Setup and configure the memory to reflect the new amount.
4. What does a non-maskable interrupt cause the CPU to produce?
A. The blue screen of death
B. A parity error
C. Excessive heat
D. An incorrect memory count
5. What does the CPU use to access the system’s RAM?
A. The system bus
B. ReadyBoost
C. The address bus
D. The expansion bus
6. What is the best way to determine the total capacity and specific type of RAM your system can handle?
A. Check the motherboard book.
B. Open the case and inspect the RAM slots.
C. Check the Device Manager.
D. Check the System utility in the Control Panel.
7. Which of the following PC speed ratings matches up with DDR5-5200 RAM?
A. PC5-38400
B. PC5-57600
C. PC5-51200
D. PC5-41600
8. Which of the following is a valid package size for DDR5 SO-DIMMs?
A. 204-pin
B. 240-pin
C. 262-pin
D. 288-pin
9. What package does DDR3 SDRAM use for desktop PCs?
A. 30-pin
B. 168-pin
C. 172-pin
D. 240-pin
10. Which of the following is a valid package size for DDR4 DIMMs?
A. 172-pin
B. 184-pin
C. 240-pin
D. 288-pin
11. What happens if you mix RAM sticks of different speeds?
A. Your computer will work fine as long as it uses dual-channel architecture.
B. Your computer may slow down.
C. Your computer will work fine if all the memory modules are slower than the speed of the motherboard.
D. Your computer may lock up every few seconds or provide corrupted data.
12. Why is SDRAM faster than regular DRAM?
A. It makes two processes per clock cycle.
B. It runs synchronously with the system clock.
C. It uses dual-channel architecture.
D. It has fewer pins, resulting in fewer corrupt bits.
13. What is true about a double-sided DIMM?
A. It has memory chips on the front and back.
B. It can be installed forward or backward.
C. It is twice as fast as a single-sided DIMM.
D. It has half the capacity of a quad-sided DIMM.
14. What is the minimum requirement for RAM for 64-bit Windows 10?
A. 512 MB
B. 1 GB
C. 2 GB
D. 4 GB
15. What happens if you add two RAM sticks to your PC and one has a bad SPD?
A. When your system boots, it will recognize both RAM sticks but will not register any special features (such as ECC) of the stick with the bad SPD.
B. When your system boots, it will only register the presence of the RAM stick with the good SPD.
C. When your system boots, it won’t register the presence of the RAM stick with the bad SPD until you configure the RAM settings by using the Setup utility.
D. When you try to boot the system, you will get a POST error message and the system will not boot.
■ Essay Quiz
1. Celia tells you she just received a new motherboard for the system she is building. She knows the motherboard is capable of using triple-channel memory, but she only has two sticks of RAM. She wonders if her PC will still work. Given such a scenario, what can you tell her to clear up the confusion?
2. Your cousin James recently bought a computer with 8 GB of RAM and a Windows 11 operating system. He’s complaining about how slow his new computer is, especially when he’s working with his graphics applications. Given such a scenario, how can you convince him that his system needs more memory?
3. Now that you’ve convinced your cousin James that he needs more memory for his new PC, how will you explain what kind he should buy and how he should install it? You may assume that he has the motherboard book and that his computer has a 266-MHz system bus and can support DDR4 RAM.
4. Your computer is acting funny. Sometimes you get an error message on the screen. Other times data seems to be corrupted. Sometimes the computer just locks up. You suspect that it may be bad memory. How can you find out whether a memory problem or something else is causing your trouble?
Lab Project
• Lab Project 4.1
Upgrading system memory requires very specific information. Using the systems available to you, assess the upgradeability. Run CPU-Z for a glimpse at currently installed RAM and available slots. Check the memory finder at https://www.crucial.com or other sites to see what upgrades you can make.
This exercise translates to almost every desktop and portable computer you can get your hands on, so keep going! (Smartphones and tablets don’t get any upgrades, sadly.)