Now that you are set up for ASP.NET Core development, it is time to create a simple application. In this chapter, you’ll create a data-entry application using ASP.NET Core. My goal is to demonstrate ASP.NET Core in action, so I will pick up the pace a little and skip over some of the explanations as to how things work behind the scenes. But don’t worry; I’ll revisit these topics in depth in later chapters.
Setting the Scene
Imagine that a friend has decided to host a New Year’s Eve party and that she has asked me to create a web app that allows her invitees to electronically RSVP. She has asked for these four key features:
A home page that shows information about the party
A form that can be used to RSVP
Validation for the RSVP form, which will display a thank-you page
A summary page that shows who is coming to the party
In this chapter, I create an ASP.NET Core project and use it to create a simple application that contains these features; once everything works, I’ll apply some styling to improve the appearance of the finished application.
Creating the Project
Open a PowerShell command prompt from the Windows Start menu, navigate to a convenient location, and run the commands in Listing 3-1 to create a project named PartyInvites.
Tip
You can download the example project for this chapter—and for all the other chapters in this book—from https://github.com/apress/pro-asp.net-core-3. See Chapter 1 for how to get help if you have problems running the examples.
dotnet new globaljson --sdk-version 3.1.101 --output PartyInvites
dotnet new mvc --no-https --output PartyInvites --framework netcoreapp3.1
Listing 3-1.
Creating a New Project
These are the same commands I used to create the project in Chapter 2. If you are a Visual Studio user, I explain how you can use a wizard to create a project in Chapter 4, but these commands are simple and will ensure you get the right project starting point that uses the required version of .NET Core.
Open the project and edit the HomeController.cs file in the Controllers folder, replacing the contents with the code shown in Listing 3-2.
using Microsoft.AspNetCore.Mvc;
namespace PartyInvites.Controllers {
public class HomeController : Controller {
public IActionResult Index() {
return View();
}
}
}
Listing 3-2.
Replacing the Contents of the HomeController.cs File in the Controllers Folder
The provides a clean starting point for the new application, defining a single action method that selects the default view for rendering. To provide a welcome message to party invitees, open the Index.cshtml file in the Views/Home folder and replace the contents with those shown in Listing 3-3.
(To do: sell it better. Add pictures or something.)
</div>
</div>
</body>
</html>
Listing 3-3.
Replacing the Contents of the Index.cshtml File in the Views/Home Folder
Start the application by selecting Start Without Debugging (for Visual Studio) or Run Without Debugging (for Visual Studio Code), and you will see the details of the party (well, the placeholder for the details, but you get the idea), as shown in Figure 3-1.
Figure 3-1.
Adding to the view HTML
Adding a Data Model
The data model is the most important part of any ASP.NET Core application. The model is the representation of the real-world objects, processes, and rules that define the subject, known as the domain, of the application. The model, often referred to as a domain model, contains the C# objects (known as domain objects) that make up the universe of the application and the methods that manipulate them. In most projects, the job of the ASP.NET Core application is to provide the user with access to the data model and the features that allow the user to interact with it.
The convention for an ASP.NET Core application is that the data model classes are defined in a folder named Models, which was added to the project by the template used in Listing 3-1.
I don’t need a complex model for the PartyInvites project because it is such a simple application. In fact, I need just one domain class that I will call GuestResponse. This object will represent an RSVP from an invitee.
If you are using Visual Studio, right-click the Models folder and select Add ➤ Class from the popup menu. Set the name of the class to GuestResponse.cs and click the Add button. If you are using Visual Studio Code, right-click the Models folder, select New File, and enter GuestResponse.cs as the file name. Use the new file to define the class shown in Listing 3-4.
namespace PartyInvites.Models {
public class GuestResponse {
public string Name { get; set; }
public string Email { get; set; }
public string Phone { get; set; }
public bool? WillAttend { get; set; }
}
}
Listing 3-4.
The Contents of the GuestResponse.cs File in the Models Folder
Tip
You may have noticed that the WillAttend property is a nullable bool, which means that it can be true, false, or null. I explain the rationale for this in the “Adding Validation” section later in the chapter.
Creating a Second Action and View
One of my application goals is to include an RSVP form, which means I need to define an action method that can receive requests for that form. A single controller class can define multiple action methods, and the convention is to group related actions together in the same controller. Listing 3-5 adds a new action method to the Home controller.
using Microsoft.AspNetCore.Mvc;
namespace PartyInvites.Controllers {
public class HomeController : Controller {
public IActionResult Index() {
return View();
}
public ViewResult RsvpForm() {
return View();
}
}
}
Listing 3-5.
Adding an Action Method in the HomeController.cs File in the Controllers Folder
Both action methods invoke the View method without arguments, which may seem odd, but remember that the Razor view engine will use the name of the action method when looking for a view file. That means the result from the Index action method tells Razor to look for a view called Index.cshtml, while the result from the RsvpForm action method tells Razor to look for a view called RsvpForm.cshtml.
If you are using Visual Studio, right-click the Views/Home folder and select Add ➤ New Item from the popup menu. Select the Razor View item, set the name to RsvpForm.cshtml, and click the Add button to create the file. Replace the contents with those shown in Listing 3-6.
If you are using Visual Studio Code, right-click the Views/Home folder and select New File from the popup menu. Set the name of the file to RsvpForm.cshtml and add the contents shown in Listing 3-6.
The Contents of the RsvpForm.cshtml File in the Views/Home Folder
This content is just static HTML for the moment. To test the new action method and view, start the application by selecting Start Without Debugging or Run Without Debugging from the Debug menu.
Using the browser window that is opened, request http://localhost:5000/home/rsvpform. (If you are using Visual Studio, you will have to change the port to the one assigned when the project was created.) The Razor view engine locates the RsvpForm.cshtml file and uses it to produce a response, as shown in Figure 3-2.
Figure 3-2.
Rendering a second view
Linking Action Methods
I want to be able to create a link from the Index view so that guests can see the RsvpForm view without having to know the URL that targets a specific action method, as shown in Listing 3-7.
(To do: sell it better. Add pictures or something.)
</div>
<a asp-action="RsvpForm">RSVP Now</a>
</div>
</body>
</html>
Listing 3-7.
Adding a Link in the Index.cshtml File in the Views/Home Folder
The addition to the listing is an a element that has an asp-action attribute. The attribute is an example of a tag helper attribute, which is an instruction for Razor that will be performed when the view is rendered. The asp-action attribute is an instruction to add an href attribute to the a element that contains a URL for an action method. I explain how tag helpers work in Chapters 25–27, but this tag helper tells Razor to insert a URL for an action method defined by the same controller for which the current view is being rendered. You can see the link that the helper creates by running the project, as shown in Figure 3-3.
Figure 3-3.
Linking between action methods
Roll the mouse over the RSVP Now link in the browser. You will see that the link points to the following URL (allowing for the different port number that Visual Studio will have assigned to your project):
http://localhost:5000/Home/RsvpForm
There is an important principle at work here, which is that you should use the features provided by ASP.NET Core to generate URLs, rather than hard-code them into your views. When the tag helper created the href attribute for the a element, it inspected the configuration of the application to figure out what the URL should be. This allows the configuration of the application to be changed to support different URL formats without needing to update any views.
Building the Form
Now that I have created the view and can reach it from the Index view, I am going to build out the contents of the RsvpForm.cshtml file to turn it into an HTML form for editing GuestResponse objects, as shown in Listing 3-8.
Creating a Form View in the RsvpForm.cshtml File in the Views/Home Folder
The @model expression specifies that the view expects to receive a GuestResponse object as its view model. I have defined a label and input element for each property of the GuestResponse model class (or, in the case of the WillAttend property, a select element). Each element is associated with the model property using the asp-for attribute, which is another tag helper attribute. The tag helper attributes configure the elements to tie them to the view model object. Here is an example of the HTML that the tag helpers produce:
The asp-for attribute on the label element sets the value of the for attribute. The asp-for attribute on the input element sets the id and name elements. This may not look especially useful, but you will see that associating elements with a model property offers additional advantages as the application functionality is defined.
Of more immediate use is the asp-action attribute applied to the form element, which uses the application’s URL routing configuration to set the action attribute to a URL that will target a specific action method, like this:
<form method="post" action="/Home/RsvpForm">
As with the helper attribute I applied to the a element, the benefit of this approach is that you can change the system of URLs that the application uses, and the content generated by the tag helpers will reflect the changes automatically.
You can see the form by running the application and clicking the RSVP Now link, as shown in Figure 3-4.
Figure 3-4.
Adding an HTML form to the application
Receiving Form Data
I have not yet told ASP.NET Core what I want to do when the form is posted to the server. As things stand, clicking the Submit RSVP button just clears any values you have entered in the form. That is because the form posts back to the RsvpForm action method in the Home controller, which just renders the view again. To receive and process submitted form data, I am going to use an important feature of controllers. I will add a second RsvpForm action method to create the following:
A method that responds to HTTPGETrequests: A GET request is what a browser issues normally each time someone clicks a link. This version of the action will be responsible for displaying the initial blank form when someone first visits /Home/RsvpForm.
A method that responds to HTTPPOSTrequests: By default, forms rendered using Html.BeginForm() are submitted by the browser as a POST request. This version of the action will be responsible for receiving submitted data and deciding what to do with it.
Handing GET and POST requests in separate C# methods helps to keep my controller code tidy since the two methods have different responsibilities. Both action methods are invoked by the same URL, but ASP.NET Core makes sure that the appropriate method is called, based on whether I am dealing with a GET or POST request. Listing 3-9 shows the changes to the HomeController class.
using Microsoft.AspNetCore.Mvc;
using PartyInvites.Models;
namespace PartyInvites.Controllers {
public class HomeController : Controller {
public IActionResult Index() {
return View();
}
[HttpGet]
public ViewResult RsvpForm() {
return View();
}
[HttpPost]
public ViewResult RsvpForm(GuestResponse guestResponse) {
// TODO: store response from guest
return View();
}
}
}
Listing 3-9.
Adding a Method in the HomeController.cs File in the Controllers Folder
I have added the HttpGet attribute to the existing RsvpForm action method, which declares that this method should be used only for GET requests. I then added an overloaded version of the RsvpForm method, which accepts a GuestResponse object. I applied the HttpPost attribute to this method, which declares that the new method will deal with POST requests. I explain how these additions to the listing work in the following sections. I also imported the PartyInvites.Models namespace—this is just so I can refer to the GuestResponse model type without needing to qualify the class name.
Understanding Model Binding
The first overload of the RsvpForm action method renders the same view as before—the RsvpForm.cshtml file—to generate the form shown in Figure 3-4. The second overload is more interesting because of the parameter, but given that the action method will be invoked in response to an HTTP POST request and that the GuestResponse type is a C# class, how are the two connected?
The answer is model binding, a useful ASP.NET Core feature whereby incoming data is parsed and the key/value pairs in the HTTP request are used to populate properties of domain model types.
Model binding is a powerful and customizable feature that eliminates the grind of dealing with HTTP requests directly and lets you work with C# objects rather than dealing with individual data values sent by the browser. The GuestResponse object that is passed as the parameter to the action method is automatically populated with the data from the form fields. I dive into the details of model binding in Chapter 28.
To demonstrate how model binding works, I need to do some preparatory work. One of the application goals is to present a summary page with details of who is attending the party, which means that I need to keep track of the responses that I receive. I am going to do this by creating an in-memory collection of objects. This isn’t useful in a real application because the response data will be lost when the application is stopped or restarted, but this approach will allow me to keep the focus on ASP.NET Core and create an application that can easily be reset to its initial state. Later chapters will demonstrate persistent data storage.
Add a class file named Repository.cs to the Models folder and use it to define the class shown in Listing 3-10.
using System.Collections.Generic;
namespace PartyInvites.Models {
public static class Repository {
private static List<GuestResponse> responses = new List<GuestResponse>();
public static IEnumerable<GuestResponse> Responses => responses;
public static void AddResponse(GuestResponse response) {
responses.Add(response);
}
}
}
Listing 3-10.
The Contents of the Repository.cs File in the Models Folder
The Repository class and its members are static, which will make it easy for me to store and retrieve data from different places in the application. ASP.NET Core provides a more sophisticated approach for defining common functionality, called dependency injection, which I describe in Chapter 14, but a static class is a good way to get started for a simple application like this one.
Storing Responses
Now that I have somewhere to store the data, I can update the action method that receives the HTTP POST requests, as shown in Listing 3-11.
using Microsoft.AspNetCore.Mvc;
using PartyInvites.Models;
namespace PartyInvites.Controllers {
public class HomeController : Controller {
public IActionResult Index() {
return View();
}
[HttpGet]
public ViewResult RsvpForm() {
return View();
}
[HttpPost]
public ViewResult RsvpForm(GuestResponse guestResponse) {
Repository.AddResponse(guestResponse);
return View("Thanks", guestResponse);
}
}
}
Listing 3-11.
Updating an Action Method in the HomeController.cs File in the Controllers Folder
Before the POST version of the RsvpForm method is invoked, the ASP.NET Core model binding feature extracts values from the HTML form and assigns them to the properties of the GuestResponse object. The result is used as the argument when the method is invoked to handle the HTTP request, and all I have to do to deal with the form data sent in a request is to work with the GuestResponse object that is passed to the action method—in this case, to pass it as an argument to the Repository.AddResponse method so that the response can be stored.
Adding the Thanks View
The call to the View method in the RsvpForm action method creates a ViewResult that selects a view called Thanks and uses the GuestResponse object created by the model binder as the view model. Add a Razor View named Thanks.cshtml to the Views/Home folder with the content shown in Listing 3-12 to present a response to the user.
@:It's great that you're coming. The drinks are already in the fridge!
} else {
@:Sorry to hear that you can't make it, but thanks for letting us know.
}
</div>
Click <a asp-action="ListResponses">here</a> to see who is coming.
</body>
</html>
Listing 3-12.
The Contents of the Thanks.cshtml File in the Views/Home Folder
The HTML produced by the Thanks.cshtml view depends on the values assigned to the GuestResponse view model provided by the RsvpForm action method. To access the value of a property in the domain object, I use an @Model.<PropertyName> expression. So, for example, to get the value of the Name property, I use the @Model.Name expression. Don’t worry if the Razor syntax doesn’t make sense—I explain it in more detail in Chapter 21.
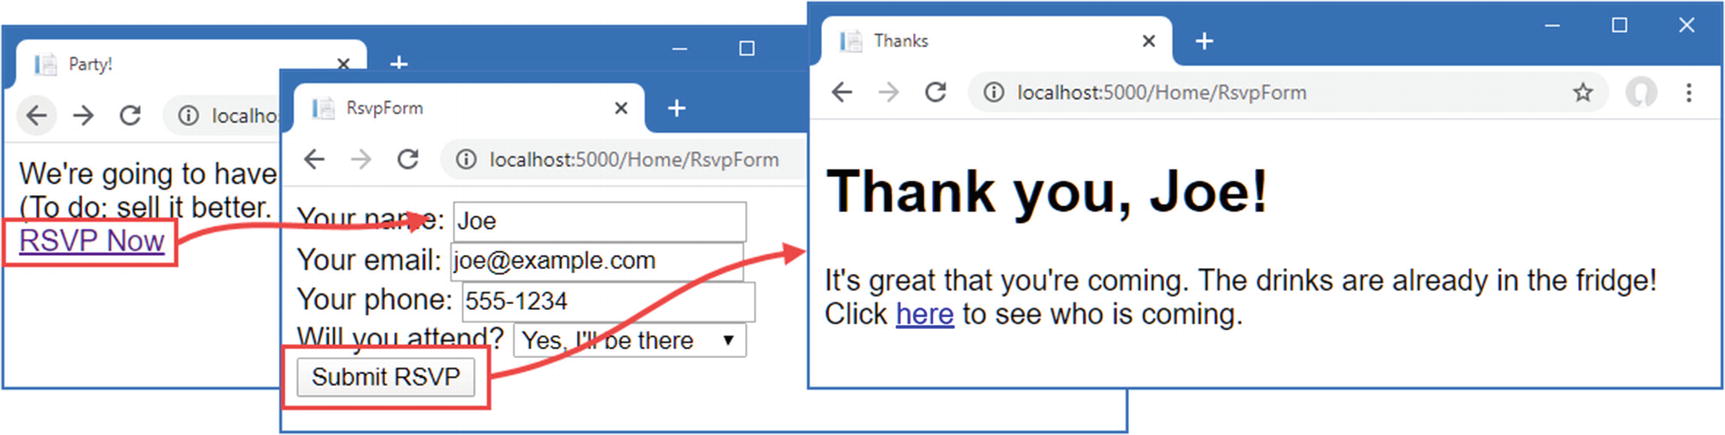
Now that I have created the Thanks view, I have a basic working example of handling a form. Start the application, click the RSVP Now link, add some data to the form, and click the Submit RSVP button. You will see the response shown in Figure 3-5 (although it will differ if your name is not Joe or you said you could not attend).
Figure 3-5.
The Thanks view
Displaying the Responses
At the end of the Thanks.cshtml view, I added an a element to create a link to display the list of people who are coming to the party. I used the asp-action tag helper attribute to create a URL that targets an action method called ListResponses, like this:
...
<div>Click <a asp-action="ListResponses">here</a> to see who is coming.</div>
...
If you hover the mouse over the link that is displayed by the browser, you will see that it targets the /Home/ListResponses URL. This doesn’t correspond to any of the action methods in the Home controller, and if you click the link, you will see a 404 Not Found error response.
To add an endpoint that will handle the URL, I need to add another action method to the Home controller, as shown in Listing 3-13.
using Microsoft.AspNetCore.Mvc;
using PartyInvites.Models;
using System.Linq;
namespace PartyInvites.Controllers {
public class HomeController : Controller {
public IActionResult Index() {
return View();
}
[HttpGet]
public ViewResult RsvpForm() {
return View();
}
[HttpPost]
public ViewResult RsvpForm(GuestResponse guestResponse) {
Adding an Action Method in the HomeController.cs File in the Controllers Folder
The new action method is called ListResponses, and it calls the View method, using the Repository.Responses property as the argument. This will cause Razor to render the default view, using the action method name as the name of the view file, and to use the data from the repository as the view model. The view model data is filtered using LINQ so that only positive responses are provided to the view.
Add a Razor View named ListResponses.cshtml to the Views/Home folder with the content shown in Listing 3-14.
@foreach (PartyInvites.Models.GuestResponse r in Model) {
<tr>
<td>@r.Name</td>
<td>@r.Email</td>
<td>@r.Phone</td>
</tr>
}
</tbody>
</table>
</body>
</html>
Listing 3-14.
Displaying Acceptances in the ListResponses.cshtml File in the Views/Home Folder
Razor view files have the .cshtml file extension because they are a mix of C# code and HTML elements. You can see this in Listing 3-14 where I have used a @foreach expression to process each of the GuestResponse objects that the action method passes to the view using the View method. Unlike a normal C# foreach loop, the body of a Razor @foreach expression contains HTML elements that are added to the response that will be sent back to the browser. In this view, each GuestResponse object generates a tr element that contains td elements populated with the value of an object property.
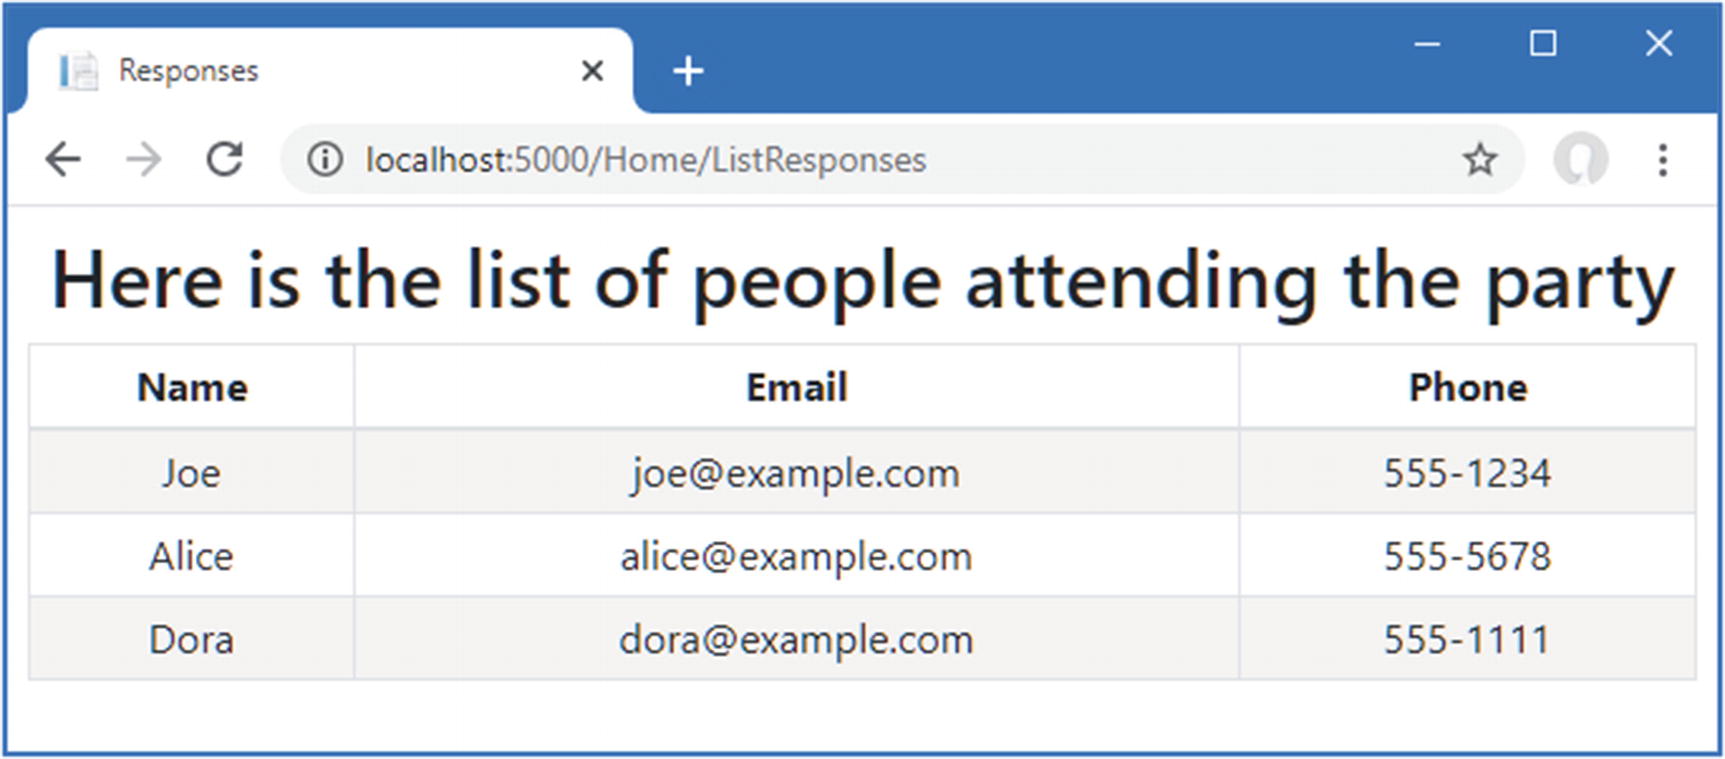
Start the application, submit some form data, and click the link to see the list of responses. You will see a summary of the data you have entered since the application was started, as shown in Figure 3-6. The view does not present the data in an appealing way, but it is enough for the moment, and I will address the styling of the application later in this chapter.
Figure 3-6.
Showing a list of party attendees
Adding Validation
I can now add data validation to the application. Without validation, users could enter nonsense data or even submit an empty form. In an ASP.NET Core application, validation rules are defined by applying attributes to model classes, which means the same validation rules can be applied in any form that uses that class. ASP.NET Core relies on attributes from the System.ComponentModel.DataAnnotations namespace, which I have applied to the GuestResponse class in Listing 3-15.
using System.ComponentModel.DataAnnotations;
namespace PartyInvites.Models {
public class GuestResponse {
[Required(ErrorMessage = "Please enter your name")]
public string Name { get; set; }
[Required(ErrorMessage = "Please enter your email address")]
[EmailAddress]
public string Email { get; set; }
[Required(ErrorMessage = "Please enter your phone number")]
Applying Validation in the GuestResponse.cs File in the Models Folder
ASP.NET Core detects the attributes and uses them to validate data during the model-binding process.
Tip
As noted earlier, I used a nullable bool for the WillAttend property. I did this so that I could apply the Required validation attribute. If I had used a regular bool, the value I received through model binding could be only true or false, and I would not be able to tell whether the user had selected a value. A nullable bool has three possible values: true, false, and null. The browser sends a null value if the user has not selected a value, and this causes the Required attribute to report a validation error. This is a nice example of how ASP.NET Core elegantly blends C# features with HTML and HTTP.
I check to see whether there has been a validation problem using the ModelState.IsValid property in the action method that receives the form data, as shown in Listing 3-16.
using Microsoft.AspNetCore.Mvc;
using PartyInvites.Models;
using System.Linq;
namespace PartyInvites.Controllers {
public class HomeController : Controller {
public IActionResult Index() {
return View();
}
[HttpGet]
public ViewResult RsvpForm() {
return View();
}
[HttpPost]
public ViewResult RsvpForm(GuestResponse guestResponse) {
Checking for Validation Errors in the HomeController.cs File in the Controllers Folder
The Controller base class provides a property called ModelState that provides details of the outcome of the model binding process. If the ModelState.IsValid property returns true, then I know that the model binder has been able to satisfy the validation constraints I specified through the attributes on the GuestResponse class. When this happens, I render the Thanks view, just as I did previously.
If the ModelState.IsValid property returns false, then I know that there are validation errors. The object returned by the ModelState property provides details of each problem that has been encountered, but I don’t need to get into that level of detail because I can rely on a useful feature that automates the process of asking the user to address any problems by calling the View method without any parameters.
When it renders a view, Razor has access to the details of any validation errors associated with the request, and tag helpers can access the details to display validation errors to the user. Listing 3-17 shows the addition of validation tag helper attributes to the RsvpForm view.
Adding a Validation Summary to the RsvpForm.cshtml File in the Views/Home Folder
The asp-validation-summary attribute is applied to a div element, and it displays a list of validation errors when the view is rendered. The value for the asp-validation-summary attribute is a value from an enumeration called ValidationSummary, which specifies what types of validation errors the summary will contain. I specified All, which is a good starting point for most applications, and I describe the other values and explain how they work in Chapter 29.
To see how the validation summary works, run the application, fill out the Name field, and submit the form without entering any other data. You will see a summary of validation errors, as shown in Figure 3-7.
Figure 3-7.
Displaying validation errors
The RsvpForm action method will not render the Thanks view until all the validation constraints applied to the GuestResponse class have been satisfied. Notice that the data entered in the Name field was preserved and displayed again when Razor rendered the view with the validation summary. This is another benefit of model binding, and it simplifies working with form data.
Highlighting Invalid Fields
The tag helper attributes that associate model properties with elements have a handy feature that can be used in conjunction with model binding. When a model class property has failed validation, the helper attributes will generate slightly different HTML. Here is the input element that is generated for the Phone field when there is no validation error:
<input type="text" data-val="true" data-val-required="Please enter your phone number" id="Phone" name="Phone" value="">
For comparison, here is the same HTML element after the user has submitted the form without entering data into the text field (which is a validation error because I applied the Required attribute to the Phone property of the GuestResponse class):
data-val-required="Please enter your phone number" id="Phone"
name="Phone" value="">
I have highlighted the difference: the asp-for tag helper attribute added the input element to a class called input-validation-error. I can take advantage of this feature by creating a stylesheet that contains CSS styles for this class and the others that different HTML helper attributes use.
The convention in ASP.NET Core projects is that static content delivered to clients is placed into the wwwroot folder and organized by content type so that CSS stylesheets go into the wwwroot/css folder, JavaScript files go into the wwwroot/js folder, and so on.
Tip
Visual Studio creates a site.css file in the wwwroot/css folder when a project is created using the Web Application template. You can ignore this file, which I don’t use in this chapter.
If you are using Visual Studio, right-click the wwwroot/css folder and select Add ➤ New Item from the popup menu. Locate the Style Sheet item template, as shown in Figure 3-8; set the name of the file to styles.css; and click the Add button.
Figure 3-8.
Creating a CSS stylesheet
If you are using Visual Studio Code, right-click the wwwroot/css folder, select New File from the popup menu, and use styles.css as the file name. Regardless of which editor you use, replace the contents of the file with the styles shown in Listing 3-18.
Applying a Stylesheet in the RsvpForm.cshtml File in the Views/Home Folder
The link element uses the href attribute to specify the location of the stylesheet. Notice that the wwwroot folder is omitted from the URL. The default configuration for ASP.NET includes support for serving static content, such as images, CSS stylesheets, and JavaScript files, and it maps requests to the wwwroot folder automatically. With the application of the stylesheet, a more obvious validation error will be displayed when data is submitted that causes a validation error, as shown in Figure 3-9.
Figure 3-9.
Automatically highlighted validation errors
Styling the Content
All the functional goals for the application are complete, but the overall appearance of the application is poor. When you create a project using the mvc template, as I did for the example in this chapter, some common client-side development packages are installed. While I am not a fan of using template projects, I do like the client-side libraries that Microsoft has chosen. One of them is called Bootstrap, which is a good CSS framework originally developed by Twitter that has become a major open source project and a mainstay of web application development.
Styling the Welcome View
The basic Bootstrap features work by applying classes to elements that correspond to CSS selectors defined in the files added to the wwwroot/lib/bootstrap folder. You can get full details of the classes that Bootstrap defines from http://getbootstrap.com, but you can see how I have applied some basic styling to the Index.cshtml view file in Listing 3-20.
Adding Bootstrap to the Index.cshtml File in the Views/Home Folder
I have added a link element whose href attribute loads the bootstrap.css file from the wwwroot/lib/bootstrap/dist/css folder. The convention is that third-party CSS and JavaScript packages are installed into the wwwroot/lib folder, and I describe the tool that is used to manage these packages in Chapter 12.
Having imported the Bootstrap stylesheets, I need to style my elements. This is a simple example, so I need to use only a small number of Bootstrap CSS classes: text-center, btn, and btn-primary.
The text-center class centers the content of an element and its children. The btn class styles a button, input, or a element as a pretty button, and the btn-primary class specifies which of a range of colors I want the button to be. You can see the effect by running the application, as shown in Figure 3-10.
Figure 3-10.
Styling a view
It will be obvious to you that I am not a web designer. In fact, as a child, I was excused from art lessons on the basis that I had absolutely no talent whatsoever. This had the happy result of making more time for math lessons but meant that my artistic skills have not developed beyond those of the average 10-year-old. For a real project, I would seek a professional to help design and style the content, but for this example, I am going it alone, and that means applying Bootstrap with as much restraint and consistency as I can muster.
Styling the Form View
Bootstrap defines classes that can be used to style forms. I am not going to go into detail, but you can see how I have applied these classes in Listing 3-21.
Adding Bootstrap to the RsvpForm.cshtml File in the Views/Home Folder
The Bootstrap classes in this example create a header, just to give structure to the layout. To style the form, I have used the form-group class, which is used to style the element that contains the label and the associated input or select element, which is assigned to the form-control class. You can see the effect of the styles in Figure 3-11.
Figure 3-11.
Styling the RsvpForm view
Styling the Thanks View
The next view file to style is Thanks.cshtml, and you can see how I have done this in Listing 3-22, using CSS classes that are similar to the ones I used for the other views. To make an application easier to manage, it is a good principle to avoid duplicating code and markup wherever possible. ASP.NET Core provides several features to help reduce duplication, which I describe in later chapters. These features include Razor layouts (Chapter 22), partial views (Chapter 22), and view components (Chapter 24).
The final view to style is ListResponses, which presents the list of attendees. Styling the content follows the same approach as used for the other views, as shown in Listing 3-23.
@foreach (PartyInvites.Models.GuestResponse r in Model) {
<tr>
<td>@r.Name</td>
<td>@r.Email</td>
<td>@r.Phone</td>
</tr>
}
</tbody>
</table>
</div>
</body>
</html>
Listing 3-23.
Adding Bootstrap to the ListResponses.cshtml File in the Views/Home Folder
Figure 3-13 shows the way that the table of attendees is presented. Adding these styles to the view completes the example application, which now meets all the development goals and has an improved appearance.
Figure 3-13.
Styling the ListResponses view
Summary
In this chapter, I created a new ASP.NET Core project and used it to construct a simple data-entry application, giving you a first glimpse of important ASP.NET features, such as tag helpers, model binding, and data validation. In the next chapter, I describe the development tools that are used for ASP.NET Core development.