ASP.NET Core Identity is an API from Microsoft to manage users in ASP.NET Core applications and includes support for integrating authentication and authorization into the request pipeline.
ASP.NET Core Identity is a toolkit with which you create the authorization and authentication features an application requires. There are endless integration options for features such as two-factor authentication, federation, single sign-on, and account self-service. There are options that are useful only in large corporate environments or when using cloud-hosted user management.
ASP.NET Core Identity has evolved into its own framework and is too large for me to cover in detail in this book. Instead, I have focused on the parts of the Identity API that intersect with web application development, much as I have done with Entity Framework Core. In this chapter, I show you how to add ASP.NET Core Identity to a project and explain how to consume the ASP.NET Core Identity API to create tools to perform basic user and role management. In Chapter 39, I show you how to use ASP.NET Core Identity to authenticate users and perform authorization. Table 38-1 puts ASP.NET Core Identity in context.
Table 38-1.
Putting ASP.NET Core Identity in Context
Question
Answer
What is it?
ASP.NET Core Identity is an API for managing users.
Why is it useful?
Most applications have some features that should not be available to all users. ASP.NET Core Identity provides features to allow users to authenticate themselves and gain access to restricted features.
How is it used?
ASP.NET Core Identity is added to projects as a package and stores its data in a database using Entity Framework Core. Management of users is performed through a well-defined API, and its features are applied as attributes, as I describe in Chapter 39.
Are there any pitfalls or limitations?
ASP.NET Core Identity is complex and provides support for a wide range of authentication, authorization, and management models. It can be difficult to understand all the options, and documentation can be sparse.
Are there any alternatives?
There is no sensible alternative to ASP.NET Core Identity if a project needs to restrict access to features.
Create the context class and use it to prepare a migration that is applied to the database
4–7
Managing user accounts
Use the UserManager<T> class
8–12, 15, 16
Setting a username and password policy
Use the options pattern to configure Identity
13, 14
Managing roles
Use the RoleManager<T> class to manage the roles and the UserManager<T> class to assign users to roles
17–20
Preparing for This Chapter
This chapter uses the Advanced, DataModel, and BlazorWebAssembly projects from Chapter 37. If you are using Visual Studio, open the Advanced.sln file you created in the previous chapter to open all three projects. If you are using Visual Studio Code, open the folder that contains the three projects.
Tip
You can download the example project for this chapter—and for all the other chapters in this book—from https://github.com/apress/pro-asp.net-core-3. See Chapter 1 for how to get help if you have problems running the examples.
Open a new PowerShell command prompt, navigate to the folder that contains the Advanced.csproj file, and run the command shown in Listing 38-1 to drop the database.
dotnet ef database drop --force
Listing 38-1.
Dropping the Database
Select Start Without Debugging or Run Without Debugging from the Debug menu or use the PowerShell command prompt to run the command shown in Listing 38-2.
dotnet run
Listing 38-2.
Running the Example Application
Use a browser to request http://localhost:5000, which will produce the response shown in Figure 38-1.
Figure 38-1.
Running the example application
Preparing the Project for ASP.NET Core Identity
The process for setting up ASP.NET Core Identity requires adding a package to the project, configuring the application, and preparing the database. To get started, use a PowerShell command prompt to run the command shown in Listing 38-3 in the Advanced project folder, which installs the ASP.NET Core Identity package. If you are using Visual Studio, you can install the package by selecting Project ➤ Manage NuGet Packages.
ASP.NET Identity requires a database, which is managed through Entity Framework Core. To create the Entity Framework Core context class that will provide access to the Identity data, add a class file named IdentityContext.cs to the Advanced/Models folder with the code shown in Listing 38-4.
using Microsoft.AspNetCore.Identity;
using Microsoft.AspNetCore.Identity.EntityFrameworkCore;
using Microsoft.EntityFrameworkCore;
namespace Advanced.Models {
public class IdentityContext: IdentityDbContext<IdentityUser> {
public IdentityContext(DbContextOptions<IdentityContext> options)
: base(options) { }
}
}
Listing 38-4.
The Contents of the IdentityContext.cs File in the Models Folder of the Advanced Project
The ASP.NET Core Identity package includes the IdentityDbContext<T> class, which is used to create an Entity Framework Core context class. The generic type argument T is used to specify the class that will represent users in the database. You can create custom user classes, but I have used the basic class, called IdentityUser, which provides the core Identity features.
Note
Don’t worry if the classes used in Listing 38-4 don’t make sense. If you are unfamiliar with Entity Framework Core, then I suggest you treat the class as a black box. Changes are rarely required once the building blocks for ASP.NET Core Identity have been set up, and you can copy the files from this chapter into your own projects.
Configuring the Database Connection String
A connection string is required to tell ASP.NET Core Identity where it should store its data. In Listing 38-5, I added a connection string to the appsettings.json file, alongside the one used for the application data.
Adding a Connection String in the appsettings.json File in the Advanced Project
The connection string specifies a LocalDB database named Identity.
Note
The width of the printed page doesn’t allow for sensible formatting of the connection string, which must appear in a single unbroken line. When you add the connection string to your own project, make sure that it is on a single line.
Configuring the Application
The next step is to configure ASP.NET Core so the Identity database context is set up as a service, as shown in Listing 38-6.
using System;
using System.Collections.Generic;
using System.Linq;
using System.Threading.Tasks;
using Microsoft.AspNetCore.Builder;
using Microsoft.AspNetCore.Hosting;
using Microsoft.AspNetCore.Http;
using Microsoft.Extensions.DependencyInjection;
using Microsoft.Extensions.Hosting;
using Microsoft.Extensions.Configuration;
using Microsoft.EntityFrameworkCore;
using Advanced.Models;
using Microsoft.AspNetCore.ResponseCompression;
using Microsoft.AspNetCore.Identity;
namespace Advanced {
public class Startup {
public Startup(IConfiguration config) {
Configuration = config;
}
public IConfiguration Configuration { get; set; }
public void ConfigureServices(IServiceCollection services) {
Configuring Identity in the Startup.cs File in the Advanced Project
Creating and Applying the Identity Database Migration
The remaining step is to create the Entity Framework Core database migration and apply it to create the database. Open a new PowerShell window, navigate to the Advanced project folder, and run the commands shown in Listing 38-7.
dotnet ef migrations add --context IdentityContext Initial
dotnet ef database update --context IdentityContext
Listing 38-7.
Creating and Applying the Database Migration
As I explained in earlier chapters, Entity Framework Core manages changes to database schemas through a feature called migrations. Now that there are two database context classes in the project, the Entity Framework Core tools require the --context argument to determine which context class is being used. The commands in Listing 38-7 create a migration that contains the ASP.NET Core Identity schema and apply it to the database.
Resetting the ASP.NET Core Identity Database
If you need to reset the database, run the dotnet ef database drop --force --context IdentityContext command in the Advanced folder and then run the dotnet ef database update --context IdentityContext command. This will delete the existing database and create a new—and empty—replacement. Do not use these commands on production systems because you will delete user credentials. If you need to reset the main database, then run the dotnet ef database drop --force --context DataContext command, followed by dotnet ef database update --context DataContext.
Creating User Management Tools
In this section, I am going to create the tools that manage users through ASP.NET Core Identity. Users are managed through the UserManager<T> class, where T is the class chosen to represent users in the database. When I created the Entity Framework Core context class, I specified IdentityUser as the class to represent users in the database. This is the built-in class that is provided by ASP.NET Core Identity, and it provides the core features that are required by most applications. Table 38-3 describes the most useful IdentityUser properties. (There are additional properties defined by the IdentityUser class, but these are the ones required by most applications and are the ones I use in this book.)
Scaffolding the Identity Management Tools
Microsoft provides a tool that will generate a set of Razor Pages for user management. The tool adds generic content—known as scaffolding—from templates to a project, which you then tailor to the application. I am not a fan of scaffolding or templates, and this is not an exception. The Microsoft Identity templates are well thought out, but they are of limited use because they focus on self-management, allowing users to create accounts, change passwords, and so on, without administrator intervention. You can adapt the templates to restrict the range of tasks that users perform, but the premise behind the features remains the same.
If you are writing the type of application where users manage their own credentials, then the scaffolding option may be worth considering and is described at https://docs.microsoft.com/en-us/aspnet/core/security/authentication/scaffold-identity. For all other approaches, the user management API provided by ASP.NET Core Identity should be used.
Table 38-3.
Useful IdentityUser Properties
Name
Description
Id
This property contains the unique ID for the user.
UserName
This property returns the user’s username.
Email
This property contains the user’s e-mail address.
Table 38-4 describes the UserManagement<T> members I use in this section to manage users.
Table 38-4.
Useful UserManager<T> Members
Name
Description
Users
This property returns a sequence containing the users stored in the database.
FindByIdAsync(id)
This method queries the database for the user object with the specified ID.
CreateAsync(user, password)
This method stores a new user in the database using the specified password.
UpdateAsync(user)
This method modifies an existing user in the database.
DeleteAsync(user)
This method removes the specified user from the database.
Preparing for User Management Tools
In preparation for creating the management tools, add the expressions shown in Listing 38-8 to the _ViewImports.cshtml file in the Pages folder of the Advanced project.
Adding Expressions in the _ViewImports.cshtml File in the Pages Folder of the Advanced Project
Next, create the Pages/Users folder in the Advanced project and add to it a Razor Layout named _Layout.cshtml to the Pages/Users folder with the content shown in Listing 38-9.
The _Layout.cshtml File in the Pages/Users Folder in the Advanced Project
Add a class file named AdminPageModel.cs to the Pages folder and use it to define the class shown in Listing 38-10.
using Microsoft.AspNetCore.Mvc.RazorPages;
namespace Advanced.Pages {
public class AdminPageModel: PageModel {
}
}
Listing 38-10.
The AdminPageModel.cs File in the Pages Folder in the Advanced Project
This class will be the base for the page model classes defined in this section. As you will see in Chapter 39, a common base class is useful when it comes to securing the application.
Enumerating User Accounts
Although the database is currently empty, I am going to start by creating a Razor Page that will enumerate user accounts. Add a Razor Page named List.cshtml to the Pages/Users folder in the Advanced project with the content shown in Listing 38-11.
public ListModel(UserManager<IdentityUser> userManager) {
UserManager = userManager;
}
public IEnumerable<IdentityUser> Users { get; set; }
public void OnGet() {
Users = UserManager.Users;
}
}
}
Listing 38-11.
The Contents of the List.cshtml File in the Pages/Users Folder in the Advanced Project
The UserManager<IdentityUser> class is set up as a service so that it can be consumed via dependency injection. The Users property returns a collection of IdentityUser objects, which can be used to enumerate the user accounts. This Razor Page displays the users in a table, with buttons that allow each user to be edited or deleted, although this won’t be visible initially because a placeholder message is shown when there are no user objects to display. There is a button that navigates to a Razor Page named Create, which I define in the next section.
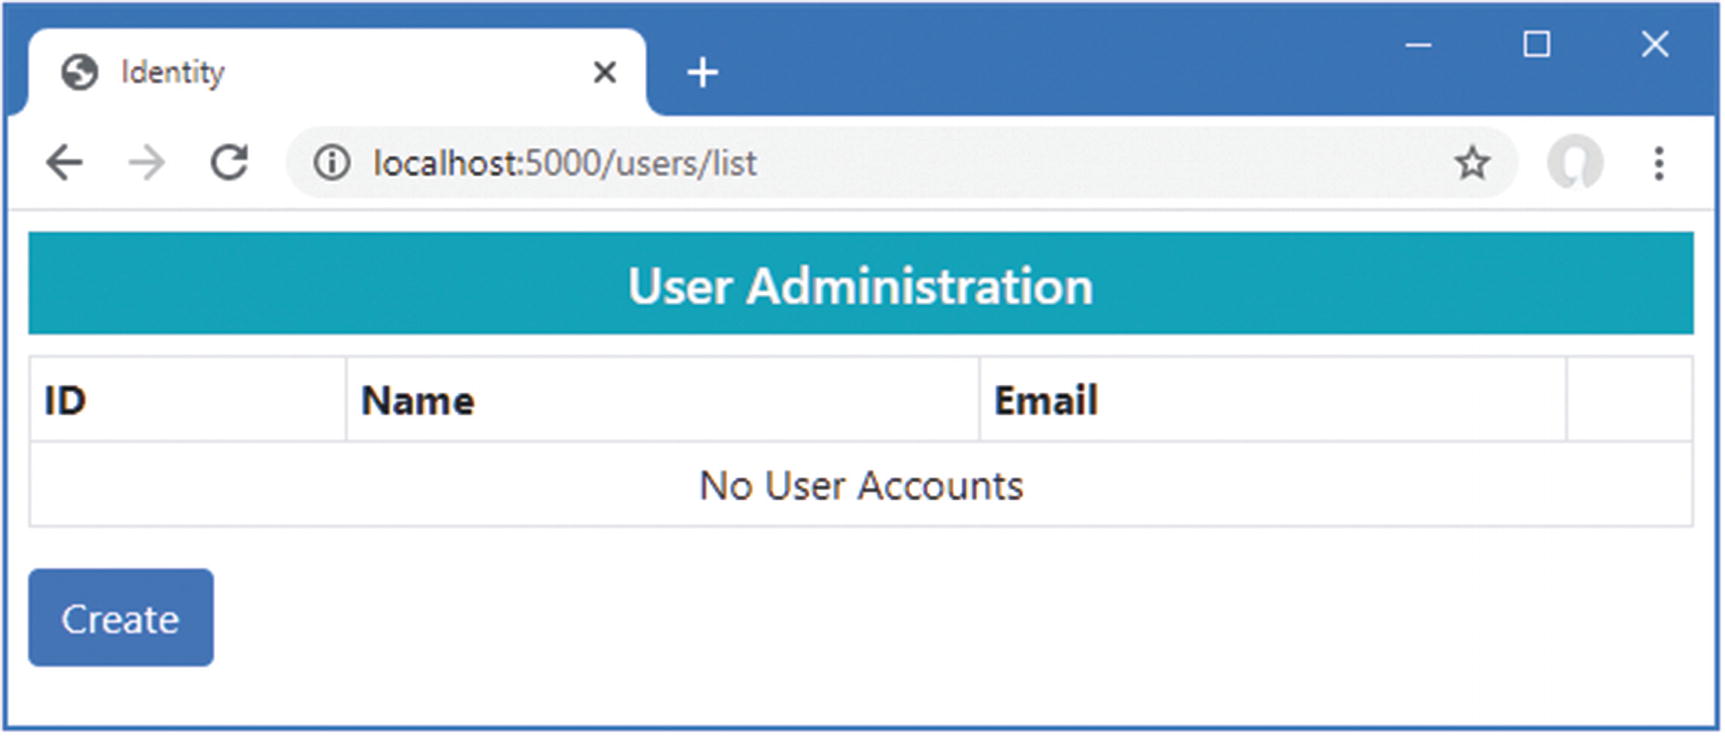
Restart ASP.NET and request http://localhost:5000/users/list to see the (currently empty) data table, which is shown in Figure 38-2.
Figure 38-2.
Enumerating users
Creating Users
Add a Razor Page named Create.cshtml to the Pages/Users folder with the content shown in Listing 38-12.
public CreateModel(UserManager<IdentityUser> usrManager) {
UserManager = usrManager;
}
[BindProperty][Required]
public string UserName { get; set; }
[BindProperty][Required][EmailAddress]
public string Email { get; set; }
[BindProperty][Required]
public string Password { get; set; }
public async Task<IActionResult> OnPostAsync() {
if (ModelState.IsValid) {
IdentityUser user =
new IdentityUser { UserName = UserName, Email = Email };
IdentityResult result =
await UserManager.CreateAsync(user, Password);
if (result.Succeeded) {
return RedirectToPage("List");
}
foreach (IdentityError err in result.Errors) {
ModelState.AddModelError("", err.Description);
}
}
return Page();
}
}
}
Listing 38-12.
The Contents of the Create.cshtml File in the Pages/Users Folder of the Advanced Project
Even though ASP.NET Core Identity data is stored using Entity Framework Core, you don’t work directly with the database context class. Instead, data is managed through the methods provided by the UserManager<T> class. New users are created using the CreateAsync method, which accepts an IdentityUser object and a password string as arguments.
This Razor Page defines three properties that are subject to model binding. The UserName and Email properties are used to configure the IdentityUser object, which is combined with the value bound to the Password property to call the CreateAsync method. These properties are configured with validation attributes, which ensure that values are supplied and that the Email property is a formatted e-mail address.
The result of the CreateAsync method is a Task<IdentityResult> object, which indicates the outcome of the create operation, using the properties described in Table 38-5.
Table 38-5.
The Properties Defined by the IdentityResult Class
Name
Description
Succeeded
Returns true if the operation succeeded.
Errors
Returns a sequence of IdentityError objects that describe the errors encountered while attempting the operation. Each IdentityError object provides a Description property that summarizes the problem.
I inspect the Succeeded property to determine whether a new user has been created in the database. If the Succeeded property is true, then the client is redirected to the List page so that the list of users is displayed, reflecting the new addition.
...
if (result.Succeeded) {
return RedirectToPage("List");
}
foreach (IdentityError err in result.Errors) {
ModelState.AddModelError("", err.Description);
}
...
If the Succeeded property is false, then the sequence of IdentityError objects provided by the Errors property is enumerated, with the Description property used to create a model-level validation error using the ModelState.AddModelError method.
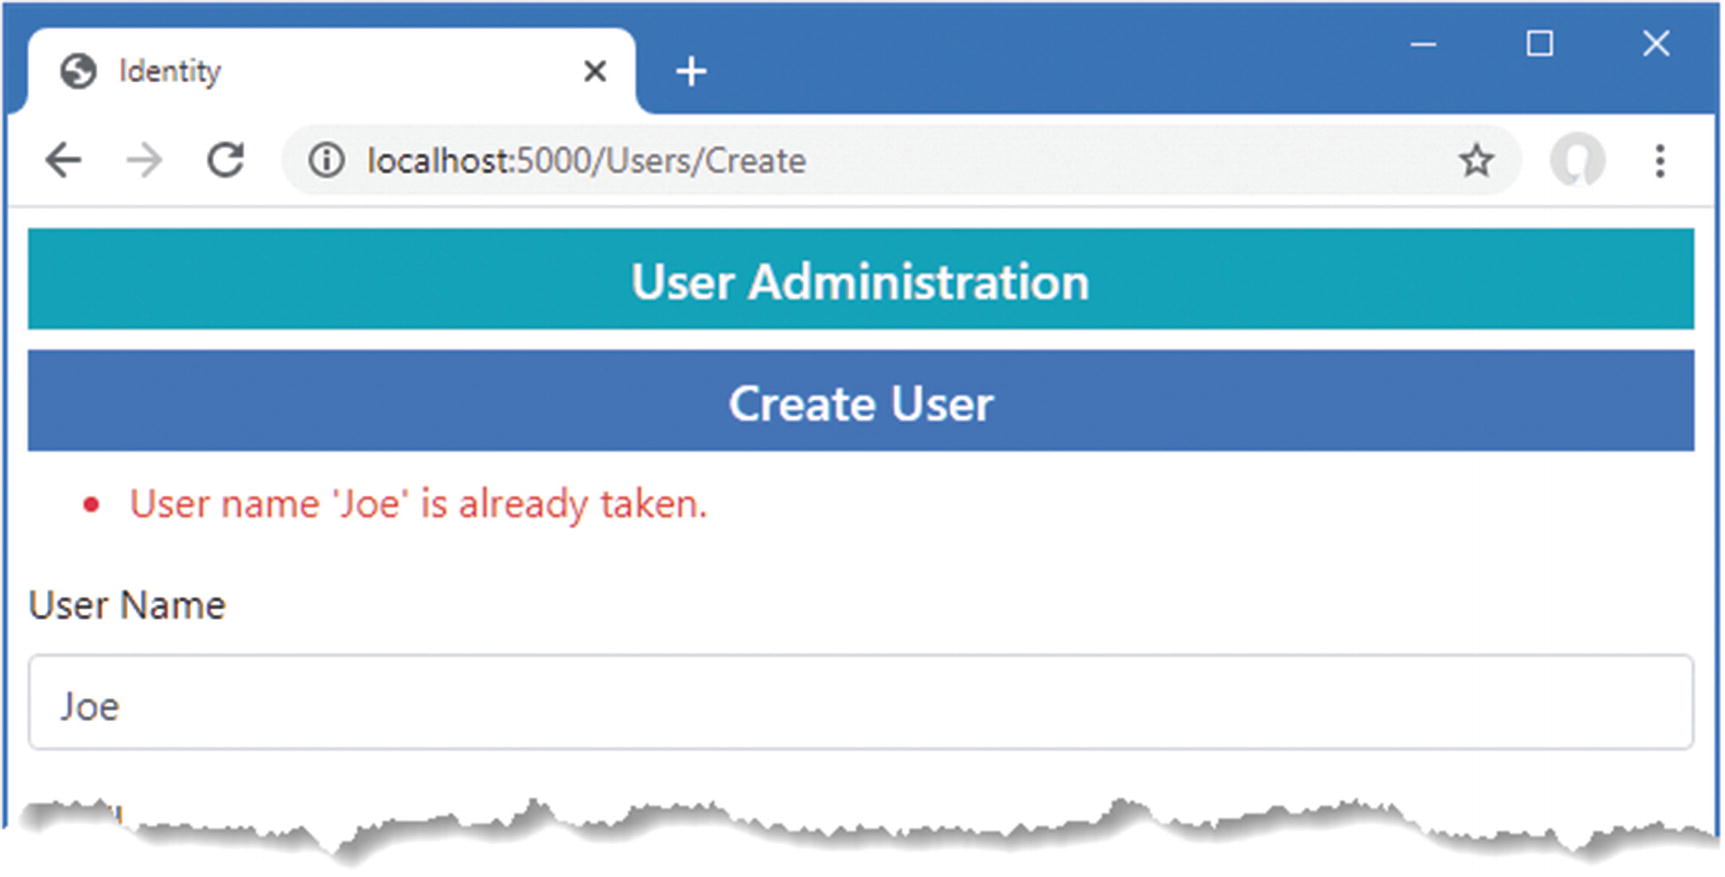
To test the ability to create a new user account, restart ASP.NET Core and request http://localhost:5000/users/list. Click the Create button and fill in the form with the values shown in Table 38-6.
Once you have entered the values, click the Submit button. ASP.NET Core Identity will create the user in the database, and the browser will be redirected, as shown in Figure 38-3. (You will see a different ID value because IDs are randomly generated for each user.)
Note
I used a regular input element for the Password field to make it easier to follow the examples in this chapter. For real projects, it is a good idea to set the input element’s type attribute to password so that the characters entered cannot be seen.
Figure 38-3.
Creating a new user
Click the Create button again and enter the same details into the form, using the values in Table 38-6. This time you will see an error reported through the model validation summary when you click the Create button, as shown in Figure 38-4. This is an example of an error returned through the IdentityResult object produced by the CreateAsync method.
Figure 38-4.
An error when creating a new user
Validating Passwords
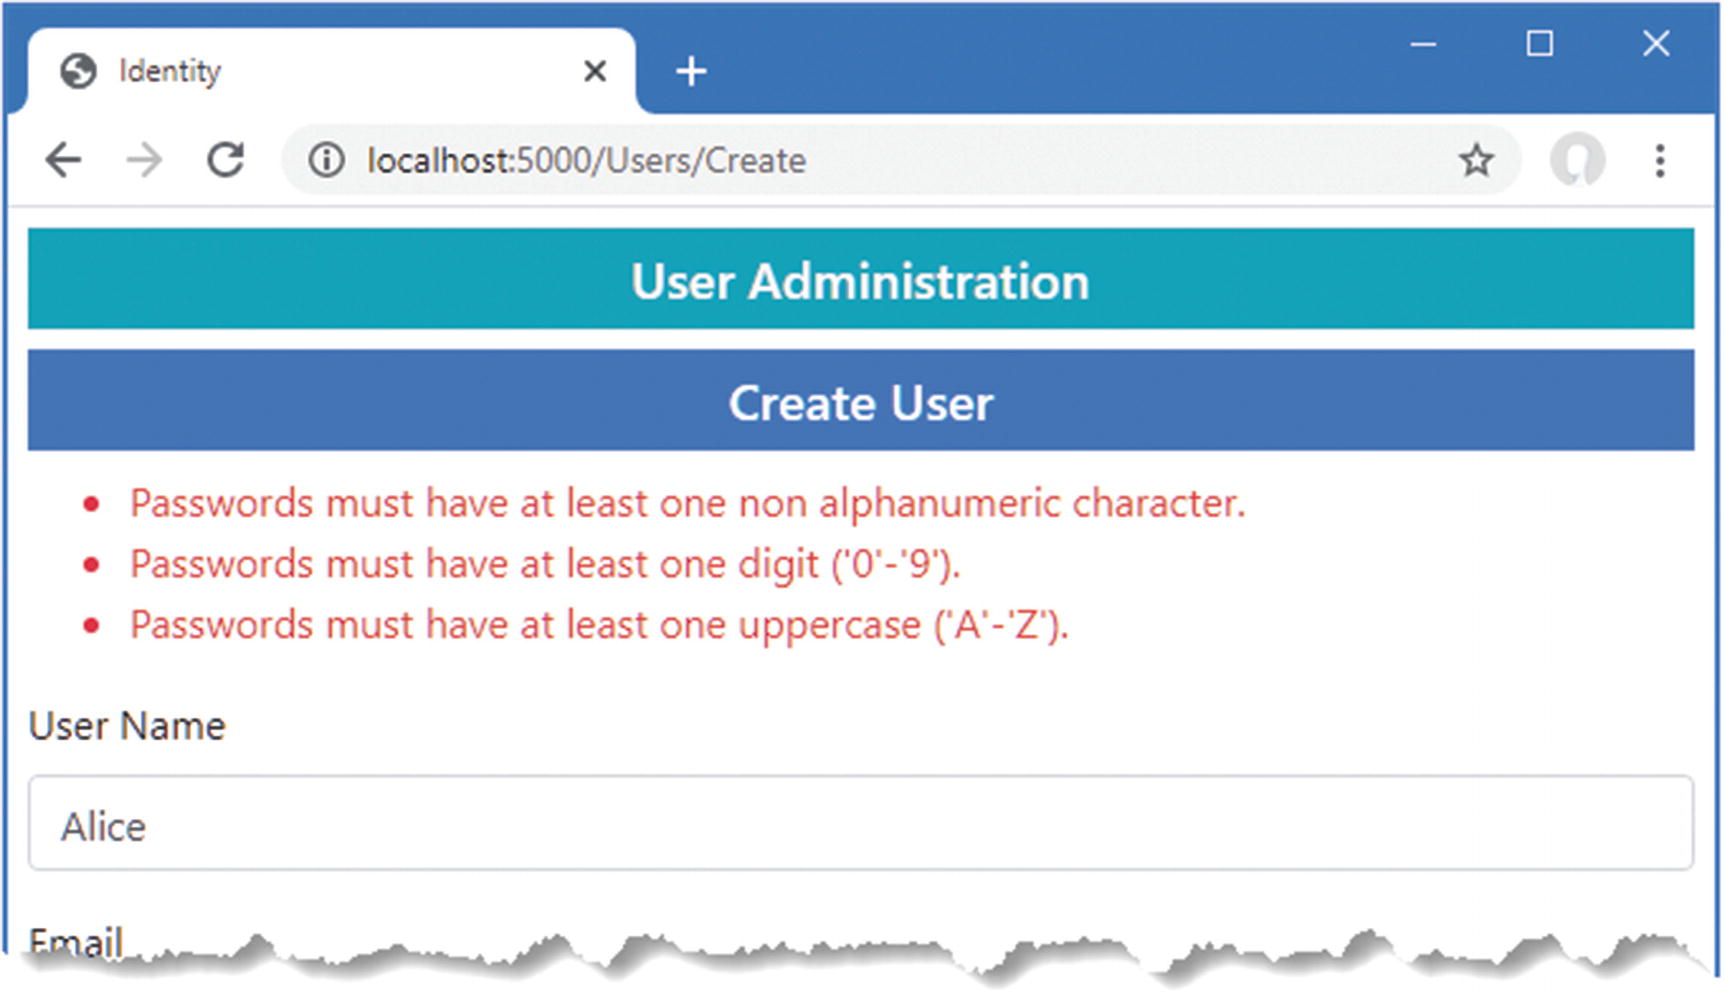
One of the most common requirements, especially for corporate applications, is to enforce a password policy. You can see the default policy by navigating to http://localhost:5000/Users/Create and filling out the form with the data shown in Table 38-7.
When you submit the form, ASP.NET Core Identity checks the candidate password and generates errors if it doesn’t match the password, as shown in Figure 38-5.
Figure 38-5.
Password validation errors
The password validation rules are configured using the options pattern, as shown in Listing 38-13.
...
public void ConfigureServices(IServiceCollection services) {
Configuring Password Validation in the Startup.cs File in the Advanced Project
ASP.NET Core Identity is configured using the IdentityOptions class, whose Password property returns a PasswordOptions class that configures password validation using the properties described in Table 38-8.
Table 38-8.
The PasswordOptions Properties
Name
Description
RequiredLength
This int property is used to specify the minimum length for passwords.
RequireNonAlphanumeric
Setting this bool property to true requires passwords to contain at least one character that is not a letter or a digit.
RequireLowercase
Setting this bool property to true requires passwords to contain at least one lowercase character.
RequireUppercase
Setting this bool property to true requires passwords to contain at least one uppercase character.
RequireDigit
Setting this bool property to true requires passwords to contain at least one numeric character.
In the listing, I specified that passwords must have a minimum length of six characters and disabled the other constraints. This isn’t something that you should do without careful consideration in a real project, but it allows for an effective demonstration. Restart ASP.NET Core, request http://localhost:5000/users/create, and fill out the form using the details from Table 38-7. When you click the Submit button, the password will be accepted by the new validation rules, and a new user will be created, as shown in Figure 38-6.
Figure 38-6.
Changing the password validation rules
Validating User Details
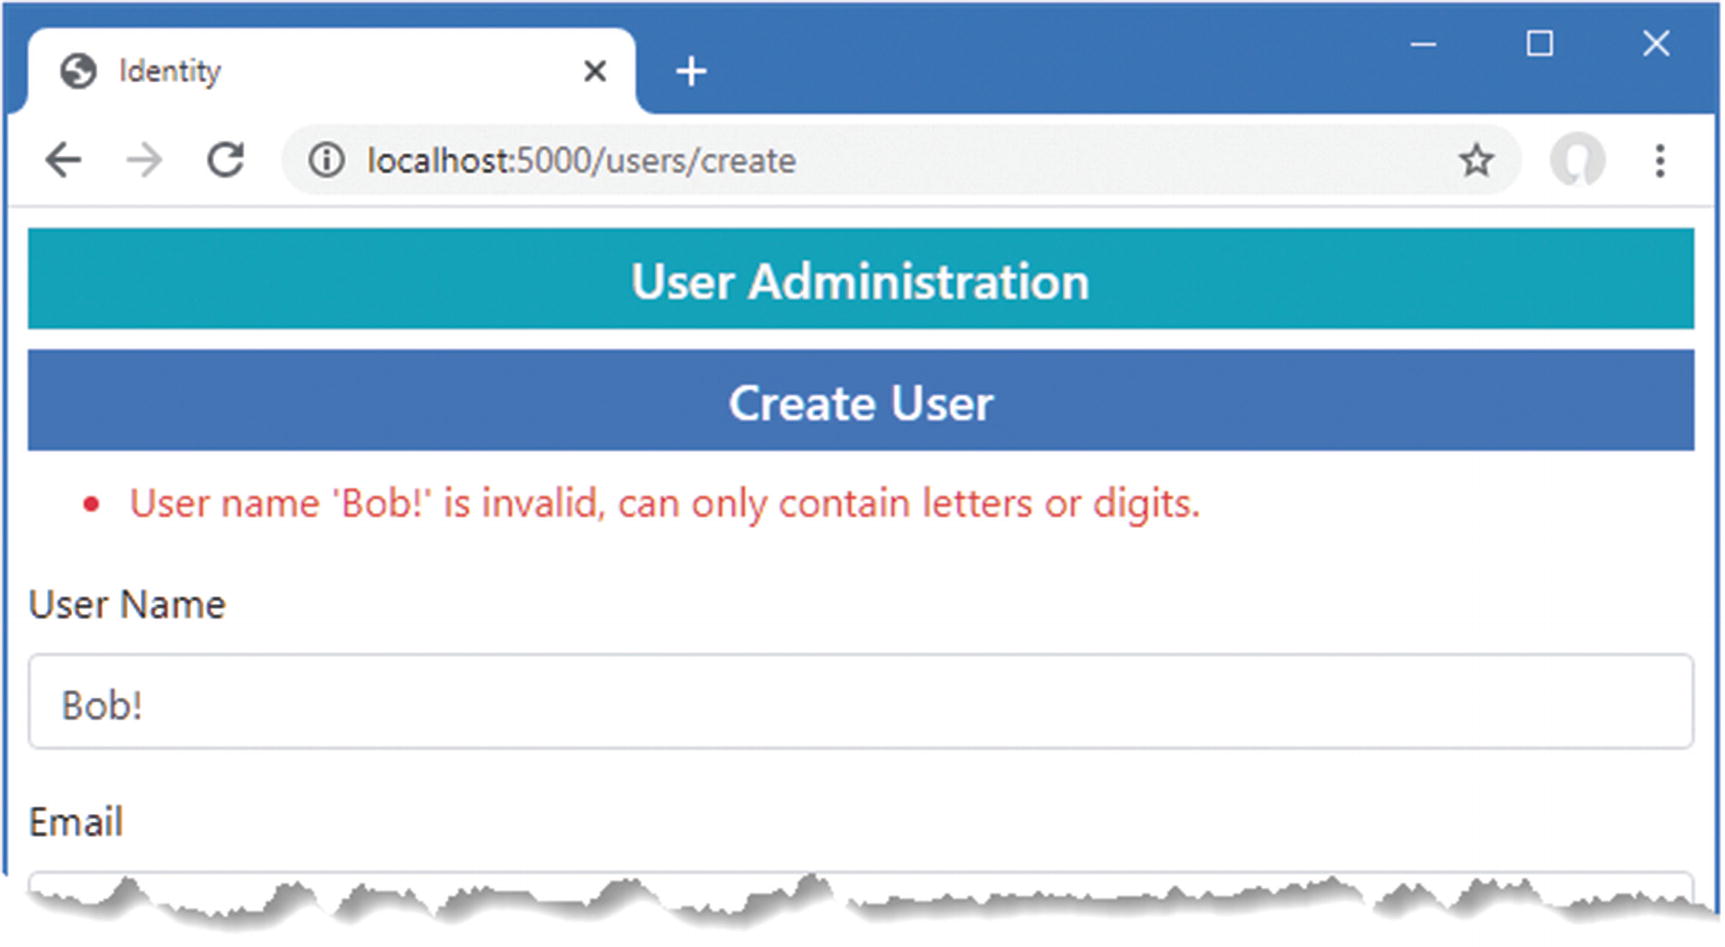
Validation is also performed on usernames and e-mail addresses when accounts are created. To see how validation is applied, request http://localhost:5000/users/create and fill out the form using the values shown in Table 38-9.
Click the Submit button, and you will see the error message shown in Figure 38-7.
Figure 38-7.
A user details validation error
Validation can be configured with the options pattern, using the User property defined by the IdentityOptions class. This class returns a UserOptions class, whose properties are described in Table 38-10.
Table 38-10.
The UserOptions Properties
Name
Description
AllowedUserNameCharacters
This string property contains all the legal characters that can be used in a username. The default value specifies a–z, A–Z, and 0–9 and the hyphen, period, underscore, and @ characters. This property is not a regular expression, and every legal character must be specified explicitly in the string.
RequireUniqueEmail
Setting this bool property to true requires new accounts to specify e-mail addresses that have not been used previously.
In Listing 38-14, I have changed the configuration of the application so that unique e-mail addresses are required and so that only lowercase alphabetic characters are allowed in usernames.
...
public void ConfigureServices(IServiceCollection services) {
Changing the User Validation Settings in the Startup.cs File in the Advanced Project
Restart ASP.NET Core, request http://localhost:5000/users/create, and fill out the form with the values in Table 38-9. Click the Submit button, and you will see that the e-mail address now causes an error. The username still contains illegal characters and is also flagged as an error, as shown in Figure 38-8.
Figure 38-8.
Validating user detail
Editing Users
To add support for editing users, add a Razor Page named Editor.cshtml to the Pages/Users folder of the Advanced project with the content shown in Listing 38-15.
public EditorModel(UserManager<IdentityUser> usrManager) {
UserManager = usrManager;
}
[BindProperty][Required]
public string Id { get; set; }
[BindProperty][Required]
public string UserName { get; set; }
[BindProperty][Required][EmailAddress]
public string Email { get; set; }
[BindProperty]
public string Password { get; set; }
public async Task OnGetAsync(string id) {
IdentityUser user = await UserManager.FindByIdAsync(id);
Id = user.Id; UserName = user.UserName; Email = user.Email;
}
public async Task<IActionResult> OnPostAsync() {
if (ModelState.IsValid) {
IdentityUser user = await UserManager.FindByIdAsync(Id);
user.UserName = UserName;
user.Email = Email;
IdentityResult result = await UserManager.UpdateAsync(user);
if (result.Succeeded && !String.IsNullOrEmpty(Password)) {
await UserManager.RemovePasswordAsync(user);
result = await UserManager.AddPasswordAsync(user, Password);
}
if (result.Succeeded) {
return RedirectToPage("List");
}
foreach (IdentityError err in result.Errors) {
ModelState.AddModelError("", err.Description);
}
}
return Page();
}
}
}
Listing 38-15.
The Contents of the Editor.cshtml File in the Pages/Users Folder of the Advanced Project
The Editor page uses the UserManager<T>.FindByIdAsync method to locate the user, querying the database with the id value received through the routing system and received as an argument to the OnGetAsync method. The values from the IdentityUser object returned by the query are used to populate the properties that are displayed by the view part of the page, ensuring that the values are not lost if the page is redisplayed due to validation errors.
When the user submits the form, the FindByIdAsync method is used to query the database for the IdentityUser object, which is updated with the UserName and Email values provided in the form. Passwords required a different approach and must be removed from the user object before a new password is assigned, like this:
...
await UserManager.RemovePasswordAsync(user);
result = await UserManager.AddPasswordAsync(user, Password);
...
The Editor page changes the password only if the form contains a Password value and if the updates for the UserName and Email fields have been successful. Errors from ASP.NET Core Identity are presented as validation messages, and the browser is redirected to the List page after a successful update. Request http://localhost:5000/Users/List, click the Edit button for Joe, and change the UserName field to bob, with all lowercase characters. Click the Submit button, and you will see the change reflected in the list of users, as shown in Figure 38-9.
Note
You will see an error if you click the Edit button for the Alice account and click Submit without making changes. This is because the account was created before the validation policy was changed. ASP.NET Core Identity applies validation checks for updates, leading to the odd situation where the data in the database can be read—and used—but must be changed for the user to be updated.
Figure 38-9.
Editing a user
Deleting Users
The last feature I need for my basic user management application is the ability to delete users, as shown in Listing 38-16.
...
@functions {
public class ListModel : AdminPageModel {
public UserManager<IdentityUser> UserManager;
public ListModel(UserManager<IdentityUser> userManager) {
UserManager = userManager;
}
public IEnumerable<IdentityUser> Users { get; set; }
public void OnGet() {
Users = UserManager.Users;
}
public async Task<IActionResult> OnPostAsync(string id) {
IdentityUser user = await UserManager.FindByIdAsync(id);
if (user != null) {
await UserManager.DeleteAsync(user);
}
return RedirectToPage();
}
}
}
...
Listing 38-16.
Deleting Users in the List.cshtml File in the Pages/Users Folder in the Advanced Project
The List page already displays a Delete button for each user in the data table, which submits a POST request containing the Id value for the IdentityUser object to be removed. The OnPostAsync method receives the Id value and uses it to query Identity using the FindByIdAsync method, passing the object that is returned to the DeleteAsync method, which deletes it from the database. To check the delete functionality, request http://localhost:5000/Users/List and click Delete for the Alice account. The user object will be removed, as shown in Figure 38-10.
Figure 38-10.
Deleting a user
Creating Role Management Tools
Some applications enforce only two levels of authorization: authenticated users are allowed access to all the application’s features, while unauthenticated users have less—or no—access. The SportsStore application in Part 1 followed this approach: there was one user, and once authenticated, they had access to all the application’s features, including administration tools, while unauthenticated users were restricted to the public store features.
ASP.NET Core Identity supports roles for applications that require more granular authorization. Users are assigned to one or more roles, and their membership of those roles determines which features are accessible. In the sections that follow, I show you how to build tools to create and manage roles.
Roles are managed through the RoleManager<T> class, where T is the representation of roles in the database. When I configured ASP.NET Core Identity at the start of the chapter, I selected IdentityRole, which is the built-in class that Identity provides to describe a role, which means that I will be using the RoleManager<IdentityRole> class in these examples. The RoleManager<T> class defines the methods and properties shown in Table 38-11 that allow roles to be created and managed.
Table 38-11.
The Members Defined by the RoleManager<T> Class
Name
Description
CreateAsync(role)
Creates a new role
DeleteAsync(role)
Deletes the specified role
FindByIdAsync(id)
Finds a role by its ID
FindByNameAsync(name)
Finds a role by its name
RoleExistsAsync(name)
Returns true if a role with the specified name exists
UpdateAsync(role)
Stores changes to the specified role
Roles
Returns an enumeration of the roles that have been defined
Table 38-12 describes the key properties defined by the IdentityRole class.
Table 38-12.
Useful IdentityRole Properties
Name
Description
Id
This property contains the unique ID for the role.
Name
This property returns the role name.
Although roles are managed through the RoleManager<T> class, membership of roles is managed through the methods provided by UserManager<T> described in Table 38-13.
Table 38-13.
The UserManager<T> Methods for Managing Role Membership
Name
Description
AddToRoleAsync(user, role)
This method adds a user to a role.
RemoveFromRoleAsync(user, role)
This method removes a user from a role.
GetRolesAsync(user)
This method returns the roles for which the user is a member.
GetUsersInRoleAsync(role)
This method returns users who are members of the specified role.
IsInRoleAsync(user, role)
This method returns true if the user is a member of the specified role.
Preparing for Role Management Tools
To prepare for the role management tools, create the Pages/Roles folder in the Advanced project and add to it a Razor layout named _Layout.cshtml with the content shown in Listing 38-17.
public async Task<IActionResult> OnPostAsync(string id) {
IdentityRole role = await RoleManager.FindByIdAsync(id);
await RoleManager.DeleteAsync(role);
return RedirectToPage();
}
}
}
Listing 38-18.
The Contents of the List.cshtml File in the Pages/Roles Folder in the Advanced Project
The roles are enumerated, along with the names of up to three of the role members or a placeholder message if there are no members. There is also a Create button, and each role is presented with Edit and Delete buttons, following the same pattern I used for the user management tools.
The Delete button sends a POST request back to the Razor Page. The OnPostAsync method uses the FindByIdAsync method to retrieve the role object, which is passed to the DeleteAsync method to remove it from the database.
Creating Roles
Add a Razor Page named Create.cshtml in the Pages/Roles folder in the Advanced project with the contents shown in Listing 38-19.
public CreateModel(UserManager<IdentityUser> userManager,
RoleManager<IdentityRole> roleManager) {
RoleManager = roleManager;
}
[BindProperty][Required]
public string Name { get; set; }
public async Task<IActionResult> OnPostAsync() {
if (ModelState.IsValid) {
IdentityRole role = new IdentityRole { Name = Name };
IdentityResult result = await RoleManager.CreateAsync(role);
if (result.Succeeded) {
return RedirectToPage("List");
}
foreach (IdentityError err in result.Errors) {
ModelState.AddModelError("", err.Description);
}
}
return Page();
}
}
}
Listing 38-19.
The Contents of the Create.cshtml File in the Pages/Roles Folder in the Advanced Project
The user is presented with a form containing an input element to specify the name of the new role. When the form is submitted, the OnPostAsync method creates a new IdentityRole object and passes it to the CreateAsync method.
Assigning Role Membership
To add support for managing role memberships, add a Razor Page named Editor.cshtml to the Pages/Roles folder in the Advanced project, with the content shown in Listing 38-20.
public async Task<IActionResult> OnPostAsync(string userid,
string rolename) {
Role = await RoleManager.FindByNameAsync(rolename);
IdentityUser user = await UserManager.FindByIdAsync(userid);
IdentityResult result;
if (await UserManager.IsInRoleAsync(user, rolename)) {
result = await UserManager.RemoveFromRoleAsync(user, rolename);
} else {
result = await UserManager.AddToRoleAsync(user, rolename);
}
if (result.Succeeded) {
return RedirectToPage();
} else {
foreach (IdentityError err in result.Errors) {
ModelState.AddModelError("", err.Description);
}
return Page();
}
}
}
}
Listing 38-20.
The Contents of the Editor.cshtml File in the Pages/Roles Folder in the Advanced Project
The user is presented with a table showing the users who are members of the role and with a table showing nonmembers. Each row contains a Change button that submits the form. The OnPostAsync method uses the UserManager.FindByIdAsync method to retrieve the user object from the database. The IsInRoleAsync method is used to determine whether the user is a member of the role, and the AddToRoleAsync and RemoveFromRoleAsync methods are used to add and remove the user, respectively.
Restart ASP.NET Core and request http://localhost:5000/roles/list. The list will be empty because there are no roles in the database. Click the Create button, enter Admins into the text field, and click the Submit button to create a new role. Once the role has been created, click the Edit button, and you will see the list of users who can be added to the role. Clicking the Change button will move the user in and out of the role. Click back, and the list will be updated to show the users who are members of the role, as shown in Figure 38-11.
Caution
ASP.NET Core Identity revalidates user details when changing role assignments, which will result in an error if you try to modify a user whose details do not match the current restrictions, which happens when restrictions are introduced after the application has been deployed and the database is already populated with users created under the old roles. It is for this reason that the Razor Page in Listing 38-20 checks the result from the operations to add or remove users from a role and displays any errors as validation messages.
Figure 38-11.
Managing roles
Summary
In this chapter, I showed you how to add ASP.NET Core Identity to a project and prepare its database to store users and roles. I described the basic ASP.NET Core Identity API and showed you how it can be used to create tools to manage users and roles. In the next chapter, I show you how to apply ASP.NET Core Identity to control access to controllers, Razor Pages, Blazor applications, and web services.