In the previous chapter, I showed you how the model binding process creates objects from HTTP requests. Throughout that chapter, I simply displayed the data that the application received. That’s because the data that users provide should not be used until it has been inspected to ensure that the application is able to use it. The reality is that users will often enter data that isn’t valid and cannot be used, which leads me to the topic of this chapter: model validation.
Model validation is the process of ensuring the data received by the application is suitable for binding to the model and, when this is not the case, providing useful information to the user that will help explain the problem.
The first part of the process, checking the data received, is one of the most important ways to preserve the integrity of an application’s data. Rejecting data that cannot be used can prevent odd and unwanted states from arising in the application. The second part of the validation process is helping the user correct the problem and is equally important. Without the feedback needed to correct the problem, users become frustrated and confused. In public-facing applications, this means users will simply stop using the application. In corporate applications, this means the user’s workflow will be hindered. Neither outcome is desirable, but fortunately, ASP.NET Core provides extensive support for model validation. Table 29-1 puts model validation in context.
Table 29-1.
Putting Model Validation in Context
Question
Answer
What is it?
Model validation is the process of ensuring that the data provided in a request is valid for use in the application.
Why is it useful?
Users do not always enter valid data, and using it in the application can produce unexpected and undesirable errors.
How is it used?
Controllers and Razor Pages check the outcome of the validation process, and tag helpers are used to include validation feedback in views displayed to the user. Validation can be performed automatically during the model binding process and can be supplemented with custom validation.
Are there any pitfalls or limitations?
It is important to test the efficacy of your validation code to ensure that it covers the full range of values that the application can receive.
Are there any alternatives?
Model validation is optional, but it is a good idea to use it whenever using model binding.
Manually use the ModelState features or apply validation attributes
5, 13–20
Displaying validation messages
Use the classes to which form elements are assigned and the validation tag helpers
6–12
Validating data before the form is submitted
Use client-side and remote validation
21–25
Preparing for This Chapter
This chapter uses the WebApp project from Chapter 28. To prepare for this chapter, change the contents of the Form controller’s Form view so it contains input elements for each of the properties defined by the Product class, excluding the navigation properties used by Entity Framework Core, as shown in Listing 29-1.
Tip
You can download the example project for this chapter—and for all the other chapters in this book—from https://github.com/apress/pro-asp.net-core-3. See Chapter 1 for how to get help if you have problems running the examples.
Changing Elements in the Form.cshtml File in the Views/Form Folder
Replace the contents of the FormController.cs file with those shown in Listing 29-2, which adds support for displaying the properties defined in Listing 29-1 and removes model binding attributes and action methods that are no longer required.
using Microsoft.AspNetCore.Mvc;
using System.Linq;
using System.Threading.Tasks;
using WebApp.Models;
using Microsoft.EntityFrameworkCore;
namespace WebApp.Controllers {
[AutoValidateAntiforgeryToken]
public class FormController : Controller {
private DataContext context;
public FormController(DataContext dbContext) {
context = dbContext;
}
public async Task<IActionResult> Index(long? id) {
return View("Form", await context.Products
.FirstOrDefaultAsync(p => id == null || p.ProductId == id));
}
[HttpPost]
public IActionResult SubmitForm(Product product) {
Replacing the Contents of the FormController.cs File in the Controllers Folder
Dropping the Database
Open a new PowerShell command prompt, navigate to the folder that contains the WebApp.csproj file, and run the command shown in Listing 29-3 to drop the database.
dotnet ef database drop --force
Listing 29-3.
Dropping the Database
Running the Example Application
Select Start Without Debugging or Run Without Debugging from the Debug menu or use the PowerShell command prompt to run the command shown in Listing 29-4.
dotnet run
Listing 29-4.
Running the Example Application
Use a browser to request http://localhost:5000/controllers/Form, which will display an HTML form. Click the Submit button, and the form data will be displayed, as shown in Figure 29-1.
Figure 29-1.
Running the example application
Understanding the Need for Model Validation
Model validation is the process of enforcing the requirements that an application has for the data it receives from clients. Without validation, an application will try to operate on any data it receives, which can lead to exceptions and unexpected behavior that appear immediately or long-term problems that appear gradually as the database is populated with bad, incomplete, or malicious data.
Currently, the action and handler methods that receive form data will accept any data that the user submits, which is why the examples just display the form data and don’t store it in the database.
Most data values have constraints of some sort. This can involve requiring a value to be provided, requiring the value to be a specific type, and requiring the value to fall within a specific range.
As an example, before I can safely store a Product object in the database, for example, I need to make sure that the user provides values for the Name, Price, CategoryId, and SupplierId properties. The Name value can be any valid string, the Price property must be a valid currency amount, and the CategoryId and SupplierId properties must correspond to existing Supplier and Category products in the database. In the following sections, I demonstrate how model validation can be used to enforce these requirements by checking the data that the application receives and providing feedback to the user when the application cannot use the data the user has submitted.
Explicitly Validating Data in a Controller
The most direct way of validating data is to do so in an action or handler method, as shown in Listing 29-5, recording details of any problems so they can be displayed to the user.
using Microsoft.AspNetCore.Mvc;
using System.Linq;
using System.Threading.Tasks;
using WebApp.Models;
using Microsoft.EntityFrameworkCore;
using Microsoft.AspNetCore.Mvc.ModelBinding;
namespace WebApp.Controllers {
[AutoValidateAntiforgeryToken]
public class FormController : Controller {
private DataContext context;
public FormController(DataContext dbContext) {
context = dbContext;
}
public async Task<IActionResult> Index(long? id) {
return View("Form", await context.Products
.FirstOrDefaultAsync(p => id == null || p.ProductId == id));
}
[HttpPost]
public IActionResult SubmitForm(Product product) {
if (string.IsNullOrEmpty(product.Name)) {
ModelState.AddModelError(nameof(Product.Name), "Enter a name");
}
if (ModelState.GetValidationState(nameof(Product.Price))
Explicitly Validating Data in the FormController.cs File in the Controllers Folder
For each of the properties of the Product parameter created, I check to see the value provided by the user and record any errors I find using the ModelStateDictionary object that is returned by the ModelState property inherited from the ControllerBase class.
As its name suggests, the ModelStateDictionary class is a dictionary used to track details of the state of the model object, with an emphasis on validation errors. Table 29-3 describes the most important ModelStateDictionary members.
Table 29-3.
Selected ModelStateDictionary Members
Name
Description
AddModelError(property, message)
This method is used to record a model validation error for the specified property.
GetValidationState(property)
This method is used to determine whether there are model validation errors for a specific property, expressed as a value from the ModelValidationState enumeration.
IsValid
This property returns true if all the model properties are valid and returns false otherwise.
Clear()
This property clears the validation state.
As an example of using the ModelStateDictionary, consider how the Name property was validated.
...
if (string.IsNullOrEmpty(product.Name)) {
ModelState.AddModelError(nameof(Product.Name), "Enter a name");
}
...
One of the validation requirements for the Product class is to ensure the user provides a value for the Name property, so I use the static string.IsNullOrEmpty method to test the property value that the model binding process has extracted from the request. If the Name property is null or an empty string, then I know that the value cannot be used by the application, and I use the ModelState.AddModelError method to register a validation error, specifying the name of the property (Name) and a message that will be displayed to the user to explain the nature of the problem (Enter a name).
The ModelStateDictionary is also used during the model binding process to record any problems with finding and assigning values to model properties. The GetValidationState method is used to see whether there have been any errors recorded for a model property, either from the model binding process or because the AddModelError method has been called during explicit validation in the action method. The GetValidationState method returns a value from the ModelValidationState enumeration, which defines the values described in Table 29-4.
Table 29-4.
The ModelValidationState Values
Name
Description
Unvalidated
This value means that no validation has been performed on the model property, usually because there was no value in the request that corresponded to the property name.
Valid
This value means that the request value associated with the property is valid.
Invalid
This value means that the request value associated with the property is invalid and should not be used.
Skipped
This value means that the model property has not been processed, which usually means that there have been so many validation errors that there is no point continuing to perform validation checks.
For the Price property, I check to see whether the model binding process has reported a problem parsing the value sent by the browser into a decimal value, like this:
...
if (ModelState.GetValidationState(nameof(Product.Price))
ModelState.AddModelError(nameof(Product.Price), "Enter a positive price");
}
...
I want to make sure that the user provides a Price value that is equal to or greater than 1, but there is no point in recording an error about zero or negative values if the user has provided a value that the model binder cannot convert into a decimal value. I use the GetValidationState method to determine the validation status of the Price property before performing my own validation check.
After I have validated all the properties in the Product object, I check the ModelState.IsValid property to see whether there were errors. This method returns true if the Model.State.AddModelError method was called during the checks or if the model binder had any problems creating the object.
The Product object is valid if the IsValid property returns true, in which case the action method redirects the browser to the Results action, where the validated form values will be displayed. There is a validation problem if the IsValue property returns false, which is dealt with by calling the View method to render the Form view again.
Displaying Validation Errors to the User
It may seem odd to deal with a validation error by calling the View method, but the context data provided to the view contains details of the model validation errors; these details are used by the tag helper to transform the input elements.
To see how this works, restart ASP.NET Core so the changes to the controller take effect and use a browser to request http://localhost:5000/controllers/form. Clear the contents of the Name field and click the Submit button. There won’t be any visible change in the content displayed by the browser, but if you examine the input element for the Name field, you will see the element has been transformed. Here is the input element before the form was submitted:
The tag helper adds elements whose values have failed validation to the input-validation-error class, which can then be styled to highlight the problem to the user.
You can do this by defining custom CSS styles in a stylesheet, but a little extra work is required if you want to use the built-in validation styles that CSS libraries like Bootstrap provides. The name of the class added to the input elements cannot be changed, which means that some JavaScript code is required to map between the name used by ASP.NET Core and the CSS error classes provided by Bootstrap.
Tip
Using JavaScript code like this can be awkward, and it can be tempting to use custom CSS styles, even when working with a CSS library like Bootstrap. However, the colors used for validation classes in Bootstrap can be overridden by using themes or by customizing the package and defining your own styles, which means you have to ensure that any changes to the theme are matched by corresponding changes to any custom styles you define. Ideally, Microsoft will make the validation class names configurable in a future release of ASP.NET Core, but until then, using JavaScript to apply Bootstrap styles is a more robust approach than creating custom stylesheets.
To define the JavaScript code so that it can be used by both controllers and Razor Pages, use the Visual Studio JavaScript File template to add a file named _Validation.cshtml to the Views/Shared folder with the content shown in Listing 29-6. Visual Studio Code doesn’t require templates, and you can just add a file named _Validation.cshtml in the Views/Shared folder with the code shown in the listing.
The Contents of the _Validation.cshtml File in the Views/Shared Folder
I will use the new file as a partial view, which contains a script element that loads the jQuery library and contains a custom script that locates input elements that are members of the input-validation-error class and adds them to the is-invalid class (which Bootstrap uses to set the error color for form elements). Listing 29-7 uses the partial tag helper to incorporate the new partial view into the HTML form so that fields with validation errors are highlighted.
Including a Partial View in the Form.cshtml File in the Views/Form Folder
The jQuery code runs when the browser has finished parsing all the elements in the HTML document, and the effect is to highlight the input elements that have been assigned to the input-validaton-error class. You can see the effect by navigating to http://localhost:5000/controllers/form, clearing the contents of the Name field, and submitting the form, which produces the response shown in Figure 29-2.
Figure 29-2.
Highlighting a validation error
The user will not be shown the Results view until the form is submitted with data that can be parsed by the model browser and that passes the explicit validation checks in the action method. Until that happens, submitting the form will cause the Form view to be rendered with the highlighted validation errors.
Displaying Validation Messages
The CSS classes that the tag helpers apply to input elements indicate that there are problems with a form field, but they do not tell the user what the problem is. Providing the user with more information requires the use of a different tag helper, which adds a summary of the problems to the view, as shown in Listing 29-8.
Displaying a Summary in the Form.cshtml File in the Views/Form Folder
The ValidationSummaryTagHelper class detects the asp-validation-summary attribute on div elements and responds by adding messages that describe any validation errors that have been recorded. The value of the asp-validation-summary attribute is a value from the ValidationSummary enumeration, which defines the values shown in Table 29-5 and which I demonstrate shortly.
Table 29-5.
The ValidationSummary Values
Name
Description
All
This value is used to display all the validation errors that have been recorded.
ModelOnly
This value is used to display only the validation errors for the entire model, excluding those that have been recorded for individual properties, as described in the “Displaying Model-Level Messages” section.
None
This value is used to disable the tag helper so that it does not transform the HTML element.
Presenting error messages helps the user understand why the form cannot be processed. As an example, try submitting the form with a negative value in the Price field, such as –10, and with a value that cannot be converted into a decimal value, such as ten. Each value results in a different error message, as shown in Figure 29-3.
Figure 29-3.
Displaying validation messages
Configuring the Default Validation Error Messages
The model binding process performs its own validation when it tries to provide the data values required to invoke an action method, which is why you see a validation message when the Price value cannot be converted to a decimal, for example. Not all the validation messages produced by the model binder are helpful to the user, which you can see by clearing the Price field and submitting the form. The empty field produces the following message:
The value '' is invalid
This message is added to the ModelStateDictionary by the model binding process when it can’t find a value for a property or does find a value but can’t parse it. In this case, the error has arisen because the empty string sent in the form data can’t be parsed into a decimal value for the Price property of the Product class.
The model binder has a set of predefined messages that it uses for validation errors. These can be replaced with custom messages using the methods defined by the DefaultModelBindingMessageProvider class, as described in Table 29-6.
Table 29-6.
The DefaultModelBindingMessageProvider Methods
Name
Description
SetValueMustNotBeNullAccessor
The function assigned to this property is used to generate a validation error message when a value is null for a model property that is non-nullable.
SetMissingBindRequiredValueAccessor
The function assigned to this property is used to generate a validation error message when the request does not contain a value for a required property.
SetMissingKeyOrValueAccessor
The function assigned to this property is used to generate a validation error message when the data required for dictionary model object contains null keys or values.
SetAttemptedValueIsInvalidAccessor
The function assigned to this property is used to generate a validation error message when the model binding system cannot convert the data value into the required C# type.
SetUnknownValueIsInvalidAccessor
The function assigned to this property is used to generate a validation error message when the model binding system cannot convert the data value into the required C# type.
SetValueMustBeANumberAccessor
The function assigned to this property is used to generate a validation error message when the data value cannot be parsed into a C# numeric type.
SetValueIsInvalidAccessor
The function assigned to this property is used to generate a fallback validation error message that is used as a last resort.
Each of the methods described in the table accepts a function that is invoked to get the validation message to display to the user. These methods are applied through the options pattern in the Startup class, as shown in Listing 29-9, in which I have replaced the default message that is displayed when a value is null or cannot be converted.
using Microsoft.AspNetCore.Builder;
using Microsoft.Extensions.DependencyInjection;
using Microsoft.Extensions.Configuration;
using Microsoft.EntityFrameworkCore;
using WebApp.Models;
using Microsoft.AspNetCore.Antiforgery;
using Microsoft.AspNetCore.Http;
using Microsoft.AspNetCore.Mvc;
namespace WebApp {
public class Startup {
public Startup(IConfiguration config) {
Configuration = config;
}
public IConfiguration Configuration { get; set; }
public void ConfigureServices(IServiceCollection services) {
Changing a Validation Message in the Startup.cs File in the WebApp Folder
The function that you specify receives the value that the user has supplied, although that is not especially useful when dealing with null values. To see the custom message, restart ASP.NET Core, use the browser to request http://localhost:5000/controllers/form, and submit the form with an empty Price field. The response will include the custom error message, as shown in Figure 29-4.
Figure 29-4.
Changing the default validation messages
Displaying Property-Level Validation Messages
Although the custom error message is more meaningful than the default one, it still isn’t that helpful because it doesn’t clearly indicate which field the problem relates to. For this kind of error, it is more useful to display the validation error messages alongside the HTML elements that contain the problem data. This can be done using the ValidationMessageTag tag helper, which looks for span elements that have the asp-validation-for attribute, which is used to specify the property for which error messages should be displayed.
In Listing 29-10, I have added property-level validation message elements for each of the input elements in the form.
Adding Property-Level Messages in the Form.cshtml File in the Views/Form Folder
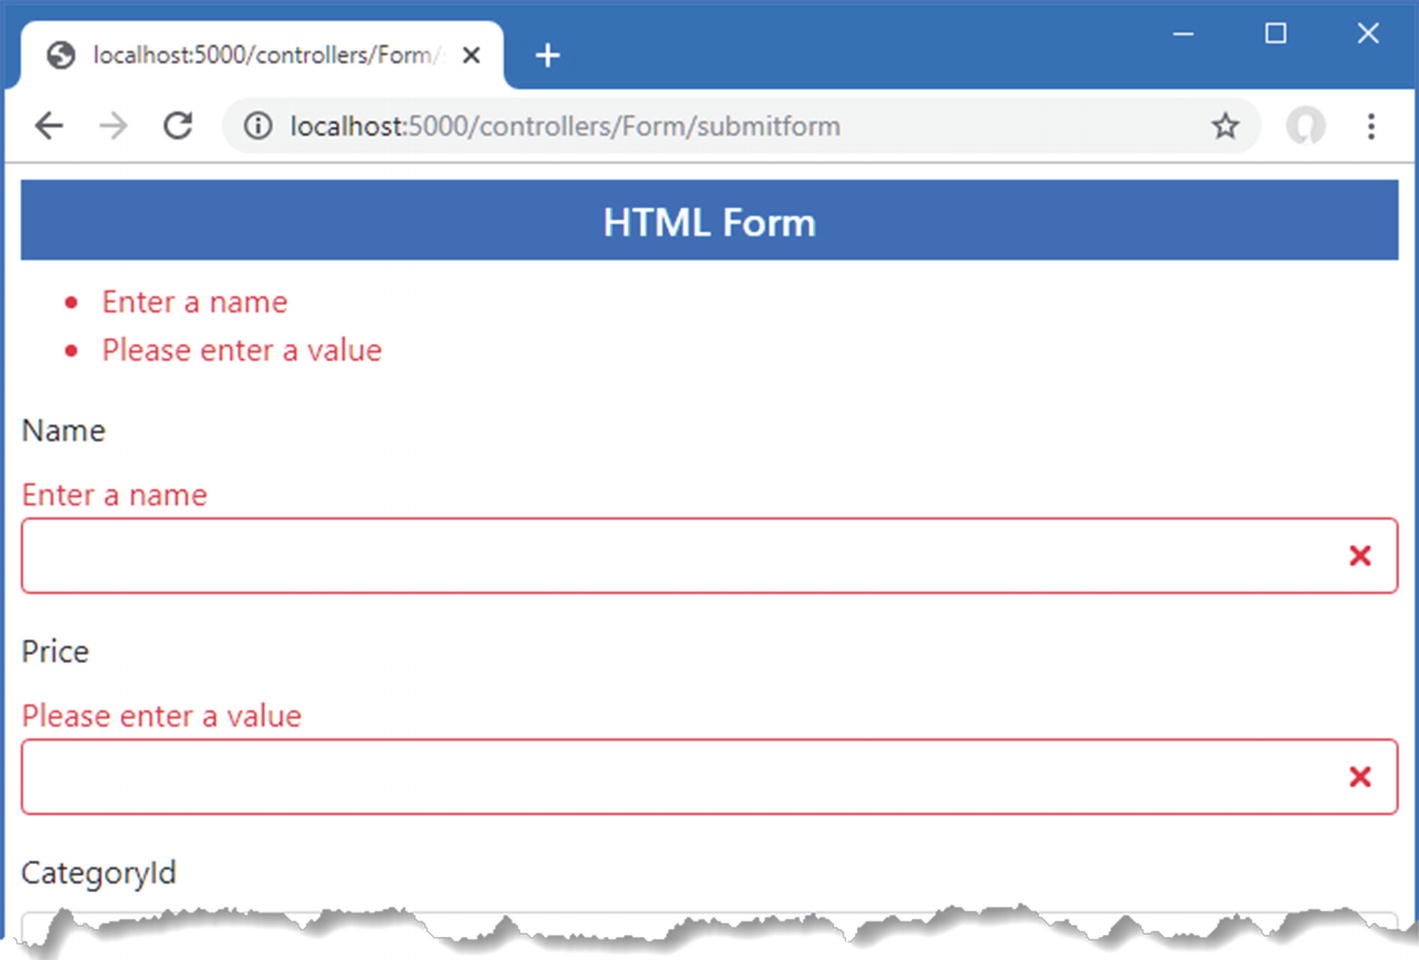
Since span elements are displayed inline, care must be taken to present the validation messages to make it obvious which element the message relates to. You can see the effect of the new validation messages by requesting http://localhost:5000/controllers/form, clearing the Name and Price fields, and submitting the form. The response, shown in Figure 29-5, includes validation messages alongside the text fields.
Figure 29-5.
Displaying property-level validation messages
Displaying Model-Level Messages
It may seem that the validation summary message is superfluous because it duplicates the property-level messages. But the summary has a useful trick, which is the ability to display messages that apply to the entire model and not just individual properties. This means you can report errors that arise from a combination of individual properties, which would otherwise be hard to express with a property-level message.
In Listing 29-11, I have added a check to the FormController.SubmitForm action that records a validation error when the Price value exceeds 100 at the time that the Name value starts with Small.
...
[HttpPost]
public IActionResult SubmitForm(Product product) {
if (string.IsNullOrEmpty(product.Name)) {
ModelState.AddModelError(nameof(Product.Name), "Enter a name");
}
if (ModelState.GetValidationState(nameof(Product.Price))
Performing Model-Level Validation in the FormController.cs File in the Controllers Folder
If the user enters a Name value that starts with Small and a Price value that is greater than 100, then a model-level validation error is recorded. I check for the combination of values only if there are no validation problems with the individual property values, which ensures the user doesn’t get conflicting messages. Validation errors that relate to the entire model are recorded using the AddModelError with the empty string as the first argument.
Listing 29-12 changes the value of the asp-validation-summary attribute to ModelOnly, which excludes property-level errors, meaning that the summary will display only those errors that apply to the entire model.
Configuring the Validation Summary in the Form.cshtml File in the Views/Form Folder
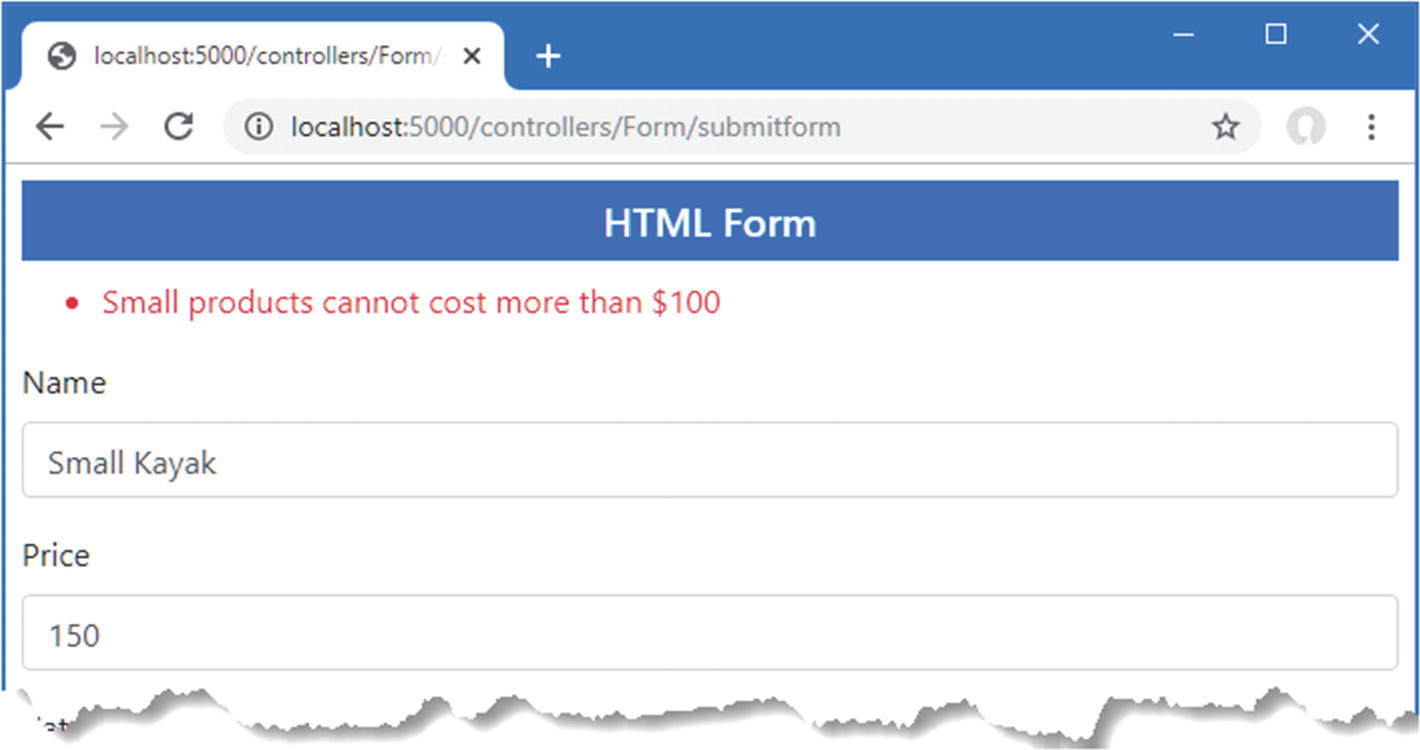
Restart ASP.NET Core and request http://localhost:5000/controllers/form. Enter Small Kayak into the Name field and 150 into the Price field and submit the form. The response will include the model-level error message, as shown in Figure 29-6.
Figure 29-6.
Displaying a model-level validation message
Explicitly Validating Data in a Razor Page
Razor Page validation relies on the features used in the controller in the previous section. Listing 29-13 adds explicit validation checks and error summaries to the FormHandler page.
Validating Data in the FormHandler.cshtml File in the Pages Folder
The PageModel class defines a ModelState property that is the equivalent of the one I used in the controller and allows validation errors to be recorded. The process for validation is the same, but you must take care when recording errors to ensure the names match the pattern used by Razor Pages. When I recorded an error, I used the nameof keyword to select the property to which the error relates, like this:
...
ModelState.AddModelError(nameof(Product.Name), "Enter a name");
...
This is a common convention because it ensures that a typo won’t cause errors to be recorded incorrectly. This expression won’t work in the Razor Page, where the error must be recorded against Product.Name, rather than Name, to reflect that @Model expressions in Razor Pages return the page model object, like this:
...
ModelState.AddModelError("Product.Name", "Enter a name");
...
To test the validation process, use a browser to request http://localhost:5000/pages/form and submit the form with empty fields or with values that cannot be converted into the C# types required by the Product class. The error messages are displayed just as they are for controllers, as shown in Figure 29-7. (The values 1, 2, and 3 are valid for both the CategoryId and SupplierId fields.)
Tip
The methods described in Table 29-6 that change the default validation messages affect Razor Pages as well as controllers.
Figure 29-7.
Validating data in a Razor Page
Specifying Validation Rules Using Metadata
One problem with putting validation logic into an action method is that it ends up being duplicated in every action or handler method that receives data from the user. To help reduce duplication, the validation process supports the use of attributes to express model validation rules directly in the model class, ensuring that the same set of validation rules will be applied regardless of which action method is used to process a request. In Listing 29-14, I have applied attributes to the Product class to describe the validation required for the Name and Price properties.
using System.ComponentModel.DataAnnotations.Schema;
using System.ComponentModel.DataAnnotations;
using Microsoft.AspNetCore.Mvc.ModelBinding;
namespace WebApp.Models {
public class Product {
public long ProductId { get; set; }
[Required]
[Display(Name = "Name")]
public string Name { get; set; }
[Column(TypeName = "decimal(8, 2)")]
[Required(ErrorMessage = "Please enter a price")]
[Range(1, 999999, ErrorMessage = "Please enter a positive price")]
public decimal Price { get; set; }
public long CategoryId { get; set; }
public Category Category { get; set; }
public long SupplierId { get; set; }
public Supplier Supplier { get; set; }
}
}
Listing 29-14.
Applying Validation Attributes in the Product.cs File in the Models Folder
I used two validation attributes in the listing: Required and Range. The Required attribute specifies that it is a validation error if the user doesn’t submit a value for a property. The Range attribute specifies a subset of acceptable values. Table 29-7 shows the set of built-in validation attributes available.
Table 29-7.
The Built-in Validation Attributes
Attribute
Example
Description
Compare
[Compare ("OtherProperty")]
This attribute ensures that properties must have the same value, which is useful when you ask the user to provide the same information twice, such as an e-mail address or a password.
Range
[Range(10, 20)]
This attribute ensures that a numeric value (or any property type that implements IComparable) is not outside the range of specified minimum and maximum values. To specify a boundary on only one side, use a MinValue or MaxValue constant.
RegularExpression
[RegularExpression ("pattern")]
This attribute ensures that a string value matches the specified regular expression pattern. Note that the pattern must match the entire user-supplied value, not just a substring within it. By default, it matches case sensitively, but you can make it case insensitive by applying the (?i) modifier—that is, [RegularExpression("(?i)mypattern")].
Required
[Required]
This attribute ensures that the value is not empty or a string consisting only of spaces. If you want to treat whitespace as valid, use [Required(AllowEmptyStrings = true)].
StringLength
[StringLength(10)]
This attribute ensures that a string value is no longer than a specified maximum length. You can also specify a minimum length: [StringLength(10, MinimumLength=2)].
All the validation attributes support specifying a custom error message by setting a value for the ErrorMessage property, like this:
...
[Column(TypeName = "decimal(8, 2)")]
[Required(ErrorMessage = "Please enter a price")]
[Range(1, 999999, ErrorMessage = "Please enter a positive price")]
public decimal Price { get; set; }
...
If there is no custom error message, then the default messages will be used, but they tend to reveal details of the model class that will make no sense to the user unless you also use the Display attribute, like this:
...
[Required]
[Display(Name = "Name")]
public string Name { get; set; }
...
The default message generated by the Required attribute reflects the name specified with the Display attribute and so doesn’t reveal the name of the property to the user.
Validation Work Arounds
Getting the validation results you require can take some care when using the validation attributes. For example, you cannot use the Required attribute if you want to ensure that a user has checked a checkbox because the browser will send a false value when the checkbox is unchecked, which will always pass the checks applied by the Required attribute. Instead, use the Range attribute and specify the minimum and maximum values as true, like this:
...
[Range(typeof(bool), "true", "true", ErrorMessage="You must check the box")]
...
If this sort of workaround feels uncomfortable, then you can create custom validation attributes, as described in the next section.
The use of the validation attributes on the Product class allows me to remove the explicit validation checks for the Name and Price properties, as shown in Listing 29-15.
...
[HttpPost]
public IActionResult SubmitForm(Product product) {
//if (string.IsNullOrEmpty(product.Name)) {
// ModelState.AddModelError(nameof(Product.Name), "Enter a name");
Removing Explicit Validation in the FormController.cs File in the Controllers Folder
The validation attributes are applied before the action method is called, which means that I can still rely on the model state to determine whether individual properties are valid when performing model-level validation. To see the validation attributes in action, restart ASP.NET Core MVC, request http://localhost:5000/controllers/form, clear the Name and Price fields, and submit the form. The response will include the validation errors produced by the attributes, as shown in Figure 29-8.
Figure 29-8.
Using validation attributes
Understanding Web Service Controller Validation
Controllers that have been decorated with the ApiController attribute do not need to check the ModelState.IsValid property. Instead, the action method is invoked only if there are no validation errors, which means you can always rely on receiving validated objects through the model binding feature. If any validation errors are detected, then the request is terminated, and an error response is sent to the browser.
Creating a Custom Property Validation Attribute
The validation process can be extended by creating an attribute that extends the ValidationAttribute class. To demonstrate, I created the WebApp/Validation folder and added to it a class file named PrimaryKeyAttribute.cs, which I used to define the class shown in Listing 29-16.
using Microsoft.EntityFrameworkCore;
using System;
using System.ComponentModel.DataAnnotations;
namespace WebApp.Validation {
public class PrimaryKeyAttribute : ValidationAttribute {
= validationContext.GetService(ContextType) as DbContext;
if (context.Find(DataType, value) == null) {
return new ValidationResult(ErrorMessage
?? "Enter an existing key value");
} else {
return ValidationResult.Success;
}
}
}
}
Listing 29-16.
The Contents of the PrimaryKeyAttribute.cs File in the Validation Folder
Custom attributes override the IsValid method, which is called with the value to check, and a ValidationContext object that provides context about the validation process and provides access to the application’s services through its GetService method.
In Listing 29-16, the custom attribute receives the type of an Entity Framework Core database context class and the type of a model class. In the IsValid method, the attribute obtains an instance of the context class and uses it to query the database to determine whether the value has been used as a primary key value.
Revalidating Data
You may need to perform the validation process again if you modify the object received from the model binder. For these situations, use the ModelState.Clear method to clear any existing validation errors and call the TryValidateModel method.
Custom validation attributes can also be used to perform model-level validation. To demonstrate, I added a class file named PhraseAndPriceAttribute.cs to the Validation folder and used it to define the class shown in Listing 29-17.
using System;
using System.ComponentModel.DataAnnotations;
using WebApp.Models;
namespace WebApp.Validation {
public class PhraseAndPriceAttribute: ValidationAttribute {
?? $"{Phrase} products cannot cost more than ${Price}");
}
return ValidationResult.Success;
}
}
}
Listing 29-17.
The Contents of the PhraseAndPriceAttribute.cs File in the Validation Folder
This attribute is configured with Phrase and Price properties, which are used in the IsValid method to check the Name and Price properties of the model object. Property-level custom validation attributes are applied directly to the properties they validate, and model-level attributes are applied to the entire class, as shown in Listing 29-18.
using System.ComponentModel.DataAnnotations.Schema;
using System.ComponentModel.DataAnnotations;
using Microsoft.AspNetCore.Mvc.ModelBinding;
using WebApp.Validation;
namespace WebApp.Models {
[PhraseAndPrice(Phrase ="Small", Price = "100")]
public class Product {
public long ProductId { get; set; }
[Required]
[Display(Name = "Name")]
public string Name { get; set; }
[Column(TypeName = "decimal(8, 2)")]
[Required(ErrorMessage = "Please enter a price")]
[Range(1, 999999, ErrorMessage = "Please enter a positive price")]
Applying Custom Validation Attributes in the Product.cs File in the Models Folder
The custom attributes allow the remaining explicit validation statements to be removed from the Form controller’s action method, as shown in Listing 29-19.
using Microsoft.AspNetCore.Mvc;
using System.Linq;
using System.Threading.Tasks;
using WebApp.Models;
using Microsoft.EntityFrameworkCore;
using Microsoft.AspNetCore.Mvc.ModelBinding;
namespace WebApp.Controllers {
[AutoValidateAntiforgeryToken]
public class FormController : Controller {
private DataContext context;
public FormController(DataContext dbContext) {
context = dbContext;
}
public async Task<IActionResult> Index(long? id) {
return View("Form", await context.Products
.FirstOrDefaultAsync(p => id == null || p.ProductId == id));
}
[HttpPost]
public IActionResult SubmitForm(Product product) {
Removing Explicit Validation in the FormController.cs File in the Controllers Folder
The validation attributes are applied automatically before the action method is invoked, which means that the validation outcome can be determined simply by reading the ModelState.IsValid property. The same simplification can be applied to the Razor Page, as shown in Listing 29-20.
Removing Explicit Validation in the FormHandler.cshtml File in the Pages Folder
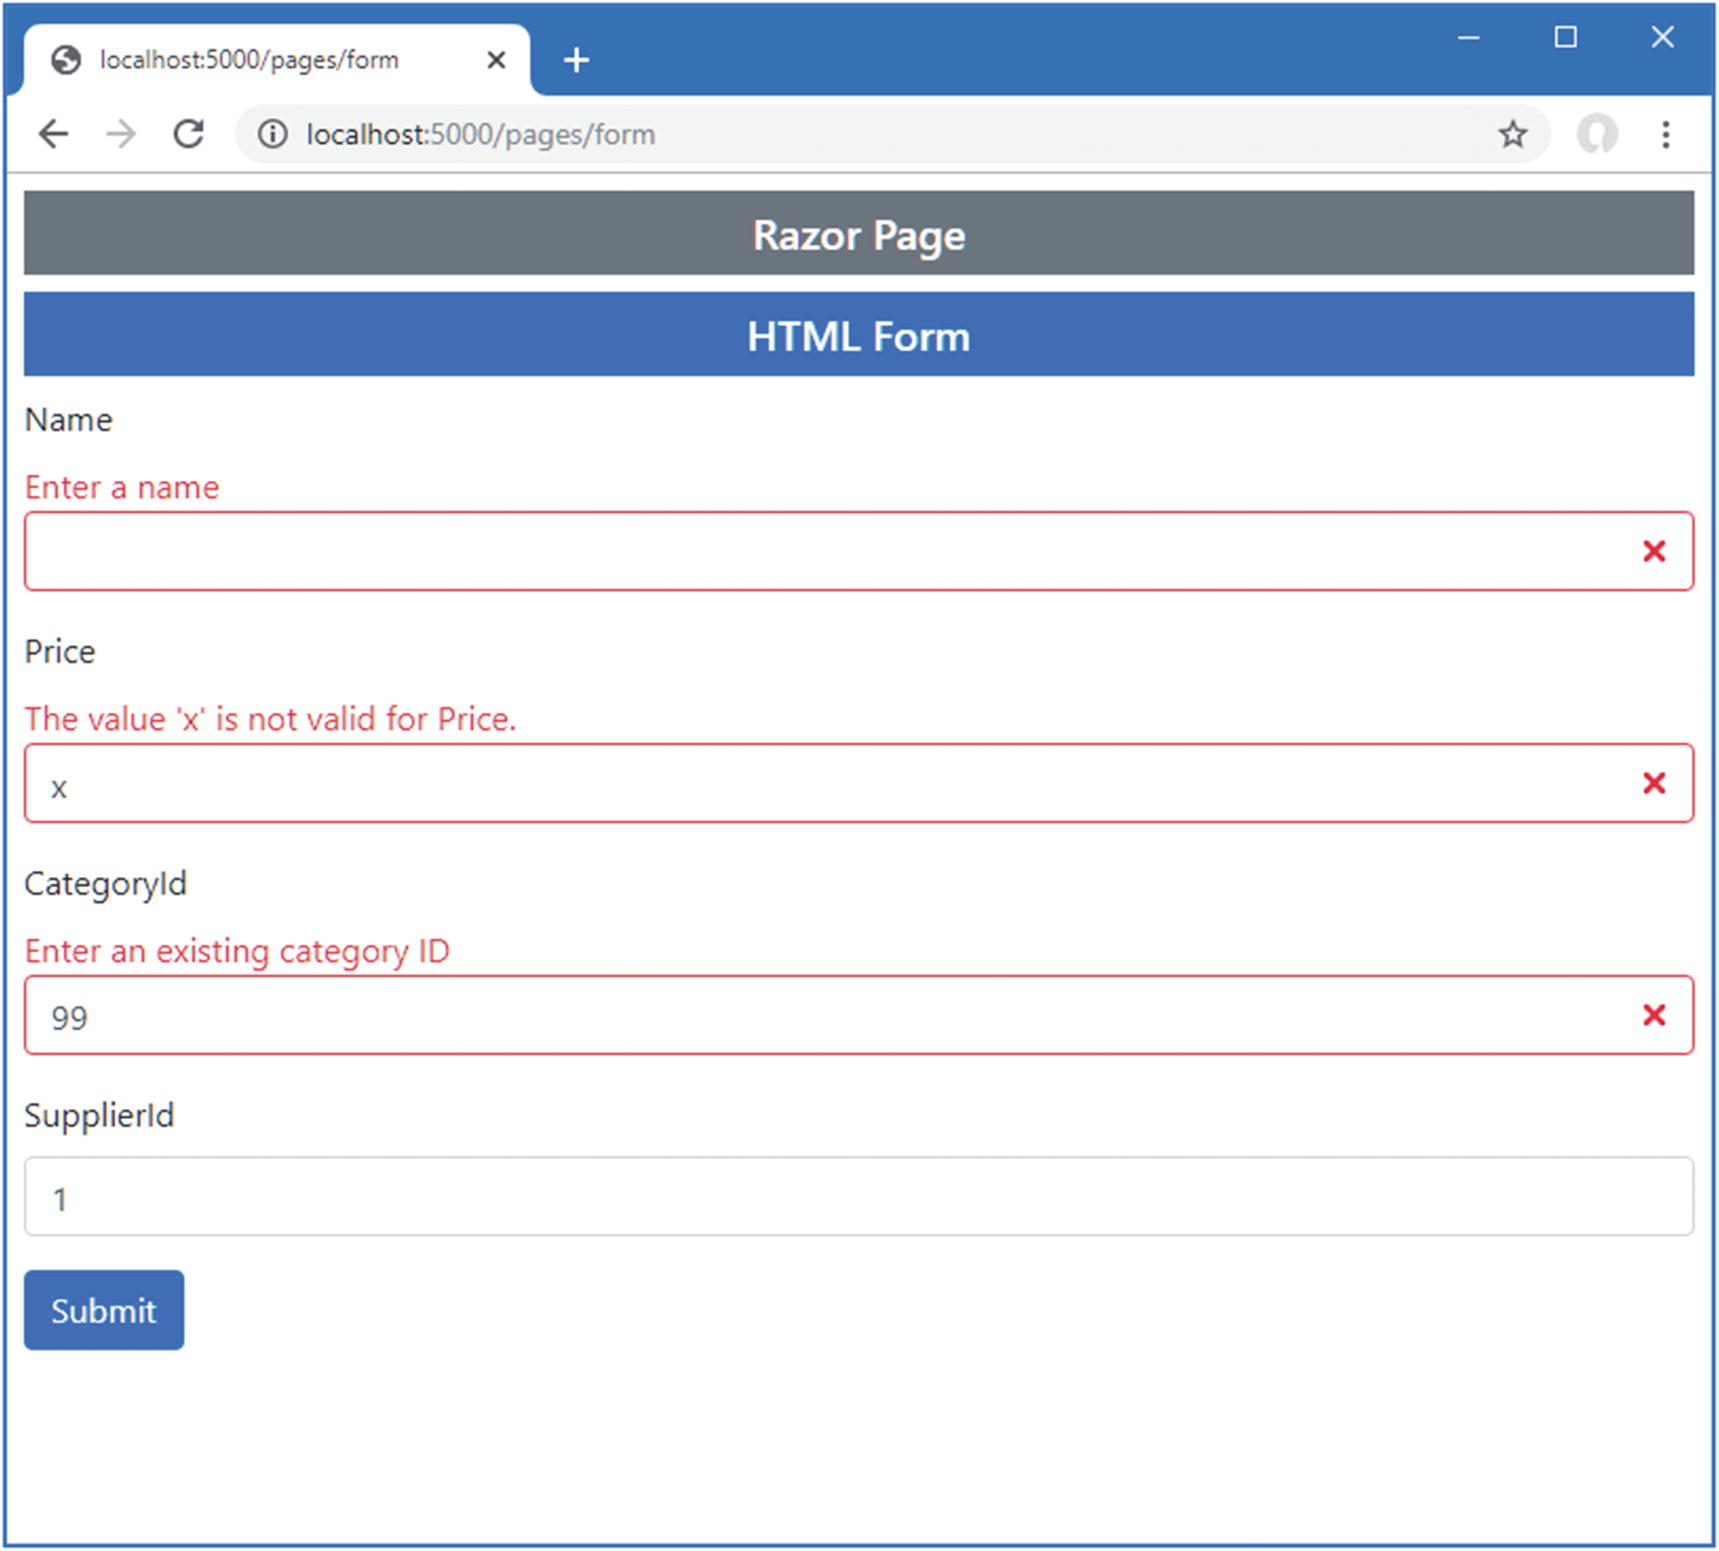
Expressing the validation through the custom attributes removes the code duplication between the controller and the Razor Page and ensures that validation is applied consistently wherever model binding is used for Product objects. To test the validation attributes, restart ASP.NET Core and navigate to http://localhost:5000/controllers/form or http://localhost:5000/pages/form. Clear the form fields or enter bad key values and submit the form, and you will see the error messages produced by the attributes, some of which are shown in Figure 29-9. (The values 1, 2, and 3 are valid for both the CategoryId and SupplierId fields.)
Figure 29-9.
Using custom validation attributes
Performing Client-Side Validation
The validation techniques I have demonstrated so far have all been examples of server-side validation. This means the user submits their data to the server, and the server validates the data and sends back the results of the validation (either success in processing the data or a list of errors that need to be corrected).
In web applications, users typically expect immediate validation feedback—without having to submit anything to the server. This is known as client-side validation and is implemented using JavaScript. The data that the user has entered is validated before being sent to the server, providing the user with immediate feedback and an opportunity to correct any problems.
ASP.NET Core supports unobtrusive client-side validation. The term unobtrusive means that validation rules are expressed using attributes added to the HTML elements that views generate. These attributes are interpreted by a JavaScript library distributed by Microsoft that, in turn, configures the jQuery Validation library, which does the actual validation work. In the following sections, I will show you how the built-in validation support works and demonstrate how I can extend the functionality to provide custom client-side validation.
The first step is to install the JavaScript packages that deal with validation. Open a new PowerShell command prompt, navigate to the WebApp project folder, and run the command shown in Listing 29-21.
Tip
The core jQuery command was added to the project in Chapter 26. Run the following command if you need to install it again: libman install [email protected] -d wwwroot/lib/jquery.
Once the packages are installed, add the elements shown in Listing 29-22 to the _Validation.cshtml file in the Views/Shared folder, which provides a convenient way to introduce the validation alongside the existing jQuery code in the application.
Tip
The elements must be defined in the order in which they are shown.
Adding Elements in the _Validation.cshtml File in the Views/Shared Folder
The tag helpers add data-val* attributes to input elements that describe validation constraints for fields. Here are the attributes added to the input element for the Name field, for example:
...
<input class="form-control valid" type="text" data-val="true" data-val-required="The name field is required." id="Name" name="Name" value="Kayak" aria-describedby="Name-error" aria-invalid="false">
...
The unobtrusive validation JavaScript code looks for these attributes and performs validation in the browser when the user attempts to submit the form. The form won’t be submitted, and an error will be displayed if there are validation problems. The data won’t be sent to the application until there are no outstanding validation issues.
The JavaScript code looks for elements with the data-val attribute and performs local validation in the browser when the user submits the form, without sending an HTTP request to the server. You can see the effect by running the application and submitting the form while using the F12 tools to note that validation error messages are displayed even though no HTTP request is sent to the server.
Avoiding Conflicts with Browser Validation
Some of the current generation of HTML5 browsers support simple client-side validation based on the attributes applied to input elements. The general idea is that, say, an input element to which the required attribute has been applied, for example, will cause the browser to display a validation error when the user tries to submit the form without providing a value.
If you are generating form elements using tag helpers, as I have been doing in this chapter, then you won’t have any problems with browser validation because the elements that are assigned data attributes are ignored by the browser.
However, you may run into problems if you are unable to completely control the markup in your application, something that often happens when you are passing on content generated elsewhere. The result is that the jQuery validation and the browser validation can both operate on the form, which is just confusing to the user. To avoid this problem, you can add the novalidate attribute to the form element to disable browser validation.
One of the nice client-side validation features is that the same attributes that specify validation rules are applied at the client and at the server. This means that data from browsers that do not support JavaScript are subject to the same validation as those that do, without requiring any additional effort.
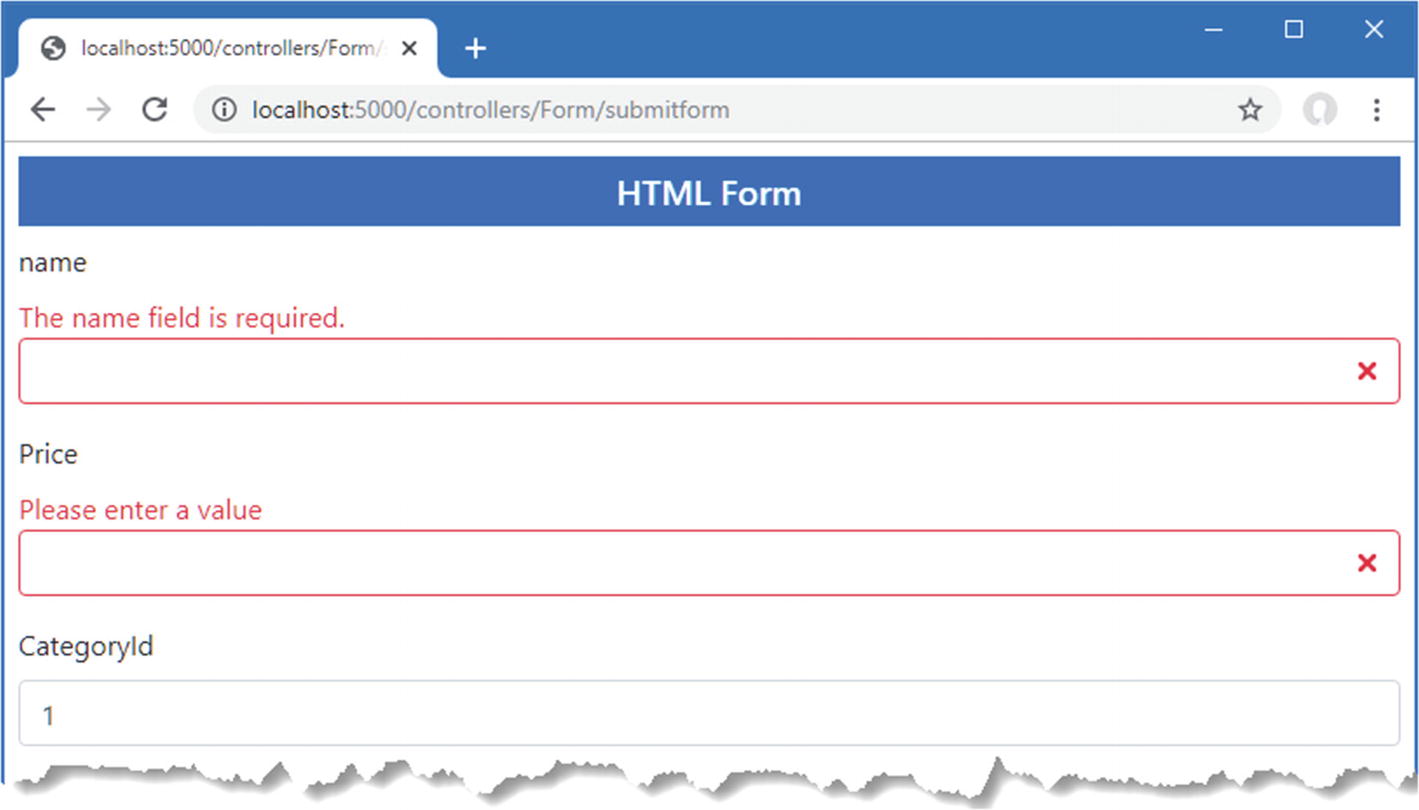
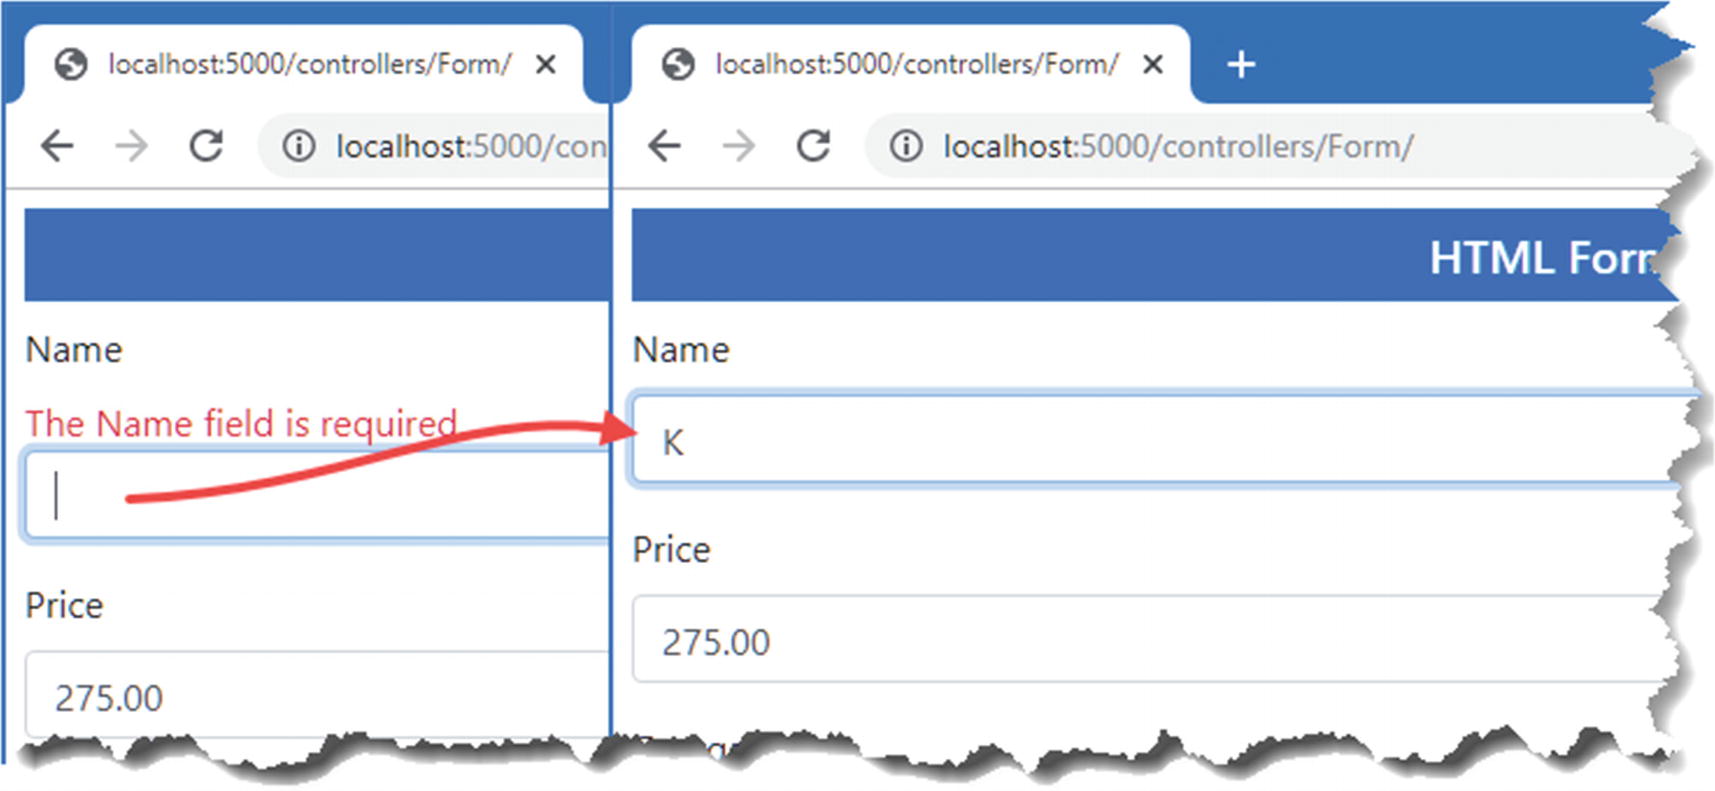
To test the client-side validation feature, request http://localhost:5000/controllers/form or http://localhost:5000/pages/form, clear the Name field, and click the Submit button.
The error message looks like the ones generated by server-side validation, but if you enter text into the field, you will see the error message disappear immediately as the JavaScript code responds to the user interaction, as shown in Figure 29-10.
Figure 29-10.
Performing client-side validation
Extending Client-Side Validation
The client-side validation feature supports the built-in property-level attributes. The feature can be extended but requires fluency in JavaScript and requires working directly with the jQuery Validation package. See https://jqueryvalidation.org/documentation for details.
If you don’t want to start writing JavaScript code, then you can follow the common pattern of using client-side validation for the built-in validation checks and server-side validation for custom validation.
Performing Remote Validation
Remote validation blurs the line between client- and server-side validation: the validation checks are enforced by the client-side JavaScript code, but the validation checking is performed by sending an asynchronous HTTP request to the application to test the value entered into the form by the user.
A common example of remote validation is to check whether a username is available in applications when such names must be unique, the user submits the data, and the client-side validation is performed. As part of this process, an asynchronous HTTP request is made to the server to validate the username that has been requested. If the username has been taken, a validation error is displayed so that the user can enter another value.
This may seem like regular server-side validation, but there are some benefits to this approach. First, only some properties will be remotely validated; the client-side validation benefits still apply to all the other data values that the user has entered. Second, the request is relatively lightweight and is focused on validation, rather than processing an entire model object.
The third difference is that the remote validation is performed in the background. The user doesn’t have to click the submit button and then wait for a new view to be rendered and returned. It makes for a more responsive user experience, especially when there is a slow network between the browser and the server.
That said, remote validation is a compromise. It strikes a balance between client-side and server-side validation, but it does require requests to the application server, and it is not as quick to validate as normal client-side validation.
For the example application, I am going to use remote validation to ensure the user enters existing key values for the CategoryId and SupplierId properties. The first step is to create a web service controller whose action methods will perform the validation checks. I added a class file named ValidationController.cs to the Controllers folder with the code shown in Listing 29-23.
using Microsoft.AspNetCore.Mvc;
using WebApp.Models;
namespace WebApp.Controllers {
[ApiController]
[Route("api/[controller]")]
public class ValidationController: ControllerBase {
private DataContext dataContext;
public ValidationController(DataContext context) {
dataContext = context;
}
[HttpGet("categorykey")]
public bool CategoryKey(string categoryId) {
long keyVal;
return long.TryParse(categoryId, out keyVal)
&& dataContext.Categories.Find(keyVal) != null;
}
[HttpGet("supplierkey")]
public bool SupplierKey(string supplierId) {
long keyVal;
return long.TryParse(supplierId, out keyVal)
&& dataContext.Suppliers.Find(keyVal) != null;
}
}
}
Listing 29-23.
The Contents of the ValidationController.cs File in the Controllers Folder
Validation action methods must define a parameter whose name matches the field they will validate, which allows the model binding process to extract the value to test from the request query string. The response from the action method must be JSON and can be only true or false, indicating whether a value is acceptable. The action methods in Listing 29-23 receive candidate values and check they have been used as database keys for Category or Supplier objects.
Tip
I could have taken advantage of model binding so that the parameter to the action methods would be converted to a long value, but doing so would mean that the validation method wouldn’t be called if the user entered a value that cannot be converted to the long type. If the model binder cannot convert a value, then the MVC Framework is unable to invoke the action method and validation can’t be performed. As a rule, the best approach to remote validation is to accept a string parameter in the action method and perform any type conversion, parsing, or model binding explicitly.
To use the remote validation method, I apply the Remote attribute to the CategoryId and SupplierId properties in the Product class, as shown in Listing 29-24.
using System.ComponentModel.DataAnnotations.Schema;
using System.ComponentModel.DataAnnotations;
using Microsoft.AspNetCore.Mvc.ModelBinding;
using WebApp.Validation;
using Microsoft.AspNetCore.Mvc;
namespace WebApp.Models {
[PhraseAndPrice(Phrase ="Small", Price = "100")]
public class Product {
public long ProductId { get; set; }
[Required]
[Display(Name = "Name")]
public string Name { get; set; }
[Column(TypeName = "decimal(8, 2)")]
[Required(ErrorMessage = "Please enter a price")]
[Range(1, 999999, ErrorMessage = "Please enter a positive price")]
public decimal Price { get; set; }
[PrimaryKey(ContextType= typeof(DataContext),
DataType = typeof(Category))]
[Remote("CategoryKey", "Validation", ErrorMessage = "Enter an existing key")]
public long CategoryId { get; set; }
public Category Category { get; set; }
[PrimaryKey(ContextType = typeof(DataContext),
DataType = typeof(Category))]
[Remote("SupplierKey", "Validation", ErrorMessage = "Enter an existing key")]
public long SupplierId { get; set; }
public Supplier Supplier { get; set; }
}
}
Listing 29-24.
Using the Remote Attribute in the Product.cs File in the Models Folder
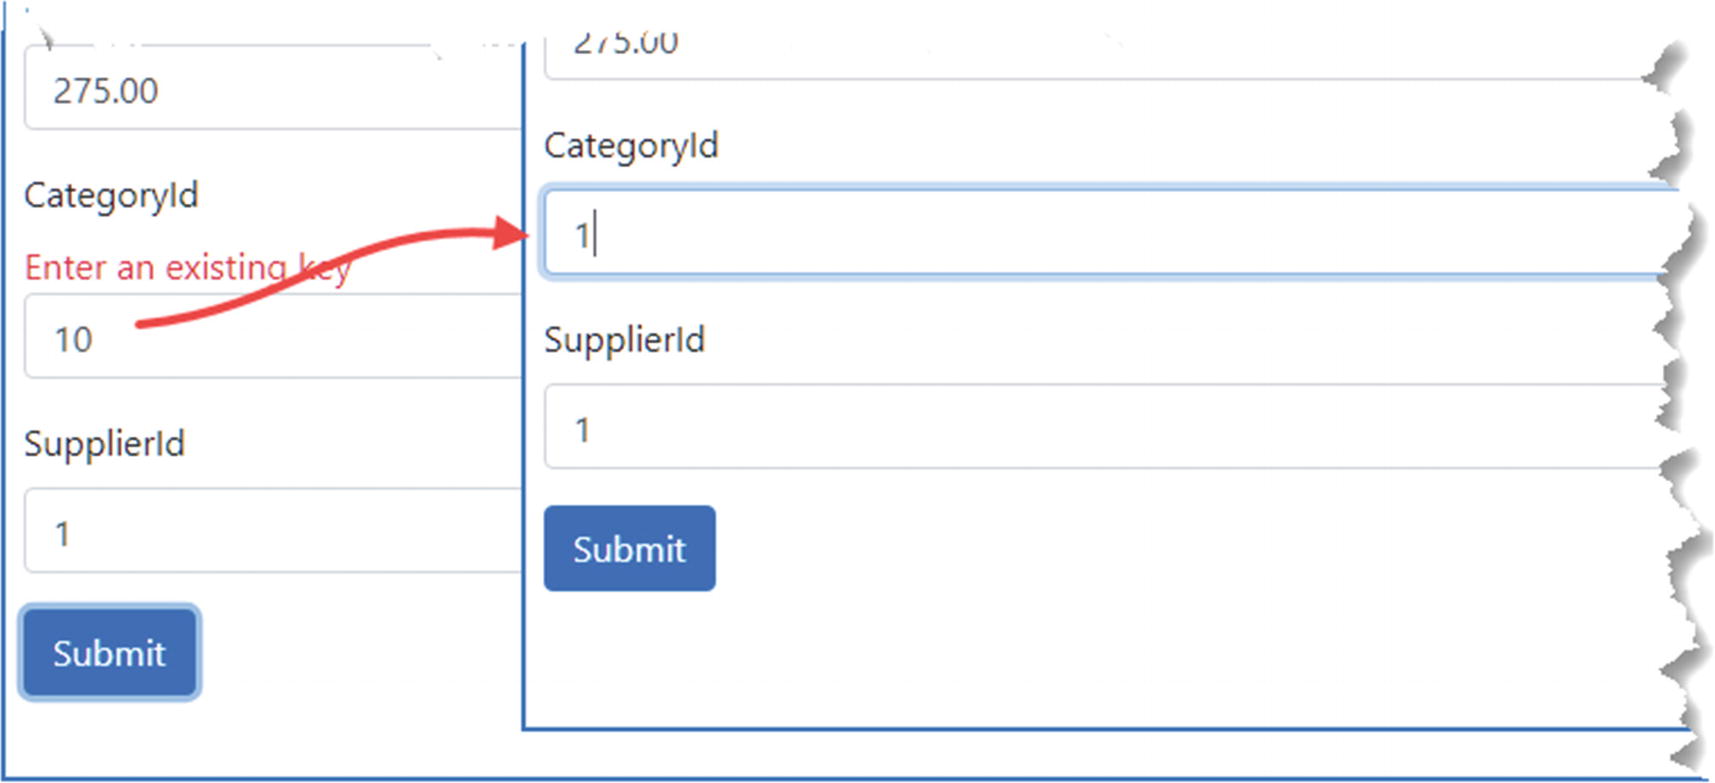
The arguments to the Remote attribute specify the name of the validation controller and its action method. I have also used the optional ErrorMessage argument to specify the error message that will be displayed when validation fails. To see the remote validation, restart ASP.NET Core and navigate to http://localhost:5000/controllers/form, enter an invalid key value, and submit the form. You will see an error message, and the value of the input element will be validated after each key press, as shown in Figure 29-11. (Only the values 1, 2, and 3 are valid for both the CategoryId and SupplierId fields.)
Figure 29-11.
Performing remote validation
Caution
The validation action method will be called when the user first submits the form and again each time the data is edited. For text input elements, every keystroke will lead to a call to the server. For some applications, this can be a significant number of requests and must be accounted for when specifying the server capacity and bandwidth that an application requires in production. Also, you might choose not to use remote validation for properties that are expensive to validate (the example repeatedly queries the database for key values, which may not be sensible for all applications or databases).
Performing Remote Validation in Razor Pages
Remote validation works in Razor Pages, but attention must be paid to the names used in the asynchronous HTTP request used to validate values. For the controller example in the previous section, the browser will send requests to URLs like this:
The way I prefer to address this difference is by adding parameters to the validation action methods that will accept both types of request, which is easy to do using the model binding features described in previous chapters, as shown in Listing 29-25.
using Microsoft.AspNetCore.Mvc;
using WebApp.Models;
namespace WebApp.Controllers {
[ApiController]
[Route("api/[controller]")]
public class ValidationController: ControllerBase {
private DataContext dataContext;
public ValidationController(DataContext context) {
dataContext = context;
}
[HttpGet("categorykey")]
public bool CategoryKey(string categoryId, [FromQuery] KeyTarget target) {
long keyVal;
return long.TryParse(categoryId ?? target.CategoryId, out keyVal)
&& dataContext.Categories.Find(keyVal) != null;
}
[HttpGet("supplierkey")]
public bool SupplierKey(string supplierId, [FromQuery] KeyTarget target) {
long keyVal;
return long.TryParse(supplierId ?? target.SupplierId, out keyVal)
&& dataContext.Suppliers.Find(keyVal) != null;
}
}
[Bind(Prefix = "Product")]
public class KeyTarget {
public string CategoryId { get; set; }
public string SupplierId{ get; set; }
}
}
Listing 29-25.
Adding Parameters in the ValidationController.cs File in the Controllers Folder
The KeyTarget class is configured to bind to the Product part of the request, with properties that will match the two types of remote validation request. Each action method has been given a KeyTarget parameter, which is used if no value is received for existing parameters. This allows the same action method to accommodate both types of request, which you can see by restarting ASP.NET Core, navigating to http://localhost:5000/pages/form, entering a nonexistent key value, and clicking the Submit button, which will produce the response shown in Figure 29-12.
Figure 29-12.
Performing remote validation using a Razor Page
Summary
In this chapter, I described the ASP.NET Core data validation features. I explained how to explicitly perform validation, how to use attributes to describe validation constraints, and how to validate individual properties and entire objects. I showed you how to display validation messages to the user and how to improve the user’s experience of validation with client-side and remote validation. In the next chapter, I describe the ASP.NET Core filters feature.