
In this chapter, I introduce the tools that Microsoft provides for ASP.NET Core development and that are used throughout this book.
Unlike earlier editions of this book, I rely on the command-line tools provided by the .NET Core SDK and additional tool packages that Microsoft publishes. In part, I have done this to help ensure you get the expected results from the examples but also because the command-line tools provide access to all the features required for ASP.NET Core development, regardless of which editor/IDE you have chosen.
Visual Studio—and, to a lesser extent, Visual Studio Code—offers access to some of the tools through user interfaces, which I describe in this chapter, but Visual Studio and Visual Studio Code don’t support all the features that are required for ASP.NET Core development, so there are times that using the command line is inevitable.
Chapter Summary
Problem | Solution | Listing |
|---|---|---|
Creating a project | Use the dotnet new commands or the Visual Studio wizard | 1–4 |
Building and running projects | Use the dotnet build and dotnet run commands or use the menus provided by Visual Studio and Visual Studio Code | 5–7 |
Adding packages to a project | Use the dotnet add package command or use the Visual Studio package manager | 8–10 |
Installing tool commands | Use the dotnet tool command | 11, 12 |
Managing client-side packages | Use the libman command or the Visual Studio client-side package manager | 13–16 |
Creating ASP.NET Core Projects
The .NET Core SDK includes a set of command-line tools for creating, managing, building, and running projects. Visual Studio provides integrated support for some of these tasks, but if you are using Visual Studio Code, then the command line is the only option.
I use the command-line tools even when working with Visual Studio because they are simple and concise, while the Visual Studio features tend to require more effort to locate the templates or settings I require. In the sections that follow, I show you how to create and use both sets of tools. The results are the same whichever approach you choose, and you can freely switch between Visual Studio and the command-line tools.
You can download the example project for this chapter—and for all the other chapters in this book—from https://github.com/apress/pro-asp.net-core-3. See Chapter 1 for how to get help if you have problems running the examples.
Creating a Project Using the Command Line
Listing the .NET Core Templates
Useful ASP.NET Core Project Templates
Name | Description |
|---|---|
web | This template creates a project that is set up with the minimum code and content required for ASP.NET Core development. This is the template I use for most of the chapters in this book. |
mvc | This template creates an ASP.NET Core project configured to use the MVC Framework. |
webapp | This template creates an ASP.NET Core project configured to use Razor Pages. |
blazorserver | This template creates an ASP.NET Core project configured to use Blazor Server. |
angular | This template creates an ASP.NET Core project that contains client-side features using the Angular JavaScript framework. |
react | This template creates an ASP.NET Core project that contains client-side features using the React JavaScript framework. |
reactredux | This template creates an ASP.NET Core project that contains client-side features using the React JavaScript framework and the popular Redux library. |
There are also templates that create commonly required files used to configure projects, as described in Table 4-3.
The project templates described in Table 4-2 are intended to help jump-start development by taking care of basic configuration settings and adding placeholder content.
These templates can give you a sense of rapid progress, but they contain assumptions about how a project should be configured and developed. If you don’t understand the impact of those assumptions, you won’t be able to get the results you require for the specific demands of your project.
The web template creates a project with the minimum configuration required for ASP.NET Core development. This is the project template I use for most of the examples in this book so that I can explain how each feature is configured and how the features can be used together.
Once you understand how ASP.NET Core works, the other project templates can be useful because you will know how to adapt them to your needs. But, while you are learning, I recommend sticking to the web template, even though it can take a little more effort to get results.
The Configuration Item Templates
Name | Description |
|---|---|
globaljson | This template adds a global.json file to a project, specifying the version of .NET Core that will be used. |
sln | This template creates a solution file, which is used to group multiple projects and is commonly used by Visual Studio. The solution file is populated with the dotnet sln add command, as shown in the following listing. |
gitignore | This template creates a .gitignore file that excludes unwanted items from Git source control. |
Creating a New Project
The first command creates a MySolution/MyProject folder that contains a global.json file, which specifies that the project will use .NET Core version 3.1.1. The top-level folder, named MySolution, is used to group multiple projects together. The nested MyProject folder will contain a single project.
I use the globaljson template to help ensure you get the expected results when following the examples in this book. Microsoft is good at ensuring backward compatibility with .NET Core releases, but breaking changes do occur, and it is a good idea to add a global.json file to projects so that everyone in the development team is using the same version.
The second command creates the project using the web template, which I use for most of the examples in this book. As noted in Table 4-3, this template creates a project with the minimum content required for ASP.NET Core development. Each template has its own set of arguments that influence the project that is created. The --no-https argument creates a project without support for HTTPS. (I explain how to use HTTPS in Chapter 16.) The --framework argument selects the .NET Core runtime that will be used for the project.
The other commands create a solution file that references the new project. Solution files are a convenient way of opening multiple related files at the same time. A MySolution.sln file is created in the MySolution folder, and opening this file in Visual Studio will load the project created with the web template. This is not essential, but it stops Visual Studio from prompting you to create the file when you exit the code editor.
Opening the Project
To open the project, start Visual Studio, select “Open a Project or Solution,” and open the MySolution.sln file in the MySolution folder. Visual Studio will open the solution file, discover the reference to the project that was added by the final command in Listing 4-2, and open the project as well.
Visual Studio Code works differently. Start Visual Studio Code, select File ➤ Open Folder, and navigate to the MySolution folder. Click Select Folder, and Visual Studio Code will open the project.

Opening a project in Visual Studio Code and Visual Studio
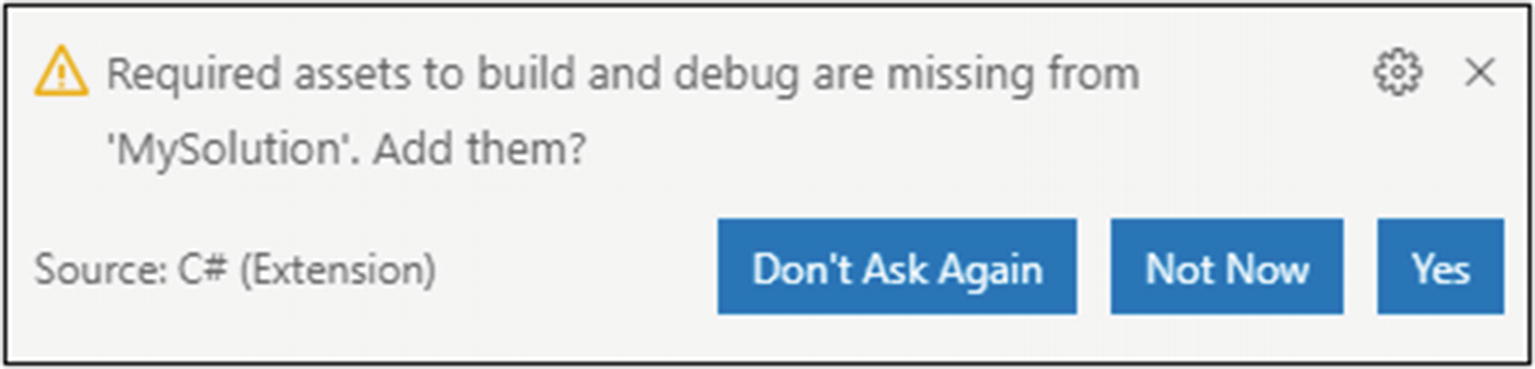
Adding assets in Visual Studio Code
Creating a Project Using Visual Studio

Creating a new project in Visual Studio
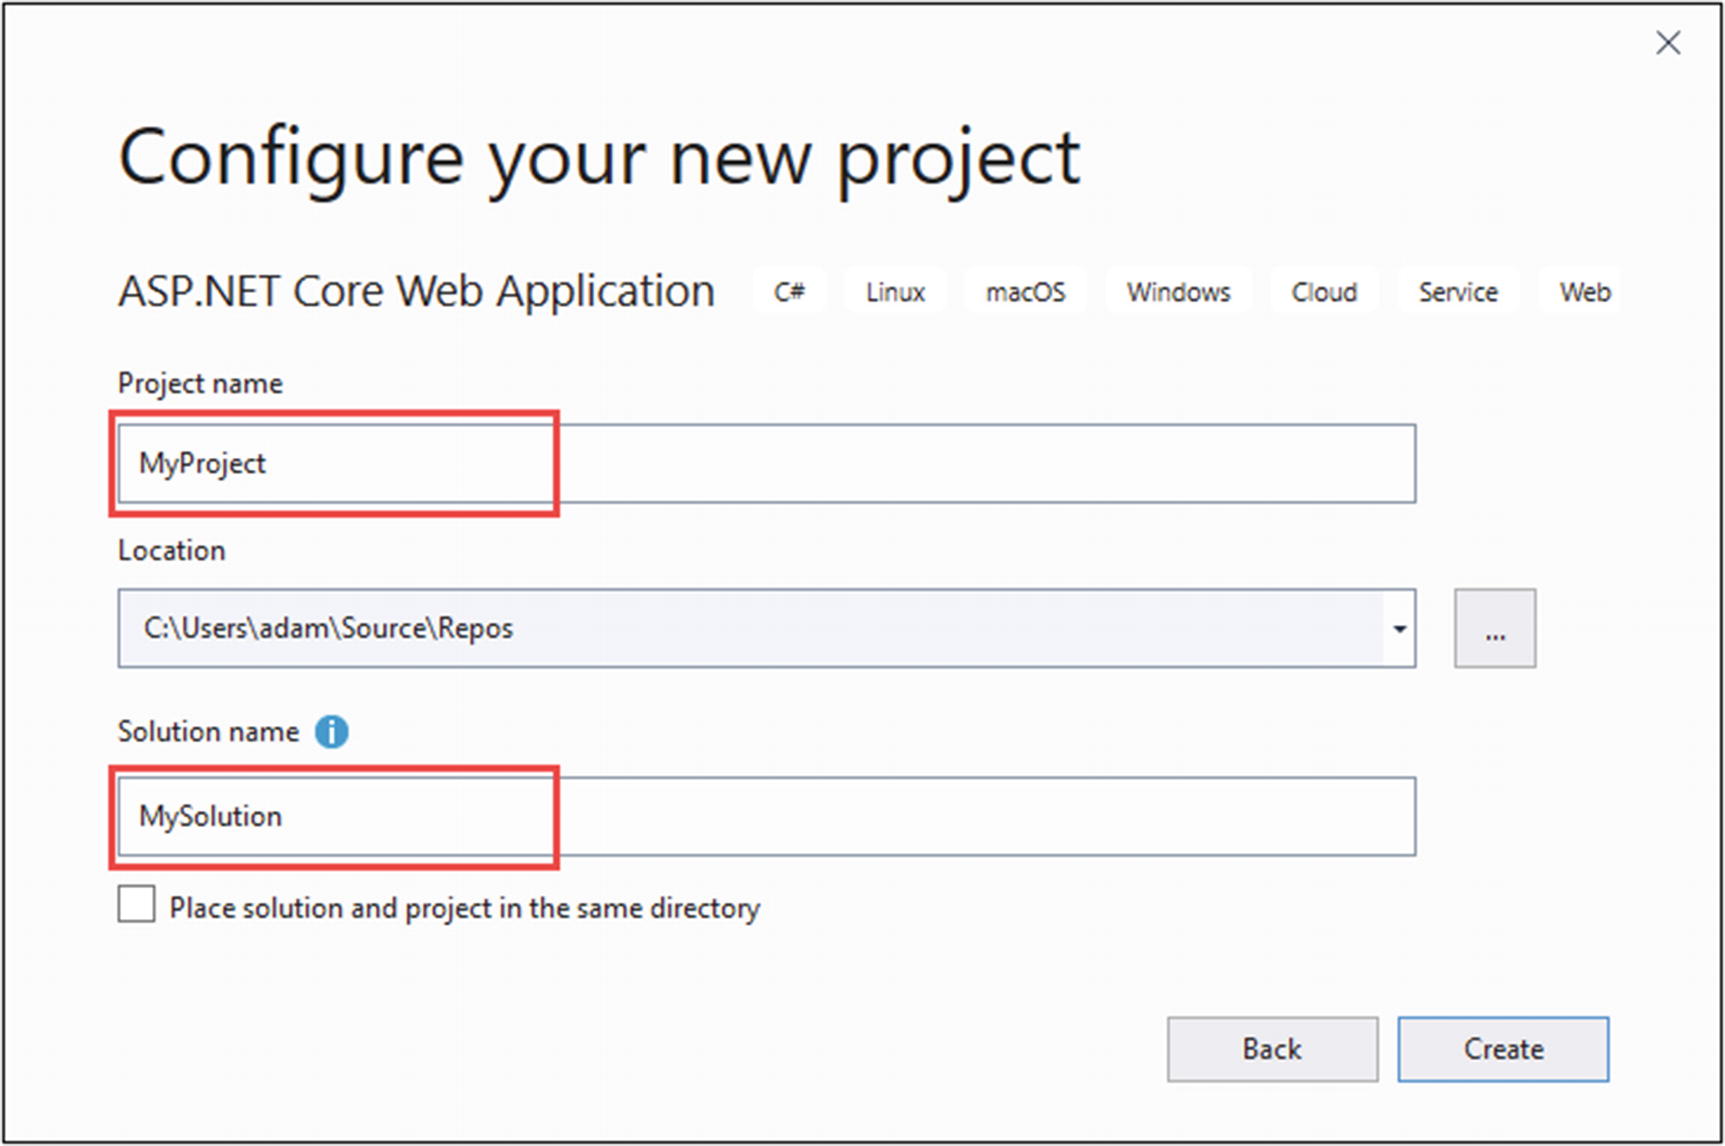
Selecting the project and solution names
The next step requires close attention, and because it is so prone to errors, I have used the command-line tools for the examples in this book. First, use the drop-downs at the top of the window to select .NET Core and ASP.NET Core 3.1. Next, select the Empty template from the list. Even though the name Empty is used, the content added to the project corresponds to the web template.
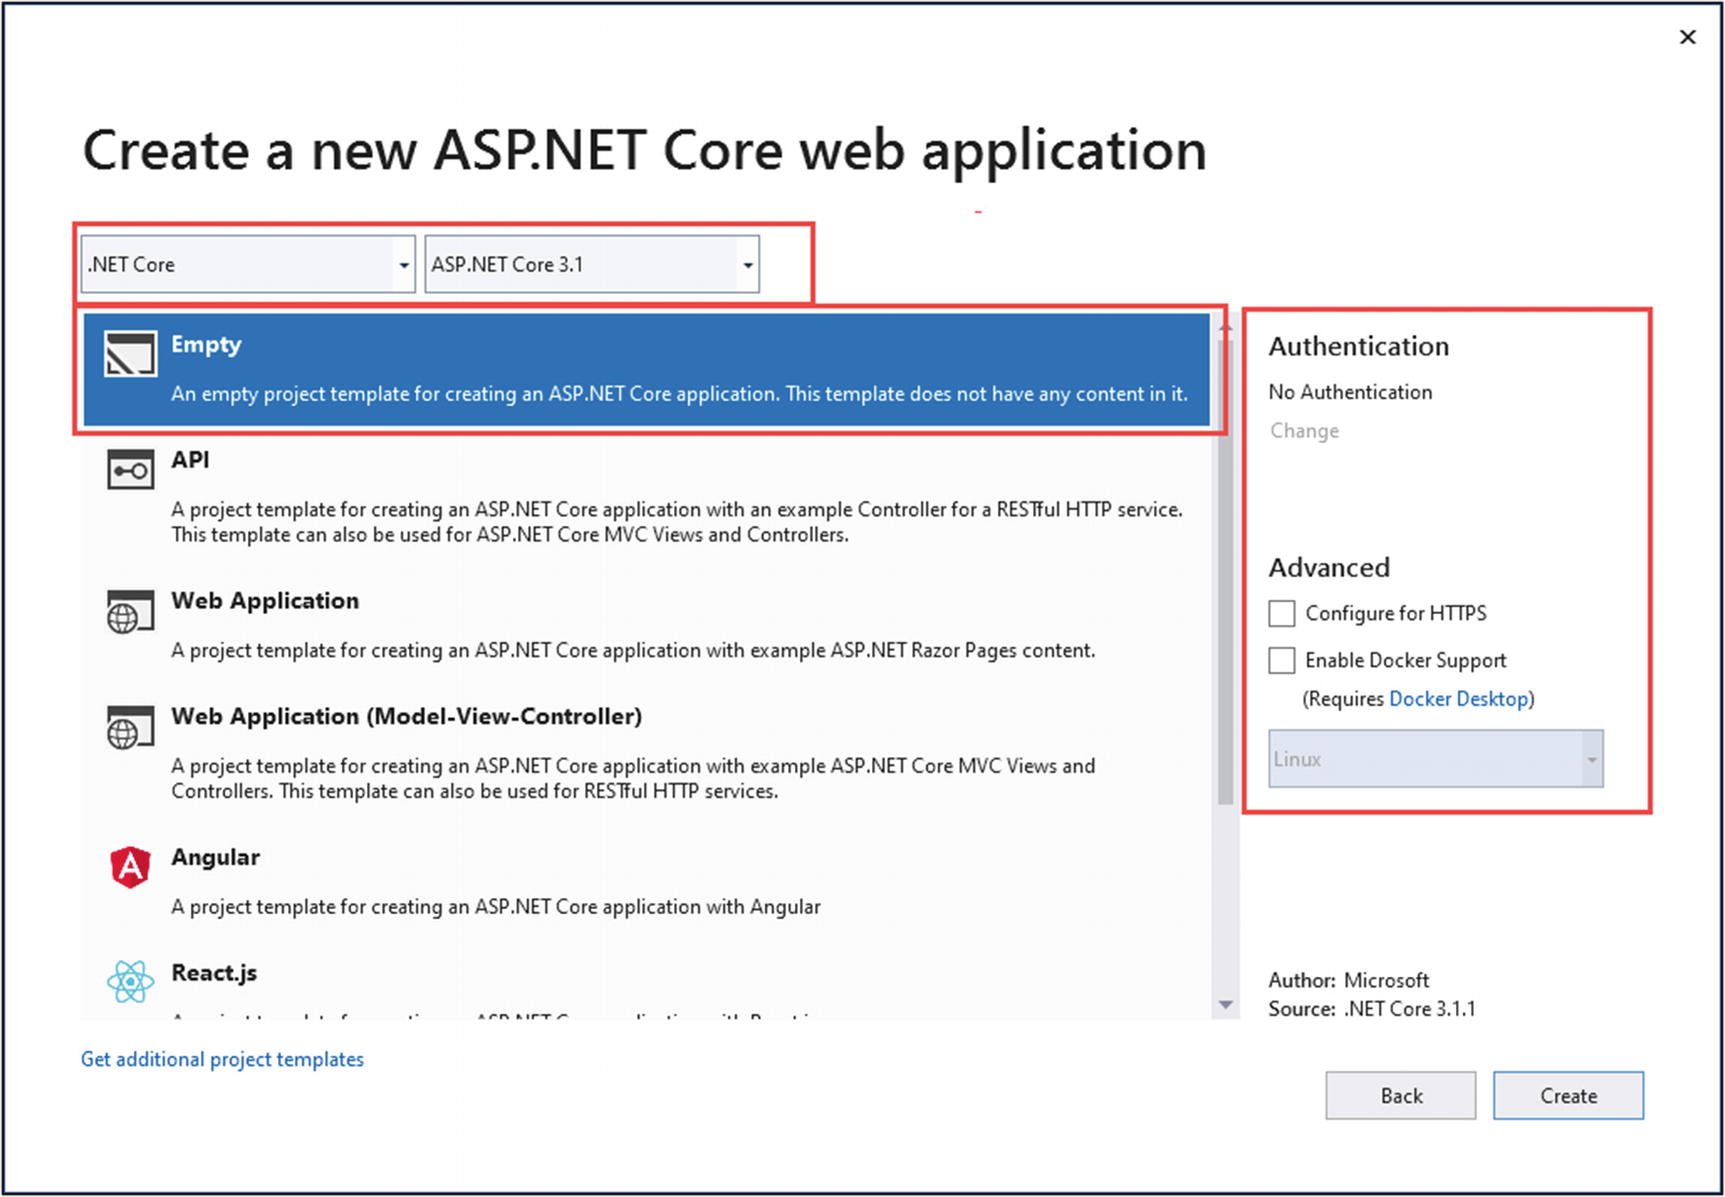
Selecting and configuring the project template

The new project in the Visual Studio Solution Explorer
The Contents of the global.json File in the MyProject Folder
Adding the global.json file ensures the right version of the .NET Core SDK will be used by the project.
Adding Code and Content to Projects
If you are using Visual Studio Code, then you add items to the project by right-clicking the folder that should contain the file and selecting New File from the popup menu (or selecting New Folder if you are adding a folder).
You are responsible for ensuring that the file extension matches the type of item you want to add; for example, an HTML file must be added with the .html extension. I give the complete file name and the name of the containing folder for every item added to a project throughout this book, so you will always know exactly what files you need to add.
The Contents of the demo.html File in the wwwroot Folder
Visual Studio provides a more comprehensive approach that can be helpful but only when used selectively. To create a folder, right-click the MyProject item in the Solution Explorer and select Add ➤ New Folder from the popup menu. Set the name of the new item to wwwroot and press Enter; Visual Studio will create the folder.
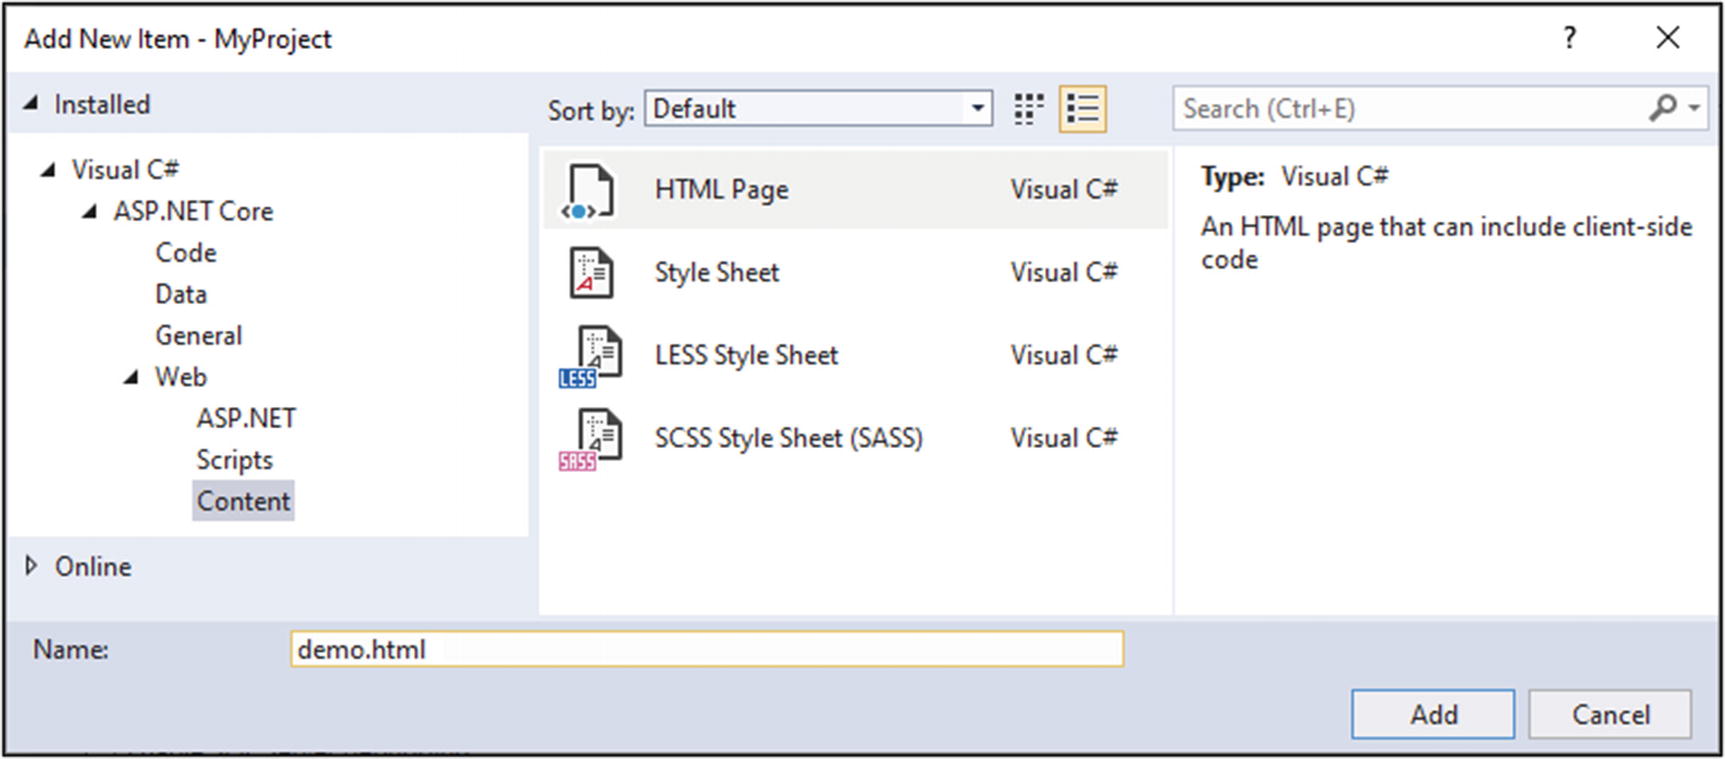
Adding an item to the example project
Enter demo.html in the Name field, click the Add button to create the new file, and replace the contents with the element shown in Listing 4-4. (If you omit the file extension, Visual Studio will add it for you based on the item template you have selected. If you entered just demo into the Name field when you created the file, Visual Studio would have created a file with the .html extension because you had selected the HTML Page item template.)
Understanding Item Scaffolding
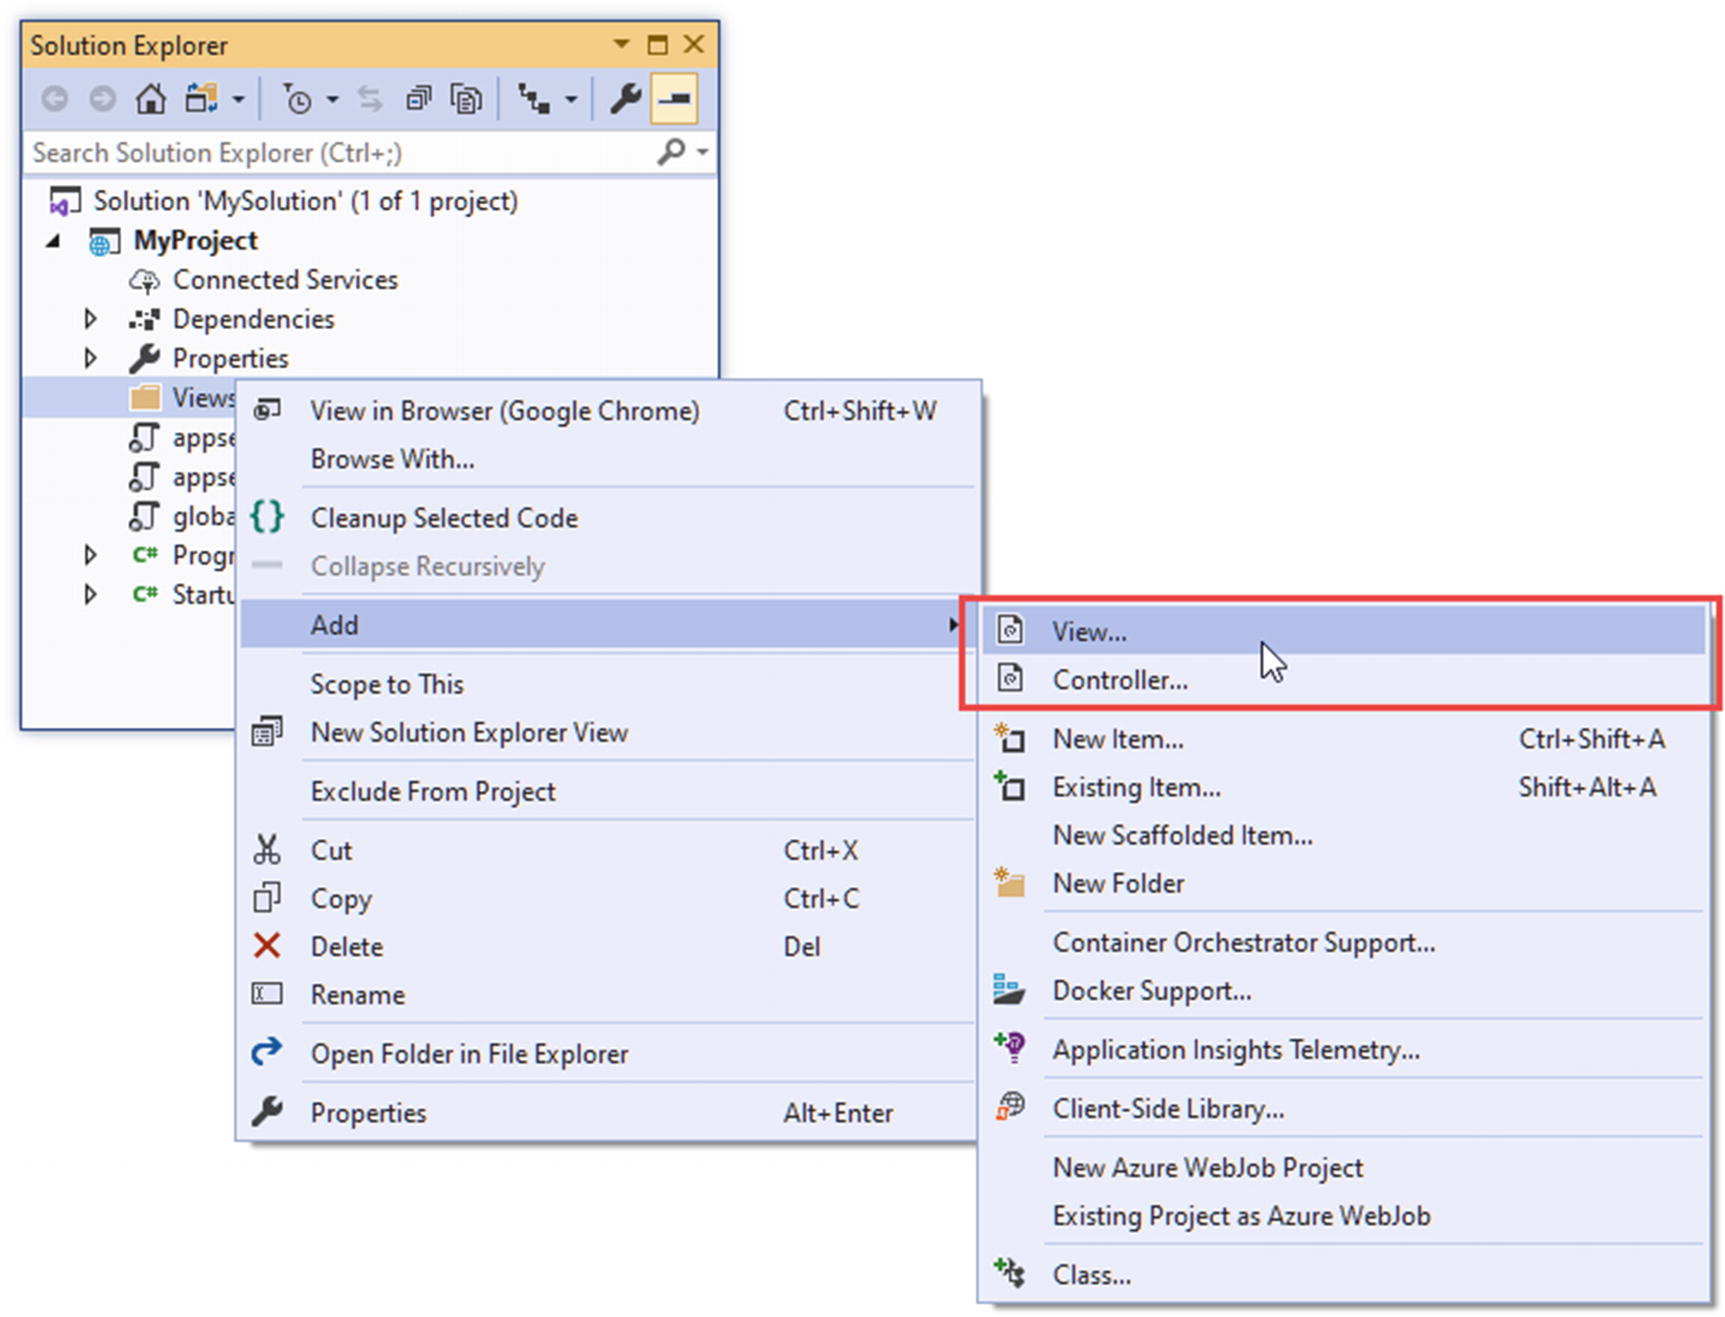
Scaffolded items in the Add menu
The View and Controller items are scaffolded, and selecting them will present you with choices that determine the content of the items you create.
Just like the project templates, I recommend against using scaffolded items, at least until you understand the content they create. In this book, I use only the Add ➤ New Item menu for the examples and change the placeholder content immediately.
Building and Running Projects
Adding a Statement in the Startup.cs File in the MyProject Folder
This statement adds support for responding to HTTP requests with static content in the wwwroot folder, such as the HTML file created in the previous section. (I explain this feature in more detail in Chapter 15.)
Building and Running Projects Using the Command Line
Building the Project
Building and Running the Project
Running the example application
Building and Running Projects Using Visual Studio Code
Visual Studio Code can build and execute the project for you if you prefer not to use the command line. Select Terminal ➤ Run Build Task, and Visual Studio Code will compile the project.
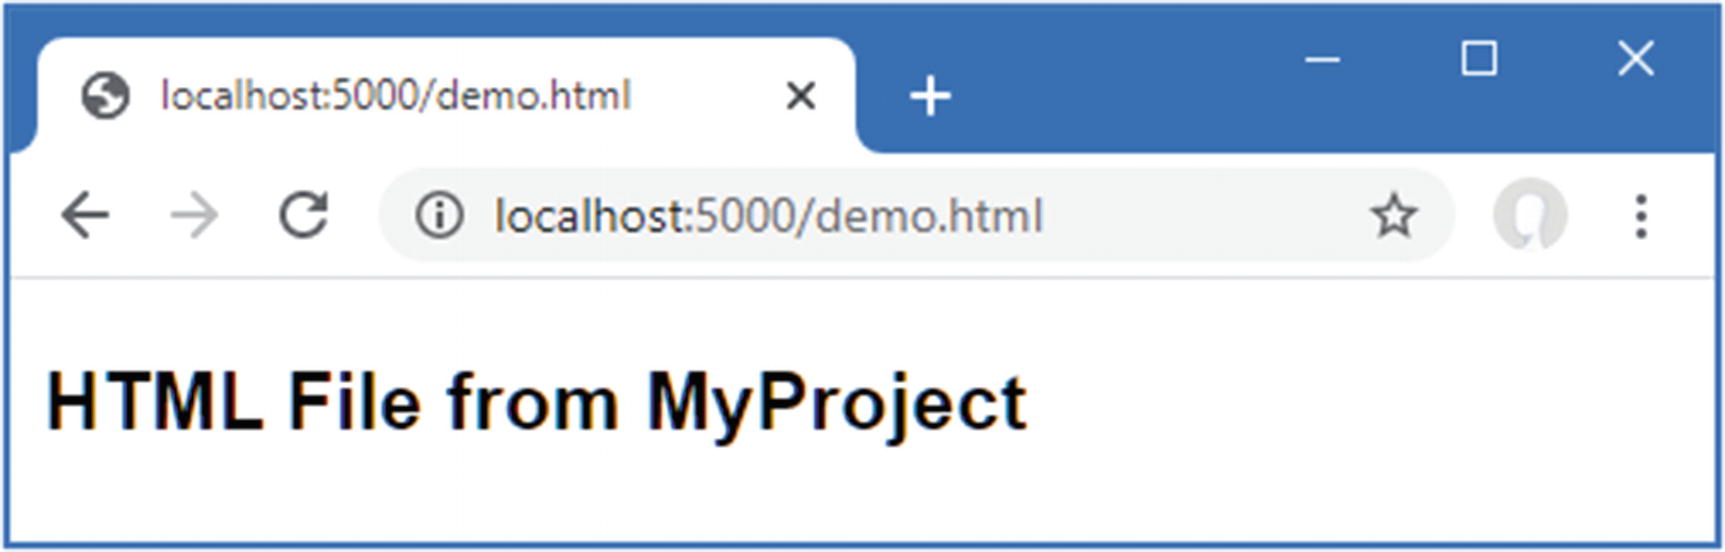
To build and run the project in a single step, select Debug Run ➤ Without Debugging. Visual Studio Code will compile and run the project and open a new browser window that will send an HTTP request to the ASP.NET Core server and produce the placeholder response. Request http://localhost:5000/demo.html, and you will receive the response shown in Figure 4-9.
Building and Running Projects Using Visual Studio
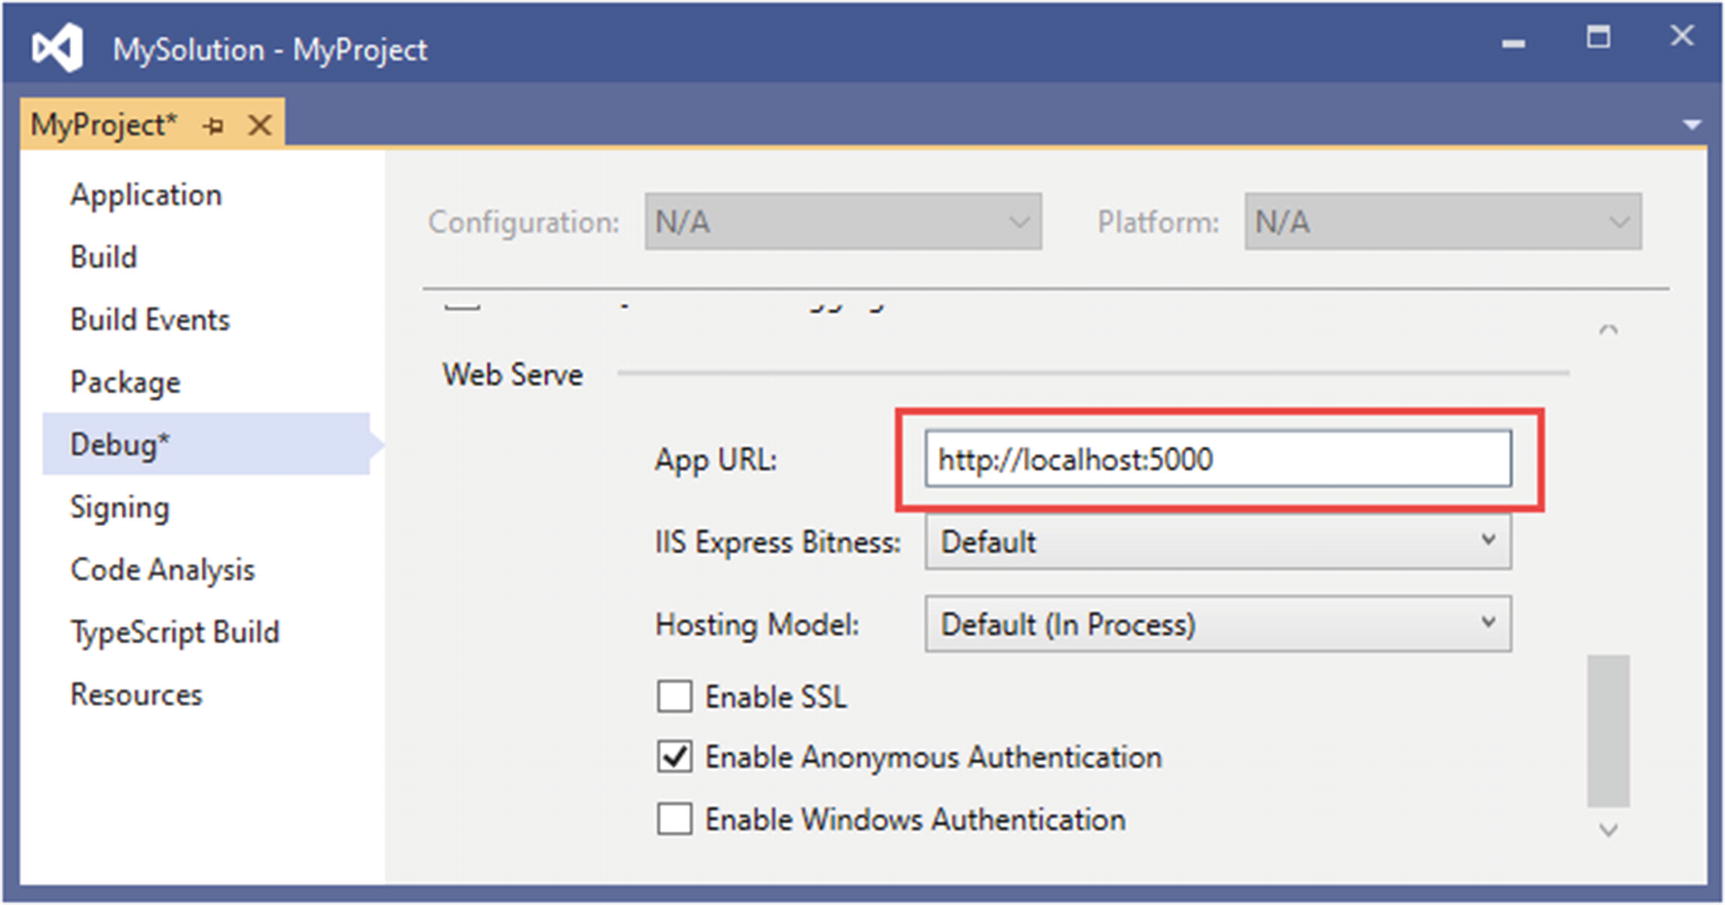
Changing the application port number
Select File ➤ Save All to apply the changes. To build the project, select Build Solution or Build MyProject from the Build menu. To build and run the project, select Debug ➤ Start Without Debugging. Once the project has been compiled, Visual Studio will open a new browser window, which sends an HTTP request that is received by IIS Express and passes it to the ASP.NET Core HTTP server, producing a placeholder response set up by the template used to create the project. Request http://localhost:5000/demo.html, and you will see the response shown in Figure 4-9.
IIS Express is generally reliable, but if you have problems, right-click the IIS Express icon in the Windows taskbar’s System Tray and select Exit from the popup menu.
Managing Packages
Most projects require additional features beyond those set up by the project templates, such as support for accessing databases or for making HTTP requests, neither of which is included in the standard ASP.NET Core packages added to the project by the template used to create the example project. In the sections that follow, I describe the tools available to manage the different types of packages that are used in ASP.NET Core development.
Managing NuGet Packages
Adding a Package to the Example Project
This command installs version 3.1.1 of the Microsoft.EntityFrameworkCore.SqlServer package. The package repository for .NET projects is nuget.org, where you can search for the package and see the versions available. The package installed in Listing 4-8, for example, is described at https://www.nuget.org/packages/Microsoft.EntityFrameworkCore.SqlServer/3.1.1.
You can see the packages installed in a project by running the command shown in Listing 4-9.
The project file—which is the file with the .csproj extension—is used to keep track of the packages added to a project. You can examine this file by opening it for editing in Visual Studio Code or by right-clicking the project item in the Visual Studio Solution Explorer and selecting Edit Project File from the popup menu.
Listing the Packages in a Project
Removing a Package from the Example Project
Managing Tool Packages
Installing a Tool Package
The first command removes the dotnet-ef package, which is named dotnet-ef. This command will produce an error if the package has not already been installed, but it is a good idea to remove existing versions before installing a package. The dotnet tool install command installs version 3.1.1 of the dotnet-ef package, which is the version I use in this book. The commands installed by tool packages are used through the dotnet command. To test the package installed in Listing 4-11, run the command shown in Listing 4-12 in the MyProject folder.
The --global arguments in Listing 4-11 mean the package is installed for global use and not just for a specific project. You can install tool packages into just one project, in which case the command is accessed with dotnet tool run <command>. The tools I use in this book are all installed globally.
Running a Tool Package Command
The commands added by this tool package are accessed using dotnet ef, and you will see examples in later chapters that rely on these commands.
Managing Client-Side Packages
Installing the LibMan Tool Package
Initializing the Example Project
Installing the Bootstrap CSS Framework
The command installs version 4.3.1 of the Bootstrap package, which is known by the name twitter-bootstrap on the CDNJS repository. There is some inconsistency in the way that popular packages are named on different repositories, and it is worth checking that you are getting the package you expect before adding to your project. The -d argument specifies the location into which the package is installed. The convention in ASP.NET Core projects is to install client-side packages into the wwwroot/lib folder.
Once the package has been installed, add the classes shown in Listing 4-16 to the elements in the demo.html file. This is how the features provided by the Bootstrap package are applied.
I don’t get into the details of using the Bootstrap CSS framework in this book. See https://getbootstrap.com for the Bootstrap documentation.
Applying Bootstrap Classes in the demo.html File in the wwwroot Folder

Using a client-side package
Managing Packages Using Visual Studio
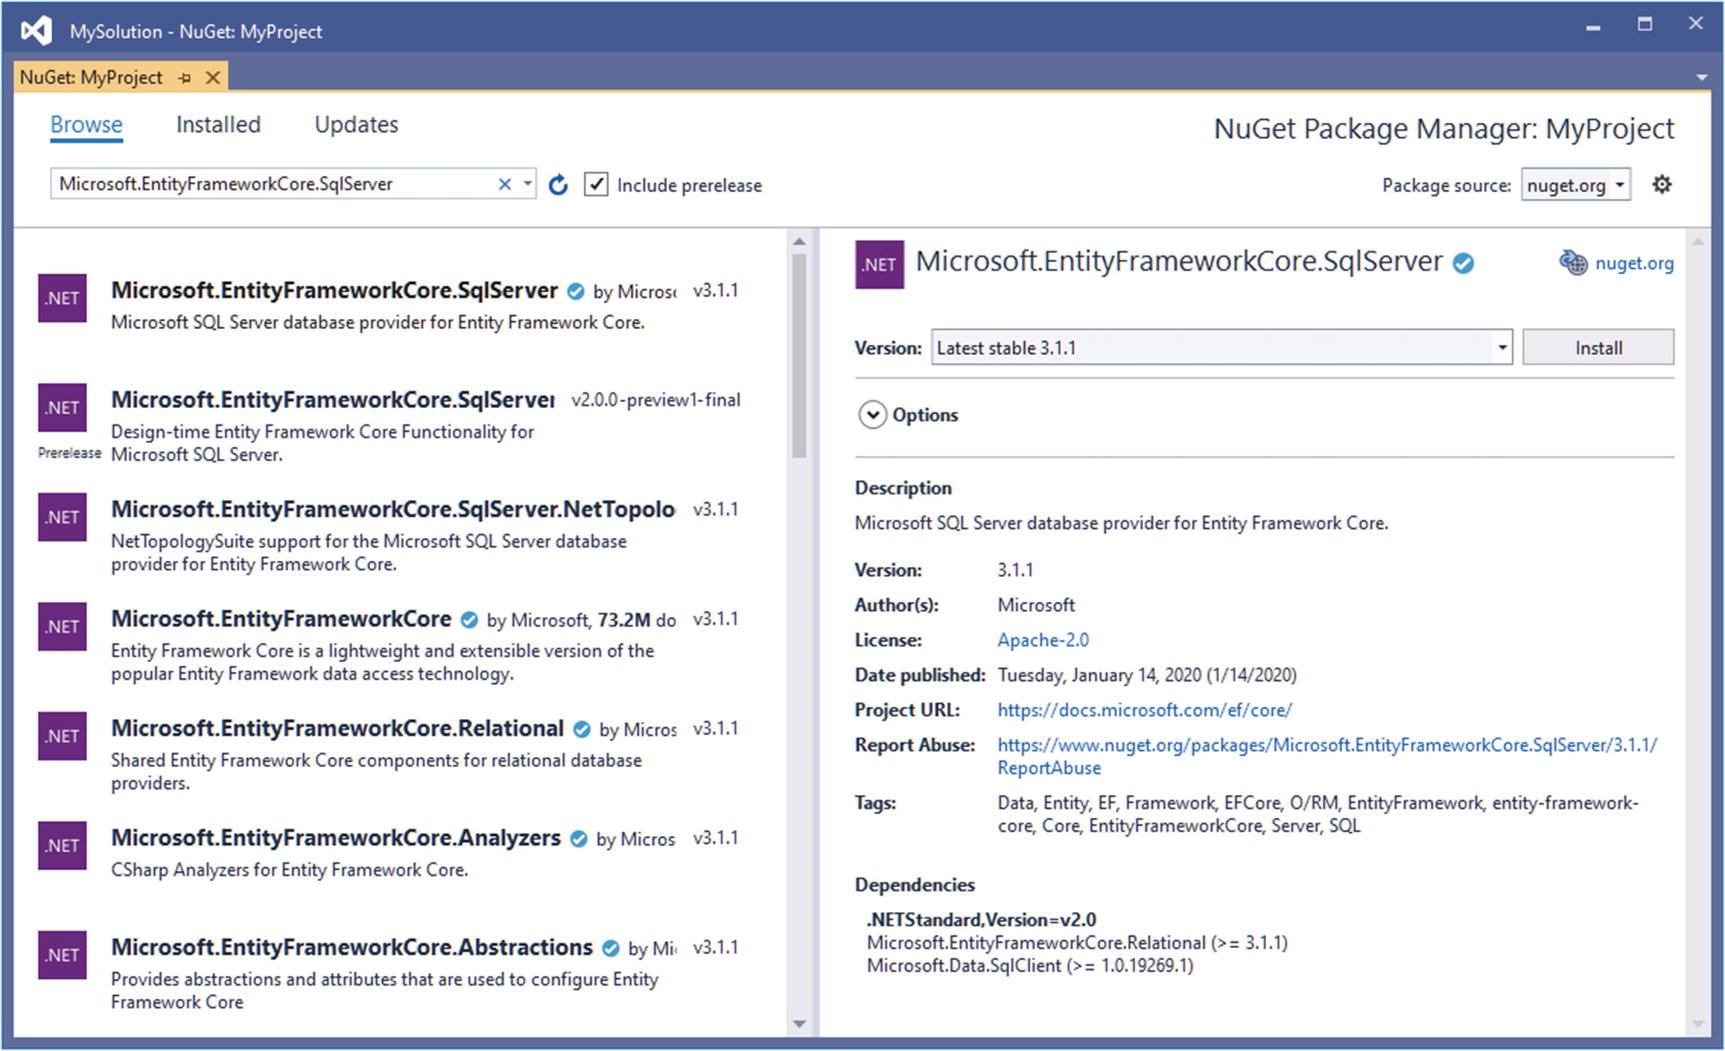
Using the Visual Studio package manager
The Visual Studio NuGet package manager cannot be used to install global tool packages, which can be installed only from the command line.
The Visual Studio NuGet package manager can also be used to inspect the packages that have been installed in the project and check whether new versions of packages are available.
Managing Client-Side Packages Using Visual Studio
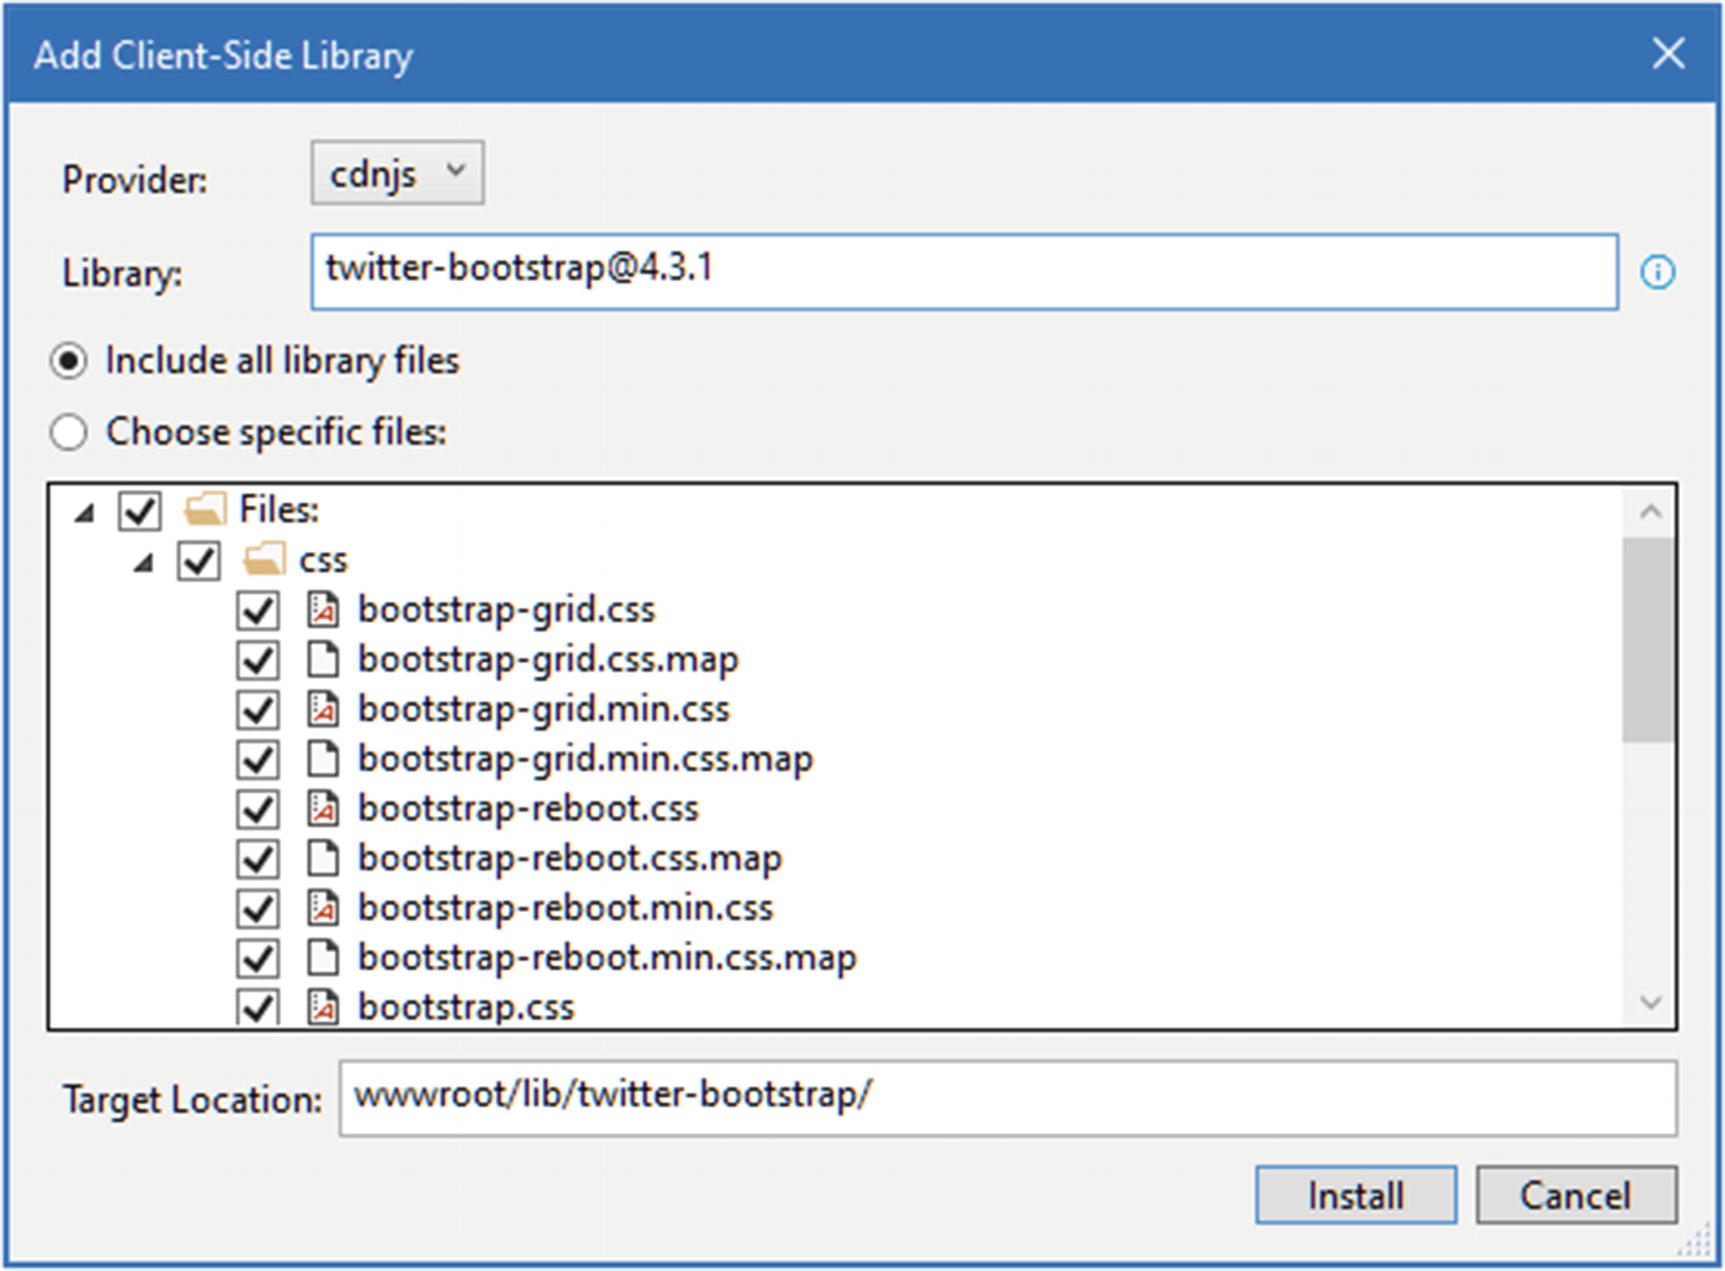
Using the Visual Studio client-side package manager
Debugging Projects

Setting a breakpoint
Start the project by selecting Debug ➤ Start Debugging, which is available in both Visual Studio and Visual Studio Code. (Choose .NET Core if Visual Studio Code prompts you to select an environment and then select the Start Debugging menu item again.)
The application will be started and continue normally until the statement to which the breakpoint is reached, at which point execution is halted. Execution can be controlled using the Debug menu or the controls that Visual Studio and Visual Studio Code display. Both debuggers are packed with features—more so if you have a paid-for version of Visual Studio—and I don’t describe them in depth in this book. The Visual Studio 2019 debugger is described at https://docs.microsoft.com/en-us/visualstudio/debugger/?view=vs-2019, and the Visual Studio Code debugger is described at https://code.visualstudio.com/docs/editor/debugging.
Debuggers are powerful tools, but I rarely use them. In most situations, I prefer to add System.Console.WriteLine statements to my code to figure out what is going on, which I can easily do because I tend to use the dotnet run command to run my projects from the command line. This is a rudimentary approach that works for me, not least because most of the errors in my code tend to be where statements are not being called because a condition in an if statement isn’t effective. If I want to examine an object in detail, I tend to serialize it to JSON and pass the result to the WriteLine method.
This may seem like madness if you are a dedicated user of the debugger, but it has the advantage of being quick and simple. When I am trying to figure out why code isn’t working, I want to explore and iterate quickly, and I find the amount of time taken to start the debugger to be a barrier. My approach is also reliable. The Visual Studio and Visual Studio Code debuggers are sophisticated, but they are not always entirely predictable, and .NET Core and ASP.NET Core change too quickly for the debugger features to have entirely settled down. When I am utterly confused by the behavior of some code, I want the simplest possible diagnostic tool, and that, for me, is a message written to the console.
I am not suggesting that this is the approach you should use, but it can be a good place to start when you are not getting the results you expect and you don’t want to battle with the debugger to figure out why.
Summary
In this chapter, I described the tools used for ASP.NET Core development. I explained that the command-line tools are the most concise and reliable way to work with ASP.NET Core projects, which is why I have used them in the examples in this book. I also demonstrated the alternative user interfaces that Visual Studio and Visual Studio Code provide, which can be a useful alternative for some—but not all—of the command-line tools. In the next chapter, I describe the C# feature that are essential for effective ASP.NET Core development.