In this chapter, I describe more of the features provided by Razor views. I show you how to pass additional data to a view using the view bang and how to use layouts and layout sections to reduce duplication. I also explain how the results from expressions are encoded and how to disable the encoding process. Table 22-1 summarizes the chapter.
Table 22-1.
Chapter Summary
Problem
Solution
Listing
Providing unstructured data to a view
Use the view bag
5, 6
Providing temporary data to a view
Use temp data
7, 8
Using the same content in multiple views
Use a layout
9–12, 15–18
Selecting the default layout for views
Use a view start file
13, 14
Interleaving unique and common content
Use layout sections
19–24
Creating reusable sections of content
Use a partial view
25–29
Inserting HTML into a response using a Razor expression
Encode the HTML
30–32
Including JSON in a view
Use the JSON encoder
33
Preparing for This Chapter
This chapter uses the WebApp project from Chapter 21. To prepare for this chapter, replace the contents of the HomeController.cs file with the code shown in Listing 22-1.
using Microsoft.AspNetCore.Mvc;
using System.Threading.Tasks;
using WebApp.Models;
namespace WebApp.Controllers {
public class HomeController: Controller {
private DataContext context;
public HomeController(DataContext ctx) {
context = ctx;
}
public async Task<IActionResult> Index(long id = 1) {
The Contents of the HomeController.cs File in the Controllers Folder
One of the features used in this chapter requires the session feature, which was described in Chapter 16. To enable sessions, add the statements shown in Listing 22-2 to the Startup class.
using System;
using System.Collections.Generic;
using System.Linq;
using Microsoft.AspNetCore.Builder;
using Microsoft.Extensions.DependencyInjection;
using Microsoft.Extensions.Configuration;
using Microsoft.EntityFrameworkCore;
using WebApp.Models;
namespace WebApp {
public class Startup {
public Startup(IConfiguration config) {
Configuration = config;
}
public IConfiguration Configuration { get; set; }
public void ConfigureServices(IServiceCollection services) {
public void Configure(IApplicationBuilder app, DataContext context) {
app.UseDeveloperExceptionPage();
app.UseStaticFiles();
app.UseSession();
app.UseRouting();
app.UseEndpoints(endpoints => {
endpoints.MapControllers();
endpoints.MapDefaultControllerRoute();
});
SeedData.SeedDatabase(context);
}
}
}
Listing 22-2.
Enabling Sessions in the Startup.cs File in the WebApp Folder
Dropping the Database
Open a new PowerShell command prompt, navigate to the folder that contains the WebApp.csproj file, and run the command shown in Listing 22-3 to drop the database.
Tip
You can download the example project for this chapter—and for all the other chapters in this book—from https://github.com/apress/pro-asp.net-core-3. See Chapter 1 for how to get help if you have problems running the examples.
dotnet ef database drop --force
Listing 22-3.
Dropping the Database
Running the Example Application
Once the database has been dropped, select Start Without Debugging or Run Without Debugging from the Debug menu, or use the PowerShell command prompt to run the command shown in Listing 22-4.
dotnet run
Listing 22-4.
Running the Example Application
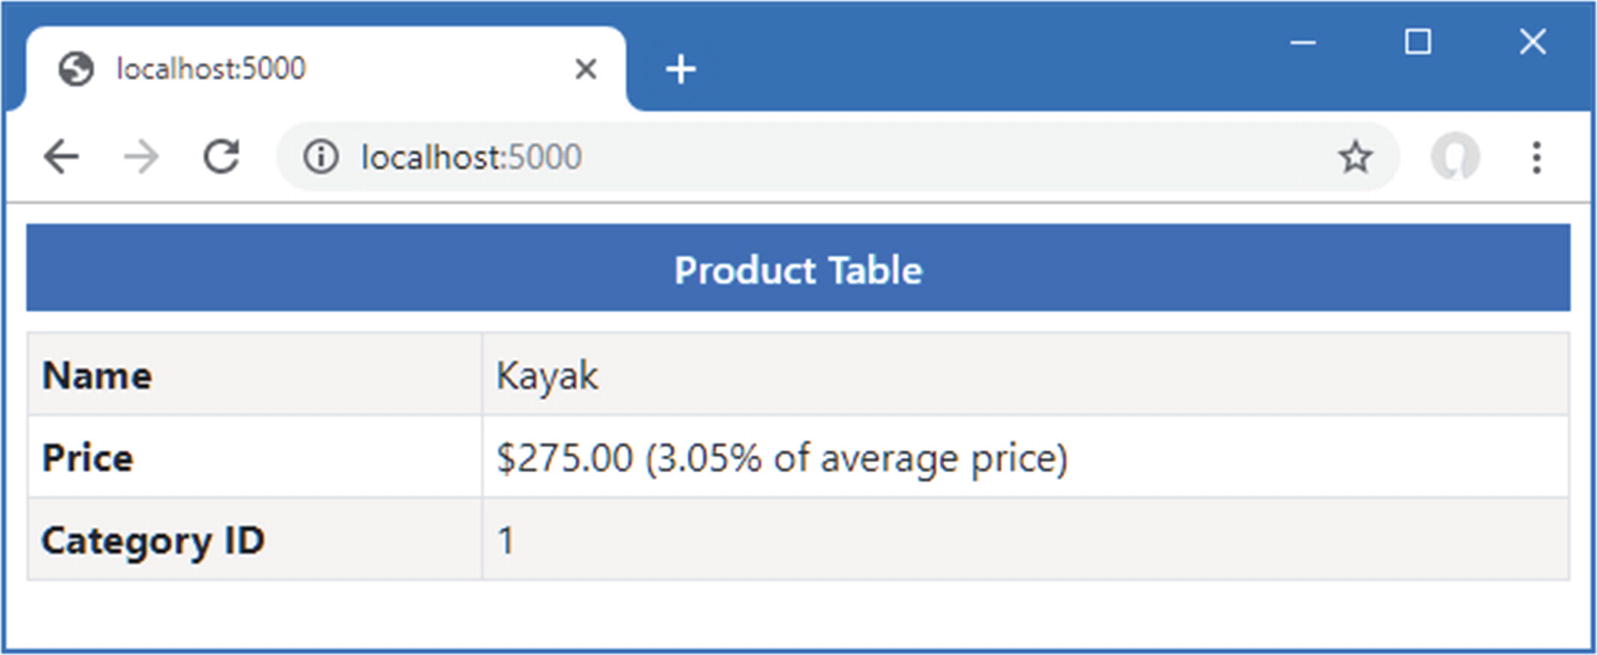
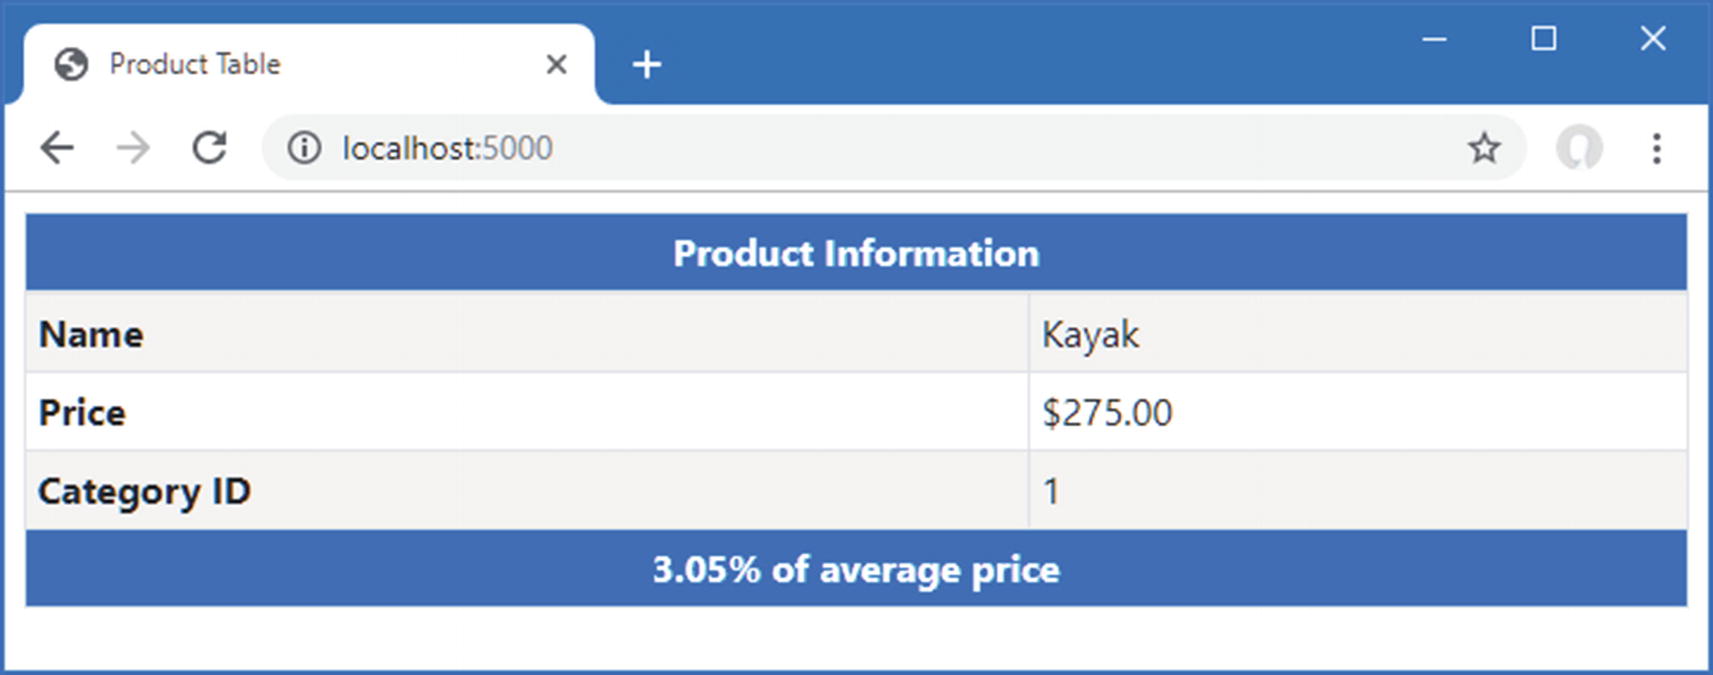
The database will be seeded as part of the application startup. Once ASP.NET Core is running, use a web browser to request http://localhost:5000, which will produce the response shown in Figure 22-1.
Figure 22-1.
Running the example application
Using the View Bag
Action methods provide views with data to display with a view model, but sometimes additional information is required. Action methods can use the view bag to provide a view with extra data, as shown in Listing 22-5.
using Microsoft.AspNetCore.Mvc;
using System.Threading.Tasks;
using WebApp.Models;
using Microsoft.EntityFrameworkCore;
namespace WebApp.Controllers {
public class HomeController: Controller {
private DataContext context;
public HomeController(DataContext ctx) {
context = ctx;
}
public async Task<IActionResult> Index(long id = 1) {
Using the View Bag in the HomeController.cs File in the Controllers Folder
The ViewBag property is inherited from the Controller base class and returns a dynamic object. This allows action methods to create new properties just by assigning values to them, as shown in the listing. The values assigned to the ViewBag property by the action method are available to the view through a property also called ViewBag, as shown in Listing 22-6.
Using the View Bag in the Index.cshtml File in the Views/Home Folder
The ViewBag property conveys the object from the action to the view, alongside the view model object. In the listing, the action method queries for the average of the Product.Price properties in the database and assigns it to a view bag property named AveragePrice, which the view uses in an expression. Restart ASP.NET Core and use a browser to request http://localhost:5000, which produces the response shown in Figure 22-2.
Figure 22-2.
Using the view bag
When to use the View Bag
The view bag works best when it is used to provide the view with small amounts of supplementary data without having to create new view model classes for each action method. The problem with the view bag is that the compiler cannot check the use of the properties on dynamic objects, much like views that don’t use an @model expression. It can be difficult to judge when a new view model class should be used, and my rule of thumb is to create a new view model class when the same view model property is used by multiple actions or when an action method adds more than two or three properties to the view bag.
Using Temp Data
The temp data feature allows a controller to preserve data from one request to another, which is useful when performing redirections. Temp data is stored using a cookie unless session state is enabled when it is stored as session data. Unlike session data, temp data values are marked for deletion when they are read and removed when the request has been processed.
Add a class file called CubedController.cs to the WebApp/Controllers folder and use it to define the controller shown in Listing 22-7.
using Microsoft.AspNetCore.Mvc;
using System;
namespace WebApp.Controllers {
public class CubedController: Controller {
public IActionResult Index() {
return View("Cubed");
}
public IActionResult Cube(double num) {
TempData["value"] = num.ToString();
TempData["result"] = Math.Pow(num, 3).ToString();
return RedirectToAction(nameof(Index));
}
}
}
Listing 22-7.
The Contents of the CubedController.cs File in the Controllers Folder
The Cubed controller defines an Index method that selects a view named Cubed. There is also a Cube action, which relies on the model binding process to obtain a value for its num parameter from the request (a process described in detail in Chapter 28). The Cubed action method performs its calculation and stores the num value and the calculation result using TempData property, which returns a dictionary that is used to store key/value pairs. Since the temp data feature is built on top of the sessions feature, only values that can be serialized to strings can be stored, which is why I convert both double values to strings in Listing 22-7. Once the values are stored as temp data, the Cube method performs a redirection to the Index method. To provide the controller with a view, add a Razor view file named Cubed.cshtml to the WebApp/Views/Shared folder with the content shown in Listing 22-8.
The cube of @TempData["value"] is @TempData["result"]
</div>
}
</body>
</html>
Listing 22-8.
The Contents of the Cubed.cshtml File in the Views/Shared Folder
The base class used for Razor views provides access to the temp data through a TempData property, allowing values to be read within expressions. In this case, temp data is used to set the content of an input element and display a results summary. Reading a temp data value doesn’t remove it immediately, which means that values can be read repeatedly in the same view. It is only once the request has been processed that the marked values are removed.
To see the effect, restart ASP.NET Core, use a browser to navigate to http://localhost:5000/cubed, enter a value into the form field, and click the Submit button. The browser will send a request that will set the temp data and trigger the redirection. The temp data values are preserved for the new request, and the results are displayed to the user. But reading the data values marks them for deletion, and if you reload the browser, the contents of the input element and the results summary are no longer displayed, as shown in Figure 22-3.
Tip
The object returned by the TempData property provides a Peek method, which allows you to get a data value without marking it for deletion, and a Keep method, which can be used to prevent a previously read value from being deleted. The Keep method doesn’t protect a value forever. If the value is read again, it will be marked for removal once more. Use session data if you want to store items so that they won’t be removed when the request is processed.
Figure 22-3.
Using temp data
Using the Temp Data Attribute
Controllers can define properties that are decorated with the TempData attribute, which is an alternative to using the TempData property, like this:
using Microsoft.AspNetCore.Mvc;
using System;
namespace WebApp.Controllers {
public class CubedController: Controller {
public IActionResult Index() {
return View("Cubed");
}
public IActionResult Cube(double num) {
Value = num.ToString();
Result = Math.Pow(num, 3).ToString();
return RedirectToAction(nameof(Index));
}
[TempData]
public string Value { get; set; }
[TempData]
public string Result { get; set; }
}
}
The values assigned to these properties are automatically added to the temp data store, and there is no difference in the way they are accessed in the view. My preference is to use the TempData dictionary to store values because it makes the intent of the action method obvious to other developers. However, both approaches are entirely valid, and choosing between them is a matter of preference.
Working with Layouts
The views in the example application contain duplicate elements that deal with setting up the HTML document, defining the head section, loading the Bootstrap CSS file, and so on. Razor supports layouts, which avoid this sort of duplication by consolidating common content in a single file that can be used by any view.
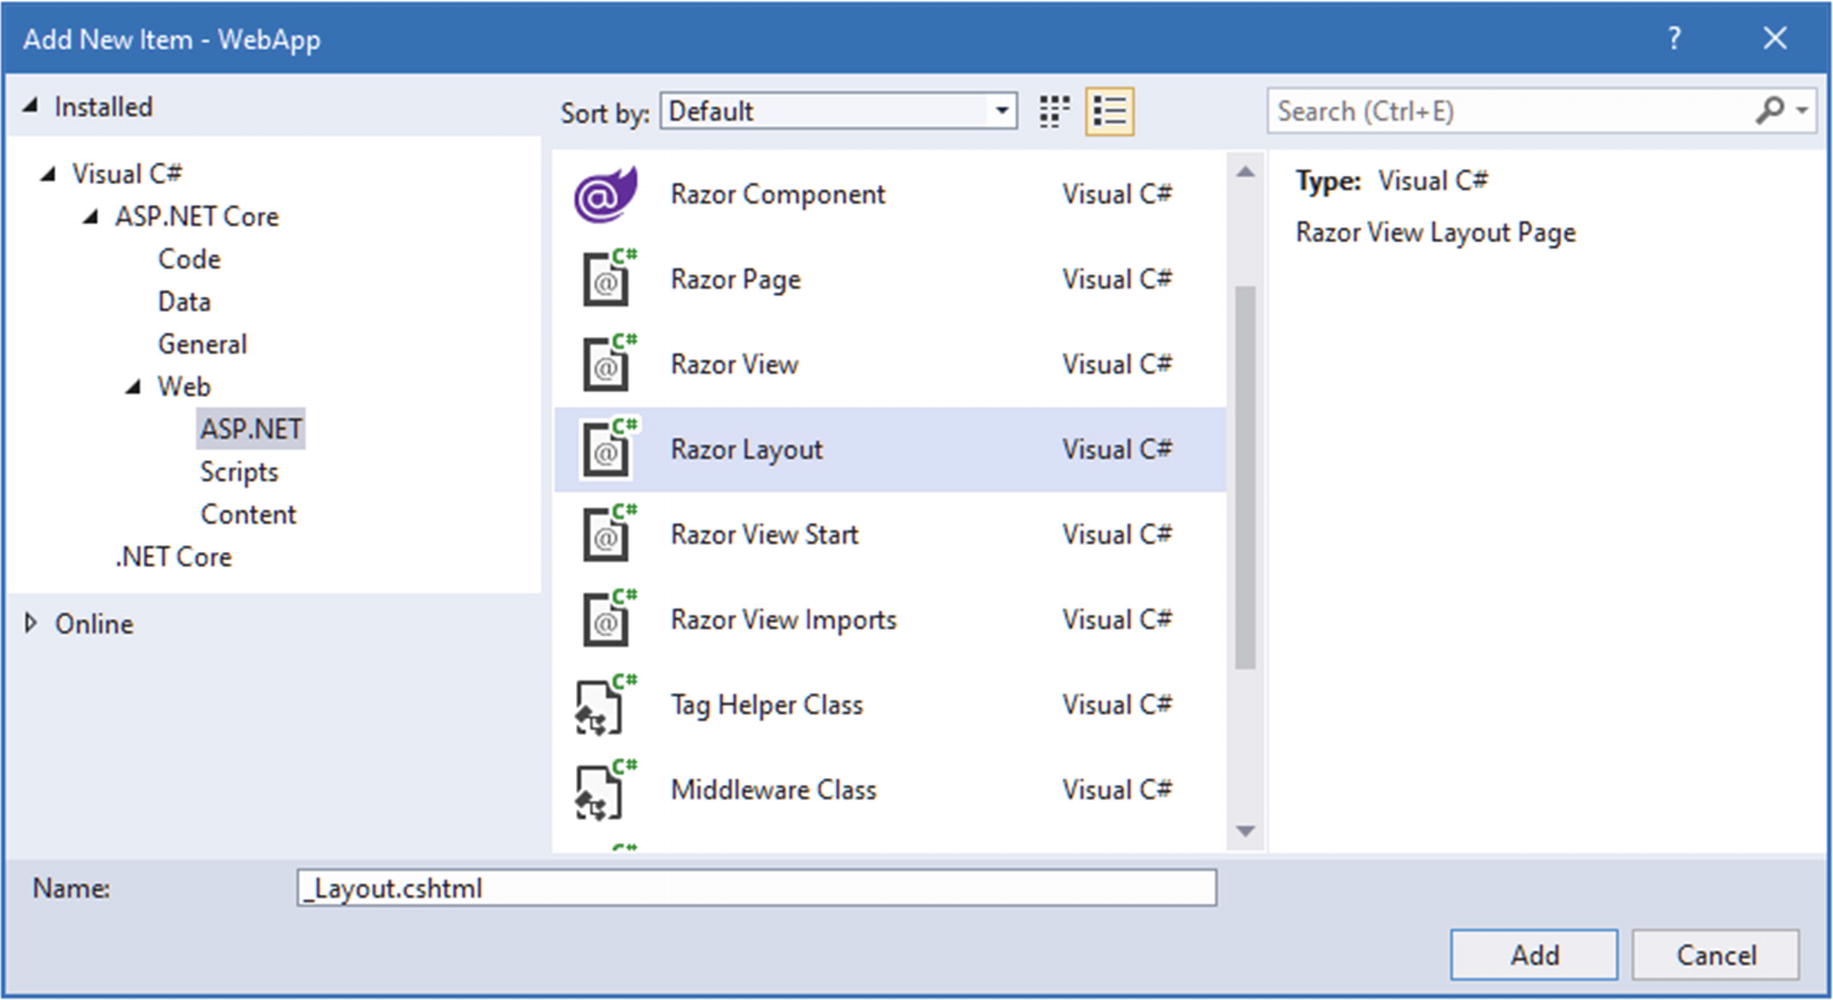
Layouts are typically stored in the Views/Shared folder because they are usually used by the action methods of more than one controller. If you are using Visual Studio, right-click the Views/Shared folder, select Add ➤ New Item from the popup menu, and choose the Razor Layout template, as shown in Figure 22-4. Make sure the name of the file is _Layout.cshtml and click the Add button to create the new file. Replace the content added to the file by Visual Studio with the elements shown in Listing 22-9.
Figure 22-4.
Creating a layout
If you are using Visual Studio Code, create a file named _Layout.cshtml in the Views/Shared folder and add the content shown in Listing 22-9.
The Contents of the _Layout.cshtml File in the Views/Shared Folder
The layout contains the common content that will be used by multiple views. The content that is unique to each view is inserted into the response by calling the RenderBody method, which is inherited by the RazorPage<T> class, as described in Chapter 21. Views that use layouts can focus on just their unique content, as shown in Listing 22-10.
Using a Layout in the Index.cshtml File in the Views/Home Folder
The layout is selected by adding a code block, denoted by the @{ and } characters, that sets the Layout property inherited from the RazorPage<T> class. In this case, the Layout property is set to the name of the layout file. As with normal views, the layout is specified without a path or file extension, and the Razor engine will search in the /Views/[controller] and /Views/Shared folders to find a matching file. Use the browser to request http://localhost:5000, and you will see the response shown in Figure 22-5.
Figure 22-5.
Using a layout
Configuring Layouts Using the View Bag
The view can provide the layout with data values, allowing the common content provided by the view to be customized. The view bag properties are defined in the code block that selects the layout, as shown in Listing 22-11.
Using a View Bag Property in the _Layout.cshtml File in the Views/Shared Folder
The Title property is used to set the content of the title element and h6 element in the body section. Layouts cannot rely on view bag properties being defined, which is why the expression in the h6 element provides a fallback value if the view doesn’t define a Title property. To see the effect of the view bag property, use a browser to request http://localhost:5000, which produces the response shown in Figure 22-6.
Understanding View Bag Precedence
The values defined by the view take precedence if the same view bag property is defined by the view and the action method. If you want to allow the action to override the value defined in the view, then use a statement like this in the view code block:
...
@{
Layout = "_Layout";
ViewBag.Title = ViewBag.Title ?? "Product Table";
}
...
This statement will set the value for the Title property only if it has not already been defined by the action method.
Figure 22-6.
Using a view bag property to configure a layout
Using a View Start File
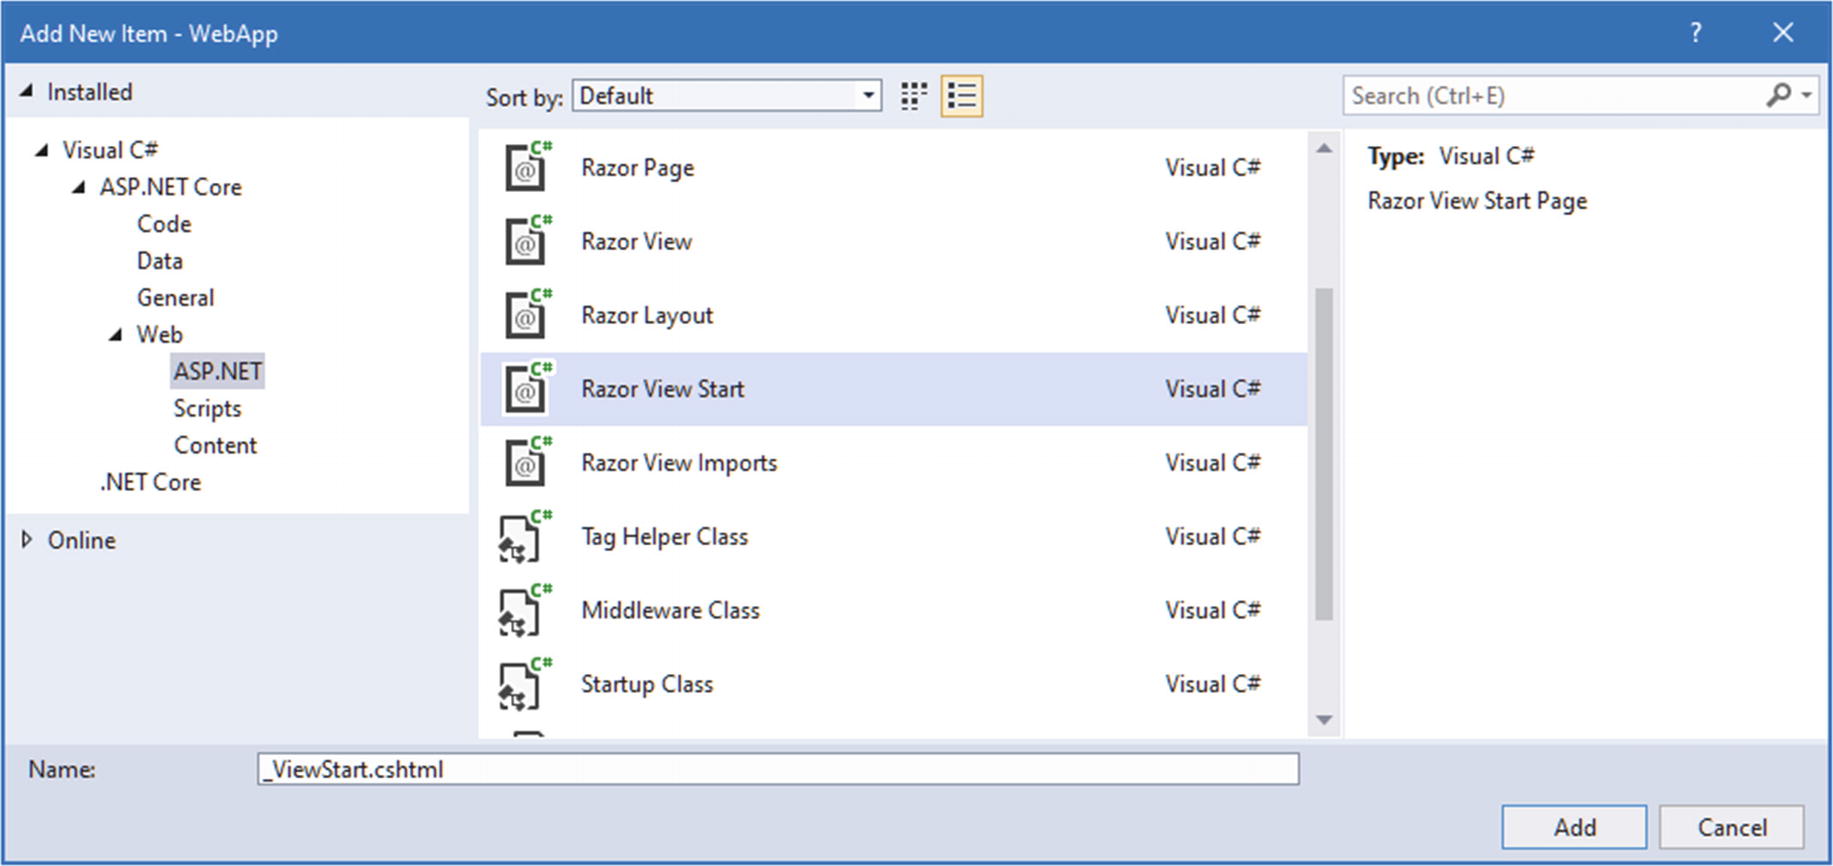
Instead of setting the Layout property in every view, you can add a view start file to the project that provides a default Layout value. If you are using Visual Studio, right-click the Views folder item in the Solution Explorer, select Add ➤ New Item, and locate the Razor View Start template, as shown in Figure 22-7. Make sure the name of the file is _ViewStart.cshtml and click the Add button to create the file, which will have the content shown in Listing 22-13.
Figure 22-7.
Creating a view start file
If you are using Visual Studio Code, then add a file named _ViewStart.cshtml to the Views folder and add the content shown in Listing 22-13.
@{
Layout = "_Layout";
}
Listing 22-13.
The Contents of the _ViewStart.cshtml File in the Views Folder
The file contains sets the Layout property, and the value will be used as the default. Listing 22-14 removes the content from the Common.cshtml file that is contained in the layout.
Removing Content in the Common.cshtml File in the Views/Shared Folder
The view doesn’t define a view model type and doesn’t need to set the Layout property because the project contains a view start file. The result is that the content in Listing 22-14 will be added to the body section of the HTML content of the response. Use a browser to navigate to http://localhost:5000/second, and you will see the response in Figure 22-8.
Figure 22-8.
Using a view start file
Overriding the Default Layout
There are two situations where you may need to define a Layout property in a view even when there is a view start file in the project. In the first situation, a view requires a different layout from the one specified by the view start file. To demonstrate, add a Razor layout file named _ImportantLayout.cshtml to the Views/Shared folder with the content shown in Listing 22-15.
The Contents of the _ImportantLayout.cshtml File in the Views/Shared Folder
In addition to the HTML document structure, this file contains a header element that displays Important in large text. Views can select this layout by assigning its name to the Layout property, as shown in Listing 22-16.
Tip
If you need to use a different layout for all the actions of a single controller, then add a view start file to the Views/[controller] folder that selects the view you require. The Razor engine will use the layout specified by the controller-specific view start file.
Using a Specific Layout in the Index.cshtml File in the Views/Home Folder
The Layout value in the view start file is overridden by the value in the view, allowing different layouts to be applied. Use a browse to request http://localhost:5000, and the response will be produced using the new layout, as shown in Figure 22-9.
Selecting a Layout Programmatically
The value that a view assigns to the Layout property can be the result of an expression that allows layouts to be selected by the view, similar to the way that action methods can select views. Here is an example that selects the layout based on a property defined by the view model object:
The layout named _ImportantLayout is selected when the value of the view model object’s Price property is greater than 100; otherwise, _Layout is used.
Figure 22-9.
Specifying a layout in a view
The second situation where a Layout property can be needed is when a view contains a complete HTML document and doesn’t require a layout at all. To see the problem, open a new PowerShell command prompt and run the command shown in Listing 22-17.
This command sends an HTTP GET request whose response will be produced using the List.cshtml file in the Views/Home folder. This view contains a complete HTML document, which is combined with the content in the view specified by the view start file, producing a malformed HTML document, like this:
The structural elements for the HTML document are duplicated, so there are two html, head, body, and link elements. Browsers are adept at handling malformed HTML but don’t always cope with poorly structured content. Where a view contains a complete HTML document, the Layout property can be set to null, as shown in Listing 22-18.
Disabling Layouts in the List.cshtml File in the Views/Home Folder
Save the view and run the command shown in Listing 22-17 again, and you will see that the response contains only the elements in the view and that the layout has been disabled.
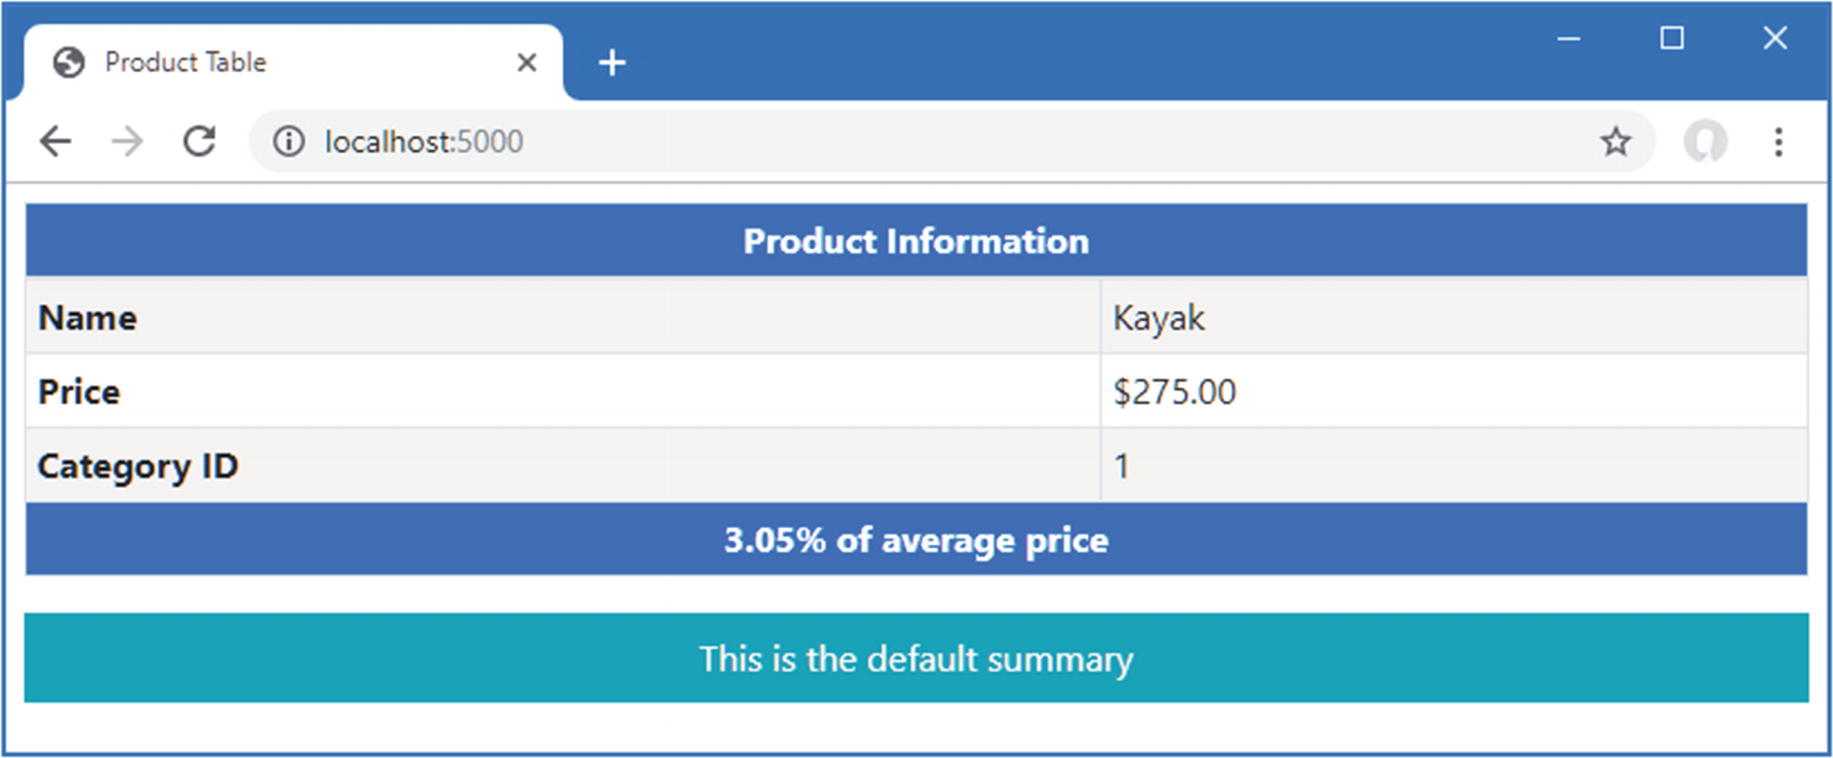
The Razor view engine supports the concept of sections, which allow you to provide regions of content within a layout. Razor sections give greater control over which parts of the view are inserted into the layout and where they are placed. To demonstrate the sections feature, I have edited the /Views/Home/Index.cshtml file, as shown in Listing 22-19.
Defining Sections in the Index.cshtml File in the Views/Home Folder
Sections are defined using the Razor @section expression followed by a name for the section. Listing 22-19 defines sections named Header and Footer, and sections can contain the same mix of HTML content and expressions, just like the main part of the view. Sections are applied in a layout with the @RenderSection expression, as shown in Listing 22-20.
Using Sections in the _Layout.cshtml File in the Views/Shared Folder
When the layout is applied, the RenderSection expression inserts the content of the specified section into the response. The regions of the view that are not contained within a section are inserted into the response by the RenderBody method. To see how the sections are applied, use a browser to request http://localhost:5000, which provides the response shown in Figure 22-10.
Note
A view can define only the sections that are referred to in the layout. The view engine throws an exception if you define sections in the view for which there is no corresponding @RenderSection expression in the layout.
Figure 22-10.
Using sections in a layout
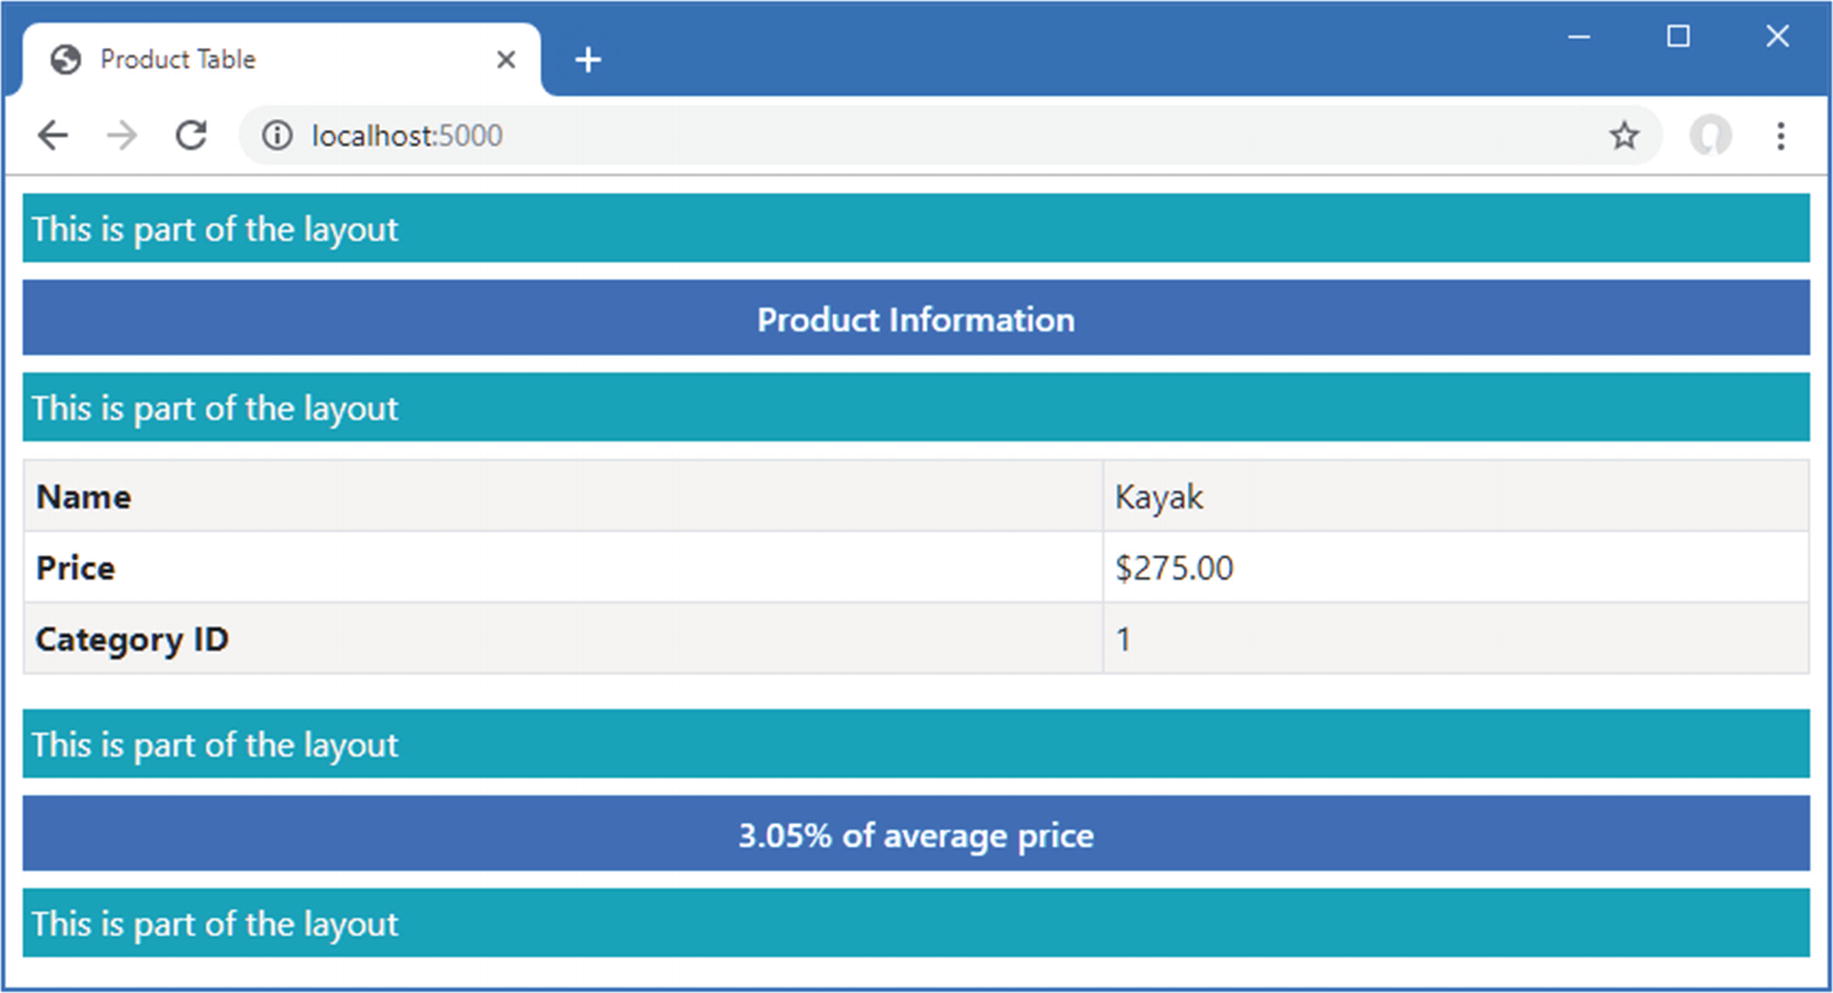
Sections allow views to provide fragments of content to the layout without specifying how they are used. As an example, Listing 22-21 redefines the layout to consolidate the body and sections into a single HTML table.
Using a Table in the _Layout.cshtml File in the Views/Shared Folder
To see the effect of the change to the view, use a browser to request http://localhost:5000, which will produce the response shown in Figure 22-11.
Figure 22-11.
Changing how sections are displayed in a layout
Using Optional Layout Sections
By default, a view must contain all the sections for which there are RenderSection calls in the layout, and an exception will be thrown if the layout requires a section that the view hasn’t defined. Listing 22-22 adds a call to the RenderSection method that requires a section named Summary.
Adding a Section in the _Layout.cshtml File in the Views/Shared Folder
Use a browser to request http://localhost:5000, and you will see the exception shown in Figure 22-12.
Figure 22-12.
Attempting to render a nonexistent view section
There are two ways to solve this problem. The first is to create an optional section, which will be rendered only if it is defined by the view. Optional sections are created by passing a second argument to the RenderSection method, as shown in Listing 22-23.
Defining an Optional Section in the _Layout.cshtml File in the Views/Shared Folder
The second argument specifies whether a section is required, and using false prevents an exception when the view doesn’t define the section.
Testing for Layout Sections
The IsSectionDefined method is used to determine whether a view defines a specified section and can be used in an if expression to render fallback content, as shown in Listing 22-24.
Checking for a Section in the _Layout.cshtml File in the Views/Shared Folder
The IsSectionDefined method is invoked with the name of the section you want to check and returns true if the view defines that section. In the example, I used this helper to render fallback content when the view does not define the Summary section. To see the fallback content, use a browser to request http://localhost:5000, which produces the response shown in Figure 22-13.
Figure 22-13.
Displaying fallback content for a view section
Using Partial Views
You will often need to use the same set of HTML elements and expressions in several different places. Partial views are views that contain fragments of content that will be included in other views to produce complex responses without duplication.
Enabling Partial Views
Partial views are applied using a feature called tag helpers, which are described in detail in Chapter 25; tag helpers are configured in the view imports file, which was added to the project in Chapter 21. To enable the feature required for partial views, add the statement shown in Listing 22-25 to the _ViewImports.cshtml file.
Enabling Tag Helpers in the _ViewImports.cshtml File in the Views Folder
Creating a Partial View
Partial views are just regular CSHTML files, and it is only the way they are used that differentiates them from standard views. If you are using Visual Studio, right-click the Views/Home folder, select Add ➤ New Item, and use the Razor View template to create a file named _RowPartial.cshtml. Once the file has been created, replace the contents with those shown in Listing 22-26. If you are using Visual Studio Code, add a file named _RowPartial.cshtml to the Views/Home folder and add to it the content shown in Listing 22-26.
Tip
Visual Studio provides some tooling support for creating prepopulated partial views, but the simplest way to create a partial view is to create a regular view using the Razor View item template.
@model Product
<tr>
<td>@Model.Name</td>
<td>@Model.Price</td>
</tr>
Listing 22-26.
The Contents of the _RowPartial.cshtml File in the Views/Home Folder
The model expression is used to define the view model type for the partial view, which contains the same mix of expressions and HTML elements as regular views. The content of this partial view creates a table row, using the Name and Price properties of a Product object to populate the table cells.
Applying a Partial View
Partial views are applied by adding a partial element in another view or layout. In Listing 22-27, I have added the element to the List.cshtml file so the partial view is used to generate the rows in the table.
Using a Partial View in the List.cshtml File in the Views/Home Folder
The attributes applied to the partial element control the selection and configuration of the partial view, as described in Table 22-2.
Table 22-2.
The partial Element Attributes
Name
Description
name
This property specifies the name of the partial view, which is located using the same search process as regular views.
model
This property specifies the value that will be used as the view model object for the partial view.
for
This property is used to define an expression that selects the view model object for the partial view, as explained next.
view-data
This property is used to provide the partial view with additional data.
The partial element in Listing 22-27 uses the name attribute to select the _RowPartial view and the model attribute to select the Product object that will be used as the view model object. The partial element is applied within the @foreach expression, which means that it will be used to generate each row in the table, which you can see by using a browser to request http://localhost:5000/home/list to produce the response shown in Figure 22-14.
Figure 22-14.
Using a partial view
Using the HTML Helper to Apply Partial Views
In earlier versions of ASP.NET Core, partial views were applied using the Html property that is added to the C# class generated from the view, as explained in Chapter 21. The object returned by the Html property implements the IHtmlHelper interface, through which views can be applied, like this:
...
@Html.Partial("_RowPartial")
...
This type of expression works and is still supported, but the partial element provides a more elegant approach that is consistent with the rest of the HTML elements in the view.
Selecting the Partial View Model Using an Expression
The for attribute is used to set the partial view’s model using an expression that is applied to the view’s model, which is a feature more easily demonstrated than described. Add a partial view named _CellPartial.cshtml to the Views/Home folder with the content shown in Listing 22-28.
@model string
<td class="bg-info text-white">@Model</td>
Listing 22-28.
The Contents of the _CellPartial.cshtml File in the Views/Home Folder
This partial view has a string view model object, which it uses as the contents of a table cell element; the table cell element is styled using the Bootstrap CSS framework. In Listing 22-29, I have added a partial element to the _RowPartial.cshtml file that uses the _CellPartial partial view to display the table cell for the name of the Product object.
@model Product
<tr>
<partial name="_CellPartial" for="Name" />
<td>@Model.Price</td>
</tr>
Listing 22-29.
Using a Partial View in the _RowPartial.cshtml File in the Views/Home Folder
The for attribute selects the Name property as the model for the _CellPartial partial view. To see the effect, use a browser to request http://localhost:5000/home/list, which will produce the response shown in Figure 22-15.
Figure 22-15.
Selecting a model property for use in a partial view
Using Templated Delegates
Templated delegates are an alternative way of avoiding duplication in a view. Templated delegates are defined in a code block, like this:
The template is a function that accepts a Product input object and returns a dynamic result. Within the template expression, the input object is referred to as item in expressions. The templated delegate is invoked as a method expression to generate content.
...
<tbody>
@foreach (Product p in Model) {
@row(p)
}
</tbody>
...
I find this feature awkward and prefer using partial views, although this is a matter of preference and habit rather than any objective problems with the way that templated delegates work.
Understanding Content-Encoding
Razor views provide two useful features for encoding content. The HTML content-encoding feature ensures that expression responses don’t change the structure of the response sent to the browser, which is an important security feature. The JSON encoding feature encodes an object as JSON and inserts it into the response, which can be a useful debugging feature and can also be useful when providing data to JavaScript applications. Both encoding features are described in the following sections.
Understanding HTML Encoding
The Razor view engine encodes expression results to make them safe to include in an HTML document without changing its structure. This is an important feature when dealing with content that is provided by users, who may try to subvert the application or accidentally enter dangerous content. Listing 22-30 adds an action method to the Home controller that passes a fragment of HTML to the View method.
using Microsoft.AspNetCore.Mvc;
using System.Threading.Tasks;
using WebApp.Models;
using Microsoft.EntityFrameworkCore;
namespace WebApp.Controllers {
public class HomeController: Controller {
private DataContext context;
public HomeController(DataContext ctx) {
context = ctx;
}
public async Task<IActionResult> Index(long id = 1) {
return View((object)"This is a <h3><i>string</i></h3>");
}
}
}
Listing 22-30.
Adding an Action in the HomeController.cs File in the Controllers Folder
The new action passes a string that contains HTML elements. To create the view for the new action method, add a Razor view file named Html.cshtml to the Views/Home folder with the content shown in Listing 22-31.
Tip
Notice that I cast the string passed to the View method as an object, without which the string is assumed to be the name of a view and not the view model object.
The Contents of the Html.cshtml File in the Views/Home Folder
Restart ASP.NET Core and use a browser to request http://localhost:5000/home/html. The response, which is shown on the left of Figure 22-17, shows how the potentially dangerous characters in the view model string have been escaped.
To include the result of an expression without safe encoding, you can invoke the Html.Raw method. The Html property is one of the properties added to the generated view class, described in Chapter 21, which returns an object that implements the IHtmlHelper interface, as shown in Listing 22-32.
Disabling Encoding in the Html.cshtml File in the Views/Home Folder
Request the http://localhost:5000/home/html URL again, and you will see that the view model string is passed on without being encoded and is then interpreted by the browser as part of the HTML document, as shown on the right of Figure 22-16.
Caution
Do not disable safe encoding unless you are entirely confident that no malicious content will be passed to the view. Careless use of this feature presents a security risk to your application and your users.
Figure 22-16.
HTML result encoding
Understanding JSON Encoding
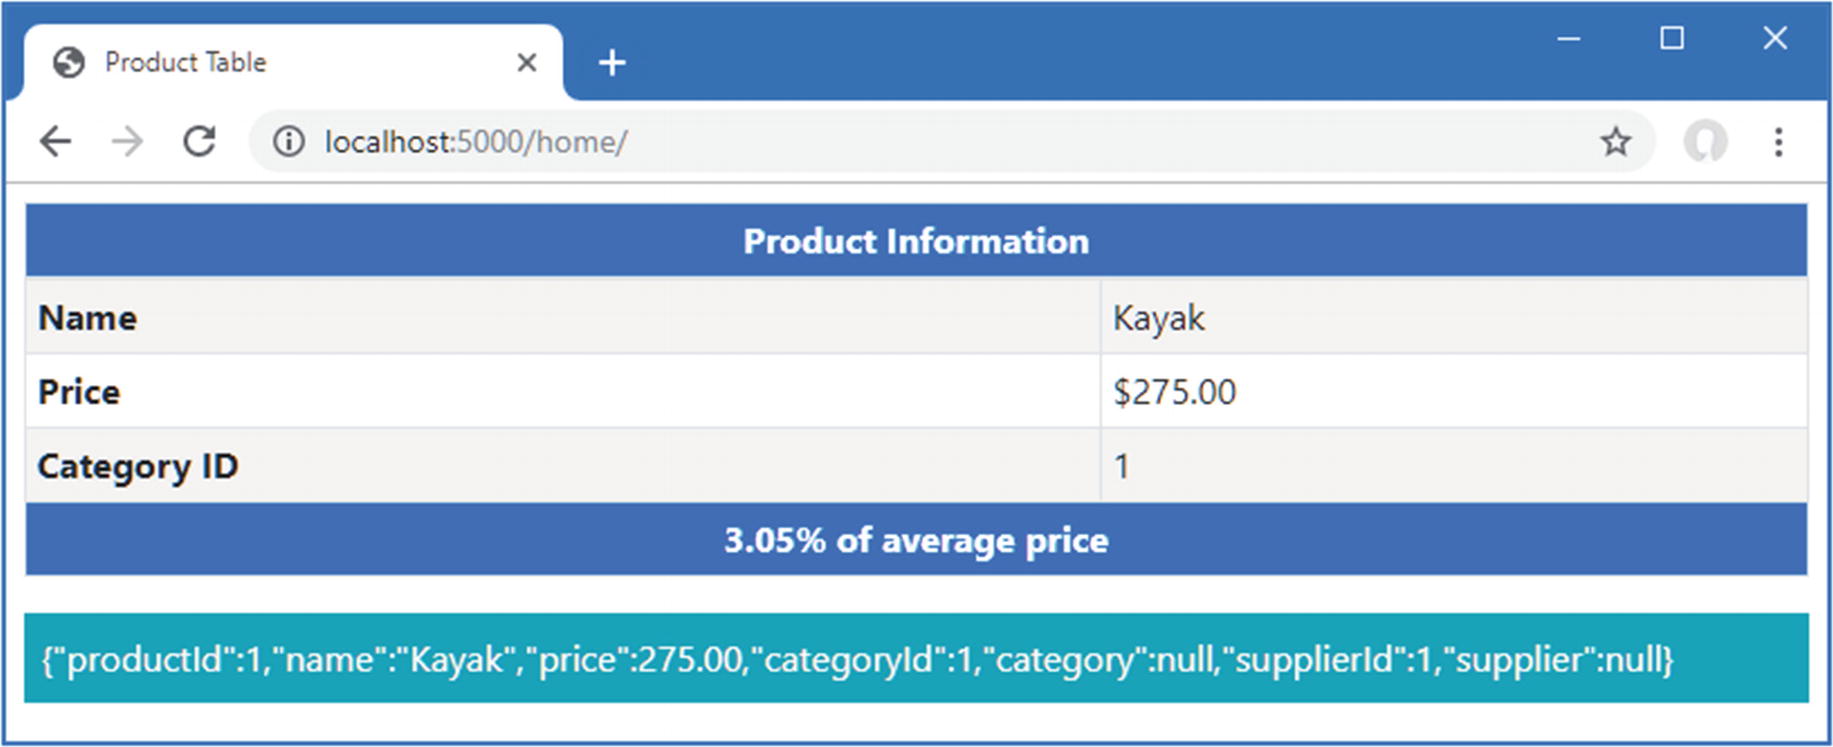
The Json property, which is added to the class generated from the view, as described in Chapter 21, can be used to encode an object as JSON. The most common use for JSON data is in RESTful web services, as described in earlier chapters, but I find the Razor JSON encoding feature useful as a debugging aid when I don’t get the output I expect from a view. Listing 22-33 adds a JSON representation of the view model object to the output produced by the Index view.
Using JSON Encoding in the Index.cshtml File in the Views/Home Folder
The Json property returns an implementation of the IJsonHelper interface, whose Serialize method produces a JSON representation of an object. Use a browser to request http://localhost:5000, and you will see the response shown in Figure 22-17, which includes JSON in the Summary section of the view.
Figure 22-17.
Encoding an expression result as JSON
Summary
In this chapter, I continued to describe the features available in Razor views. I showed you how to use the view bag, how to use layouts and partial views to deal with common content, and how to manage the encoding process for expression results. In the next chapter, I introduce Razor Pages, which provides an alternative way to generate HTML responses.