© Adam Freeman 2020
A. FreemanPro ASP.NET Core 3https://doi.org/10.1007/978-1-4842-5440-0_32

32. Creating the Example Project

Adam Freeman1 
(1)
London, UK
 

In this chapter, you will create the example project used throughout this part of the book. The project contains a data model that is displayed using simple controllers and Razor Pages.

Creating the Project

Open a new PowerShell command prompt from the Windows Start menu and run the commands shown in Listing 32-1.

Tip

You can download the example project for this chapter—and for all the other chapters in this book—from https://github.com/apress/pro-asp.net-core-3. See Chapter 1 for how to get help if you have problems running the examples.

dotnet new globaljson --sdk-version 3.1.101 --output Advanced
dotnet new web --no-https --output Advanced --framework netcoreapp3.1
dotnet new sln -o Advanced
dotnet sln Advanced add Advanced
Listing 32-1.

Creating the Project

If you are using Visual Studio, open the Advanced.sln file in the Advanced folder. Select Project ➤ Platform Properties, navigate to the Debug page, and change the App URL field to http://localhost:5000, as shown in Figure 32-1. This changes the port that will be used to receive HTTP requests. Select File ➤ Save All to save the configuration changes.
../images/338050_8_En_32_Chapter/338050_8_En_32_Fig1_HTML.jpg
Figure 32-1.

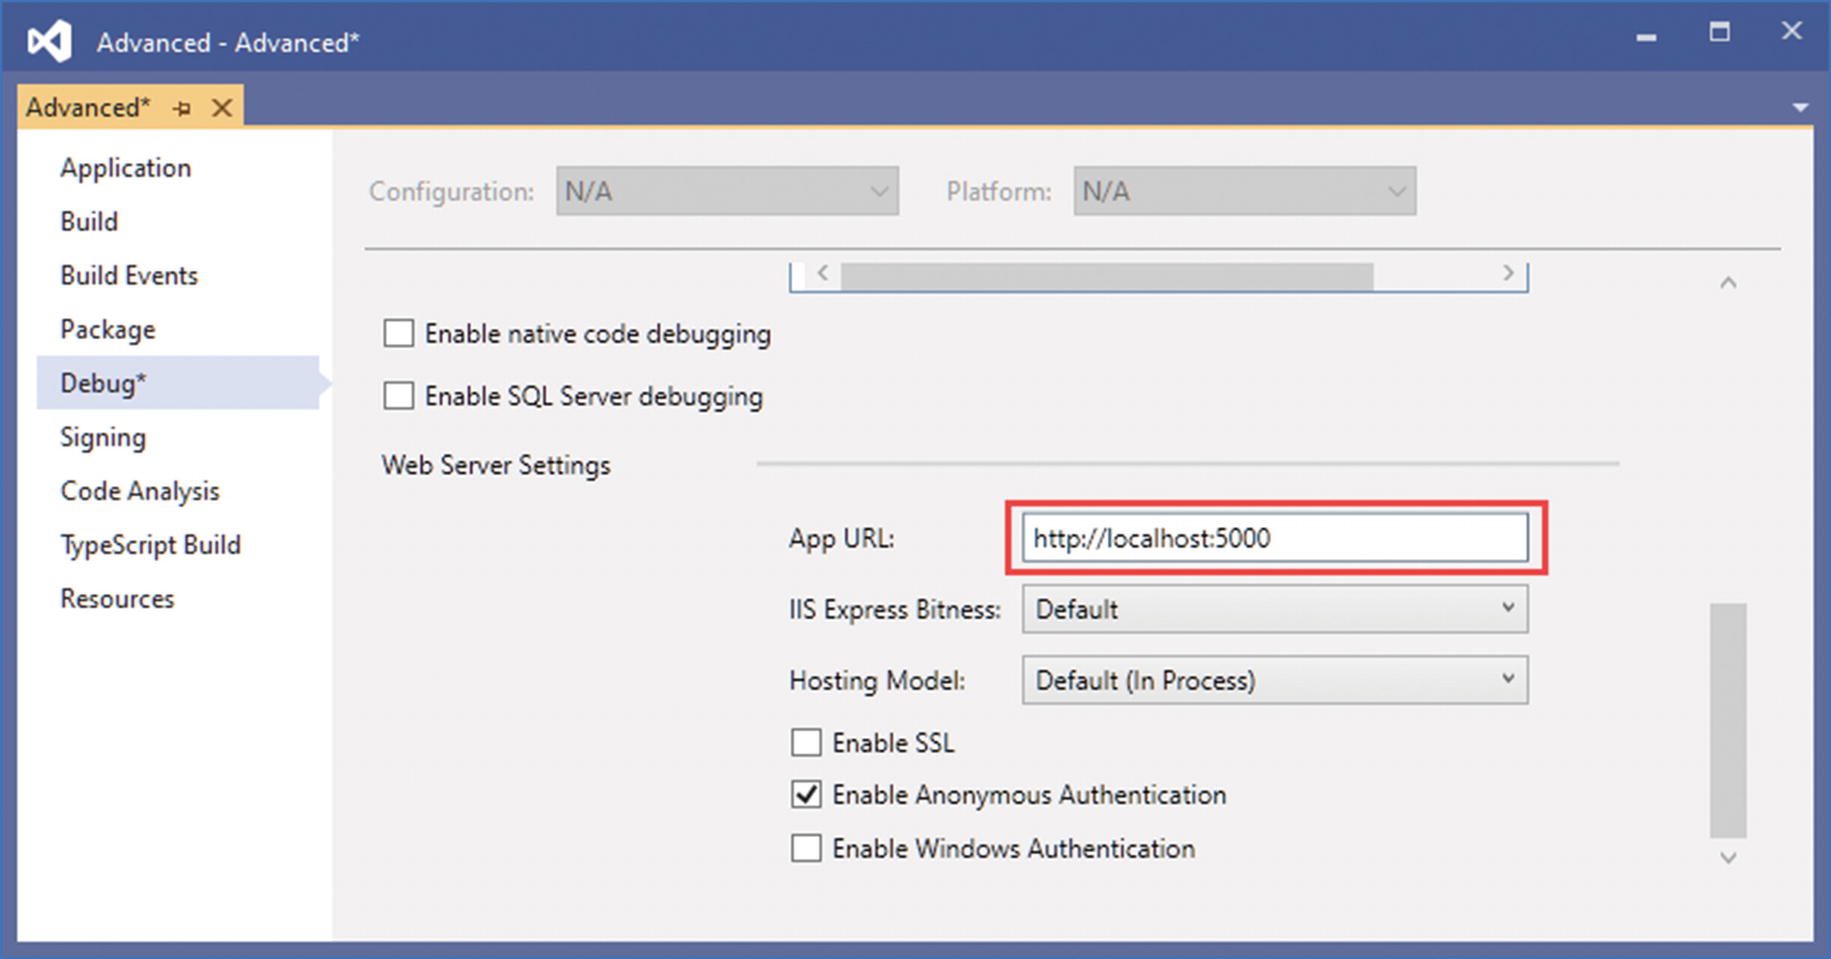
Changing the HTTP port

If you are using Visual Studio Code, open the Advanced folder. Click the Yes button when prompted to add the assets required for building and debugging the project, as shown in Figure 32-2.
../images/338050_8_En_32_Chapter/338050_8_En_32_Fig2_HTML.jpg
Figure 32-2.

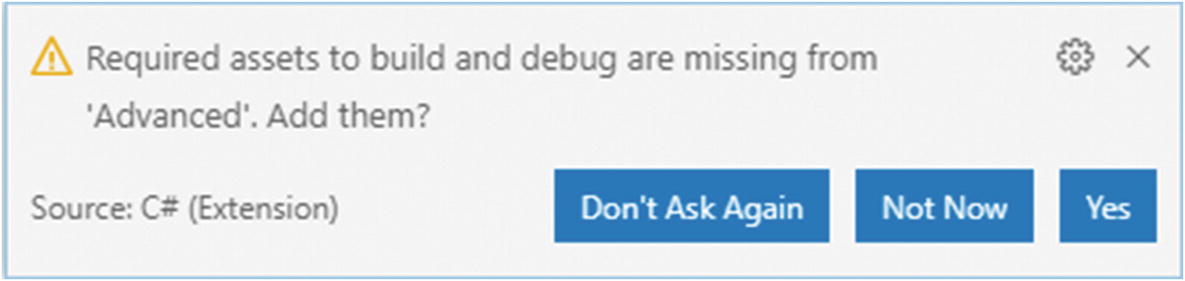
Adding project assets

Adding NuGet Packages to the Project

The data model will use Entity Framework Core to store and query data in a SQL Server LocalDB database. To add the NuGet packages for Entity Framework Core, use a PowerShell command prompt to run the commands shown in Listing 32-2 in the Advanced project folder.
dotnet add package Microsoft.EntityFrameworkCore.Design --version 3.1.1
dotnet add package Microsoft.EntityFrameworkCore.SqlServer --version 3.1.1
Listing 32-2.

Adding Packages to the Project

If you are using Visual Studio, you can add the packages by selecting Project ➤ Manage NuGet Packages. Take care to choose the correct version of the packages to add to the project.

If you have not followed the examples in earlier chapters, you will need to install the global tool package that is used to create and manage Entity Framework Core migrations. Run the commands shown in Listing 32-3 to remove any existing version of the package and install the version required for this book.
dotne.t tool uninstall --global dotnet-ef
dotnet tool install --global dotnet-ef --version 3.1.1
Listing 32-3.

Installing a Global Tool Package

Adding a Data Model

The data model for this application will consist of three classes, representing people, the department in which they work, and their location. Create a Models folder and add to it a class file named Person.cs with the code in Listing 32-4.
using System.Collections.Generic;
namespace Advanced.Models {
    public class Person {
        public long PersonId { get; set; }
        public string Firstname { get; set; }
        public string Surname { get; set; }
        public long DepartmentId { get; set; }
        public long LocationId { get; set; }
        public Department Department {get; set; }
        public Location Location { get; set; }
    }
}
Listing 32-4.

The Contents of the Person.cs File in the Models Folder

Add a class file named Department.cs to the Models folder and use it to define the class shown in Listing 32-5.
using System.Collections.Generic;
namespace Advanced.Models {
    public class Department {
        public long Departmentid { get; set; }
        public string Name { get; set; }
        public IEnumerable<Person> People { get; set; }
    }
}
Listing 32-5.

The Contents of the Department.cs File in the Models Folder

Add a class file named Location.cs to the Models folder and use it to define the class shown in Listing 32-6.
using System.Collections.Generic;
namespace Advanced.Models {
    public class Location {
        public long LocationId { get; set; }
        public string City { get; set; }
        public string State { get; set; }
        public IEnumerable<Person> People { get; set; }
    }
}
Listing 32-6.

The Contents of the Location.cs File in the Models Folder

Each of the three data model classes defines a key property whose value will be allocated by the database when new objects are stored and defines foreign key properties that define the relationships between the classes. These are supplemented by navigation properties that will be used with the Entity Framework Core Include method to incorporate related data into queries.

To create the Entity Framework Core context class that will provide access to the database, add a file called DataContext.cs to the Models folder and add the code shown in Listing 32-7.
using Microsoft.EntityFrameworkCore;
namespace Advanced.Models {
    public class DataContext: DbContext {
        public DataContext(DbContextOptions<DataContext> opts)
            : base(opts) { }
        public DbSet<Person> People { get; set; }
        public DbSet<Department> Departments { get; set; }
        public DbSet<Location> Locations { get; set; }
    }
}
Listing 32-7.

The Contents of the DataContext.cs File in the Models Folder

The context class defines properties that will be used to query the database for Person, Department, and Location data.

Preparing the Seed Data

Add a class called SeedData.cs to the Models folder and add the code shown in Listing 32-8 to define the seed data that will be used to populate the database.
using Microsoft.EntityFrameworkCore;
using System.Linq;
namespace Advanced.Models {
    public static class SeedData {
        public static void SeedDatabase(DataContext context) {
            context.Database.Migrate();
            if (context.People.Count() == 0 && context.Departments.Count() == 0 &&
                context.Locations.Count() == 0) {
                Department d1 = new Department { Name = "Sales" };
                Department d2 = new Department { Name = "Development" };
                Department d3 = new Department { Name = "Support" };
                Department d4 = new Department { Name = "Facilities" };
                context.Departments.AddRange(d1, d2, d3, d4);
                context.SaveChanges();
                Location l1 = new Location { City = "Oakland", State = "CA" };
                Location l2 = new Location { City = "San Jose", State = "CA" };
                Location l3 = new Location { City = "New York", State = "NY" };
                context.Locations.AddRange(l1, l2, l3);
                context.People.AddRange(
                    new Person {
                        Firstname = "Francesca", Surname = "Jacobs",
                        Department = d2, Location = l1
                    },
                    new Person {
                        Firstname = "Charles", Surname = "Fuentes",
                        Department = d2, Location = l3
                    },
                    new Person {
                        Firstname = "Bright", Surname = "Becker",
                        Department = d4, Location = l1
                    },
                    new Person {
                        Firstname = "Murphy", Surname = "Lara",
                        Department = d1, Location = l3
                    },
                    new Person {
                        Firstname = "Beasley", Surname = "Hoffman",
                        Department = d4, Location = l3
                    },
                    new Person {
                        Firstname = "Marks", Surname = "Hays",
                        Department = d4, Location = l1
                    },
                    new Person {
                        Firstname = "Underwood", Surname = "Trujillo",
                        Department = d2, Location = l1
                    },
                    new Person {
                        Firstname = "Randall", Surname = "Lloyd",
                        Department = d3, Location = l2
                    },
                    new Person {
                        Firstname = "Guzman", Surname = "Case",
                        Department = d2, Location = l2
                    });
                context.SaveChanges();
            }
        }
    }
}
Listing 32-8.

The Contents of the SeedData.cs File in the Models Folder

The static SeedDatabase method ensures that all pending migrations have been applied to the database. If the database is empty, it is seeded with data. Entity Framework Core will take care of mapping the objects into the tables in the database, and the key properties will be assigned automatically when the data is stored.

Configuring Entity Framework Core Services and Middleware

Make the changes to the Startup class shown in Listing 32-9, which configure Entity Framework Core and set up the DataContext services that will be used throughout this part of the book to access the database.
using System;
using System.Collections.Generic;
using System.Linq;
using System.Threading.Tasks;
using Microsoft.AspNetCore.Builder;
using Microsoft.AspNetCore.Hosting;
using Microsoft.AspNetCore.Http;
using Microsoft.Extensions.DependencyInjection;
using Microsoft.Extensions.Hosting;
using Microsoft.Extensions.Configuration;
using Microsoft.EntityFrameworkCore;
using Advanced.Models;
namespace Advanced {
    public class Startup {
        public Startup(IConfiguration config) {
            Configuration = config;
        }
        public IConfiguration Configuration { get; set; }
        public void ConfigureServices(IServiceCollection services) {
            services.AddDbContext<DataContext>(opts => {
                opts.UseSqlServer(Configuration[
                    "ConnectionStrings:PeopleConnection"]);
                opts.EnableSensitiveDataLogging(true);
            });
        }
        public void Configure(IApplicationBuilder app, DataContext context) {
            app.UseDeveloperExceptionPage();
            app.UseRouting();
            app.UseEndpoints(endpoints => {
                endpoints.MapGet("/", async context => {
                    await context.Response.WriteAsync("Hello World!");
                });
            });
            SeedData.SeedDatabase(context);
        }
    }
}
Listing 32-9.

Preparing Services and Middleware in the Startup.cs File in the Advanced Folder

To define the connection string that will be used for the application’s data, add the configuration settings shown in Listing 32-10 in the appsettings.json file. The connection string should be entered on a single line.
{
  "Logging": {
    "LogLevel": {
      "Default": "Information",
      "Microsoft": "Warning",
      "Microsoft.Hosting.Lifetime": "Information",
      "Microsoft.EntityFrameworkCore": "Information"
    }
  },
  "AllowedHosts": "*",
  "ConnectionStrings": {
    "PeopleConnection": "Server=(localdb)\MSSQLLocalDB;Database=People;MultipleActiveResultSets=True"
  }
}
Listing 32-10.

Defining a Connection String in the appsettings.json File in the Advanced Folder

In addition to the connection string, Listing 32-10 increases the logging detail for Entity Framework Core so that the SQL queries sent to the database are logged.

Creating and Applying the Migration

To create the migration that will set up the database schema, use a PowerShell command prompt to run the command shown in Listing 32-11 in the Advanced project folder.
dotnet ef migrations add Initial
Listing 32-11.

Creating an Entity Framework Core Migration

Once the migration has been created, apply it to the database using the command shown in Listing 32-12.
dotnet ef database update
Listing 32-12.

Applying the Migration to the Database

The logging messages displayed by the application will show the SQL commands that are sent to the database.

Note

If you need to reset the database, then run the dotnet ef database drop --force command and then the command in Listing 32-12.

Adding the Bootstrap CSS Framework

Following the pattern established in earlier chapters, I will use the Bootstrap CSS framework to style the HTML elements produced by the example application. To install the Bootstrap package, run the commands shown in Listing 32-13 in the Advanced project folder. These commands rely on the Library Manager package.
libman init -p cdnjs
libman install [email protected] -d wwwroot/lib/twitter-bootstrap
Listing 32-13.

Installing the Bootstrap CSS Framework

If you are using Visual Studio, you can install client-side packages by right-clicking the Advanced project item in the Solution Explorer and selecting Add ➤ Client-Side Library from the popup menu.

Configuring the Services and Middleware

I am going to enable runtime Razor view compilation in this project. Run the command shown in Listing 32-14 in the Advanced project folder to install the package that will provide the runtime compilation service.
dotnet add package Microsoft.AspNetCore.Mvc.Razor.RuntimeCompilation --version 3.1.1
Listing 32-14.

Adding a Package to the Example Project

The example application in this part of the book will respond to requests using both MVC controllers and Razor Pages. Add the statements shown in Listing 32-15 to the Startup class to configure the services and middleware the application will use.
using System;
using System.Collections.Generic;
using System.Linq;
using System.Threading.Tasks;
using Microsoft.AspNetCore.Builder;
using Microsoft.AspNetCore.Hosting;
using Microsoft.AspNetCore.Http;
using Microsoft.Extensions.DependencyInjection;
using Microsoft.Extensions.Hosting;
using Microsoft.Extensions.Configuration;
using Microsoft.EntityFrameworkCore;
using Advanced.Models;
namespace Advanced {
    public class Startup {
        public Startup(IConfiguration config) {
            Configuration = config;
        }
        public IConfiguration Configuration { get; set; }
        public void ConfigureServices(IServiceCollection services) {
            services.AddDbContext<DataContext>(opts => {
                opts.UseSqlServer(Configuration[
                    "ConnectionStrings:PeopleConnection"]);
                opts.EnableSensitiveDataLogging(true);
            });
            services.AddControllersWithViews().AddRazorRuntimeCompilation();
            services.AddRazorPages().AddRazorRuntimeCompilation();
        }
        public void Configure(IApplicationBuilder app, DataContext context) {
            app.UseDeveloperExceptionPage();
            app.UseStaticFiles();
            app.UseRouting();
            app.UseEndpoints(endpoints => {
                endpoints.MapControllerRoute("controllers",
                    "controllers/{controller=Home}/{action=Index}/{id?}");
                endpoints.MapDefaultControllerRoute();
                endpoints.MapRazorPages();
            });
            SeedData.SeedDatabase(context);
        }
    }
}
Listing 32-15.

Adding Services and Middleware in the Startup.cs File in the Advanced Folder

In addition to the default controller route, I have added a route that matches URL paths that begin with controllers, which will make it easier to follow the examples in later chapters as they switch between controllers and Razor Pages. This is the same convention I adopted in earlier chapters, and I will route URL paths beginning with /pages to Razor Pages.

Creating a Controller and View

To display the application’s data using a controller, create a folder named Controllers in the Advanced project folder and add to it a class file named HomeController.cs, with the content shown in Listing 32-16.
using Advanced.Models;
using Microsoft.AspNetCore.Mvc;
using Microsoft.EntityFrameworkCore;
using System.Collections.Generic;
using System.Linq;
namespace Advanced.Controllers {
    public class HomeController : Controller {
        private DataContext context;
        public HomeController(DataContext dbContext) {
            context = dbContext;
        }
        public IActionResult Index([FromQuery] string selectedCity) {
            return View(new PeopleListViewModel {
                People = context.People
                    .Include(p => p.Department).Include(p => p.Location),
                Cities = context.Locations.Select(l => l.City).Distinct(),
                SelectedCity = selectedCity
            });
        }
    }
    public class PeopleListViewModel {
        public IEnumerable<Person> People { get; set; }
        public IEnumerable<string> Cities { get; set; }
        public string SelectedCity { get; set; }
        public string GetClass(string city) =>
            SelectedCity == city ? "bg-info text-white" : "";
    }
}
Listing 32-16.

The Contents of the HomeController.cs File in the Controllers Folder

To provide the controller with a view, create the Views/Home folder and add to it a Razor View named Index.cshtml with the content shown in Listing 32-17.
@model PeopleListViewModel
<h4 class="bg-primary text-white text-center p-2">People</h4>
<table class="table table-sm table-bordered table-striped">
    <thead>
        <tr>
            <th>ID</th><th>Name</th><th>Dept</th><th>Location</th>
        </tr>
    </thead>
    <tbody>
        @foreach (Person p in Model.People) {
            <tr class="@Model.GetClass(p.Location.City)">
                <td>@p.PersonId</td>
                <td>@p.Surname, @p.Firstname</td>
                <td>@p.Department.Name</td>
                <td>@p.Location.City, @p.Location.State</td>
            </tr>
        }
    </tbody>
</table>
<form asp-action="Index" method="get">
    <div class="form-group">
        <label for="selectedCity">City</label>
        <select name="selectedCity" class="form-control">
            <option disabled selected>Select City</option>
            @foreach (string city in Model.Cities) {
                <option selected="@(city == Model.SelectedCity)">
                    @city
                </option>
            }
        </select>
    </div>
    <button class="btn btn-primary" type="submit">Select</button>
</form>
Listing 32-17.

The Contents of the Index.cshtml File in the Views/Home Folder

To enable tag helpers and add the namespaces that will be available by default in views, add a Razor View Imports file named _ViewImports.cshtml to the Views folder with the content shown in Listing 32-18.
@addTagHelper *, Microsoft.AspNetCore.Mvc.TagHelpers
@using Advanced.Models
@using Advanced.Controllers
Listing 32-18.

The Contents of the _ViewImports.cshtml File in the Views Folder

To specify the default layout for controller views, add a Razor View Start start file named _ViewStart.cshtml to the Views folder with the content shown in Listing 32-19.
@{
    Layout = "_Layout";
}
Listing 32-19.

The Contents of the _ViewStart.cshtml File in the Views Folder

To create the layout, create the Views/Shared folder and add to it a Razor Layout named _Layout.cshtml with the content shown in Listing 32-20.
<!DOCTYPE html>
<html>
<head>
    <title>@ViewBag.Title</title>
    <link href="/lib/twitter-bootstrap/css/bootstrap.min.css" rel="stylesheet" />
</head>
<body>
    <div class="m-2">
        @RenderBody()
    </div>
</body>
</html>
Listing 32-20.

The Contents of the _Layout.cshtml File in the Views/Shared Folder

Creating a Razor Page

To display the application’s data using a Razor Page, create the Pages folder and add to it a Razor Page named Index.cshtml with the content shown in Listing 32-21.
@page "/pages"
@model IndexModel
<h4 class="bg-primary text-white text-center p-2">People</h4>
<table class="table table-sm table-bordered table-striped">
    <thead>
        <tr>
            <th>ID</th><th>Name</th><th>Dept</th><th>Location</th>
        </tr>
    </thead>
    <tbody>
        @foreach (Person p in Model.People) {
            <tr class="@Model.GetClass(p.Location.City)">
                <td>@p.PersonId</td>
                <td>@p.Surname, @p.Firstname</td>
                <td>@p.Department.Name</td>
                <td>@p.Location.City, @p.Location.State</td>
            </tr>
        }
    </tbody>
</table>
<form asp-page="Index" method="get">
    <div class="form-group">
        <label for="selectedCity">City</label>
        <select name="selectedCity" class="form-control">
            <option disabled selected>Select City</option>
            @foreach (string city in Model.Cities) {
                <option selected="@(city == Model.SelectedCity)">
                    @city
                </option>
            }
        </select>
    </div>
    <button class="btn btn-primary" type="submit">Select</button>
</form>
@functions {
    public class IndexModel: PageModel {
        private DataContext context;
        public IndexModel(DataContext dbContext) {
            context = dbContext;
        }
        public IEnumerable<Person> People { get; set; }
        public IEnumerable<string> Cities { get; set; }
        [FromQuery]
        public string SelectedCity { get; set; }
        public void OnGet() {
            People = context.People.Include(p => p.Department)
                .Include(p => p.Location);
            Cities = context.Locations.Select(l => l.City).Distinct();
        }
        public string GetClass(string city) =>
            SelectedCity == city ? "bg-info text-white" : "";
    }
}
Listing 32-21.

The Contents of the Index.cshtml File in the Pages Folder

To enable tag helpers and add the namespaces that will be available by default in the view section of the Razor Pages, add a Razor view imports file named _ViewImports.cshtml to the Pages folder with the content shown in Listing 32-22.
@addTagHelper *, Microsoft.AspNetCore.Mvc.TagHelpers
@using Advanced.Models
@using Microsoft.AspNetCore.Mvc.RazorPages
@using Microsoft.EntityFrameworkCore
Listing 32-22.

The Contents of the _ViewImports.cshtml File in the Pages Folder

To specify the default layout for Razor Pages, add a Razor View Start file named _ViewStart.cshtml to the Pages folder with the content shown in Listing 32-23.
@{
    Layout = "_Layout";
}
Listing 32-23.

The Contents of the _ViewStart.cshtml File in the Pages Folder

To create the layout, add a Razor Layout named _Layout.cshtml to the Pages folder with the content shown in Listing 32-24.
<!DOCTYPE html>
<html>
<head>
    <title>@ViewBag.Title</title>
    <link href="/lib/twitter-bootstrap/css/bootstrap.min.css" rel="stylesheet" />
</head>
<body>
    <div class="m-2">
        <h5 class="bg-secondary text-white text-center p-2">Razor Page</h5>
        @RenderBody()
    </div>
</body>
</html>
Listing 32-24.

The Contents of the _Layout.cshtml File in the Pages Folder

Running the Example Application

Start the application, either by selecting Start Without Debugging or Run Without Debugging from the Debug menu or by running the command shown in Listing 32-25 in the Advanced project folder.
dotnet run
Listing 32-25.

Running the Example Application

Use a browser to request http://localhost:5000/controllers and http://localhost:5000/pages. Select a city using the select element and click the Select button to highlight rows in the table, as shown in Figure 32-3.
../images/338050_8_En_32_Chapter/338050_8_En_32_Fig3_HTML.jpg
Figure 32-3.

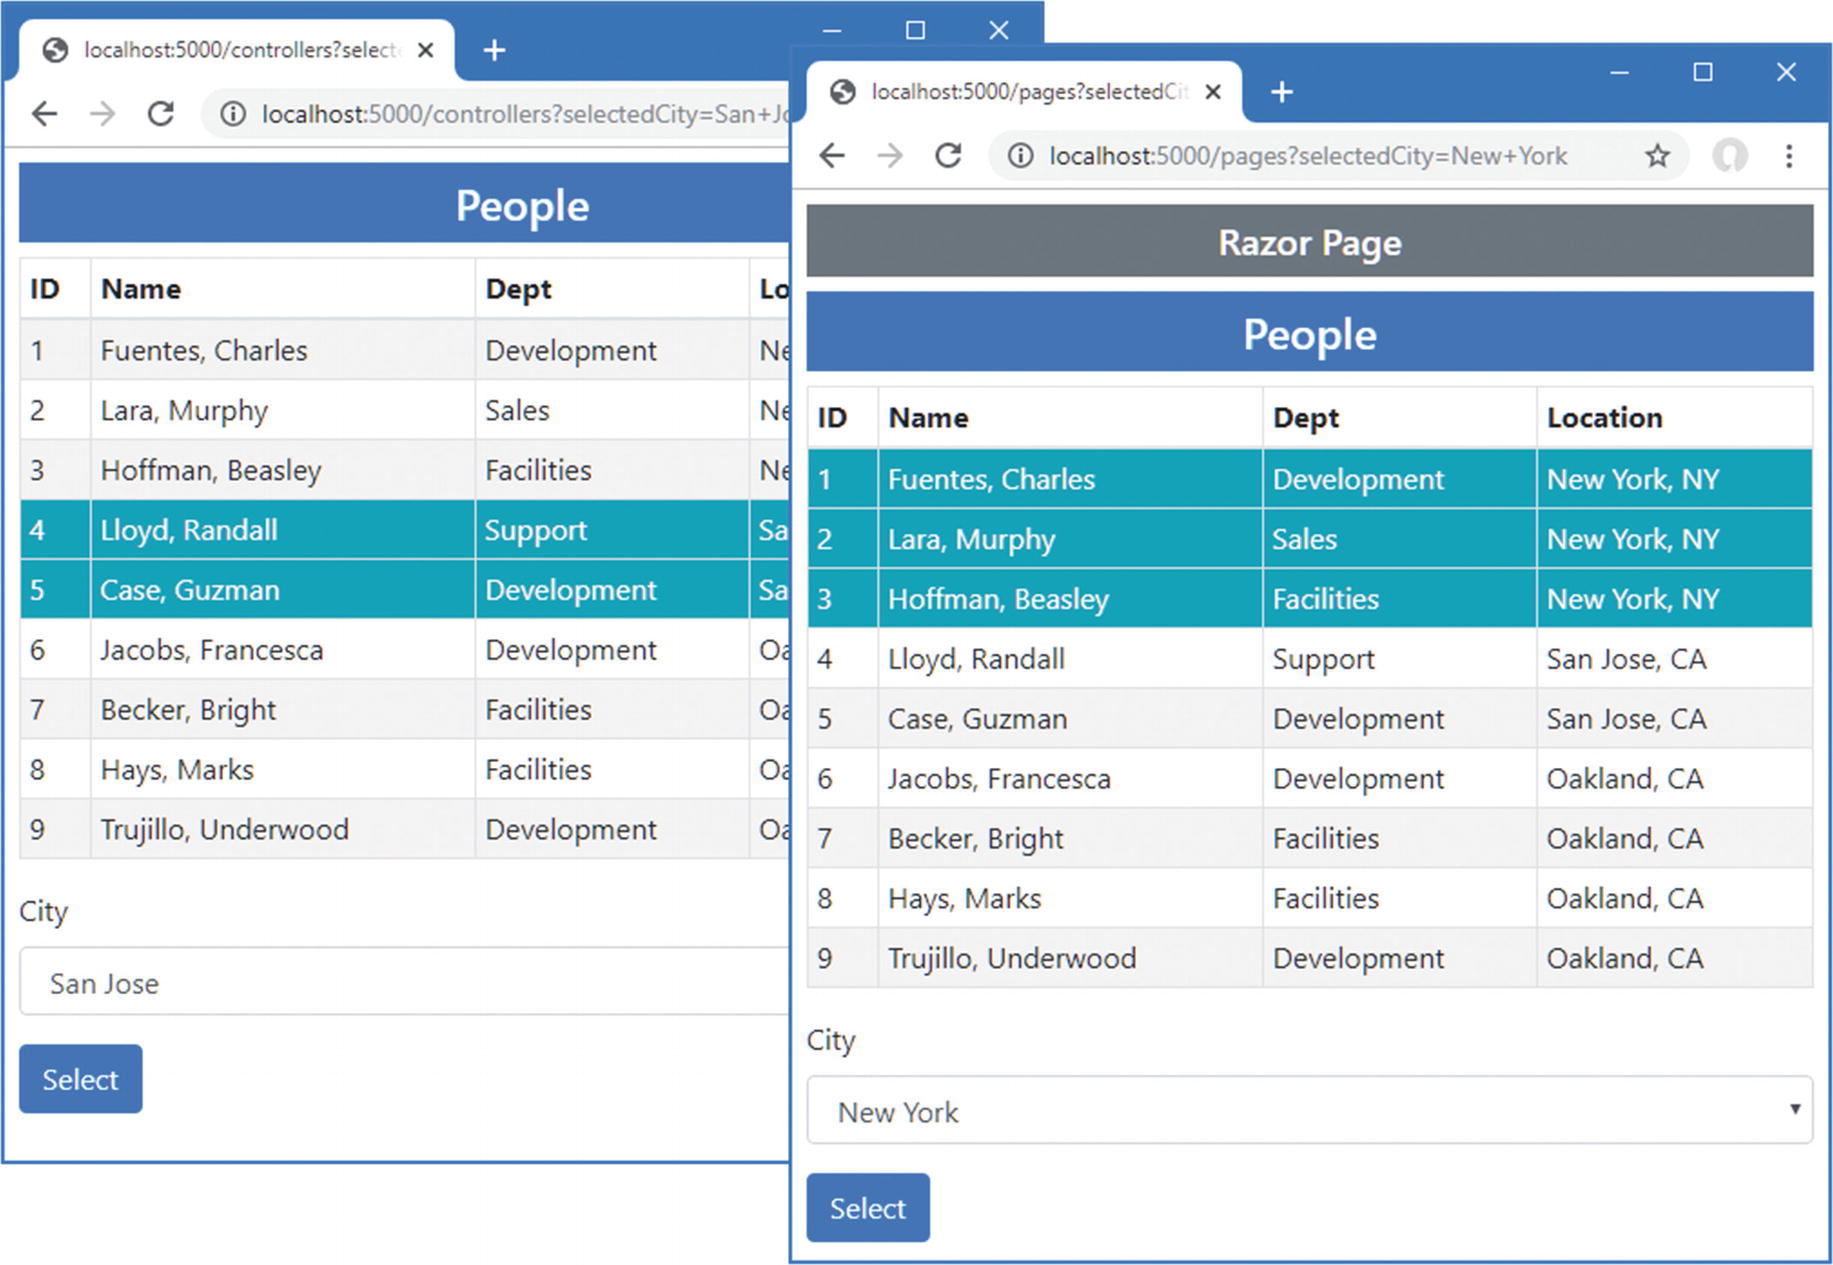
Running the example application

Summary

In this chapter, I showed how to create the example application that is used throughout this part of the book. The project was created with the Empty template, and it contains a data model that relies on Entity Framework Core and handles requests using a controller and a Razor Page. In the next chapter, I introduce Blazor, which is a new addition to ASP.NET Core.

..................Content has been hidden....................

You can't read the all page of ebook, please click here login for view all page.
Reset
18.118.166.98