Model binding is the process of creating .NET objects using the values from the HTTP request to provide easy access to the data required by action methods and Razor Pages. In this chapter, I describe the way the model binding system works; show how it binds simple types, complex types, and collections; and demonstrate how you can take control of the process to specify which part of the request provides the data values your application requires. Table 28-1 puts model binding in context.
Table 28-1.
Putting Model Binding in Context
Question
Answer
What is it?
Model binding is the process of creating the objects that action methods and page handlers require using data values obtained from the HTTP request.
Why is it useful?
Model binding lets controllers or page handlers declare method parameters or properties using C# types and automatically receive data from the request without having to inspect, parse, and process the data directly.
How is it used?
In its simplest form, methods declare parameters or classes define properties whose names are used to retrieve data values from the HTTP request. The part of the request used to obtain the data can be configured by applying attributes to the method parameters or properties.
Are there any pitfalls or limitations?
The main pitfall is getting data from the wrong part of the request. I explain the way that requests are searched for data in the “Understanding Model Binding” section, and the search locations can be specified explicitly using the attributes that I describe in the “Specifying a Model Binding Source” section.
Are there any alternatives?
Data can be obtained without model binding using context objects. However, the result is more complicated code that is hard to read and maintain.
Ensure the form value types follow the dotted notation
13–17
Selecting properties for binding
Use the Bind and BindNever attributes
18–19
Binding collections
Follow the sequence binding conventions
20–25
Specifying the source for binding
Use one of the source attributes
26–31
Manually performing binding
Use the TryUpdateModel method
32
Preparing for This Chapter
This chapter uses the WebApp project from Chapter 27. To prepare for this chapter, replace the contents of the Form.cshtml file in the Views/Form folder with the content shown in Listing 28-1.
Tip
You can download the example project for this chapter—and for all the other chapters in this book—from https://github.com/apress/pro-asp.net-core-3. See Chapter 1 for how to get help if you have problems running the examples.
Removing an Attribute in the Product.cs File in the Models Folder
Dropping the Database
Open a new PowerShell command prompt, navigate to the folder that contains the WebApp.csproj file, and run the command shown in Listing 28-3 to drop the database.
dotnet ef database drop --force
Listing 28-3.
Dropping the Database
Running the Example Application
Select Start Without Debugging or Run Without Debugging from the Debug menu or use the PowerShell command prompt to run the command shown in Listing 28-4.
dotnet run
Listing 28-4.
Running the Example Application
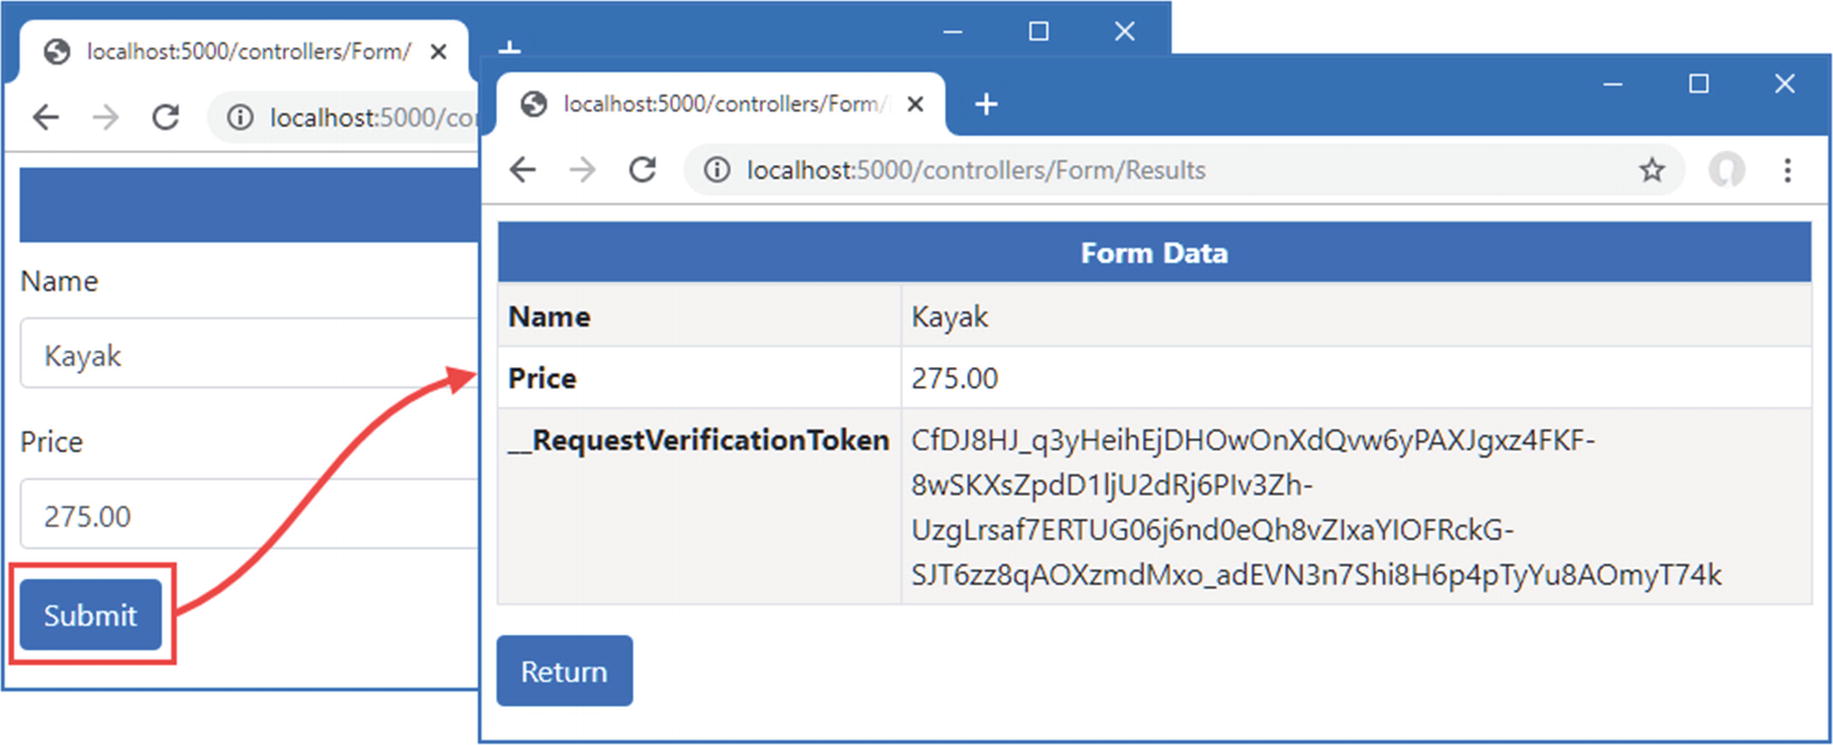
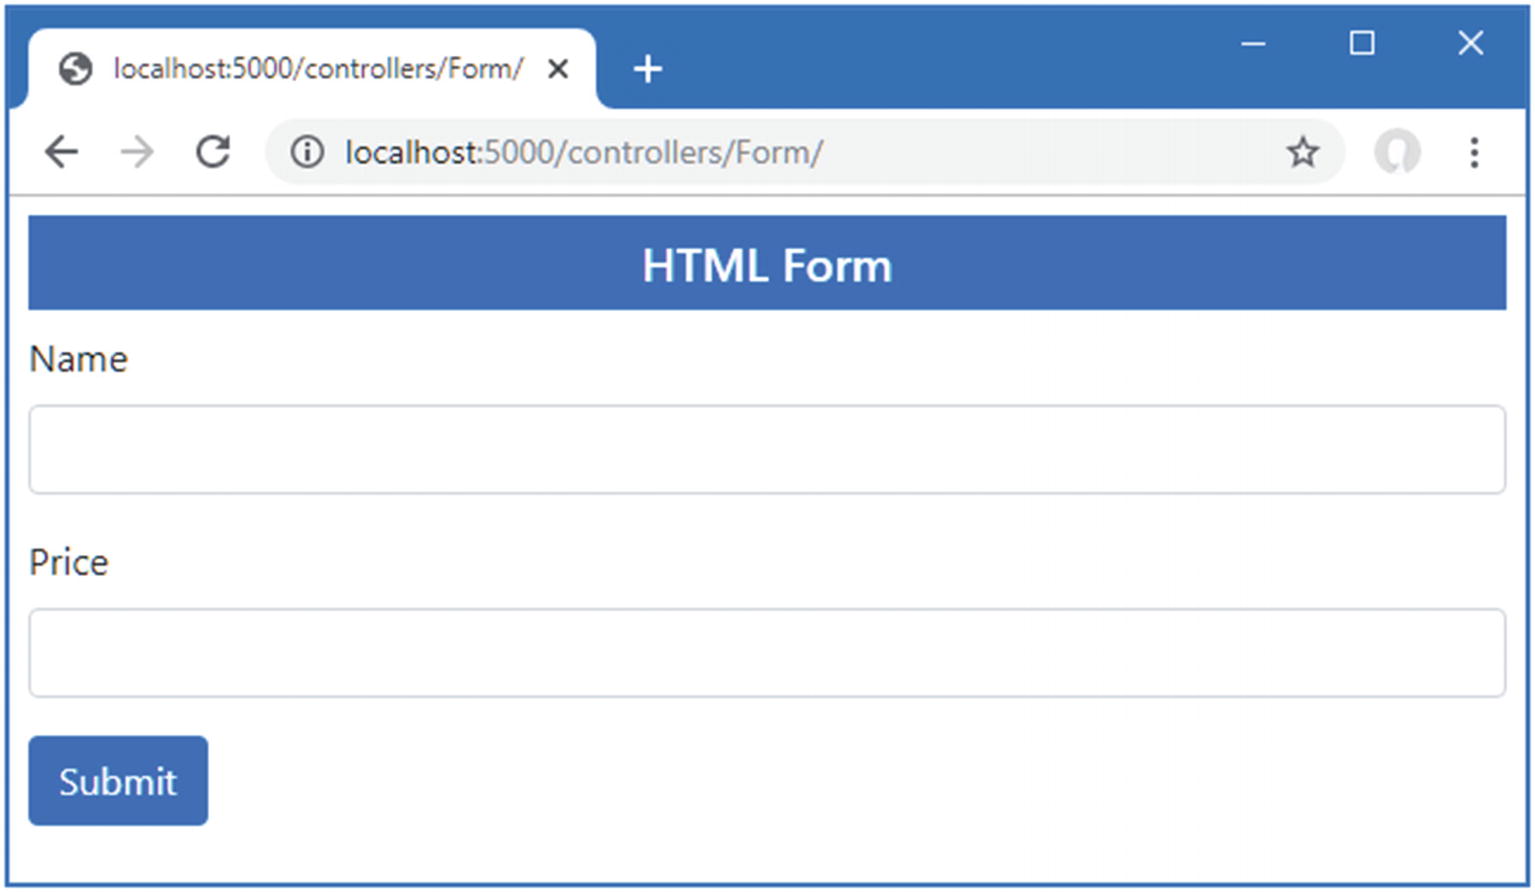
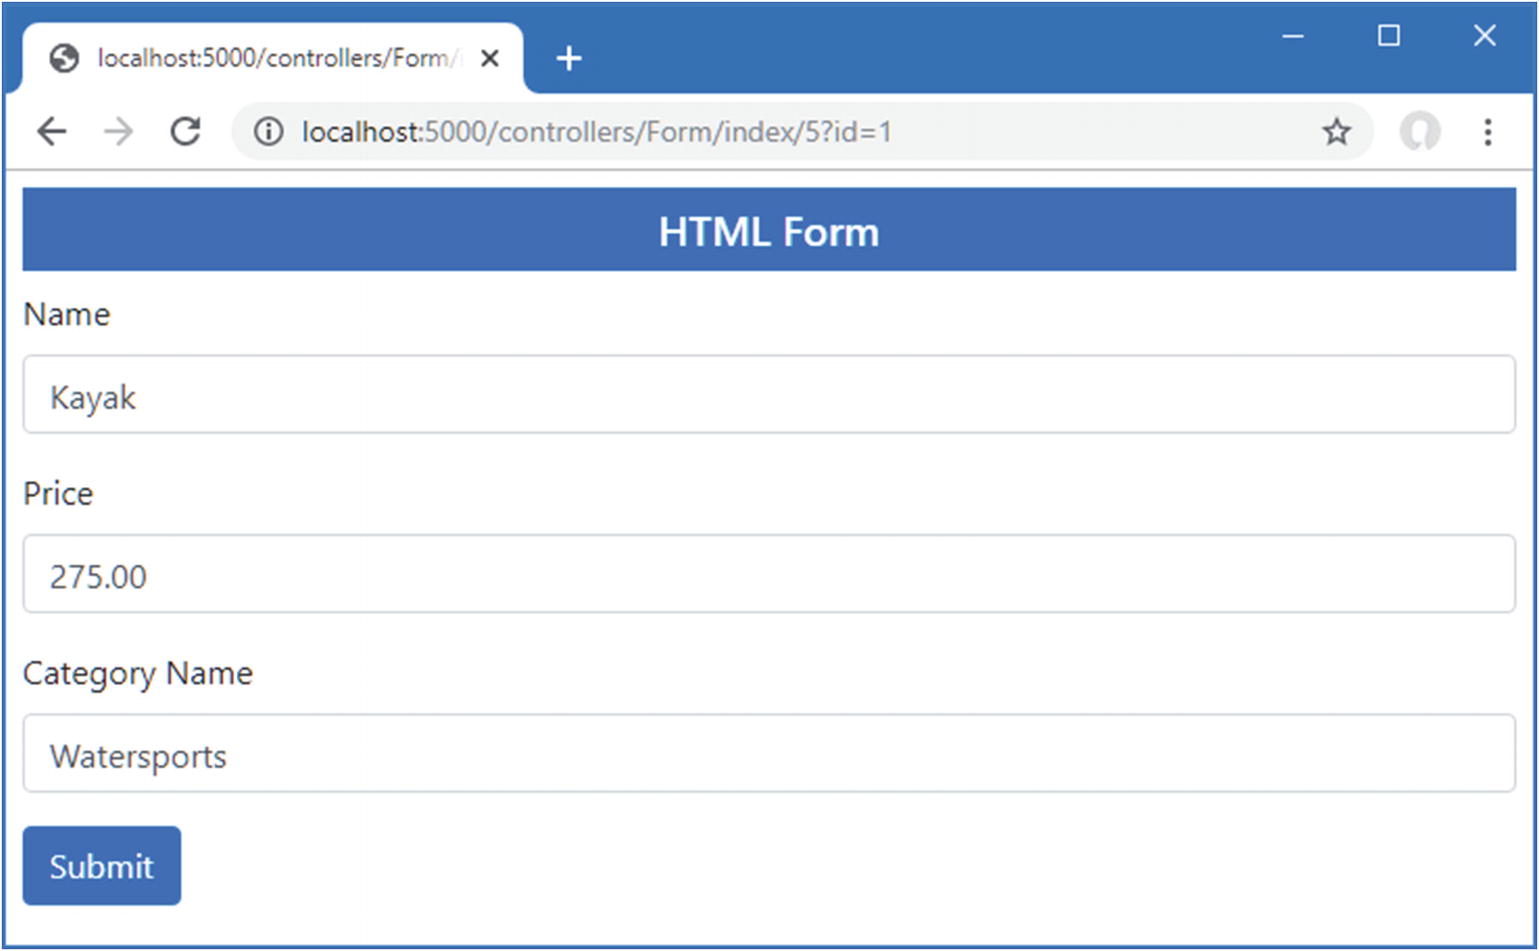
Use a browser to request http://localhost:5000/controllers/form, which will display an HTML form. Click the Submit button, and the form data will be displayed, as shown in Figure 28-1.
Figure 28-1.
Running the example application
Understanding Model Binding
Model binding is an elegant bridge between the HTTP request and action or page handler methods. Most ASP.NET Core applications rely on model binding to some extent, including the example application for this chapter.
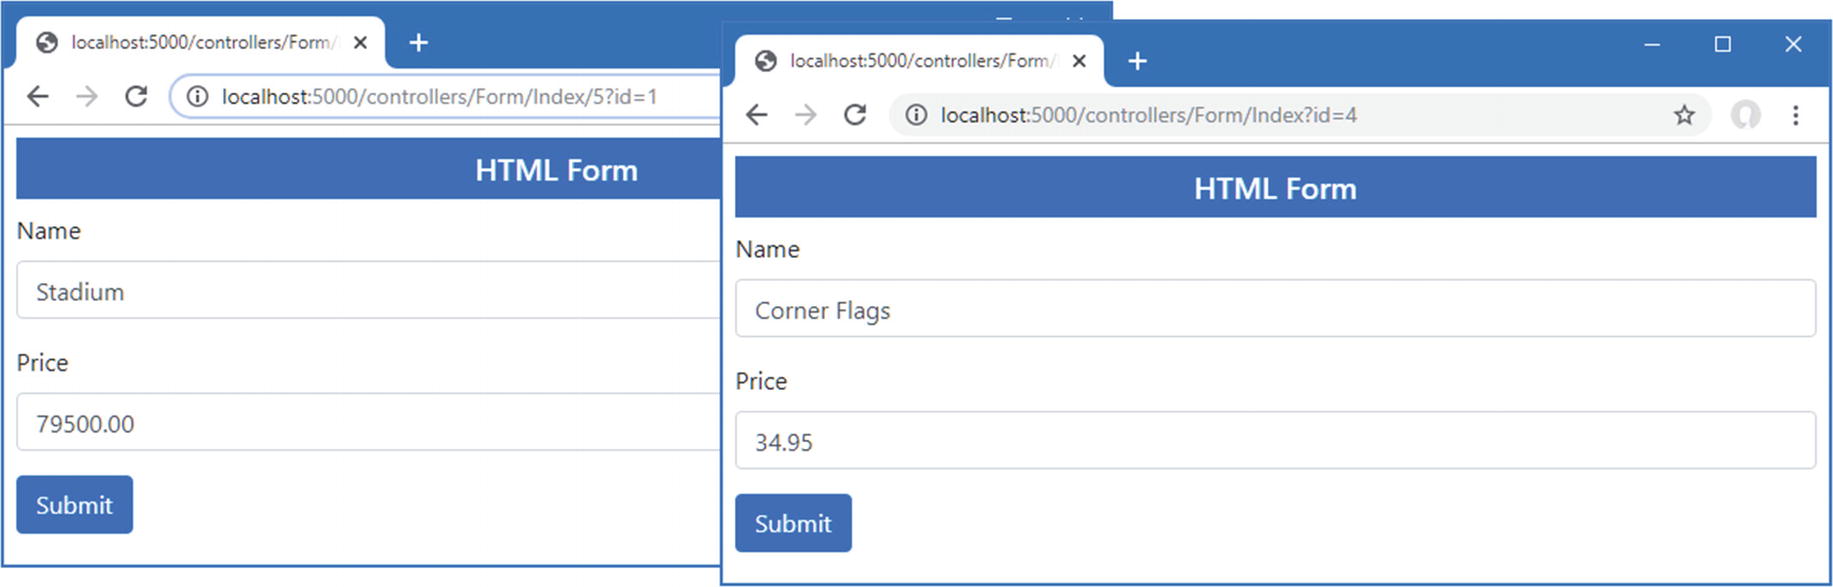
You can see model binding at work by using the browser to request http://localhost:5000/controllers/form/index/5. This URL contains the value of the ProductId property of the Product object that I want to view, like this:
http://localhost:5000/controllers/form/index/5
This part of the URL corresponds to the id segment variable defined by the controller routing pattern and matches the name of the parameter defined by the Form controller’s Index action:
...
public async Task<IActionResult> Index(long id = 1) {
...
A value for the id parameter is required before the MVC Framework can invoke the action method, and finding a suitable value is the responsibility of the model binding system. The model binding system relies on model binders, which are components responsible for providing data values from one part of the request or application. The default model binders look for data values in these four places:
Form data
The request body (only for controllers decorated with ApiController)
Routing segment variables
Query strings
Each source of data is inspected in order until a value for the argument is found. There is no form data in the example application, so no value will be found there, and the Form controller isn’t decorated with the ApiController attribute, so the request body won’t be checked. The next step is to check the routing data, which contains a segment variable named id. This allows the model binding system to provide a value that allows the Index action method to be invoked. The search stops after a suitable data value has been found, which means that the query string isn’t searched for a data value.
Tip
In the “Specifying a Model Binding Source” section, I explain how you can specify the source of model binding data using attributes. This allows you to specify that a data value is obtained from, for example, the query string, even if there is also suitable data in the routing data.
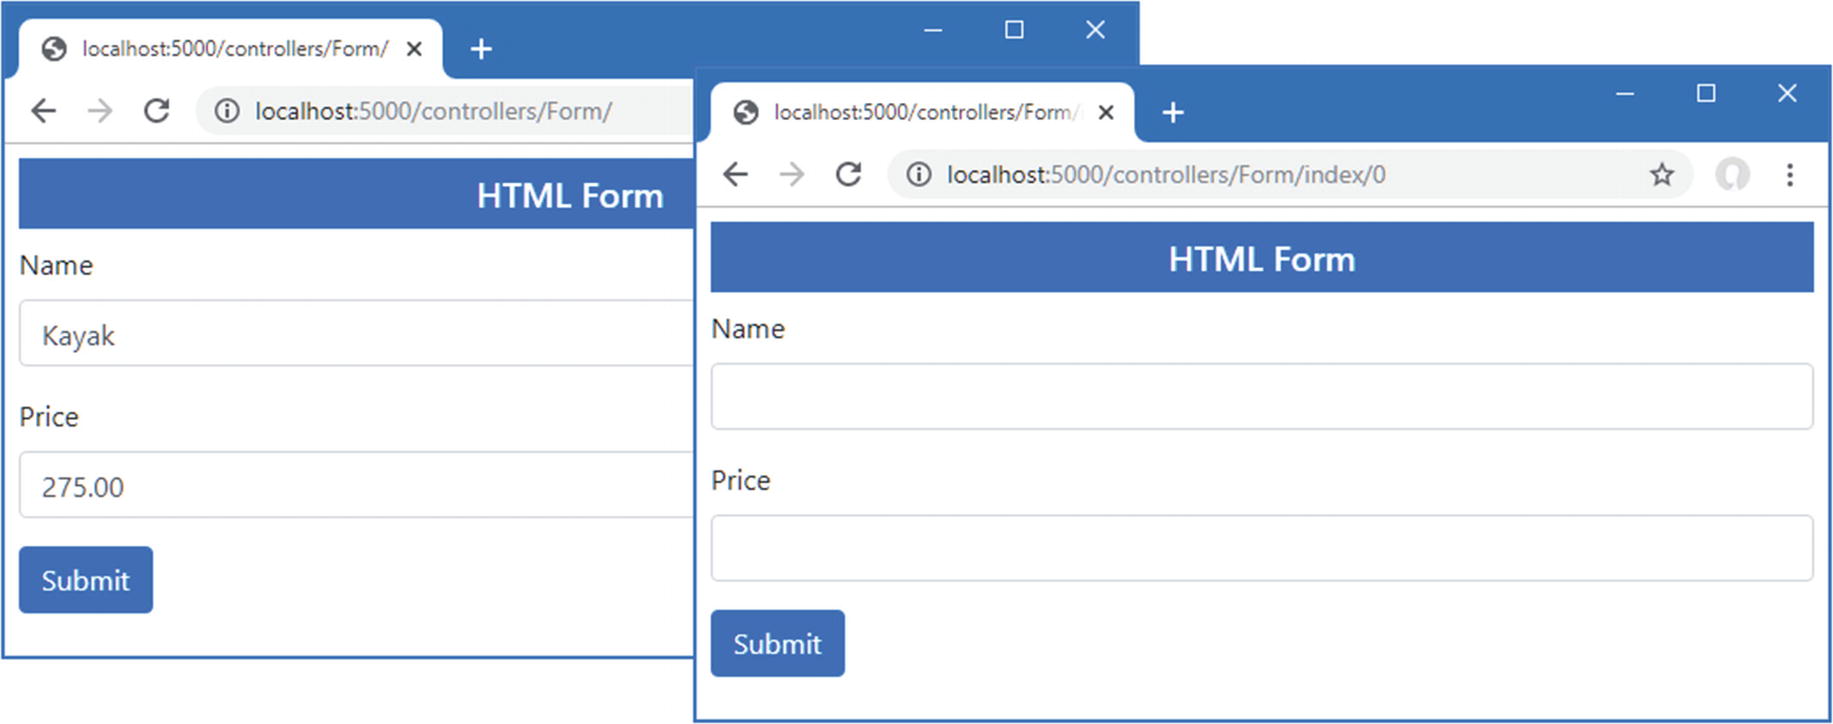
Knowing the order in which data values are sought is important because a request can contain multiple values, like this URL:
The routing system will process the request and match the id segment in the URL template to the value 3, and the query string contains an id value of 1. Since the routing data is searched for data before the query string, the Index action method will receive the value 3, and the query string value will be ignored.
On the other hand, if you request a URL that doesn’t have an id segment, then the query string will be examined, which means that a URL like this one will also allow the model binding system to provide a value for the id argument so that it can invoke the Index method.
http://localhost:5000/controllers/Form/Index?id=4
You can see the effect of both these URLs in Figure 28-2.
Figure 28-2.
The effect of model binding data source order
Binding Simple Data Types
Request data values must be converted into C# values so they can be used to invoke action or page handler methods. Simple types are values that originate from one item of data in the request that can be parsed from a string. This includes numeric values, bool values, dates, and, of course, string values.
Data binding for simple types makes it easy to extract single data items from the request without having to work through the context data to find out where it is defined. Listing 28-5 adds parameters to the SubmitForm action method defined by the Form controller method so that the model binder will be used to provide name and price values.
using Microsoft.AspNetCore.Mvc;
using System.Linq;
using System.Threading.Tasks;
using WebApp.Models;
using Microsoft.EntityFrameworkCore;
using Microsoft.AspNetCore.Mvc.Rendering;
namespace WebApp.Controllers {
[AutoValidateAntiforgeryToken]
public class FormController : Controller {
private DataContext context;
public FormController(DataContext dbContext) {
context = dbContext;
}
public async Task<IActionResult> Index(long id = 1) {
ViewBag.Categories
= new SelectList(context.Categories, "CategoryId", "Name");
public IActionResult SubmitForm(string name, decimal price) {
TempData["name param"] = name;
TempData["price param"] = price.ToString();
return RedirectToAction(nameof(Results));
}
public IActionResult Results() {
return View(TempData);
}
}
}
Listing 28-5.
Adding Method Parameters in the FormController.cs File in the Controllers Folder
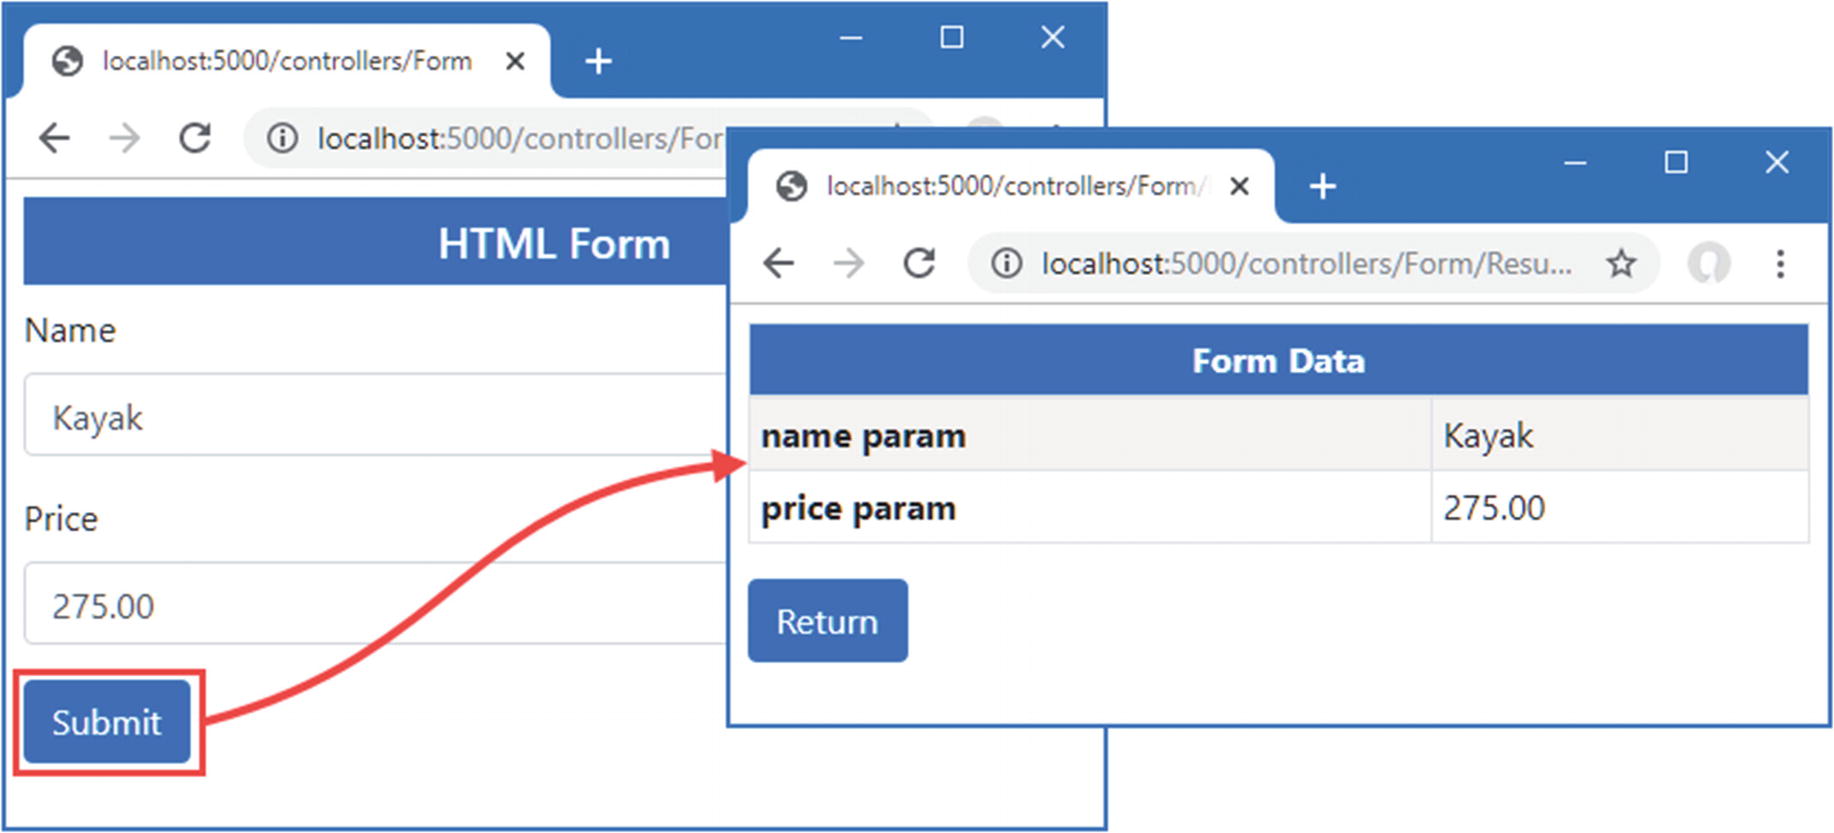
The model binding system will be used to obtain name and price values when ASP.NET Core receives a request that will be processed by the SubmitForm action method. The use of parameters simplifies the action method and takes care of converting the request data into C# data types so that the price value will be converted to the C# decimal type before the action method is invoked. (I had to convert the decimal back to a string to store it as temp data in this example. I demonstrate more useful ways of dealing with form data in Chapter 31.) Restart ASP.NET Core so the change to the controller takes effect and request http://localhost:5000/controllers/Form. Click the Submit button, and you will see the values that were extracted from the request by the model binding feature, as shown in Figure 28-3.
Figure 28-3.
Model binding for simple types
Binding Simple Data Types in Razor Pages
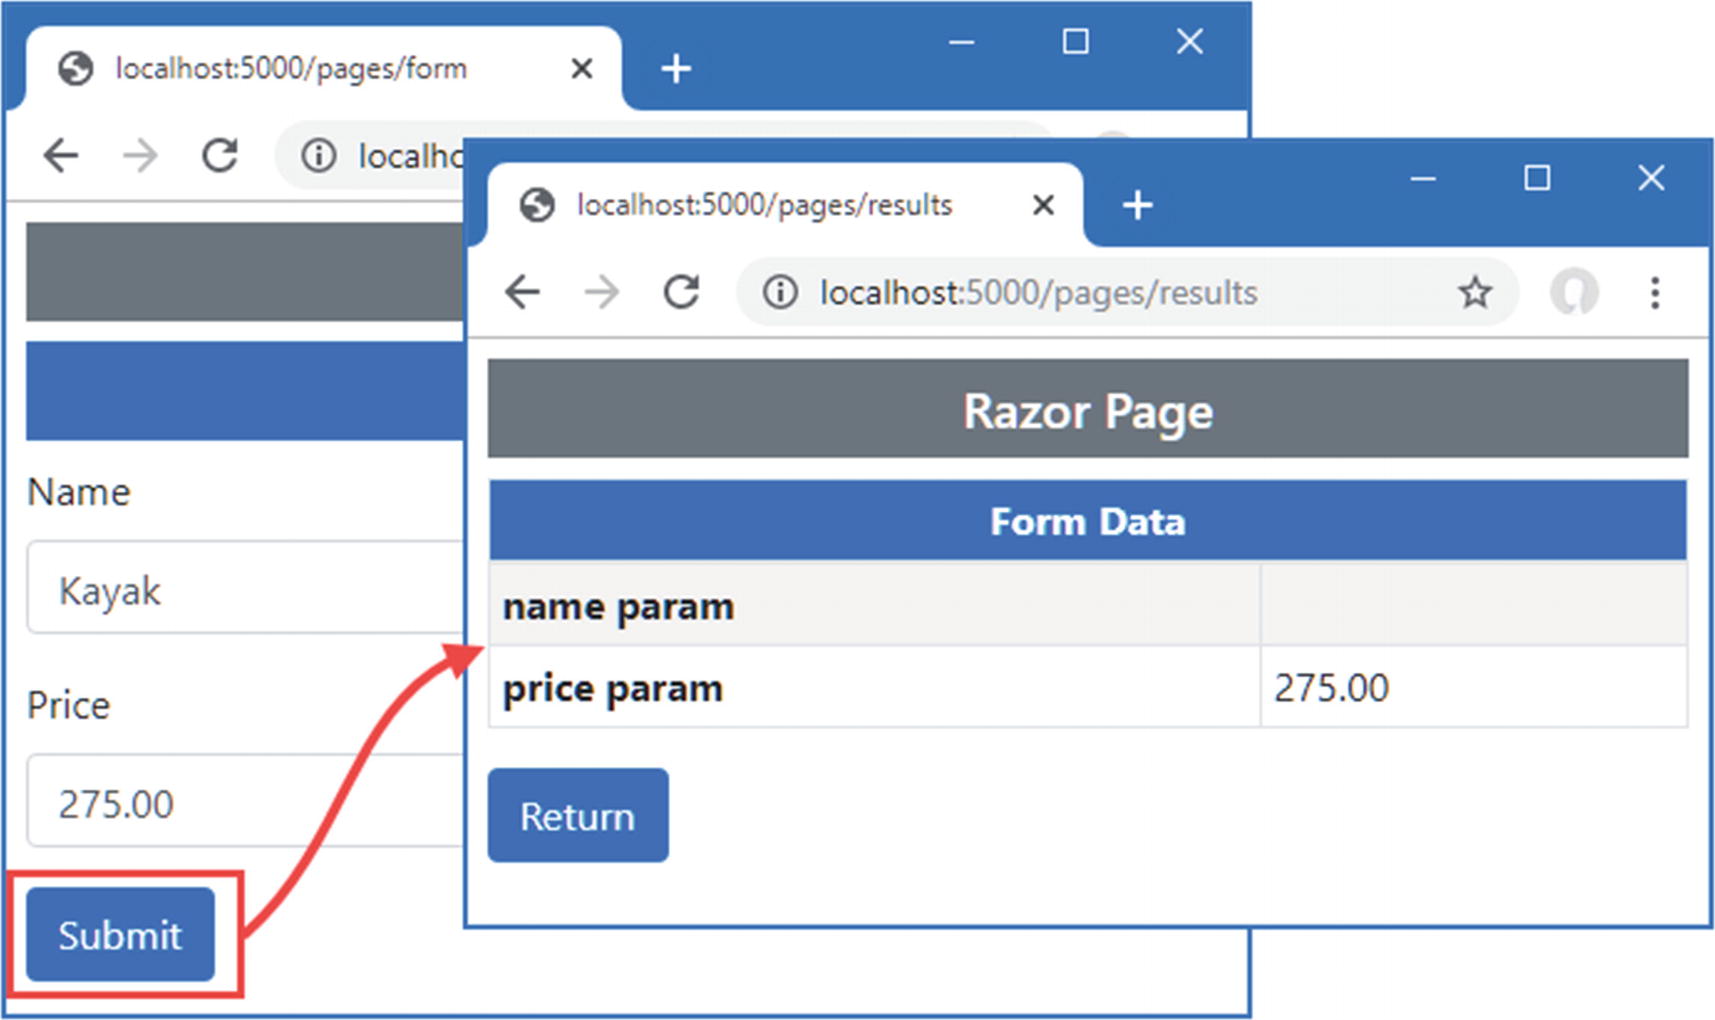
Razor Pages can use model binding, but care must be taken to ensure that the value of the form element’s name attribute matches the name of the handler method parameter, which may not be the case if the asp-for attribute has been used to select a nested property. To ensure the names match, the name attribute can be defined explicitly, as shown in Listing 28-6, which also simplifies the HTML form so that it matches the controller example.
public IActionResult OnPost(string name, decimal price) {
TempData["name param"] = name;
TempData["price param"] = price.ToString();
return RedirectToPage("FormResults");
}
}
}
Listing 28-6.
Using Model Binding in the FormHandler.cshtml File in the Pages Folder
The tag helper would have set the name attributes of the input elements to Product.Name and Product.Price, which prevents the model binder from matching the values. Explicitly setting the name attribute overrides the tag helper and ensures the model binding process works correctly. Use a browser to request http://localhost:5000/pages/form and click the Submit button, and you will see the values found by the model binder, as shown in Figure 28-4.
Figure 28-4.
Model binding in a Razor Page
Understanding Default Binding Values
Model binding is a best-effort feature, which means the model binder will try to get values for method parameters but will still invoke the method if data values cannot be located. You can see how this works by removing the default value for the id parameter in the Form controller’s Index action method, as shown in Listing 28-7.
...
public async Task<IActionResult> Index(long id) {
ViewBag.Categories
= new SelectList(context.Categories, "CategoryId", "Name");
Removing a Parameter in the FormController.cs File in the Controllers Folder
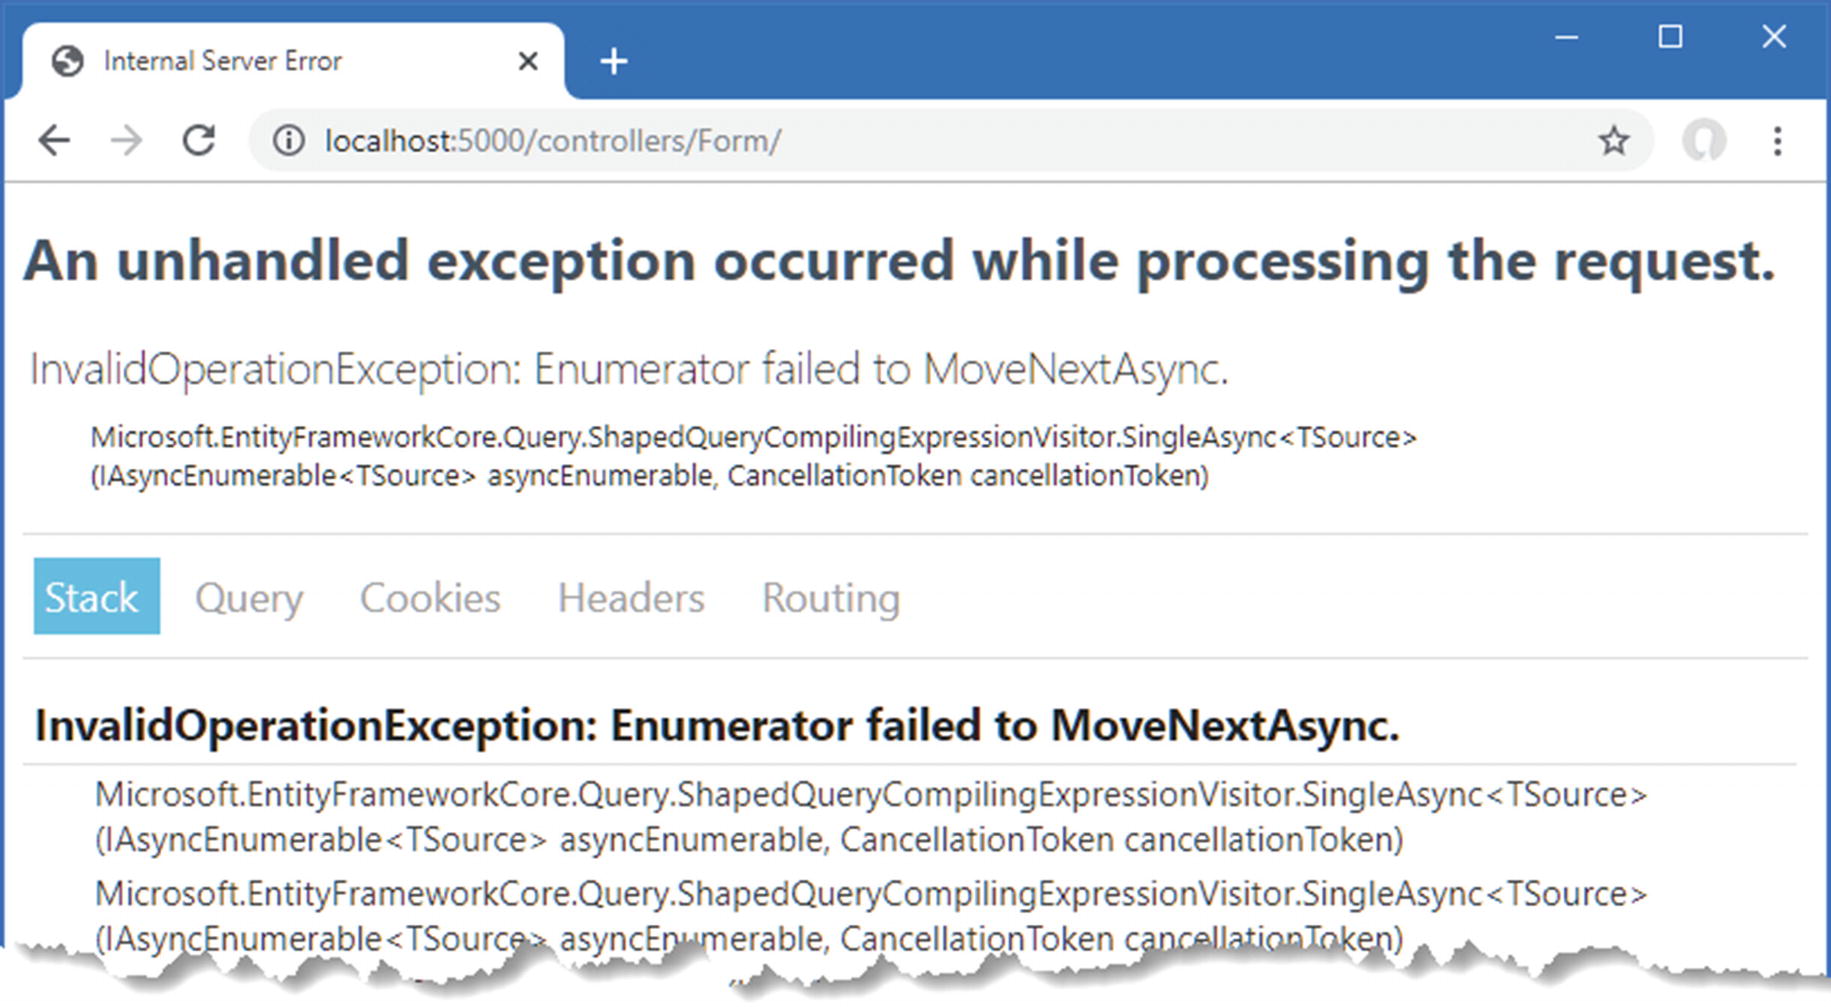
Restart ASP.NET Core and request http://localhost:5000/controllers/Form. The URL doesn’t contain a value that the model binder can use for the id parameter, and there is no query string or form data, but the method is still invoked, producing the error shown in Figure 28-5.
Figure 28-5.
An error caused by a missing data value
This exception isn’t reported by the model binding system. Instead, it occurred when the Entity Framework Core query was executed. The MVC Framework must provide some value for the id argument to invoke the Index action method, so it uses a default value and hopes for the best. For long arguments, the default value is 0, and this is what leads to the exception. The Index action method uses the id value as the key to query the database for a Product object, like this:
...
public async Task<IActionResult> Index(long id) {
ViewBag.Categories = new SelectList(context.Categories, "CategoryId", "Name");
When there is no value available for model binding, the action method tries to query the database with an id of zero. There is no such object, which causes the error shown in the figure when Entity Framework Core tries to process the result.
Applications must be written to cope with default argument values, which can be done in several ways. You can add fallback values to the routing URL patterns used by controllers (as shown in Chapter 21) or pages (as shown in Chapter 23). You can assign default values when defining the parameter in the action or page handler method, which is the approach that I have taken so far in this part of the book. Or you can simply write methods that accommodate the default values without causing an error, as shown in Listing 28-8.
...
public async Task<IActionResult> Index(long id) {
ViewBag.Categories = new SelectList(context.Categories, "CategoryId", "Name");
Avoiding a Query Error in the FormController.cs File in the Controllers Folder
The Entity Framework Core FirstOrDefaultAsync method will return null if there is no matching object in the database and won’t attempt to load related data. The tag helpers cope with null values and display empty fields, which you can see by restarting ASP.NET Core and requesting http://localhost:5000/controllers/Form, which produces the result shown in Figure 28-6.
Figure 28-6.
Avoiding an error
Some applications need to differentiate between a missing value and any value provided by the user. In these situations, a nullable parameter type can be used, as shown in Listing 28-9.
...
public async Task<IActionResult> Index(long? id) {
ViewBag.Categories = new SelectList(context.Categories, "CategoryId", "Name");
.FirstOrDefaultAsync(p => id == null || p.ProductId == id));
}
...
Listing 28-9.
Using a Nullable Parameter in the FormController.cs File in the Controllers Folder
The id parameter will be null only if the request doesn’t contain a suitable value, which allows the expression passed to the FirstOrDefaultAsync method to default to the first object in the database when there is no value and to query for any other value. To see the effect, restart ASP.NET Core and request http://localhost:5000/controllers/Form and http://localhost:5000/controllers/Form/index/0. The first URL contains no id value, so the first object in the database is selected. The second URL provides an id value of zero, which doesn’t correspond to any object in the database. Figure 28-7 shows both results.
Figure 28-7.
Using a nullable type to determine whether a request contains a value
Binding Complex Types
The model binding system shines when dealing with complex types, which are any type that cannot be parsed from a single string value. The model binding process inspects the complex type and performs the binding process on each of the public properties it defines. This means that instead of dealing with individual values such as name and price, I can use the binder to create complete Product objects, as shown in Listing 28-10.
using Microsoft.AspNetCore.Mvc;
using System.Linq;
using System.Threading.Tasks;
using WebApp.Models;
using Microsoft.EntityFrameworkCore;
using Microsoft.AspNetCore.Mvc.Rendering;
namespace WebApp.Controllers {
[AutoValidateAntiforgeryToken]
public class FormController : Controller {
private DataContext context;
public FormController(DataContext dbContext) {
context = dbContext;
}
public async Task<IActionResult> Index(long? id) {
ViewBag.Categories
= new SelectList(context.Categories, "CategoryId", "Name");
Binding a Complex Type in the FormController.cs File in the Controllers Folder
The listing changes the SubmitForm action method so that it defines a Product parameter. Before the action method is invoked, a new Product object is created, and the model binding process is applied to each of its public properties. The SubmitForm method is then invoked, using the Product object as its argument.
To see the model binding process, restart ASP.NET Core, navigate to http://localhost:5000/controllers/Form, and click the Submit button. The model binding process will extract the data values from the request and produce the result shown in Figure 28-8. The Product object created by the model binding process is serialized as JSON data so that it can be stored as temp data, making it easy to see the request data.
Figure 28-8.
Data binding a complex type
The data binding process for complex types remains a best-effort feature, meaning that a value will be sought for each public property defined by the Product class, but missing values won’t prevent the action method from being invoked. Instead, properties for which no value can be located will be left as the default value for the property type. The example provided values for the Name and Price properties, but the ProductId, CategoryId, and SupplierId properties are zero, and the Category and Supplier properties are null.
Binding to a Property
Using parameters for model binding doesn’t fit with the Razor Pages development style because the parameters often duplicate properties defined by the page model class, as shown in Listing 28-11.
Binding a Complex Type in the FormHandler.cshtml File in the Pages Folder
This code works, but the OnPost handler method has its own version of the Product object, mirroring the property used by the OnGetAsync handler. A more elegant approach is to use the existing property for model binding, as shown in Listing 28-12.
Using a Property for Model Binding in the FormHandler.cshtml File in the Pages Folder
Decorating a property with the BindProperty attribute indicates that its properties should be subject to the model binding process, which means the OnPost handler method can get the data it requires without declaring a parameter. When the BindProperty attribute is used, the model binder uses the property name when locating data values, so the explicit name attributes added to the input element are not required. By default, BindProperty won’t bind data for GET requests, but this can be changed by setting the BindProperty attribute’s SupportsGet argument to true.
Note
The BindProperties attribute can be applied to classes that require the model binding process for all the public properties they define, which can be more convenient than applying BindProperty to many individual properties. Decorate properties with the BindNever attribute to exclude them from model binding.
Binding Nested Complex Types
If a property that is subject to model binding is defined using a complex type, then the model binding process is repeated using the property name as a prefix. For example, the Product class defines the Category property, whose type is the complex Category type. Listing 28-13 adds elements to the HTML form to provide the model binder with values for the properties defined by the Category class.
Adding Nested Form Elements in the Form.cshtml File in the Views/Form Folder
The name attribute combines the property names, separated by periods. In this case, the element is for the Name property of the object assigned to the view model’s Category property, so the name attribute is set to Category.Name. The input element tag helper will automatically use this format for the name attribute when the asp-for attribute is applied, as shown in Listing 28-14.
Using a Tag Helper in the Form.cshtml File in the Views/Form Folder
The tag helper is a more reliable method of creating elements for nested properties and avoids the risk of typos producing elements that are ignored by the model binding process. To see the effect of the new elements, request http://localhost:5000/controllers/Form and click the Submit button, which will produce the response shown in Figure 28-9.
Figure 28-9.
Model binding a nested property
During the model binding process, a new Category object is created and assigned to the Category property of the Product object. The model binder locates the value for the Category object’s Name property, which can be seen in the figure, but there is no value for the CategoryId property, which is left as the default value.
Specifying Custom Prefixes for Nested Complex Types
There are occasions when the HTML you generate relates to one type of object but you want to bind it to another. This means that the prefixes containing the view won’t correspond to the structure that the model binder is expecting, and your data won’t be properly processed. Listing 28-15 demonstrates this problem by changing the type of the parameter defined by the controller’s SubmitForm action method.
...
[HttpPost]
public IActionResult SubmitForm(Category category) {
Changing a Parameter in the FormController.cs File in the Controllers Folder
The new parameter is a Category, but the model binding process won’t be able to pick out the data values correctly, even though the form data sent by the Form view will contain a value for the Category object’s Name property. Instead, the model binder will find the Name value for the Product object and use that instead, which you can see by restarting ASP.NET Core, requesting http://localhost:5000/controllers/Form, and submitting the form data, which will produce the first response shown in Figure 28-10.
This problem is solved by applying the Bind attribute to the parameter and using the Prefix argument to specify a prefix for the model binder, as shown in Listing 28-16.
...
[HttpPost]
public IActionResult SubmitForm([Bind(Prefix ="Category")] Category category) {
Setting a Prefix in the FormController.cs File in the Controllers Folder
The syntax is awkward, but the attribute ensures the model binder can locate the data the action method requires. In this case, setting the prefix to Category ensures the correct data values are used to bind the Category parameter. Restart ASP.NET Core, request http://localhost:5000/controllers/form, and submit the form, which produces the second response shown in Figure 28-10.
Figure 28-10.
Specifying a model binding prefix
When using the BindProperty attribute, the prefix is specified using the Name argument, as shown in Listing 28-17.
Specifying a Model Binding Prefix in the FormHandler.cshtml File in the Pages Folder
This listing adds an input element that uses the asp-for attribute to select the Product.Category property. A page handler class defined a Category property that is decorated with the BindProperty attribute and configured with the Name argument. To see the result of the model binding process, use a browser to request http://localhost:5000/pages/form and click the Submit button. The model binding finds values for both the decorated properties, which produces the response shown in Figure 28-11.
Figure 28-11.
Specifying a model binding prefix in a Razor Page
Selectively Binding Properties
Some model classes define properties that are sensitive and for which the user should not be able to specify values. A user may be able to change the category for a Product object, for example, but should not be able to alter the price.
You might be tempted to simply create views that omit HTML elements for sensitive properties but that won’t prevent malicious users from crafting HTTP requests that contain values anyway, which is known as an over-binding attack. To prevent the model binder from using values for sensitive properties, the list of properties that should be bound can be specified, as shown in Listing 28-18.
using Microsoft.AspNetCore.Mvc;
using System.Linq;
using System.Threading.Tasks;
using WebApp.Models;
using Microsoft.EntityFrameworkCore;
using Microsoft.AspNetCore.Mvc.Rendering;
namespace WebApp.Controllers {
[AutoValidateAntiforgeryToken]
public class FormController : Controller {
private DataContext context;
public FormController(DataContext dbContext) {
context = dbContext;
}
public async Task<IActionResult> Index(long? id) {
ViewBag.Categories
= new SelectList(context.Categories, "CategoryId", "Name");
Selectively Binding Properties in the FormController.cs File in the Controllers Folder
I have returned to the Product type for the action method parameter, which has been decorated with the Bind attribute to specify the names of the properties that should be included in the model binding process. This example tells the model binding feature to look for values for the Name and Category properties, which excludes any other property from the process. Restart ASP.NET Core, navigate to http://localhost:5000/controller/Form, and submit the form. Even though the browser sends a value for the Price property as part of the HTTP POST request, it is ignored by the model binder, as shown in Figure 28-12.
Figure 28-12.
Selectively binding properties
Selectively Binding in the Model Class
If you are using Razor Pages or you want to use the same set of properties for model binding throughout the application, you can apply the BindNever attribute directly to the model class, as shown in Listing 28-19.
using System.ComponentModel.DataAnnotations.Schema;
using System.ComponentModel.DataAnnotations;
using Microsoft.AspNetCore.Mvc.ModelBinding;
namespace WebApp.Models {
public class Product {
public long ProductId { get; set; }
public string Name { get; set; }
[Column(TypeName = "decimal(8, 2)")]
[BindNever]
public decimal Price { get; set; }
public long CategoryId { get; set; }
public Category Category { get; set; }
public long SupplierId { get; set; }
public Supplier Supplier { get; set; }
}
}
Listing 28-19.
Decorating a Property in the Product.cs File in the Models Folder
The BindNever attribute excludes a property from the model binder, which has the same effect as omitting it from the list used in the previous section. To see the effect, restart ASP.NET Core so the change to the Product class takes effect, request http://localhost:5000/pages/form, and submit the form. Just as with the previous example, the model binder ignores the value for the Price property, as shown in Figure 28-13.
Tip
There is also a BindRequired attribute that tells the model binding process that a request must include a value for a property. If the request doesn’t have a required value, then a model validation error is produced, as described in Chapter 29.
Figure 28-13.
Excluding a property from model binding
Binding to Arrays and Collections
The model binding process has some nice features for binding request data to arrays and collections, which I demonstrate in the following sections.
Binding to Arrays
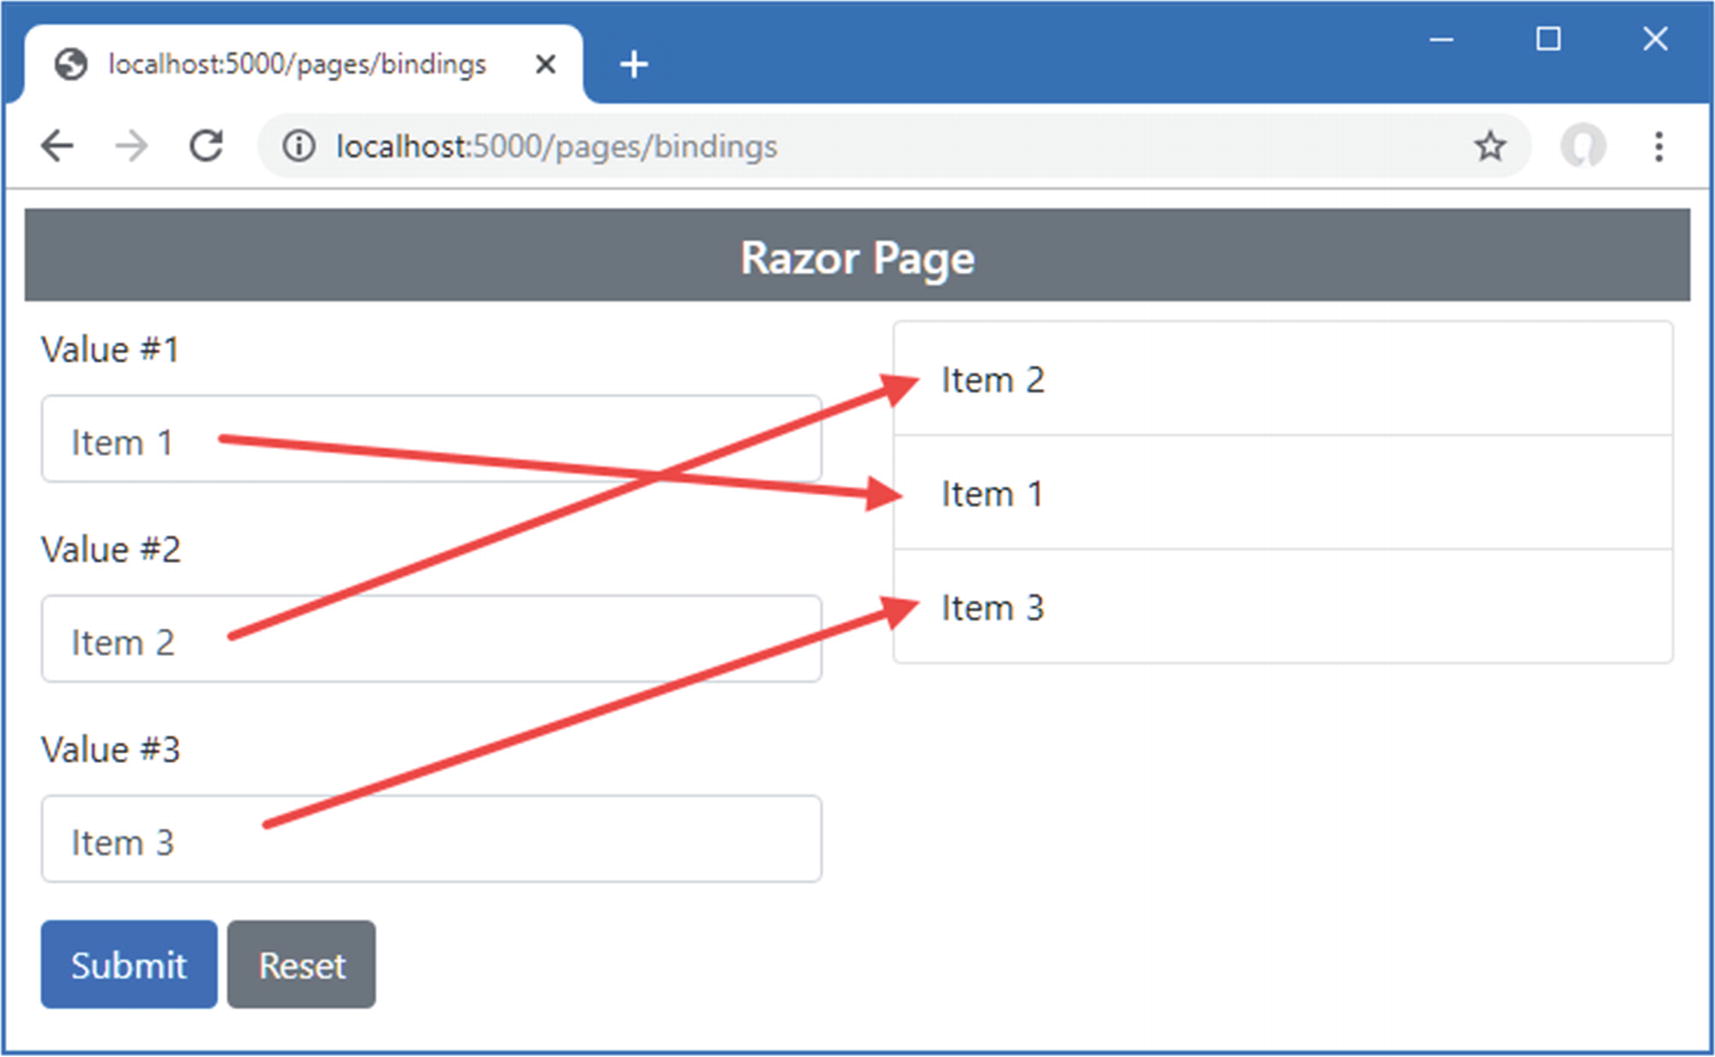
One elegant feature of the default model binder is how it supports arrays. To see how this feature works, add a Razor Page named Bindings.cshtml to the Pages folder with the content shown in Listing 28-20.
@foreach (string s in Model.Data.Where(s => s != null)) {
<li class="list-group-item">@s</li>
}
</ul>
</div>
</div>
</div>
@functions {
public class BindingsModel : PageModel {
[BindProperty(Name = "Data")]
public string[] Data { get; set; } = Array.Empty<string>();
}
}
Listing 28-20.
The Contents of the Bindings.cshtml File in the Pages Folder
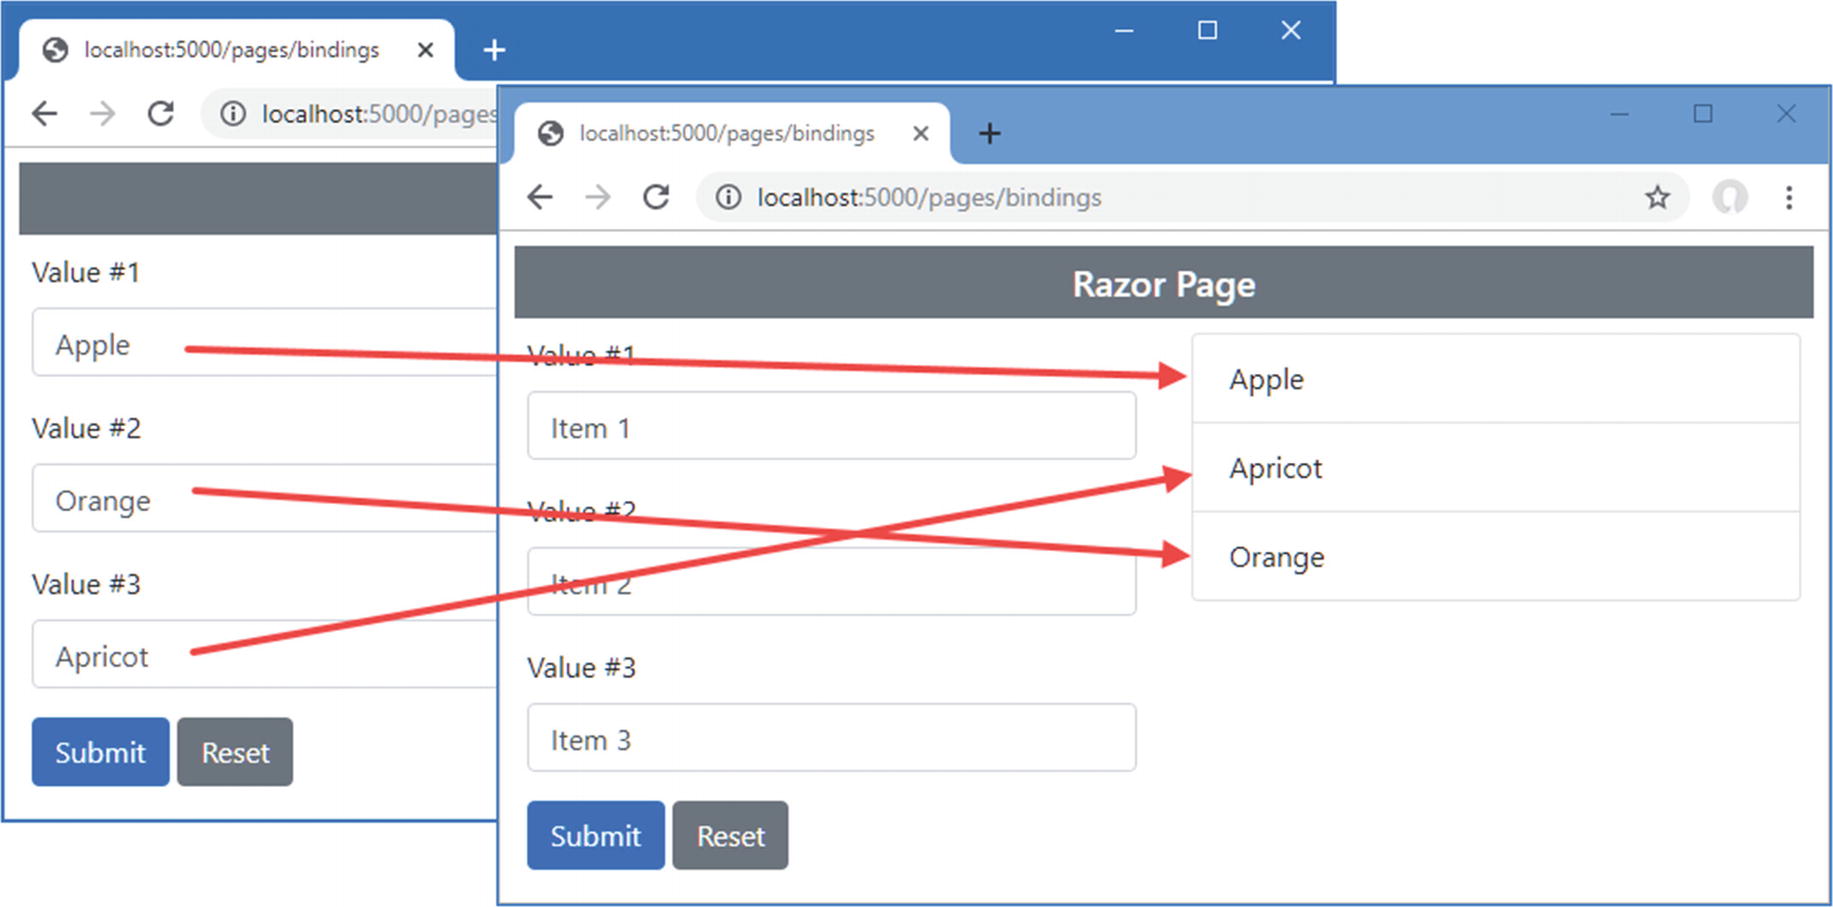
Model binding for an array requires setting the name attribute to the same value for all the elements that will provide an array value. This page displays three input elements, all of which have a name attribute value of Data. To allow the model binder to find the array values, I have decorated the page model’s Data property with the BindProperty attribute and used the Name argument.
Tip
Notice that the page model class in Listing 28-20 defines no handler methods. This is unusual, but it works because there is no explicit processing required for any requests since requests only provide values for and display the Data array.
When the HTML form is submitted, a new array is created and populated with the values from all three input elements, which are displayed to the user. To see the binding process, request http://localhost:5000/pages/bindings, edit the form fields, and click the Submit button. The contents of the Data array are displayed in a list using an @foreach expression, as shown in Figure 28-14.
Figure 28-14.
Model binding for array values
Notice that I filter out null values when displaying the array contents.
...
@foreach (string s in Model.Data.Where(s => s != null)) {
<li class="list-group-item">@s</li>
}
...
Empty form fields produce null values in the array, which I don’t want to show in the results. In Chapter 29, I show you how to ensure that values are provided for model binding properties.
Specifying Index Positions for Array Values
By default, arrays are populated in the order in which the form values are received from the browser, which will generally be the order in which the HTML elements are defined. The name attribute can be used to specify the position of values in the array if you need to override the default, as shown in Listing 28-21.
@foreach (string s in Model.Data.Where(s => s != null)) {
<li class="list-group-item">@s</li>
}
</ul>
</div>
</div>
</div>
@functions {
public class BindingsModel : PageModel {
[BindProperty(Name = "Data")]
public string[] Data { get; set; } = Array.Empty<string>();
}
}
Listing 28-21.
Specifying Array Position in the Bindings.cshtml File in the Pages Folder
The array index notation is used to specify the position of a value in the data-bound array. Use a browser to request http://localhost:5000/pages/bindings and submit the form, and you will see the items appear in the order dictated by the name attributes, as shown in Figure 28-15. The index notation must be applied to all the HTML elements that provide array values, and there must not be any gaps in the numbering sequence.
Figure 28-15.
Specifying array position
Binding to Simple Collections
The model binding process can create collections as well as arrays. For sequence collections, such as lists and sets, only the type of the property or parameter that is used by the model binder is changed, as shown in Listing 28-22.
@foreach (string s in Model.Data.Where(s => s != null)) {
<li class="list-group-item">@s</li>
}
</ul>
</div>
</div>
</div>
@functions {
public class BindingsModel : PageModel {
[BindProperty(Name = "Data")]
public SortedSet<string> Data { get; set; } = new SortedSet<string>();
}
}
Listing 28-22.
Binding to a List in the Bindings.cshtml File in the Pages Folder
I changed the type of the Data property to SortedSet<string>. The model binding process will populate the set with the values from the input elements, which will be sorted alphabetically. I have left the index notation on the input element name attributes, but they have no effect since the collection class will sort its values alphabetically. To see the effect, use a browser to request http://localhost:5000/pages/bindings, edit the text fields, and click the Submit button. The model binding process will populate the sorted set with the form values, which will be presented in order, as shown in Figure 28-16.
Figure 28-16.
Model binding to a collection
Binding to Dictionaries
For elements whose name attribute is expressed using the index notation, the model binder will use the index as the key when binding to a Dictionary, allowing a series of elements to be transformed into key/value pairs, as shown in Listing 28-23.
public Dictionary<string, string> Data { get; set; }
= new Dictionary<string, string>();
}
}
Listing 28-23.
Binding to a Dictionary in the Bindings.cshtml File in the Pages Folder
All elements that provide values for the collection must share a common prefix, which is Data in this example, followed by the key value in square brackets. The keys for this example are the strings first, second, and third, and will be used as the keys for the content the user provides in the text fields. To see the binding process, request http://localhost:5000/pages/bindings, edit the text fields, and submit the form. The keys and values from the form data will be displayed in a table, as shown in Figure 28-17.
Figure 28-17.
Model binding to a dictionary
Binding to Collections of Complex Types
The examples in this section have all been collections of simple types, but the same process can be used for complex types, too. To demonstrate, Listing 28-24 revises the Razor Page to gather details used to bind to an array of Product objects.
public Product[] Data { get; set; } = Array.Empty<Product>();
}
}
Listing 28-24.
Binding to Complex Types in the Bindings.cshtml File in the Pages Folder
The name attributes for the input elements use the array notation, followed by a period, followed by the name of the complex type properties they represent. To define elements for the Name and Price properties, this requires elements like this:
During the binding process, the model binder will attempt to locate values for all the public properties defined by the target type, repeating the process for each set of values in the form data.
This example relies on model binding for the Price property defined by the Product class, which was excluded from the binding process with the BindNever attribute. Remove the attribute from the property, as shown in Listing 28-25.
using System.ComponentModel.DataAnnotations.Schema;
using System.ComponentModel.DataAnnotations;
using Microsoft.AspNetCore.Mvc.ModelBinding;
namespace WebApp.Models {
public class Product {
public long ProductId { get; set; }
public string Name { get; set; }
[Column(TypeName = "decimal(8, 2)")]
//[BindNever]
public decimal Price { get; set; }
public long CategoryId { get; set; }
public Category Category { get; set; }
public long SupplierId { get; set; }
public Supplier Supplier { get; set; }
}
}
Listing 28-25.
Removing an Attribute in the Product.cs File in the Models Folder
Restart ASP.NET Core so the change to the Product class takes effect and use a browser to request http://localhost:5000/pages/bindings. Enter names and prices into the text fields and submit the form, and you will see the details of the Product objects created from the data displayed in a table, as shown in Figure 28-18.
Figure 28-18.
Binding to a collection of complex types
Specifying a Model Binding Source
As I explained at the start of the chapter, the default model binding process looks for data in four places: the form data values, the request body (for web service controllers only), the routing data, and the request query string.
The default search sequence isn’t always helpful, either because you always want data to come from a specific part of the request or because you want to use a data source that isn’t searched by default. The model binding feature includes a set of attributes used to override the default search behavior, as described in Table 28-3.
Tip
There is also the FromService attribute, which doesn’t get a value from the request, but through the dependency injection feature described in Chapter 14.
Table 28-3.
The Model Binding Source Attributes
Name
Description
FromForm
This attribute is used to select form data as the source of binding data. The name of the parameter is used to locate a form value by default, but this can be changed using the Name property, which allows a different name to be specified.
FromRoute
This attribute is used to select the routing system as the source of binding data. The name of the parameter is used to locate a route data value by default, but this can be changed using the Name property, which allows a different name to be specified.
FromQuery
This attribute is used to select the query string as the source of binding data. The name of the parameter is used to locate a query string value by default, but this can be changed using the Name property, which allows a different query string key to be specified.
FromHeader
This attribute is used to select a request header as the source of binding data. The name of the parameter is used as the header name by default, but this can be changed using the Name property, which allows a different header name to be specified.
FromBody
This attribute is used to specify that the request body should be used as the source of binding data, which is required when you want to receive data from requests that are not form-encoded, such as in API controllers that provide web services.
The FromForm, FromRoute, and FromQuery attributes allow you to specify that the model binding data will be obtained from one of the standard locations but without the normal search sequence. Earlier in the chapter, I used this URL:
This URL contains two possible values that can be used for the id parameter of the Index action method on the Form controller. The routing system will assign the final segment of the URL to a variable called id, which is defined in the default URL pattern for controllers, and the query string also contains an id value. The default search pattern means that the model binding data will be taken from the route data and the query string will be ignored.
In Listing 28-26, I have applied the FromQuery attribute to the id parameter defined by the Index action method, which overrides the default search sequence.
using Microsoft.AspNetCore.Mvc;
using System.Linq;
using System.Threading.Tasks;
using WebApp.Models;
using Microsoft.EntityFrameworkCore;
using Microsoft.AspNetCore.Mvc.Rendering;
namespace WebApp.Controllers {
[AutoValidateAntiforgeryToken]
public class FormController : Controller {
private DataContext context;
public FormController(DataContext dbContext) {
context = dbContext;
}
public async Task<IActionResult> Index([FromQuery] long? id) {
ViewBag.Categories
= new SelectList(context.Categories, "CategoryId", "Name");
Selecting the Query String in the FormController.cs File in the Controllers Folder
The attribute specifies the source for the model binding process, which you can see by restarting ASP.NET Core and using a browser to request http://localhost:5000/controllers/Form/Index/5?id=1. Instead of using the value that has been matched by the routing system, the query string will be used instead, producing the response shown in Figure 28-19. No other location will be used if the query string doesn’t contain a suitable value for the model binding process.
Tip
You can still bind complex types when specifying a model binding source such as the query string. For each simple property in the parameter type, the model binding process will look for a query string key with the same name.
Figure 28-19.
Specifying a model binding data source
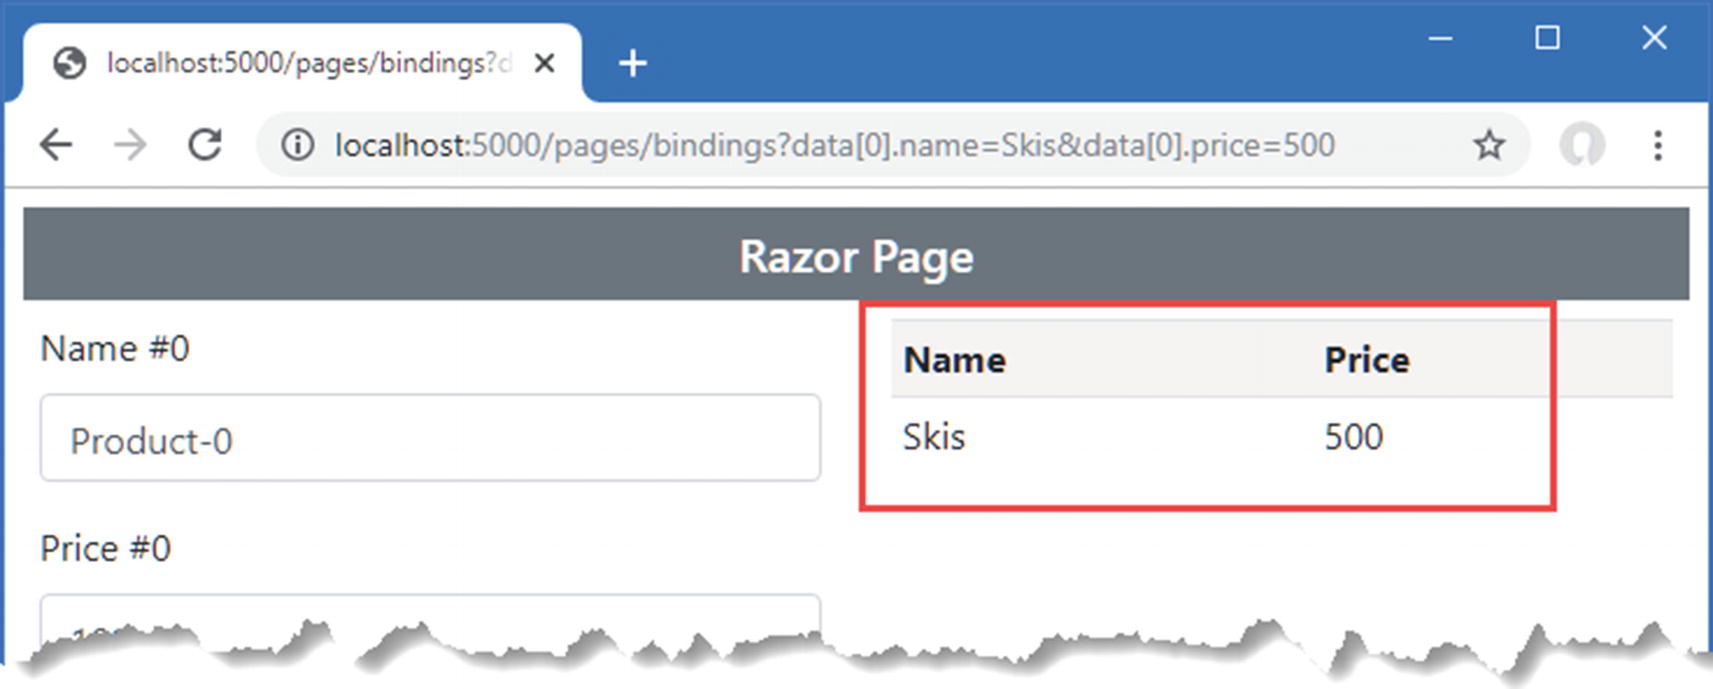
Selecting a Binding Source for a Property
The same attributes can be used to model bind properties defined by a page model or a controller, as shown in Listing 28-27.
...
@functions {
public class BindingsModel : PageModel {
//[BindProperty(Name = "Data")]
[FromQuery(Name = "Data")]
public Product[] Data { get; set; } = Array.Empty<Product>();
}
}
...
Listing 28-27.
Selecting the Query String in the Bindings.cshtml File in the Pages Folder
The use of the FromQuery attribute means the query string is used as the source of values for the model binder as it creates the Product array, which you can see by requesting http://localhost:5000/pages/bindings?data[0].name=Skis&data[0].price=500, which produces the response shown in Figure 28-20.
Note
In this example, I have used a GET request because it allows the query string to be easily set. Although it is harmless in such a simple example, care must be taken when sending GET requests that modify the state of the application. As noted previously, making changes in GET requests can lead to problems.
Figure 28-20.
Specifying a model binding data source in a Razor Page
Tip
Although it is rarely used, you can bind complex types using header values by applying the FromHeader attribute to the properties of a model class.
Using Headers for Model Binding
The FromHeader attribute allows HTTP request headers to be used as the source for binding data. In Listing 28-28, I have added a simple action method to the Form controller that defines a parameter that will be model bound from a standard HTTP request header.
using Microsoft.AspNetCore.Mvc;
using System.Linq;
using System.Threading.Tasks;
using WebApp.Models;
using Microsoft.EntityFrameworkCore;
using Microsoft.AspNetCore.Mvc.Rendering;
namespace WebApp.Controllers {
[AutoValidateAntiforgeryToken]
public class FormController : Controller {
private DataContext context;
// ...other action methods omitted for brevity...
public string Header([FromHeader]string accept) {
return $"Header: {accept}";
}
}
}
Listing 28-28.
Model Binding from a Header in the FormController.cs File in the Controllers Folder
The Header action method defines an accept parameter, the value for which will be taken from the Accept header in the current request and returned as the method result. Restart ASP.NET Core and request http://localhost:5000/controllers/form/header, and you will see a result like this:
Not all HTTP header names can be easily selected by relying on the name of the action method parameter because the model binding system doesn’t convert from C# naming conventions to those used by HTTP headers. In these situations, you must configure the FromHeader attribute using the Name property to specify the name of the header, as shown in Listing 28-29.
using Microsoft.AspNetCore.Mvc;
using System.Linq;
using System.Threading.Tasks;
using WebApp.Models;
using Microsoft.EntityFrameworkCore;
using Microsoft.AspNetCore.Mvc.Rendering;
namespace WebApp.Controllers {
[AutoValidateAntiforgeryToken]
public class FormController : Controller {
private DataContext context;
// ...other action methods omitted for brevity...
public string Header([FromHeader(Name = "Accept-Language")] string accept) {
return $"Header: {accept}";
}
}
}
Listing 28-29.
Selecting a Header by Name in the FormController.cs File in the Controllers Folder
I can’t use Accept-Language as the name of a C# parameter, and the model binder won’t automatically convert a name like AcceptLanguage into Accept-Language so that it matches the header. Instead, I used the Name property to configure the attribute so that it matches the right header. If you restart ASP.NET Core and request http://localhost:5000/controllers/form/header, you will see a result like this, which will vary based on your locale settings:
Header: en-US;q=0.9,en;q=0.8
Using Request Bodies as Binding Sources
Not all data sent by clients is sent as form data, such as when a JavaScript client sends JSON data to an API controller. The FromBody attribute specifies that the request body should be decoded and used as a source of model binding data. In Listing 28-30, I have added a new action method to the Form controller with a parameter that is decorated with the FromBody attribute.
Tip
The FromBody attribute isn’t required for controllers that are decorated with the ApiController attribute.
using Microsoft.AspNetCore.Mvc;
using System.Linq;
using System.Threading.Tasks;
using WebApp.Models;
using Microsoft.EntityFrameworkCore;
using Microsoft.AspNetCore.Mvc.Rendering;
namespace WebApp.Controllers {
[AutoValidateAntiforgeryToken]
public class FormController : Controller {
private DataContext context;
public FormController(DataContext dbContext) {
context = dbContext;
}
// ...other action methods omitted for brevity...
[HttpPost]
[IgnoreAntiforgeryToken]
public Product Body([FromBody] Product model) {
return model;
}
}
}
Listing 28-30.
Adding an Action Method in the FormController.cs File in the Controllers Folder
To test the model binding process, restart ASP.NET Core, open a new PowerShell command prompt, and run the command in Listing 28-31 to send a request to the application.
Note
I added the IgnoreAntiforgeryToken to the action method in Listing 28-31 because the request that I am going to send won’t include an anti-forgery token, which I described in Chapter 27.
The JSON-encoded request body is used to model bind the action method parameter, which produces the following response:
productId : 0
name : Soccer Boots
price : 89.99
categoryId : 0
category :
supplierId : 0
supplier :
Manually Model Binding
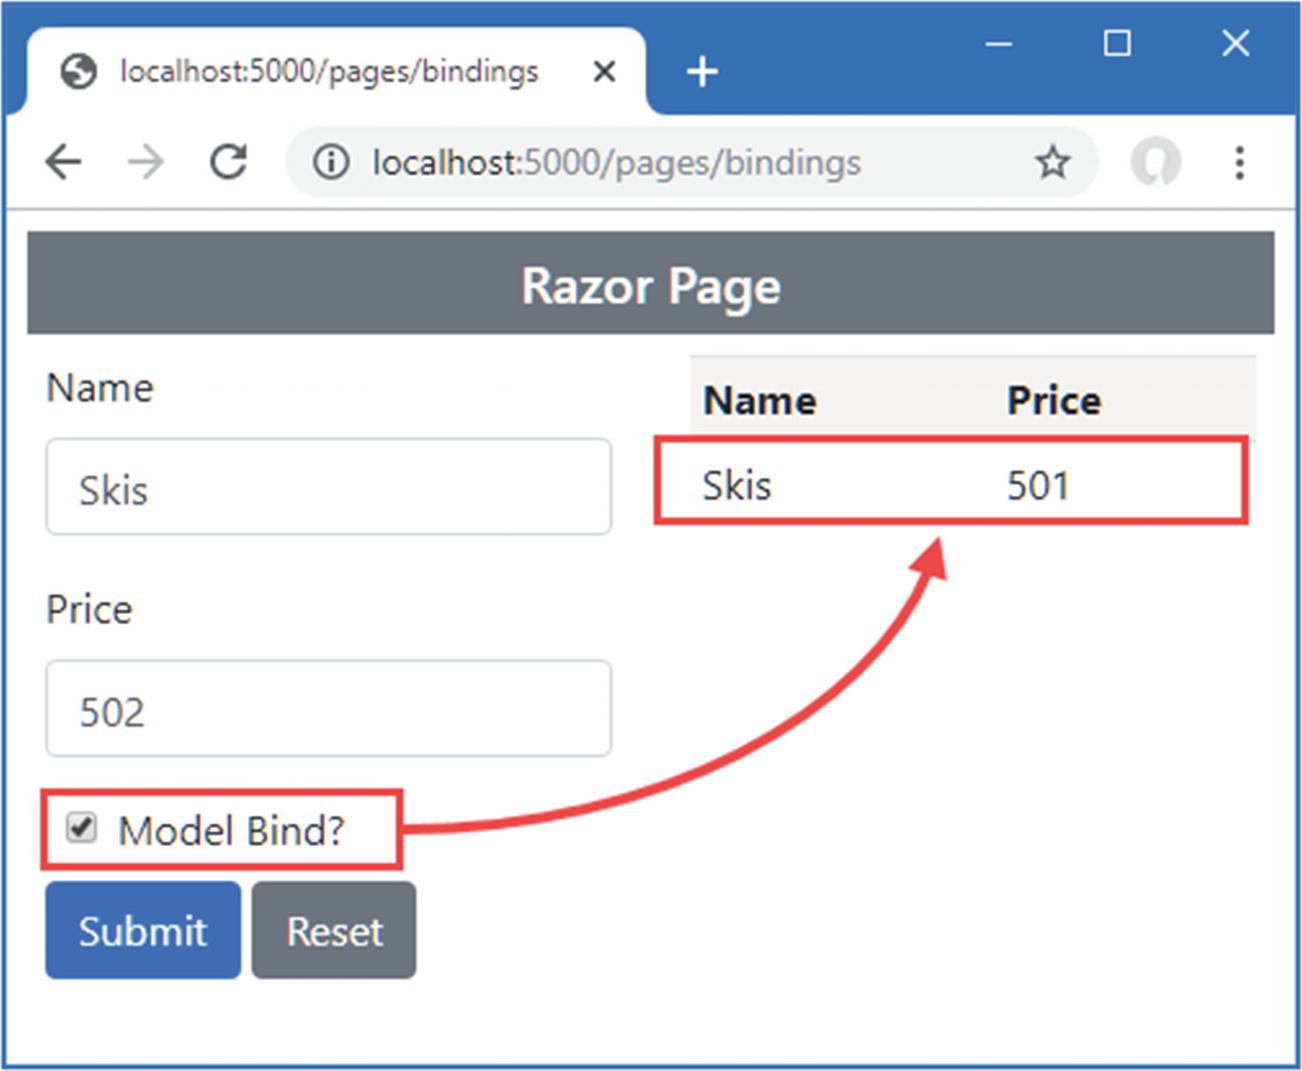
Model binding is applied automatically when you define a parameter for an action or handler method or apply the BindProperty attribute. Automatic model binding works well if you can consistently follow the name conventions and you always want the process to be applied. If you need to take control of the binding process or you want to perform binding selectively, then you can perform model binding manually, as shown in Listing 28-32.
public async Task OnPostAsync([FromForm] bool bind) {
if (bind) {
await TryUpdateModelAsync<Product>(Data,
"data", p => p.Name, p => p.Price);
}
}
}
}
Listing 28-32.
Manually Binding in the Bindings.cshtml File in the Pages Folder
Manual model binding is performed using the TryUpdateModelAsync method, which is provided by the PageModel and ControllerBase classes, which means it is available for both Razor Pages and MVC controllers.
This example mixes automatic and manual model binding. The OnPostAsync method uses automatic model binding to receive a value for its bind parameter, which has been decorated with the FromForm attribute. If the value of the parameter is true, the TryUpdateModelAsync method is used to apply model binding. The arguments to the TryUpdateModelAsync method are the object that will be model bound, the prefix for the values, and a series of expressions that select the properties that will be included in the process, although there are other versions of the TryUpdateModelAsync method available.
The result is that the model binding process for the Data property is performed only when the user checks the checkbox added to the form in Listing 28-32. If the checkbox is unchecked, then no model binding occurs, and the form data is ignored. To make it obvious when model binding is used, the value of the Price property is incremented when the form is rendered. To see the effect, request http://localhost:5000/pages/bindings and submit the form with the checkbox checked and then unchecked, as shown in Figure 28-21.
Figure 28-21.
Using manual model binding
Summary
In this chapter, I introduced the model binding feature, which makes it easy to work with request data. I showed you how to use model binding with parameters and properties, how to bind simple and complex types, and the conventions required to bind to arrays and collections. I also explained how to control which part of the request is used for model binding and how to take control of when model binding is performed. In the next chapter, I describe the features that ASP.NET Core provides to validate form data.