The ASP.NET Core platform is the foundation for creating web applications and provides the features that allow frameworks like MVC and Blazor to be used. In this chapter, I explain how the basic ASP.NET Core features work, describe the purpose of the files in an ASP.NET Core project, and explain how the ASP.NET Core request pipeline is used to process HTTP requests and demonstrate the different ways that it can be customized.
Don’t worry if not everything in this chapter makes immediate sense or appears to apply to the applications you intend to create. The features I describe in this chapter are the underpinnings for everything that ASP.NET Core does, and understanding how they work helps provide a context for understanding the features that you will use on a daily basis, as well as giving you the knowledge you need to diagnose problems when you don’t get the behavior you expect. Table 12-1 puts the ASP.NET Core platform in context.
Table 12-1.
Putting the ASP.NET Core Platform in Context
Question
Answer
What is it?
The ASP.NET Core platform is the foundation on which web applications are built and provides features for processing HTTP requests.
Why is it useful?
The ASP.NET Core platform takes care of the low-level details of web applications so that developers can focus on features for the end user.
How is it used?
The key building blocks are services and middleware components, both of which can be created in the Startup class.
Are there any pitfalls or limitations?
The use of the Startup class can be confusing, and close attention must be paid to the order of the statements it contains.
Are there any alternatives?
The ASP.NET Core platform is required for ASP.NET Core applications, but you can choose not to work with the platform directly and rely on just the higher-level ASP.NET Core features, which are described in later chapters.
Call the Use or UseMiddleware method to add a function or class to the request pipeline
4–6
Modifying a response
Write a middleware component that uses the return pipeline path
7
Preventing other components from processing a request
Short-circuit the request pipeline or create terminal middleware
8, 11, 12
Using different sets of middleware
Create a pipeline branch
9
Configuring middleware components
Use the options pattern
13–16
Preparing for This Chapter
To prepare for this chapter, I am going to create a new project named Platform, using the template that provides the minimal ASP.NET Core setup. Open a new PowerShell command prompt from the Windows Start menu and run the commands shown in Listing 12-1.
Tip
You can download the example project for this chapter—and for all the other chapters in this book—from https://github.com/apress/pro-asp.net-core-3. See Chapter 1 for how to get help if you have problems running the examples.
dotnet new globaljson --sdk-version 3.1.101 --output Platform
dotnet new web --no-https --output Platform --framework netcoreapp3.1
dotnet new sln -o Platform
dotnet sln Platform add Platform
Listing 12-1.
Creating the Project
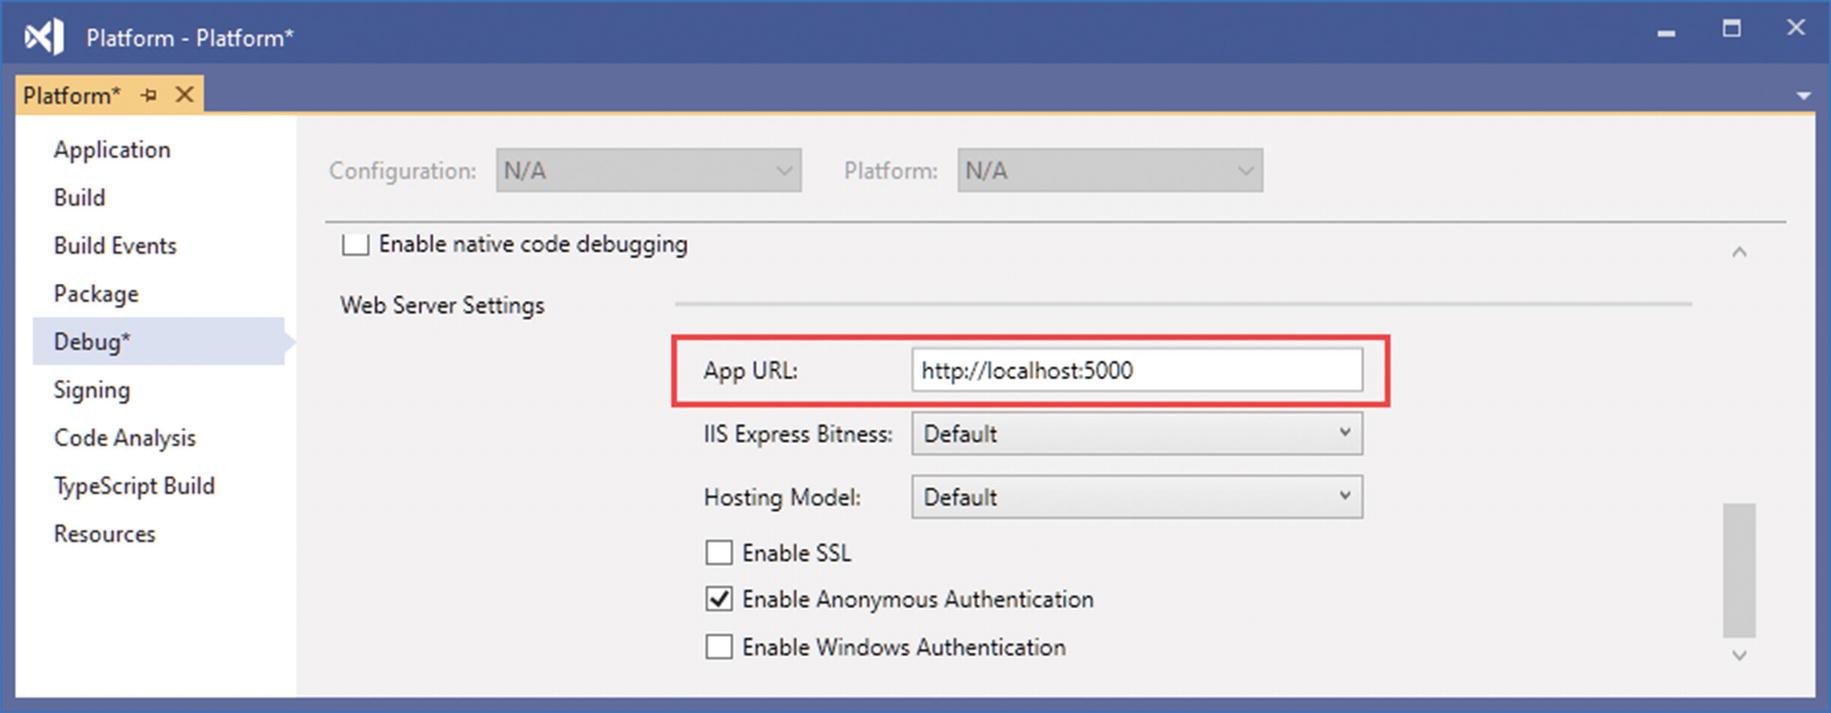
If you are using Visual Studio, open the Platform.sln file in the Platform folder. Select Project ➤ Platform Properties, navigate to the Debug page, and change the App URL field to http://localhost:5000, as shown in Figure 12-1. This changes the port that will be used to receive HTTP requests. Select File ➤ Save All to save the configuration changes.
Figure 12-1.
Changing the HTTP port
If you are using Visual Studio Code, open the Platform folder. Click the Yes button when prompted to add the assets required for building and debugging the project, as shown in Figure 12-2.
Figure 12-2.
Adding project assets
Running the Example Application
Start the example application by selecting Start Without Debugging or Run Without Debugging from the Debug menu. If you are using Visual Studio Code, select .NET Core when prompted to select an environment. This is a selection that is made only when the project is first started. A new browser window will be opened, and you will see the output shown in Figure 12-3.
Figure 12-3.
Running the example application
You can also start the application from the command line by running the command shown in Listing 12-2 in the Platform folder.
dotnet run
Listing 12-2.
Starting the Example Application
This command doesn’t open a new browser window, and you will have to manually navigate to http://localhost:5000 to see the output shown in Figure 12-3.
Understanding the ASP.NET Core Platform
To understand ASP.NET Core, it is helpful to focus on just the key features: the request pipeline, middleware, and services. Understanding how these features fit together—even without going into detail—provides useful context for understanding the contents of the ASP.NET Core project and the shape of the ASP.NET Core platform.
Understanding Middleware and the Request Pipeline
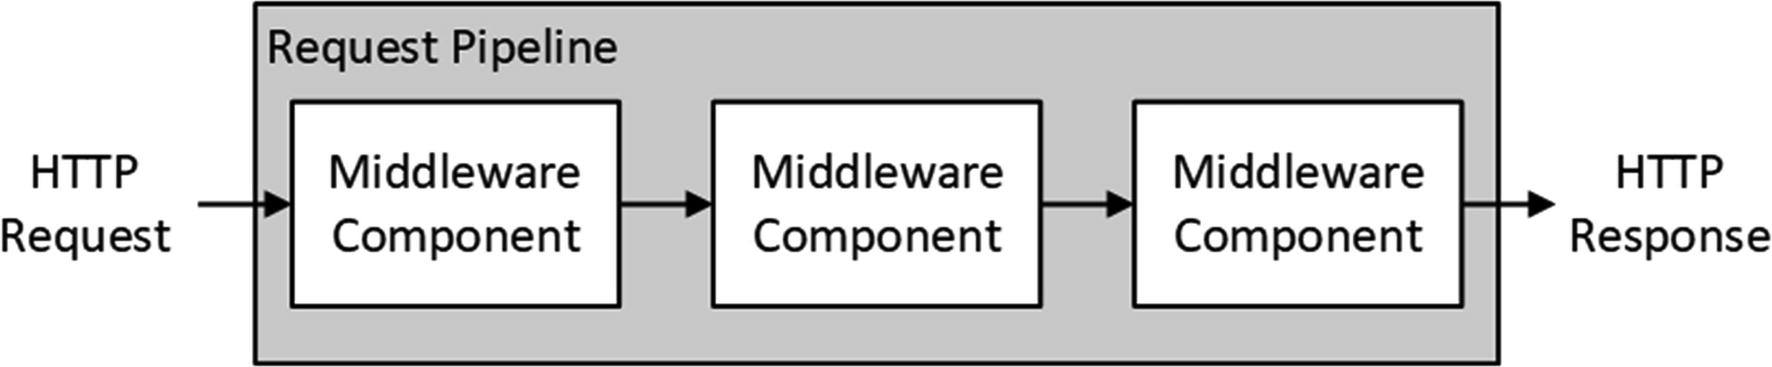
The purpose of the ASP.NET Core platform is to receive HTTP requests and send responses to them, which ASP.NET Core delegates to middleware components. Middleware components are arranged in a chain, known as the request pipeline.
When a new HTTP request arrives, the ASP.NET Core platform creates an object that describes it and a corresponding object that describes the response that will be sent in return. These objects are passed to the first middleware component in the chain, which inspects the request and modifies the response. The request is then passed to the next middleware component in the chain, with each component inspecting the request and adding to the response. Once the request has made its way through the pipeline, the ASP.NET Core platform sends the response, as illustrated in Figure 12-4.
Figure 12-4.
The ASP.NET Core request pipeline
Some components focus on generating responses for requests, but others are there to provide supporting features, such as formatting specific data types or reading and writing cookies. ASP.NET Core includes middleware components that solve common problems, as described in Chapters 15 and 16, and I show how to create custom middleware components later in this chapter. If no response is generated by the middleware components, then ASP.NET Core will return a response with the HTTP 404 Not Found status code.
Understanding Services
Services are objects that provide features in a web application. Any class can be used as a service, and there are no restrictions on the features that services provide. What makes services special is that they are managed by ASP.NET Core, and a feature called dependency injection makes it possible to easily access services anywhere in the application, including middleware components.
Dependency injection can be a difficult topic to understand, and I describe it in detail in Chapter 14. For now, it is enough to know that there are objects that are managed by the ASP.NET Core platform that can be shared by middleware components, either to coordinate between components or to avoid duplicating common features, such as logging or loading configuration data, as shown in Figure 12-5.
Figure 12-5.
Services in the ASP.NET Core platform
As the figure shows, middleware components use only the services they require to do their work. As you will learn in later chapters, ASP.NET Core provides some basic services that can be supplemented by additional services that are specific to an application.
Understanding the ASP.NET Core Project
The Empty template produces a project with just enough code and configuration to start the ASP.NET Core runtime with some basic services and middleware components. Figure 12-6 shows the files added to the project by the template.
Figure 12-6.
The files in the example project
Visual Studio and Visual Studio Code take different approaches to displaying files and folders. Visual Studio hides items that are not commonly used by the development and nests related items together, while Visual Studio Code shows everything.
This is why the two project views shown in the figure are different: Visual Studio has hidden the bin and obj folders and nested the appsettings.Development.json file within the appsettings.json file. The buttons at the top of the Solution Explorer window can be used to prevent nesting and to show all of the files in the project.
Although there are few files in the project, they underpin ASP.NET Core development and are described in Table 12-3.
Table 12-3.
The Files and Folders in the Example Project
Name
Description
appsettings.json
This file is used to configure the application, as described in Chapter 15.
appsettings.Development.json
This file is used to define configuration settings that are specific to development, as explained in Chapter 15.
bin
This folder contains the compiled application files. Visual Studio hides this folder.
global.json
This file is used to select a specific version of the .NET Core SDK.
Properties/launchSettings.json
This file is used to configure the application when it starts. Visual Studio hides this folder and file.
obj
This folder contains the intermediate output from the compiler. Visual Studio hides this folder.
Platform.csproj
This file describes the project to the .NET Core tools, including the package dependencies and build instructions, as described in the “Understanding the Project File” section. Visual Studio hides this file, but it can be edited by right-clicking the project item in the Solution Explorer and selecting Edit Project File from the pop-up menu.
Program.cs
This file is the entry point for the ASP.NET Core platform.
Startup.cs
This file is used to configure the ASP.NET Core runtime and its associated frameworks, as described in the “Understanding the Startup Class” section.
Understanding the Entry Point
.NET Core applications define a main method, which is invoked when the application is executed and which is known as the application’s entry point. For ASP.NET Core, the main method is defined by the Program class in the Program.cs file. Here is the content of the Program.cs in the example project:
using System;
using System.Collections.Generic;
using System.Linq;
using System.Threading.Tasks;
using Microsoft.AspNetCore.Hosting;
using Microsoft.Extensions.Configuration;
using Microsoft.Extensions.Hosting;
using Microsoft.Extensions.Logging;
namespace Platform {
public class Program {
public static void Main(string[] args) {
CreateHostBuilder(args).Build().Run();
}
public static IHostBuilder CreateHostBuilder(string[] args) =>
Host.CreateDefaultBuilder(args)
.ConfigureWebHostDefaults(webBuilder => {
webBuilder.UseStartup<Startup>();
});
}
}
The .NET Core runtime invokes the Main method, which calls the CreateHostBuilder method. The first step in the setup process is the call to the Host.CreateDefaultBuilder method.
...
public static IHostBuilder CreateHostBuilder(string[] args) =>
Host.CreateDefaultBuilder(args)
.ConfigureWebHostDefaults(webBuilder => {
webBuilder.UseStartup<Startup>();
});
...
This method is responsible for setting up the basic features of the ASP.NET Core platform, including creating services responsible for configuration data and logging, both of which are described in Chapter 15. This method also sets up the HTTP server, named Kestrel, that is used to receive HTTP requests and adds support for working with Internet Information Services (IIS).
The result from the CreateDefaultBuilder method is passed to the ConfigureWebHostDefaults method, which selects the Startup class as the next step in the startup process.
...
public static IHostBuilder CreateHostBuilder(string[] args) =>
Host.CreateDefaultBuilder(args)
.ConfigureWebHostDefaults(webBuilder => {
webBuilder.UseStartup<Startup>();
});
...
The statements added to the Program class by the Empty template are suitable for most ASP.NET Core projects, but you can change them if an application has specific requirements.
Understanding the Startup Class
The Startup class is where most of the setup required by an application is performed, using the two methods that are added to the class when the project is created.
using System;
using System.Collections.Generic;
using System.Linq;
using System.Threading.Tasks;
using Microsoft.AspNetCore.Builder;
using Microsoft.AspNetCore.Hosting;
using Microsoft.AspNetCore.Http;
using Microsoft.Extensions.DependencyInjection;
using Microsoft.Extensions.Hosting;
namespace Platform {
public class Startup {
public void ConfigureServices(IServiceCollection services) {
}
public void Configure(IApplicationBuilder app, IWebHostEnvironment env) {
The ConfigureServices method is used to define the services that the application requires. By default, only the services created by the Program class are available, but you will see examples of different types of service used in later chapters, and Chapter 14 describes in detail the mechanism for using services.
The Configure method is used to register the middleware components for the request pipeline. Three middleware components are added to the pipeline by default when a project is created using the Empty template, each of which is described in Table 12-4.
Table 12-4.
The Middleware Added to the Pipeline by the Empty Template
Middleware Method
Description
UseDeveloperExceptionPage
This method adds a middleware component that includes details of unhandled exceptions. The IsDevelopment method is used to ensure this information isn’t presented to users, as described in Chapter 16.
UseRouting
This method adds the endpoint routing middleware component to the pipeline, which is responsible for determining how some requests are handled and is used with other parts of ASP.NET Core such as the MVC Framework. Routing is described in detail in Chapter 13.
UseEndpoints
This method provides the configuration for the endpoint routing middleware added by the UseRouting method. The configuration is described in Chapter 13.
Microsoft provides other middleware as part of ASP.NET Core that deals with the most common features required by web applications, which I describe in Chapters 15 and 16. You can also create your own middleware, as described in the “Creating Custom Middleware” section, when the built-in features don’t suit your requirements.
Understanding the Project File
The Platform.csproj file, known as the project file, contains the information that .NET Core uses to build the project and keep track of dependencies. Here is the content that was added to the file by the Empty template when the project was created:
<Project Sdk="Microsoft.NET.Sdk.Web">
<PropertyGroup>
<TargetFramework>netcoreapp3.1</TargetFramework>
</PropertyGroup>
</Project>
The csproj file is hidden when using Visual Studio; you can edit it by right-clicking the Platform project item in the Solution Explorer and selecting Edit Project File from the popup menu.
The project file contains XML elements that describe the project to MSBuild, the Microsoft build engine. MSBuild can be used to create complex build processes and is described in detail at https://docs.microsoft.com/en-gb/visualstudio/msbuild/msbuild.
There is no need to edit the project file directly in most projects. The most common change to the file is to add dependencies on other .NET packages, but these are typically added using the command-line tools or through the interface provided by Visual Studio.
To add a package to the project using the command line, open a new PowerShell command prompt, navigate to the Platform project folder (the one that contains the csproj file), and run the command shown in Listing 12-3.
This command adds the Swashbuckle.AspNetCore package to the project. You will see this package used in Chapter 20, but for now, it is the effect of the dotnet add package command that is important.
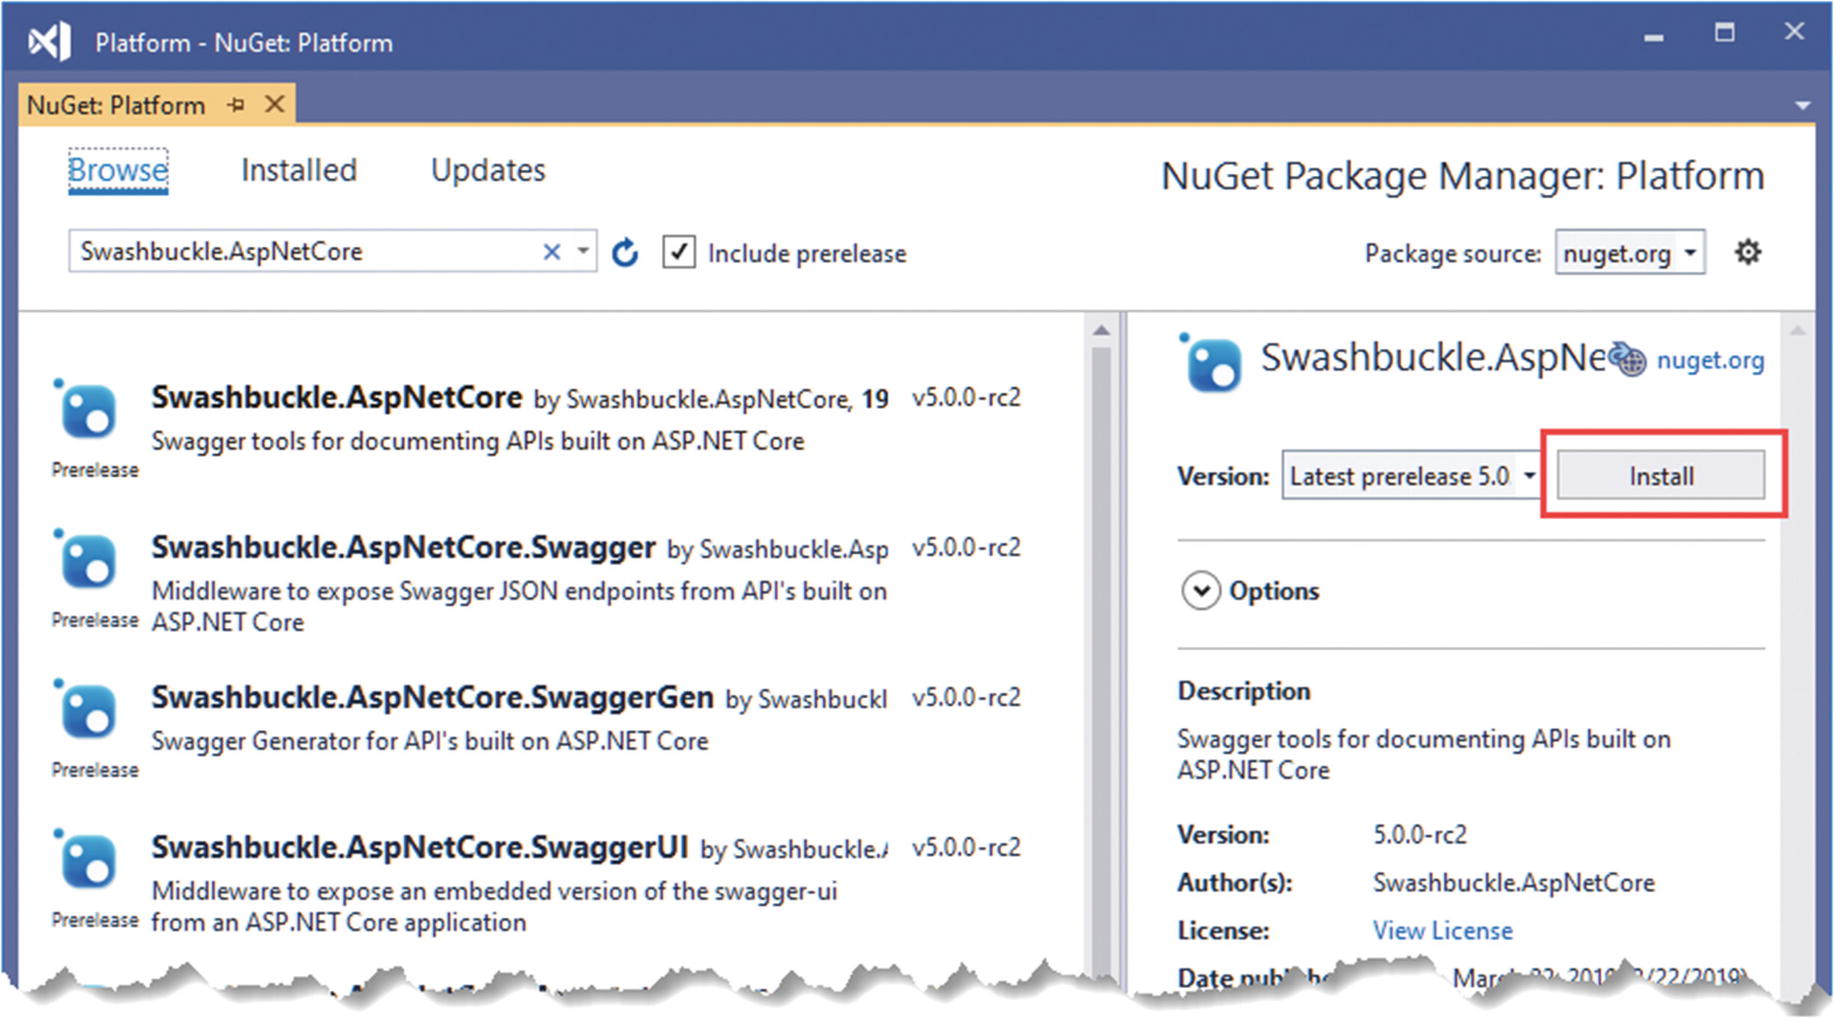
If you are using Visual Studio, you can add the package by right-clicking the Platform item in the Solution Explorer and selecting Manage NuGet packages from the popup menu. Click Browse and enter Swashbuckle.AspNetCore into the search text box. Select the Swashbuckle.AspNetCore package from the list, choose the 5.0.0-rc2 version from the Version drop-down list, and click the Install button, as shown in Figure 12-7. You will be prompted to accept the license of the package and its dependencies.
Figure 12-7.
Installing a package in Visual Studio
The new dependency will be shown in the Platform.csproj file, regardless of which approach you use to install the package.
As mentioned, Microsoft provides various middleware components for ASP.NET Core that handle the features most commonly required by web applications. You can also create your own middleware, which is a useful way to understand how ASP.NET Core works, even if you use only the standard components in your projects. The key method for creating middleware is Use, as shown in Listing 12-4.
using System;
using System.Collections.Generic;
using System.Linq;
using System.Threading.Tasks;
using Microsoft.AspNetCore.Builder;
using Microsoft.AspNetCore.Hosting;
using Microsoft.AspNetCore.Http;
using Microsoft.Extensions.DependencyInjection;
using Microsoft.Extensions.Hosting;
namespace Platform {
public class Startup {
public void ConfigureServices(IServiceCollection services) {
}
public void Configure(IApplicationBuilder app, IWebHostEnvironment env) {
Creating Custom Middleware in the Startup.cs File in the Platform Folder
The Use method registers a middleware component that is typically expressed as a lambda function that receives each request as it passes through the pipeline (there is another method used for classes, as described in the next section).
The arguments to the lambda function are an HttpContext object and a function that is invoked to tell ASP.NET Core to pass the request to the next middleware component in the pipeline.
The HttpContext object describes the HTTP request and the HTTP response and provides additional context, including details of the user associated with the request. Table 12-5 describes the most useful members provided by the HttpContext class, which is defined in the Microsoft.AspNetCore.Http namespace.
Table 12-5.
Useful HttpContext Members
Name
Description
Connection
This property returns a ConnectionInfo object that provides information about the network connection underlying the HTTP request, including details of local and remote IP addresses and ports.
Request
This property returns an HttpRequest object that describes the HTTP request being processed.
RequestServices
This property provides access to the services available for the request, as described in Chapter 14.
Response
This property returns an HttpResponse object that is used to create a response to the HTTP request.
Session
This property returns the session data associated with the request. The session data feature is described in Chapter 16.
User
This property returns details of the user associated with the request, as described in Chapters 37 and 38.
Features
This property provides access to request features, which allow access to the low-level aspects of request handling. See Chapter 16 for an example of using a request feature.
The ASP.NET Core platform is responsible for processing the HTTP request to create the HttpRequest object, which means that middleware and endpoints don’t have to worry about the raw request data. Table 12-6 describes the most useful members of the HttpRequest class.
Table 12-6.
Useful HttpRequest Members
Name
Description
Body
This property returns a stream that can be used to read the request body.
ContentLength
This property returns the value of the Content-Length header.
ContentType
This property returns the value of the Content-Type header.
Cookies
This property returns the request cookies.
Form
This property returns a representation of the request body as a form.
Headers
This property returns the request headers.
IsHttps
This property returns true if the request was made using HTTPS.
Method
This property returns the HTTP verb used for the request.
Path
This property returns the path section of the request URL.
Query
This property returns the query string section of the request URL as key/value pairs.
The HttpResponse object describes the HTTP response that will be sent back to the client when the request has made its way through the pipeline. Table 12-7 describes the most useful members of the HttpResponse class. The ASP.NET Core platform makes dealing with responses as easy as possible, sets headers automatically, and makes it easy to send content to the client.
Table 12-7.
Useful HttpResponse Members
Name
Description
ContentLength
This property sets the value of the Content-Length header.
ContentType
This property sets the value of the Content-Type header.
Cookies
This property allows cookies to be associated with the request.
HasStarted
This property returns true if ASP.NET Core has started to send the response headers to the client, after which it is not possible to make changes.
Headers
This property allows the response headers to be set.
StatusCode
This property sets the status code for the response.
WriteAsync(data)
This asynchronous method writes a data string to the response body.
Redirect(url)
This method sends a redirection response.
When creating custom middleware, the HttpContext, HttpRequest, and HttpResponse objects are used directly, but, as you will learn in later chapters, this isn’t usually required when using the higher-level ASP.NET Core features such as the MVC Framework and Razor Pages.
The middleware function I defined in Listing 12-4 uses the HttpRequest object to check the HTTP method and query string to identify GET requests that have a custom parameter in the query string whose value is true, like this:
...
if (context.Request.Method == HttpMethods.Get
&& context.Request.Query["custom"] == "true") {
...
The HttpMethods class defines static strings for each HTTP method. For GET requests with the expected query string, the middleware function uses the WriteAsync method to add a string to the body of the response.
In this part of the book, all the examples send simple string results to the browser. In Part 3, I show you how to create web services that return JSON data and introduce the different ways that ASP.NET Core can produce HTML results.
The second argument to the middleware is the function conventionally named next that tells ASP.NET Core to pass the request to the next component in the request pipeline.
No arguments are required when invoking the next middleware component because ASP.NET Core takes care of providing the component with the HttpContext object and its own next function so that it can process the request. The next function is asynchronous, which is why the await keyword is used and why the lambda function is defined with the async keyword.
Tip
You may encounter middleware that calls next.Invoke() instead of next(). These are equivalent, and next() is provided as a convenience by the compiler to produce concise code.
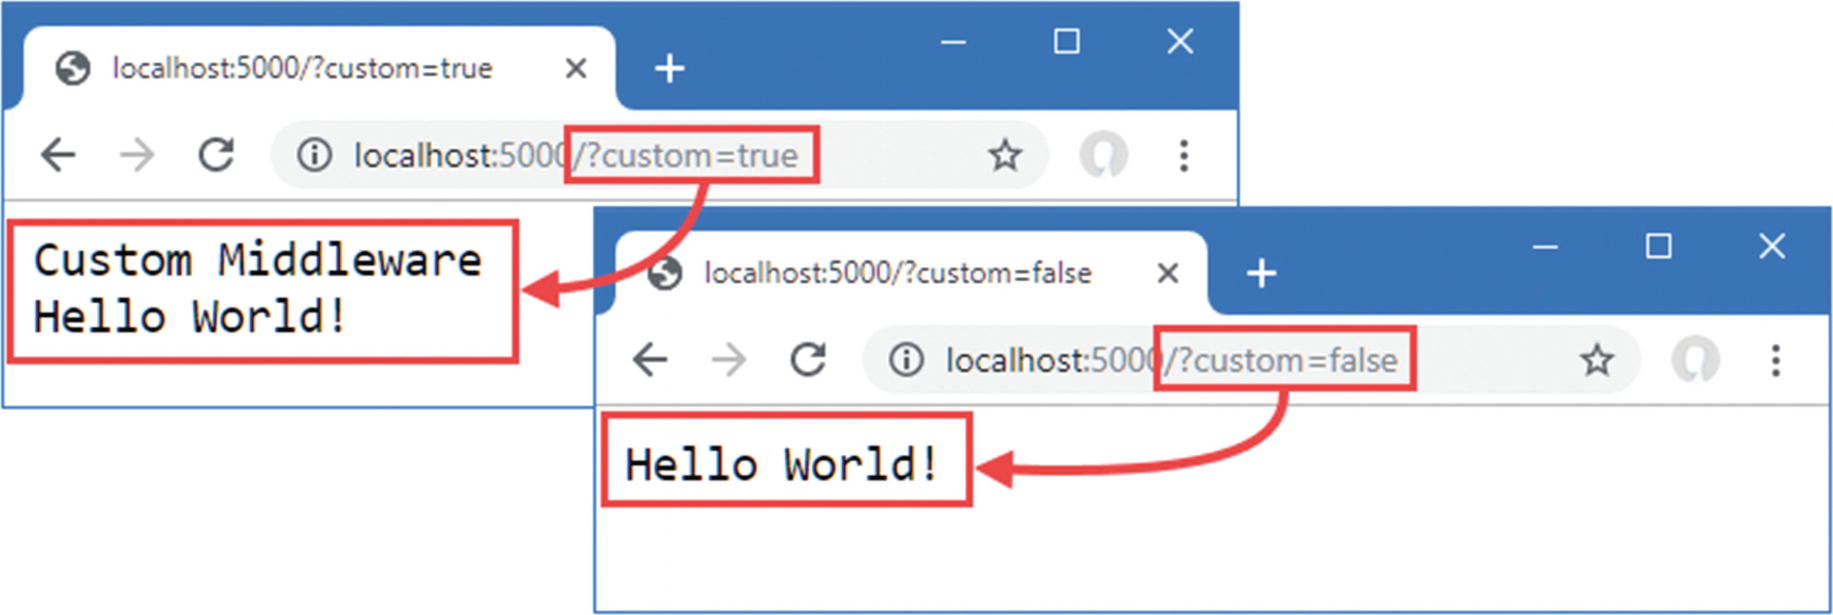
Restart ASP.NET Core and navigate to http://localhost:5000/?custom=true. You will see that the new middleware function appends its message to the response body before passing on the request to the next middleware component, as shown in Figure 12-8. Remove the query string, or change true to false, and the middleware component will pass on the request without adding to the response.
Figure 12-8.
Creating custom middleware
Defining Middleware Using a Class
Defining middleware using lambda functions is convenient, but it can lead to a long and complex Configure method in the Startup class and makes it hard to reuse middleware in different projects. Middleware can also be defined using classes. Add a class file named Middleware.cs to the Platform folder and add the code shown in Listing 12-5.
using Microsoft.AspNetCore.Http;
using System.Threading.Tasks;
namespace Platform {
public class QueryStringMiddleWare {
private RequestDelegate next;
public QueryStringMiddleWare(RequestDelegate nextDelegate) {
The Contents of the Middleware.cs File in the Platform Folder
Middleware classes receive a RequestDelegate as a constructor parameter, which is used to forward the request to the next component in the pipeline. The Invoke method is called by ASP.NET Core when a request is received and receives an HttpContext object that provides access to the request and response, using the same classes that lambda function middleware receives. The RequestDelegate returns a Task, which allows it to work asynchronously.
One important difference in class-based middleware is that the HttpContext object must be used as an argument when invoking the RequestDelete to forward the request, like this:
...
await next(context);
...
Class-based middleware components are added to the pipeline with the UseMiddleware method, which accepts the middleware as a type argument, as shown in Listing 12-6.
using System;
using System.Collections.Generic;
using System.Linq;
using System.Threading.Tasks;
using Microsoft.AspNetCore.Builder;
using Microsoft.AspNetCore.Hosting;
using Microsoft.AspNetCore.Http;
using Microsoft.Extensions.DependencyInjection;
using Microsoft.Extensions.Hosting;
namespace Platform {
public class Startup {
public void ConfigureServices(IServiceCollection services) {
}
public void Configure(IApplicationBuilder app, IWebHostEnvironment env) {
Adding a Class-Based Middleware Component in the Startup.cs File in the Platform Folder
When the ASP.NET Core is started, the QueryStringMiddleware class will be instantiated, and its Invoke method will be called to process requests as they are received.
Caution
A single middleware object is used to handle all requests, which means that the code in the Invoke method must be thread-safe.
Select Start Without Debugging from the Debug menu or restart ASP.NET Core using the dotnet run command. Navigate to http://localhost:5000?custom=true, and you will see the output from both middleware components, as shown in Figure 12-9.
Figure 12-9.
Using a class-based middleware component
Understanding the Return Pipeline Path
Middleware components can modify the HTTPResponse object after the next function has been called, as shown by the new middleware in Listing 12-7.
using System;
using System.Collections.Generic;
using System.Linq;
using System.Threading.Tasks;
using Microsoft.AspNetCore.Builder;
using Microsoft.AspNetCore.Hosting;
using Microsoft.AspNetCore.Http;
using Microsoft.Extensions.DependencyInjection;
using Microsoft.Extensions.Hosting;
namespace Platform {
public class Startup {
public void ConfigureServices(IServiceCollection services) {
}
public void Configure(IApplicationBuilder app, IWebHostEnvironment env) {
if (env.IsDevelopment()) {
app.UseDeveloperExceptionPage();
}
app.Use(async (context, next) => {
await next();
await context.Response
.WriteAsync($"
Status Code: { context.Response.StatusCode}");
Adding New Middleware in the Startup.cs File in the Platform Folder
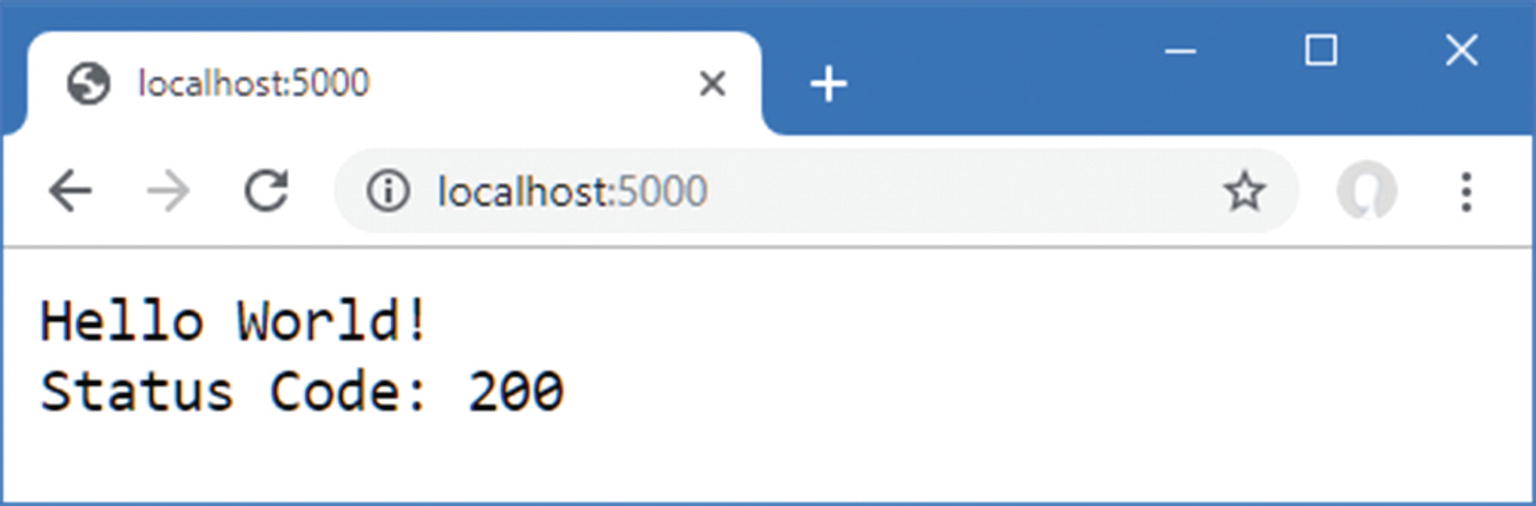
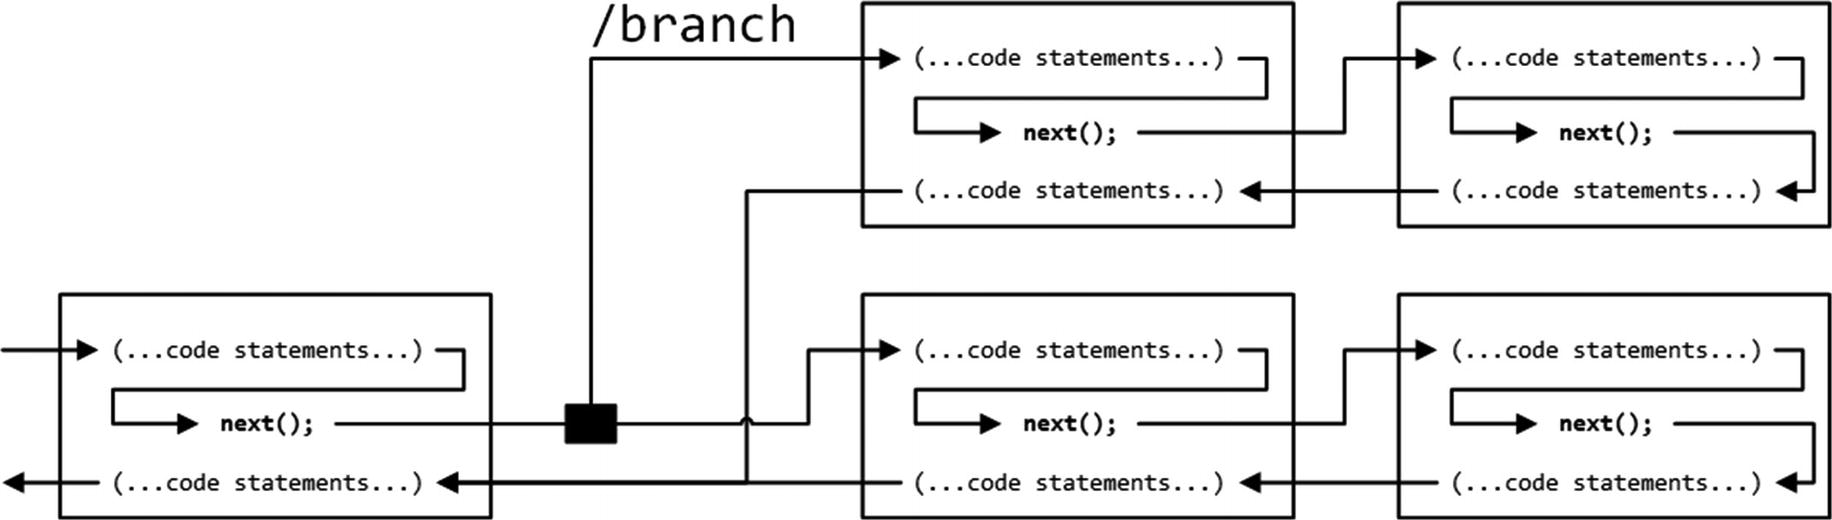
The new middleware immediately calls the next method to pass the request along the pipeline and then uses the WriteAsync method to add a string to the response body. This may seem like an odd approach, but it allows middleware to make changes to the response before and after it is passed along the request pipeline by defining statements before and after the next function is invoked, as illustrated by Figure 12-10.
Figure 12-10.
Passing request and responses through the ASP.NET Core pipeline
Middleware can operate before the request is passed on, after the request has been processed by other components, or both. The result is that several middleware components collectively contribute to the response that is produced, each providing some aspect of the response or providing some feature or data that is used later in the pipeline.
Select Start Without Debugging from the Debug menu or use dotnet to see the effect of the middleware defined in Listing 12-7, as shown in Figure 12-11. If you are using the command line, start ASP.NET Core using the dotnet run command and navigate to http://localhost:5000.
Figure 12-11.
Modifying a response in the return path
Note
Middleware components must not make changes to the HttpResponse object after ASP.NET Core has started to send the response to the client. The HasStarted property, described in Table 12-7, can be checked to avoid exceptions.
Short-Circuiting the Request Pipeline
Components that generate complete responses can choose not to call the next function so that the request isn’t passed on. Components that don’t pass on requests are said to short-circuit the pipeline, which is what the new middleware component shown in Listing 12-8 does for requests that target the /short URL.
using System;
using System.Collections.Generic;
using System.Linq;
using System.Threading.Tasks;
using Microsoft.AspNetCore.Builder;
using Microsoft.AspNetCore.Hosting;
using Microsoft.AspNetCore.Http;
using Microsoft.Extensions.DependencyInjection;
using Microsoft.Extensions.Hosting;
namespace Platform {
public class Startup {
public void ConfigureServices(IServiceCollection services) {
}
public void Configure(IApplicationBuilder app, IWebHostEnvironment env) {
if (env.IsDevelopment()) {
app.UseDeveloperExceptionPage();
}
app.Use(async (context, next) => {
await next();
await context.Response
.WriteAsync($"
Status Code: { context.Response.StatusCode}");
Short-Circuiting the Request Pipeline in the Startup.cs File in the Platform Folder
The new middleware checks the Path property of the HttpRequest object to see whether the request is for the /short URL; if it is, it calls the WriteAsync method without calling the next function. To see the effect, restart ASP.NET Core and navigate to the http://localhost:5000/short?custom=true URL, which will produce the output shown in Figure 12-12.
Figure 12-12.
Short-circuiting the request pipeline
Even though the URL has the query string parameter that is expected by the next component in the pipeline, the request isn’t forwarded, so that middleware doesn’t get used. Notice, however, that the previous component in the pipeline has added its message to the response. That’s because the short-circuiting only prevents components further along the pipeline from being used and doesn’t affect earlier components, as illustrated in Figure 12-13.
Figure 12-13.
Short-circuiting the request pipeline
Creating Pipeline Branches
The Map method is used to create a section of pipeline that is used to process requests for specific URLs, creating a separate sequence of middleware components, as shown in Listing 12-9.
using System;
using System.Collections.Generic;
using System.Linq;
using System.Threading.Tasks;
using Microsoft.AspNetCore.Builder;
using Microsoft.AspNetCore.Hosting;
using Microsoft.AspNetCore.Http;
using Microsoft.Extensions.DependencyInjection;
using Microsoft.Extensions.Hosting;
namespace Platform {
public class Startup {
public void ConfigureServices(IServiceCollection services) {
}
public void Configure(IApplicationBuilder app, IWebHostEnvironment env) {
The first argument to the Map method specifies the string that will be used to match URLs. The second argument is the branch of the pipeline, to which middleware components are added with the Use and UseMiddleware methods. The statements in Listing 12-9 create a branch that is used for URLs that start with /branch and that pass requests through the QueryStringMiddleware class defined in Listing 12-9, and the statements define a middleware lambda expression that adds a message to the response. Figure 12-14 shows the effect of the branch on the request pipeline.
Figure 12-14.
Adding a branch to the request pipeline
When a URL is matched by the Map method, it follows the branch and no longer passes through the middleware components on the main path through the pipeline. The same middleware can be used in different parts of the pipeline, which can be seen in Listing 12-9, where the QueryStringMiddleWare class is used in both the main part of the pipeline and the branch.
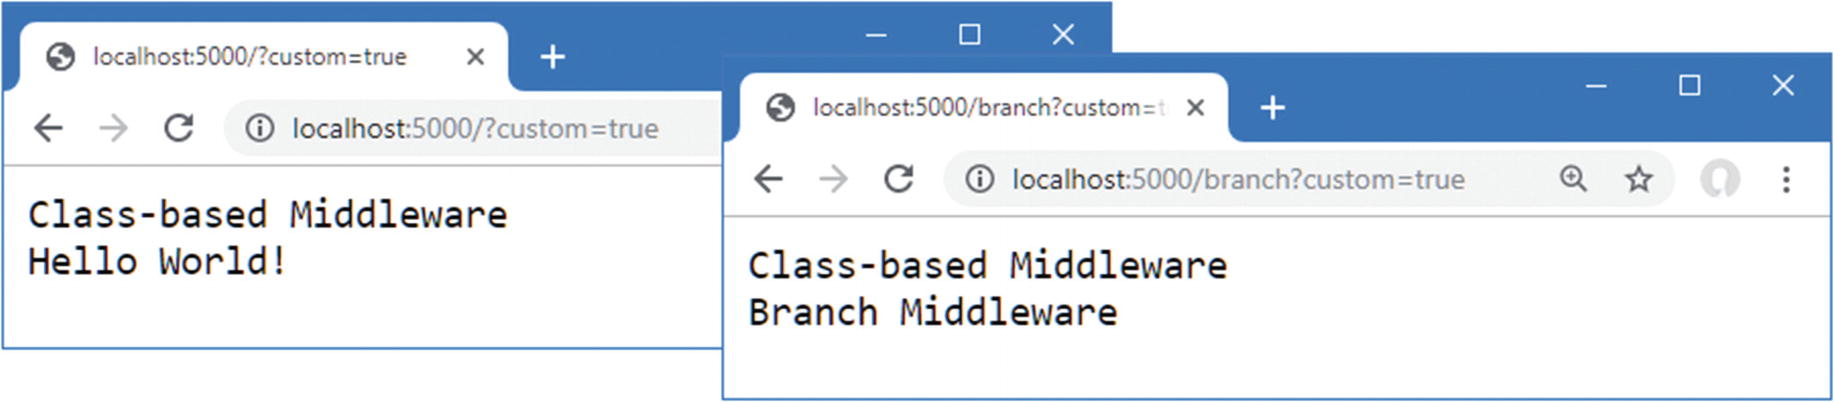
To see the different ways that requests are handled, restart ASP.NET Core and request the http://localhost:5000?custom=true URL, which will be handled on the main part of the pipeline and will produce the output shown on the left of Figure 12-15. Navigate to http://localhost:5000/branch?custom=true, and the request will be forwarded to the middleware in the branch, producing the output shown on the right in Figure 12-15.
Figure 12-15
The effect of branching the request pipeline
Branching with a Predicate
ASP.NET Core also supports the MapWhen method, which can be used to match requests using a predicate, allowing requests to be selected for a pipeline branch on criteria other than just URLs.
The arguments to the MapWhen method are a predicate function that receives an HttpContext and that returns true for requests that should follow the branch, and a function that receives an IApplicationBuilder object representing the pipeline branch, to which middleware is added. Here is an example of using the MapWhen method to branch the pipeline:
The predicate function returns true to branch for requests whose query string contains a parameter named branch.
Creating Terminal Middleware
Terminal middleware never forwards requests to other components and always marks the end of the request pipeline. There is a terminal middleware component in the Startup class, as shown here:
ASP.NET Core supports the Run method as a convenience feature for creating terminal middleware, which makes it obvious that a middleware component won’t forward requests and that a deliberate decision has been made not to call the next function. In Listing 12-10, I have used the Run method for the terminal middleware in the pipeline branch.
Using the Run Method in the Startup.cs File in the Platform Folder
The middleware function passed to the Run method receives only an HttpContext object and doesn’t have to define a parameter that isn’t used. Behind the scenes, the Run method is implemented through the Use method, and this feature is provided only as a convenience.
Caution
Middleware added to the pipeline after a terminal component will never receive requests. ASP.NET Core won’t warn you if you add a terminal component before the end of the pipeline.
Class-based components can be written so they can be used as both regular and terminal middleware, as shown in Listing 12-11.
using Microsoft.AspNetCore.Http;
using System.Threading.Tasks;
namespace Platform {
public class QueryStringMiddleWare {
private RequestDelegate next;
public QueryStringMiddleWare() {
// do nothing
}
public QueryStringMiddleWare(RequestDelegate nextDelegate) {
Adding Terminal Support in the Middleware.cs File in the Platform Folder
The component will forward requests only when the constructor has been provided with a non-null value for the nextDelegate parameter. Listing 12-12 shows the application of the component in both standard and terminal forms.
using System;
using System.Collections.Generic;
using System.Linq;
using System.Threading.Tasks;
using Microsoft.AspNetCore.Builder;
using Microsoft.AspNetCore.Hosting;
using Microsoft.AspNetCore.Http;
using Microsoft.Extensions.DependencyInjection;
using Microsoft.Extensions.Hosting;
namespace Platform {
public class Startup {
public void ConfigureServices(IServiceCollection services) {
}
public void Configure(IApplicationBuilder app, IWebHostEnvironment env) {
Applying Class-Based Middleware in the Startup.cs File in the Platform Folder
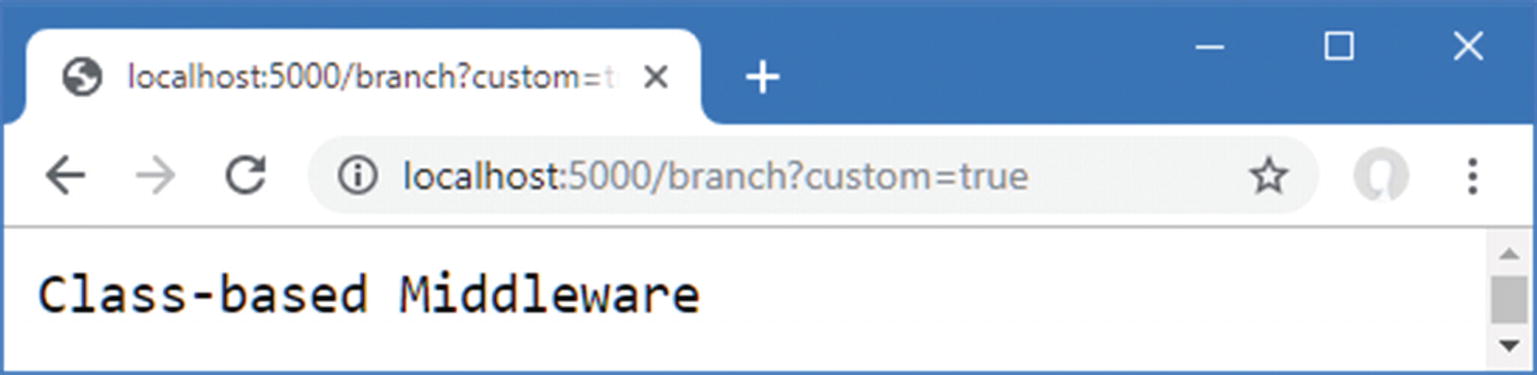
There is no equivalent to the UseMiddleware method for terminal middleware, so the Run method must be used by creating a new instance of the middleware class and selecting its Invoke method. Using the Run method doesn’t alter the output from the middleware, which you can see by restarting ASP.NET Core and navigating to the http://localhost:5000/branch?custom=true URL, which produces the content shown in Figure 12-16.
Figure 12-16.
Using the Run method to create terminal middleware
Configuring Middleware
There is a common pattern for configuring middleware that is known as the options pattern and that is used by some of the built-in middleware components described in later chapters.
The starting point is to define a class that contains the configuration options for a middleware component. Add a class file named MessageOptions.cs to the Platform folder with the code shown in Listing 12-13.
namespace Platform {
public class MessageOptions {
public string CityName { get; set; } = "New York";
public string CountryName{ get; set; } = "USA";
}
}
Listing 12-13.
The Contents of the MessageOptions.cs File in the Platform Folder
The MessageOptions class defines properties that detail a city and a country. In Listing 12-14, I have used the options pattern to create a custom middleware component that relies on the MessageOptions class for its configuration. I have also removed some of the middleware from previous examples for brevity.
using System;
using System.Collections.Generic;
using System.Linq;
using System.Threading.Tasks;
using Microsoft.AspNetCore.Builder;
using Microsoft.AspNetCore.Hosting;
using Microsoft.AspNetCore.Http;
using Microsoft.Extensions.DependencyInjection;
using Microsoft.Extensions.Hosting;
using Microsoft.Extensions.Options;
namespace Platform {
public class Startup {
public void ConfigureServices(IServiceCollection services) {
services.Configure<MessageOptions>(options => {
options.CityName= "Albany";
});
}
public void Configure(IApplicationBuilder app, IWebHostEnvironment env,
Using the Options Pattern in the Startup.cs File in the Platform Folder
The options are set up using IServiceCollection.Configure in the ConfigureServices method. The generic type parameter is used to specify the options class, like this:
...
services.Configure<MessageOptions>(options => {
options.CityName= "Albany";
});
...
This statement creates options using the MessageOptions class and changes the value of the CityName property. When the application starts, the ASP.NET Core platform will create a new instance of the options class and pass it to the function supplied as the argument to the Configure method, allowing the default option values to be changed.
The options are accessed by adding an IOptions<T> parameter to the Startup.Configure method, where the generic type argument specifies the options class, like this:
...
public void Configure(IApplicationBuilder app,IWebHostEnvironment env,
The IOptions<T> interface defines a Value property that returns the options object created by the ASP.NET Core platform, allowing middleware components and endpoints to use the options, like this:
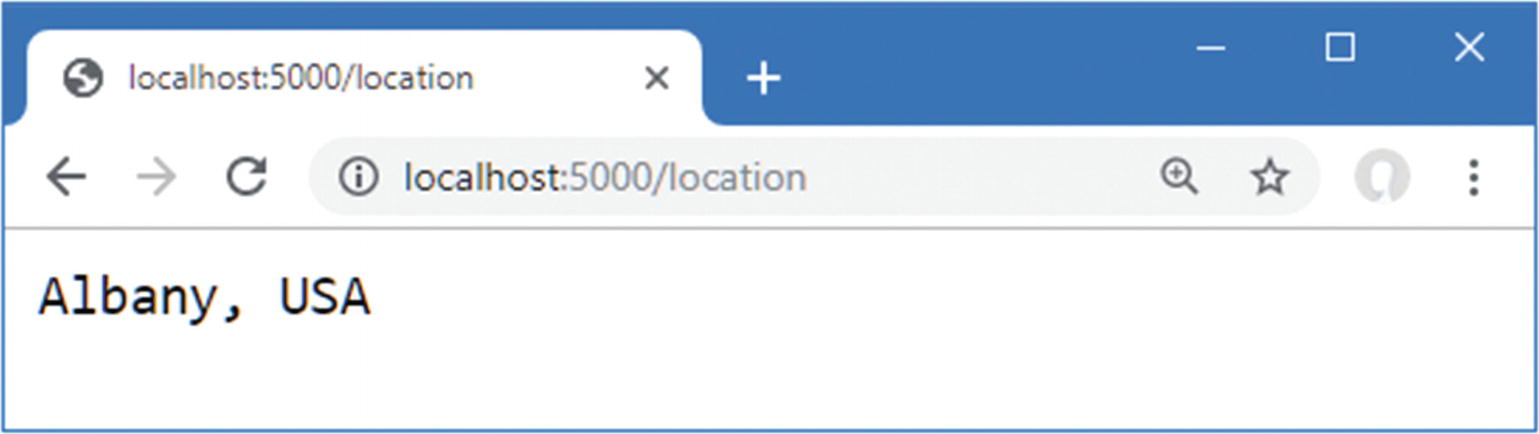
You can see the result by restarting ASP.NET Core and using the browser to navigate to http://localhost:5000/location. The middleware component uses the options to produce the output shown in Figure 12-17.
Figure 12-17.
Using the options pattern
Using the Options Pattern with Class-Based Middleware
Although the options pattern can be used with lambda function middleware, you will usually see it applied to class-based middleware, such as the built-in features described in Chapters 15 and 16. When used with class-based middleware, the configuration options don’t have to be accessed through a Startup.Configure method parameter, which produces a more elegant result.
Add the statements shown in Listing 12-15 to the Middleware.cs file to define a class-based middleware component that uses the MessageOptions class for configuration.
using Microsoft.AspNetCore.Http;
using System.Threading.Tasks;
using Microsoft.Extensions.Options;
namespace Platform {
public class QueryStringMiddleWare {
private RequestDelegate? next;
// ...statements omitted for brevity...
}
public class LocationMiddleware {
private RequestDelegate next;
private MessageOptions options;
public LocationMiddleware(RequestDelegate nextDelegate,
Defining a Middleware Component in the Middleware.cs File in the Platform Folder
The LocationMiddleware class defines an IOptions<MessageOptions> constructor parameter. In Listing 12-16, I have replaced the lambda function middleware component with the class from Listing 12-15 and removed the IOptions<MessageOptions> parameter.
using System;
using System.Collections.Generic;
using System.Linq;
using System.Threading.Tasks;
using Microsoft.AspNetCore.Builder;
using Microsoft.AspNetCore.Hosting;
using Microsoft.AspNetCore.Http;
using Microsoft.Extensions.DependencyInjection;
using Microsoft.Extensions.Hosting;
using Microsoft.Extensions.Options;
namespace Platform {
public class Startup {
public void ConfigureServices(IServiceCollection services) {
services.Configure<MessageOptions>(options => {
options.CityName= "Albany";
});
}
public void Configure(IApplicationBuilder app, IWebHostEnvironment env) {
Using Class-Based Middleware in the Startup.cs File in the Platform Folder
When the UseMiddleware statement is executed, the LocationMiddleware constructor is inspected, and its IOptions<MessageOptions> parameter will be resolved using the object created in the ConfigureServices method. This is done using the dependency injection feature that is described in Chapter 14, but the immediate effect is that the options pattern can be used to easily configure class-based middleware. Restart ASP.NET Core and request http://localhost:5000/location to test the new middleware, which will produce the same output as shown in Figure 12-17.
Summary
In this chapter, I focused on the ASP.NET Core platform, introducing the request pipeline, middleware components, and, briefly, services. I described the files added to the project when the Empty template is used and explained the role of the Program and Startup classes. In the next chapter, I describe the ASP.NET Core URL routing feature.