In this chapter, I continue to build the SportsStore example app. In the previous chapter, I added the basic support for a shopping cart, and now I am going to improve on and complete that functionality.
Tip
You can download the example project for this chapter—and for all the other chapters in this book—from https://github.com/apress/pro-asp.net-core-3. See Chapter 1 for how to get help if you have problems running the examples.
Refining the Cart Model with a Service
I defined a Cart model class in the previous chapter and demonstrated how it can be stored using the session feature, allowing the user to build up a set of products for purchase. The responsibility for managing the persistence of the Cart class fell to the Cart Razor Page, which has to deal with getting and storing Cart objects as session data.
The problem with this approach is that I will have to duplicate the code that obtains and stores Cart objects in any other Razor Page or controller that uses them. In this section, I am going to use the services feature that sits at the heart of ASP.NET Core to simplify the way that Cart objects are managed, freeing individual components such as the Cart controller from needing to deal with the details directly.
Services are commonly used to hide details of how interfaces are implemented from the components that depend on them. But services can be used to solve lots of other problems as well and can be used to shape and reshape an application, even when you are working with concrete classes such as Cart.
Creating a Storage-Aware Cart Class
The first step in tidying up the way that the Cart class is used will be to create a subclass that is aware of how to store itself using session state. To prepare, I apply the virtual keyword to the Cart class, as shown in Listing 9-1, so that I can override the members.
using System.Collections.Generic;
using System.Linq;
namespace SportsStore.Models {
public class Cart {
public List<CartLine> Lines { get; set; } = new List<CartLine>();
public virtual void AddItem(Product product, int quantity) {
public override void AddItem(Product product, int quantity) {
base.AddItem(product, quantity);
Session.SetJson("Cart", this);
}
public override void RemoveLine(Product product) {
base.RemoveLine(product);
Session.SetJson("Cart", this);
}
public override void Clear() {
base.Clear();
Session.Remove("Cart");
}
}
}
Listing 9-2.
The Contents of the SessionCart.cs File in the SportsStore/Models Folder
The SessionCart class subclasses the Cart class and overrides the AddItem, RemoveLine, and Clear methods so they call the base implementations and then store the updated state in the session using the extension methods on the ISession interface. The static GetCart method is a factory for creating SessionCart objects and providing them with an ISession object so they can store themselves.
Getting hold of the ISession object is a little complicated. I obtain an instance of the IHttpContextAccessor service, which provides me with access to an HttpContext object that, in turn, provides me with the ISession. This indirect approach is required because the session isn’t provided as a regular service.
Registering the Service
The next step is to create a service for the Cart class. My goal is to satisfy requests for Cart objects with SessionCart objects that will seamlessly store themselves. You can see how I created the service in Listing 9-3.
Creating the Cart Service in the Startup.cs File in the SportsStore Folder
The AddScoped method specifies that the same object should be used to satisfy related requests for Cart instances. How requests are related can be configured, but by default, it means that any Cart required by components handling the same HTTP request will receive the same object.
Rather than provide the AddScoped method with a type mapping, as I did for the repository, I have specified a lambda expression that will be invoked to satisfy Cart requests. The expression receives the collection of services that have been registered and passes the collection to the GetCart method of the SessionCart class. The result is that requests for the Cart service will be handled by creating SessionCart objects, which will serialize themselves as session data when they are modified.
I also added a service using the AddSingleton method, which specifies that the same object should always be used. The service I created tells ASP.NET Core to use the HttpContextAccessor class when implementations of the IHttpContextAccessor interface are required. This service is required so I can access the current session in the SessionCart class.
Simplifying the Cart Razor Page
The benefit of creating this kind of service is that it allows me to simplify the code where Cart objects are used. In Listing 9-4, I have reworked the page model class for the Cart Razor Page to take advantage of the new service.
using Microsoft.AspNetCore.Mvc;
using Microsoft.AspNetCore.Mvc.RazorPages;
using SportsStore.Infrastructure;
using SportsStore.Models;
using System.Linq;
namespace SportsStore.Pages {
public class CartModel : PageModel {
private IStoreRepository repository;
public CartModel(IStoreRepository repo, Cart cartService) {
repository = repo;
Cart = cartService;
}
public Cart Cart { get; set; }
public string ReturnUrl { get; set; }
public void OnGet(string returnUrl) {
ReturnUrl = returnUrl ?? "/";
}
public IActionResult OnPost(long productId, string returnUrl) {
Using the Cart Service in the Cart.cshtml.cs File in the SportsStore/Pages Folder
The page model class indicates that it needs a Cart object by declaring a constructor argument, which has allowed me to remove the statements that load and store sessions from the handler methods. The result is a simpler page model class that focuses on its role in the application without having to worry about how Cart objects are created or persisted. And, since services are available throughout the application, any component can get hold of the user’s cart using the same technique.
Updating the Unit Tests
The simplification of the CartModel class in Listing 9-4 requires a corresponding change to the unit tests in the CartPageTests.cs file in the unit test project so that the Cart is provided as a constructor argument and not accessed through the context objects. Here is the change to the test for reading the cart:
...
[Fact]
public void Can_Load_Cart() {
// Arrange
// - create a mock repository
Product p1 = new Product { ProductID = 1, Name = "P1" };
Product p2 = new Product { ProductID = 2, Name = "P2" };
Mock<IStoreRepository> mockRepo = new Mock<IStoreRepository>();
Using services simplifies the testing process and makes it much easier to provide the class being tested with its dependencies.
Completing the Cart Functionality
Now that I have introduced the Cart service, it is time to complete the cart functionality by adding two new features. The first will allow the customer to remove an item from the cart. The second feature will display a summary of the cart at the top of the page.
Removing Items from the Cart
To remove items from the cart, I need to add a Remove button to the content rendered by the Cart Razor Page that will submit an HTTP POST request. The changes are shown in Listing 9-5.
Removing an Item in the Cart.cshtml.cs File in the SportsStore/Pages Folder
The new HTML content defines an HTML form. The handler method that will receive the request is specified with the asp-page-handler tag helper attribute, like this:
...
<form asp-page-handler="Remove" method="post">
...
The specified name is prefixed with On and given a suffix that matches the request type so that a value of Remove selects the OnRemovePost handler method. The handler method uses the value it receives to locate the item in the cart and remove it.
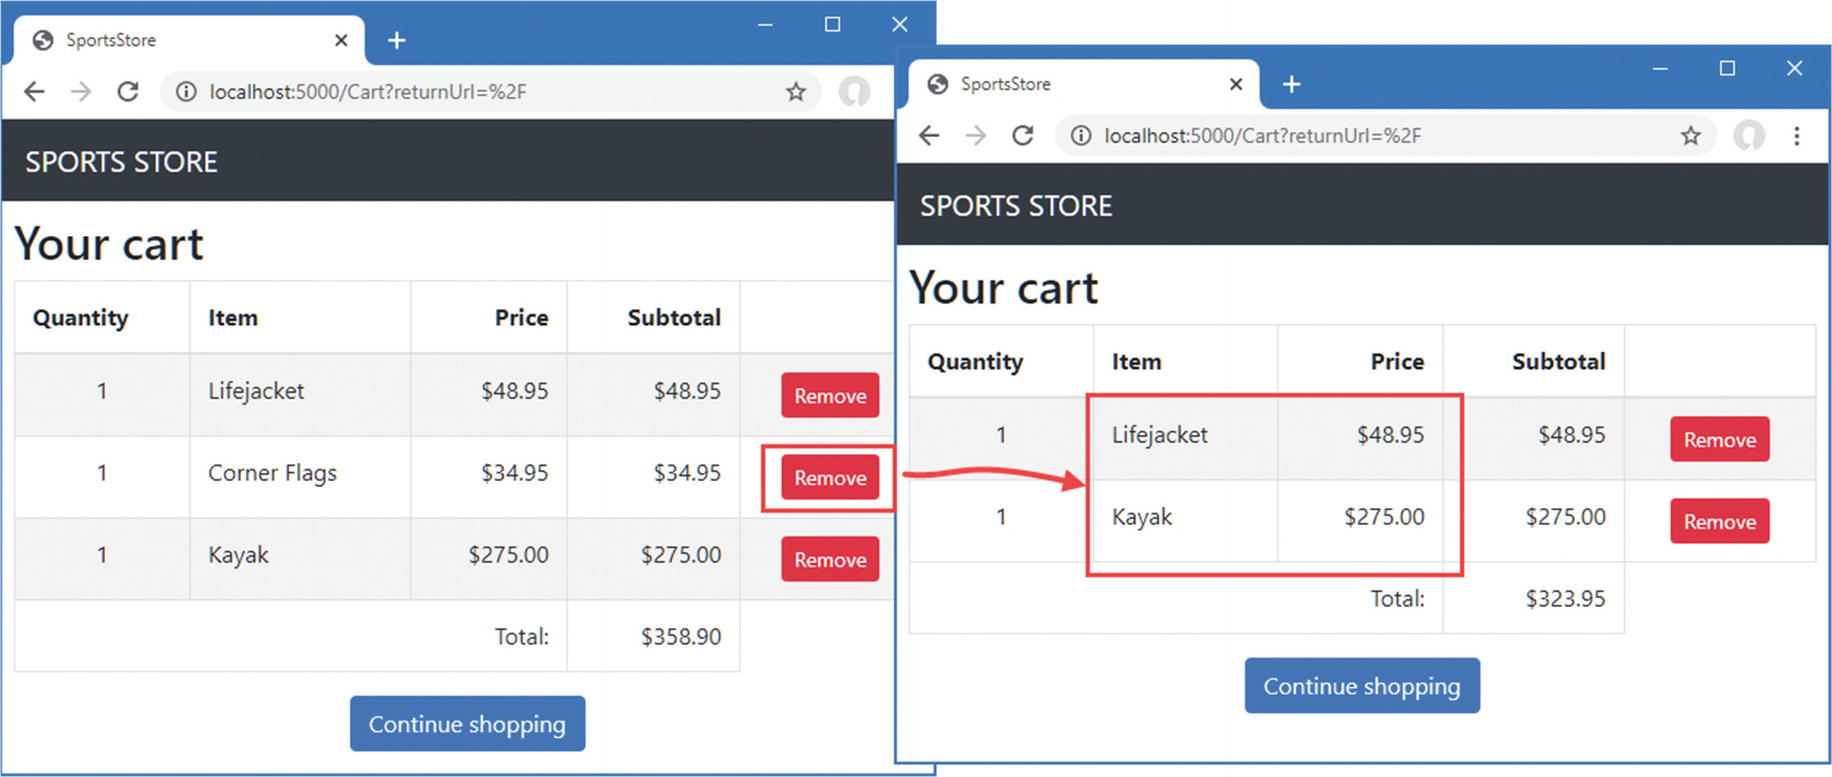
Restart ASP.NET Core and request http://localhost:5000. Click the Add To Cart buttons to add items to the cart and then click a Remove button. The cart will be updated to remove the item you specified, as shown in Figure 9-1.
Figure 9-1.
Removing items from the shopping cart
Adding the Cart Summary Widget
I may have a functioning cart, but there is an issue with the way it is integrated into the interface. Customers can tell what is in their cart only by viewing the cart summary screen. And they can view the cart summary screen only by adding a new item to the cart.
To solve this problem, I am going to add a widget that summarizes the contents of the cart and that can be clicked to display the cart contents throughout the application. I will do this in much the same way that I added the navigation widget—as a view component whose output I can include in a Razor layout.
Adding the Font Awesome Package
As part of the cart summary, I am going to display a button that allows the user to check out. Rather than display the word checkout in the button, I want to use a cart symbol. Since I have no artistic skills, I am going to use the Font Awesome package, which is an excellent set of open source icons that are integrated into applications as fonts, where each character in the font is a different image. You can learn more about Font Awesome, including inspecting the icons it contains, at http://fortawesome.github.io/Font-Awesome.
To install the client-side package, use a PowerShell command prompt to run the command shown in Listing 9-7 in the SportsStore project.
I added a class file called CartSummaryViewComponent.cs in the Components folder and used it to define the view component shown in Listing 9-8.
using Microsoft.AspNetCore.Mvc;
using SportsStore.Models;
namespace SportsStore.Components {
public class CartSummaryViewComponent : ViewComponent {
private Cart cart;
public CartSummaryViewComponent(Cart cartService) {
cart = cartService;
}
public IViewComponentResult Invoke() {
return View(cart);
}
}
}
Listing 9-8.
The Contents of the CartSummaryViewComponent.cs File in the SportsStore/Components Folder
This view component is able to take advantage of the service that I created earlier in the chapter to receive a Cart object as a constructor argument. The result is a simple view component class that passes on the Cart to the View method to generate the fragment of HTML that will be included in the layout. To create the view for the component, I created the Views/Shared/Components/CartSummary folder and added to it a Razor View named Default.cshtml with the content shown in Listing 9-9.
The Default.cshtml File in the Views/Shared/Components/CartSummary Folder
The view displays a button with the Font Awesome cart icon and, if there are items in the cart, provides a snapshot that details the number of items and their total value. Now that I have a view component and a view, I can modify the layout so that the cart summary is included in the responses generated by the Home controller, as shown in Listing 9-10.
Adding the Cart Summary in the _Layout.cshtml File in the Views/Shared Folder
You can see the cart summary by starting the application. When the cart is empty, only the checkout button is shown. If you add items to the cart, then the number of items and their combined cost are shown, as illustrated in Figure 9-2. With this addition, customers know what is in their cart and have an obvious way to check out from the store.
Figure 9-2.
Displaying a summary of the cart
Submitting Orders
I have now reached the final customer feature in SportsStore: the ability to check out and complete an order. In the following sections, I will extend the data model to provide support for capturing the shipping details from a user and add the application support to process those details.
Creating the Model Class
I added a class file called Order.cs to the Models folder and used it to define the class shown in Listing 9-11. This is the class I will use to represent the shipping details for a customer.
using System.Collections.Generic;
using System.ComponentModel.DataAnnotations;
using Microsoft.AspNetCore.Mvc.ModelBinding;
namespace SportsStore.Models {
public class Order {
[BindNever]
public int OrderID { get; set; }
[BindNever]
public ICollection<CartLine> Lines { get; set; }
[Required(ErrorMessage = "Please enter a name")]
public string Name { get; set; }
[Required(ErrorMessage = "Please enter the first address line")]
public string Line1 { get; set; }
public string Line2 { get; set; }
public string Line3 { get; set; }
[Required(ErrorMessage = "Please enter a city name")]
public string City { get; set; }
[Required(ErrorMessage = "Please enter a state name")]
public string State { get; set; }
public string Zip { get; set; }
[Required(ErrorMessage = "Please enter a country name")]
public string Country { get; set; }
public bool GiftWrap { get; set; }
}
}
Listing 9-11.
The Contents of the Order.cs File in the SportsStore/Models Folder
I am using the validation attributes from the System.ComponentModel.DataAnnotations namespace, just as I did in Chapter 3. I describe validation further in Chapter 29.
I also use the BindNever attribute, which prevents the user from supplying values for these properties in an HTTP request. This is a feature of the model binding system, which I describe in Chapter 28, and it stops ASP.NET Core using values from the HTTP request to populate sensitive or important model properties.
Adding the Checkout Process
The goal is to reach the point where users are able to enter their shipping details and submit an order. To start, I need to add a Checkout button to the cart view, as shown in Listing 9-12.
Adding a Button in the Cart.cshtml File in the SportsStore/Pages Folder
This change generates a link that I have styled as a button and that, when clicked, calls the Checkout action method of the Order controller, which I create in the following section. To show how Razor Pages and controllers can work together, I am going to handle the order processing in a controller and then return to a Razor Page at the end of the process. To see the Checkout button, restart ASP.NET Core, request http://localhost:5000, and click one of the Add To Cart buttons. The new button is shown as part of the cart summary, as shown in Figure 9-3.
Figure 9-3.
The Checkout button
Creating the Controller and View
I now need to define the controller that will deal with the order. I added a class file called OrderController.cs to the Controllers folder and used it to define the class shown in Listing 9-13.
using Microsoft.AspNetCore.Mvc;
using SportsStore.Models;
namespace SportsStore.Controllers {
public class OrderController : Controller {
public ViewResult Checkout() => View(new Order());
}
}
Listing 9-13.
The Contents of the OrderController.cs File in the SportsStore/Controllers Folder
The Checkout method returns the default view and passes a new Order object as the view model. To create the view, I created the Views/Order folder and added to it a Razor View called Checkout.cshtml with the markup shown in Listing 9-14.
@model Order
<h2>Check out now</h2>
<p>Please enter your details, and we'll ship your goods right away!</p>
The Contents of the Checkout.cshtml File in the SportsStore/Views/Order Folder
For each of the properties in the model, I have created a label and input elements to capture the user input, styled with Bootstrap and configured using a tag helper. The asp-for attribute on the input elements is handled by a built-in tag helper that generates the type, id, name, and value attributes based on the specified model property, as described in Chapter 27.
You can see the form, shown in Figure 9-4, by restarting ASP.NET Core, requesting http://localhost:5000, adding an item to the basket, and clicking the Checkout button. Or, more directly, you can request http://localhost:5000/order/checkout.
Figure 9-4.
The shipping details form
Implementing Order Processing
I will process orders by writing them to the database. Most e-commerce sites would not simply stop there, of course, and I have not provided support for processing credit cards or other forms of payment. But I want to keep things focused on ASP.NET Core, so a simple database entry will do.
Extending the Database
Adding a new kind of model to the database is simple because of the initial setup I went through in Chapter 7. First, I added a new property to the database context class, as shown in Listing 9-15.
using Microsoft.EntityFrameworkCore;
namespace SportsStore.Models {
public class StoreDbContext: DbContext {
public StoreDbContext(DbContextOptions<StoreDbContext> options)
: base(options) { }
public DbSet<Product> Products { get; set; }
public DbSet<Order> Orders { get; set; }
}
}
Listing 9-15.
Adding a Property in the StoreDbContext.cs File in the SportsStore/Models Folder
This change is enough for Entity Framework Core to create a database migration that will allow Order objects to be stored in the database. To create the migration, use a PowerShell command prompt to run the command shown in Listing 9-16 in the SportsStore folder.
dotnet ef migrations add Orders
Listing 9-16.
Creating a Migration
This command tells Entity Framework Core to take a new snapshot of the application data model, work out how it differs from the previous database version, and generate a new migration called Orders. The new migration will be applied automatically when the application starts because the SeedData calls the Migrate method provided by Entity Framework Core.
Resetting the Database
When you are making frequent changes to the model, there will come a point when your migrations and your database schema get out of sync. The easiest thing to do is delete the database and start over. However, this applies only during development, of course, because you will lose any data you have stored. Run this command to delete the database:
dotnet ef database drop --force --context StoreDbContext
Once the database has been removed, run the following command from the SportsStore folder to re-create the database and apply the migrations you have created by running the following command:
dotnet ef database update --context StoreDbContext
The migrations will also be applied by the SeedData class if you just start the application. Either way, the database will be reset so that it accurately reflects your data model and allows you to return to developing your application.
Creating the Order Repository
I am going to follow the same pattern I used for the product repository to provide access to the Order objects. I added a class file called IOrderRepository.cs to the Models folder and used it to define the interface shown in Listing 9-17.
using System.Linq;
namespace SportsStore.Models {
public interface IOrderRepository {
IQueryable<Order> Orders { get; }
void SaveOrder(Order order);
}
}
Listing 9-17.
The Contents of the IOrderRepository.cs File in the SportsStore/Models Folder
To implement the order repository interface, I added a class file called EFOrderRepository.cs to the Models folder and defined the class shown in Listing 9-18.
using Microsoft.EntityFrameworkCore;
using System.Linq;
namespace SportsStore.Models {
public class EFOrderRepository : IOrderRepository {
The Contents of the EFOrderRepository.cs File in the SportsStore/Models Folder
This class implements the IOrderRepository interface using Entity Framework Core, allowing the set of Order objects that have been stored to be retrieved and allowing for orders to be created or changed.
Understanding the Order Repository
Entity Framework Core requires instruction to load related data if it spans multiple tables. In Listing 9-18, I used the Include and ThenInclude methods to specify that when an Order object is read from the database, the collection associated with the Lines property should also be loaded along with each Product object associated with each collection object.
...
public IQueryable<Order> Orders => context.Orders
.Include(o => o.Lines)
.ThenInclude(l => l.Product);
...
This ensures that I receive all the data objects that I need without having to perform separate queries and then assemble the data myself.
An additional step is also required when I store an Order object in the database. When the user’s cart data is de-serialized from the session store, new objects are created that are not known to Entity Framework Core, which then tries to write all the objects into the database. For the Product objects associated with an Order, this means that Entity Framework Core tries to write objects that have already been stored, which causes an error. To avoid this problem, I notify Entity Framework Core that the objects exist and shouldn’t be stored in the database unless they are modified, as follows:
Registering the Order Repository Service in the Startup.cs File in the SportsStore Folder
Completing the Order Controller
To complete the OrderController class, I need to modify the constructor so that it receives the services it requires to process an order and add an action method that will handle the HTTP form POST request when the user clicks the Complete Order button. Listing 9-20 shows both changes.
using Microsoft.AspNetCore.Mvc;
using SportsStore.Models;
using System.Linq;
namespace SportsStore.Controllers {
public class OrderController : Controller {
private IOrderRepository repository;
private Cart cart;
public OrderController(IOrderRepository repoService, Cart cartService) {
repository = repoService;
cart = cartService;
}
public ViewResult Checkout() => View(new Order());
[HttpPost]
public IActionResult Checkout(Order order) {
if (cart.Lines.Count() == 0) {
ModelState.AddModelError("", "Sorry, your cart is empty!");
}
if (ModelState.IsValid) {
order.Lines = cart.Lines.ToArray();
repository.SaveOrder(order);
cart.Clear();
return RedirectToPage("/Completed", new { orderId = order.OrderID });
} else {
return View();
}
}
}
}
Listing 9-20.
Completing the Controller in the OrderController.cs File in the SportsStore/Controllers Folder
The Checkout action method is decorated with the HttpPost attribute, which means that it will be used to handle POST requests—in this case, when the user submits the form.
In Chapter 8, I use the ASP.NET Core model binding feature to receive simple data values from the request. This same feature is used in the new action method to receive a completed Order object. When a request is processed, the model binding system tries to find values for the properties defined by the Order class. This works on a best-effort basis, which means I may receive an Order object lacking property values if there is no corresponding data item in the request.
To ensure I have the data I require, I applied validation attributes to the Order class. ASP.NET Core checks the validation constraints that I applied to the Order class and provides details of the result through the ModelState property. I can see whether there are any problems by checking the ModelState.IsValid property. I call the ModelState.AddModelError method to register an error message if there are no items in the cart. I will explain how to display such errors shortly, and I have much more to say about model binding and validation in Chapters 28 and 29.
Unit Test: Order Processing
To perform unit testing for the OrderController class, I need to test the behavior of the POST version of the Checkout method. Although the method looks short and simple, the use of model binding means that there is a lot going on behind the scenes that needs to be tested.
I want to process an order only if there are items in the cart and the customer has provided valid shipping details. Under all other circumstances, the customer should be shown an error. Here is the first test method, which I defined in a class file called OrderControllerTests.cs in the SportsStore.Tests project:
using Microsoft.AspNetCore.Mvc;
using Moq;
using SportsStore.Controllers;
using SportsStore.Models;
using Xunit;
namespace SportsStore.Tests {
public class OrderControllerTests {
[Fact]
public void Cannot_Checkout_Empty_Cart() {
// Arrange - create a mock repository
Mock<IOrderRepository> mock = new Mock<IOrderRepository>();
// Arrange - create an empty cart
Cart cart = new Cart();
// Arrange - create the order
Order order = new Order();
// Arrange - create an instance of the controller
OrderController target = new OrderController(mock.Object, cart);
// Act
ViewResult result = target.Checkout(order) as ViewResult;
// Assert - check that the order hasn't been stored
// Assert - check that I am passing an invalid model to the view
Assert.False(result.ViewData.ModelState.IsValid);
}
}
}
This test ensures that I cannot check out with an empty cart. I check this by ensuring that the SaveOrder of the mock IOrderRepository implementation is never called, that the view the method returns is the default view (which will redisplay the data entered by customers and give them a chance to correct it), and that the model state being passed to the view has been marked as invalid. This may seem like a belt-and-braces set of assertions, but I need all three to be sure that I have the right behavior. The next test method works in much the same way but injects an error into the view model to simulate a problem reported by the model binder (which would happen in production when the customer enters invalid shipping data):
...
[Fact]
public void Cannot_Checkout_Invalid_ShippingDetails() {
// Arrange - create a mock order repository
Mock<IOrderRepository> mock = new Mock<IOrderRepository>();
// Arrange - create a cart with one item
Cart cart = new Cart();
cart.AddItem(new Product(), 1);
// Arrange - create an instance of the controller
OrderController target = new OrderController(mock.Object, cart);
// Assert - check that I am passing an invalid model to the view
Assert.False(result.ViewData.ModelState.IsValid);
}
...
Having established that an empty cart or invalid details will prevent an order from being processed, I need to ensure that I process orders when appropriate. Here is the test:
...
[Fact]
public void Can_Checkout_And_Submit_Order() {
// Arrange - create a mock order repository
Mock<IOrderRepository> mock = new Mock<IOrderRepository>();
// Arrange - create a cart with one item
Cart cart = new Cart();
cart.AddItem(new Product(), 1);
// Arrange - create an instance of the controller
OrderController target = new OrderController(mock.Object, cart);
// Act - try to checkout
RedirectToPageResult result =
target.Checkout(new Order()) as RedirectToPageResult;
// Assert - check that the method is redirecting to the Completed action
Assert.Equal("/Completed", result.PageName);
}
...
I did not need to test that I can identify valid shipping details. This is handled for me automatically by the model binder using the attributes applied to the properties of the Order class.
Displaying Validation Errors
ASP.NET Core uses the validation attributes applied to the Order class to validate user data, but I need to make a simple change to display any problems. This relies on another built-in tag helper that inspects the validation state of the data provided by the user and adds warning messages for each problem that has been discovered. Listing 9-21 shows the addition of an HTML element that will be processed by the tag helper to the Checkout.cshtml file.
@model Order
<h2>Check out now</h2>
<p>Please enter your details, and we'll ship your goods right away!</p>
Adding a Validation Summary to the Checkout.cshtml File in the SportsStore/Views/Order Folder
With this simple change, validation errors are reported to the user. To see the effect, restart ASP.NET Core, request http://localhost:5000/Order/Checkout, and click the Complete Order button without filling out the form. ASP.NET Core will process the form data, detect that the required values were not found, and generate the validation errors shown in Figure 9-5.
Figure 9-5.
Displaying validation messages
Tip
The data submitted by the user is sent to the server before it is validated, which is known as server-side validation and for which ASP.NET Core has excellent support. The problem with server-side validation is that the user isn’t told about errors until after the data has been sent to the server and processed and the result page has been generated—something that can take a few seconds on a busy server. For this reason, server-side validation is usually complemented by client-side validation, where JavaScript is used to check the values that the user has entered before the form data is sent to the server. I describe client-side validation in Chapter 29.
Displaying a Summary Page
To complete the checkout process, I am going to create a Razor Page that displays a thank-you message with a summary of the order. Add a Razor Page named Completed.cshtml to the Pages folder with the contents shown in Listing 9-22.
@page
<div class="text-center">
<h2>Thanks!</h2>
<p>Thanks for placing order #@OrderId</p>
<p>We'll ship your goods as soon as possible.</p>
<a class="btn btn-primary" asp-controller="Home">Return to Store</a>
</div>
@functions {
[BindProperty(SupportsGet = true)]
public string OrderId { get; set; }
}
Listing 9-22.
The Contents of the Completed.cshtml File in the SportsStore/Pages Folder
Although Razor Pages usually have page model classes, they are not a requirement, and simple features can be developed without them. In this example, I have defined a property named OrderId and decorated it with the BindProperty attribute, which specifies that a value for this property should be obtained from the request by the model binding system
Now customers can go through the entire process, from selecting products to checking out. If they provide valid shipping details (and have items in their cart), they will see the summary page when they click the Complete Order button, as shown in Figure 9-6.
Figure 9-6.
The completed order summary view
Notice the way the application moves between controllers and Razor Pages. The application features that ASP.NET Core provides are complementary and can be mixed freely in projects.
Summary
I have completed all the major parts of the customer-facing portion of SportsStore. It might not be enough to worry Amazon, but I have a product catalog that can be browsed by category and page, a neat shopping cart, and a simple checkout process.
The approach I have taken means I can easily change the behavior of any piece of the application without causing problems or inconsistencies elsewhere. For example, I could change the way that orders are stored, and it would not have any impact on the shopping cart, the product catalog, or any other area of the application. In the next chapter, I add the features required to administer the SportsStore application.