
The previous chapters have focused on individual features that deal with one aspect of HTML forms, and it can sometimes be difficult to see how they fit together to perform common tasks. In this chapter, I go through the process of creating controllers, views, and Razor Pages that support an application with create, read, update, and delete (CRUD) functionality. There are no new features described in this chapter, and the objective is to demonstrate how features such as tag helpers, model binding, and model validation can be used in conjunction with Entity Framework Core.
Preparing for This Chapter
This chapter uses the WebApp project from Chapter 30. To prepare for this chapter, replace the contents of the HomeController.cs file in the Controllers folder with those shown in Listing 31-1.
You can download the example project for this chapter—and for all the other chapters in this book—from https://github.com/apress/pro-asp.net-core-3. See Chapter 1 for how to get help if you have problems running the examples.
The Contents of the HomeController.cs File in the Controllers Folder
The Contents of the Index.cshtml File in the Views/Home Folder
Changing Validation in the Product.cs File in the Models Folder
Disabling Filters in the Startup.cs File in the WebApp Folder
Dropping the Database
Dropping the Database
Running the Example Application
Running the Example Application
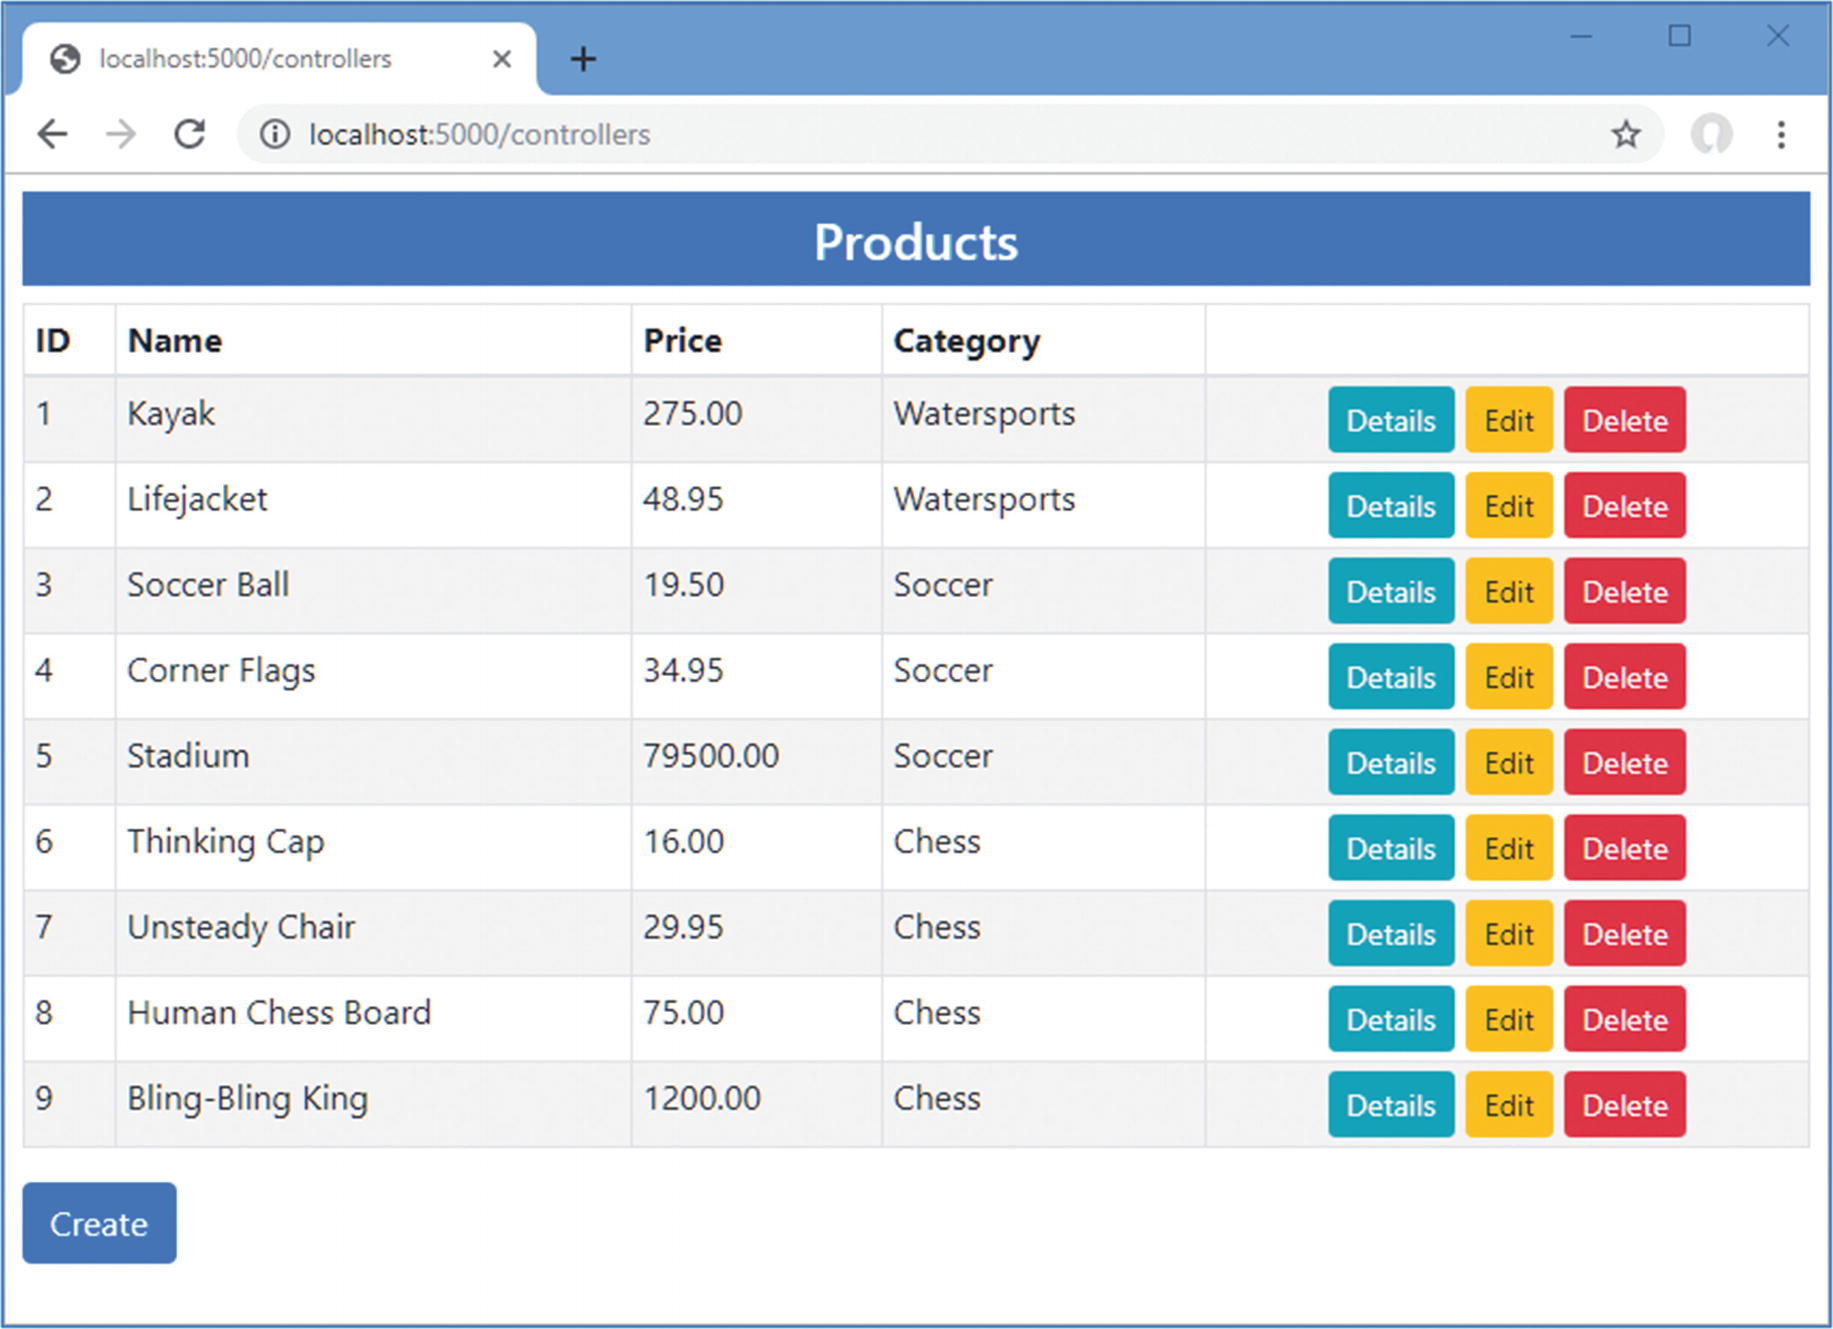
Running the example application
Creating an MVC Forms Application
In the sections that follow, I show you how to perform the core data operations using MVC controllers and views. Later in the chapter, I create the same functionality using Razor Pages.
Preparing the View Model and the View
The Contents of the ProductViewModel.cs File in the Models Folder
This class will allow the controller to pass data and display settings to its view. The Product property provides the data to display, and the Categories and Suppliers properties provide access to the Category and Suppliers objects when they are required. The other properties configure aspects of how the content is presented to the user: the Action property specifies the name of the action method for the current task, the ReadOnly property specifies whether the user can edit the data, the Theme property specifies the Bootstrap theme for the content, and the ShowAction property is used to control the visibility of the button that submits the form.
The Contents of the ProductEditor.cshtml File in the Views/Home Folder
This view can look complicated, but it combines only the features you have seen in earlier chapters and will become clearer once you see it in action. The model for this view is a ProductViewModel object, which provides both the data that is displayed to the user and some direction about how that data should be presented.
For each of the properties defined by the Product class, the view contains a set of elements: a label element that describes the property, an input or select element that allows the value to be edited, and a span element that will display validation messages. Each of the elements is configured with the asp-for attribute, which ensures tag helpers will transform the elements for each property. There are div elements to define the view structure, and all the elements are members of Bootstrap CSS classes to style the form.
Reading Data
The Contents of the ViewModelFactory.cs File in the Models Folder
The Details method produces a ProductViewModel object configured for viewing an object. When the user views the details, the category and supplier details will be read-only, which means that I need to provide only the current category and supplier information.
Adding an Action Method in the HomeController.cs File in the Controllers Folder
The action method uses the id parameter, which will be model bound from the routing data, to query the database and passes the Product object to the ViewModelFactory.Details method. Most of the operations are going to require the Category and Supplier data, so I have added properties that provide direct access to the data.

Viewing data
If the user navigates to a URL that doesn’t correspond to an object in the database, such as http://localhost:5000/controllers/Home/Details/100, for example, then an empty form will be displayed.
Creating Data
Adding a Method in the ViewModelFactory.cs File in the Models Folder
Adding Actions in the HomeController.cs File in the Controllers Folder
There are two Create methods, which are differentiated by the HttpPost attribute and method parameters. HTTP GET requests will be handled by the first method, which selects the ProductEditor view and provides it with a ProductViewModel object. When the user submits the form, it will be received by the second method, which relies on model binding to receive the data and model validation to ensure the data is valid.
Entity Framework Core configures the database so that primary keys are allocated by the database server when new data is stored. If you attempt to store an object and provide a ProductId value other than zero, then an exception will be thrown.
I reset the Category and Supplier properties to prevent Entity Framework Core from trying to deal with related data when storing an object. Entity Framework Core is capable of processing related data, but it can produce unexpected outcomes. (I show you how to create related data in the “Creating New Related Data Objects” section, later in this chapter.)
I do this because the view model object expected by the view isn’t the same data type that I have extracted from the request using model binding. Instead, I create a new view model object that incorporates the model bound data and passes this to the View method.

Creating a new object
In Chapter 30, I used input elements to allow the value of these properties to be set directly, but that was because I wanted to demonstrate different types of validation. In real applications, it is a good idea to provide the user with restricted choices when the application already has the data it expects the user to choose from. Making the user enter a valid primary key, for example, makes no sense in a real project because the application can easily provide the user with a list of those keys to choose from, as shown in Figure 31-4.
I show you different techniques for creating related data in the “Creating New Related Data Objects” section.
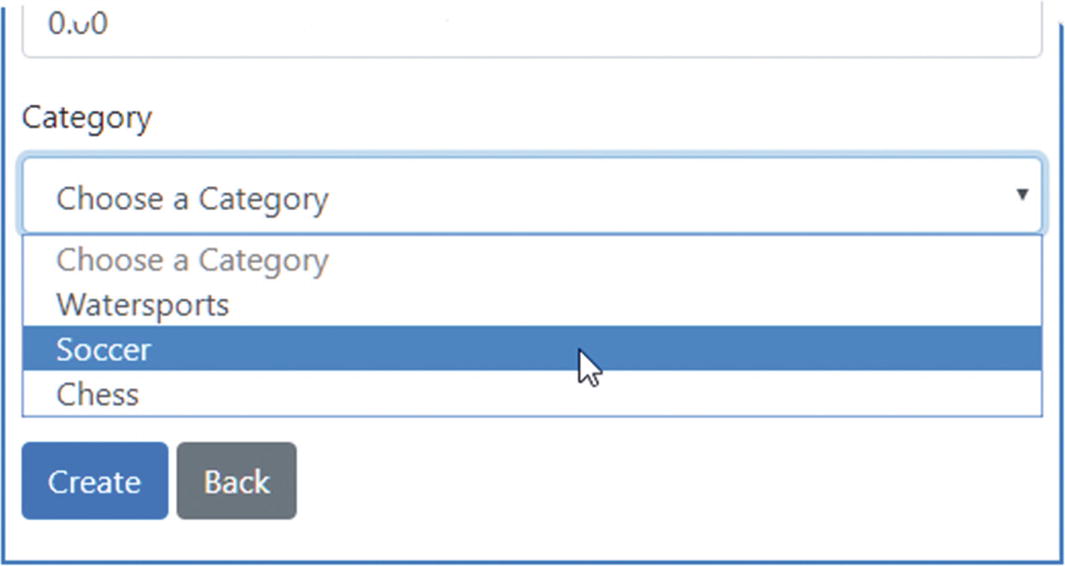
Presenting the user with a choice
Editing Data
Adding a Method in the ViewModelFactory.cs File in the Models Folder
Adding Action Methods in the HomeController.cs File in the Controllers Folder

Editing a product
Notice that the ProductId property cannot be changed. Attempting to change the primary key of an object should be avoided because it interferes with the Entity Framework Core understanding of the identity of its objects. If you can’t avoid changing the primary key, then the safest approach is to delete the existing object and store a new one.
Deleting Data
Adding a Method in the ViewModelFactory.cs File in the Models Folder
Adding Action Methods in the HomeController.cs File in the Controllers Folder
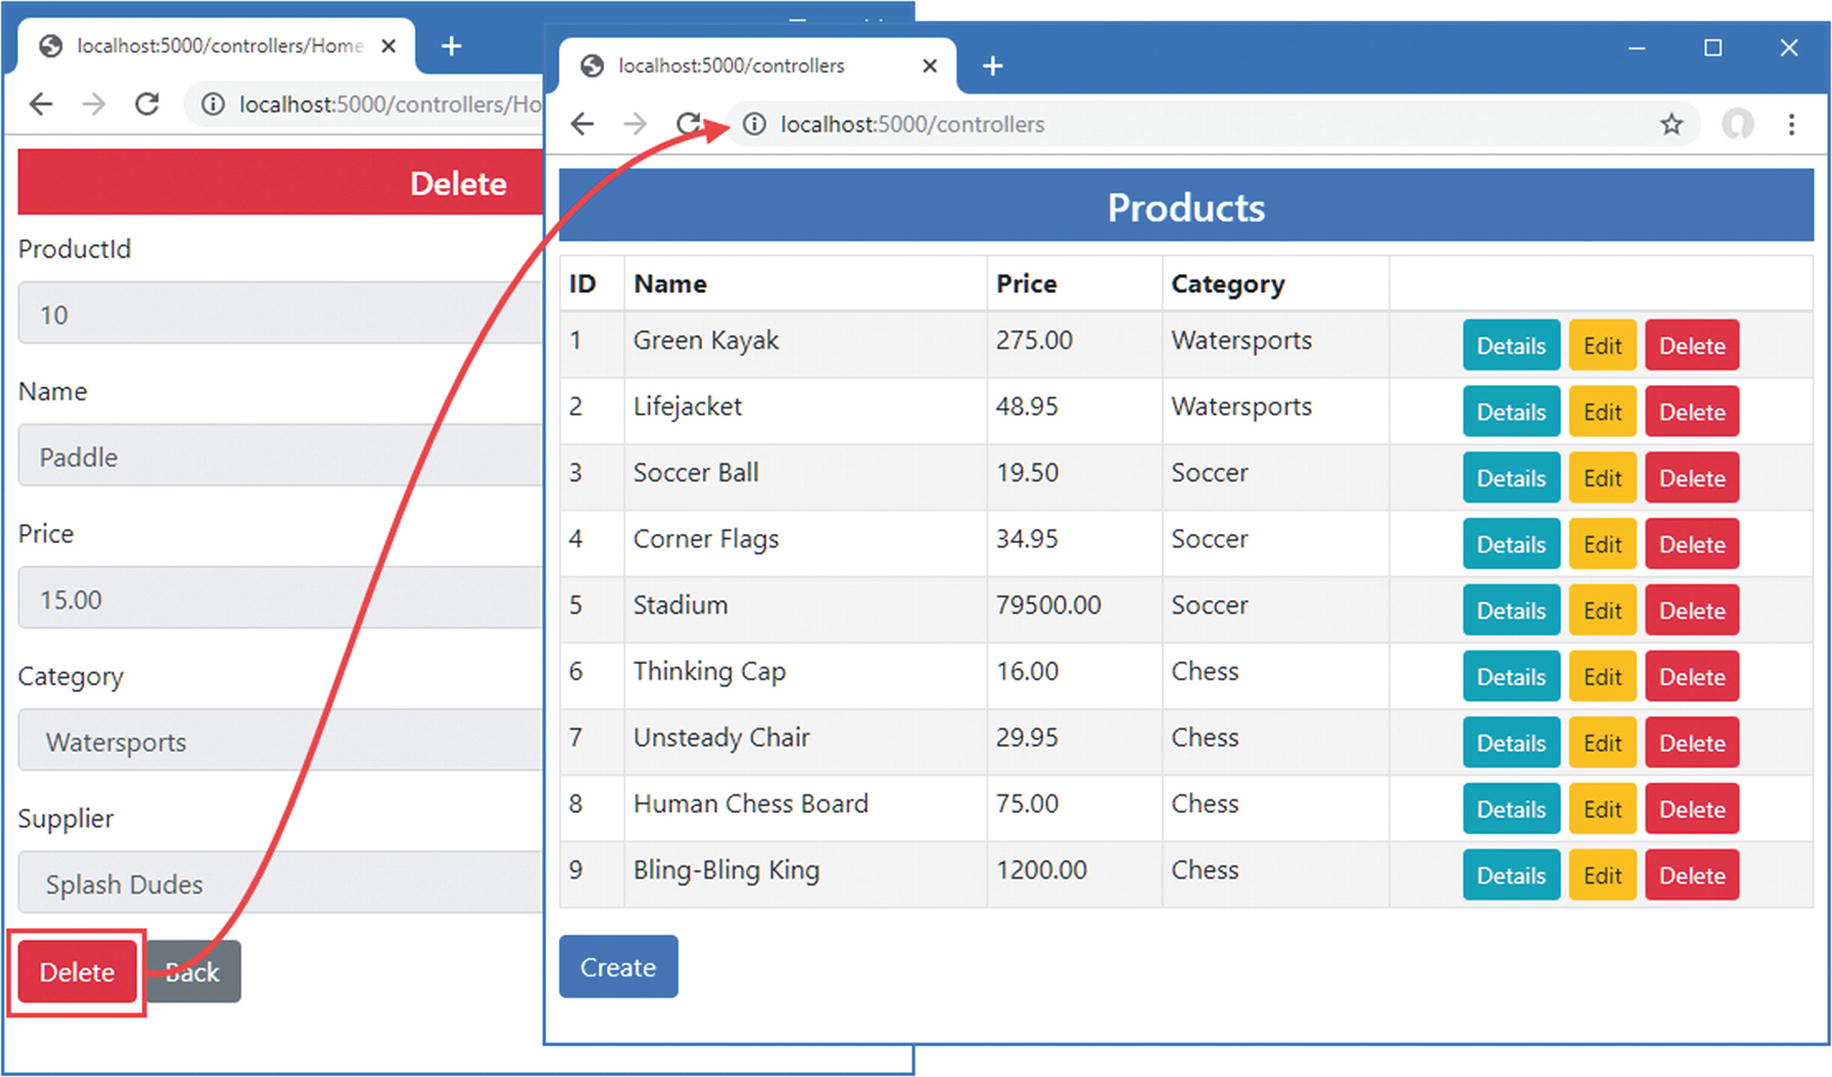
Deleting data
Creating a Razor Pages Forms Application
The Contents of the Index.cshtml File in the Pages Folder

Listing data using a Razor Page
Creating Common Functionality
I don’t want to duplicate the same HTML form and supporting code in each of the pages required by the example application. Instead, I am going to define a partial view that defines the HTML form and a base class that defines the common code required by the page model classes. For the partial view, a Razor View named _ProductEditor.cshtml to the Pages folder with the content shown in Listing 31-18.
The asp-page-handler attribute can be used to specify the name of a handler method, which allows a Razor Page to be used for more than one operation. I don’t like this feature because the result is too close to a standard MVC controller and undermines the self-contained and modular aspects of Razor Page development that I like.
The approach I prefer is, of course, the one that I have taken in this chapter, which is to consolidate common content in partial views and a shared base class. Either approach works, and I recommend you try both to see which suits you and your project.
The Contents of the _ProductEditor.cshtml File in the Pages Folder
The partial view uses the ProductViewModel class as its model type and relies on the built-in tag helpers to present input and select elements for the properties defined by the Product class. This is the same content used earlier in the chapter, except with the asp-action attribute replaced with asp-page to specify the target for the form and anchor elements.
The Contents of the EditorPageModel.cs File in the Pages Folder
The properties defined by this class are simple, but they will help simplify the page model classes of the Razor Pages that handle each operation.
All the Razor Pages required for this example depend on the same namespaces. Add the expressions shown in Listing 31-20 to the _ViewImports.cshtml file in the Pages folder to avoid duplicate expressions in the individual pages.
Make sure you alter the _ViewImports.cshtml file in the Pages folder and not the file with the same name in the Views folder.
Adding Namespaces in the _ViewImports.cshtml File in the Pages Folder
Defining Pages for the CRUD Operations
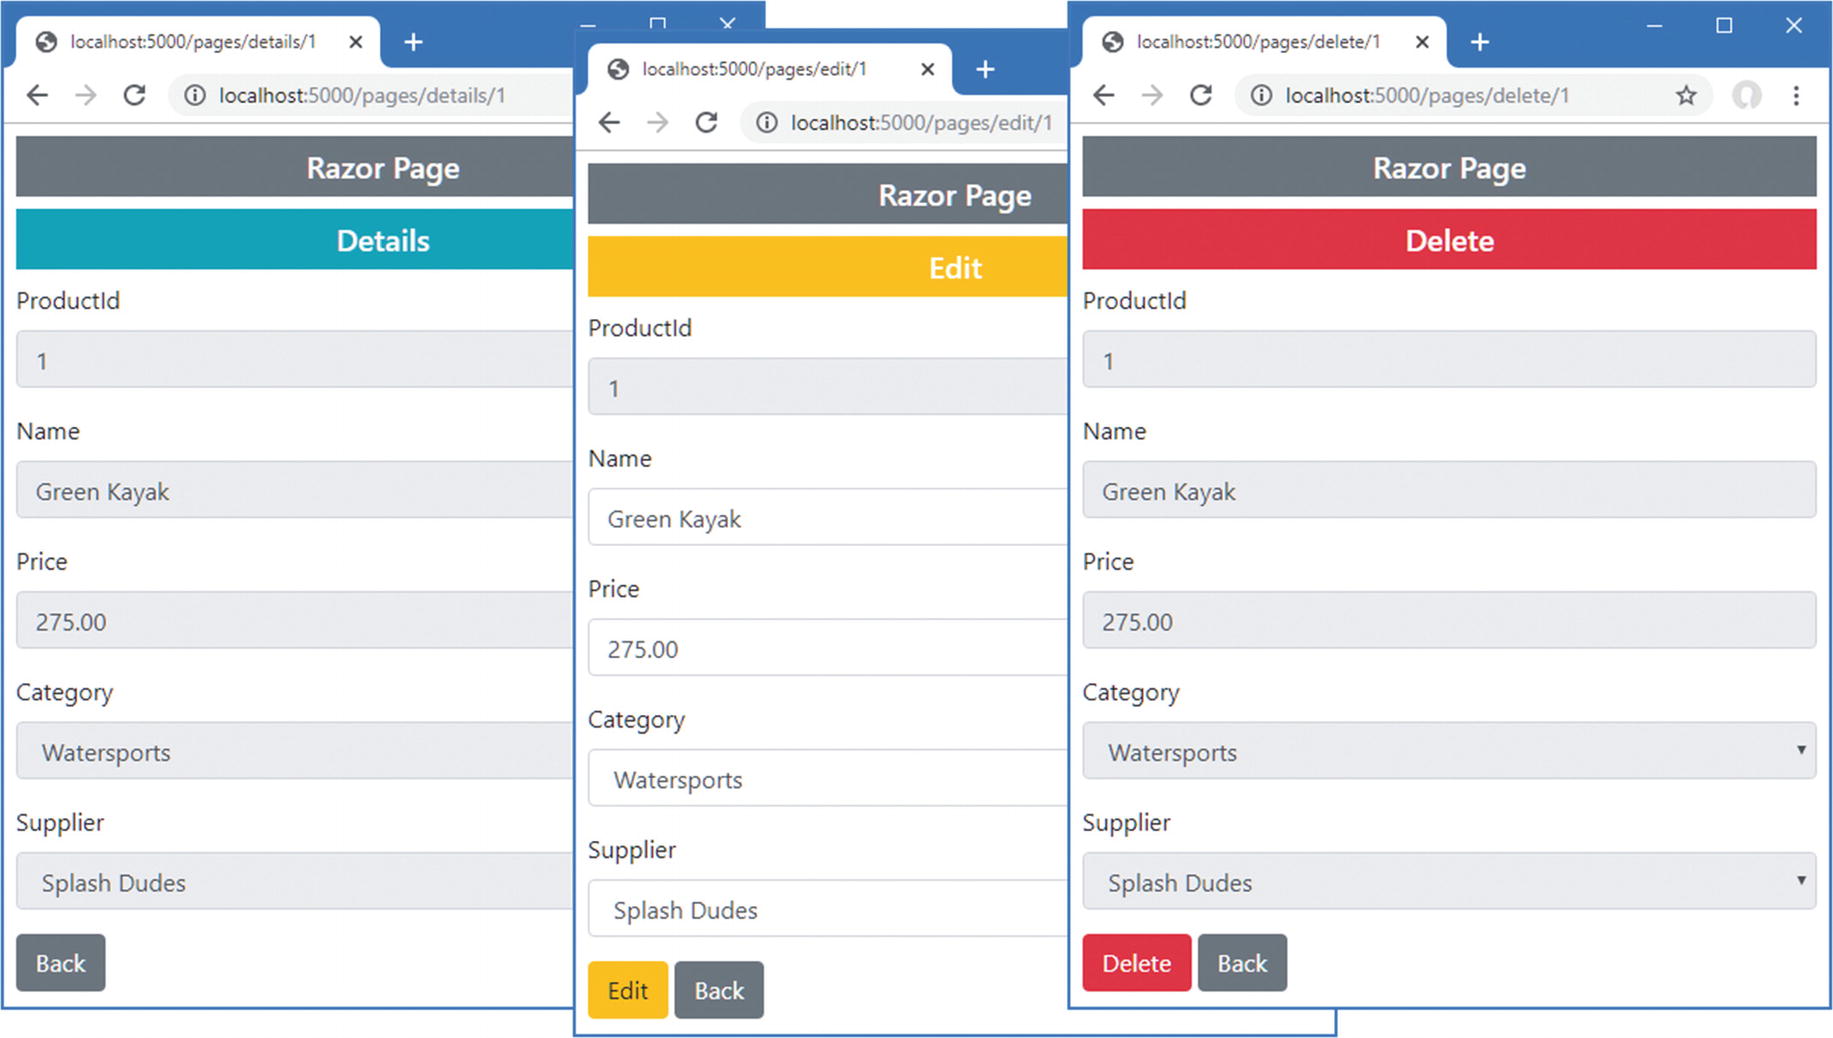
The Contents of the Details.cshtml File in the Pages Folder
The constructor receives an Entity Framework Core context object, which it passes to the base class. The handler method responds to requests by querying the database and using the response to create a ProductViewModel object using the ViewModelFactory class.
Add a Razor Page named Create.cshtml to the Pages folder with the code and content shown in Listing 31-22.
Using a partial view means that the asp-for attributes set element names without an additional prefix. This allows me to use the FromForm attribute for model binding without using the Name argument.
The Contents of the Create.cshtml File in the Pages Folder
The Contents of the Edit.cshtml File in the Pages Folder
The Contents of the Delete.cshtml File in the Pages Folder
Using Razor Pages
Creating New Related Data Objects
Some applications will need to allow the user to create new related data so that, for example, a new Category can be created along with a Product in that Category. There are two ways to approach this problem, as described in the sections that follow.
Providing the Related Data in the Same Request
The first approach is to ask the user to provide the data required to create the related data in the same form. For the example application, this means collecting details for a Category object in the same form that the user enters the values for the Product object.
This can be a useful approach for simple data types, where only a small amount of data is required to create the related object but is not well suited for types with many properties.
The Contents of the _CategoryEditor.cshtml File in the Pages Folder
The Category type requires only one property, which the user will provide using a standard input element. The script element in the partial view contains jQuery code that hides the new elements until the user selects an option element that sets a value of -1 for the Product.CategoryId property. (Using JavaScript is entirely optional, but it helps to emphasize the purpose of the new elements.)
Adding Elements in the _ProductEditor.cshtml File in the Pages Folder
Adding a Method in the EditorPageModel.cs File in the Pages Folder
Adding a Statement in the Create.cshtml File in the Pages Folder
Adding a Statement in the Edit.cshtml File in the Pages Folder

Creating related data
Breaking Out to Create New Data
For related data types that have their own complex creation process, adding elements to the main form can be overwhelming to the user; a better approach is to navigate away from the main form to another controller or page, let the user create the new object, and then return to complete the original task. I will demonstrate this technique for the creation of Supplier objects, even though the Supplier type is simple and requires only two values from the user.
The Contents of the SupplierBreakOut.cshtml File in the Pages Folder
The user will navigate to this page using a GET request that will contain the details of the Product the user has provided and the name of the page that the user should be returned to. This data is stored using the temp data feature.
This page presents the user with a form containing fields for the Name and City properties required to create a new Supplier object. When the form is submitted, the POST handler method stores a new Supplier object and uses the key assigned by the database server to update the Product object, which is then stored as temp data again. The user is redirected back to the page from which they arrived.
Adding Elements in the _ProductEditor.cshtml File in the Pages Folder
Retrieving Data in the Create.cshtml File in the Pages Folder
Retrieving Data in the Edit.cshtml File in the Pages Folder

Breaking out to create related data
Summary
In this chapter, I demonstrated how the features described in earlier chapters can be combined with Entity Framework Core to create, read, update, and delete data. In Part 4, I describe some of the advanced features that ASP.NET Core provides.