© Adam Freeman 2020
A. FreemanPro ASP.NET Core 3https://doi.org/10.1007/978-1-4842-5440-0_10

10. SportsStore: Administration

Adam Freeman1 
(1)
London, UK
 

In this chapter, I continue to build the SportsStore application in order to give the site administrator a way to manage orders and products. In this chapter, I use Blazor to create administration features. Blazor is a new addition to ASP.NET Core, and it combines client-side JavaScript code with server-side code executed by ASP.NET Core, connected by a persistent HTTP connection. I describe Blazor in detail in Chapters 3235, but it is important to understand that the Blazor model is not suited to all projects. (I use Blazor Server in this chapter, which is a supported part of the ASP.NET Core platform. There is also Blazor WebAssembly, which is, at the time of writing, experimental and runs entirely in the browser. I describe Blazor WebAssembly in Chapter 36.)

Tip

You can download the example project for this chapter—and for all the other chapters in this book—from https://github.com/apress/pro-asp.net-core-3. See Chapter 1 for how to get help if you have problems running the examples.

Preparing Blazor Server

The first step is to enable the services and middleware for Blazor, as shown in Listing 10-1.
using System;
using System.Collections.Generic;
using System.Linq;
using System.Threading.Tasks;
using Microsoft.AspNetCore.Builder;
using Microsoft.AspNetCore.Hosting;
using Microsoft.AspNetCore.Http;
using Microsoft.Extensions.DependencyInjection;
using Microsoft.Extensions.Hosting;
using Microsoft.Extensions.Configuration;
using Microsoft.EntityFrameworkCore;
using SportsStore.Models;
namespace SportsStore {
    public class Startup {
        public Startup(IConfiguration config) {
            Configuration = config;
        }
        private IConfiguration Configuration { get; set; }
        public void ConfigureServices(IServiceCollection services) {
            services.AddControllersWithViews();
            services.AddDbContext<StoreDbContext>(opts => {
                opts.UseSqlServer(
                    Configuration["ConnectionStrings:SportsStoreConnection"]);
            });
            services.AddScoped<IStoreRepository, EFStoreRepository>();
            services.AddScoped<IOrderRepository, EFOrderRepository>();
            services.AddRazorPages();
            services.AddDistributedMemoryCache();
            services.AddSession();
            services.AddScoped<Cart>(sp => SessionCart.GetCart(sp));
            services.AddSingleton<IHttpContextAccessor, HttpContextAccessor>();
            services.AddServerSideBlazor();
        }
        public void Configure(IApplicationBuilder app, IWebHostEnvironment env) {
            app.UseDeveloperExceptionPage();
            app.UseStatusCodePages();
            app.UseStaticFiles();
            app.UseSession();
            app.UseRouting();
            app.UseEndpoints(endpoints => {
                endpoints.MapControllerRoute("catpage",
                    "{category}/Page{productPage:int}",
                    new { Controller = "Home", action = "Index" });
                endpoints.MapControllerRoute("page", "Page{productPage:int}",
                    new { Controller = "Home", action = "Index", productPage = 1 });
                endpoints.MapControllerRoute("category", "{category}",
                    new { Controller = "Home", action = "Index", productPage = 1 });
                endpoints.MapControllerRoute("pagination",
                    "Products/Page{productPage}",
                    new { Controller = "Home", action = "Index", productPage = 1 });
                endpoints.MapDefaultControllerRoute();
                endpoints.MapRazorPages();
                endpoints.MapBlazorHub();
                endpoints.MapFallbackToPage("/admin/{*catchall}", "/Admin/Index");
            });
            SeedData.EnsurePopulated(app);
        }
    }
}
Listing 10-1.

Enabling Blazor in the Startup.cs File in the SportsStore Folder

The AddServerSideBlazor method creates the services that Blazor uses, and the MapBlazorHub method registers the Blazor middleware components. The final addition is to finesse the routing system to ensure that Blazor works seamlessly with the rest of the application.

Creating the Imports File

Blazor requires its own imports file to specify the namespaces that it uses. Create the Pages/Admin folder and add to it a file named _Imports.razor with the content shown in Listing 10-2. (If you are using Visual Studio, you can use the Razor Components template to create this file.)

Note

The conventional location for Blazor files is within the Pages folder, but Blazor files can be defined anywhere in the project. In Part 4, for example, I used a folder named Blazor to help emphasize which features were provided by Blazor and which by Razor Pages.

@using Microsoft.AspNetCore.Components
@using Microsoft.AspNetCore.Components.Forms
@using Microsoft.AspNetCore.Components.Routing
@using Microsoft.AspNetCore.Components.Web
@using Microsoft.EntityFrameworkCore
@using SportsStore.Models
Listing 10-2.

The Contents of the _Imports.razor File in the SportsStore/Pages/Admin Folder

The first four @using expressions are for the namespaces required for Blazor. The last two expressions are for convenience in the examples that follow because they will allow me to use Entity Framework Core and the classes in the Models namespace.

Creating the Startup Razor Page

Blazor relies on a Razor Page to provide the initial content to the browser, which includes the JavaScript code that connects to the server and renders the Blazor HTML content. Add a Razor Page named Index.cshtml to the Pages/Admin folder with the contents shown in Listing 10-3.
@page "/admin"
@{  Layout = null; }
<!DOCTYPE html>
<html>
<head>
    <title>SportsStore Admin</title>
    <link href="/lib/twitter-bootstrap/css/bootstrap.min.css" rel="stylesheet" />
    <base href="/" />
</head>
<body>
    <component type="typeof(Routed)" render-mode="Server" />
    <script src="/_framework/blazor.server.js"></script>
</body>
</html>
Listing 10-3.

The Contents of the Index.cshtml File in the SportsStore/Pages/Admin Folder

The component element is used to insert a Razor Component in the output from the Razor Page. Razor Components are the confusingly named Blazor building blocks, and the component element applied in Listing 10-3 is named Routed and will be created shortly. The Razor Page also contains a script element that tells the browser to load the JavaScript file that Blazor Server uses. Requests for this file are intercepted by the Blazor Server middleware, and you don’t need to explicitly add the JavaScript file to the project.

Creating the Routing and Layout Components

Add a Razor Component named Routed.razor to the Pages/Admin folder and add the content shown in Listing 10-4.
<Router AppAssembly="typeof(Startup).Assembly">
    <Found>
        <RouteView RouteData="@context" DefaultLayout="typeof(AdminLayout)" />
    </Found>
    <NotFound>
        <h4 class="bg-danger text-white text-center p-2">
            No Matching Route Found
        </h4>
    </NotFound>
</Router>
Listing 10-4.

The Contents of the Routed.razor File in the SportsStore/Pages/Admin Folder

The content of this component is described in detail in Part 4 of this book, but, for this chapter, it is enough to know that the component will use the browser’s current URL to locate a Razor Component that can be displayed to the user. If no matching component can be found, then an error message is displayed.

Blazor has its own system of layouts. To create the layout for the administration tools, add a Razor Component named AdminLayout.razor to the Pages/Admin folder with the content shown in Listing 10-5.
@inherits LayoutComponentBase
<div class="bg-info text-white p-2">
    <span class="navbar-brand ml-2">SPORTS STORE Administration</span>
</div>
<div class="container-fluid">
    <div class="row p-2">
        <div class="col-3">
            <NavLink class="btn btn-outline-primary btn-block"
                        href="/admin/products"
                        ActiveClass="btn-primary text-white"
                        Match="NavLinkMatch.Prefix">
                Products
            </NavLink>
            <NavLink class="btn btn-outline-primary btn-block"
                        href="/admin/orders"
                        ActiveClass="btn-primary text-white"
                        Match="NavLinkMatch.Prefix">
                Orders
            </NavLink>
        </div>
        <div class="col">
            @Body
        </div>
    </div>
</div>
Listing 10-5.

The Contents of the AdminLayout.razor File in the SportsStore/Pages/Admin Folder

Blazor uses Razor syntax to generate HTML but introduces its own directives and features. This layout renders a two-column display with Product and Order navigation buttons, which are created using NavLink elements. These elements apply a built-in Razor Component that changes the URL without triggering a new HTTP request, which allows Blazor to respond to user interaction without losing the application state.

Creating the Razor Components

To complete the initial setup, I need to add the components that will provide the administration tools, although they will contain placeholder messages at first. Add a Razor Component named Products.razor to the Pages/Admin folder with the content shown in Listing 10-6.
@page "/admin/products"
@page "/admin"
<h4>This is the products component</h4>
Listing 10-6.

The Contents of the Products.razor File in the SportsStore/Pages/Admin Folder

The @page directives specify the URLs for which this component will be displayed, which is /admin/products and /admin. Next, add a Razor Component named Orders.razor to the Pages/Admin folder with the content shown in Listing 10-7.
@page "/admin/orders"
<h4>This is the orders component</h4>
Listing 10-7.

The Contents of the Orders.razor File in the SportsStore/Pages/Admin Folder

Checking the Blazor Setup

To make sure that Blazor is working correctly, start ASP.NET Core and request http://localhost:5000/admin. This request will be handled by the Index Razor Page in the Pages/Admin folder, which will include the Blazor JavaScript file in the content it sends to the browser. The JavaScript code will open a persistent HTTP connection to the ASP.NET Core server, and the initial Blazor content will be rendered, as shown in Figure 10-1.

Note

Microsoft has not yet released the tools required to test Razor Components, which is why there are no unit testing examples in this chapter.

../images/338050_8_En_10_Chapter/338050_8_En_10_Fig1_HTML.jpg
Figure 10-1.

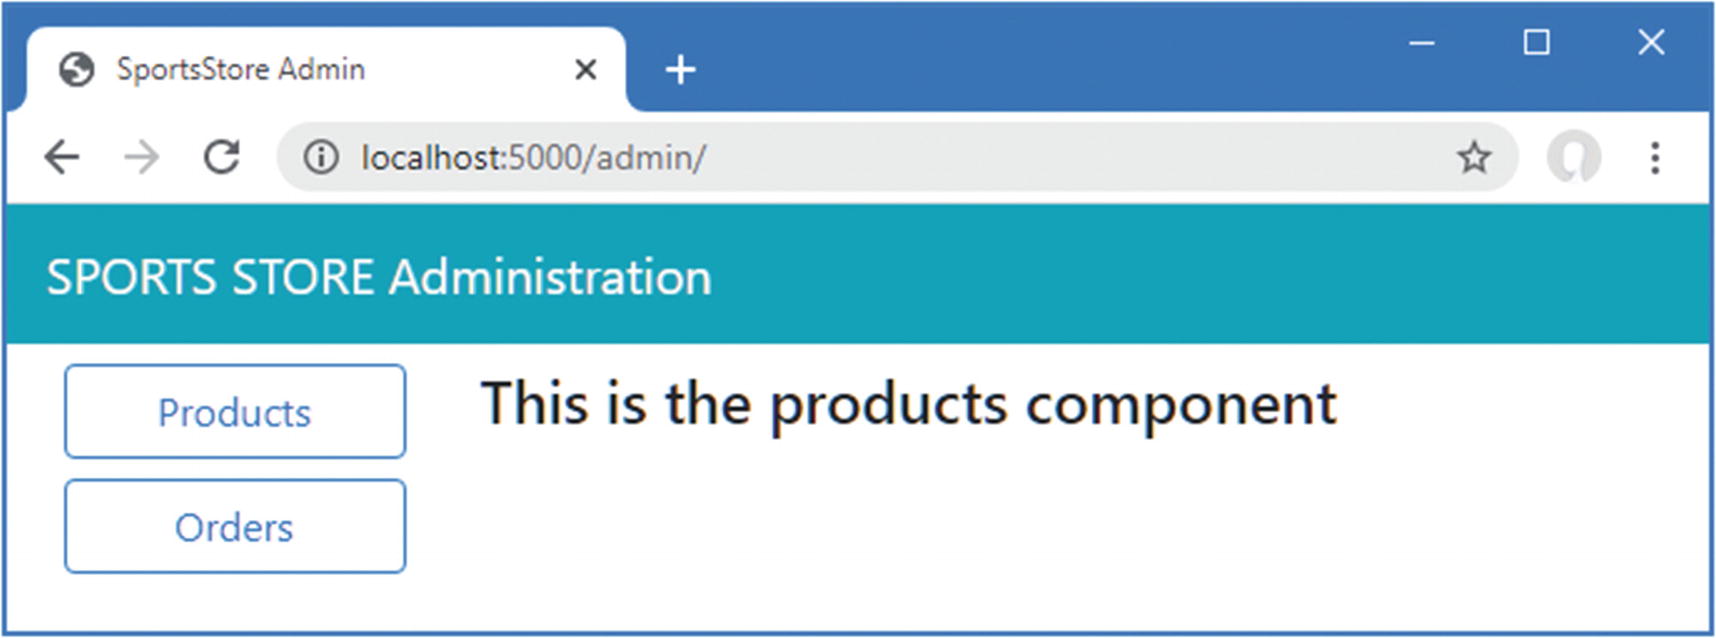
The Blazor application

Click the Orders button, and content generated by the Orders Razor Component will be displayed, as shown in Figure 10-2. Unlike the other ASP.NET Core application frameworks I used in earlier chapters, the new content is displayed without a new HTTP request being sent, even though the URL displayed by the browser changes.
../images/338050_8_En_10_Chapter/338050_8_En_10_Fig2_HTML.jpg
Figure 10-2.

Navigating in the Blazor application

Managing Orders

Now that Blazor has been set up and tested, I am going to start implementing administration features. In the previous chapter, I added support for receiving orders from customers and storing them in a database. In this section, I am going to create a simple administration tool that will let me view the orders that have been received and mark them as shipped.

Enhancing the Model

The first change I need to make is to enhance the data model so that I can record which orders have been shipped. Listing 10-8 shows the addition of a new property to the Order class, which is defined in the Order.cs file in the Models folder.
using System.Collections.Generic;
using System.ComponentModel.DataAnnotations;
using Microsoft.AspNetCore.Mvc.ModelBinding;
namespace SportsStore.Models {
    public class Order {
        [BindNever]
        public int OrderID { get; set; }
        [BindNever]
        public ICollection<CartLine> Lines { get; set; }
        [Required(ErrorMessage = "Please enter a name")]
        public string Name { get; set; }
        [Required(ErrorMessage = "Please enter the first address line")]
        public string Line1 { get; set; }
        public string Line2 { get; set; }
        public string Line3 { get; set; }
        [Required(ErrorMessage = "Please enter a city name")]
        public string City { get; set; }
        [Required(ErrorMessage = "Please enter a state name")]
        public string State { get; set; }
        public string Zip { get; set; }
        [Required(ErrorMessage = "Please enter a country name")]
        public string Country { get; set; }
        public bool GiftWrap { get; set; }
        [BindNever]
        public bool Shipped { get; set; }
    }
}
Listing 10-8.

Adding a Property in the Order.cs File in the SportsStore/Models Folder

This iterative approach of extending and adapting the data model to support different features is typical of ASP.NET Core development. In an ideal world, you would be able to completely define the data model at the start of the project and just build the application around it, but that happens only for the simplest of projects, and, in practice, iterative development is to be expected as the understanding of what is required develops and evolves.

Entity Framework Core migrations make this process easier because you don’t have to manually keep the database schema synchronized to the model class by writing your own SQL commands. To update the database to reflect the addition of the Shipped property to the Order class, open a new PowerShell window and run the command shown in Listing 10-9 in the SportsStore project.
dotnet ef migrations add ShippedOrders
Listing 10-9.

Creating a New Migration

The migration will be applied automatically when the application is started and the SeedData class calls the Migrate method provided by Entity Framework Core.

Displaying Orders to the Administrator

I am going to display two tables, one of which shows the orders waiting to be shipped and the other the shipped orders. Each order will be presented with a button that changes the shipping state. This is not entirely realistic because orders processing is typically more complex than simply updating a field in the database, but integration with warehouse and fulfillment systems is well beyond the scope of this book.

To avoid duplicating code and content, I am going to create a Razor Component that displays a table without knowing which category of order it is dealing with. Add a Razor Component named OrderTable.razor to the Pages/Admin folder with the content shown in Listing 10-10.
<table class="table table-sm table-striped table-bordered">
    <thead>
        <tr><th colspan="5" class="text-center">@TableTitle</th></tr>
    </thead>
    <tbody>
        @if (Orders?.Count() > 0) {
            @foreach (Order o in Orders) {
                <tr>
                    <td>@o.Name</td><td>@o.Zip</td><th>Product</th><th>Quantity</th>
                <td>
                    <button class="btn btn-sm btn-danger"
                            @onclick="@(e => OrderSelected.InvokeAsync(o.OrderID))">
                        @ButtonLabel
                    </button>
                </td>
            </tr>
                @foreach (CartLine line in o.Lines) {
                    <tr>
                        <td colspan="2"></td>
                        <td>@line.Product.Name</td><td>@line.Quantity</td>
                        <td></td>
                    </tr>
                }
            }
        } else {
            <tr><td colspan="5" class="text-center">No Orders</td></tr>
        }
    </tbody>
</table>
@code {
    [Parameter]
    public string TableTitle { get; set; } = "Orders";
    [Parameter]
    public IEnumerable<Order> Orders { get; set; }
    [Parameter]
    public string ButtonLabel { get; set; } = "Ship";
    [Parameter]
    public EventCallback<int> OrderSelected{ get; set; }
}
Listing 10-10.

The Contents of the OrderTable.razor File in the SportsStore/Pages/Admin Folder

Razor Components, as the name suggests, rely on the Razor approach to annotated HTML elements. The view part of the component is supported by the statements in the @code section. The @code section in this component defines four properties that are decorated with the Parameter attribute, which means the values will be provided at runtime by the parent component, which I will create shortly. The values provided for the parameters are used in the view section of the component to display details of a sequence of Order objects.

Blazor adds expressions to the Razor syntax. The view section of this component includes this button element, which has an @onclick attribute.
...
<button class="btn btn-sm btn-danger"
        @onclick="@(e => OrderSelected.InvokeAsync(o.OrderID))">
    @ButtonLabel
</button>
...

This tells Blazor how to react when the user clicks the button. In this case, the expression tells Razor to call the InvokeAsync method of the OrderSelected property. This is how the table will communicate with the rest of the Blazor application and will become clearer as I build out additional features.

Tip

I describe Blazor in-depth in Part 4 of this book, so don’t worry if the Razor Components in this chapter do not make immediate sense. The purpose of the SportsStore example is to show the overall development process, even if individual features are not understood.

The next step is to create a component that will get the Order data from the database and use the OrderTable component to display it to the user. Remove the placeholder content in the Orders component and replace it with the code and content shown in Listing 10-11.
@page "/admin/orders"
@inherits OwningComponentBase<IOrderRepository>
<OrderTable TableTitle="Unshipped Orders"
        Orders="UnshippedOrders" ButtonLabel="Ship" OrderSelected="ShipOrder" />
<OrderTable TableTitle="Shipped Orders"
       Orders="ShippedOrders" ButtonLabel="Reset" OrderSelected="ResetOrder" />
<button class="btn btn-info" @onclick="@(e => UpdateData())">Refresh Data</button>
@code {
    public IOrderRepository Repository => Service;
    public IEnumerable<Order> AllOrders { get; set; }
    public IEnumerable<Order> UnshippedOrders { get; set; }
    public IEnumerable<Order> ShippedOrders { get; set; }
    protected async override Task OnInitializedAsync() {
        await UpdateData();
    }
    public async Task UpdateData() {
        AllOrders = await Repository.Orders.ToListAsync();
        UnshippedOrders = AllOrders.Where(o => !o.Shipped);
        ShippedOrders = AllOrders.Where(o => o.Shipped);
    }
    public void ShipOrder(int id) => UpdateOrder(id, true);
    public void ResetOrder(int id) => UpdateOrder(id, false);
    private void UpdateOrder(int id, bool shipValue) {
        Order o = Repository.Orders.FirstOrDefault(o => o.OrderID == id);
        o.Shipped = shipValue;
        Repository.SaveOrder(o);
    }
}
Listing 10-11.

The Revised Contents of the Orders.razor File in the SportsStore/Pages/Admin Folder

Blazor Components are not like the other application framework building blocks used for the user-facing sections of the SportsStore application. Instead of dealing with individual requests, components can be long-lived and deal with multiple user interactions over a longer period. This requires a different style of development, especially when it comes to dealing with data using Entity Framework Core. The @inherits expression ensures that this component gets its own repository object, which ensures its operations are separate from those performed by other components displayed to the same user. And to avoid repeatedly querying the database—which can be a serious problem in Blazor, as I explain in Part 4—the repository is used only when the component is initialized, when Blazor invokes the OnInitializedAsync method, or when the user clicks a Refresh Data button.

To display its data to the user, the OrderTable component is used, which is applied as an HTML element, like this:
...
<OrderTable TableTitle="Unshipped Orders"
        Orders="UnshippedOrders" ButtonLabel="Ship" OrderSelected="ShipOrder" />
...

The values assigned to the OrderTable element’s attributes are used to set the properties decorated with the Parameter attribute in Listing 10-10. In this way, a single component can be configured to present two different sets of data without the need to duplicate code and content.

The ShipOrder and ResetOrder methods are used as the values for the OrderSelected attributes, which means they are invoked when the user clicks one of the buttons presented by the OrderTable component, updating the data in the database through the repository.

To see the new features, restart ASP.NET Core, request http://localhost:5000, and create an order. Once you have at least one order in the database, request http://localhost:5000/admin/orders, and you will see a summary of the order you created displayed in the Unshipped Orders table. Click the Ship button, and the order will be updated and moved to the Shipped Orders table, as shown in Figure 10-3.
../images/338050_8_En_10_Chapter/338050_8_En_10_Fig3_HTML.jpg
Figure 10-3.

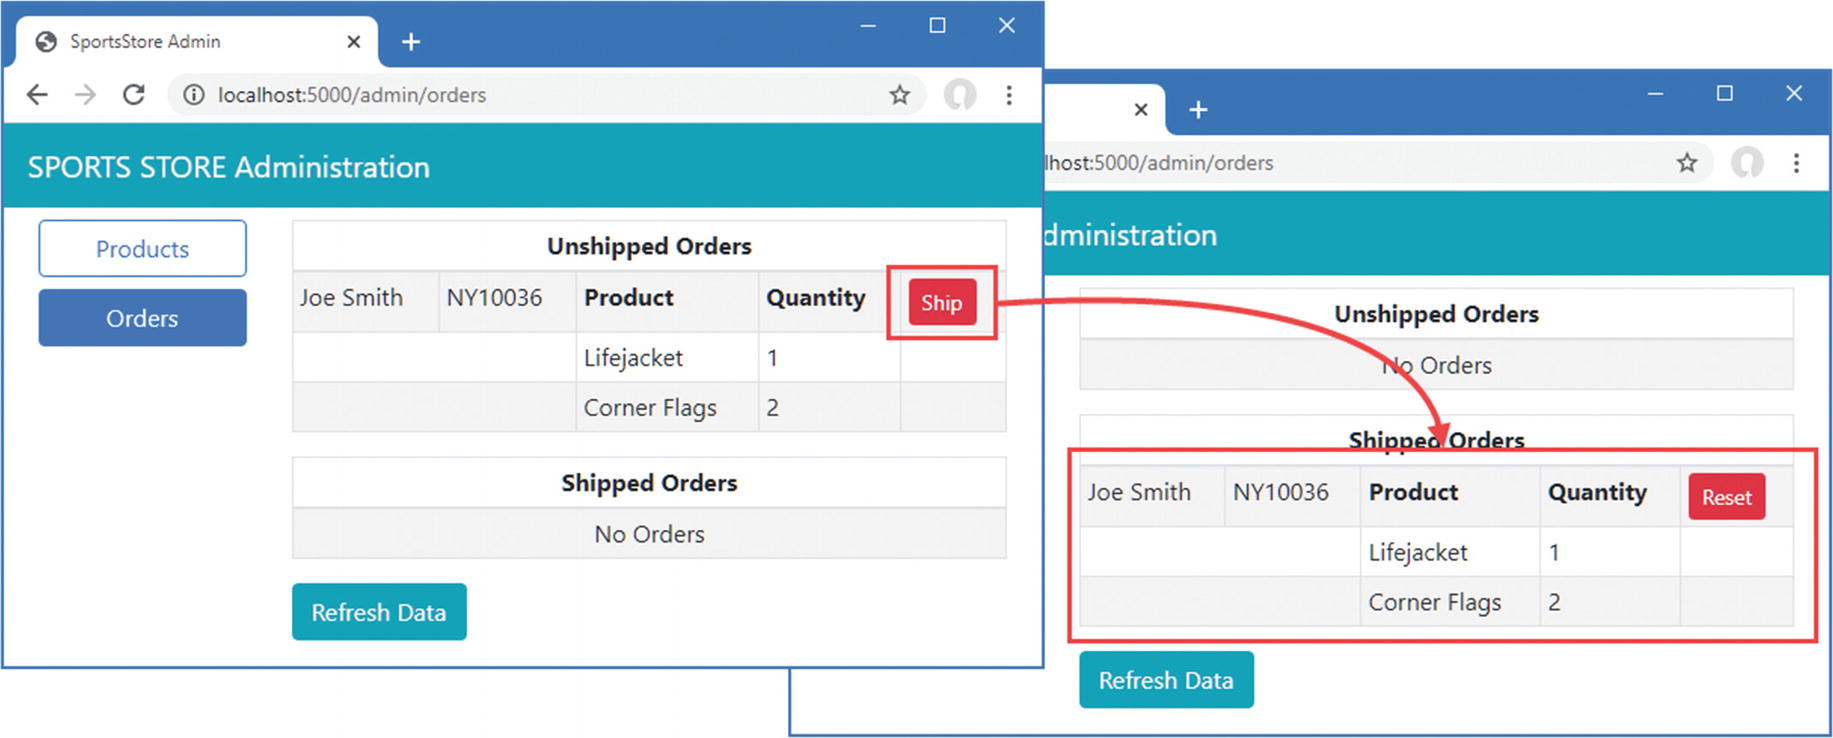
Administering orders

Adding Catalog Management

The convention for managing more complex collections of items is to present the user with two interfaces: a list interface and an edit interface, as shown in Figure 10-4.
../images/338050_8_En_10_Chapter/338050_8_En_10_Fig4_HTML.jpg
Figure 10-4.

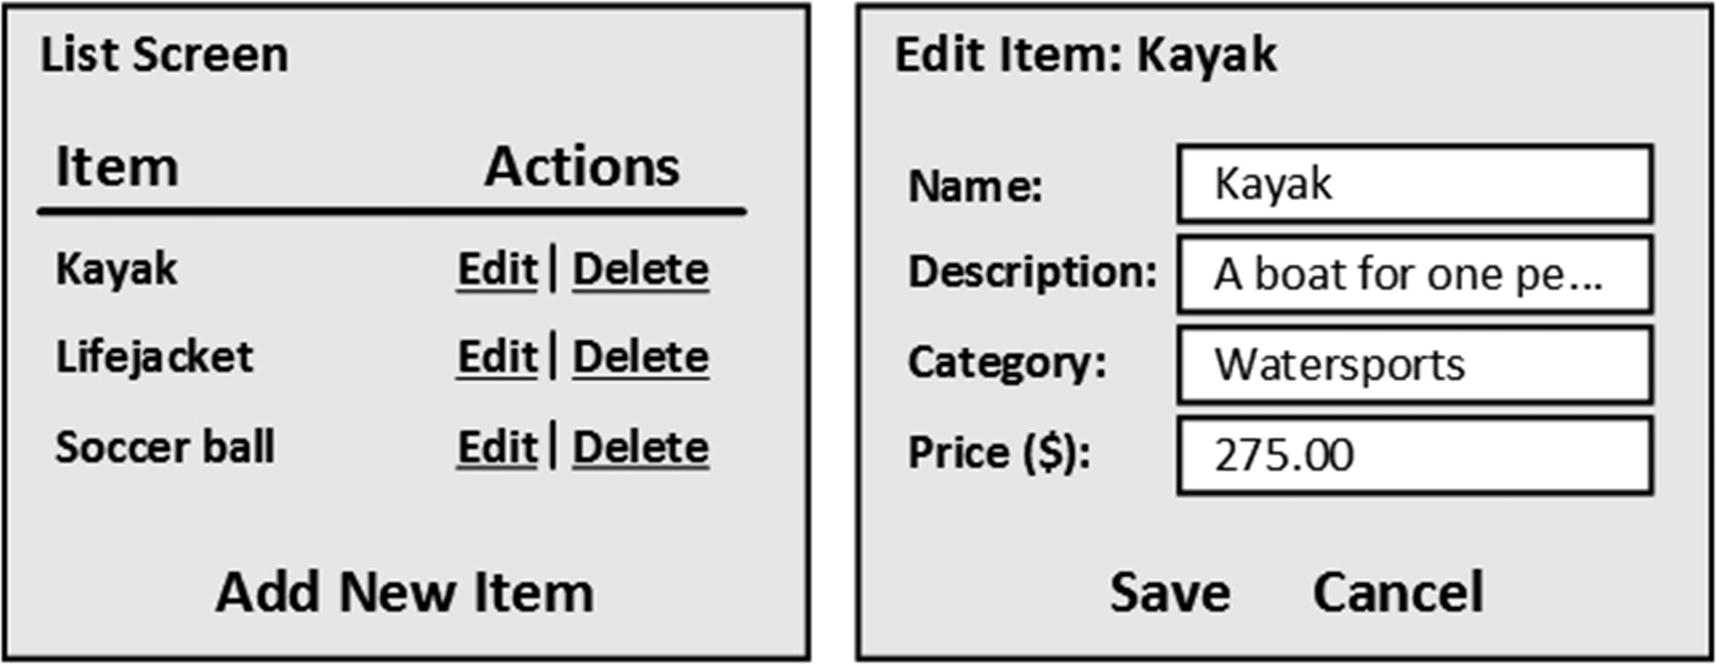
Sketch of a CRUD UI for the product catalog

Together, these interfaces allow a user to create, read, update, and delete items in the collection. Collectively, these actions are known as CRUD. In this section, I will implement these interfaces using Blazor.

Tip

Developers need to implement CRUD so often that Visual Studio scaffolding includes scenarios for creating CRUD controllers or Razor Pages. But, like all Visual Studio scaffolding, I think it is better to learn how to create these features directly, which is why I demonstrate CRUD operations for all the ASP.NET Core application frameworks in later chapters.

Expanding the Repository

The first step is to add features to the repository that will allow Product objects to be created, modified, and deleted. Listing 10-12 adds new methods to the IStoreRepository interface.
using System.Linq;
namespace SportsStore.Models {
    public interface IStoreRepository {
        IQueryable<Product> Products { get; }
        void SaveProduct(Product p);
        void CreateProduct(Product p);
        void DeleteProduct(Product p);
    }
}
Listing 10-12.

Adding Methods in the IStoreRepository.cs File in the SportsStore/Models Folder

Listing 10-13 adds implementations of these methods to the Entity Framework Core repository class.
using System.Linq;
namespace SportsStore.Models {
    public class EFStoreRepository : IStoreRepository {
        private StoreDbContext context;
        public EFStoreRepository(StoreDbContext ctx) {
            context = ctx;
        }
        public IQueryable<Product> Products => context.Products;
        public void CreateProduct(Product p) {
            context.Add(p);
            context.SaveChanges();
        }
        public void DeleteProduct(Product p) {
            context.Remove(p);
            context.SaveChanges();
        }
        public void SaveProduct(Product p) {
            context.SaveChanges();
        }
    }
}
Listing 10-13.

Implementing Methods in the EFStoreRepository.cs File in the SportsStore/Models Folder

Applying Validation Attributes to the Data Model

I want to validate the values the user provides when editing or creating Product objects, just as I did for the customer checkout process. In Listing 10-14, I have added validation attributes to the Product data model class.
using System.ComponentModel.DataAnnotations.Schema;
using System.ComponentModel.DataAnnotations;
namespace SportsStore.Models {
    public class Product {
        public long ProductID { get; set; }
        [Required(ErrorMessage = "Please enter a product name")]
        public string Name { get; set; }
        [Required(ErrorMessage = "Please enter a description")]
        public string Description { get; set; }
        [Required]
        [Range(0.01, double.MaxValue,
            ErrorMessage = "Please enter a positive price")]
        [Column(TypeName = "decimal(8, 2)")]
        public decimal Price { get; set; }
        [Required(ErrorMessage = "Please specify a category")]
        public string Category { get; set; }
    }
}
Listing 10-14.

Adding Validation Attributes in the Product.cs File in the SportsStore/Models Folder

Blazor uses the same approach to validation as the rest of ASP.NET Core but, as you will see, applies it a different way to deal with the more interactive nature of Razor Components.

Creating the List Component

I am going to start by creating the table that will present the user with a table of products and the links that will allow them to be inspected and edited. Replace the contents of the Products.razor file with those shown in Listing 10-15.
@page "/admin/products"
@page "/admin"
@inherits OwningComponentBase<IStoreRepository>
<table class="table table-sm table-striped table-bordered">
    <thead>
        <tr>
            <th>ID</th><th>Name</th>
            <th>Category</th><th>Price</th><td/>
        </tr>
    </thead>
    <tbody>
        @if (ProductData?.Count() > 0) {
            @foreach (Product p in ProductData) {
                <tr>
                    <td>@p.ProductID</td>
                    <td>@p.Name</td>
                    <td>@p.Category</td>
                    <td>@p.Price.ToString("c")</td>
                    <td>
                        <NavLink class="btn btn-info btn-sm"
                                 href="@GetDetailsUrl(p.ProductID)">
                            Details
                        </NavLink>
                        <NavLink class="btn btn-warning btn-sm"
                                 href="@GetEditUrl(p.ProductID)">
                            Edit
                        </NavLink>
                    </td>
                </tr>
            }
        } else {
            <tr>
                <td colspan="5" class="text-center">No Products</td>
            </tr>
        }
    </tbody>
</table>
<NavLink class="btn btn-primary" href="/admin/products/create">Create</NavLink>
@code {
    public IStoreRepository Repository => Service;
    public IEnumerable<Product> ProductData { get; set; }
    protected async override Task OnInitializedAsync() {
        await UpdateData();
    }
    public async Task UpdateData() {
        ProductData = await Repository.Products.ToListAsync();
    }
    public string GetDetailsUrl(long id) => $"/admin/products/details/{id}";
    public string GetEditUrl(long id) => $"/admin/products/edit/{id}";
}
Listing 10-15.

The Revised Contents of the Products.razor File in the SportsStore/Pages/Admin Folder

The component presents each Product object in the repository in a table row with NavLink components that will navigate to the components that will provide a detailed view and an editor. There is also a button that navigates to the component that will allow new Product objects to be created and stored in the database. Restart ASP.NET Core and request http://localhost:5000/admin/products, and you will see the content shown in Figure 10-5, although none of the buttons presented by the Products component work currently because I have yet to create the components they target.
../images/338050_8_En_10_Chapter/338050_8_En_10_Fig5_HTML.jpg
Figure 10-5.

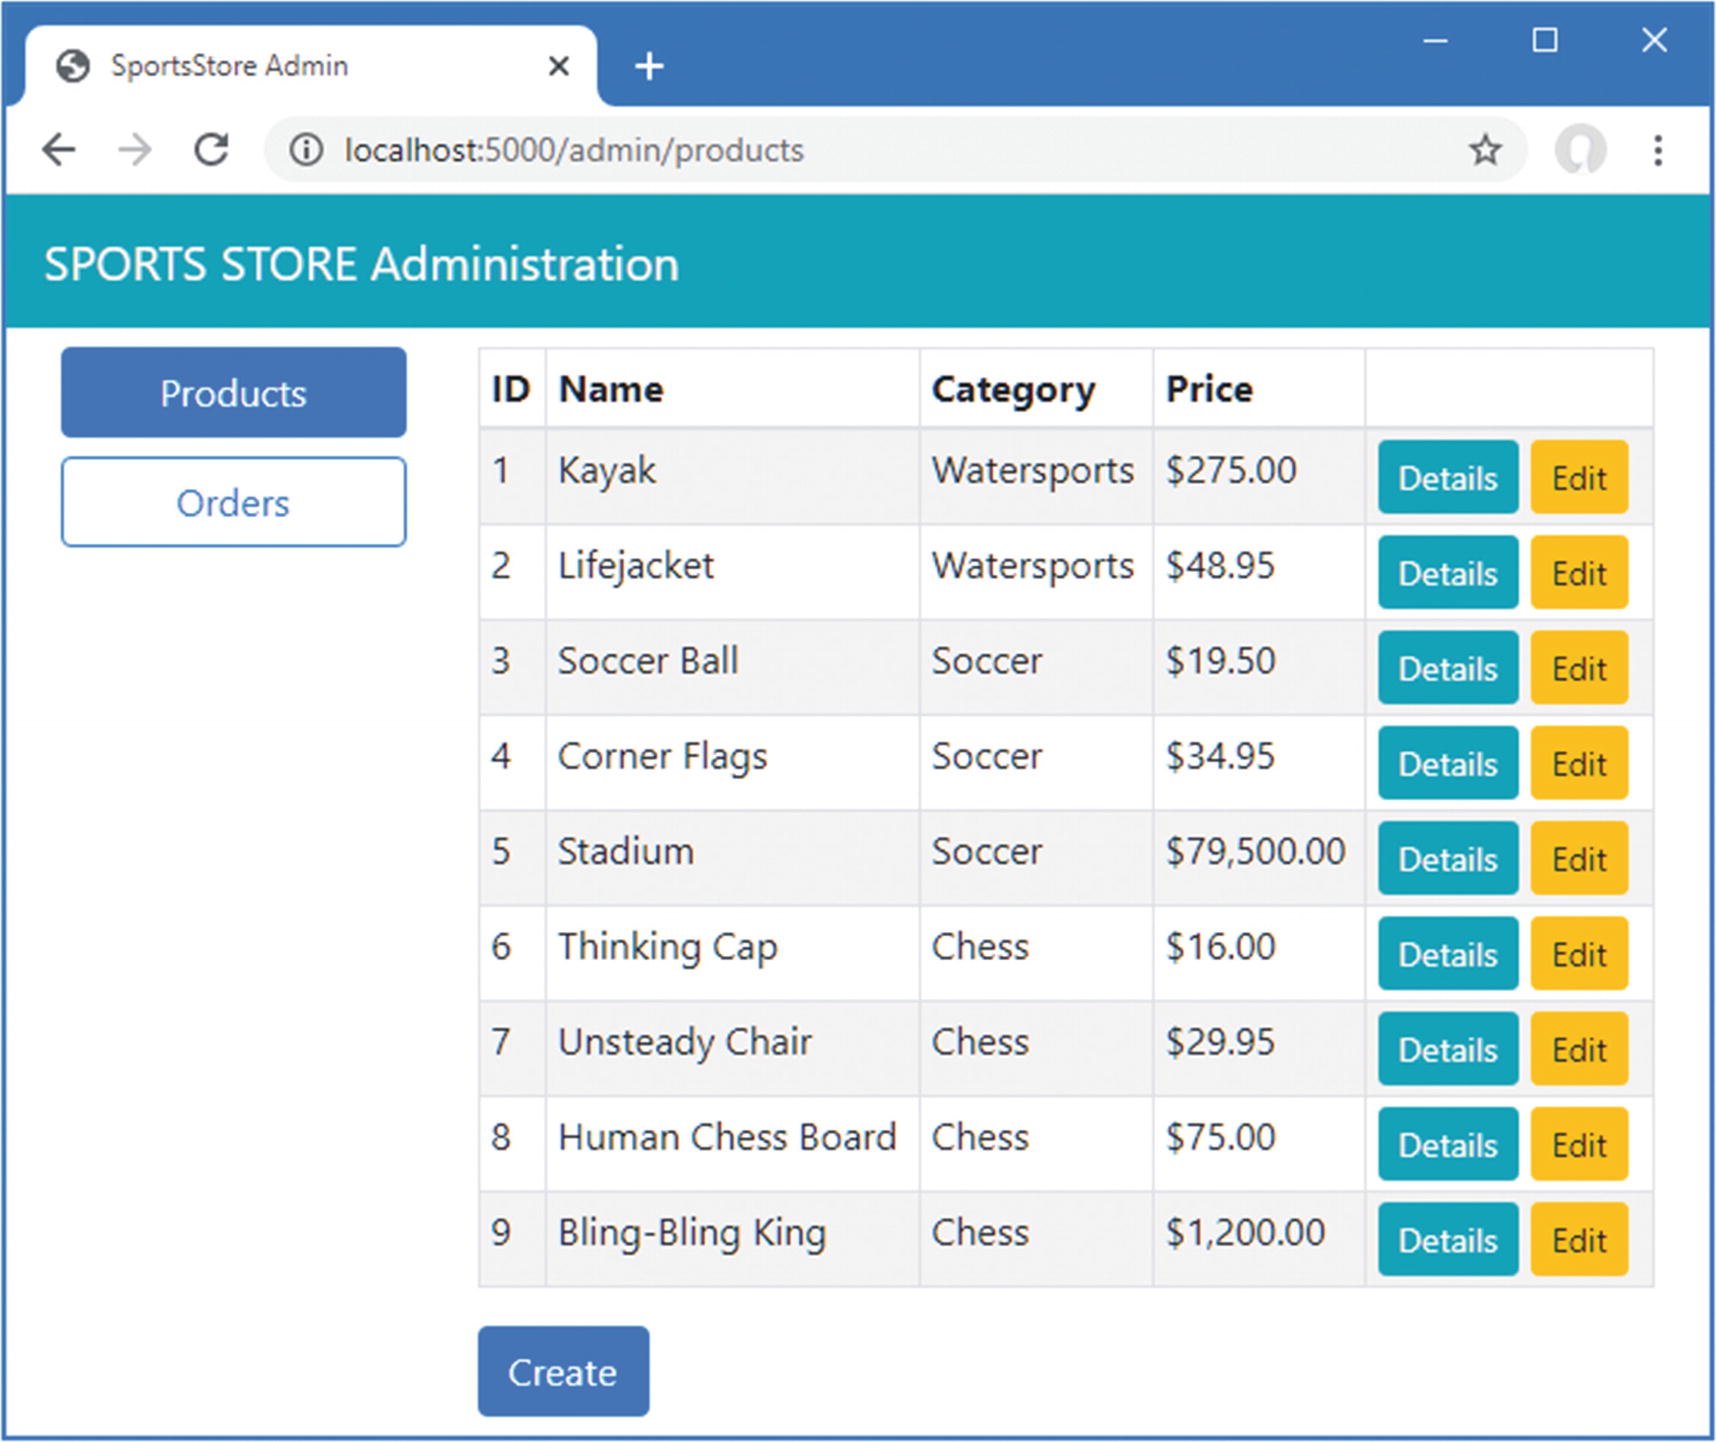
Presenting a list of products

Creating the Detail Component

The job of the detail component is to display all the fields for a single Product object. Add a Razor Component named Details.razor to the Pages/Admin folder with the content shown in Listing 10-16.
@page "/admin/products/details/{id:long}"
<h3 class="bg-info text-white text-center p-1">Details</h3>
<table class="table table-sm table-bordered table-striped">
    <tbody>
        <tr><th>ID</th><td>@Product.ProductID</td></tr>
        <tr><th>Name</th><td>@Product.Name</td></tr>
        <tr><th>Description</th><td>@Product.Description</td></tr>
        <tr><th>Category</th><td>@Product.Category</td></tr>
        <tr><th>Price</th><td>@Product.Price.ToString("C")</td></tr>
    </tbody>
</table>
<NavLink class="btn btn-warning" href="@EditUrl">Edit</NavLink>
<NavLink class="btn btn-secondary" href="/admin/products">Back</NavLink>
@code {
    [Inject]
    public IStoreRepository Repository { get; set; }
    [Parameter]
    public long Id { get; set; }
    public Product Product { get; set; }
    protected override void OnParametersSet() {
        Product = Repository.Products.FirstOrDefault(p => p.ProductID == Id);
    }
    public string EditUrl => $"/admin/products/edit/{Product.ProductID}";
}
Listing 10-16.

The Contents of the Details.razor File in the SportsStore/Pages/Admin Folder

The component uses the Inject attribute to declare that it requires an implementation of the IStoreRepository interface, which is one of the ways that Blazor provides access to the application’s services. The value of the Id property will be populated from the URL that has been used to navigate to the component, which is used to retrieve the Product object from the database. To see the detail view, restart ASP.NET Core, request http://localhost:5000/admin/products, and click one of the Details buttons, as shown in Figure 10-6.
../images/338050_8_En_10_Chapter/338050_8_En_10_Fig6_HTML.jpg
Figure 10-6.

Displaying details of a product

Creating the Editor Component

The operations to create and edit data will be handled by the same component. Add a Razor Component named Editor.razor to the Pages/Admin folder with the content shown in Listing 10-17.
@page "/admin/products/edit/{id:long}"
@page "/admin/products/create"
@inherits OwningComponentBase<IStoreRepository>
<style>
    div.validation-message { color: rgb(220, 53, 69); font-weight: 500 }
</style>
<h3 class="bg-@ThemeColor text-white text-center p-1">@TitleText a Product</h3>
<EditForm Model="Product" OnValidSubmit="SaveProduct">
    <DataAnnotationsValidator />
    @if(Product.ProductID != 0) {
        <div class="form-group">
            <label>ID</label>
            <input class="form-control" disabled value="@Product.ProductID" />
        </div>
    }
    <div class="form-group">
        <label>Name</label>
        <ValidationMessage For="@(() => Product.Name)" />
        <InputText class="form-control" @bind-Value="Product.Name" />
    </div>
    <div class="form-group">
        <label>Description</label>
        <ValidationMessage For="@(() => Product.Description)" />
        <InputText class="form-control" @bind-Value="Product.Description" />
    </div>
    <div class="form-group">
        <label>Category</label>
        <ValidationMessage For="@(() => Product.Category)" />
        <InputText class="form-control" @bind-Value="Product.Category" />
    </div>
    <div class="form-group">
        <label>Price</label>
        <ValidationMessage For="@(() => Product.Price)" />
        <InputNumber class="form-control" @bind-Value="Product.Price" />
    </div>
    <button type="submit" class="btn btn-@ThemeColor">Save</button>
    <NavLink class="btn btn-secondary" href="/admin/products">Cancel</NavLink>
</EditForm>
@code {
    public IStoreRepository Repository => Service;
    [Inject]
    public NavigationManager NavManager { get; set; }
    [Parameter]
    public long Id { get; set; } = 0;
    public Product Product { get; set; } = new Product();
    protected override void OnParametersSet() {
        if (Id != 0) {
            Product = Repository.Products.FirstOrDefault(p => p.ProductID == Id);
        }
    }
    public void SaveProduct() {
        if (Id == 0) {
            Repository.CreateProduct(Product);
        } else {
            Repository.SaveProduct(Product);
        }
        NavManager.NavigateTo("/admin/products");
    }
    public string ThemeColor => Id == 0 ? "primary" : "warning";
    public string TitleText => Id == 0 ? "Create" : "Edit";
}
Listing 10-17.

The Contents of the Editor.razor File in the SportsStore/Pages/Admin Folder

Blazor provides a set of built-in Razor Components that are used to display and validate forms, which is important because the browser can’t submit data using a POST request in a Blazor Component. The EditForm component is used to render a Blazor-friendly form, and the InputText and InputNumber components render input elements that accept string and number values and that automatically update a model property when the user makes a change.

Data validation is integrated into these built-in components, and the OnValidSubmit attribute on the EditForm component is used to specify a method that is invoked only if the data entered into the form conforms to the rules defined by the validation attributes.

Blazor also provides the NavigationManager class, which is used to programmatically navigate between components without triggering a new HTTP request. The Editor component uses NavigationManager, which is obtained as a service, to return to the Products component after the database has been updated.

To see the editor, restart ASP.NET Core, request http://localhost:5000/admin, and click the Create button. Click the Save button without filling out the form fields, and you will see the validation errors that Blazor produces automatically, as shown in Figure 10-7. Fill out the form and click Save again, and you will see the product you created displayed in the table, also as shown in Figure 10-7.
../images/338050_8_En_10_Chapter/338050_8_En_10_Fig7_HTML.jpg
Figure 10-7.

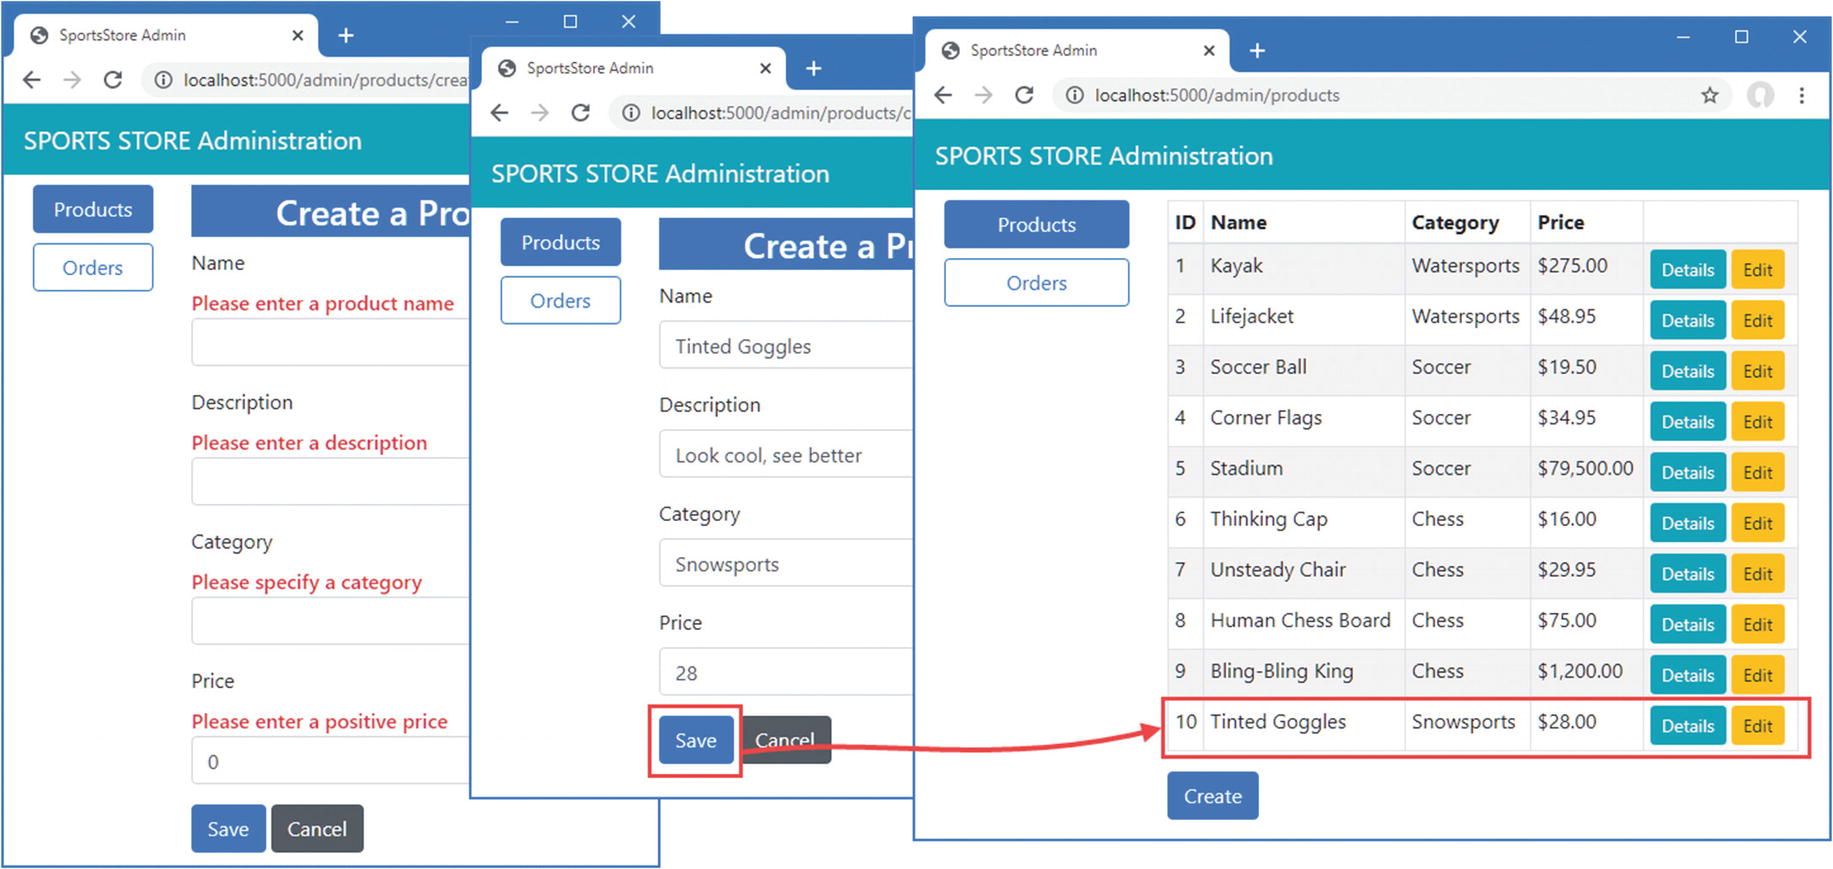
Using the Editor component

Click the Edit button for one of the products, and the same component will be used to edit the selected Product object’s properties. Click the Save button, and any changes you made—if they pass validation—will be stored in the database, as shown in Figure 10-8.
../images/338050_8_En_10_Chapter/338050_8_En_10_Fig8_HTML.jpg
Figure 10-8.

Editing products

Deleting Products

The final CRUD feature is deleting products, which is easily implemented in the Products component, as shown in Listing 10-18.
@page "/admin/products"
@page "/admin"
@inherits OwningComponentBase<IStoreRepository>
<table class="table table-sm table-striped table-bordered">
    <thead>
        <tr>
            <th>ID</th><th>Name</th>
            <th>Category</th><th>Price</th><td/>
        </tr>
    </thead>
    <tbody>
        @if (ProductData?.Count() > 0) {
            @foreach (Product p in ProductData) {
                <tr>
                    <td>@p.ProductID</td>
                    <td>@p.Name</td>
                    <td>@p.Category</td>
                    <td>@p.Price.ToString("c")</td>
                    <td>
                        <NavLink class="btn btn-info btn-sm"
                                 href="@GetDetailsUrl(p.ProductID)">
                            Details
                        </NavLink>
                        <NavLink class="btn btn-warning btn-sm"
                                 href="@GetEditUrl(p.ProductID)">
                            Edit
                        </NavLink>
                        <button class="btn btn-danger btn-sm"
                                 @onclick="@(e => DeleteProduct(p))">
                            Delete
                        </button>
                    </td>
                </tr>
            }
        } else {
            <tr>
                <td colspan="5" class="text-center">No Products</td>
            </tr>
        }
    </tbody>
</table>
<NavLink class="btn btn-primary" href="/admin/products/create">Create</NavLink>
@code {
    public IStoreRepository Repository => Service;
    public IEnumerable<Product> ProductData { get; set; }
    protected async override Task OnInitializedAsync() {
        await UpdateData();
    }
    public async Task UpdateData() {
        ProductData = await Repository.Products.ToListAsync();
    }
    public async Task DeleteProduct(Product p) {
        Repository.DeleteProduct(p);
        await UpdateData();
    }
    public string GetDetailsUrl(long id) => $"/admin/products/details/{id}";
    public string GetEditUrl(long id) => $"/admin/products/edit/{id}";
}
Listing 10-18.

Adding Delete Support in the Products.razor File in the SportsStore/Pages/Admin Folder

The new button element is configured with the @onclick attribute, which invokes the DeleteProduct method. The selected Product object is removed from the database, and the data displayed by the component is updated. Restart ASP.NET Core, request http://localhost:5000/admin/products, and click a Delete button to remove an object from the database, as shown in Figure 10-9.
../images/338050_8_En_10_Chapter/338050_8_En_10_Fig9_HTML.jpg
Figure 10-9.

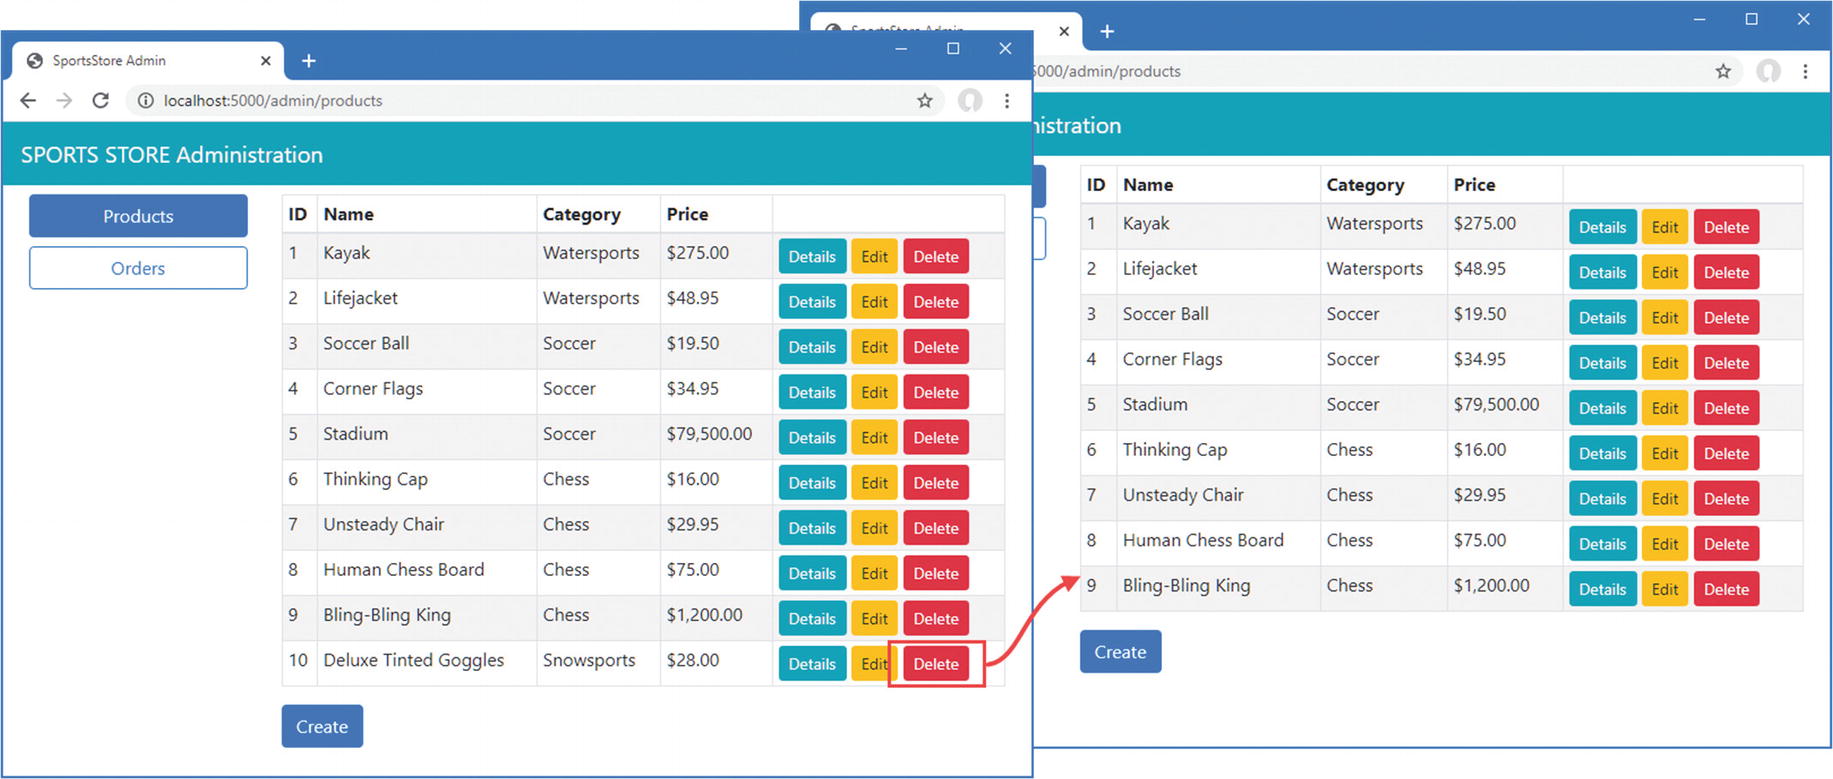
Deleting objects from the database

Summary

In this chapter, I introduced the administration capability and showed you how to use Blazor Server to implement CRUD operations that allow the administrator to create, read, update, and delete products from the repository and mark orders as shipped. In the next chapter, I show you how to secure the administration functions so that they are not available to all users, and I prepare the SportsStore application for deployment into production.

..................Content has been hidden....................

You can't read the all page of ebook, please click here login for view all page.
Reset
18.219.22.169