© Adam Freeman 2020
A. FreemanPro ASP.NET Core 3https://doi.org/10.1007/978-1-4842-5440-0_16

16. Using the Platform Features, Part 2

Adam Freeman1 
(1)
London, UK
 
In this chapter, I continue to describe the basic features provided by the ASP.NET Core platform. I explain how cookies are used and how the user’s consent for tracking cookies is managed. I describe how sessions provide a robust alternative to basic cookies, how to use and enforce HTTPS requests, how to deal with errors, and how to filter requests based on the Host header. Table 16-1 summarizes the chapter.
Table 16-1.

Chapter Summary

Problem

Solution

Listing

Using cookies

Use the context objects to read and write cookies

1–3

Managing cookie consent

Use the consent middleware

4–6

Storing data across requests

Use sessions

7, 8

Securing HTTP requests

Use the HTTPS middleware

9–13

Handling errors

Use the error and status code middleware

14–19

Restricting a request with the host header

Set the AllowedHosts configuration setting

20

Preparing for This Chapter

In this chapter, I continue to use the Platform project from Chapter 15. To prepare for this chapter, replace the contents of the Startup.cs file with the contents of Listing 16-1, which remove the middleware and services from the previous chapter.
using Microsoft.AspNetCore.Builder;
using Microsoft.AspNetCore.Http;
using Microsoft.Extensions.DependencyInjection;
namespace Platform {
    public class Startup {
        public void ConfigureServices(IServiceCollection services) {
        }
        public void Configure(IApplicationBuilder app) {
            app.UseDeveloperExceptionPage();
            app.UseRouting();
            app.UseEndpoints(endpoints => {
                endpoints.MapFallback(async context =>
                    await context.Response.WriteAsync("Hello World!"));
            });
        }
    }
}
Listing 16-1.

Replacing the Contents of the Startup.cs File in the Platform Folder

Start the application by selecting Start Without Debugging or Run Without Debugging from the Debug menu or by opening a new PowerShell command prompt, navigating to the folder that contains the Platform.csproj file, and running the command shown in Listing 16-2.

Tip

You can download the example project for this chapter—and for all the other chapters in this book—from https://github.com/apress/pro-asp.net-core-3. See Chapter 1 for how to get help if you have problems running the examples.

dotnet run
Listing 16-2.

Starting the ASP.NET Core Runtime

If the application was started using Visual Studio or Visual Studio Code, a new browser window will open and display the content shown in Figure 16-1. If the application was started from the command line, open a new browser tab and navigate to http://localhost:5000; you will see the content shown in Figure 16-1.
../images/338050_8_En_16_Chapter/338050_8_En_16_Fig1_HTML.jpg
Figure 16-1.

Running the example application

Using Cookies

Cookies are small amounts of text added to responses that the browser includes in subsequent requests. Cookies are important for web applications because they allow features to be developed that span a series of HTTP requests, each of which can be identified by the cookies that the browser sends to the server.

ASP.NET Core provides support for working with cookies through the HttpRequest and HttpResponse objects that are provided to middleware components. To demonstrate, Listing 16-3 changes the routing configuration in the example application to add endpoints that implement a counter.
using Microsoft.AspNetCore.Builder;
using Microsoft.AspNetCore.Http;
using Microsoft.Extensions.DependencyInjection;
using System;
using System.Threading.Tasks;
namespace Platform {
    public class Startup {
        public void ConfigureServices(IServiceCollection services) {
        }
        public void Configure(IApplicationBuilder app) {
            app.UseDeveloperExceptionPage();
            app.UseRouting();
            app.UseEndpoints(endpoints => {
                endpoints.MapGet("/cookie", async context => {
                    int counter1 =
                        int.Parse(context.Request.Cookies["counter1"] ?? "0") + 1;
                    context.Response.Cookies.Append("counter1", counter1.ToString(),
                        new CookieOptions {
                            MaxAge = TimeSpan.FromMinutes(30)
                        });
                    int counter2 =
                        int.Parse(context.Request.Cookies["counter2"] ?? "0") + 1;
                    context.Response.Cookies.Append("counter2", counter1.ToString(),
                        new CookieOptions {
                            MaxAge = TimeSpan.FromMinutes(30)
                        });
                    await context.Response
                        .WriteAsync($"Counter1: {counter1}, Counter2: {counter2}");
                });
                endpoints.MapGet("clear", context => {
                    context.Response.Cookies.Delete("counter1");
                    context.Response.Cookies.Delete("counter2");
                    context.Response.Redirect("/");
                    return Task.CompletedTask;
                });
                endpoints.MapFallback(async context =>
                    await context.Response.WriteAsync("Hello World!"));
            });
        }
    }
}
Listing 16-3.

Using Cookies in the Startup.cs File in the Platform Folder

The new endpoints rely on cookies called counter1 and counter2. When the /cookie URL is requested, the middleware looks for the cookies and parses the values to an int. If there is no cookie, a fallback zero is used.
...
int counter1 = int.Parse(context.Request.Cookies["counter1"] ?? "0") + 1;
...
Cookies are accessed through the HttpRequest.Cookies property, where the name of the cookie is used as the key. The value retrieved from the cookie is incremented and used to set a cookie in the response, like this:
...
context.Response.Cookies.Append("counter1", counter1.ToString(),
    new CookieOptions {
        MaxAge = TimeSpan.FromMinutes(30)
});
...
Cookies are set through the HttpResponse.Cookies property, and the Append method creates or replaces a cookie in the response. The arguments to the Append method are the name of the cookie, its value, and a CookieOptions object, which is used to configure the cookie. The CookieOptions class defines the properties described in Table 16-2, each of which corresponds to a cookie field.
Table 16-2.

The CookieOptions Properties

Name

Description

Domain

This property specifies the hosts to which the browser will send the cookie. By default, the cookie will be sent only to the host that created the cookie.

Expires

This property sets the expiry for the cookie.

HttpOnly

When true, this property tells the browser not to include the cookie in requests made by JavaScript code.

IsEssential

This property is used to indicate that a cookie is essential, as described in the “Managing Cookie Consent” section.

MaxAge

This property specifies the number of seconds until the cookie expires. Older browsers do not support cookies with this setting.

Path

This property is used to set a URL path that must be present in the request before the cookie will be sent by the browser.

SameSite

This property is used to specify whether the cookie should be included in cross-site requests. The values are Lax, Strict, and None (which is the default value).

Secure

When true, this property tells the browser to send the cookie using HTTPS only.
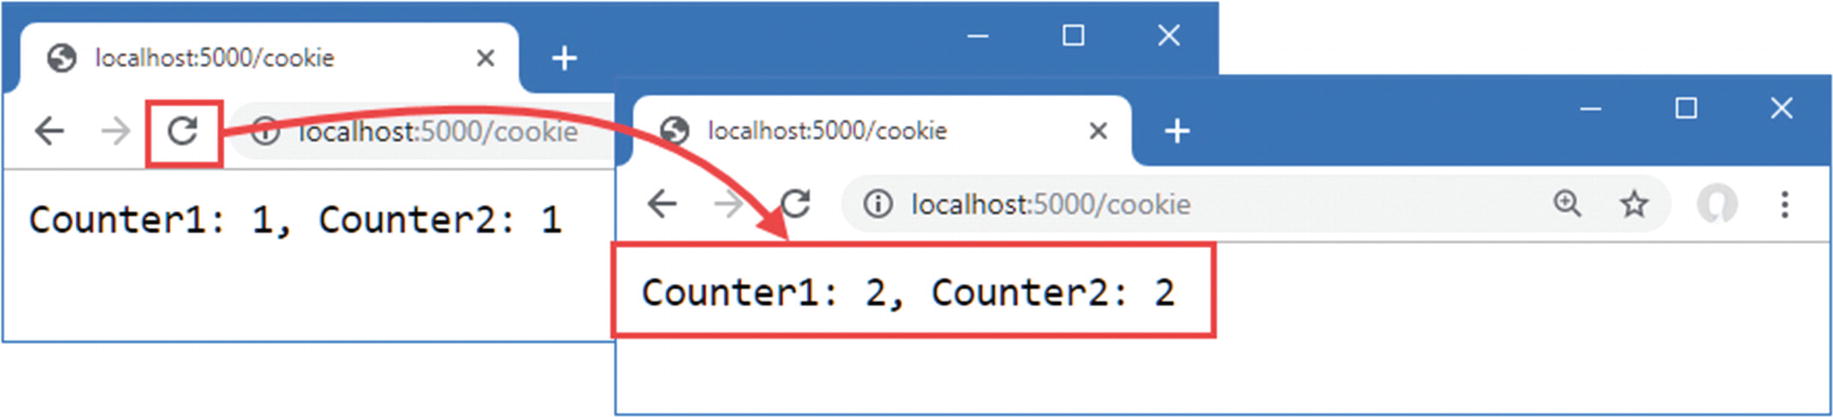
The only cookie option set in Listing 16-3 is MaxAge, which tells the browser that the cookies expire after 30 minutes. The middleware in Listing 16-3 deletes the cookies when the /clear URL is requested, which is done using the HttpResponse.Cookie.Delete method, after which the browser is redirected to the / URL.
...
} else if (context.Request.Path == "/clear") {
    context.Response.Cookies.Delete("counter1");
    context.Response.Cookies.Delete("counter2");
    context.Response.Redirect("/");
}
...
Restart ASP.NET Core and navigate to http://localhost:5000/cookie. The response will contain cookies that are included in subsequent requests, and the counters will be incremented each time the browser is reloaded, as shown in Figure 16-2. A request for http://localhost:5000/clear will delete the cookies, and the counters will be reset.
../images/338050_8_En_16_Chapter/338050_8_En_16_Fig2_HTML.jpg
Figure 16-2.

Using a cookie

Enabling Cookie Consent Checking

The EU General Data Protection Regulation (GDPR) requires the user’s consent before nonessential cookies can be used. ASP.NET Core provides support for obtaining consent and preventing nonessential cookies being sent to the browser when consent has not been granted. The options pattern is used to create a policy for cookies, which is applied by a middleware component, as shown in Listing 16-4.

Caution

Cookie consent is only one part of GDPR. See https://en.wikipedia.org/wiki/General_Data_Protection_Regulation for a good overview of the regulations.

using Microsoft.AspNetCore.Builder;
using Microsoft.AspNetCore.Http;
using Microsoft.Extensions.DependencyInjection;
using System;
using System.Threading.Tasks;
namespace Platform {
    public class Startup {
        public void ConfigureServices(IServiceCollection services) {
            services.Configure<CookiePolicyOptions>(opts => {
                opts.CheckConsentNeeded = context => true;
            });
        }
        public void Configure(IApplicationBuilder app) {
            app.UseDeveloperExceptionPage();
            app.UseCookiePolicy();
            app.UseRouting();
            app.UseEndpoints(endpoints => {
                endpoints.MapGet("/cookie", async context => {
                    int counter1 =
                        int.Parse(context.Request.Cookies["counter1"] ?? "0") + 1;
                    context.Response.Cookies.Append("counter1", counter1.ToString(),
                        new CookieOptions {
                            MaxAge = TimeSpan.FromMinutes(30),
                            IsEssential = true
                        });
                    int counter2 =
                        int.Parse(context.Request.Cookies["counter2"] ?? "0") + 1;
                    context.Response.Cookies.Append("counter2", counter1.ToString(),
                        new CookieOptions {
                            MaxAge = TimeSpan.FromMinutes(30)
                        });
                    await context.Response
                        .WriteAsync($"Counter1: {counter1}, Counter2: {counter2}");
                });
                endpoints.MapGet("clear", context => {
                    context.Response.Cookies.Delete("counter1");
                    context.Response.Cookies.Delete("counter2");
                    context.Response.Redirect("/");
                    return Task.CompletedTask;
                });
                endpoints.MapFallback(async context =>
                    await context.Response.WriteAsync("Hello World!"));
            });
        }
    }
}
Listing 16-4.

Enabling Cookie Consent in the Startup.cs File in the Platform Folder

The options pattern is used to configure a CookiePolicyOptions object, which sets the overall policy for cookies in the application using the properties described in Table 16-3.
Table 16-3.

The CookiePolicyOptions Properties

Name

Description

CheckConsentNeeded

This property is assigned a function that receives an HttpContext object and returns true if it represents a request for which cookie consent is required. The function is called for every request, and the default function always returns false.

ConsentCookie

This property returns an object that is used to configure the cookie sent to the browser to record the user’s cookie consent.

HttpOnly

This property sets the default value for the HttpOnly property, as described in Table 16-2.

MinimumSameSitePolicy

This property sets the lowest level of security for the SameSite property, as described in Table 16-2.

Secure

This property sets the default value for the Secure property, as described in Table 16-2.

To enable consent checking, I assigned a new function to the CheckConsentNeeded property that always returns true. The function is called for every request that ASP.NET Core receives, which means that sophisticated rules can be defined to select the requests for which consent is required. For this application, I have taken the most cautious approach and required consent for all requests.

The middleware that enforces the cookie policy is added to the request pipeline using the UseCookiePolicy method. The result is that only cookies whose IsEssential property is true will be added to responses. Listing 16-4 sets the IsEssential property on cookie1 only, and you can see the effect by restarting ASP.NET Core, requesting http://localhost:5000/cookie, and reloading the browser. Only the counter whose cookie is marked as essential updates, as shown in Figure 16-3.
../images/338050_8_En_16_Chapter/338050_8_En_16_Fig3_HTML.jpg
Figure 16-3.

Using cookie consent

Managing Cookie Consent

Unless the user has given consent, only cookies that are essential to the core features of the web application are allowed. Consent is managed through a request feature, which provides middleware components with access to the implementation details of how requests and responses are handled by ASP.NET Core. Features are accessed through the HttpRequest.Features property, and each feature is represented by an interface whose properties and methods deal with one aspect of low-level request handling.

Features deal with aspects of request handling that rarely need to be altered, such as the structure of responses. The exception is the management of cookie consent, which is handled through the ITrackingConsentFeature interface, which defines the methods and properties described in Table 16-4.
Table 16-4.

The ITrackingConsentFeature Members

Name

Description

CanTrack

This property returns true if nonessential cookies can be added to the current request, either because the user has given consent or because consent is not required.

CreateConsentCookie()

This method returns a cookie that can be used by JavaScript clients to indicate consent.

GrantConsent()

Calling this method adds a cookie to the response that grants consent for nonessential cookies.

HasConsent

This property returns true if the user has given consent for nonessential cookies.

IsConsentNeeded

This property returns true if consent for nonessential cookies is required for the current request.

WithdrawConsent()

This method deletes the consent cookie.

To deal with consent, add a class file named ConsentMiddleware.cs to the Platform folder and the code shown in Listing 16-5. Managing cookie consent can be done using lambda expressions, but I have used a class in this example to keep the Configure method uncluttered.
using Microsoft.AspNetCore.Http;
using Microsoft.AspNetCore.Http.Features;
using System.Threading.Tasks;
namespace Platform {
    public class ConsentMiddleware {
        private RequestDelegate next;
        public ConsentMiddleware(RequestDelegate nextDelgate) {
            next = nextDelgate;
        }
        public async Task Invoke(HttpContext context) {
            if (context.Request.Path == "/consent") {
                ITrackingConsentFeature consentFeature
                    = context.Features.Get<ITrackingConsentFeature>();
                if (!consentFeature.HasConsent) {
                    consentFeature.GrantConsent();
                } else {
                    consentFeature.WithdrawConsent();
                }
                await context.Response.WriteAsync(consentFeature.HasConsent
                    ? "Consent Granted " : "Consent Withdrawn ");
            }
            await next(context);
        }
    }
}
Listing 16-5.

The Contents of the ConsentMiddleware.cs File in the Platform Folder

Request features are obtained using the Get method, where the generic type argument specifies the feature interface that is required, like this:
...
ITrackingConsentFeature consentFeature
    = context.Features.Get<ITrackingConsentFeature>();
...
Using the properties and methods described in Table 16-4, the new middleware component responds to the /consent URL to determine and change the cookie consent. Listing 16-6 adds the new middleware to the request pipeline.
...
public void Configure(IApplicationBuilder app) {
    app.UseDeveloperExceptionPage();
    app.UseCookiePolicy();
    app.UseMiddleware<ConsentMiddleware>();
    app.UseRouting();
    // ...statments omitted for brevity...
}
...
Listing 16-6.

Adding Middleware in the Startup.cs File in the Platform Folder

To see the effect, restart ASP.NET Core and request http://localhost:5000/consent and then http://localhost:5000/cookie. When consent is granted, nonessential cookies are allowed, and both the counters in the example will work, as shown in Figure 16-4. Repeat the process to withdraw consent, and you will find that only the counter whose cookie has been denoted as essential works.
../images/338050_8_En_16_Chapter/338050_8_En_16_Fig4_HTML.jpg
Figure 16-4.

Managing cookie consent

Using Sessions

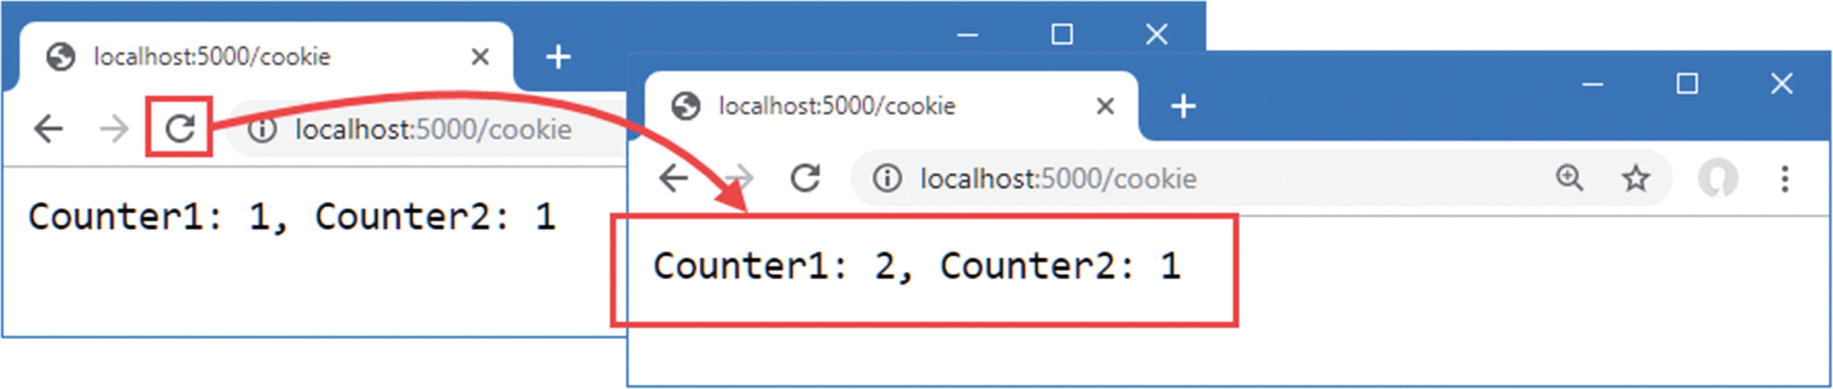
The example in the previous section used cookies to store the application’s state data, providing the middleware component with the data required. The problem with this approach is that the contents of the cookie are stored at the client, where it can be manipulated and used to alter the behavior of the application.

A better approach is to use the ASP.NET Core session feature. The session middleware adds a cookie to responses, which allows related requests to be identified and which is also associated with data stored at the server.

When a request containing the session cookie is received, the session middleware component retrieves the server-side data associated with the session and makes it available to other middleware components through the HttpContext object. Using sessions means that the application’s data remains at the server and only the identifier for the session is sent to the browser.

Configuring the Session Service and Middleware

Setting up sessions requires configuring services and adding a middleware component to the request pipeline. Listing 16-7 adds the statements to the Startup class to set up sessions for the example application and removes the endpoints from the previous section.
using Microsoft.AspNetCore.Builder;
using Microsoft.AspNetCore.Http;
using Microsoft.Extensions.DependencyInjection;
using System;
using System.Threading.Tasks;
namespace Platform {
    public class Startup {
        public void ConfigureServices(IServiceCollection services) {
            services.Configure<CookiePolicyOptions>(opts => {
                opts.CheckConsentNeeded = context => true;
            });
            services.AddDistributedMemoryCache();
            services.AddSession(options => {
                options.IdleTimeout = TimeSpan.FromMinutes(30);
                options.Cookie.IsEssential = true;
            });
        }
        public void Configure(IApplicationBuilder app) {
            app.UseDeveloperExceptionPage();
            app.UseCookiePolicy();
            app.UseMiddleware<ConsentMiddleware>();
            app.UseSession();
            app.UseRouting();
            app.UseEndpoints(endpoints => {
                endpoints.MapFallback(async context =>
                    await context.Response.WriteAsync("Hello World!"));
            });
        }
    }
}
Listing 16-7.

Configuring Sessions in the Startup.cs File in the Platform Folder

When you use sessions, you must decide how to store the associated data. ASP.NET Core provides three options for session data storage, each of which has its own method to register a service in the ConfigureServices method of the Startup class, as described in Table 16-5.
Table 16-5.

The Session Storage Methods

Name

Description

AddDistributedMemoryCache

This method sets up an in-memory cache. Despite the name, the cache is not distributed and is responsible only for storing data for the instance of the ASP.NET Core runtime where it is created.

AddDistributedSqlServerCache

This method sets up a cache that stores data in SQL Server and is available when the Microsoft.Extensions.Caching.SqlServer package is installed. This cache is used in Chapter 17.

AddStackExchangeRedisCache

This method sets up a Redis cache and is available when the Microsoft.Extensions.Caching.Redis package is installed.

Caching is described in detail in Chapter 17, but for this chapter, I used the in-memory cache, which is set up in the ConfigureServices method:
...
services.AddDistributedMemoryCache();
...

Despite its name, the cache service created by the AddDistributedMemoryCache method isn’t distributed and stores the session data for a single instance of the ASP.NET Core runtime. If you scale an application by deploying multiple instances of the runtime, then you should use one of the other caches, such as the SQL Server cache, which is demonstrated in Chapter 17.

The next step is to use the options pattern to configure the session middleware, like this:
...
services.AddSession(options => {
    options.IdleTimeout = TimeSpan.FromMinutes(30);
    options.Cookie.IsEssential = true;
});
...
Table 16-6 shows that the options class for sessions is SessionOptions and describes the key properties it defines.
Table 16-6.

Properties Defined by the SessionOptions Class

Name

Description

Cookie

This property is used to configure the session cookie.

IdleTimeout

This property is used to configure the time span after which a session expires.

The Cookie property returns an object that can be used to configure the session cookie. Table 16-7 describes the most useful cookie configuration properties for session data.
Table 16-7.

Cookie Configuration Properties

Name

Description

HttpOnly

This property specifies whether the browser will prevent the cookie from being included in HTTP requests sent by JavaScript code. This property should be set to true for projects that use a JavaScript application whose requests should be included in the session. The default value is true.

IsEssential

This property specifies whether the cookie is required for the application to function and should be used even when the user has specified that they don’t want the application to use cookies. The default value is false. See the “Managing Cookie Consent” section for more details.

SecurityPolicy

This property sets the security policy for the cookie, using a value from the CookieSecurePolicy enum. The values are Always (which restricts the cookie to HTTPS requests), SameAsRequest (which restricts the cookie to HTTPS if the original request was made using HTTPS) and None (which allows the cookie to be used on HTTP and HTTPS requests). The default value is None.

The options set in Listing 16-7 allow the session cookie to be included in requests started by JavaScript and flag the cookie as essential so that it will be used even when the user has expressed a preference not to use cookies (see the “Managing Cookie Consent” section for more details about essential cookies). The IdleTimeout option has been set so that sessions expire if no request containing the sessions cookie is received for 30 minutes.

Caution

The session cookie isn’t denoted as essential by default, which can cause problems when cookie consent is used. Listing 16-7 sets the IsEssential property to true to ensure that sessions always work. If you find sessions don’t work as expected, then this is the likely cause, and you must either set IsEssential to true or adapt your application to deal with users who don’t grant consent and won’t accept session cookies.

The final step is to add the session middleware component to the request pipeline, which is done with the UseSession method. When the middleware processes a request that contains a session cookie, it retrieves the session data from the cache and makes it available through the HttpContext object, before passing the request along the request pipeline and providing it to other middleware components. When a request arrives without a session cookie, a new session is started, and a cookie is added to the response so that subsequent requests can be identified as being part of the session.

Using Session Data

The session middleware provides access to details of the session associated with a request through the Session property of the HttpContext object. The Session property returns an object that implements the ISession interface, which provides the methods shown in Table 16-8 for accessing session data.
Table 16-8.

Useful ISession Methods and Extension Methods

Name

Description

Clear()

This method removes all the data in the session.

CommitAsync()

This asynchronous method commits changed session data to the cache.

GetString(key)

This method retrieves a string value using the specified key.

GetInt32(key)

This method retrieves an integer value using the specified key.

Id

This property returns the unique identifier for the session.

IsAvailable

This returns true when the session data has been loaded.

Keys

This enumerates the keys for the session data items.

Remove(key)

This method removes the value associated with the specified key.

SetString(key, val)

This method stores a string using the specified key.

SetInt32(key, val)

This method stores an integer using the specified key.

Session data is stored in key/value pairs, where the keys are strings and the values are strings or integers. This simple data structure allows session data to be stored easily by each of the caches listed in Table 16-6. Applications that need to store more complex data can use serialization, which is the approach I took for the SportsStore. Listing 16-8 uses session data to re-create the counter example.
...
public void Configure(IApplicationBuilder app) {
    app.UseDeveloperExceptionPage();
    app.UseCookiePolicy();
    app.UseMiddleware<ConsentMiddleware>();
    app.UseSession();
    app.UseRouting();
    app.UseEndpoints(endpoints => {
        endpoints.MapGet("/cookie", async context => {
            int counter1 = (context.Session.GetInt32("counter1") ?? 0) + 1;
            int counter2 = (context.Session.GetInt32("counter2") ?? 0) + 1;
            context.Session.SetInt32("counter1", counter1);
            context.Session.SetInt32("counter2", counter2);
            await context.Session.CommitAsync();
            await context.Response
                .WriteAsync($"Counter1: {counter1}, Counter2: {counter2}");
        });
        endpoints.MapFallback(async context =>
            await context.Response.WriteAsync("Hello World!"));
    });
}
...
Listing 16-8.

Using Session Data in the Startup.cs File in the Platform Folder

The GetInt32 method is used to read the values associated with the keys counter1 and counter2. If this is the first request in a session, no value will be available, and the null coalescing operator is used to provide an initial value. The value is incremented and then stored using the SetInt32 method and used to generate a simple result for the client.

The use of the CommitAsync method is optional, but it is good practice to use it because it will throw an exception if the session data can’t be stored in the cache. By default, no error is reported if there are caching problems, which can lead to unpredictable and confusing behavior.

All changes to the session data must be made before the response is sent to the client, which is why I read, update, and store the session data before calling the Response.WriteAsync method in Listing 16-8.

Notice that the new statements in Listing 16-8 do not have to deal with the session cookie, detect expired sessions, or load the session data from the cache. All this work is done automatically by the session middleware, which presents the results through the HttpContext.Session property. One consequence of this approach is that the HttpContext.Session property is not populated with data until after the session middleware has processed a request, which means that you should attempt to access session data only in middleware or endpoints that are added to the request pipeline after the UseSession method is called.

Restart ASP.NET Core and navigate to the http://localhost:5000/cookie URL, and you will see the value of the counter. Reload the browser, and the counter values will be incremented, as shown in Figure 16-5. The sessions and session data will be lost when ASP.NET Core is stopped because I chose the in-memory cache. The other storage options operate outside of the ASP.NET Core runtime and survive application restarts.
../images/338050_8_En_16_Chapter/338050_8_En_16_Fig5_HTML.jpg
Figure 16-5.

Using session data

Working with HTTPS Connections

Users increasingly expect web applications to use HTTPS connections, even for requests that don’t contain or return sensitive data. ASP.NET Core supports both HTTP and HTTPS connections and provides middleware that can force HTTP clients to use HTTPS.

HTTPS vs SSL vs TLS

HTTPS is the combination of HTTP and the Transport Layer Security (TLS) or Secure Sockets Layer (SSL). TLS has replaced the obsolete SSL protocol, but the term SSL has become synonymous with secure networking and is often used when TLS is actually being used. If you are interested in security and cryptography, then the details of HTTPS are worth exploring, and https://en.wikipedia.org/wiki/HTTPS is a good place to start.

Enabling HTTP Connections

If you are using Visual Studio, select Project ➤ Platform Properties, navigate to the Debug section, and check the Enable SSL option, as shown in Figure 16-6. Once you have checked the option, select File ➤ Save All to save the configuration change.
../images/338050_8_En_16_Chapter/338050_8_En_16_Fig6_HTML.jpg
Figure 16-6.

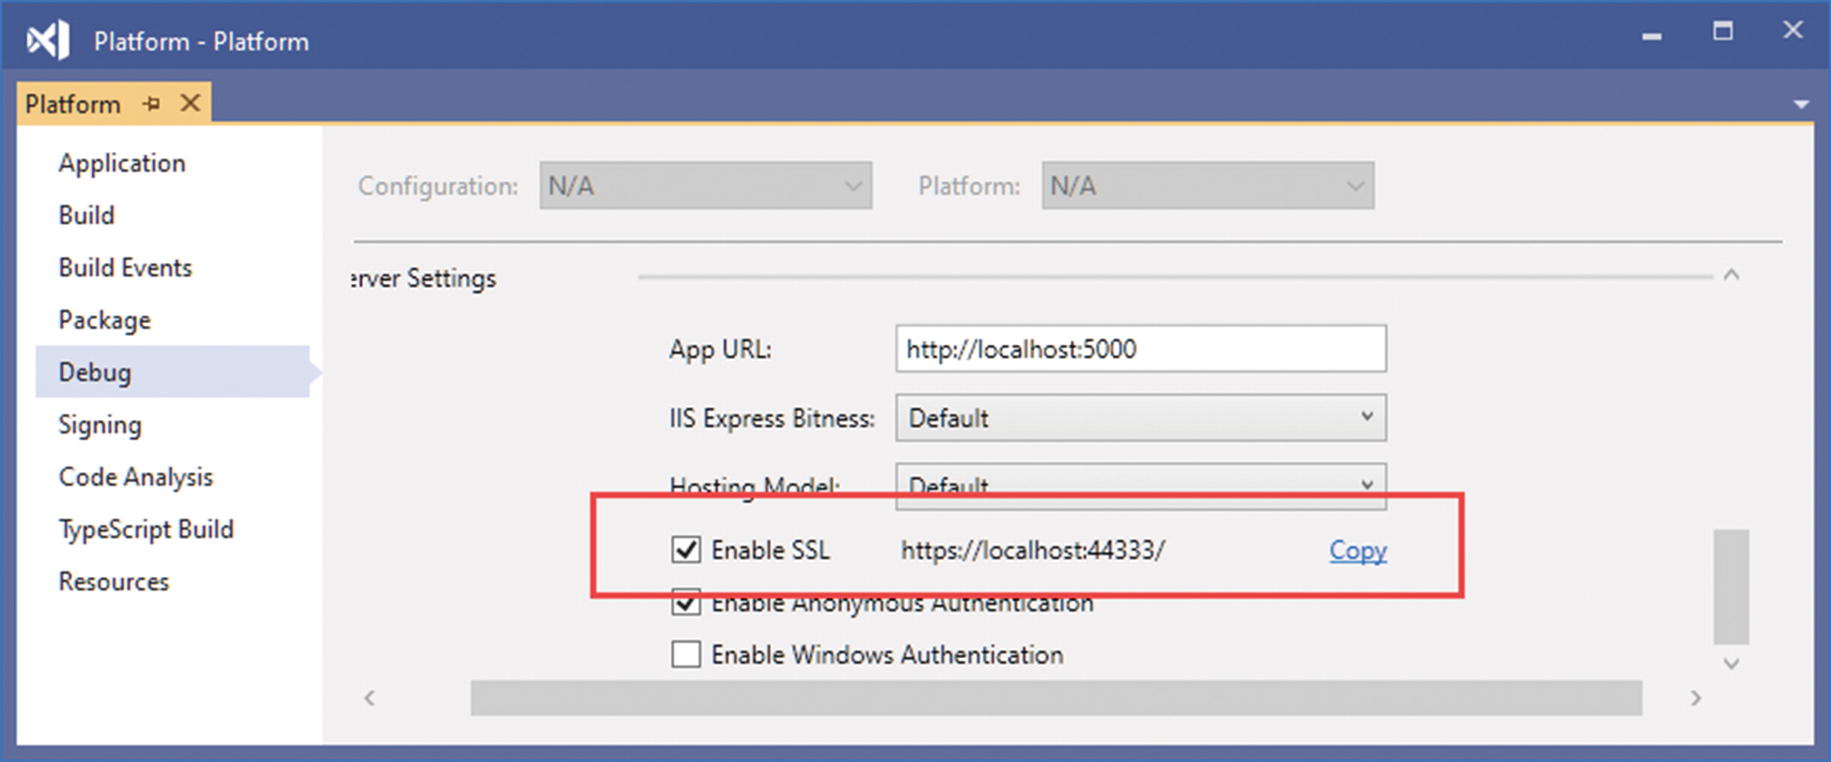
Enabling HTTPS in Visual Studio

The port used to receive HTTPS is assigned randomly. To change the port, click the Show All button at the top of the Solution Explorer to reveal the Properties folder and the launchSettings.json file if they are not already visible. Edit the file to change the HTTPS port that is used by the application, as shown in Listing 16-9.
{
  "iisSettings": {
    "windowsAuthentication": false,
    "anonymousAuthentication": true,
    "iisExpress": {
      "applicationUrl": "http://localhost:5000",
      "sslPort": 44350
    }
  },
  "profiles": {
    "IIS Express": {
      "commandName": "IISExpress",
      "launchBrowser": true,
      "environmentVariables": {
        "ASPNETCORE_ENVIRONMENT": "Development"
      }
    },
    "Platform": {
      "commandName": "Project",
      "launchBrowser": true,
      "environmentVariables": {
        "ASPNETCORE_ENVIRONMENT": "Development"
      },
      "applicationUrl": "https://localhost:44350;http://localhost:5000"
    }
  }
}
Listing 16-9.

Changing the HTTPS Port in the launchSettings.json File in the Platform/Properties Folder

The new value for the sslPort setting changes the port used when the application is started within Visual Studio. The new applicationUrl setting sets the port used when the application is started from the command line or with Visual Studio.

Note

IIS Express supports HTTPS only on port numbers between 4400 and 44399.

The .NET Core runtime includes a test certificate that is used for HTTPS requests. Run the commands shown in Listing 16-10 in the Platform folder to regenerate and trust the test certificate.
dotnet dev-certs https --clean
dotnet dev-certs https --trust
Listing 16-10.

Regenerating the Development Certificates

Select Yes to the prompts to delete the existing certificate it has already been trusted and select Yes to trust the new certificate, as shown in Figure 16-7.
../images/338050_8_En_16_Chapter/338050_8_En_16_Fig7_HTML.jpg
Figure 16-7.

Regenerating the HTTPS certificate

Detecting HTTPS Requests

Requests made using HTTPS can be detected through the HttpRequest.IsHttps property. In Listing 16-11, I added a new middleware component to the request pipeline that adds a message to the response when a request is made using HTTPS.
...
public void Configure(IApplicationBuilder app) {
    app.UseDeveloperExceptionPage();
    app.UseCookiePolicy();
    app.UseMiddleware<ConsentMiddleware>();
    app.UseSession();
    app.UseRouting();
    app.Use(async (context, next) => {
        await context.Response
            .WriteAsync($"HTTPS Request: {context.Request.IsHttps} ");
        await next();
    });
    app.UseEndpoints(endpoints => {
        endpoints.MapGet("/cookie", async context => {
            int counter1 = (context.Session.GetInt32("counter1") ?? 0) + 1;
            int counter2 = (context.Session.GetInt32("counter2") ?? 0) + 1;
            context.Session.SetInt32("counter1", counter1);
            context.Session.SetInt32("counter2", counter2);
            await context.Session.CommitAsync();
            await context.Response
                .WriteAsync($"Counter1: {counter1}, Counter2: {counter2}");
        });
        endpoints.MapFallback(async context =>
            await context.Response.WriteAsync("Hello World!"));
    });
}
...
Listing 16-11.

Detecting HTTPS in the Startup.cs File in the Platform Folder

To test HTTPS, restart ASP.NET Core and navigate to http://localhost:5000. This is a regular HTTP request and will produce the result shown on the left of Figure 16-8. Next, navigate to https://localhost:44350, paying close attention to the URL scheme, which is https and not http, as it has been in previous examples. The new middleware will detect the HTTPS connection and produce the output on the right of Figure 16-8.
../images/338050_8_En_16_Chapter/338050_8_En_16_Fig8_HTML.jpg
Figure 16-8.

Making an HTTPS request

Enforcing HTTPS Requests

ASP.NET Core provides a middleware component that enforces the use of HTTPS by sending a redirection response for requests that arrive over HTTP. Listing 16-12 adds this middleware to the request pipeline.
...
public void Configure(IApplicationBuilder app) {
    app.UseDeveloperExceptionPage();
    app.UseHttpsRedirection();
    app.UseCookiePolicy();
    app.UseMiddleware<ConsentMiddleware>();
    app.UseSession();
    app.UseRouting();
    app.Use(async (context, next) => {
        await context.Response
            .WriteAsync($"HTTPS Request: {context.Request.IsHttps} ");
        await next();
    });
    app.UseEndpoints(endpoints => {
        endpoints.MapGet("/cookie", async context => {
            int counter1 = (context.Session.GetInt32("counter1") ?? 0) + 1;
            int counter2 = (context.Session.GetInt32("counter2") ?? 0) + 1;
            context.Session.SetInt32("counter1", counter1);
            context.Session.SetInt32("counter2", counter2);
            await context.Session.CommitAsync();
            await context.Response
                .WriteAsync($"Counter1: {counter1}, Counter2: {counter2}");
        });
        endpoints.MapFallback(async context =>
            await context.Response.WriteAsync("Hello World!"));
    });
}
...
Listing 16-12.

Enforcing HTTPS in the Startup.cs File in the Platform Folder

The UseHttpsRedirection method adds the middleware component, which appears at the start of the request pipeline so that the redirection to HTTPS occurs before any other component can short-circuit the pipeline and produce a response using regular HTTP.

Configuring HTTPS Redirection
The options pattern can be used configure the HTTPS redirection middleware, by calling the AddHttpsRedirection method in the ConfigureServices method, like this:
...
services.AddHttpsRedirection(opts => {
    opts.RedirectStatusCode = StatusCodes.Status307TemporaryRedirect;
    opts.HttpsPort = 443;
});
...

The only two configuration options are shown in this fragment, which sets the status code used in the redirection responses the port to which the client is redirected, overriding the value that is loaded from the configuration files. Specifying the HTTPS port can be useful when deploying the application, but care should be taken when changing the redirection status code.

Restart ASP.NET Core and request http://localhost:5000, which is the HTTP URL for the application. The HTTPS redirection middleware will intercept the request and redirect the browser to the HTTPS URL, as shown in Figure 16-9.

Tip

Modern browsers often hide the URL scheme, which is why you should pay attention to the port number that is displayed. To display the URL scheme in the figure, I had to click the URL bar so the browser would display the full URL.

../images/338050_8_En_16_Chapter/338050_8_En_16_Fig9_HTML.jpg
Figure 16-9.

Forcing HTTPS requests

Enabling HTTP Strict Transport Security

One limitation of HTTPS redirection is that the user can make an initial request using HTTP before being redirected to a secure connection, presenting a security risk.

The HTTP Strict Transport Security (HSTS) protocol is intended to help mitigate this risk and works by including a header in responses that tells browsers to use HTTPS only when sending requests to the web application’s host. After an HSTS header has been received, browsers that support HSTS will send requests to the application using HTTPS even if the user specifies an HTTP URL. Listing 16-13 shows the addition of the HSTS middleware to the request pipeline.
using Microsoft.AspNetCore.Builder;
using Microsoft.AspNetCore.Http;
using Microsoft.Extensions.DependencyInjection;
using System;
using System.Threading.Tasks;
using Microsoft.AspNetCore.Hosting;
using Microsoft.Extensions.Hosting;
namespace Platform {
    public class Startup {
        public void ConfigureServices(IServiceCollection services) {
            services.Configure<CookiePolicyOptions>(opts => {
                opts.CheckConsentNeeded = context => true;
            });
            services.AddDistributedMemoryCache();
            services.AddSession(options => {
                options.IdleTimeout = TimeSpan.FromMinutes(30);
                options.Cookie.IsEssential = true;
            });
            services.AddHsts(opts => {
                opts.MaxAge = TimeSpan.FromDays(1);
                opts.IncludeSubDomains = true;
            });
        }
        public void Configure(IApplicationBuilder app, IWebHostEnvironment env) {
            app.UseDeveloperExceptionPage();
            if (env.IsProduction()) {
                app.UseHsts();
            }
            app.UseHttpsRedirection();
            app.UseCookiePolicy();
            app.UseMiddleware<ConsentMiddleware>();
            app.UseSession();
            app.UseRouting();
            app.Use(async (context, next) => {
                await context.Response
                    .WriteAsync($"HTTPS Request: {context.Request.IsHttps} ");
                await next();
            });
            app.UseEndpoints(endpoints => {
                endpoints.MapGet("/cookie", async context => {
                    int counter1 = (context.Session.GetInt32("counter1") ?? 0) + 1;
                    int counter2 = (context.Session.GetInt32("counter2") ?? 0) + 1;
                    context.Session.SetInt32("counter1", counter1);
                    context.Session.SetInt32("counter2", counter2);
                    await context.Session.CommitAsync();
                    await context.Response
                        .WriteAsync($"Counter1: {counter1}, Counter2: {counter2}");
                });
                endpoints.MapFallback(async context =>
                    await context.Response.WriteAsync("Hello World!"));
            });
        }
    }
}
Listing 16-13.

Enabling HSTS in the Startup.cs File in the Platform Folder

The middleware is added to the request pipeline using the UseHsts method. The HSTS middleware can be configured with the AddHsts method, using the properties described in Table 16-9.
Table 16-9.

The HSTS Configuration Properties

Name

Description

ExcludeHosts

This property returns a List<string> that contains the hosts for which the middleware won’t send an HSTS header. The defaults exclude localhost and the loopback addresses for IP version 4 and version 6.

IncludeSubDomains

When true, the browser will apply the HSTS setting to subdomains. The default value is false.

MaxAge

This property specifies the time period for which the browser should make only HTTPS requests. The default value is 30 days.

Preload

This property is set to true for domains that are part of the HSTS preload scheme. The domains are hard-coded into the browser, which avoids the initial insecure request and ensures that only HTTPS is used. See hstspreload.org for more details.

HSTS is disabled during development and enabled only in production, which is why the UseHsts method is called only for that environment.
...
if (env.IsProduction()) {
    app.UseHsts();
}
...

HSTS must be used with care because it is easy to create a situation where clients cannot access the application, especially when nonstandard ports are used for HTTP and HTTPS.

If the example application is deployed to a server named myhost, for example, and the user requests http://myhost:5000, the browser will be sent the HSTS header and redirected to https://myhost:5001, and the application will work as expected. But the next time the user requests http://myhost:5000, they will receive an error stating that a secure connection cannot be established.

This problem arises because browsers take a simplistic approach to HSTS and assume that HTTP requests are handled on port 80 and HTTPS requests on port 443.

When the user requests http://myhost:5000, the browser checks its HSTS data and sees that it previously received an HSTS header for myhost. Instead of the HTTP URL that the user entered, the browser sends a request to https://myhost:5000. ASP.NET Core doesn’t handle HTTPS on the port it uses for HTTP, and the request fails. The browser doesn’t remember or understand the redirection it previously received for port 5001.

This isn’t an issue where port 80 is used for HTTP and 443 is used for HTTPS. The URL http://myhost is equivalent to http://myhost:80, and https://myhost is equivalent to https://myhost:443, which means that changing the scheme targets the right port.

Once a browser has received an HSTS header, it will continue to honor it for the duration of the header’s MaxAge property. When you first deploy an application, it is a good idea to set the HSTS MaxAge property to a relatively short duration until you are confident that your HTTPS infrastructure is working correctly, which is why I have set MaxAge to one day in Listing 16-13. Once you are sure that clients will not need to make HTTP requests, you can increase the MaxAge property. A MaxAge value of one year is commonly used.

Tip

If you are testing HSTS with Google Chrome, you can inspect and edit the list of domains to which HSTS is applied by navigating to chrome://net-internals/#hsts.

Handling Exceptions and Errors

If an exception occurs when processing a request, the ASP.NET Core will return a response using the status code 500, which tells the browser that something has gone wrong.

A plain 500 result isn’t useful during development because it reveals nothing about the case of the problem. The UseDeveloperExceptionPage method adds a middleware component that intercepts exceptions and presents a more useful response.

To demonstrate the way that exceptions are handled, Listing 16-14 replaces the middleware and endpoints used in earlier examples with a new component that deliberately throws an exception.
using Microsoft.AspNetCore.Builder;
using Microsoft.AspNetCore.Http;
using Microsoft.Extensions.DependencyInjection;
using System;
using System.Threading.Tasks;
using Microsoft.AspNetCore.Hosting;
using Microsoft.Extensions.Hosting;
namespace Platform {
    public class Startup {
        public void ConfigureServices(IServiceCollection services) {
            services.Configure<CookiePolicyOptions>(opts => {
                opts.CheckConsentNeeded = context => true;
            });
            services.AddDistributedMemoryCache();
            services.AddSession(options => {
                options.IdleTimeout = TimeSpan.FromMinutes(30);
                options.Cookie.IsEssential = true;
            });
            services.AddHsts(opts => {
                opts.MaxAge = TimeSpan.FromDays(1);
                opts.IncludeSubDomains = true;
            });
        }
        public void Configure(IApplicationBuilder app, IWebHostEnvironment env) {
            app.UseDeveloperExceptionPage();
            if (env.IsProduction()) {
                app.UseHsts();
            }
            app.UseHttpsRedirection();
            app.UseCookiePolicy();
            app.UseMiddleware<ConsentMiddleware>();
            app.UseSession();
            app.Run(context => {
                throw new Exception("Something has gone wrong");
            });
        }
    }
}
Listing 16-14.

Adding a Middleware Component in the Startup.cs File in the Platform Folder

Restart ASP.NET Core and navigate to https://localhost:44350 to see the response that the middleware component generates, which is shown in Figure 16-10. The page presents a stack trace and details about the request, including details of the headers and cookies it contained.
../images/338050_8_En_16_Chapter/338050_8_En_16_Fig10_HTML.jpg
Figure 16-10.

The developer exception page

Managing Development and Production Middleware
The details shown in Figure 16-10 should be revealed only to developers, which is why the middleware is added to the pipeline only during development. A common pattern is to use the IWebHostEnvironment service to check the environment, calling the UseDeveloperExceptionPage method in Development and the UseHsts method in the other environments, like this:
...
public void Configure(IApplicationBuilder app, IWebHostEnvironment env) {
    if (env.IsDevelopment()) {
        app.UseDeveloperExceptionPage();
    } else {
        app.UseHsts();
    }
    app.UseHttpsRedirection();
    app.UseCookiePolicy();
    app.UseMiddleware<ConsentMiddleware>();
    app.UseSession();
     app.Run(context => {
        throw new Exception("Something has gone wrong");
    });
}
...

This combination ensures that the exception handling middleware is added only in development and the HSTS middleware is added only outside of development.

Returning an HTML Error Response

When the developer exception middleware is disabled, as it should be when the application is in production, ASP.NET Core deals with unhandled exceptions by sending a response that contains just an error code. Listing 16-15 disables the development exception middleware so that the default behavior can be seen.
...
public void Configure(IApplicationBuilder app, IWebHostEnvironment env) {
    //app.UseDeveloperExceptionPage();
    if (env.IsProduction()) {
        app.UseHsts();
    }
    app.UseHttpsRedirection();
    app.UseCookiePolicy();
    app.UseMiddleware<ConsentMiddleware>();
    app.UseSession();
     app.Run(context => {
        throw new Exception("Something has gone wrong");
    });
}
...
Listing 16-15.

Disabling Middleware in the Startup.cs File in the Platform Folder

Restart ASP.NET Core and navigate to https://localhost:44350. The response you see will depend on your browser because ASP.NET Core has only provided it with a response containing status code 500, without any content to display. Figure 16-11 shows how this is handled by Google Chrome.
../images/338050_8_En_16_Chapter/338050_8_En_16_Fig11_HTML.jpg
Figure 16-11.

Returning an error response

As an alternative to returning just status codes, ASP.NET Core provides middleware that intercepts unhandled exceptions and sends a redirection to the browser instead, which can be used to show a friendlier response than the raw status code. The exception redirection middleware is added with the UseExceptionHandler method, as shown in Listing 16-16.
...
public void Configure(IApplicationBuilder app, IWebHostEnvironment env) {
    //app.UseDeveloperExceptionPage();
    app.UseExceptionHandler("/error.html");
    if (env.IsProduction()) {
        app.UseHsts();
    }
    app.UseHttpsRedirection();
    app.UseCookiePolicy();
    app.UseStaticFiles();
    app.UseMiddleware<ConsentMiddleware>();
    app.UseSession();
     app.Run(context => {
        throw new Exception("Something has gone wrong");
    });
}
...
Listing 16-16.

Returning an HTML Error Response in the Startup.cs File in the Platform Folder

When an exception is thrown, the exception handler middleware will intercept the response and redirect the browser to the URL provided as the argument to the UseExceptionHandler method. For this example, the redirection is to a URL that will be handled by a static file, so the UseStaticFiles middleware has also been added to the pipeline.

To add the file that the browser will receive, create an HTML file named error.html in the wwwroot folder and add the content shown in Listing 16-17.
<!DOCTYPE html>
<html lang="en">
<head>
    <link rel="stylesheet" href="/lib/twitter-bootstrap/css/bootstrap.min.css" />
    <title>Error</title>
</head>
<body class="text-center">
    <h3 class="p-2">Something went wrong...</h3>
    <h6>You can go back to the <a href="/">homepage</a> and try again</h6>
</body>
</html>
Listing 16-17.

The Contents of the error.html File in the Platform/wwwroot Folder

Restart ASP.NET Core and navigate to https://localhost:44350 to see the effect of the new middleware. Instead of the raw status code, the browser will be sent a redirection to the /error.html URL, as shown in Figure 16-12.
../images/338050_8_En_16_Chapter/338050_8_En_16_Fig12_HTML.jpg
Figure 16-12.

Displaying an HTML error

There are versions of the UseExceptionHandler method that allow more complex responses to be composed, but my advice is to keep error handling as simple as possible because you can’t anticipate all of the problems an application may encounter, and you run the risk of encountering another exception when trying to handle the one that triggered the handler, resulting in a confusing response or no response at all.

Enriching Status Code Responses

Not all error responses will be the result of uncaught exceptions. Some requests cannot be processed for reasons other than software defects, such as requests for URLs that are not supported or that require authentication. For this type of problem, redirecting the client to a different URL can be problematic because some clients rely on the error code to detect problems. You will see examples of this in later chapters when I show you how to create and consume RESTful web applications.

ASP.NET Core provides middleware that adds user-friendly content to error responses without requiring redirection. This preserves the error status code while providing a human-readable message that helps users make sense of the problem.

The simplest approach is to define a string that will be used as the body for the response. This is more awkward than simply pointing at a file, but it is a more reliable technique and, as a rule, simple and reliable techniques are preferable when handling errors. To create the string response for the example project, add a class file named ResponseStrings.cs to the Platform folder with the code shown in Listing 16-18.
namespace Platform {
public static class Responses {
    public static string DefaultResponse = @"
        <!DOCTYPE html>
            <html lang=""en"">
            <head>
                <link rel=""stylesheet""
                   href=""/lib/twitter-bootstrap/css/bootstrap.min.css"" />
                <title>Error</title>
            </head>
            <body class=""text-center"">
                <h3 class=""p-2"">Error {0}</h3>
                <h6>
                    You can go back to the <a href=""/"">homepage</a> and try again
                </h6>
            </body>
        </html>";
    }
}
Listing 16-18.

The Contents of the ResponseStrings.cs File in the Platform Folder

The Responses class defines a DefaultResponse property to which I have assigned a multiline string containing a simple HTML document. There is a placeholder—{0}—into which the response status code will be inserted when the response is sent to the client.

Listing 16-19 adds the status code middleware to the request pipeline and adds a new middleware component that will return a 404 status code, indicating that the requested URL was not found.
...
public void Configure(IApplicationBuilder app, IWebHostEnvironment env) {
    //app.UseDeveloperExceptionPage();
    app.UseExceptionHandler("/error.html");
    if (env.IsProduction()) {
        app.UseHsts();
    }
    app.UseStaticFiles();
    app.UseHttpsRedirection();
    app.UseStatusCodePages("text/html", Responses.DefaultResponse);
    app.UseCookiePolicy();
    app.UseMiddleware<ConsentMiddleware>();
    app.UseSession();
    app.Use(async (context, next) => {
        if (context.Request.Path == "/error") {
            context.Response.StatusCode = StatusCodes.Status404NotFound;
            await Task.CompletedTask;
        } else {
            await next();
        }
    });
     app.Run(context => {
        throw new Exception("Something has gone wrong");
    });
}
...
Listing 16-19.

Adding Status Code Middleware in the Startup.cs File in the Platform Folder

The UseStatusCodePages method adds the response-enriching middleware to the request pipeline. The first argument is the value that will be used for the response’s Content-Type header, which is text/html in this example. The second argument is the string that will be used as the body of the response, which is the HTML string from Listing 16-18.

The custom middleware component sets the HttpResponse.StatusCode property to specify the status code for the response, using a value defined by the StatusCode class. Middleware components are required to return a Task, so I have used the Task.CompletedTask property because there is no work for this middleware component to do.

To see how the 404 status code is handled, restart ASP.NET Core and request https://localhost:44350/error. The status code middleware will intercept the result and add the content shown in Figure 16-13 to the response. The string used as the second argument to UseStatusCodePages is interpolated using the status code to resolve the placeholder.
../images/338050_8_En_16_Chapter/338050_8_En_16_Fig13_HTML.jpg
Figure 16-13.

Using the status code middleware

The status code middleware responds only to status codes between 400 and 600 and doesn’t alter responses that already contain content, which means you won’t see the response in the figure if an error occurs after another middleware component has started to generate a response. The status code middleware won’t respond to unhandled exceptions because exceptions disrupt the flow of a request through the pipeline, meaning that the status code middleware isn’t given the opportunity to inspect the response before it is sent to the client. As a result, the UseStatusCodePages method is typically used in conjunction with the UseExceptionHandler or UseDeveloperExceptionPage method.

Note

There are two related methods, UseStatusCodePagesWithRedirects and UseStatusCodePagesWithReExecute, which work by redirecting the client to a different URL or by rerunning the request through the pipeline with a different URL. In both cases, the original status code may be lost.

Filtering Requests Using the Host Header

The HTTP specification requires requests to include a Host header that specifies the hostname the request is intended for, which makes it possible to support virtual servers where one HTTP server receives requests on a single port and handles them differently based on the hostname that was requested.

The default set of middleware that is added to the request pipeline by the Program class includes middleware that filters requests based on the Host header so that only requests that target a list of approved hostnames are handled and all other requests are rejected.

The default configuration for the Hosts header middleware is included in the appsettings.json file, as follows:
...
{
  "Location": {
      "CityName": "Buffalo"
  },
  "Logging": {
    "LogLevel": {
      "Default": "Information",
      "Microsoft": "Warning",
      "Microsoft.Hosting.Lifetime": "Information"
    }
  },
  "AllowedHosts": "*"
}
...

The AllowedHosts configuration property is added to the JSON file when the project is created, and the default value accepts requests regardless of the Host header value. You can change the configuration by editing the JSON file. The configuration can also be changed using the options pattern, as shown in Listing 16-20.

Note

The middleware is already added to the pipeline by the Program class, but you can use the UseHostFiltering method if you need to add the middleware explicitly.

using Microsoft.AspNetCore.Builder;
using Microsoft.AspNetCore.Http;
using Microsoft.Extensions.DependencyInjection;
using System;
using System.Threading.Tasks;
using Microsoft.AspNetCore.Hosting;
using Microsoft.Extensions.Hosting;
using Microsoft.AspNetCore.HostFiltering;
namespace Platform {
    public class Startup {
        public void ConfigureServices(IServiceCollection services) {
            services.Configure<CookiePolicyOptions>(opts => {
                opts.CheckConsentNeeded = context => true;
            });
            services.AddDistributedMemoryCache();
            services.AddSession(options => {
                options.IdleTimeout = TimeSpan.FromMinutes(30);
                options.Cookie.IsEssential = true;
            });
            services.AddHsts(opts => {
                opts.MaxAge = TimeSpan.FromDays(1);
                opts.IncludeSubDomains = true;
            });
            services.Configure<HostFilteringOptions>(opts => {
                opts.AllowedHosts.Clear();
                opts.AllowedHosts.Add("*.example.com");
            });
        }
        public void Configure(IApplicationBuilder app, IWebHostEnvironment env) {
            // ...statements omitted for brevity...
        }
    }
}
Listing 16-20.

Configuring Host Header Filtering in the Startup.cs File in the Platform Folder

The HostFilteringOptions class is used to configure the host filtering middleware using the properties described in Table 16-10.
Table 16-10.

The HostFilteringOptions Properties

Name

Description

AllowedHosts

This property returns a List<string> that contains the domains for which requests are allowed. Wildcards are allowed so that *.example.com accepts all names in the example.com domain and * accepts all header values.

AllowEmptyHosts

When false, this property tells the middleware to reject requests that do not contain a Host header. The default value is true.

IncludeFailureMessage

When true, this property includes a message in the response that indicates the reason for the error. The default value is true.

In Listing 16-20, I called the Clear method to remove the wildcard entry that has been loaded from the appsettings.json file and then called the Add method to accept all hosts in the example.com domain. Requests sent from the browser to localhost will no longer contain an acceptable Host header. You can see what happens by restarting ASP.NET Core and using the browser to request http://localhost:5000. The Host header middleware checks the Host header in the request determines that the request hostname doesn’t match the AllowedHosts list and terminates the request with the 400 status code, which indicates a bad request. Figure 16-14 shows the error message.
../images/338050_8_En_16_Chapter/338050_8_En_16_Fig14_HTML.jpg
Figure 16-14.

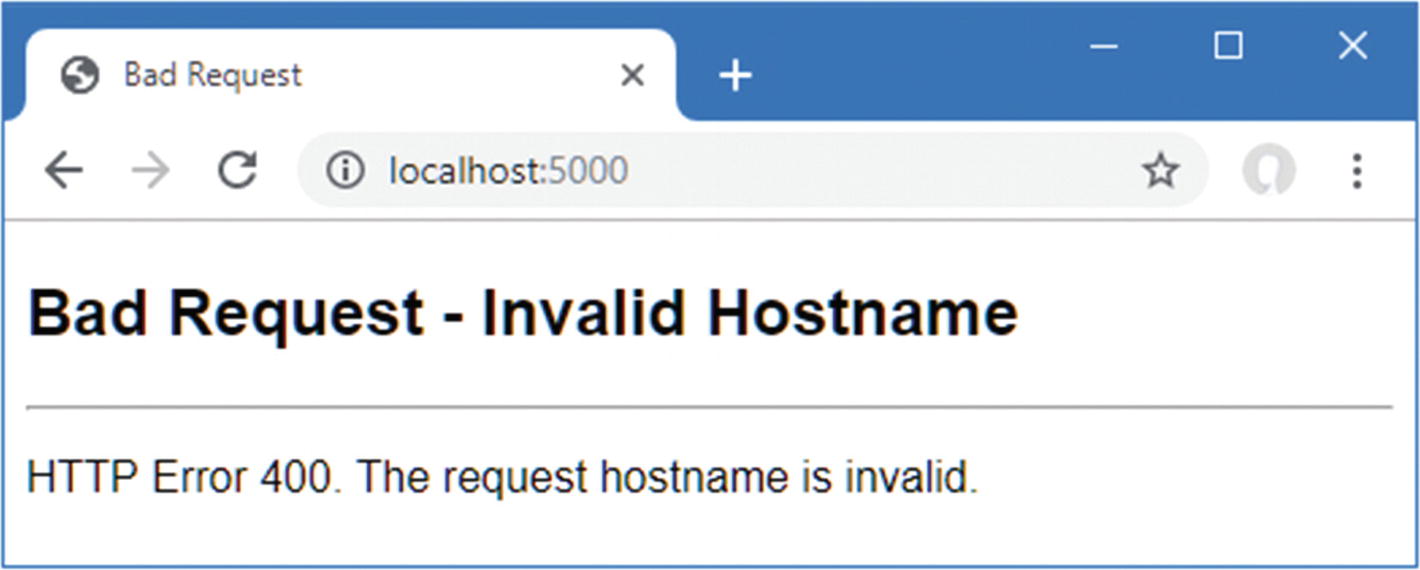
A request rejected based on the Host header

Tip

Notice that the browser isn’t redirected to use HTTPS because the Host header middleware is added to the request pipeline before the HTTPS redirection middleware.

Summary

In this chapter, I continued to describe the basic features provided by the ASP.NET Core platform. I showed you how to manage cookies and track cookie consent, how to use sessions, how to use and enforce HTTPS, how to deal with unhandled exceptions and status code responses, and, finally, how to filter requests based on the Host header. In the next chapter, I explain how ASP.NET Core supports working with data.

..................Content has been hidden....................

You can't read the all page of ebook, please click here login for view all page.
Reset
3.129.210.17