© Adam Freeman 2020
A. FreemanPro ASP.NET Core 3https://doi.org/10.1007/978-1-4842-5440-0_36

36. Blazor Forms and Data

Adam Freeman1 
(1)
London, UK
 
In this chapter, I describe the features that Blazor provides for dealing with HTML forms, including support for data validation. I describe the built-in components that Blazor provides and show you how they are used. In this chapter, I also explain how the Blazor model can cause unexpected results with Entity Framework Core and show you how to address these issues. I finish the chapter by creating a simple form application for creating, reading, updating, and deleting data (the CRUD operations) and explain how to extend the Blazor form features to improve the user’s experience. Table 36-1 puts the Blazor form features in context.
Table 36-1.

Putting Blazor Form Features in Context

Question

Answer

What are they?

Blazor provides a set of built-in components that present the user with a form that can be easily validated.

Why are they useful?

Forms remain one of the core building blocks of web applications, and these components provide functionality that will be required in most projects.

How are they used?

The EditForm component is used as a parent for individual form field components.

Are there any pitfalls or limitations?

There can be issues with the way that Entity Framework Core and Blazor work together, and these become especially apparent when using forms.

Are there any alternatives?

You could create your own form components and validation features, although the features described in this chapter are suitable for most projects and, as I demonstrate, can be easily extended.

Table 36-2 summarizes the chapter.
Table 36-2.

Chapter Summary

Problem

Solution

Listing

Creating an HTML form

Use the EditForm and Input* components

7–9, 13

Validating data

Use the standard validation attributes and the events emitted by the EditForm component

10–12

Discarding unsaved data

Explicitly release the data or create new scopes for components

14–16

Avoiding repeatedly querying the database

Manage query execution explicitly

17–19

Preparing for This Chapter

This chapter uses the Advanced project from Chapter 35. To prepare for this chapter, create the Blazor/Forms folder and add to it a Razor Component named EmptyLayout.razor with the content shown in Listing 36-1. I will use this component as the main layout for this chapter.

Tip

You can download the example project for this chapter—and for all the other chapters in this book—from https://github.com/apress/pro-asp.net-core-3. See Chapter 1 for how to get help if you have problems running the examples.

@inherits LayoutComponentBase
<div class="m-2">
    @Body
</div>
Listing 36-1.

The Contents of the EmptyLayout.razor File in the Blazor/Forms Folder

Add a RazorComponent named FormSpy.razor to the Blazor/Forms folder with the content shown in Listing 36-2. This is a component I will use to display form elements alongside the values that are being edited.
<div class="container-fluid no-gutters">
    <div class="row">
        <div class="col">
            @ChildContent
        </div>
        <div class="col">
            <table class="table table-sm table-striped table-bordered">
                <thead>
                    <tr><th colspan="2" class="text-center">Data Summary</th></tr>
                </thead>
                <tbody>
                    <tr><th>ID</th><td>@PersonData?.PersonId</td></tr>
                    <tr><th>Firstname</th><td>@PersonData?.Firstname</td></tr>
                    <tr><th>Surname</th><td>@PersonData?.Surname</td></tr>
                    <tr><th>Dept ID</th><td>@PersonData?.DepartmentId</td></tr>
                    <tr><th>Location ID</th><td>@PersonData?.LocationId</td></tr>
                </tbody>
            </table>
        </div>
    </div>
</div>
@code {
    [Parameter]
    public RenderFragment ChildContent { get; set; }
    [Parameter]
    public Person PersonData { get; set; }
}
Listing 36-2.

The Contents of the FormSpy.razor File in the Blazor/Forms Folder

Next, add a component named Editor.razor to the Blazor/Forms folder and add the content shown in Listing 36-3. This component will be used to edit existing Person objects and to create new ones.

Caution

Do not use the Editor and List components in real projects until you have read the rest of the chapter. I have included common pitfalls that I explain later in the chapter.

@page "/forms/edit/{id:long}"
@layout EmptyLayout
<h4 class="bg-primary text-center text-white p-2">Edit</h4>
<FormSpy PersonData="PersonData">
    <h4 class="text-center">Form Placeholder</h4>
    <div class="text-center">
        <NavLink class="btn btn-secondary" href="/forms">Back</NavLink>
    </div>
</FormSpy>
@code {
    [Inject]
    public NavigationManager NavManager { get; set; }
    [Inject]
    DataContext Context { get; set; }
    [Parameter]
    public long Id { get; set; }
    public Person PersonData { get; set; } = new Person();
    protected async override Task OnParametersSetAsync() {
        PersonData = await Context.People.FindAsync(Id);
    }
}
Listing 36-3.

The Contents of the Editor.razor File in the Blazor/Forms Folder

The component in Listing 36-3 uses an @layout expression to override the default layout and select EmptyLayout. The side-by-side layout is used to present the PersonTable component alongside a placeholder, which is where I will add a form.

Finally, create a component named List.razor in the Blazor/Forms folder and add the content shown in Listing 36-4 to define a component that will present the user with a list of Person objects, presented as a table.
@page "/forms"
@page "/forms/list"
@layout EmptyLayout
<h5 class="bg-primary text-white text-center p-2">People</h5>
<table class="table table-sm table-striped table-bordered">
    <thead>
        <tr>
            <th>ID</th><th>Name</th><th>Dept</th><th>Location</th><th></th>
        </tr>
    </thead>
    <tbody>
        @if  (People.Count() == 0) {
            <tr><th colspan="5" class="p-4 text-center">Loading Data...</th></tr>
        } else {
            @foreach (Person p in People) {
                <tr>
                    <td>@p.PersonId</td>
                    <td>@p.Surname, @p.Firstname</td>
                    <td>@p.Department.Name</td>
                    <td>@p.Location.City</td>
                    <td>
                        <NavLink class="btn btn-sm btn-warning"
                             href="@GetEditUrl(p.PersonId)">
                            Edit
                        </NavLink>
                    </td>
                </tr>
            }
        }
    </tbody>
</table>
@code {
    [Inject]
    public DataContext Context { get; set; }
    public IEnumerable<Person> People { get; set; } = Enumerable.Empty<Person>();
    protected override void OnInitialized() {
        People = Context.People.Include(p => p.Department).Include(p => p.Location);
    }
    string GetEditUrl(long id) => $"/forms/edit/{id}";
}
Listing 36-4.

The Contents of the List.razor File in the Blazor/Forms Folder

Dropping the Database and Running the Application

Open a new PowerShell command prompt, navigate to the folder that contains the Advanced.csproj file, and run the command shown in Listing 36-5 to drop the database.
dotnet ef database drop --force
Listing 36-5.

Dropping the Database

Select Start Without Debugging or Run Without Debugging from the Debug menu or use the PowerShell command prompt to run the command shown in Listing 36-6.
dotnet run
Listing 36-6.

Running the Example Application

Use a browser to request http://localhost:5000/forms, which will produce a data table. Click one of the Edit buttons, and you will see a placeholder for the form and a summary showing the current property values of the selected Person object, as shown in Figure 36-1.
../images/338050_8_En_36_Chapter/338050_8_En_36_Fig1_HTML.jpg
Figure 36-1.

Running the example application

Using the Blazor Form Components

Blazor provides a set of built-in components that are used to render form elements, ensuring that the server-side component properties are updated after user interaction and integrating validation. Table 36-3 describes the components that Blazor provides.
Table 36-3.

The Bazor Form Components

Name

Description

EditForm

This component renders a form element that is wired up for data validation.

InputText

This component renders an input element that is bound to a C# string property.

InputCheckbox

This component renders an input element whose type attribute is checkbox and that is bound to a C# bool property.

InputDate

This component renders an input element those type attribute is date and that is bound to a C# DateTime or DateTimeOffset property.

InputNumber

This component renders an input element those type attribute is number and that is bound to a C# int, long, float, double, or decimal value.

InputTextArea

This component renders a textarea component that is bound to a C# string property.

The EditForm component must be used for any of the other components to work. In Listing 36-7, I have added an EditForm, along with InputText components that represent two of the properties defined by the Person class.
@page "/forms/edit/{id:long}"
@layout EmptyLayout
<h4 class="bg-primary text-center text-white p-2">Edit</h4>
<FormSpy PersonData="PersonData">
    <EditForm Model="PersonData">
        <div class="form-group">
            <label>Person ID</label>
            <InputNumber class="form-control"
                @bind-Value="PersonData.PersonId" disabled />
        </div>
        <div class="form-group">
            <label>Firstname</label>
            <InputText class="form-control" @bind-Value="PersonData.Firstname" />
        </div>
        <div class="form-group">
            <label>Surname</label>
            <InputText class="form-control" @bind-Value="PersonData.Surname" />
        </div>
        <div class="form-group">
            <label>Dept ID</label>
            <InputNumber class="form-control"
                @bind-Value="PersonData.DepartmentId" />
        </div>
        <div class="text-center">
            <NavLink class="btn btn-secondary" href="/forms">Back</NavLink>
       </div>
    </EditForm>
</FormSpy>
@code {
    // ...statements omitted for brevity...
}
Listing 36-7.

Using Form Components in the Editor.razor File in the Blazor/Forms Folder

The EditForm component renders a form element and provides the foundation for the validation features described in the “Validating Form Data” section. The Model attribute is used to provide the EditForm with the object that the form is used to edit and validate.

The components in Table 36-3 whose names begin with Input are used to display an input or textarea element for a single model property. These components define a custom binding named Value that is associated with the model property using the @bind-Value attribute. The property-level components must be matched to the type of the property they present to the user. It is for this reason that I have used the InputText component for the Firstname and Surname properties of the Person class, while the InputNumber component is used for the PersonId and DepartmentId properties. If you use a property-level component with a model property of the wrong type, you will receive an error when the component attempts to parse a value entered into the HTML element.

Restart ASP.NET Core and request http://localhost:5000/forms/edit/2, and you will see the three input elements displayed. Edit the values and move the focus by pressing the Tab key, and you will see the summary data on the right of the window update, as shown in Figure 36-2. The built-in form components support attribute splatting, which is why the disabled attribute applied to the InputNumber component for the PersonId property has been applied to the input element.
../images/338050_8_En_36_Chapter/338050_8_En_36_Fig2_HTML.jpg
Figure 36-2.

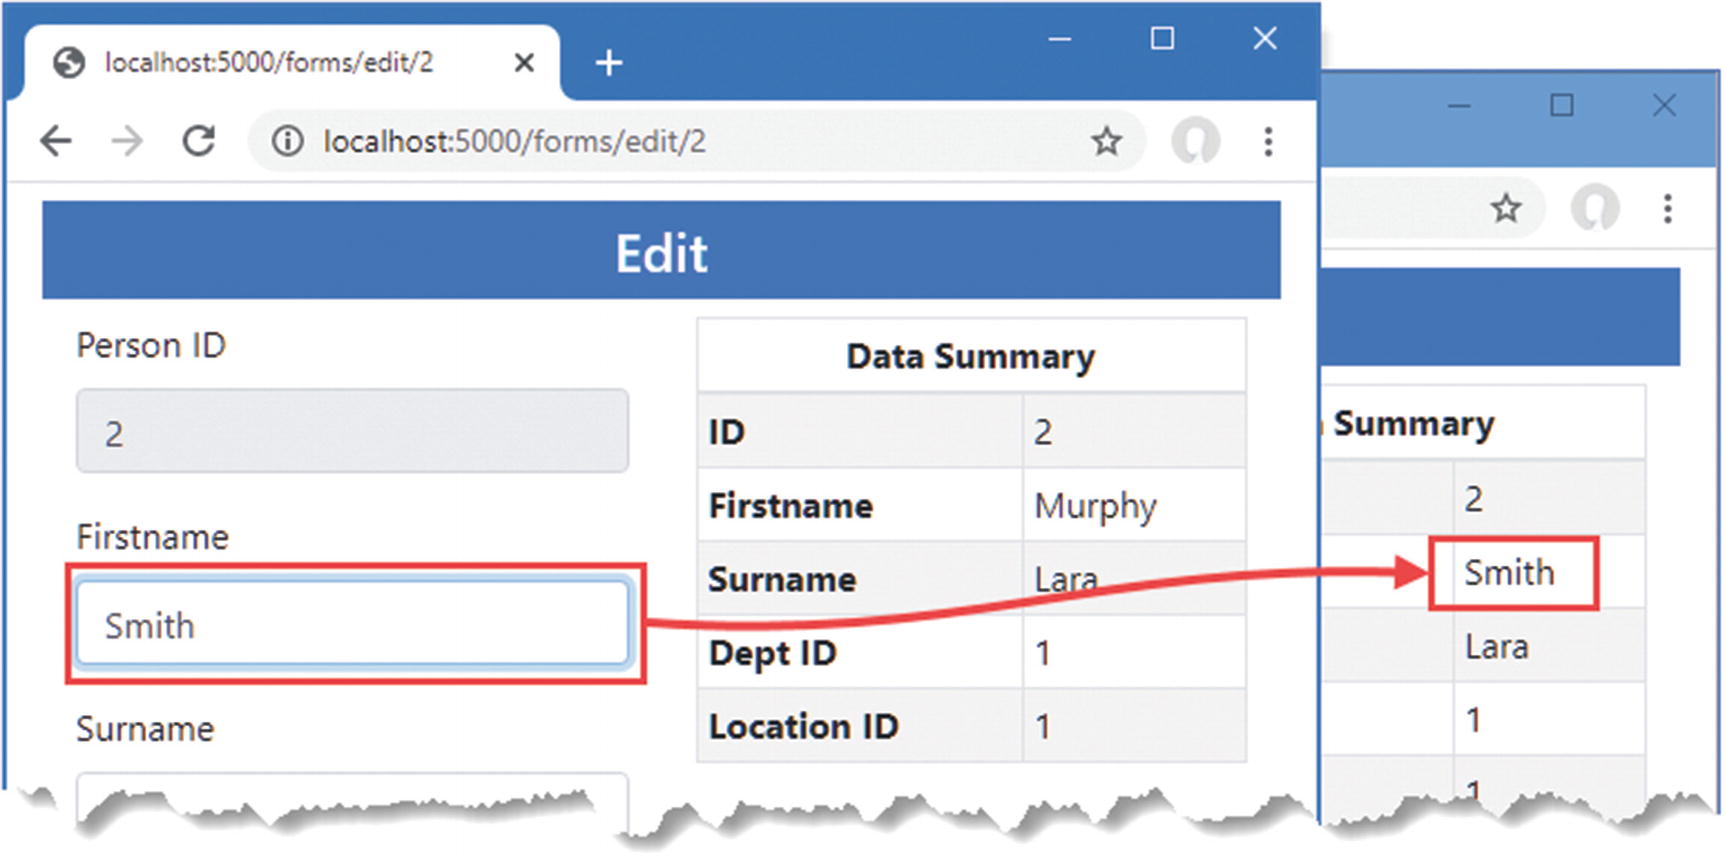
Using the Blazor form elements

Creating Custom Form Components

Blazor provides built-in components for only input and textarea elements. Fortunately, creating a custom component that integrates into the Blazor form features is a simple process. Add a Razor Component named CustomSelect.razor to the Blazor/Forms folder and use it to define the component shown in Listing 36-8.
@typeparam TValue
@inherits InputBase<TValue>
<select class="form-control @CssClass" value="@CurrentValueAsString"
            @onchange="@(ev => CurrentValueAsString = ev.Value as string)">
        @ChildContent
        @foreach (KeyValuePair<string, TValue> kvp in Values) {
            <option value="@kvp.Value">@kvp.Key</option>
        }
</select>
@code {
    [Parameter]
    public RenderFragment ChildContent { get; set; }
    [Parameter]
    public IDictionary<string, TValue> Values { get; set; }
    [Parameter]
    public Func<string, TValue> Parser { get; set; }
    protected override bool TryParseValueFromString(string value, out TValue result,
            out string validationErrorMessage) {
        try {
            result = Parser(value);
            validationErrorMessage = null;
            return true;
        } catch {
            result = default(TValue);
            validationErrorMessage = "The value is not valid";
            return false;
        }
    }
}
Listing 36-8.

The Contents of the CustomSelect.razor File in the Blazor/Forms Folder

The base class for form components is InputBase<TValue>, where the generic type argument is the model property type the component represents. The base class takes care of most of the work and provides the CurrentValueAsString property, which is used to provide the current value in event handlers when the user selects a new value, like this:
...
<select class="form-control @CssClass" value="@CurrentValueAsString"
            @onchange="@(ev => CurrentValueAsString = ev.Value as string)">
...
In preparation for data validation, which I describe in the next section, this component includes the value of the CssClass property in the select element’s class attribute, like this:
...
<select class="form-control @CssClass" value="@CurrentValueAsString"
            @onchange="@(ev => CurrentValueAsString = ev.Value as string)">
...

The abstract TryParseValueFromString method has to be implemented so that the base class is able to map between string values used by HTML elements and the corresponding value for the C# model property. I don’t want to implement my custom select element to any specific C# data type, so I have used an @typeparam expression to define a generic type parameter. The Values property is used to receive a dictionary mapping string values that will be displayed to the user and TValue values that will be used as C# values. The method receives two out parameters that are used to set the parsed value and a parser validation error message that will be displayed to the user if there is a problem. Since I am working with generic types, the Parser property receives a function that is invoked to parse a string value into a TValue value.

Listing 36-9 applies the new form component so the user can select values for the DepartmentId and LocationId properties defined by the Person class.
@page "/forms/edit/{id:long}"
@layout EmptyLayout
<h4 class="bg-primary text-center text-white p-2">Edit</h4>
<FormSpy PersonData="PersonData">
    <EditForm Model="PersonData">
        <div class="form-group">
            <label>Firstname</label>
            <InputText class="form-control" @bind-Value="PersonData.Firstname" />
        </div>
        <div class="form-group">
            <label>Surname</label>
            <InputText class="form-control" @bind-Value="PersonData.Surname" />
        </div>
        <div class="form-group">
            <label>Dept ID</label>
            <CustomSelect TValue="long" Values="Departments"
                          Parser="@(str => long.Parse(str))"
                          @bind-Value="PersonData.DepartmentId">
                <option selected disabled value="0">Choose a Department</option>
            </CustomSelect>
        </div>
        <div class="form-group">
            <label>Location ID</label>
            <CustomSelect TValue="long" Values="Locations"
                          Parser="@(str => long.Parse(str))"
                          @bind-Value="PersonData.LocationId">
                <option selected disabled value="0">Choose a Location</option>
            </CustomSelect>
        </div>
        <div class="text-center">
            <NavLink class="btn btn-secondary" href="/forms">Back</NavLink>
        </div>
    </EditForm>
</FormSpy>
@code {
    [Inject]
    public NavigationManager NavManager { get; set; }
    [Inject]
    DataContext Context { get; set; }
    [Parameter]
    public long Id { get; set; }
    public Person PersonData { get; set; } = new Person();
    public IDictionary<string, long> Departments { get; set; }
        = new Dictionary<string, long>();
    public IDictionary<string, long> Locations { get; set; }
        = new Dictionary<string, long>();
    protected async override Task OnParametersSetAsync() {
        PersonData = await Context.People.FindAsync(Id);
        Departments = await Context.Departments
            .ToDictionaryAsync(d => d.Name, d => d.Departmentid);
        Locations = await Context.Locations
            .ToDictionaryAsync(l => $"{l.City}, {l.State}", l => l.LocationId);
    }
}
Listing 36-9.

Using a Custom Form Element in the Editor.razor File in the Blazor/Forms Folder

I use the Entity Framework Core ToDictionaryAsync method to create collections of values and labels from the Department and Location data and use them to configure the CustomSelect components. Restart ASP.NET Core and request http://localhost:5000/forms/edit/2; you will see the select elements shown in Figure 36-3. When you pick a new value, the CustomSelect component will update the CurrentValueAsString property, which will result in a call to the TryParseValueFromString method, with the result used to update the Value binding.
../images/338050_8_En_36_Chapter/338050_8_En_36_Fig3_HTML.jpg
Figure 36-3.

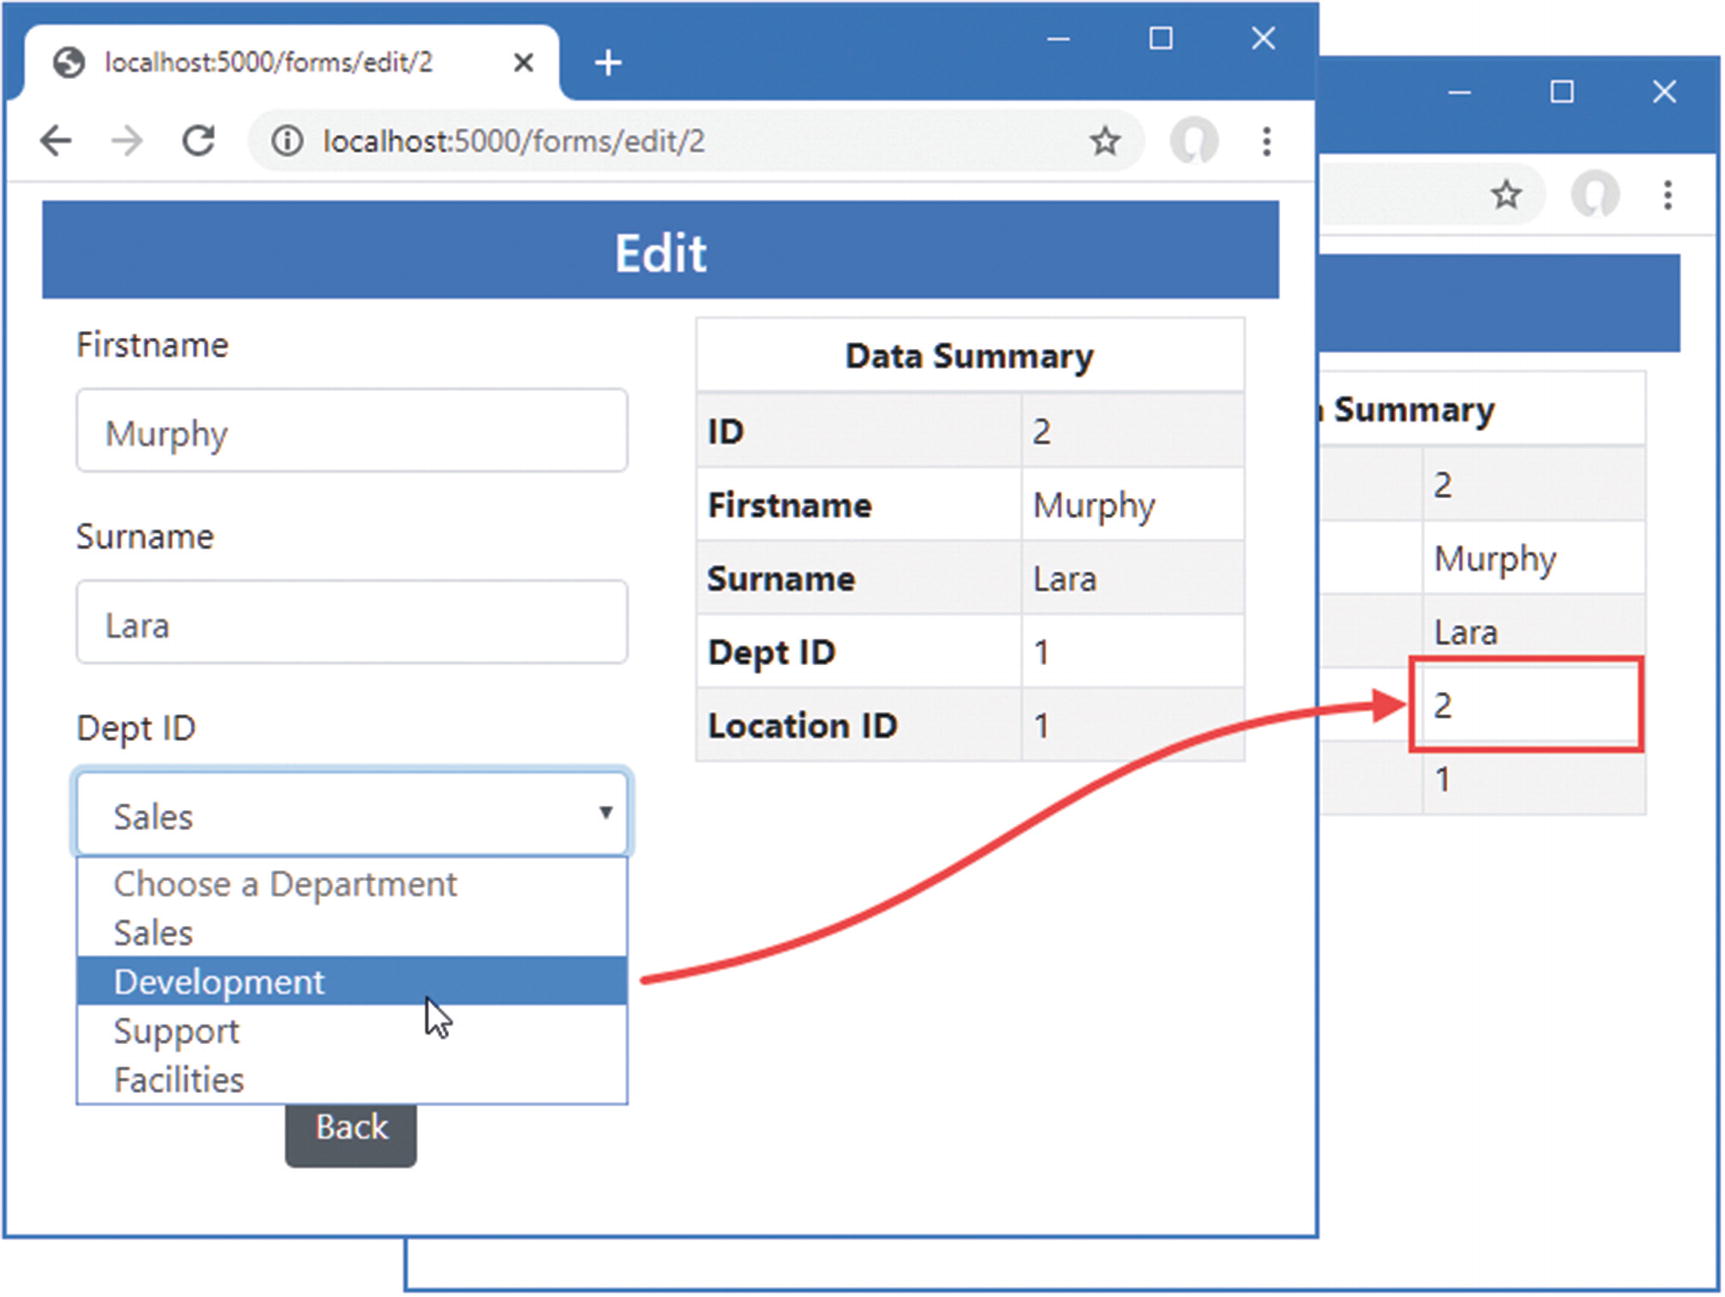
Using a custom form element

Validating Form Data

Blazor provides components that perform validation using the standard attributes. Table 36-4 describes the validation components.
Table 36-4.

The Blazor Validation Components

Name

Description

DataAnnotationsValidator

This component integrates the validation attributes applied to the model class into the Blazor form features.

ValidationMessage

This component displays validation error messages for a single property.

ValidationSummary

This component displays validation error messages for the entire model object.

The validation components generate elements assigned to classes, described in Table 36-5, which can be styled with CSS to draw the user’s attention.
Table 36-5.

The Classes Used by the Blazor Validation Components

Name

Description

validation-errors

The ValidationSummary component generates a ul element that is assigned to this class and is the top-level container for the summary of validation messages.

validation-message

The ValidationSummary component populates its ul element with li elements assigned to this class for each validation message. The ValidationMessage component renders a div element assigned to this class for its property-level messages.

The Blazor Input* components add the HTML elements they generate to the classes described in Table 36-6 to indicate validation status. This includes the InputBase<TValue> class from which I derived the CustomSelect component and is the purpose of the CssClass property in Listing 36-8.
Table 36-6.

The Validation Classes Added to Form Elements

Name

Description

modified

Elements are added to this class once the user has edited the value.

valid

Elements are added to this class if the value they contain passes validation.

invalid

Elements are added to this class if the value they contain fails validation.

This combination of components and classes can be confusing at first, but the key is to start by defining the CSS styles you require based on the classes in Tables 36-5 and 36-6. Add a CSS Stylesheet named blazorValidation.css to the wwwroot folder with the content shown in Listing 36-10.
.validation-errors {
    background-color: rgb(220, 53, 69); color: white; padding: 8px;
    text-align: center; font-size: 16px; font-weight: 500;
}
div.validation-message { color: rgb(220, 53, 69); font-weight: 500 }
.modified.valid { border: solid 3px rgb(40, 167, 69); }
.modified.invalid { border: solid 3px rgb(220, 53, 69); }
Listing 36-10.

The Contents of the blazorValidation.css File in the wwwroot Folder

These styles format error messages in red and apply a red or green border to individual form elements. Listing 36-11 imports the CSS stylesheet and applies the Blazor validation components.
@page "/forms/edit/{id:long}"
@layout EmptyLayout
<link href="/blazorValidation.css" rel="stylesheet" />
<h4 class="bg-primary text-center text-white p-2">Edit</h4>
<FormSpy PersonData="PersonData">
    <EditForm Model="PersonData">
        <DataAnnotationsValidator />
        <ValidationSummary />
        <div class="form-group">
            <label>Firstname</label>
            <ValidationMessage For="@(() => PersonData.Firstname)" />
            <InputText class="form-control" @bind-Value="PersonData.Firstname" />
        </div>
        <div class="form-group">
            <label>Surname</label>
            <ValidationMessage For="@(() => PersonData.Surname)" />
            <InputText class="form-control" @bind-Value="PersonData.Surname" />
        </div>
        <div class="form-group">
            <label>Dept ID</label>
            <ValidationMessage For="@(() => PersonData.DepartmentId)" />
            <CustomSelect TValue="long" Values="Departments"
                          Parser="@(str => long.Parse(str))"
                          @bind-Value="PersonData.DepartmentId">
                <option selected disabled value="0">Choose a Department</option>
            </CustomSelect>
        </div>
        <div class="form-group">
            <label>Location ID</label>
            <ValidationMessage For="@(() => PersonData.LocationId)" />
            <CustomSelect TValue="long" Values="Locations"
                          Parser="@(str => long.Parse(str))"
                          @bind-Value="PersonData.LocationId">
                <option selected disabled value="0">Choose a Location</option>
            </CustomSelect>
        </div>
        <div class="text-center">
            <NavLink class="btn btn-secondary" href="/forms">Back</NavLink>
        </div>
    </EditForm>
</FormSpy>
@code {
    // ...statements omitted for brevity...
}
Listing 36-11.

Applying Validation Components in the Editor.razor File in the Blazor/Forms Folder

The DataAnnotationsValidator and ValidationSummary components are applied without any configuration attributes. The ValidationMessage attribute is configured using the For attribute, which receives a function that returns the property the component represents. For example, here is the expression that selects the Firstname property:
..s.
<ValidationMessage For="@(() => PersonData.Firstname)" />
...

The expression defines no parameters and selects the property from the object used for the Model attribute of the EditForm component and not the model type. For this example, this means the expression operates on the PersonData object and not the Person class.

Tip

Blazor isn’t always able to determine the type of the property for the ValidationMessage component. If you receive an exception, then you can add a TValue attribute to set the type explicitly. For example, if the type of the property the ValidationMessage represents is long, then add a TValue="long" attribute.

The final step for enabling data validation is to apply attributes to the model class, as shown in Listing 36-12.
using System.Collections.Generic;
using System.ComponentModel.DataAnnotations;
namespace Advanced.Models {
    public class Person {
        public long PersonId { get; set; }
        [Required(ErrorMessage = "A firstname is required")]
        [MinLength(3, ErrorMessage = "Firstnames must be 3 or more characters")]
        public string Firstname { get; set; }
        [Required(ErrorMessage = "A surname is required")]
        [MinLength(3, ErrorMessage = "Surnames must be 3 or more characters")]
        public string Surname { get; set; }
        [Required]
        [Range(1, long.MaxValue,
            ErrorMessage = "A department must be selected")]
        public long DepartmentId { get; set; }
        [Required]
        [Range(1, long.MaxValue,
            ErrorMessage = "A location must be selected")]
        public long LocationId { get; set; }
        public Department Department { get; set; }
        public Location Location { get; set; }
    }
}
Listing 36-12.

Applying Validation Attributes in the Person.cs File in the Models Folder

To see the effect of the validation components, restart ASP.NET Core and request http://localhost:5000/forms/edit/2. Clear the Firstname field and move the focus by pressing the Tab key or clicking on another field. As the focus changes, validation is performed, and error messages will be displayed. The Editor component shows both summary and per-property messages, so you will see the same error message shown twice. Delete all but the first two characters from the Surname field, and a second validation message will be displayed when you change the focus, as shown in Figure 36-4. (There is validation support for the other properties, too, but the select element doesn’t allow the user to select an invalid valid. If you change a value, the select element will be decorated with a green border to indicate a valid selection, but you won’t be able to see an invalid response until I demonstrate how the form components can be used to create new data objects.)
../images/338050_8_En_36_Chapter/338050_8_En_36_Fig4_HTML.jpg
Figure 36-4.

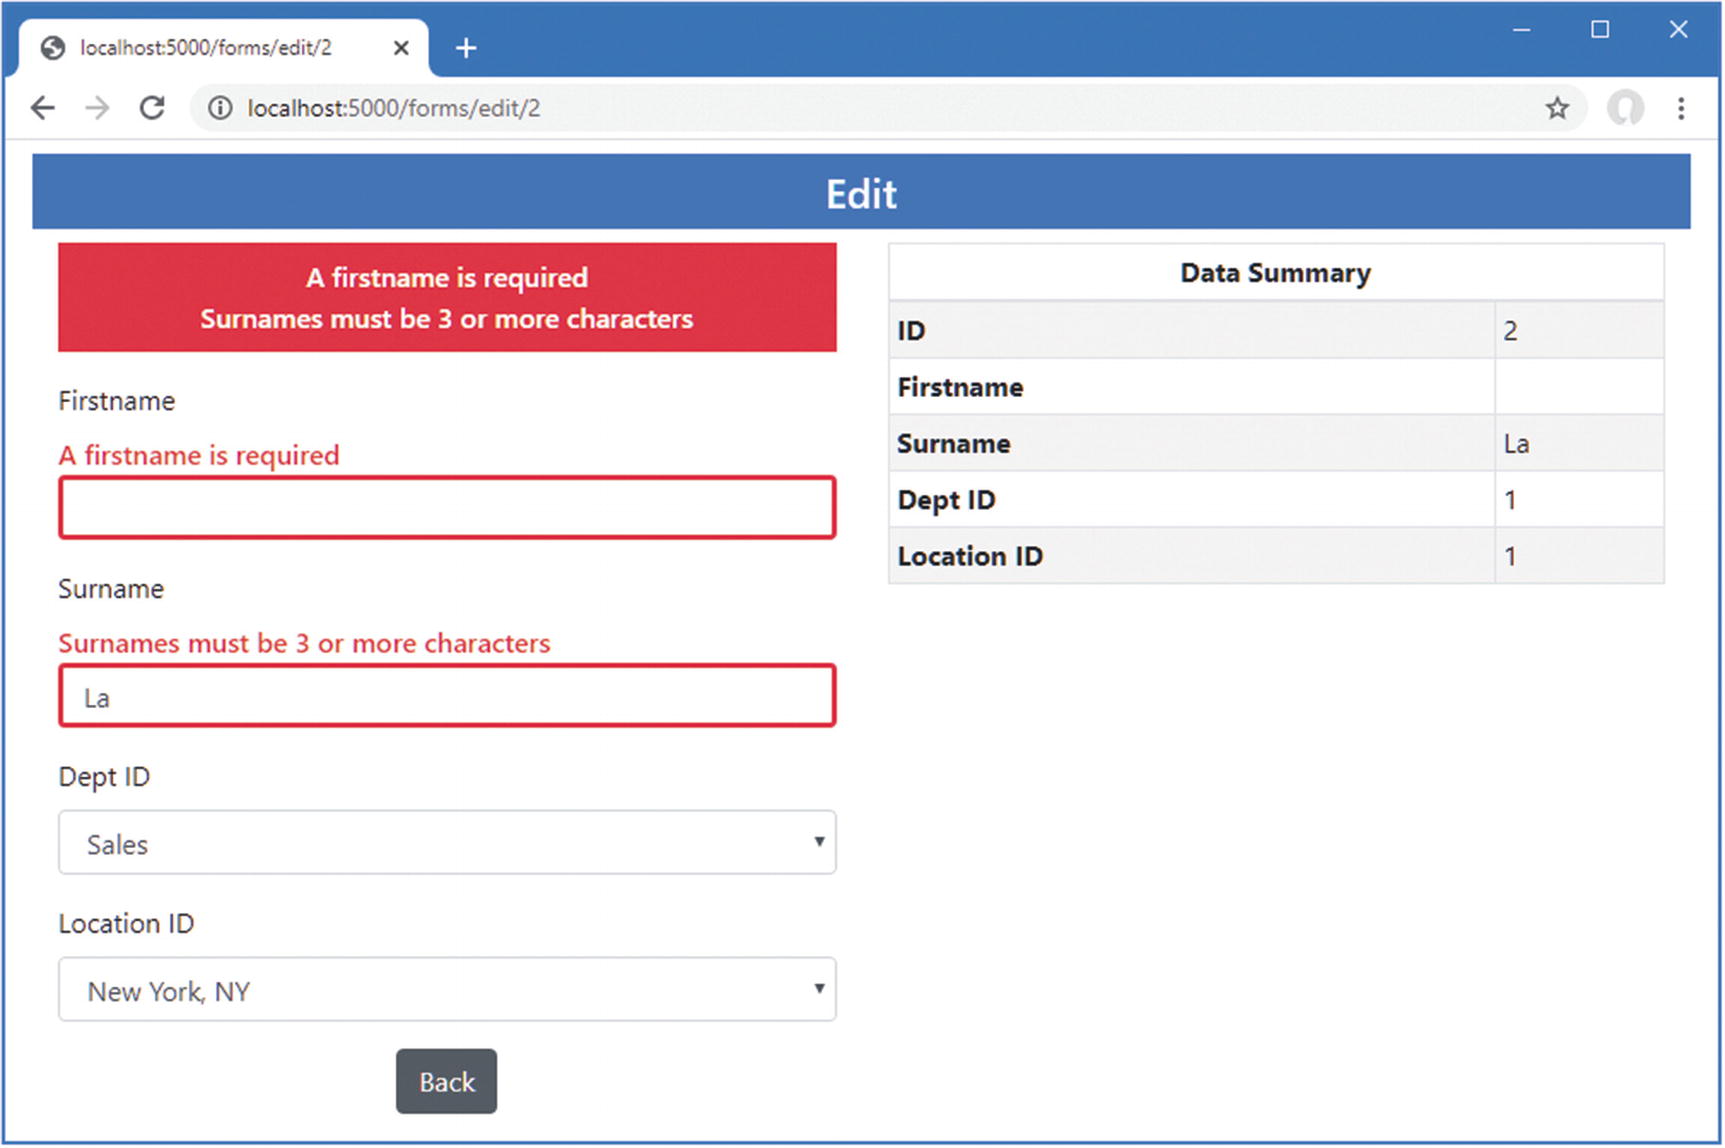
Using the Blazor validation features

Handling Form Events

The EditForm component defines events that allow an application to respond to user action, as described in Table 36-7.
Table 36-7.

The EditForm Events

Name

Description

OnValidSubmit

This event is triggered when the form is submitted and the form data passes validation.

OnInvalidSubmit

This event is triggered when the form is submitted and the form data fails validation.

OnSubmit

This event is triggered when the form is submitted and before validation is performed.

These events are triggered by adding a conventional submit button within the content contained by the EditForm component. The EditForm component handles the onsubmit event sent by the form element it renders, applies validation, and triggers the events described in the table. Listing 36-13 adds a submit button to the Editor component and handles the EditForm events.
@page "/forms/edit/{id:long}"
@layout EmptyLayout
<link href="/blazorValidation.css" rel="stylesheet" />
<h4 class="bg-primary text-center text-white p-2">Edit</h4>
<h6 class="bg-info text-center text-white p-2">@FormSubmitMessage</h6>
<FormSpy PersonData="PersonData">
    <EditForm Model="PersonData" OnValidSubmit="HandleValidSubmit"
            OnInvalidSubmit="HandleInvalidSubmit">
        <DataAnnotationsValidator />
        <ValidationSummary />
        <div class="form-group">
            <label>Firstname</label>
            <ValidationMessage For="@(() => PersonData.Firstname)" />
            <InputText class="form-control" @bind-Value="PersonData.Firstname" />
        </div>
        <div class="form-group">
            <label>Surname</label>
            <ValidationMessage For="@(() => PersonData.Surname)" />
            <InputText class="form-control" @bind-Value="PersonData.Surname" />
        </div>
        <div class="form-group">
            <label>Dept ID</label>
            <ValidationMessage For="@(() => PersonData.DepartmentId)" />
            <CustomSelect TValue="long" Values="Departments"
                          Parser="@(str => long.Parse(str))"
                          @bind-Value="PersonData.DepartmentId">
                <option selected disabled value="0">Choose a Department</option>
            </CustomSelect>
        </div>
        <div class="form-group">
            <label>Location ID</label>
            <ValidationMessage For="@(() => PersonData.LocationId)" />
            <CustomSelect TValue="long" Values="Locations"
                          Parser="@(str => long.Parse(str))"
                          @bind-Value="PersonData.LocationId">
                <option selected disabled value="0">Choose a Location</option>
            </CustomSelect>
        </div>
        <div class="text-center">
            <button type="submit" class="btn btn-primary">Submit</button>
            <NavLink class="btn btn-secondary" href="/forms">Back</NavLink>
        </div>
    </EditForm>
</FormSpy>
@code {
    // ...other statements omitted for brevity...
    public string FormSubmitMessage { get; set; } = "Form Data Not Submitted";
    public void HandleValidSubmit() => FormSubmitMessage = "Valid Data Submitted";
    public void HandleInvalidSubmit() =>
        FormSubmitMessage = "Invalid Data Submitted";
}
Listing 36-13.

Handling EditForm Events in the Editor.razor File in the Blazor/Forms Folder

Restart ASP.NET Core and request http://localhost:5000/forms/edit/2. Clear the Firstname field, and click the Submit button. In addition to the validation error, you will see a message indicating that the form was submitted with invalid data. Enter a name into the field and click Submit again, and the message will change, as shown in Figure 36-5.
../images/338050_8_En_36_Chapter/338050_8_En_36_Fig5_HTML.jpg
Figure 36-5.

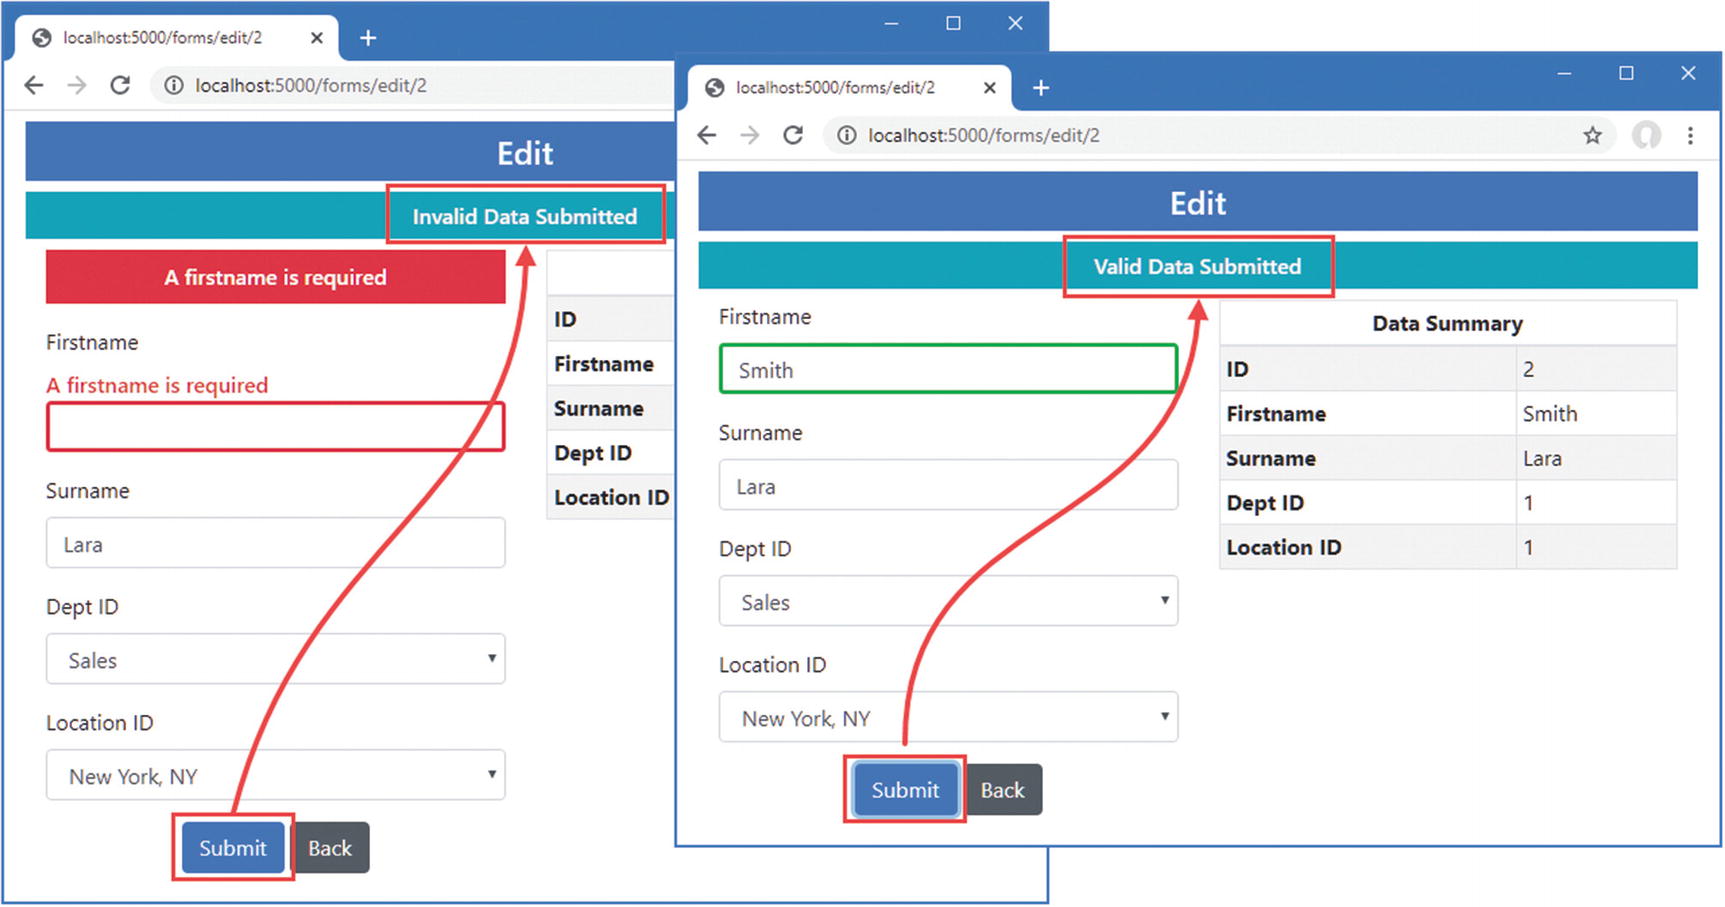
Handling EditForm events

Using Entity Framework Core with Blazor

The Blazor model changes the way that Entity Framework Core behaves, which can lead to unexpected results if you are used to writing conventional ASP.NET Core applications. In the sections that follow, I explain the issues and how to avoid the problems that can arise.

Understanding the Entity Framework Core Context Scope Issue

To see the first issue, request http://localhost:5000/forms/edit/2, clear the Firstname field, and change the contents of the Surname field to La. Neither of these values passes validation, and you will see error messages as you move between the form elements. Click the Back button, and you will see that the data table reflects the changes you made, as shown in Figure 36-6, even though they were not valid.
../images/338050_8_En_36_Chapter/338050_8_En_36_Fig6_HTML.jpg
Figure 36-6.

The effect of editing data

In a conventional ASP.NET Core application, written using controllers or Razor Pages, clicking a button triggers a new HTTP request. Each request is handled in isolation, and each request receives its own Entity Framework Core context object, which is configured as a scoped service. The result is that the data created when handling one request affects other requests only once it has been written to the database.

In a Blazor application, the routing system responds to URL changes without sending new HTTP requests, which means that multiple components are displayed using only the persistent HTTP connection that Blazor maintains to the server. This results in a single dependency injection scope being shared by multiple components, as shown in Figure 36-7, and the changes made by one component will affect other components even if the changes are not written to the database.
../images/338050_8_En_36_Chapter/338050_8_En_36_Fig7_HTML.jpg
Figure 36-7.

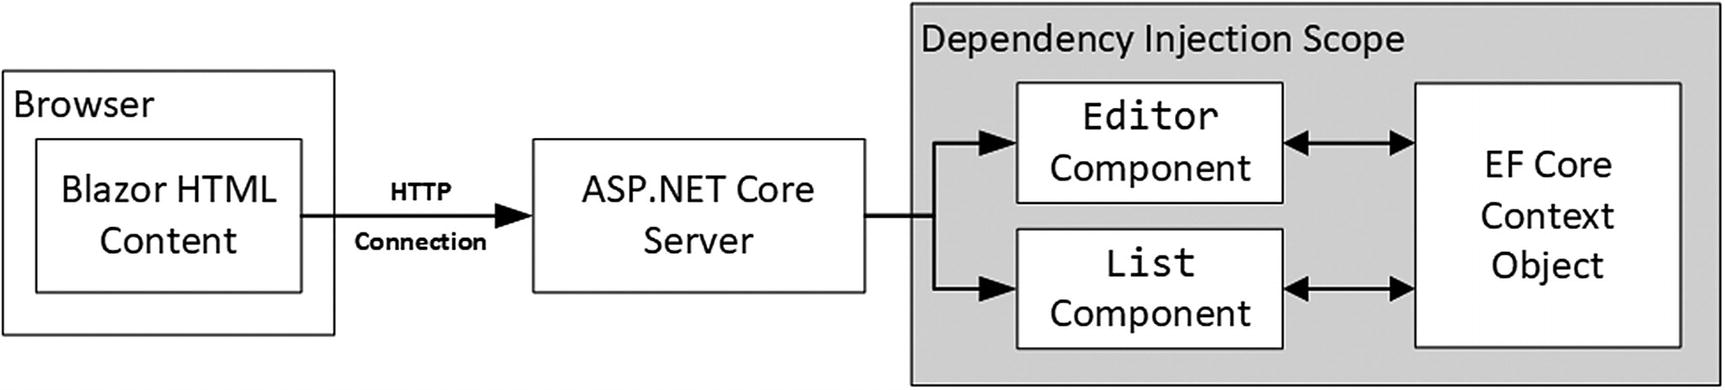
The use of an Entity Framework Core context in a Blazor application

Entity Framework Core is trying to be helpful, and this approach allows complex data operations to be performed over time before being stored (or discarded). Unfortunately, much like the helpful approach Entity Framework Core takes to dealing with related data, which I described in Chapter 35, it presents a pitfall for the unwary developer who expects components to handle data like the rest of ASP.NET Core.

Discarding Unsaved Data Changes

If sharing a context between components is appealing, which it will be for some applications, then you can embrace the approach and ensure that components discard any changes when they are destroyed, as shown in Listing 36-14.
@page "/forms/edit/{id:long}"
@layout EmptyLayout
@implements IDisposable
<!-- ...elements omitted for brevity... -->
@code {
    // ...statements omitted for brevity...
    public string FormSubmitMessage { get; set; } = "Form Data Not Submitted";
    public void HandleValidSubmit() => FormSubmitMessage = "Valid Data Submitted";
    public void HandleInvalidSubmit() =>
        FormSubmitMessage = "Invalid Data Submitted";
    public void Dispose() => Context.Entry(PersonData).State = EntityState.Detached;
}
Listing 36-14.

Discarding Unsaved Data Changes in the Editor.razor File in the Blazor/Forms Folder

As I noted in Chapter 35, components can implement the System.IDisposable interface, and the Dispose method will be invoked when the component is about to be destroyed, which happens when navigation to another component occurs. In Listing 36-14, the implementation of the Dispose method tells Entity Framework Core to disregard the PersonData object, which means it won’t be used to satisfy future requests. To see the effect, restart ASP.NET Core, request http://localhost:5000/forms/edit/2, clear the Firstname field, and click the Back button. The modified Person object is disregarded when Entity Framework Core provides the List component with its data, as shown in Figure 36-8.
../images/338050_8_En_36_Chapter/338050_8_En_36_Fig8_HTML.jpg
Figure 36-8.

Discarding data objects

Creating New Dependency Injection Scopes

You must create new dependency injection scopes if you want to preserve the model used by the rest of ASP.NET Core and have each component receive its own Entity Framework Core context object. This is done by using the @inherits expression to set the base class for the component to OwningComponentBase or OwningComponentBase<T>.

The OwningComponentCase class defines a ScopedServices property that is inherited by the component and that provides an IServiceProvider object that can be used to obtain services that are created in a scope that is specific to the component’s lifecycle and will not be shared with any other component, as shown in Listing 36-15.
@page "/forms/edit/{id:long}"
@layout EmptyLayout
@inherits OwningComponentBase
@using Microsoft.Extensions.DependencyInjection
<link href="/blazorValidation.css" rel="stylesheet" />
<h4 class="bg-primary text-center text-white p-2">Edit</h4>
<h6 class="bg-info text-center text-white p-2">@FormSubmitMessage</h6>
<!-- ...elements omitted for brevity... -->
@code {
    [Inject]
    public NavigationManager NavManager { get; set; }
    //[Inject]
    DataContext Context => ScopedServices.GetService<DataContext>();
    [Parameter]
    public long Id { get; set; }
    // ...statements omitted for brevity...
    //public void Dispose() =>
    //      Context.Entry(PersonData).State = EntityState.Detached;
}
Listing 36-15.

Using a New Scope in the Editor.razor File in the Blazor/Forms Folder

In the listing, I commented out the Inject attribute and set the value of the Context property by obtaining a DataContext service. The Microsoft.Extensions.DependencyInjection namespace contains extension methods that make it easier to obtain services from an IServiceProvider object, as described in Chapter 14.

Note

Changing the base class doesn’t affect services that are received using the Inject attribute, which will still be obtained within the request scope. Each service that you require in the dedicated component’s scope must be obtained through the ScopedServices property, and the Inject attribute should not be applied to that property.

The OwningComponentBase<T> class defines an additional convenience property that provides access to a scoped service of type T and that can be useful if a component requires only a single scoped service, as shown in Listing 36-16 (although further services can still be obtained through the ScopedServices property).
@page "/forms/edit/{id:long}"
@layout EmptyLayout
@inherits OwningComponentBase<DataContext>
<link href="/blazorValidation.css" rel="stylesheet" />
<h4 class="bg-primary text-center text-white p-2">Edit</h4>
<h6 class="bg-info text-center text-white p-2">@FormSubmitMessage</h6>
<!-- ...elements omitted for brevity... -->
@code {
    [Inject]
    public NavigationManager NavManager { get; set; }
    //[Inject]
    DataContext Context => Service;
    // ...statements omitted for brevity...
}
Listing 36-16.

Using the Typed Base Class in the Editor.razor File in the Blazor/Forms Folder

The scoped service is available through a property named Service. In this example, I specified DataContext as the type argument for the base class.

Regardless of which base class is used, the result is that the Editor component has its own dependency injection scope and its own DataContext object. The List component has not been modified, so it will receive the request-scoped DataContext object, as shown in Figure 36-9.
../images/338050_8_En_36_Chapter/338050_8_En_36_Fig9_HTML.jpg
Figure 36-9.

Using scoped services for components

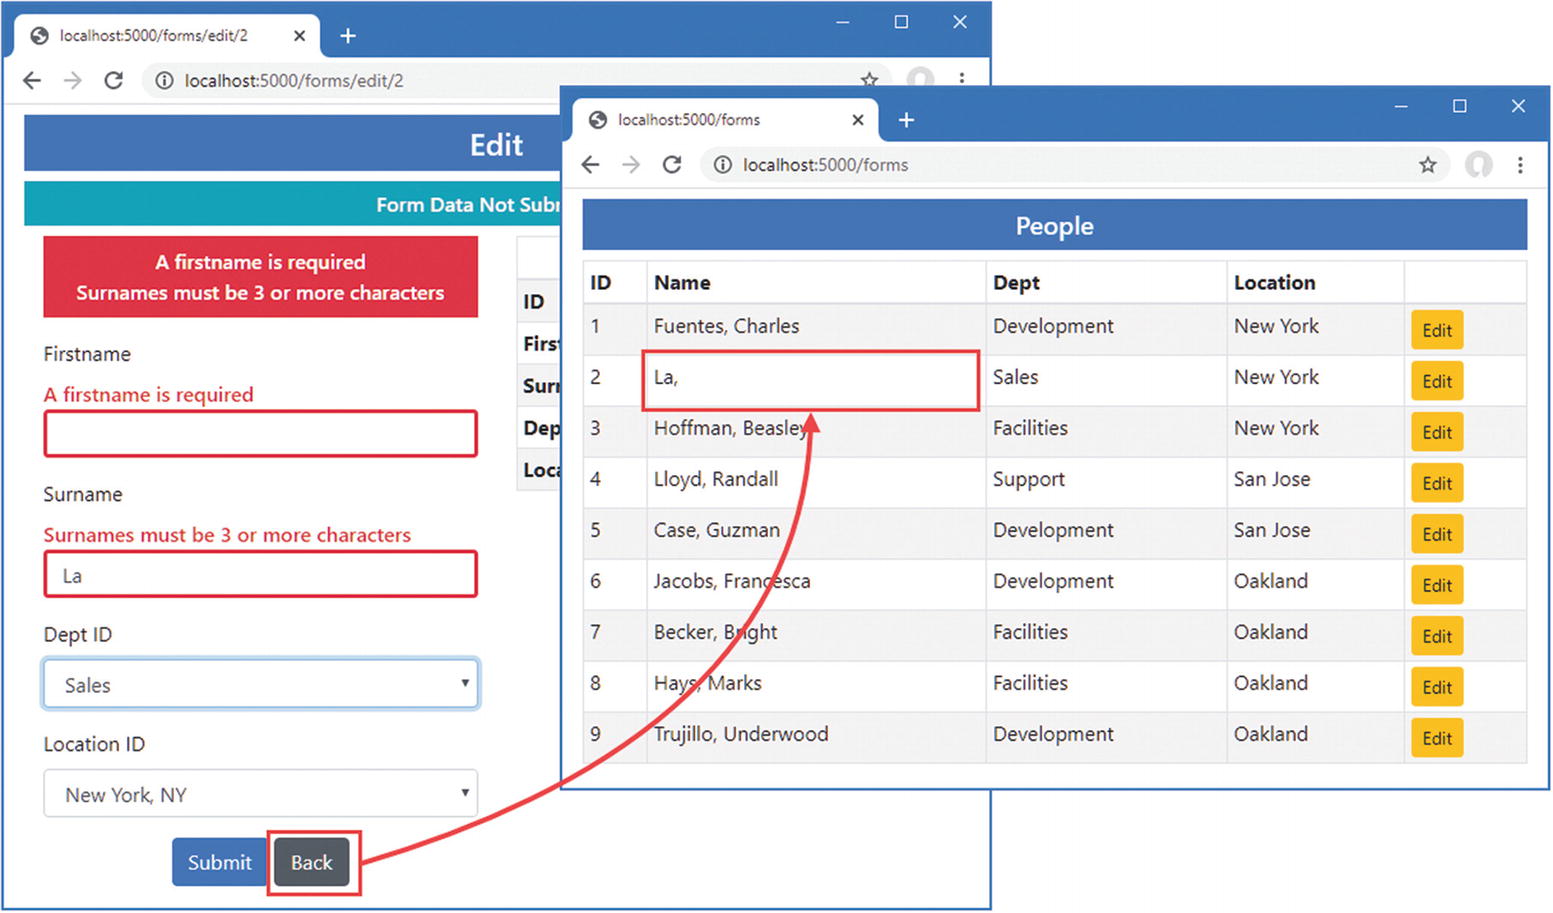
Restart ASP.NET Core, navigate to http://localhost:5000/forms/edit/2, clear the Firstname field, and click the Back button. The changes made by the Editor component are not saved to the database, and since the Editor component’s data context is separate from the one used by the List component, the edited data is discarded, producing the same response as shown in Figure 36-8.

Understanding the Repeated Query Issue

Blazor responds to changes in state as efficiently as possible but still has to render a component’s content to determine the changes that should be sent to the browser.

One consequence of the way that Blazor works is that it can lead to a sharp increase in the number of queries sent to the database. To demonstrate the issue, Listing 36-17 adds a button that increments a counter to the List component.
@page "/forms"
@page "/forms/list"
@layout EmptyLayout
<h5 class="bg-primary text-white text-center p-2">People</h5>
<table class="table table-sm table-striped table-bordered">
    <thead>
        <tr>
            <th>ID</th><th>Name</th><th>Dept</th><th>Location</th><th></th>
        </tr>
    </thead>
    <tbody>
        @if  (People.Count() == 0) {
            <tr><th colspan="5" class="p-4 text-center">Loading Data...</th></tr>
        } else {
            @foreach (Person p in People) {
                <tr>
                    <td>@p.PersonId</td>
                    <td>@p.Surname, @p.Firstname</td>
                    <td>@p.Department.Name</td>
                    <td>@p.Location.City</td>
                    <td>
                        <NavLink class="btn btn-sm btn-warning"
                               href="@GetEditUrl(p.PersonId)">
                            Edit
                        </NavLink>
                    </td>
                </tr>
            }
        }
    </tbody>
</table>
<button class="btn btn-primary" @onclick="@(() => Counter++)">Increment</button>
<span class="h5">Counter: @Counter</span>
@code {
    [Inject]
    public DataContext Context { get; set; }
    public IEnumerable<Person> People { get; set; } = Enumerable.Empty<Person>();
    protected override void OnInitialized() {
        People = Context.People.Include(p => p.Department).Include(p => p.Location);
    }
    string GetEditUrl(long id) => $"/forms/edit/{id}";
    public int Counter { get; set; } = 0;
}
Listing 36-17.

Adding a Button in the List.razor File in the Blazor/Forms Folder

Restart ASP.NET Core and request http://localhost:5000/forms. Click the button and watch the output from the ASP.NET Core server. Each time you click the button, the event handler is invoked, and a new database query is sent to the database, producing logging messages like these:
...
info: Microsoft.EntityFrameworkCore.Database.Command[20101]
      Executed DbCommand (1ms) [Parameters=[], CommandType="Text",
      CommandTimeout='30']
  SELECT [p].[PersonId], [p].[DepartmentId], [p].[Firstname], [p].[LocationId],
       [p].[Surname], [d].[Departmentid], [d].[Name], [l].[LocationId], [l].[City],
       [l].[State]
    FROM [People] AS [p]
    INNER JOIN [Departments] AS [d] ON [p].[DepartmentId] = [d].[Departmentid]
    INNER JOIN [Locations] AS [l] ON [p].[LocationId] = [l].[LocationId]
info: Microsoft.EntityFrameworkCore.Database.Command[20101]
      Executed DbCommand (0ms) [Parameters=[], CommandType="Text",
      CommandTimeout='30']
  SELECT [p].[PersonId], [p].[DepartmentId], [p].[Firstname], [p].[LocationId],
      [p].[Surname], [d].[Departmentid], [d].[Name], [l].[LocationId], [l].[City],
      [l].[State]
    FROM [People] AS [p]
    INNER JOIN [Departments] AS [d] ON [p].[DepartmentId] = [d].[Departmentid]
    INNER JOIN [Locations] AS [l] ON [p].[LocationId] = [l].[LocationId]
...

Each time the component is rendered, Entity Framework Core sends two identical requests to the database, even when the Increment button is clicked where no data operations are performed.

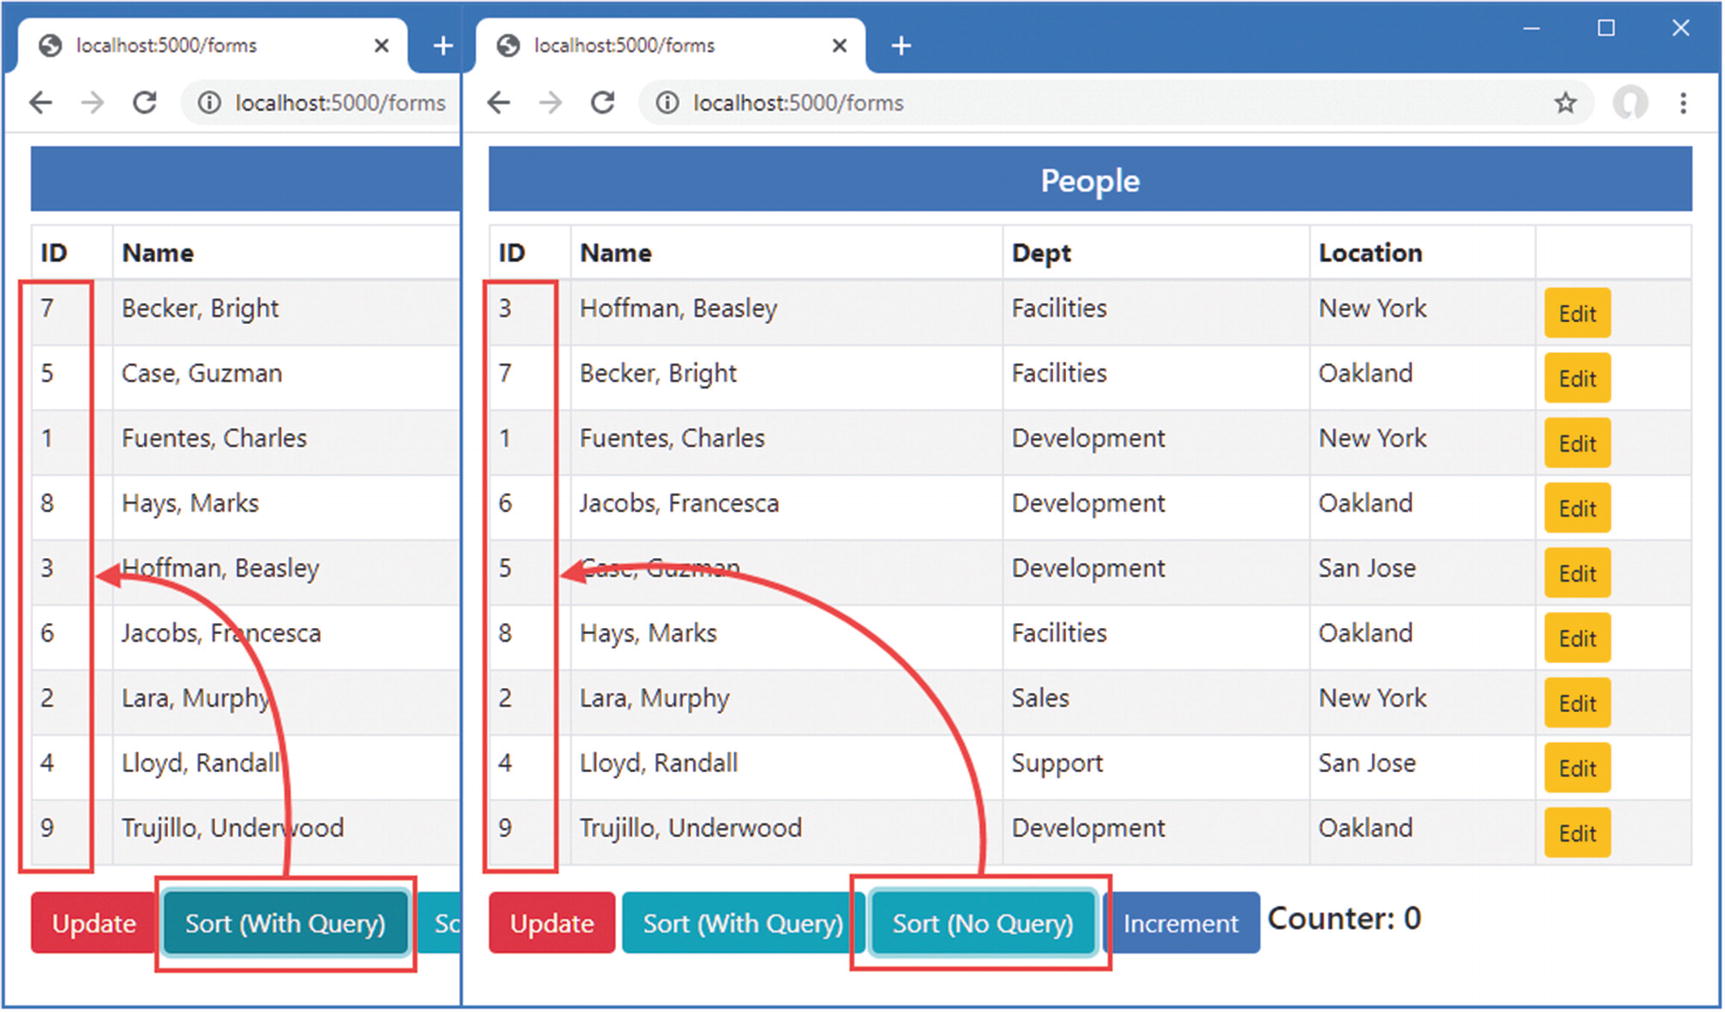
This issue can arise whenever Entity Framework Core is used and is exacerbated by Blazor. Although it is common practice to assign database queries to IEnumerable<T> properties, doing so masks an important aspect of Entity Framework Core, which is that its LINQ expressions are expressions of queries and not results, and each time the property is read, a new query is sent to the database. The value of the People property is read twice by the List component: once by the Count property to determine whether the data has loaded and once by the @foreach expression to generate the rows for the HTML table. When the user clicks the Increment button, Blazor renders the List component again to figure out what has changed, which causes the People property to be read twice more, producing two additional database queries.

Blazor and Entity Framework Core are both working the way they should. Blazor must rerender the component’s output to figure out what HTML changes need to be sent to the browser. It has no way of knowing what effect clicking the button has until after it has rendered the elements and evaluated all the Razor expressions. Entity Framework Core is executing its query each time the property is read, ensuring that the application always has fresh data.

This combination of features presents two issues. The first is that needless queries are sent to the database, which can increase the capacity required by an application (although not always because database servers are adept at handling queries).

The second issue is that changes to the database will be reflected in the content presented to the user after they make an unrelated interaction. If another user adds a Person object to the database, for example, it will appear in the table the next time the user clicks the Increment button. Users expect applications to reflect only their actions, and unexpected changes are confusing and distracting.

Managing Queries in a Component

The interaction between Blazor and Entity Framework Core won’t be a problem for all projects, but, if it is, then the best approach is to query the database once and requery only for operations where the user might expect an update to occur. Some applications may need to present the user with an explicit option to reload the data, especially for applications where updates are likely to occur that the user will want to see, as shown in Listing 36-18.
@page "/forms"
@layout EmptyLayout
<h5 class="bg-primary text-white text-center p-2">People</h5>
<table class="table table-sm table-striped table-bordered">
    <thead>
        <tr>
            <th>ID</th><th>Name</th><th>Dept</th><th>Location</th><th></th>
        </tr>
    </thead>
    <tbody>
        @if  (People.Count() == 0) {
            <tr><th colspan="5" class="p-4 text-center">Loading Data...</th></tr>
        } else {
            @foreach (Person p in People) {
                <tr>
                    <td>@p.PersonId</td>
                    <td>@p.Surname, @p.Firstname</td>
                    <td>@p.Department.Name</td>
                    <td>@p.Location.City</td>
                    <td></td>
                </tr>
            }
        }
    </tbody>
</table>
<button class="btn btn-danger" @onclick="UpdateData">Update</button>
<button class="btn btn-primary" @onclick="@(() => Counter++)">Increment</button>
<span class="h5">Counter: @Counter</span>
@code {
    [Inject]
    public DataContext Context { get; set; }
    public IEnumerable<Person> People { get; set; } = Enumerable.Empty<Person>();
    protected async override Task OnInitializedAsync() {
        await UpdateData();
    }
    private async Task UpdateData() =>
        People = await Context.People.Include(p => p.Department)
            .Include(p => p.Location).ToListAsync<Person>();
    public int Counter { get; set; } = 0;
}
Listing 36-18.

Controlling Queries in the List.razor File in the Blazor/Forms Folder

The UpdateData method performs the same query but applies the ToListAsync method, which forces evaluation of the Entity Framework Core query. The results are assigned to the People property and can be read repeatedly without triggering additional queries. To give the user control over the data, I added a button that invokes the UpdateData method when it is clicked. Restart ASP.NET Core, request http://localhost:5000/forms, and click the Increment button. Monitor the output from the ASP.NET Core server, and you will see that there is a query made only when the component is initialized. To explicitly trigger a query, click the Update button.

Some operations may require a new query, which is easy to perform. To demonstrate, Listing 36-19 adds a sort operation to the List component, which is implemented both with and without a new query.
@page "/forms"
@page "/forms/list"
@layout EmptyLayout
<h5 class="bg-primary text-white text-center p-2">People</h5>
<table class="table table-sm table-striped table-bordered">
    <thead>
        <tr>
            <th>ID</th><th>Name</th><th>Dept</th><th>Location</th><th></th>
        </tr>
    </thead>
    <tbody>
        @if  (People.Count() == 0) {
            <tr><th colspan="5" class="p-4 text-center">Loading Data...</th></tr>
        } else {
            @foreach (Person p in People) {
                <tr>
                    <td>@p.PersonId</td>
                    <td>@p.Surname, @p.Firstname</td>
                    <td>@p.Department.Name</td>
                    <td>@p.Location.City</td>
                    <td>
                        <NavLink class="btn btn-sm btn-warning"
                               href="@GetEditUrl(p.PersonId)">
                            Edit
                        </NavLink>
                    </td>
                </tr>
            }
        }
    </tbody>
</table>
<button class="btn btn-danger" @onclick="@(() => UpdateData())">Update</button>
<button class="btn btn-info" @onclick="SortWithQuery">Sort (With Query)</button>
<button class="btn btn-info" @onclick="SortWithoutQuery">Sort (No Query)</button>
<button class="btn btn-primary" @onclick="@(() => Counter++)">Increment</button>
<span class="h5">Counter: @Counter</span>
@code {
    [Inject]
    public DataContext Context { get; set; }
    public IEnumerable<Person> People { get; set; } = Enumerable.Empty<Person>();
    protected async override Task OnInitializedAsync() {
        await UpdateData();
    }
    private IQueryable<Person> Query => Context.People.Include(p => p.Department)
            .Include(p => p.Location);
    private async Task UpdateData(IQueryable<Person> query = null) =>
        People = await (query ?? Query).ToListAsync<Person>();
    public async Task SortWithQuery() {
        await UpdateData(Query.OrderBy(p => p.Surname));
    }
    public void SortWithoutQuery() {
        People = People.OrderBy(p => p.Firstname).ToList<Person>();
    }
    string GetEditUrl(long id) => $"/forms/edit/{id}";
    public int Counter { get; set; } = 0;
}
Listing 36-19.

Adding Operations to the List.razor File in the Blazor/Forms Folder

Entity Framework Core queries are expressed as IQueryable<T> objects, allowing the query to be composed with additional LINQ methods before it is dispatched to the database server. The new operations in the example both use the LINQ OrderBy method, but one applies this to the IQueryable<T>, which is then evaluated to send the query with the ToListAsync method. The other operation applies the OrderBy method to the existing result data, sorting it without sending a new query. To see both operations, restart ASP.NET Core, request http://localhost:5000/forms, and click the Sort buttons, as shown in Figure 36-10. When the Sort (With Query) button is clicked, you will see a log message indicating that a query has been sent to the database.
../images/338050_8_En_36_Chapter/338050_8_En_36_Fig10_HTML.jpg
Figure 36-10.

Managing component queries

Avoiding the Overlapping Query Pitfall

You may encounter an exception telling you that “a second operation started on this context before a previous operation completed.” This happens when a child component uses the OnParametersSetAsync method to perform an asynchronous Entity Framework Core query and a change in the parent’s data triggers a second call to OnParametersSetAsync before the query is complete. The second method call starts a duplicate query that causes the exception. This problem can be resolved by performing the Entity Framework Core query synchronously. You can see an example in Listing 36-12, where I perform queries synchronously because the parent component will trigger an update when it receives its data.

Performing Create, Read, Update, and Delete Operations

To show how the features described in previous sections fit together, I am going to create a simple application that allows the user to perform CRUD operations on Person objects.

Creating the List Component

The List component contains the basic functionality I require. Listing 36-20 removes some of the features from earlier sections that are no longer required and adds buttons that allow the user to navigate to other functions.
@page "/forms"
@page "/forms/list"
@layout EmptyLayout
@inherits OwningComponentBase<DataContext>
<h5 class="bg-primary text-white text-center p-2">People</h5>
<table class="table table-sm table-striped table-bordered">
    <thead>
        <tr>
            <th>ID</th><th>Name</th><th>Dept</th><th>Location</th><th></th>
        </tr>
    </thead>
    <tbody>
        @if  (People.Count() == 0) {
            <tr><th colspan="5" class="p-4 text-center">Loading Data...</th></tr>
        } else {
            @foreach (Person p in People) {
                <tr>
                    <td>@p.PersonId</td>
                    <td>@p.Surname, @p.Firstname</td>
                    <td>@p.Department.Name</td>
                    <td>@p.Location.City</td>
                    <td class="text-center">
                        <NavLink class="btn btn-sm btn-info"
                               href="@GetDetailsUrl(p.PersonId)">
                            Details
                        </NavLink>
                        <NavLink class="btn btn-sm btn-warning"
                               href="@GetEditUrl(p.PersonId)">
                            Edit
                        </NavLink>
                        <button class="btn btn-sm btn-danger"
                                @onclick="@(() => HandleDelete(p))">
                            Delete
                        </button>
                    </td>
                </tr>
            }
        }
    </tbody>
</table>
<NavLink class="btn btn-primary" href="/forms/create">Create</NavLink>
@code {
    public DataContext Context => Service;
    public IEnumerable<Person> People { get; set; } = Enumerable.Empty<Person>();
    protected async override Task OnInitializedAsync() {
        await UpdateData();
    }
    private IQueryable<Person> Query => Context.People.Include(p => p.Department)
            .Include(p => p.Location);
    private async Task UpdateData(IQueryable<Person> query = null) =>
        People = await (query ?? Query).ToListAsync<Person>();
    string GetEditUrl(long id) => $"/forms/edit/{id}";
    string GetDetailsUrl(long id) => $"/forms/details/{id}";
    public async Task HandleDelete(Person p) {
        Context.Remove(p);
        await Context.SaveChangesAsync();
        await UpdateData();
    }
}
Listing 36-20.

Preparing the Component in the List.razor File in the Blazor/Forms Folder

The operations for creating, viewing, and editing objects navigate to other URLs, but the delete operations are performed by the List component, taking care to reload the data after the changes have been saved to reflect the change to the user.

Creating the Details Component

The details component displays a read-only view of the data, which doesn’t require the Blazor form features or present any issues with Entity Framework Core. Add a Blazor Component named Details.razor to the Blazor/Forms folder with the content shown in Listing 36-21.
@page "/forms/details/{id:long}"
@layout EmptyLayout
@inherits OwningComponentBase<DataContext>
<h4 class="bg-info text-center text-white p-2">Details</h4>
<div class="form-group">
    <label>ID</label>
    <input class="form-control" value="@PersonData.PersonId" disabled />
</div>
<div class="form-group">
    <label>Firstname</label>
    <input class="form-control" value="@PersonData.Firstname" disabled />
</div>
<div class="form-group">
    <label>Surname</label>
    <input class="form-control" value="@PersonData.Surname" disabled />
</div>
<div class="form-group">
    <label>Department</label>
    <input class="form-control" value="@PersonData.Department?.Name" disabled />
</div>
<div class="form-group">
    <label>Location</label>
    <input class="form-control"
           value="@($"{PersonData.Location?.City}, {PersonData.Location?.State}")"
           disabled />
</div>
<div class="text-center">
    <NavLink class="btn btn-info" href="@EditUrl">Edit</NavLink>
    <NavLink class="btn btn-secondary" href="/forms">Back</NavLink>
</div>
@code {
    [Inject]
    public NavigationManager NavManager { get; set; }
    DataContext Context => Service;
    [Parameter]
    public long Id { get; set; }
    public Person PersonData { get; set; } = new Person();
    protected async override Task OnParametersSetAsync() {
        PersonData = await Context.People.Include(p => p.Department)
            .Include(p => p.Location).FirstOrDefaultAsync(p => p.PersonId == Id);
    }
    public string EditUrl => $"/forms/edit/{Id}";
}
Listing 36-21.

The Contents of the Details.razor File in the Blazor/Forms Folder

All the input elements displayed by this component are disabled, which means there is no need to handle events or process user input.

Creating the Editor Component

The remaining features will be handled by the Editor component. Listing 36-22 removes the features from earlier examples that are no longer required and adds support for creating and editing objects, including persisting the data.
@page "/forms/edit/{id:long}"
@page "/forms/create"
@layout EmptyLayout
@inherits OwningComponentBase<DataContext>
<link href="/blazorValidation.css" rel="stylesheet" />
<h4 class="bg-@Theme text-center text-white p-2">@Mode</h4>
<EditForm Model="PersonData" OnValidSubmit="HandleValidSubmit">
    <DataAnnotationsValidator />
    @if (Mode == "Edit") {
        <div class="form-group">
            <label>ID</label>
            <InputNumber class="form-control"
                @bind-Value="PersonData.PersonId" readonly />
        </div>
    }
    <div class="form-group">
        <label>Firstname</label>
        <ValidationMessage For="@(() => PersonData.Firstname)" />
        <InputText class="form-control" @bind-Value="PersonData.Firstname" />
    </div>
    <div class="form-group">
        <label>Surname</label>
        <ValidationMessage For="@(() => PersonData.Surname)" />
        <InputText class="form-control" @bind-Value="PersonData.Surname" />
    </div>
    <div class="form-group">
        <label>Deptartment</label>
        <ValidationMessage For="@(() => PersonData.DepartmentId)" />
        <CustomSelect TValue="long" Values="Departments"
                        Parser="@(str => long.Parse(str))"
                        @bind-Value="PersonData.DepartmentId">
            <option selected disabled value="0">Choose a Department</option>
        </CustomSelect>
    </div>
    <div class="form-group">
        <label>Location</label>
        <ValidationMessage For="@(() => PersonData.LocationId)" />
        <CustomSelect TValue="long" Values="Locations"
                        Parser="@(str => long.Parse(str))"
                        @bind-Value="PersonData.LocationId">
            <option selected disabled value="0">Choose a Location</option>
        </CustomSelect>
    </div>
    <div class="text-center">
        <button type="submit" class="btn btn-@Theme">Save</button>
        <NavLink class="btn btn-secondary" href="/forms">Back</NavLink>
    </div>
</EditForm>
@code {
    [Inject]
    public NavigationManager NavManager { get; set; }
    DataContext Context => Service;
    [Parameter]
    public long Id { get; set; }
    public Person PersonData { get; set; } = new Person();
    public IDictionary<string, long> Departments { get; set; }
        = new Dictionary<string, long>();
    public IDictionary<string, long> Locations { get; set; }
        = new Dictionary<string, long>();
    protected async override Task OnParametersSetAsync() {
        if (Mode == "Edit") {
            PersonData = await Context.People.FindAsync(Id);
        }
        Departments = await Context.Departments
            .ToDictionaryAsync(d => d.Name, d => d.Departmentid);
        Locations = await Context.Locations
            .ToDictionaryAsync(l => $"{l.City}, {l.State}", l => l.LocationId);
    }
    public string Theme => Id == 0 ? "primary" : "warning";
    public string Mode => Id == 0 ? "Create" : "Edit";
    public async Task HandleValidSubmit()  {
        if (Mode== "Create") {
            Context.Add(PersonData);
        }
        await Context.SaveChangesAsync();
        NavManager.NavigateTo("/forms");
    }
}
Listing 36-22.

Adding Application Features in the Editor.razor File in the Forms/Blazor Folder

I added support for a new URL and used Bootstrap CSS themes to differentiate between creating a new object and editing an existing one. I removed the validation summary so that only property-level validation messages are displayed and added support for storing the data through Entity Framework Core. Unlike form applications created using controllers or Razor Pages, I don’t have to deal with model binding because Blazor lets me work directly with the object that Entity Framework Core produces from the initial database query. Restart ASP.NET Core and request http://localhost:5000/forms. You will see the list of Person objects shown in Figure 36-11, and clicking the Create, Details, Edit, and Delete buttons will allow you to work with the data in the database.

Tip

Open a command prompt and run dotnet ef database drop --force in the Advanced project folder if you need to reset the database to undo the changes you have made. The database will be seeded again when you restart ASP.NET Core, and you will see the data shown in the figure.

../images/338050_8_En_36_Chapter/338050_8_En_36_Fig11_HTML.jpg
Figure 36-11.

Using Blazor to work with data

Extending the Blazor Form Features

The Blazor form features are effective but have the rough edges that are always found in new technology. I expect future releases to round out the feature set, but, in the meantime, Blazor makes it easy to enhance the way that forms work. The EditForm component defines a cascading EditContext object that provides access to form validation and makes it easy to create custom form components through the events, properties, and methods described in Table 36-8.
Table 36-8.

The EditContext Features

Name

Description

OnFieldChanged

This event is triggered when any of the form fields are modified.

OnValidationRequested

This event is triggered when validation is required and can be used to create custom validation processes.

OnValidationStateChanged

This event is triggered when the validation state of the overall form changes.

Model

This property returns the value passed to the EditForm component’s Model property.

Field(name)

This method is used to get a FieldIdentifier object that describes a single field.

IsModified()

This method returns true if any of the form fields have been modified.

IsModified(field)

This method returns true if the field specified by the FieldIdentifier argument has been modified.

GetValidationMessages()

This method returns a sequence containing the validation error messages for the entire form.

GetValidationMessages(field)

This method returns a sequence containing the validation error messages for a single field, using a FieldIdentifer object obtained from the Field method.

MarkAsUnmodified()

This method marks the form as unmodified.

MarkAsUnmodified(field)

This method marks a specific field as unmodified, using a FieldIdentifer object obtained from the Field method.

NotifyValidationStateChanged()

This method is used to indicate a change in validation status.

NotifyFieldChanged(field)

This method is used to indicate when a field has changed, using a FieldIdentifer object obtained from the Field method.

Validate()

This method performs validation on the form, returning true if all the form fields pass validation and false otherwise.

Creating a Custom Validation Constraint

You can create components that apply custom validation constraints if the built-in validation attributes are not sufficient. This type of component doesn’t render its own content, and it is more easily defined as a class. Add a class file named DeptStateValidator.cs to the Blazor/Forms folder and use it to define the component class shown in Listing 36-23.
using Advanced.Models;
using Microsoft.AspNetCore.Components;
using Microsoft.AspNetCore.Components.Forms;
using System.Collections.Generic;
using System.Linq;
namespace Advanced.Blazor.Forms {
    public class DeptStateValidator: OwningComponentBase<DataContext> {
        public DataContext Context => Service;
        [Parameter]
        public long DepartmentId { get; set; }
        [Parameter]
        public string State { get; set; }
        [CascadingParameter]
        public EditContext CurrentEditContext { get; set; }
        private string DeptName { get; set; }
        private IDictionary<long, string> LocationStates { get; set; }
        protected override void OnInitialized() {
            ValidationMessageStore store =
                new ValidationMessageStore(CurrentEditContext);
            CurrentEditContext.OnFieldChanged += (sender, args) => {
                string name = args.FieldIdentifier.FieldName;
                if (name == "DepartmentId" || name == "LocationId") {
                    Validate(CurrentEditContext.Model as Person, store);
                }
            };
        }
        protected override void OnParametersSet() {
            DeptName = Context.Departments.Find(DepartmentId).Name;
            LocationStates = Context.Locations
                .ToDictionary(l => l.LocationId, l => l.State);
        }
        private void Validate(Person model, ValidationMessageStore store) {
            if (model.DepartmentId == DepartmentId &&
                (!LocationStates.ContainsKey(model.LocationId) ||
                    LocationStates[model.LocationId] != State)) {
                store.Add(CurrentEditContext.Field("LocationId"),
                    $"{DeptName} staff must be in: {State}");
            } else {
                store.Clear();
            }
            CurrentEditContext.NotifyValidationStateChanged();
        }
    }
}
Listing 36-23.

The Contents of the DeptStateValidator.cs File in the Blazor/Forms Folder

This component enforces a restriction on the state in which departments can be defined so that, for example, locations in California are the valid options only when the Development department has been chosen, and any other locations will produce a validation error.

The component has its own scoped DataContext object, which it receives by using OwningComponentBase<T> as its base class. The parent component provides values for the DepartmentId and State properties, which are used to enforce the validation rule. The cascading EditContext property is received from the EditForm component and provides access to the features described in Table 36-8.

When the component is initialized, a new ValidationMessageStore is created. This object is used to register validation error messages and accepts the EditContext object as its constructor argument, like this:
...
ValidationMessageStore store = new ValidationMessageStore(CurrentEditContext);
...
Blazor takes care of processing the messages added to the store, and the custom validation component only needs to decide which messages are required, which is handled by the Validate method. This method checks the DepartmentId and LocationId properties to make sure that the combination is allowed. If there is an issue, then a new validation message is added to the store, like this:
...
store.Add(CurrentEditContext.Field("LocationId"),
    $"{DeptName} staff must be in: {State}");
...

The arguments to the Add method are a FieldIdentifier that identifies the field the error relates to and the validation message. If there are no validation errors, then the message store’s Clear method is called, which will ensure that any stale messages that have been previously generated by the component are no longer displayed.

The Validation method is called by the handler for the OnFieldChanged event, which allows the component to respond whenever the user makes a change.
...
CurrentEditContext.OnFieldChanged += (sender, args) => {
    string name = args.FieldIdentifier.FieldName;
    if (name == "DepartmentId" || name == "LocationId") {
        Validate(CurrentEditContext.Model as Person, store);
     }
};
...
The handler receives a FieldChangeEventArgs object, which defines a FieldIdentifer property that indicates which field has been modified. Listing 36-24 applies the new validation to the Editor component.
@page "/forms/edit/{id:long}"
@page "/forms/create"
@layout EmptyLayout
@inherits OwningComponentBase<DataContext>
<link href="/blazorValidation.css" rel="stylesheet" />
<h4 class="bg-@Theme text-center text-white p-2">@Mode</h4>
<EditForm Model="PersonData" OnValidSubmit="HandleValidSubmit">
    <DataAnnotationsValidator />
    <DeptStateValidator DepartmentId="2" State="CA" />
    <!-- ...elements omitted for brevity... -->
</EditForm>
@code {
    // ...statements omitted for brevity...
}
Listing 36-24.

Applying a Validation Component in the Editor.razor File in the Blazor/Forms Folder

The DepartmentId and State attributes specify the restriction that only locations in California can be selected for the Development department. Restart ASP.NET Core and request http://localhost:5000/forms/edit/2. Choose Development for the Department field, and you will see a validation error because the location for this Person is New York. This error will remain visible until you select a location in California or change the department, as shown in Figure 36-12.
../images/338050_8_En_36_Chapter/338050_8_En_36_Fig12_HTML.jpg
Figure 36-12.

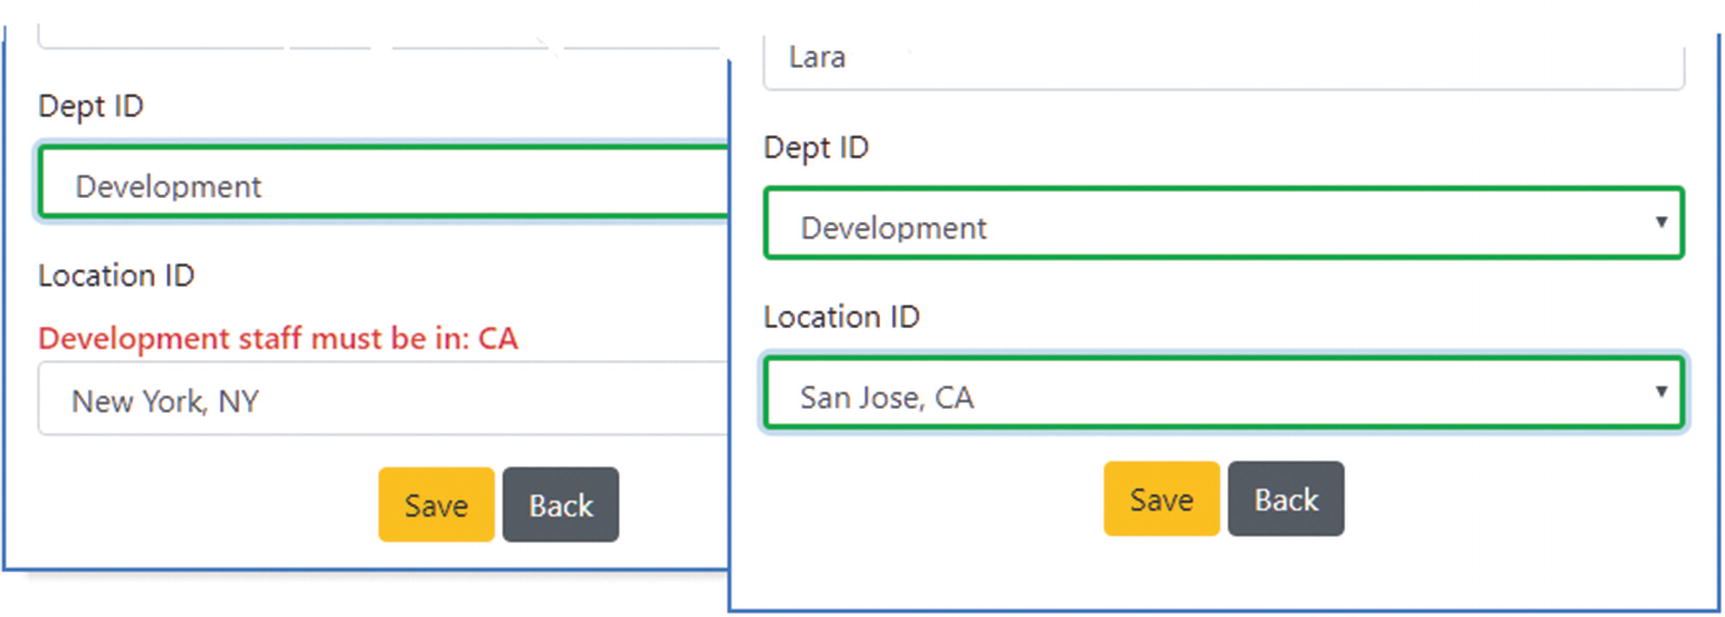
Creating a custom validation component

Creating a Valid-Only Submit Button Component

To finish this chapter, I am going to create a component that will render a submit button for the form that is enabled only when the data is valid. Add a Razor Component named ValidButton.razor to the Forms/Blazor folder with the contents shown in Listing 36-25.
<button class="@ButtonClass" @attributes="Attributes" disabled="@Disabled">
    @ChildContent
</button>
@code {
    [Parameter]
    public RenderFragment ChildContent { get; set; }
    [Parameter]
    public string BtnTheme { get; set; }
    [Parameter]
    public string DisabledClass { get; set;} = "btn-outline-dark disabled";
    [Parameter(CaptureUnmatchedValues = true)]
    public IDictionary<string, object> Attributes { get; set; }
    [CascadingParameter]
    public EditContext CurrentEditContext { get; set; }
    public bool Disabled { get; set; }
    public string ButtonClass =>
        Disabled ? $"btn btn-{BtnTheme} {DisabledClass}" : $"btn btn-{BtnTheme}";
    protected override void OnInitialized() {
        SetButtonState();
        CurrentEditContext.OnValidationStateChanged +=
            (sender, args) => SetButtonState();
        CurrentEditContext.Validate();
    }
    public void SetButtonState() {
        Disabled = CurrentEditContext.GetValidationMessages().Any();
    }
}
Listing 36-25.

The Contents of the ValidButton.razor File in the Forms/Blazor Folder

This component responds to the OnValidationStateChanged method, which is triggered when the validation state of the form changes. There is no EditContext property that details the validation state, so the best way to see if there are any validation issues is to see whether there are any validation messages. If there are, there are validation issues. If there are no validation messages, the form is valid. To ensure the button state is displayed correctly, the Validation method is called so that a validation check is performed as soon as the component is initialized.

Listing 36-26 uses the new component to replace the conventional button in the Editor component.
...
<div class="text-center">
    <ValidButton type="submit" BtnTheme="@Theme">Save</ValidButton>
    <NavLink class="btn btn-secondary" href="/forms">Back</NavLink>
</div>
...
Listing 36-26.

Applying a Component in the Editor.razor File in the Blazor/Forms Folder

Restart ASP.NET Core and request http://localhost:5000/forms/create; you will see the validation messages displayed for each form element, with the Save button disabled. The button will be enabled once each validation issue has been resolved, as shown in Figure 36-13.
../images/338050_8_En_36_Chapter/338050_8_En_36_Fig13_HTML.jpg
Figure 36-13.

Creating a custom form button

Summary

In this chapter, I described Blazor form features and showed you how they can be used to create forms that validate data. I also explained how the interactions between Entity Framework Core and Blazor can cause unexpected results and how these can be resolved by creating dependency injection scopes and managing how queries are executed. In the next chapter, I describe Blazor WebAssembly, which executes Razor Components entirely in the browser.

..................Content has been hidden....................

You can't read the all page of ebook, please click here login for view all page.
Reset
18.218.234.83