© Adam Freeman 2020
A. FreemanPro ASP.NET Core 3https://doi.org/10.1007/978-1-4842-5440-0_6

6. Testing ASP.NET Core Applications

Adam Freeman1 
(1)
London, UK
 
In this chapter, I demonstrate how to unit test ASP.NET Core applications. Unit testing is a form of testing in which individual components are isolated from the rest of the application so their behavior can be thoroughly validated. ASP.NET Core has been designed to make it easy to create unit tests, and there is support for a wide range of unit testing frameworks. I show you how to set up a unit test project and describe the process for writing and running tests. Table 6-1 summarizes the chapter.
Table 6-1.

Chapter Summary

Problem

Solution

Listing

Creating a unit test project

Use the dotnet new command with the project template for your preferred test framework

7

Creating an XUnit test

Create a class with methods decorated with the Fact attribute and use the Assert class to inspect the test results

9

Running unit tests

Use the Visual Studio or Visual Studio Code test runners or use the dotnet test command

11

Isolating a component for testing

Create mock implementations of the objects that the component under test requires

12–19

Deciding Whether To Unit Test

Being able to easily perform unit testing is one of the benefits of using ASP.NET Core, but it isn’t for everyone, and I have no intention of pretending otherwise.

I like unit testing, and I use it in my own projects, but not all of them and not as consistently as you might expect. I tend to focus on writing unit tests for features and functions that I know will be hard to write and likely to be the source of bugs in deployment. In these situations, unit testing helps structure my thoughts about how to best implement what I need. I find that just thinking about what I need to test helps produce ideas about potential problems, and that’s before I start dealing with actual bugs and defects.

That said, unit testing is a tool and not a religion, and only you know how much testing you require. If you don’t find unit testing useful or if you have a different methodology that suits you better, then don’t feel you need to unit test just because it is fashionable. (However, if you don’t have a better methodology and you are not testing at all, then you are probably letting users find your bugs, which is rarely ideal. You don’t have to unit test, but you really should consider doing some testing of some kind.)

If you have not encountered unit testing before, then I encourage you to give it a try to see how it works. If you are not a fan of unit testing, then you can skip this chapter and move on to Chapter 7, where I start to build a more realistic ASP.NET Core application.

Preparing for This Chapter

To prepare for this chapter, I need to create a simple ASP.NET Core project. Open a new PowerShell command prompt using the Windows Start menu, navigate to a convenient location, and run the commands shown in Listing 6-1.

Tip

You can download the example project for this chapter—and for all the other chapters in this book—from https://github.com/apress/pro-asp.net-core-3. See Chapter 1 for how to get help if you have problems running the examples.

dotnet new globaljson --sdk-version 3.1.101 --output Testing/SimpleApp
dotnet new web --no-https --output Testing/SimpleApp --framework netcoreapp3.1
dotnet new sln -o Testing
dotnet sln Testing add Testing/SimpleApp
Listing 6-1.

Creating the Example Project

These commands create a new project named SimpleApp using the web template, which contains the minimal configuration for ASP.NET Core applications. The project folder is contained within a solution folder also called Testing.

Opening the Project

If you are using Visual Studio, select File ➤ Open ➤ Project/Solution, select the Testing.sln file in the Testing folder, and click the Open button to open the solution file and the project it references. If you are using Visual Studio Code, select File ➤ Open Folder, navigate to the Testing folder, and click the Select Folder button.

Selecting the HTTP Port

If you are using Visual Studio, select Project ➤ SimpleApp Properties, select the Debug section, and change the HTTP port to 5000 in the App URL field, as shown in Figure 6-1. Select File ➤ Save All to save the new port. (This change is not required if you are using Visual Studio Code.)
../images/338050_8_En_6_Chapter/338050_8_En_6_Fig1_HTML.jpg
Figure 6-1.

Setting the HTTP port

Enabling the MVC Framework

As I explained in Chapter 1, ASP.NET Core supports different application frameworks, but I am going to continue using the MVC Framework in this chapter. I introduce the other frameworks in the SportsStore application that I start to build in Chapter 7, but for the moment, the MVC Framework gives me a foundation for demonstrating how to perform unit testing that is familiar from earlier examples. Add the statements shown in Listing 6-2 to the Startup.cs file in the SimpleApp folder.
using System;
using System.Collections.Generic;
using System.Linq;
using System.Threading.Tasks;
using Microsoft.AspNetCore.Builder;
using Microsoft.AspNetCore.Hosting;
using Microsoft.AspNetCore.Http;
using Microsoft.Extensions.DependencyInjection;
using Microsoft.Extensions.Hosting;
namespace SimpleApp {
    public class Startup {
        public void ConfigureServices(IServiceCollection services) {
            services.AddControllersWithViews();
        }
        public void Configure(IApplicationBuilder app, IWebHostEnvironment env) {
            if (env.IsDevelopment()) {
                app.UseDeveloperExceptionPage();
            }
            app.UseRouting();
            app.UseEndpoints(endpoints => {
                endpoints.MapDefaultControllerRoute();
                //endpoints.MapGet("/", async context => {
                //    await context.Response.WriteAsync("Hello World!");
                //});
            });
        }
    }
}
Listing 6-2.

Enabling the MVC Framework in the Startup.cs File in the SimpleApp Folder

Creating the Application Components

Now that the MVC Framework is set up, I can add the application components that I will use to demonstrate important C# language features.

Creating the Data Model

I started by creating a simple model class so that I can have some data to work with. I added a folder called Models and created a class file called Product.cs within it, which I used to define the class shown in Listing 6-3.
namespace SimpleApp.Models {
    public class Product {
        public string Name { get; set; }
        public decimal? Price { get; set; }
        public static Product[] GetProducts() {
            Product kayak = new Product {
                Name = "Kayak", Price = 275M
            };
            Product lifejacket = new Product {
                Name = "Lifejacket", Price = 48.95M
            };
            return new Product[] { kayak, lifejacket };
        }
    }
}
Listing 6-3.

The Contents of the Product.cs File in the SimpleApp/Models Folder

The Product class defines Name and Price properties, and there is a static method called GetProducts that returns a Products array.

Creating the Controller and View

For the examples in this chapter, I use a simple controller class to demonstrate different language features. I created a Controllers folder and added to it a class file called HomeController.cs, the contents of which are shown in Listing 6-4.
using Microsoft.AspNetCore.Mvc;
using SimpleApp.Models;
namespace SimpleApp.Controllers {
    public class HomeController : Controller {
        public ViewResult Index() {
            return View(Product.GetProducts());
        }
    }
}
Listing 6-4.

The Contents of the HomeController.cs File in the SimpleApp/Controllers Folder

The Index action method tells ASP.NET Core to render the default view and provides it with the Product objects obtained from the static Product.GetProducts method. To create the view for the action method, I added a Views/Home folder (by creating a Views folder and then adding a Home folder within it) and added a Razor View called Index.cshtml, with the contents shown in Listing 6-5.
@using SimpleApp.Models
@model IEnumerable<Product>
@{ Layout = null; }
<!DOCTYPE html>
<html>
<head>
    <meta name="viewport" content="width=device-width" />
    <title>Simple App</title>
</head>
<body>
    <ul>
        @foreach (Product p in Model) {
            <li>Name: @p.Name, Price: @p.Price</li>
        }
    </ul>
</body>
</html>
Listing 6-5.

The Contents of the Index.cshtml File in the SimpleApp/Views/Home Folder

Running the Example Application

Start ASP.NET Core by selecting Start Without Debugging (Visual Studio) or Run Without Debugging (Visual Studio Code) from the Debug menu or by running the command shown in Listing 6-6 in the SimpleApp folder.
dotnet run
Listing 6-6.

Running the Example Application

Request http://localhost:5000, and you will see the output shown in Figure 6-2.
../images/338050_8_En_6_Chapter/338050_8_En_6_Fig2_HTML.jpg
Figure 6-2.

Running the example application

Creating a Unit Test Project

For ASP.NET Core applications, you generally create a separate Visual Studio project to hold the unit tests, each of which is defined as a method in a C# class. Using a separate project means you can deploy your application without also deploying the tests. The .NET Core SDK includes templates for unit test projects using three popular test tools, as described in Table 6-2.
Table 6-2.

The Unit Test Project Tools

Name

Description

mstest

This template creates a project configured for the MS Test framework, which is produced by Microsoft.

nunit

This template creates a project configured for the NUnit framework.

xunit

This template creates a project configured for the XUnit framework.

These testing frameworks have largely the same feature set and differ only in how they are implemented and how they integrate into third-party testing environments. I recommend starting with XUnit If you do not have an established preference, largely because it is the test framework that I find easiest to work with.

The convention is to name the unit test project <ApplicationName>.Tests. Run the commands shown in Listing 6-7 in the Testing folder to create the XUnit test project named SimpleApp.Tests, add it to the solution file, and create a reference between projects so the unit tests can be applied to the classes defined in the SimpleApp project.
dotnet new xunit -o SimpleApp.Tests --framework netcoreapp3.1
dotnet sln add SimpleApp.Tests
dotnet add SimpleApp.Tests reference SimpleApp
Listing 6-7.

Creating the Unit Test Project

If you are using Visual Studio, you will be prompted to reload the solution, which will cause the new unit test project to be displayed in the Solution Explorer, alongside the existing project. You may find that Visual Studio Code doesn’t build the new project. If that happens, select Terminal ➤ Configure Default Build Task, select “build” from the list, and, if prompted, select .NET Core from the list of environments.

Removing the Default Test Class

The project template adds a C# class file to the test project, which will confuse the results of later examples. Either delete the UnitTest1.cs file from the SimpleApp.Tests folder using the Solution Explorer or File Explorer pane or run the command shown in Listing 6-8 in the Testing folder.
Remove-Item SimpleApp.Tests/UnitTest1.cs
Listing 6-8.

Removing the Default Test Class File

Writing and Running Unit Tests

Now that all the preparation is complete, I can write some tests. To get started, I added a class file called ProductTests.cs to the SimpleApp.Tests project and used it to define the class shown in Listing 6-9. This is a simple class, but it contains everything required to get started with unit testing.

Note

The CanChangeProductPrice method contains a deliberate error that I resolve later in this section.

using SimpleApp.Models;
using Xunit;
namespace SimpleApp.Tests {
    public class ProductTests {
        [Fact]
        public void CanChangeProductName() {
            // Arrange
            var p = new Product { Name = "Test", Price = 100M };
            // Act
            p.Name = "New Name";
            //Assert
            Assert.Equal("New Name", p.Name);
        }
        [Fact]
        public void CanChangeProductPrice() {
            // Arrange
            var p = new Product { Name = "Test", Price = 100M };
            // Act
            p.Price = 200M;
            //Assert
            Assert.Equal(100M, p.Price);
        }
    }
}
Listing 6-9.

The Contents of the ProductTests.cs File in the SimpleApp.Tests Folder

There are two unit tests in the ProductTests class, each of which tests a behavior of the Product model class from the SimpleApp project. A test project can contain many classes, each of which can contain many unit tests.

Conventionally, the name of the test methods describes what the test does, and the name of the class describes what is being tested. This makes it easier to structure the tests in a project and to understand what the results of all the tests are when they are run by Visual Studio. The name ProductTests indicates that the class contains tests for the Product class, and the method names indicate that they test the ability to change the name and price of a Product object.

The Fact attribute is applied to each method to indicate that it is a test. Within the method body, a unit test follows a pattern called arrange, act, assert (A/A/A). Arrange refers to setting up the conditions for the test, act refers to performing the test, and assert refers to verifying that the result was the one that was expected.

The arrange and act sections of these tests are regular C# code, but the assert section is handled by xUnit.net, which provides a class called Assert, whose methods are used to check that the outcome of an action is the one that is expected.

Tip

The Fact attribute and the Asset class are defined in the Xunit namespace, for which there must be a using statement in every test class.

The methods of the Assert class are static and are used to perform different kinds of comparison between the expected and actual results. Table 6-3 shows the commonly used Assert methods.
Table 6-3.

Commonly Used xUnit.net Assert Methods

Name

Description

Equal(expected, result)

This method asserts that the result is equal to the expected outcome. There are overloaded versions of this method for comparing different types and for comparing collections. There is also a version of this method that accepts an additional argument of an object that implements the IEqualityComparer<T> interface for comparing objects.

NotEqual(expected, result)

This method asserts that the result is not equal to the expected outcome.

True(result)

This method asserts that the result is true.

False(result)

This method asserts that the result is false.

IsType(expected, result)

This method asserts that the result is of a specific type.

IsNotType(expected, result)

This method asserts that the result is not a specific type.

IsNull(result)

This method asserts that the result is null.

IsNotNull(result)

This method asserts that the result is not null.

InRange(result, low, high)

This method asserts that the result falls between low and high.

NotInRange(result, low, high)

This method asserts that the result falls outside low and high.

Throws(exception, expression)

This method asserts that the specified expression throws a specific exception type.

Each Assert method allows different types of comparison to be made and throws an exception if the result is not what was expected. The exception is used to indicate that a test has failed. In the tests in Listing 6-9, I used the Equal method to determine whether the value of a property has been changed correctly.
...
Assert.Equal("New Name", p.Name);
...

Running Tests with the Visual Studio Test Explorer

Visual Studio includes support for finding and running unit tests through the Test Explorer window, which is available through the Test ➤ Test Explorer menu and is shown in Figure 6-3.

Tip

Build the solution if you don’t see the unit tests in the Test Explorer window. Compilation triggers the process by which unit tests are discovered.

../images/338050_8_En_6_Chapter/338050_8_En_6_Fig3_HTML.jpg
Figure 6-3.

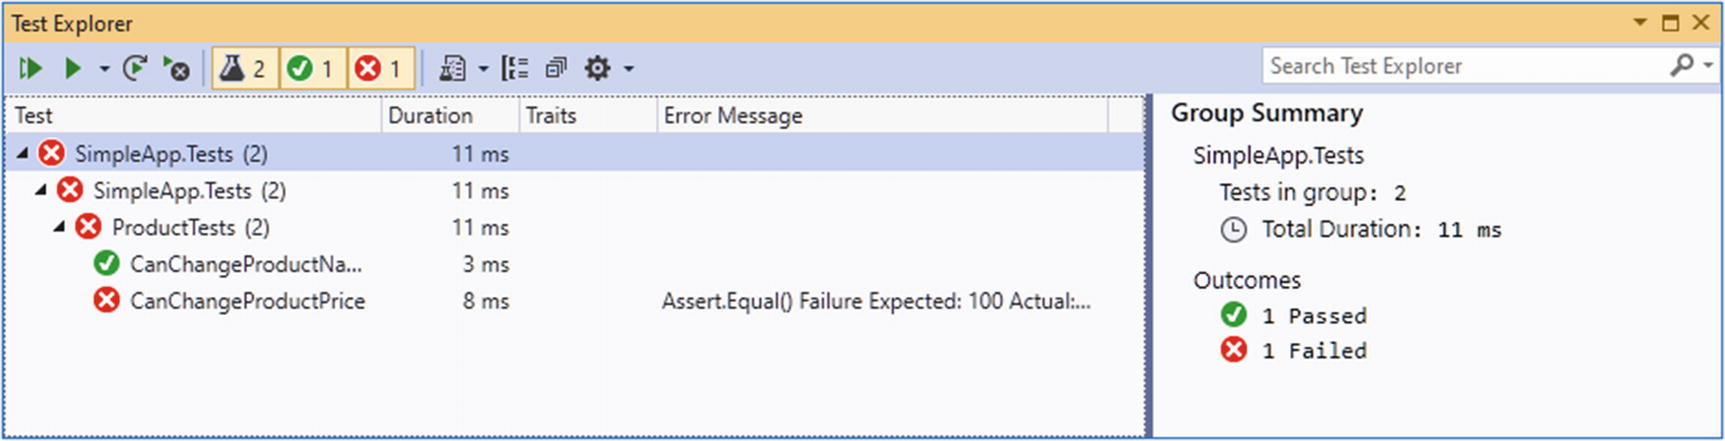
The Visual Studio Test Explorer

Run the tests by clicking the Run All Tests button in the Test Explorer window (it is the button that shows two arrows and is the first button in the row at the top of the window). As noted, the CanChangeProductPrice test contains an error that causes the test to fail, which is clearly indicated in the test results shown in the figure.

Running Tests with Visual Studio Code

Visual Studio Code detects tests and allows them to be run using the code lens feature, which displays details about code features in the editor. To run all the tests in the ProductTests class, click Run All Tests in the code editor when the unit test class is open, as shown in Figure 6-4.
../images/338050_8_En_6_Chapter/338050_8_En_6_Fig4_HTML.jpg
Figure 6-4.

Running tests with the Visual Studio Code code lens feature

Tip

Close and reopen the Testing folder in Visual Studio Code if you don’t see the code lens test features.

Visual Studio Code runs the tests using the command-line tools that I describe in the following section, and the results are displayed as text in a terminal window.

Running Tests from the Command Line

To run the tests in the project, run the command shown in Listing 6-10 in the Testing folder.
dotnet test
Listing 6-10.

Running Unit Tests

The tests are discovered and executed, producing the following results, which show the deliberate error that I introduced earlier:
Test run for C:UsersadamSimpleApp.Tests.dll(.NETCoreApp,Version=v3.1)
Microsoft (R) Test Execution Command Line Tool Version 16.3.0
Copyright (c) Microsoft Corporation.  All rights reserved.
Starting test execution, please wait...
A total of 1 test files matched the specified pattern.
[xUnit.net 00:00:00.83]     SimpleApp.Tests.ProductTests.CanChangeProductPrice [FAIL]
  X SimpleApp.Tests.ProductTests.CanChangeProductPrice [6ms]
  Error Message:
   Assert.Equal() Failure
Expected: 100
Actual:   200
  Stack Trace:
     at SimpleApp.Tests.ProductTests.CanChangeProductPrice() in C:UsersadamDocumentsBooksPro ASP.NET Core MVC 3Source CodeCurrentTestin
gSimpleApp.TestsProductTests.cs:line 31
Test Run Failed.
Total tests: 2
     Passed: 1
     Failed: 1
 Total time: 1.7201 Seconds

Correcting the Unit Test

The problem with the unit test is with the arguments to the Assert.Equal method, which compares the test result to the original Price property value rather than the value it has been changed to. Listing 6-11 corrects the problem.

Tip

When a test fails, it is always a good idea to check the accuracy of the test before looking at the component it targets, especially if the test is new or has been recently modified.

using SimpleApp.Models;
using Xunit;
namespace SimpleApp.Tests {
    public class ProductTests {
        [Fact]
        public void CanChangeProductName() {
            // Arrange
            var p = new Product { Name = "Test", Price = 100M };
            // Act
            p.Name = "New Name";
            //Assert
            Assert.Equal("New Name", p.Name);
        }
        [Fact]
        public void CanChangeProductPrice() {
            // Arrange
            var p = new Product { Name = "Test", Price = 100M };
            // Act
            p.Price = 200M;
            //Assert
            Assert.Equal(200M, p.Price);
        }
    }
}
Listing 6-11.

Correcting a Test in the ProductTests.cs File in the SimpleApp.Tests Folder

Run the tests again, and you will see they all pass. If you are using Visual Studio, you can click the Run Failed Tests button, which will execute only the tests that failed, as shown in Figure 6-5.
../images/338050_8_En_6_Chapter/338050_8_En_6_Fig5_HTML.jpg
Figure 6-5.

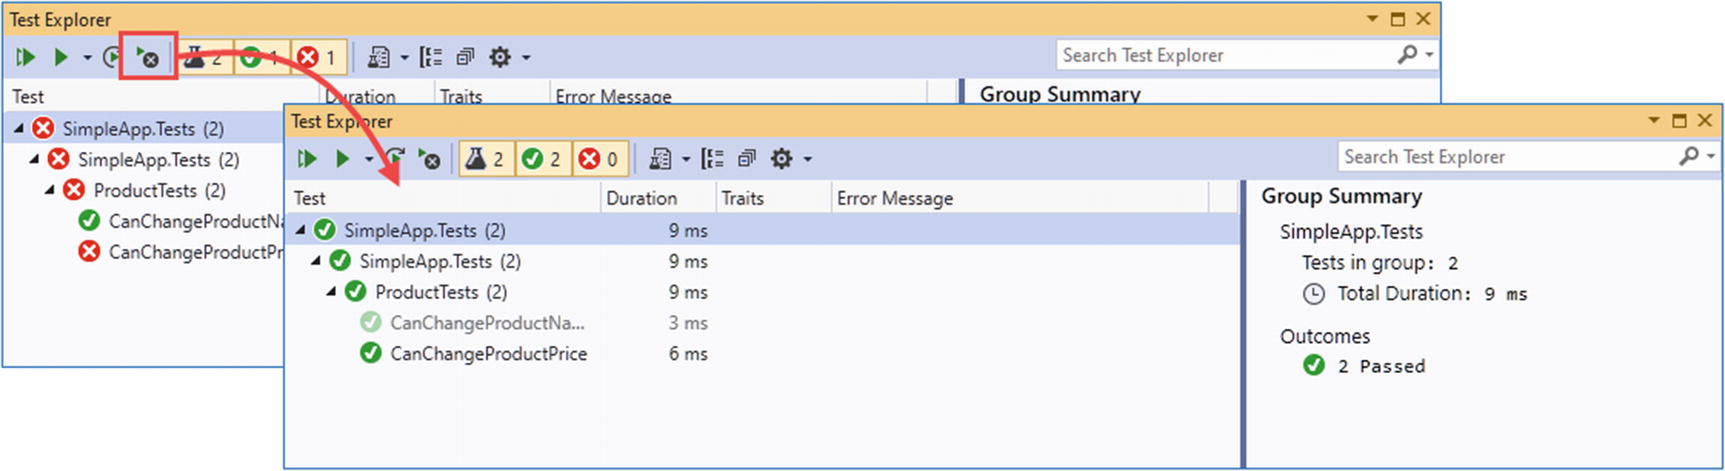
Running only failed tests

Isolating Components for Unit Testing

Writing unit tests for model classes like Product is easy. Not only is the Product class simple, but it is self-contained, which means that when I perform an action on a Product object, I can be confident that I am testing the functionality provided by the Product class.

The situation is more complicated with other components in an ASP.NET Core application because there are dependencies between them. The next set of tests that I define will operate on the controller, examining the sequence of Product objects that are passed between the controller and the view.

When comparing objects instantiated from custom classes, you will need to use the xUnit.net Assert.Equal method that accepts an argument that implements the IEqualityComparer<T> interface so that the objects can be compared. My first step is to add a class file called Comparer.cs to the unit test project and use it to define the helper classes shown in Listing 6-12.
using System;
using System.Collections.Generic;
namespace SimpleApp.Tests {
    public class Comparer {
        public static Comparer<U> Get<U>(Func<U, U, bool> func) {
            return new Comparer<U>(func);
        }
    }
    public class Comparer<T> : Comparer, IEqualityComparer<T> {
        private Func<T, T, bool> comparisonFunction;
        public Comparer(Func<T, T, bool> func) {
            comparisonFunction = func;
        }
        public bool Equals(T x, T y) {
            return comparisonFunction(x, y);
        }
        public int GetHashCode(T obj) {
            return obj.GetHashCode();
        }
    }
}
Listing 6-12.

The Contents of the Comparer.cs File in the SimpleApp.Tests Folder

These classes will allow me to create IEqualityComparer<T> objects using lambda expressions rather than having to define a new class for each type of comparison that I want to make. This isn’t essential, but it will simplify the code in my unit test classes and make them easier to read and maintain.

Now that I can easily make comparisons, I can illustrate the problem of dependencies between components in the application. I added a new class called HomeControllerTests.cs to the SimpleApp.Tests folder and used it to define the unit test shown in Listing 6-13.
using Microsoft.AspNetCore.Mvc;
using System.Collections.Generic;
using SimpleApp.Controllers;
using SimpleApp.Models;
using Xunit;
namespace SimpleApp.Tests {
    public class HomeControllerTests {
        [Fact]
        public void IndexActionModelIsComplete() {
            // Arrange
            var controller = new HomeController();
            Product[] products = new Product[]  {
                new Product { Name = "Kayak", Price = 275M },
                new Product { Name = "Lifejacket", Price = 48.95M}
            };
            // Act
            var model = (controller.Index() as ViewResult)?.ViewData.Model
                as IEnumerable<Product>;
            // Assert
            Assert.Equal(products, model,
                Comparer.Get<Product>((p1, p2) => p1.Name == p2.Name
                    && p1.Price == p2.Price));
        }
    }
}
Listing 6-13.

The HomeControllerTests.cs File in the SimpleApp.Tests Folder

The unit test creates an array of Product objects and checks that they correspond to the ones the Index action method provides as the view model. (Ignore the act section of the test for the moment; I explain the ViewResult class in Chapters 21 and 22. For the moment, it is enough to know that I am getting the model data returned by the Index action method.)

The test passes, but it isn’t a useful result because the Product data that I am testing is coming from the hardwired objects’ Product class. I can’t write a test to make sure that the controller behaves correctly when there are more than two Product objects, for example, or if the Price property of the first object has a decimal fraction. The overall effect is that I am testing the combined behavior of the HomeController and Product classes and only for the specific hardwired objects.

Unit tests are effective when they target small parts of an application, such as an individual method or class. What I need is the ability to isolate the Home controller from the rest of the application so that I can limit the scope of the test and rule out any impact caused by the repository.

Isolating a Component

The key to isolating components is to use C# interfaces. To separate the controller from the repository, I added a new class file called IDataSource.cs to the Models folder and used it to define the interface shown in Listing 6-14.
using System.Collections.Generic;
namespace SimpleApp.Models {
    public interface IDataSource {
        IEnumerable<Product> Products { get; }
    }
}
Listing 6-14.

The Contents of the IDataSource.cs File in the SimpleApp/Models Folder

In Listing 6-15, I have removed the static method from the Product class and created a new class that implements the IDataSource interface.
using System.Collections.Generic;
namespace SimpleApp.Models {
    public class Product {
        public string Name { get; set; }
        public decimal? Price { get; set; }
    }
    public class ProductDataSource : IDataSource {
        public IEnumerable<Product> Products =>
            new Product[] {
                new Product { Name = "Kayak", Price = 275M },
                new Product { Name = "Lifejacket", Price = 48.95M }
            };
    }
}
Listing 6-15.

Creating a Data Source in the Product.cs File in the SimpleApp/Models Folder

The next step is to modify the controller so that it uses the ProductDataSource class as the source for its data, as shown in Listing 6-16.

Tip

ASP.NET Core supports a more elegant approach for solving this problem, known as dependency injection, which I describe in Chapter 14. Dependency injection often causes confusion, so I isolate components in a simpler and more manual way in this chapter.

using Microsoft.AspNetCore.Mvc;
using SimpleApp.Models;
namespace SimpleApp.Controllers {
    public class HomeController : Controller {
        public IDataSource dataSource = new ProductDataSource();
        public ViewResult Index() {
            return View(dataSource.Products);
        }
    }
}
Listing 6-16.

Adding a Property in the HomeController.cs File in the SimpleApp/Controllers Folder

This may not seem like a significant change, but it allows me to change the data source the controller uses during testing, which is how I can isolate the controller. In Listing 6-17, I have updated the controller unit tests so they use a special version of the repository.
using Microsoft.AspNetCore.Mvc;
using System.Collections.Generic;
using SimpleApp.Controllers;
using SimpleApp.Models;
using Xunit;
namespace SimpleApp.Tests {
    public class HomeControllerTests {
        class FakeDataSource : IDataSource {
            public FakeDataSource(Product[] data) => Products = data;
            public IEnumerable<Product> Products { get; set; }
        }
        [Fact]
        public void IndexActionModelIsComplete() {
            // Arrange
            Product[] testData = new Product[] {
                new Product { Name = "P1", Price = 75.10M },
                new Product { Name = "P2", Price = 120M },
                new Product { Name = "P3", Price = 110M }
            };
            IDataSource data = new FakeDataSource(testData);
            var controller = new HomeController();
            controller.dataSource = data;
            // Act
            var model = (controller.Index() as ViewResult)?.ViewData.Model
                as IEnumerable<Product>;
            // Assert
            Assert.Equal(data.Products, model,
                Comparer.Get<Product>((p1, p2) => p1.Name == p2.Name
                    && p1.Price == p2.Price));
        }
    }
}
Listing 6-17.

Isolating the Controller in the HomeControllerTests.cs File in the SimpleApp.Tests Folder

I have defined a fake implementation of the IDataSource interface that lets me use any test data with the controller.

Understanding Test-Driven Development

I have followed the most commonly used unit testing style in this chapter, in which an application feature is written and then tested to make sure it works as required. This is popular because most developers think about application code first and testing comes second (this is certainly the category that I fall into).

This approach is that it tends to produce unit tests that focus only on the parts of the application code that were difficult to write or that needed some serious debugging, leaving some aspects of a feature only partially tested or untested altogether.

An alternative approach is Test-Driven Development (TDD). There are lots of variations on TDD, but the core idea is that you write the tests for a feature before implementing the feature itself. Writing the tests first makes you think more carefully about the specification you are implementing and how you will know that a feature has been implemented correctly. Rather than diving into the implementation detail, TDD makes you consider what the measures of success or failure will be in advance.

The tests that you write will all fail initially because your new feature will not be implemented. But as you add code to the application, your tests will gradually move from red to green, and all your tests will pass by the time that the feature is complete. TDD requires discipline, but it does produce a more comprehensive set of tests and can lead to more robust and reliable code.

Using a Mocking Package

It was easy to create a fake implementation for the IDataSource interface, but most classes for which fake implementations are required are more complex and cannot be handled as easily.

A better approach is to use a mocking package, which makes it easy to create fake—or mock—objects for tests. There are many mocking packages available, but the one I use (and have for years) is called Moq. To add Moq to the unit test project, run the command shown in Listing 6-18 in the Testing folder.

Note

The Moq package is added to the unit testing project and not the project that contains the application to be tested.

dotnet add SimpleApp.Tests package Moq --version 4.13.1
Listing 6-18.

Installing the Mocking Package

Creating a Mock Object

I can use the Moq framework to create a fake IDataSource object without having to define a custom test class, as shown in Listing 6-19.
using Microsoft.AspNetCore.Mvc;
using System.Collections.Generic;
using SimpleApp.Controllers;
using SimpleApp.Models;
using Xunit;
using Moq;
namespace SimpleApp.Tests {
    public class HomeControllerTests {
        //class FakeDataSource : IDataSource {
        //    public FakeDataSource(params Product[] data) => Products = data;
        //    public IEnumerable<Product> Products { get; set; }
        //}
        [Fact]
        public void IndexActionModelIsComplete() {
            // Arrange
            Product[] testData = new Product[] {
                new Product { Name = "P1", Price = 75.10M },
                new Product { Name = "P2", Price = 120M },
                new Product { Name = "P3", Price = 110M }
            };
            var mock = new Mock<IDataSource>();
            mock.SetupGet(m => m.Products).Returns(testData);
            var controller = new HomeController();
            controller.dataSource = mock.Object;
            // Act
            var model = (controller.Index() as ViewResult)?.ViewData.Model
                as IEnumerable<Product>;
            // Assert
            Assert.Equal(testData, model,
                Comparer.Get<Product>((p1, p2) => p1.Name == p2.Name
                    && p1.Price == p2.Price));
            mock.VerifyGet(m => m.Products, Times.Once);
        }
    }
}
Listing 6-19.

Creating a Mock Object in the HomeControllerTests.cs File in the SimpleApp.Tests Folder

The use of Moq has allowed me to remove the fake implementation of the IDataSource interface and replace it with a few lines of code. I am not going to go into detail about the different features that Moq supports, but I will explain the way that I used Moq in the examples. (See https://github.com/Moq/moq4 for examples and documentation for Moq. There are also examples in later chapters as I explain how to unit test different types of components.)

The first step is to create a new instance of the Mock object, specifying the interface that should be implemented, like this:
...
var mock = new Mock<IDataSource>();
...
The Mock object I created will fake the IDataSource interface. To create an implementation of the Product property, I use the SetUpGet method, like this:
...
mock.SetupGet(m => m.Products).Returns(testData);
...

The SetupGet method is used to implement the getter for a property. The argument to this method is a lambda expression that specifies the property to be implemented, which is Products in this example. The Returns method is called on the result of the SetupGet method to specify the result that will be returned when the property value is read.

The Mock class defines an Object property, which returns the object that implements the specified interface with the behaviors that have been defined. I used the Object property to set the dataSource field defined by the HomeController, like this:
...
controller.dataSource = mock.Object;
...
The final Moq feature I used was to check that the Products property was called once, like this:
...
mock.VerifyGet(m => m.Products, Times.Once);
...

The VerifyGet method is one of the methods defined by the Mock class to inspect the state of the mock object when the test has completed. In this case, the VerifyGet method allows me to check the number of times that the Products property method has been read. The Times.Once value specifies that the VerifyGet method should throw an exception if the property has not been read exactly once, which will cause the test to fail. (The Assert methods usually used in tests work by throwing an exception when a test fails, which is why the VerifyGet method can be used to replace an Assert method when working with mock objects.)

The overall effect is the same as my fake interface implementation, but mocking is more flexible and more concise and can provide more insight into the behavior of the components under test.

Summary

This chapter focused on unit testing, which can be a powerful tool for improving the quality of code. Unit testing doesn’t suit every developer, but it is worth experimenting with and can be useful even if used only for complex features or problem diagnosis. I described the use of the xUnit.net test framework, explained the importance of isolating components for testing, and demonstrated some tools and techniques for simplifying unit test code. In the next chapter, I start the development of a more realistic project, named SportsStore.

..................Content has been hidden....................

You can't read the all page of ebook, please click here login for view all page.
Reset
3.145.204.201