
In Chapter 3, I talked at length about scale and how it relates to building LEGO models. The discussion lead you through the steps to create a small-scale train station to add to a small-scale LEGO town. In this chapter, you’re going to go the other way. You’re going to build a model that is larger, not smaller, than the real life object it represents.
One great way to demonstrate this idea is by taking advantage of an interesting characteristic of LEGO bricks; you can use them to make other LEGO bricks. No, I’m not suggesting that you melt down your bricks and remold them. Rather, I’m talking about the technique whereby you use individual bricks to construct a jumbo brick that looks exactly like the small version, just many times larger.
When you go to build a jumbo brick, you use a technique called scaling up. This is the idea that you take the dimensions of the real life object and multiply them by some number. That number is the scale factor that you first saw in Chapter 3.
In your first encounter with scale, I suggested that a minifig world might be built to a scale of around 1:48. In other words, a model building or vehicle would be 48 times smaller than the same object in the real world. In this chapter, you’ll explore macro building, or making the model larger than the real life object.
Macro building involves reversing the relationship of the numbers in your scale. For example, the model in Figure 5-1 is ten times bigger than the real brick it represents. That means it was built to a scale of 10:1.

Figure 5-1. This jumbo model of a 1x1 brick dwarfs the real 1x1 that served as inspiration. It is ten times larger and stands nearly 4 1/2 inches tall.
Note
Remember from Chapter 3 that the number on the left signifies the number of real objects you are talking about and the number on the right represents the model version.
For the example shown in Figure 5-1, you would say that you are building a brick to ten times scale—also sometimes written as 10X.
It’s important to note that the ten times scale is applied to each of the three dimensions. Take the length and multiply it by ten, then multiply the width by ten, and finally do the same to the height. This gives you the final size you are aiming to build. So in the example in Figure 5-1, your 1x1 brick has sides that are 10 studs wide, by 10 studs deep, by 10 bricks or courses high.
Note
You can also describe this process as building to a “factor of” something. Keeping with the current example, you can say that you are building jumbo bricks to a factor of 10. This is an expression you may hear from time to time, and it’s an effective way of describing the scale to which you are building something.
Figure 5-2 shows a 1x1 brick scaled up to a factor of 4. This might make it a little easier to see the relationship between the two numbers that make up the scale.
At first glance, you might think that Figure 5-2 is a visual representation of 1:4 scale. In fact, it is just the opposite. It shows 4:1 scale. You can see that it would take four of the actual brick (shown on the left) to equal the height of the macro model (shown on the right). Don’t forget that the length and width are also four times larger in the jumbo version.

Note
As I discuss the scale of models and objects, I am talking about only one dimension at a time. For instance, I say that the jumbo is four times as high or four times as wide as the real thing. If I was to talk about all three dimensions (length, width, and height) at the same time, I’d be discussing the volume of the object. That would tell you how many of the real objects it would take to occupy the same amount of space as the jumbo. For example, for a 4X model, you would multiply 4x4x4. Put another way, a 4X scale 1x1 brick takes up as much space as 64 normal sized 1x1’s!
There isn’t much to building a 4X jumbo 1x1 like the one in Figures Figure 5-3 through Figure 5-5. In fact, it’s as easy as one, two, three.


In step 1, I actually show you two courses of bricks because this construction technique should be familiar to you by now. You’ll recognize the arrangements of 1x2 and 1x4 bricks as the chimney pattern from Chapter 2.
Step 2 isn’t much more complicated. You add a third layer of 1x2’s and 1x4’s and then cap the model off with two 2x4 bricks. To appreciate the true effect of macro-sized bricks, always construct them using the same color elements.
In step 3, a 2x2 cylinder brick finishes our jumbo-sized 1x1 model. Although it’s possible to cover the studs using tiles, I’ve avoided this technique for two reasons. First, it adds to the number of pieces you need to make each brick. Second, if you leave exposed studs on the top of each jumbo brick, you can later build with them very much like you use the real versions at normal size. I’ll discuss this later in this chapter.
Now you’re ready to build your own jumbo brick. To begin, take a different-sized brick and build it to 4X scale. The classic 2x4 brick should provide a good example of how the same scale can be applied to different sized models.
When you’re scaling up a simple object like a LEGO brick, it’s really just a matter of multiplying each of the original dimensions by the factor you’re using—in this case, 4. In Table 5-1, I show you the actual dimensions of a 2x4 brick and the dimensions of the jumbo version at 4X scale.
Table 5-1. Dimensions for Building a 2x4 Brick to 4X Scale Size
|
Real Brick |
Jumbo Brick Model | |
|---|---|---|
|
Width |
2 studs |
8 studs |
|
Length |
4 studs |
16 studs |
|
Height |
1 brick |
4 bricks |
The calculations here are really fairly simple. You know that your actual model will be 8 studs wide, 16 studs long, and 4 bricks high. Begin building this example by laying down a foundation layer that is 8x16 studs. (The example shown here, beginning with Figure 5-6, uses 1x8 and 1x6 bricks, but you can use whatever pieces you have available as long as the end result is the same.)

Next, as shown in Figure 5-7, you need to build another course on top of the initial one you set down. (Don’t forget to always overlap as much as possible.) The third layer, shown in Figure 5-8, is just more of the same.


For the fourth and final layer, begin to finish the jumbo by covering the top completely, not just with another outside course of bricks. You can do this in one of two ways: either by using two layers of 1xN plates around the top of the model (as shown in Figure 5-9), and then topping things off with some 2x8 and 4x8 plates (as shown in Figure 5-10); or by building the final course using just 2x8 bricks and no plates at all.

Figure 5-10. Step 5. In place of plates as the top layer(s) you can use 2x8 bricks if you have them.
Note
For simplicity’s sake, I’ve not included the tubes (inside the brick) with these instructions. However, a simple solution to creating them will be shown later in this chapter when you build a jumbo version of a 2x2 45-degree slope.
Finally, you need some studs on top of this jumbo. But where do they go? The 1x1 you looked at earlier was easy since the stud went right in the middle.
For this example, you need to add the eight studs found on the top of every standard 2x4 brick. Look carefully at an actual 2x4 brick. You’ll see that the studs are evenly spaced and that they are closer to the edge of the brick than to each other. In fact, in Figure 5-11, you can see that A is only about half the width of the distance indicated by B.

Figure 5-11. By studying actual elements, you learn facts that will help you make your jumbo models look more realistic.
When you look at the top of the finished jumbo brick in Figure 5-12, you will see that the 2x2 cylinder bricks, used to represent studs, should be placed one stud away from the edge of the brick. At 4X scale, they will also always be two studs away from the next nearest 2x2 cylinder.
In other words, the cylinders are placed twice as far from each other as from the edge of the brick, just as you saw in Figure 5-11.

If you look carefully at Figure 5-12, you will see that the studs feel right. Although the calculations for their placement may not be precise enough to land a man on the moon, they are more than sufficient to build jumbo bricks.
Because you only scaled up the 2x4 brick by a factor of 4 in the preceding example, you again used 1xN bricks to represent the side walls of the brick. The reason for this is that even though the scaled-up 2x4 brick is bigger than the previous 1x1 example (see Figure 5-5), the thickness of the walls is the same on both bricks. Scaling them up by the same factor means the jumbo models should have walls that are equally thick.
The thickness of the outer wall of a real 1xN brick (or a 2xN brick) is just about 1/16 of an inch. The width of the brick itself, as seen in Figure 5-13, is just over 1/4 of an inch.

If we take 1/16 of an inch and multiply it by a factor of 4, you get 4/16 or 1/4 inch—almost the same as the actual brick.
This means that a real 1xN brick is just about the right width to duplicate the outer wall of a jumbo brick built to 4X scale.
For the 10X example shown in Figure 5-1, you need to use 2xN bricks to simulate the thickness of the brick walls. For the 4X version, those would probably have looked unnecessarily chunky and out of proportion. You can see what I mean in Figure 5-14. Here, you use 1x4 bricks used for the jumbo on the left, which allows it to have walls that are the correct proportion. The example on the far right uses 2xN bricks and, as you can see, the walls are much too thick. In fact, there’s no opening for a stud, so this is obviously a bad choice.

Figure 5-14. One of these things is not like the others, and it might not be the one you think! The version on the right was built with the wrong bricks and lacks the open core of the jumbo version (far left) and the real 1x1 (center).
The decision about what size bricks to use to construct any model is most often made on a case-by-case basis, so it’s nearly impossible to devise or apply a single rule that applies to every situation. Given enough other knowledge, however, it is reasonable to assume that you can work out many of these small details as they present themselves.
Sometimes you need a test build to see if a particular solution holds water. In the instance just described, it would be sensible to set out the first layer of bricks in both sizes (2xN and 1xN) and compare them. Right away you would see that with 2xN bricks, the resulting scaled brick would have a hollow underside that would be too small (or even nonexistent) in relation to its overall size. Conversely, you would see that if you made the model of 1xN bricks, it would look more like your original.
Note
A test build is like sticking your foot in a pool to find out the temperature of the water. Instead of jumping in completely, you just go partway in to see if things are what you expect—that the water isn’t freezing cold. When you are building with LEGO bricks, you can do something similar. Build a section of a large model to see if a certain technique is working. Or try building a small-scale version of something to see if it translates well into LEGO bricks. If it does, then build a larger version.
By tinkering and experimenting during a test build, you can save yourself a great deal of frustration later on. Although it may be easy to spot the correct approach in the example of the 1x1 built to 4X scale, imagine instead that you were trying to build a 10X scale 2x4 brick. Take it one step further and imagine you made the wrong choice and tried to build the side walls from 1xN bricks instead of 2xN bricks. You could easily have put together two or three hundred bricks before you realized the mistake in your selection of materials. However, if you had done a test build of even a layer or two and then evaluated the results, you would likely have corrected yourself early on. In fact, it may not have even been necessary to build an entire course of the 2x4 jumbo brick. You would likely have spotted the problem by just building a few layers of one or two corners.
You might be wondering, “Are there other parts, besides standard bricks, that make good jumbos?” The answer is “yes.” You can scale up many other elements from within the LEGO system just like the basic bricks I’ve already shown you. Standard slopes and plates are relatively easy since their geometry is simple to copy. Other elements, such as arches, Technic pieces, or some of the specialized elements are also possible to scale though they might require a bit more planning and attention to detail.
Figure 5-15 shows a couple of example pieces to get you started.

Both of the elements shown in Figure 5-15 make excellent subjects for macroscale building. Here’s how to make your own versions of these common pieces.
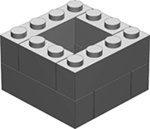
If you’re looking for a small but interesting element to get started with jumbo building, I strongly suggest a 1x2 plate. Once you’ve finished the larger-scale version, try holding it in one hand while you hold a real 1x2 plate in the other. The sense of scale should become quickly obvious when you realize that a tiny piece that you normally pinch between two fingers becomes big enough to nearly cover your palm!
As shown in Figures Figure 5-16 through Figure 5-19, constructing this element in 4X scale is pretty simple.


The studs on the final model (Figure 5-19) appear a bit large, but they are built from a fairly common piece (the 2x2 cylinder brick). If you have 2x2 cylindrical plates, you can substitute two for each of the 2x2 cylinders I used here to make the size appear more accurate.
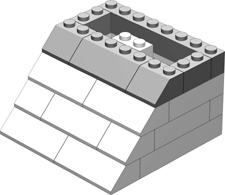
The 2x2 45-degree slope is another common element that’s fun to re-create as a jumbo model. When you’re choosing which elements to scale up, keep in mind that you may need large quantities of certain pieces. For example, the 2x2 45-degree slope uses a number of actual 45-degree slopes to re-create the angled side of the jumbo brick. Figures Figure 5-20 through Figure 5-24 show the steps you need to follow to build this element. As you can see, the model requires four 2x2 slopes and six 2x4 slopes. Building the same element to a larger scale (10X or 12X) requires even more actual 45-degree elements. Deciding which pieces to re-create as jumbo versions will, therefore, depend largely on whether or not you have enough of the actual-sized elements in your collection.


You’ll find that the 1x2 plate and the 2x2 slope shown in the preceding pages can connect to each other in almost the same way at their regularly sized versions. The only real difference is the way in which they grip in order to stick together. Normal-sized bricks use the friction between the studs on top and the tubes inside other pieces to lock together, but jumbo elements lock together differently.
Remember when I mentioned earlier that you were leaving the small-sized studs exposed on the top of each of your jumbo elements? That was because the studs you built (the scaled-up versions) don’t work to hold jumbo bricks together. Instead, you must rely on the normal-sized exposed studs to connect to the pieces of another jumbo brick. This means it’s possible to build an entire LEGO set out of jumbo bricks.
This isn’t unlike the idea of submodels that I talked about in Chapter 3. In the case of building an entire LEGO model out of jumbo elements, you could consider each of the jumbos to be a submodel. The main structure then is the model that you build from them. The building process is twofold. First, you need to re-create each individual piece in a jumbo size. Then you need to assemble the set exactly as you would the normal-sized version. In Figure 5-25, you can see that I’ve finished the first step, building jumbo versions of a number of different elements.

Figure 5-25. Once you’ve built each piece at 4X scale, you’ll have a jumbo pile of bricks ready for the next step.
The jumbo elements in Figure 5-25 don’t look like much. In fact, they just look like a pile of assorted LEGO pieces, though each of them is really a 4X jumbo model.
When you put them all together, just as you would normal-sized pieces, you end up building a complete LEGO model to jumbo scale. In Figure 5-26, you see the 4X model that arises from the pile of assorted jumbos shown in Figure 5-25. As well, in Figure 5-26 you see the original, much smaller, airplane model that I used as inspiration.

Bear in mind that this type of model—an entire set build of jumbo elements—can consume large quantities of bricks, so you might want to select to build a small set initially. In addition, you’ll want to work at a reasonable scale, such as the 4X technique you used for the last few examples.
As you work through virtually any LEGO project, you will find yourself questioning the usefulness of this part or that part in this situation or that. You’ll wrestle with choices between various techniques and, of course, at what scale to build something. It’s all part of the art of LEGO building and part of the challenge that puts this building system at the top of its class. To that end, there is one principle that will help you no matter what you are constructing:
Make things only as complicated as they need be but no more.
Using the 2x2 cylinder brick to represent the stud on a 4X model (Figure 5-5) is an example of this kind of solution. It uses the minimum number of pieces required to complete the task and no more. When you’re building or designing a new model, try always to focus on simple solutions like that.