
Adding virtual instruments, software sounds, and software plugins allow you to make inspirational harmonies in your music production. Usually, you will find presets that you can scroll through in any given virtual instrument plugin. You will also find knobs that affect the sound parameters. Virtual instruments mean sounds that are based in software. You will be able to control these sounds using your QWERTY keyboard, MIDI controller, your mouse (preview only), or by using the FL Studio Piano roll. The actual installation of virtual instruments and effects to be utilized in FL Studio was covered in Chapter 1, Configuring FL Studio. There is a wide array of virtual instruments, from low quality to high quality. For example, Hans Zimmer uses certain virtual instruments when composing scores for film, so there are many high-quality orchestral and sample libraries. NATIVE INSTRUMENTS and EASTWEST are two companies known for high-quality virtual instruments. The quality will be based on the coding and algorithms of software designers. Usually, the most realistic sounding virtual instruments are hybrids of high-quality recordings and programming. The drawback is that they are also pricey, but may be worth it depending on your needs. You may also find free virtual instruments by searching on the Internet.
To get started using virtual instruments, you will simply need to have the step sequencer opened. Your virtual instruments will appear as a channel in the step sequencer. With FL Studio default virtual instruments such as 3x Osc and TS404, the PLUGIN tab will give you immediate access to the parameters. Other times, your PLUGIN tab will be a graphical pop-out interface that will vary in appearance depending on the plugin designers.
The following steps will guide you through the process of adding virtual instruments:
- Right-click on a channel in the step sequencer as shown in Fig 4.7.
- Select Insert and then bring up the software instrument you want to use. FL Studio allows you to use their factory plugins, 3x Osc, TS404 bassline synthesizer, Fruity DX10, BooBass, and FL Keys, among others as instrument plugins. If it says DEMO after opening or trying to save a project, it is only a demo plugin. You can test out demo sounds but cannot save them to your project.
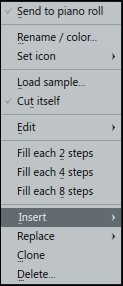
Fig 4.7
- Alternatively, you may use the FL Studio Browser. Right-click on a sound and select Open in a new channel. Fig 4.8 shows a right-click on a sound within the
3x Oscfolder. You may also use the main FL Studio CHANNELS menu and then select Add one.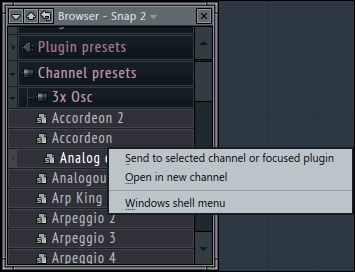
Fig 4.8
- Use the FL Studio step sequencer and Keyboard editor to enter the notes of your instrument. You may also right-click on a channel and use the Piano roll, reviewed later in this chapter.
- Use your MIDI controller, mouse, or QWERTY keyboard to preview the sounds of your instrument plugin. Hold down Ctrl and click on a channel name to play a previous C4 note.
- Fig 4.9 shows the graphical pop out of an instrument plugin when you click on the PLUGIN tab in your channel settings:
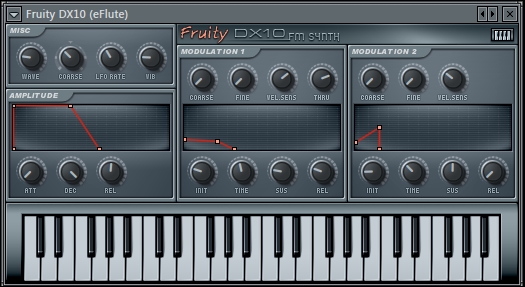
Fig 4.9
- When an instrument plugin has an actual pop out and a software graphical readout, you may scroll through presets using the left and right arrows at the upper right-hand corner of the plugin. It will list the name of your preset on the upper-left of your plugin. Fig 4.9 shows we are working with the instrument called eFlute, within the Fruity DX10 plugin. Right-click on the left or right arrow to display a list of all available sound patches of your plugin.
- To see how many presets are present within a given instrument plugin, look at the FL Studio hint bar. In the following screenshot, we see that eFlute is the 11th patch/sound out of 59 presets:

Fig 4.10
- There are two main ways to engage your QWERTY keyboard to function as a basic controller. The keys on your actual computer screen will control the notes in FL Studio. This is in cases where you do not have an actual computer keybed or MIDI controller, or when you are mobile with a laptop but no MIDI controller.

Fig 4.11
- To use your QWERTY keyboard to record or preview notes, you will want to select Typing keyboard to piano in the OPTIONS menu or simply engage the orange light on the small keyboard in Fig 4.11 (on the top left-hand side). If you decide to use Metronome, you can click the symbol underneath the keyboard sign in Fig 4.11. Right-click to select different sounds of your Metronome.
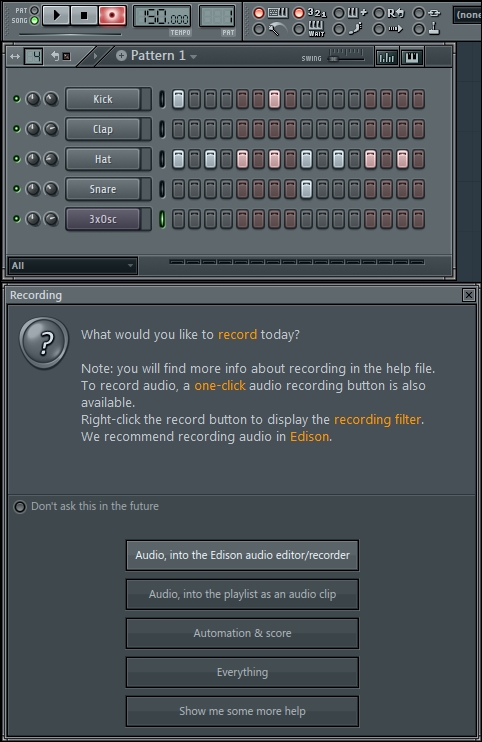
Fig 4.12
Recording using a MIDI controller/keyboard or a QWERTY computer keybed
- Engage the channel you want to record with the channel select button (small green slit next to the 3xOsc channel in Fig 4.12).
- Right-click on the 3 2 1 button to select your precount duration.
- Click on the recording button in the transport controls and it will turn orange.
- Select Automation & score. This means your MIDI data and notes will be recorded into the step sequencer. MIDI isn't actual audio—it is simply note data, duration, and how hard you pressed a particular key (note velocity). You can change and cycle through various sound patches once MIDI data is recorded.
- Click on the play button to begin your countdown.
- Record your performance and your channel will now show data in the FL Studio Piano roll. The following screenshot shows the transport controls used for recording purposes:

Fig 4.13
Once you have your instrument plugin in a channel within the step sequencer, you have many options with regard to how to get your data recorded and saved in the step sequencer. Working with the Keyboard editor can be handy if you are on the go and you only have access to a mouse and your computer. If you have a MIDI controller and you want to actually perform your notes as your pattern plays, you will use the recording method from Fig 4.12. You will be recording Automation & score because your score means the notes you are playing. Using virtual instruments within your computer means you are not actually recording audio per se—you are recording the MIDI notes within your software plugin. Once recorded, you can replace your sound patch. You may also paint or draw notes directly into the Piano roll, which we will review later in this chapter.
The area next to the transport controls (play, stop, and record) is crucial when working with virtual instruments, recording, and using the step sequencer. If you engage the button to the right of 3 2 1, you will find the hint bar tells you it is the Blend recording (overdub) button (highlighted with a red circle). When using the overdub button in conjunction with the Loop recording (the button with the R and an arrow icon) button, your pattern will loop back around and you can continue to add notes/data to your given channel without pressing stop. You can also switch to different channels and continue to record. This is a remarkable function of FL Studio because your creativity can expand as your project continues to play. Be careful during the blend recording process because everything you do (besides recording MIDI data) will be recorded, for example, tempo and volume knob tweaks.
If the overdub button is turned off and you still have the Loop recording button engaged, your notes/data will be replaced by whatever notes you choose to play. During this process of overdubbing or loop recording, you can actually move from channel to channel by using the channel select button, and FL Studio will continue to record. You can also add new channels, sounds, and plugins while FL Studio continues to record! This allows you to get very creative and add parts on the fly, which you can edit later.
- The Using the Piano roll recipe
- The Installing virtual instruments and effects recipe in Chapter 1, Configuring FL Studio
- The Sending a channel to a mixer slot recipe in Chapter 3, Working with Step Sequencer and Channels
- The Adding effects to your effect chains recipe in Chapter 6, Using the FL Studio Mixer and Recording Audio