
The step sequencer contains a plethora of areas that can be clicked on and explored to aid your music production.
In order to get started using the step sequencer, open up FL Studio and press the F6 key to toggle it. Additionally, go to the VIEW menu and then select Step Sequencer. When the step sequencer is selected, you will see a small checkbox next to it. A third way is to simply click on the step sequencer symbol. The step sequencer is the second button from the left in Fig 3.1. You will also want to have your FL Studio Browser open so you can browse the sounds, which in turn will be sent to your channels. However, you may also load the samples from your Channel settings window in the step sequencer or drag them from your computer into an FL Studio channel. You may right-click directly on a channel and then select Insert or Replace.
Fig 3.1
Let's take a look at the fundamental areas of the step sequencer. This opens up to many other levels and subtopics. The following screenshot shows the step sequencer:
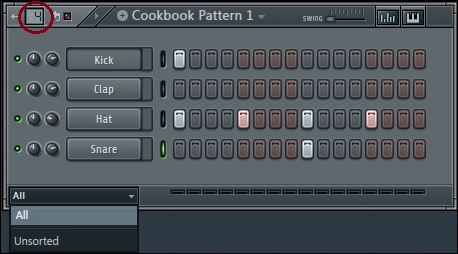
Fig 3.2
- Beats per bar for this pattern:
The following steps will help you set the beats per bar value for a pattern:
- Hover your mouse over the small box in the left-hand corner (see the number 4 in Fig 3.2). Observe the FL Studio hint bar to see Beats per bar for this pattern.
- Click on Drag up or down to adjust your beats per bar and it will adjust the steps accordingly. Release your mouse button when you reach the number you want.
- Pattern selector:
- Hover your mouse over Pattern selector (where it says Cookbook Pattern 1 in Fig 3.2).
- Click on it and it will populate the patterns you have used so far. Keep in mind that you can rename each pattern to your own liking; otherwise, the patterns will keep its default labels of the generic patterns 1, 2, 3, and so on.
- Swing:
Sometimes, it is important that you offset the timing of your groove and make it more human. Chapter 9, Humanizing Your Song, is dedicated to doing exactly that. Fig 3.3 shows the adjustment of the swing slider on the title bar. It shows the beats of your waveform and how their start time is being shifted. It pushes your groove ever so slightly in time to the right, and the areas in red represent the down beat in 4/4 musical time.
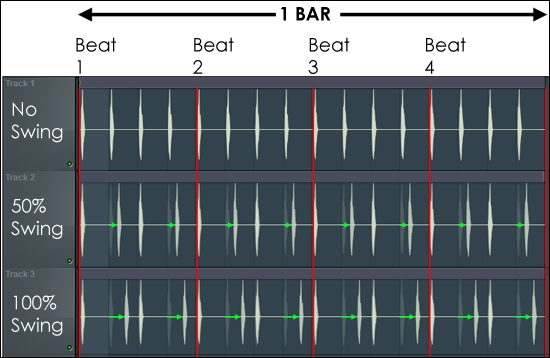
Fig 3.3 Image courtesy: The FL Studio help file
- Click on the small swing button next to the swing.
- You may slide the small box to the right and adjust your swing percentage (remember to check the FL Studio hint bar as discussed previously).
- Graph editor:
The Graph editor tab provides the added ability to tweak your various steps. Each note can be moved individually. Take a look at the following screenshot:
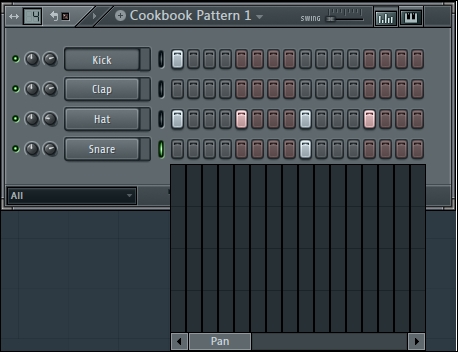
Fig 3.4
- Click on the first button to the right of the swing slider to bring up the Graph editor section. If Typing keyboard to piano is turned off (your QWERTY keyboard), you may press the G key to engage Graph editor.
- It will then populate the options from left to right, including Pan, Velocity, Release, Mod X, Mod Y, Fine pitch, and Shift. Note that in Fig 3.4, the Snare channel is selected with the small green light. You must select a channel with the small green light and then click on Graph editor. You can then control that particular channel with Graph editor. Each row on the parameters correlates to each step on a given channel.
- Left-click anywhere in Graph editor to enter data for steps, which will show up in any given Graph editor parameters. This will show up as a vertical readout in FL Studio.
- Keyboard editor:
This turns each step into a full-fledged piano turned on its side, as shown in the following screenshot:
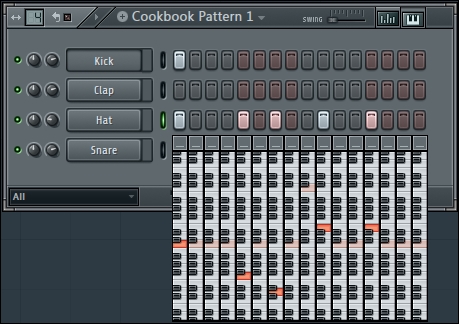
Fig 3.5
- Click on the mini keyboard symbol in the top right-hand corner of the FL Studio step sequencer.
- Click on the notes you desire for the steps in your particular channel. When you open Keyboard editor, every individual step can be changed into a new note if desired. This is like a piano with all of the keys, but the layout is vertical instead of the regular, horizontal one. If you turn your head to the left, you can see that it is in a piano. You can click inside Keyboard editor and your selection will be shown in orange, which will also automatically activate the particular step in question.
- Scroll up and down with your mouse; you may also click, hold, and drag vertically with your mouse on every column of Keyboard editor. This will help you quickly find notes in octaves that are higher or lower on the keyboard. This allows for speedy inspiration and is another useful tool to create music, random melodies, and rhythms. Right-clicking on a note will delete its note data and also leave a faint red color where you last engaged a note.
- Hold down Ctrl when clicking-and-dragging to simultaneously move all the notes up or down in pitch.
- Mute/Solo Button:
- Hover your mouse over the small green circle button, shown in the following screenshot, at the far left of a channel in the step sequencer:
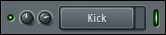
Fig 3.6
- When you left-click on a channel, you can turn a given channel on and off. As a shortcut, simply press numbers 1 to 9 at the top of your QWERTY keyboard to mute on or off. The numbers correlate with the channels from top to bottom.
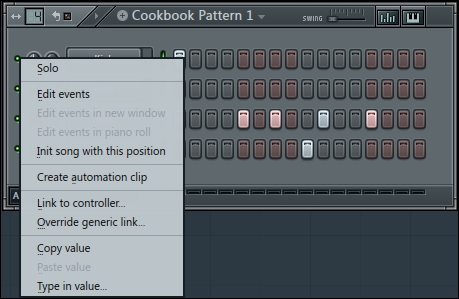
Fig 3.7
- When you right-click on a channel, it will open up the options in the preceding screenshot.
- Also, hold Ctrl + 1 and other numbers at the top of your QWERTY keyboard as a shortcut (again, the numbers correlate with the channels).
- Select the Solo button to mute all of the other channels and only hear the audio from your isolated selection. You can also hold Ctrl and click on the green light to make the channel a solo selection.
- We will review the creation of automation clips in Chapter 10, Recording Automation.
- Note that in the previous option of Link to controller…, you may use a MIDI controller to turn the Solo button on or off or control the volume and panning knobs. Please review the recipe Working with MIDI controllers and MIDI pads in Chapter 4, Building Your Song, for more details. There are many physical knobs and sliders that can be utilized in MIDI controllers if you enjoy using the feel of your hands in lieu of clicking with a mouse. Essentially, any parameter on your computer screen can be controlled using a MIDI controller.
- Hover your mouse over the small green circle button, shown in the following screenshot, at the far left of a channel in the step sequencer:
- Channel panning knob:
- Hover your mouse over the knob directly to the right of the Mute / solo button in Fig 3.6. The hint bar will tell you that it is, indeed, the channel panning parameter. You will also see a small FL Studio symbol that represents how far left or right you are pushing your sound.
- Left-clicking, holding, and dragging up or down correlates with a right/left crossfade, respectively. Hold down Ctrl to make the knob move slowly. You may place certain instruments to the left, right, or somewhere in between based on your creative taste. Although a fundamental property of all music productions, panning can have a huge impact on your final mood, mix, and production.
- Right-click to select additional options. You may reset the knob here to return it to FL Studio's default position. Alt + left-click will also reset it.
- Right-clicking will also give you the automation clips and the Link to controller… options, both of which will be covered later in the book.
- Channel volume knob:
- Click on the volume knob and pull up or down to adjust the level of your channel. Directly to the right of the channel panning is the Channel volume knob in Fig 3.6. FL Studio will also show a small readout of the volume setting when the volume knob is engaged.
- Hold down Ctrl before engaging your mouse button to have more control over the volume. This will enable you to adjust your level in small steps rather than large steps and may help in cases where only a small tweak is needed.
- Right-clicking will allow you to reset the volume to FL Studio's default position, create an automation clip, or link to a MIDI controller (using Link to controller…).
- This is arguably the most important aspect of music production—the relative volume of one instrument or part to another. They should not be clipped or set too high, which could cause distortion. The step sequencer makes it very easy to adjust the volume as the volume knob is included directly to the left of every channel. We will review other volume adjusters later in the chapter.
- Channel:
- Left-click on a channel to bring up the Channel settings window. We will review this in the next recipe of this chapter, titled Exploring Channel settings.
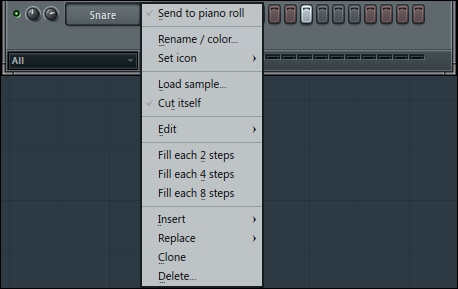
Fig 3.8
- Right-click on a channel to open up the additional options. In the preceding screenshot, we right-clicked on the Snare channel.
- Select Fill each 2 steps, Fill each 4 steps, or Fill each 8 steps to command FL Studio to automatically fill your steps in the channel that you have selected. This may help when you are testing out hi hats, shakers, and percussion, or in any creative way that you can think of.
- Select Rename / color… to better organize your project to your individual system. A quicker shortcut is pressing Shift + click.
- Select Set icon to help with the organization if necessary.
- Select Clone to make an exact copy of your selected channel. This will not include the steps or the Piano roll information, but cloning a channel will produce the same parameters as the original channel that is being cloned. This means that the panning, volume and all the knobs within the Channel settings window will be cloned. The cloned channel will then appear directly below the original channel that is being cloned. This is very useful when you want to make a variation of an existing instrument that you are using and don't want to lose the original.
- Left-click on a channel to bring up the Channel settings window. We will review this in the next recipe of this chapter, titled Exploring Channel settings.
- Channel select:
The Select tab is the small green slit to the right of the kick channel in Fig 3.6.
- Left-click on the green slit button currently engaged to select all the channels, and have the green slit button highlight all of your channels in your given pattern.
- Right-click to select the additional channels, which includes your currently selected channel. Alternatively, you may press Shift and click on the desired channels.
- Right-clicking on a channel select will also remove the channel selection.
- Knowing which channels have been selected is crucial to understanding how to copy and paste channels or patterns and when you will send certain channels to the FL Studio Mixer. We will review these details in subsequent chapters. Also, multiple samples can be triggered at once via multiple MIDI triggers or controllers.
- Steps:
Left-click or right-click on the steps in the step sequencer (grey or reddish blocks) to trigger your sound or virtual instrument (refer to Fig 3.2).
The beats per bar set the number of steps in each step sequencer pattern. When working your beats per bar with a standard 4/4 time pattern (which is mostly used in popular music genres such as Indie Rock, Pop, Alternative, EDM, and Hip Hop), you can set this number to 4, 8, 16, 32, or 64. This will enable you to have a standard beats and bar pattern, and after engaging the Space bar while in pattern mode, your pattern will loop around to form a seamless loop. If you are working with a 3/4 time pattern, you may set your beats per bar for this pattern to the number 6 or 12. The loop you form can happen very quickly, and that is a reason why FL Studio is one of the easiest programs to use.
Each pattern may have a different and individual beats per bar. You may set the number of beats per bar in the GENERAL settings of the song project (press F10 and then go to Project | GENERAL). By using the Piano roll, you will eradicate this entire issue of setting individual beats per bar values because you will be able to stretch your notes infinitely.
You may have up to 999 patterns using FL Studio, and each pattern will incorporate as many channels as you desire.
Using the space bar is vital to working with the step sequencer in all phases of your music production. This will enable you to stop your current loop and restart it from the beginning so that you can revise the steps you have entered at the start of the sequence if you wish to do so. Alternatively, you can let the loop play through, and it will cycle back to the beginning.
You may add as many channels as you want to whichever patterns you desire in the step sequencer. Remember that these patterns will later be used to arrange and build your song in the FL Studio Playlist, which is covered at the start of Chapter 5, Using the Playlist. For example, pattern 1 may include only your kick drum pattern, and you may rename it to Kick; pattern 2 may include only your hi hat pattern, and you may rename it to Hi Hat; pattern 3 may be your virtual instrument violin pattern, and you may rename it to Violin; and pattern 4 may be a guitar bassline, and you may rename it to Bassline.
A key function in all of this is copying and pasting channel data in addition to cutting channel data (erasing the channel data in the step sequencer). Channel data is anything to the right of a channel. This can be MIDI data, audio, a Piano roll, automation data, controller data, and so on. You will want to use the channel Select button (small green slit) on the channel in question. For example, let's pretend you have many channels and many steps filled in the step sequencer, all within pattern 16. In an example of pattern 16, you could have a cymbal channel, a piano channel, and a shaker channel, all on separate channels, but within the same pattern 16.
In order to separate the sounds from the pattern, which will later be used in the FL Studio Playlist (Chapter 5, Using the Playlist) when building your song, you will want to use the channel Select green slit, press Ctrl + X to copy and delete it's sequencer data (because you are moving it elsewhere), navigate to a new pattern, and finally press Ctrl + V to paste it in. You may do this with multiple channels at once. You will not have to adjust the channel Select button in this process. It will remain in place on your given selected channel or channels. Using this method will allow you to work with one pattern of your choice when adding sounds and instruments and let you be creative with it. You will then have to separate the individual pieces and parts of your production by cutting and pasting channels or using the Split by channel feature covered later in this chapter. You can copy, paste, and cut channel data like you would with text in a Word document. Using the beats per bar and pattern selectors is all up to the user. How you divide your pieces and parts and arrange them is another crucial piece of the music production process.
The key features of working with the Graph editor are Velocity and Shift. The Graph editor can also adjust the panning and fine-tuning of the music file − using the Fine pitch function can make slightly flat instruments sound really cool. When working with the step sequencer, using the Velocity tab allows you to adjust the volume for each individual step on the step sequencer. Velocity is a tremendous tool for virtual instruments, guitars, and pianos because the lower the volume, the more soft and gentle the notes are conveyed. When you move the Graph editor to adjust the value of Velocity, you will be able to adjust the orange columns on each step in the step sequencer on a given channel. This will make things less robotic and add a human feel. Feel free to experiment with the velocity of your music in the Graph editor, and make sure you have the channel Select button engaged on the channel data that you want to adjust with the Graph editor. Another key feature is something you will find when you slide the Graph editor function all the way to the right. There you will find the Shift function, which offsets the timing of the notes ever so slightly. At a maximum Shift value, it will play the next step. Again, you will be able to adjust the columns of the Graph editor, which in this case will show in a blue column. The key reason for using the Graph editor is to adjust individual notes or events in lieu of working globally and affecting them all. The step sequencer is extremely intuitive when used this way because everything is located on one screen, and you don't have to navigate very far to make considerable adjustments to your music project. It's unbelievably powerful in its own right—just look under the proverbial hood!
Using the Keyboard editor on the step sequencer also makes it easy for the user to make quick changes to their music project. If you are using this, you are dealing with the tone and key of your sounds in any given channel. As discussed earlier, the Keyboard editor is a piano that has been turned on its side, and you may enter the piano notes by simply using your mouse. Note that using the Keyboard editor can come in handy when dealing with a multitude of sounds. You can adjust the key of your percussion or virtual instruments. Changing the pitch of an audio sample will adjust the playback speed. Changing a virtual instrument note will adjust the MIDI note value. Any note placed in the steps of the step sequencer can be manipulated with the Keyboard editor. Also, remember that each note that you press using your mouse in the Keyboard editor will automatically place a step in the step sequencer on your given channel.
Using the Mute/Solo button is something that is done during the mixing process. In FL Studio, the moment you start using the step sequencer, you are immediately immersed into the mixing process because you have control over the mute/solo feature, panning feature, and volume. Muting or soloing your channel can provide you with access to hear what your project sounds like with your channel, without your channel, and with only your channel. Soloing a channel can help when you really need to hear what is going on with your audio and in the cases of a vocal performance. Sometimes, you may hear a pop or click noise in your music project, and soloing something allows you to "find the culprit," so to speak. Soloing is also used when making equalization adjustments, which we will discuss when reviewing the FL Studio Mixer. When mixing, you will want to hear how your tracks/channels sound by themselves and also in the context of the entire mix. The content of your entire mix is incredibly important, so you may use muting or soloing, as you see fit, to build your music project and for the process of choosing your arrangement.
The channel panning and channel volume features are also crucial elements in any musical project. Panning will allow you to and interest to your song and place instruments tactfully to the left or right to make all of the elements of your song sound harmonious. You may also automate panning whenever you want to. We will review automation in Chapter 10, Recording Automation. The volume is arguably the most important part of mixing instruments because you want each channel to be at an optimal volume relative to all of your other channels. This also goes for when you have vocal tracks or any external instrument. Your vocals will need to "sit" well with all of the instruments in your project. Mixing instruments and vocals also includes additive or subtractive equalization (EQ), which will be reviewed in Chapter 6, Using the FL Studio Mixer and Recording Audio. You also want your percussion and all of the instrument channels to be set at the proper volume. Decreasing or increasing the volume on given channels is up to the musical creator and their creative taste. Holding down the Ctrl button while moving up or down with your mouse allows you to adjust the volume in smaller increments with more control.
Using the steps in the step sequencer gives you immediate feedback of the steps you have placed. This is all about left-clicking to input data and right-clicking to erase a step. You may also click-and-drag with either mouse button to easily fill or erase successive steps.
Note that your main project tempo in FL Studio is directly correlated to the steps in the step sequencer. If you have a drum beat with MIDI data, this can be slowed down or sped up by adjusting your project tempo.
You may also use the Alt + up/down arrow key to move your selected channel(s) up or down in the step sequencer. This may help organize your project. You can find this option under the CHANNEL menu in the main window of FL Studio. The options will show Move selected up or Move selected down.
Often, you may want to start your project by adding channels with percussion and starting your drum beat. This means that you may add channels that include a kick, hi hat, snare, cymbal, and other percussion and enter the steps as you see fit. After this, you may add virtual instruments, sounds, and then a bassline. On the other hand, it is also handy to start with a MIDI part or harmony, add some other instruments, and lastly make your drum beat. In this fashion, you can really pick percussion that fits your existing harmonies and bassline. Nevertheless, some people enjoy starting with the drum beat and adding their harmonies and notes later on. Of course, you can record live music to a click track with many instrument players to develop the human chemistry and vibe. Again, there are no true rules in music production; use whatever method works best for you.
Note
Keep in mind that many people prefer to use the Piano roll option after adding channels in the step sequencer. We will review the Piano roll in Chapter 4, Building Your Song.