
Although each part of your song is tremendously important to the final outcome, working with rhythm and percussion is debatably the most important part of your song. If your drums, kicks, snares, hi hats, and other percussion are weak, you song won't stand the test of time and won't sound very good to your listeners. Rhythm and drum samples can sound very different from genre to genre, so you want to pick these properly. That being said, you can also experiment with a fusion of sounds and mix genres to create your own sound.
To get started adding rhythm and percussion, you will want to have the step sequencer and FL Studio browser opened. Press F6 to bring up the step sequencer, or go to the VIEW menu and select View step sequencer. A third way to bring up the step sequencer is to click on the second button from the left in the console shown in the following screenshot. It shows the tiny square steps inside of the step sequencer. You may press F8 to bring up the FL Studio Browser, or go to the View menu and select Browser. A third way to bring up the Browser window is to click on the fourth button from the left in the console, as shown in the following screenshot:
Fig 4.1
The following steps will explore the important functions required to work with rhythm and percussion:
- Go to the main OPTIONS menu and then to Project general settings. There, under Time division, you may set your main Bar and Beat for the entire music project, as shown in the following screenshot:
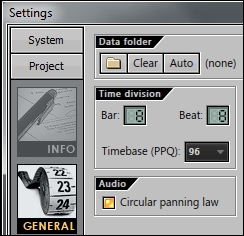
Fig 4.2
- If you need to override your main Bar and Beat settings with a different scaling, set beats per bar for this pattern for your specific pattern. In Fig 4.3, this is set to 4 and shown in the upper-left-hand corner of the step sequencer.
Tip
A song structure in 4/4 time (most popular song signature) is usually by 4, 8, or 16 bar loops. If you want a longer drum loop with more variation, you should set it to 16 bars. Nevertheless, the drum loop can actually last as long as you need when sending channels into the FL Studio Piano roll. This is reviewed in the final recipe of this chapter, Using the Piano roll feature.
- Set your FL Studio project tempo, which is signified as Beats Per Minute (BPM). The BPM tempo adjuster is located to the right of the transport controls, which are the play, stop, and record buttons. The following screenshot shows the options for the Percussion menu:
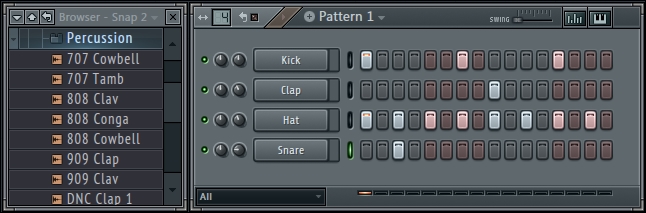
Fig 4.3
- Add channels to the step sequencer. This will usually be a kick, snare, hi hat, shaker, bongo, cymbal, sound effects, or any type of sound you want to utilize as percussion. You may drag samples from the browser to the gray, blank area on the step sequencer to add them. You may also right-click on a sample inside of the browser and select Open in new channel.
- Right-click on a Hat or Shaker channel as per Fig 4.4 and select Fill each 2 steps.
- Fill in your step data for Kick, Snare, and Percussion. The following screenshot shows the step sequencer entries:
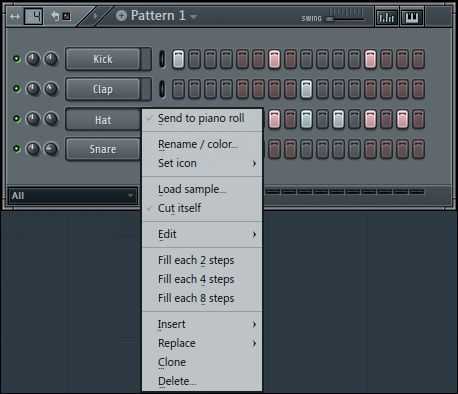
Fig 4.4
Once you have step data on any percussion channel in the step sequencer, there are two ways to swap and replace the data with a new sound. These two ways are mentioned in the upcoming steps. The following screenshot shows the FL Studio Browser:
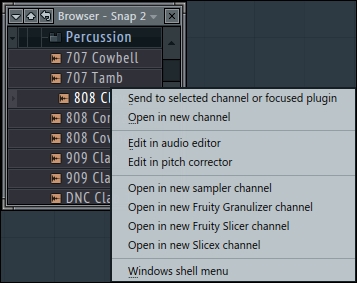
Fig 4.5
- Swap current data in any channel with a new sound from the FL Studio in order to test the different options. This is done by right-clicking on a sound in the FL Studio Browser or you can just engage any channel by clicking on the small green slit areas. selecting Send to selected channel or focused plugin, as shown in Fig 4.5.
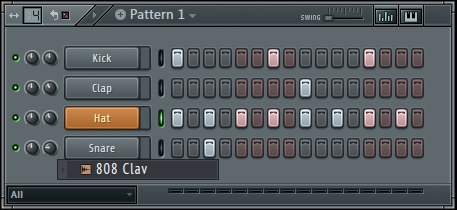
Fig 4.6
- Another way to swap current data in a channel is to left-click on any sound in the Browser window and drag it to the channel you want to swap. In Fig 4.6, we dragged a sample from the Browser window and were about to swap it with the Hat channel. When you hover your mouse over the channel you want to swap, it will show the channel in orange and then you can release your mouse button. The 808 Clav WAV sound will replace the Hat channel. Step data will remain unchanged, but the actual sound will be replaced/swapped.
- Press the Space bar to start and stop your current pattern.
You may add as many channels as you want for your percussion and rhythm. It helps with the creative process to "go with the flow" and keep adding elements to your music project in a single pattern. You may then use the Split by channel method, as discussed in Chapter 3, Working with the Step Sequencer and Channels, in order to separate all of these elements for your song arrangement. You will also want to set your Preview mixer track as discussed in Chapter 2, Using Browser. This will help to test out sounds before adding them as a channel to the step sequencer. You can also just simply click on sounds in the Browser window to test them out, but the Preview mixer track will help you to at least adjust the volume on previewed sounds. Please remember to work with the various parameters in Graph editor as well as Keyboard editor. This will allow you to enhance and fine-tune individual notes of percussion and rhythm—not just a global adjustment. Also remember to open up your CHANNEL settings on any given channel in order to modify and alter your sounds. If you are constantly starting with the same processes in your workflow, you can save your project as a template. In this manner, you can take some of the tedious nature out of the equation. Remember to clone channels (right-click on a channel for the Clone option) if you want to experiment with different options of the same sound as well as copy and paste data from one channel to the next.
The rhythm and percussion section of your music production is the backbone of your music production. This can drastically alter the mood and genre of your music. Once your drums and rhythm are established, you will have a nice base to work with and then you can add your bass line, instruments, and other harmonies such as the piano, violin, guitar, and various synthesized sounds. That being said, sometimes you will want to do the opposite. You may start with an extremely simple hi hat or shaker that acts as a metronome and then begin your instrument melodies. Once you have some melodies in place, it can be very rewarding to add a kick and snare that compliments the mood and tone of your melody. If you enjoy adding your kick and snare later, make sure your melodies are at a suitable volume. If you start with a harmony that is too low in volume and then add your rhythm, the volume may not be loud enough. That is why you must start with the kick, snare, and hi hat first—so you can set it at a suitable volume and then add your instruments. Nonetheless, do what you feel is right during your creative process. Your volume level is crucial here because after you start with one sound, you will be building other sounds around it.
- The Getting new sounds in Browser recipe in Chapter 2, Using Browser
- The Exploring Channel settings recipe in Chapter 3, Working with Step Sequencer and Channels
- The Sending a channel to a mixer slot recipe in Chapter 3, Working with Step Sequencer and Channels
- The Perfecting equalization recipe in Chapter 6, Using the FL Studio Mixer and Recording Audio