
Using send tracks in the mixer allows you to free up your computer load and easily add an effect to multiple mixer slots.
In order to start using send tracks, you will want to have the FL Studio Mixer open as well as have your channels in the step sequencer sent to the mixer slots. This is done by setting the FX number, as reviewed in the Sending a channel to a mixer slot recipe in Chapter 3, Working with Step Sequencer and Channels.
The use of send tracks is a well-known practice on both analog mixers and mixers inside of DAWs. Perform the following steps to learn to use send tracks in these mixers:
- Open up the FL Studio Mixer. This can be done by pressing F9.
- Look at the far right of the mixer. You will see four send mixer slots titled Send 1, Send 2, Send 3, and Send 4.
- Click on one of the previous send channels, either 1, 2, 3, or 4. In Fig 6.1, we have selected Send 1.
- Select an effect from the effect slots. These are labeled 1 through 8 and can be selected using the triangle drop-down icon and by hovering on Select or Replace. For our purpose, we will select an effect called Fruity Reeverb 2. In Fig 6.1, we have engaged Send 1 and picked Fruity Reeverb 2 in the first effect slot on the right-hand side.
- Rename the send channel to your liking. In this case, we will rename the channel
Reverb Sendbecause we know we are working with a reverb effect, as selected in step 4. This is done by selecting the send channel and hitting F2 to rename it.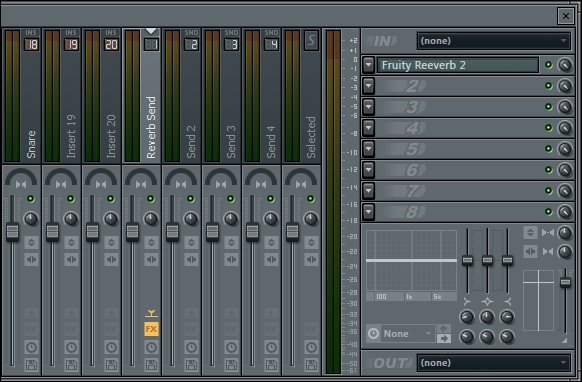
Fig 6.1
- Click directly on the insert slot that you want to tweak with the send channel. You must engage the audio you want to adjust. In our case, we will click on a Snare channel in the mixer, which is shown in Fig 6.2. We have the Snare channel audio here, as discussed in the Sending a channel to a mixer slot recipe in Chapter 3, Working with Step Sequencer and Channels. Once you click on the Snare channel or any channel in the mixer, it will be faintly highlighted.
- Finally, adjust the reverb send knob to your liking. Bear in mind that you need to select/highlight the Snare channel first, and then you need to turn your send knob. In Fig 6.2, we have the Snare slot highlighted, but we only turn the small send knob near the bottom of the mixer in the same column as the Reverb Send channel. When you turn your send knob to the right, you will see a graphical vertical readout of the amount applied as well as the FL Studio hint bar, which will show the percentage, from 0 to 125 percent.
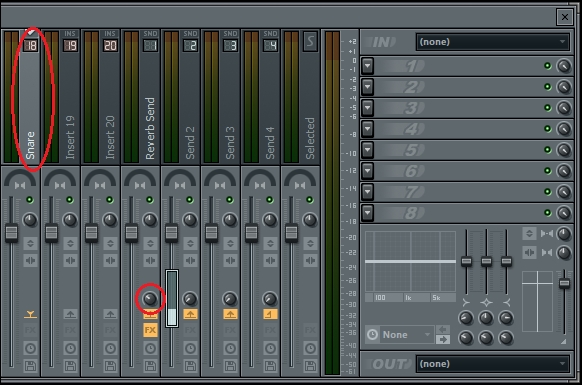
Fig 6.2
- Turning the Reverb Send knob allows the Snare mixer slot to send its signal to the Reverb Send track, which then applies the effect to the signal and sends the affected signal to the master track. You will also see that regular inserts in the mixer display a very small INS slot at the top of the mixer. These are channels sent to the mixer from the step sequencer. The four send slots in Fig 6.2 say SND.
When you have a full-scale music project, you will have many channels on various inserts (INS or FX slots) in the mixer. When you set up a send channel, you can add a little bit of the send effect to multiple mixer inserts, without having to add the same reverb effect individually. The send slot equates to a global effect. If you want to send some reverb (or any effect you desire) to your hi hat mixer slot, you can simply engage your hi hat insert and then adjust the send knob to your liking. If you want to send some of the same reverb send to your percussion or bongo insert, then you can adjust it again with the same send knob. If you want to apply the same send effect to your virtual instrument harmonies, you can use the same send knob again. It is up to you how much you want to apply. Again, your send knob goes from 0 to 125 percent, so you are able to specify how high you want to go in each individual insert slot. You can set up your four send slots and apply them to any mixer slot you desire. Generally, sends are used for reverb and delay, but there are no rules in music production. If you think outside the box, your creative possibilities are boundless. It's all about finding your own sound.
You can also create automation clips (reviewed in Chapter 10, Recording Automation) and use physical knobs on a MIDI controller to control your send knob. Additionally, you can add more effects (1 through 8 in the vertical region of the mixer) to shape your send sound. You may also want to cut out your low-end frequency when your send slot is actually highlighted or engaged and you are working with reverb. This will help open up your reverb send and take away the "muddy" and unclear sound. Panning your instruments or sounds left and right also helps a great deal with creating your own sonic space. Please remember that you can still tweak all of your parameters on any given effect as well as scroll through the presets. In this recipe, we can see our virtual effect and all of its parameters by clicking on the Fruity Reeverb 2 effect in Fig 6.1.
- The Adding effects and your effect chain recipe
- The Sending a channel to a mixer slot recipe in Chapter 3, Working with the Step Sequencer and Channels
- The Using automation for virtual instruments and effects recipe in Chapter 10, Recording Automation
- The Creating automation clips recipe in Chapter 10, Recording Automation