
Using markers in your FL Studio Playlist is a great way to organize your pieces and parts and to label what is happening in certain sections. The basic idea is to label these with intro, verse, chorus, bridge, outro, or whatever you want depending on your workflow. It helps to have these markers because they remind you of what is going on with your song and also help when you are selecting areas in the playlist. Snap is the setting that dictates how your patterns can be moved around and locked to the playlist timeline. These can be adjusted to certain beats, bars, and fractions of time.
To start using markers, you need to have the FL Studio playlist open. You do not need to have any patterns pasted in the playlist to add markers. When you have patterns in your song, the markers can be added, moved, renamed, or deleted; so the modification of the markers depends on your own organizational habits.
The following steps you show how to use markers and snap, and Fig 5.6 shows the basic view of the playlist:
- Press Alt + T when viewing your playlist and a marker will be created. You can then name your marker and press Enter. The following screenshot shows the markers, titled Intro and Verse 1, that have been added to the playlist:
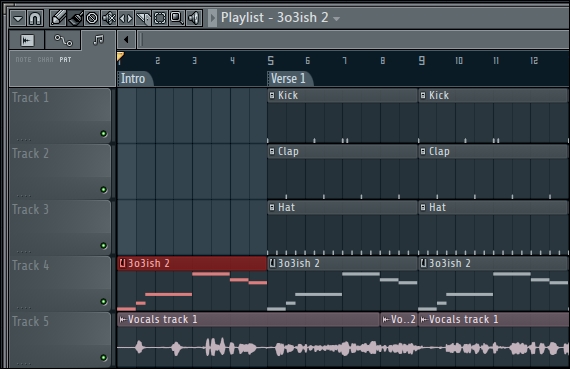
Fig 5.6
- Alternatively, you can add a marker by using the Playlist option's drop-down box (triangle at the upper-left corner), which is shown in Fig 5.7. Your markers, options are populated once you scroll down to the Time markers option.
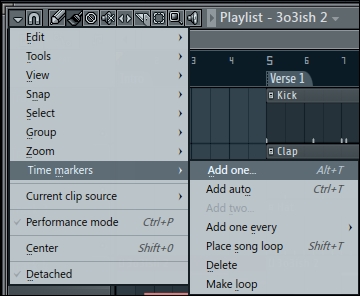
Fig 5.7
- Once you have a marker in the playlist, you can right-click on the marker in order to add another one, delete it, or rename it. This is shown in Fig 5.8.
- To move or slide markers to different sections of your song, hover your mouse over to the beginning (left-hand side) of your marker. A horizontal slide cursor will appear.
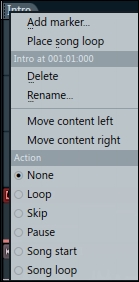
Fig 5.8
The use of markers is up each individual user and depends on how your current music project is organized. You can add markers wherever you desire; you can move, delete, and even rename them. Even though you can see what is happening in the playlist with your patterns, markers are a great function that help with organization. Label them as you wish so that you are reminded of the parts that are currently triggered.
The Snap to grid settings in your playlist are directly correlated with your ability to slide your markers, patterns, audio, and automation clips (shown in Fig 5.9). You will also find the Snap to grid button in the Piano roll and Event editor sections. If your grid is set to Cell, your markers and patterns will be locked in time with the cells on the playlist when clicking, dragging, and inserting. If your grid is set to (none), you can freely slide your marker without any grid constraints. The grid can be toggled on and off by pressing Alt when dragging . When you have audio on your playlist, the grid setting allows you to chop, slice, or edit your audio in fine, exact increments. The same rules apply to automation clips and patterns. The following screenshot shows options in the Snap to grid button:
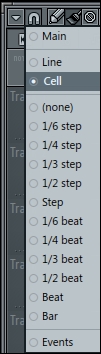
Fig 5.9
Your Snap to grid setting is the governor of the time values that your patterns are locked to. As mentioned earlier, you can momentarily ignore the grid by pressing the Alt key while dragging.
Selecting Main in any of the Snap to grid settings will make all the applicable windows (Piano roll, Playlist, and Event editor) use the default Main value. You can set the default value by clicking on Line (above the magnetic snap symbol in Fig 5.10) or the value currently displayed, generally located at the top in the main window of FL Studio. This Main value will govern the Main snap, quantization, and step edit steps. Snap to grid simply shows how your parts of music are magnetized to the grid.
Fig 5.10
- The Using patterns to build your song recipe
- The Comparing patterns and audio recipe
- The Recording external audio – keyboards, vocals, guitar, and devices recipe in Chapter 6, Using the FL Studio Mixer and Recording Audio
- The Exporting an MP3 or WAV file recipe in Chapter 8, Exporting and Rendering Your Project