
When humanizing your percussion, it may help to use the OFS knob within the Channel settings window.
In order to start humanizing your song using the OFS knob, you will want to have data within a channel on your step sequencer. When you click on a channel in the step sequencer, the Channel settings window will open up.
Let's take a look at how to humanize your song using the step sequencer and FUNC tab within the Channel settings window through the following steps:
- Right-click on your hi hat or shaker type of sound and select Fill each 4 steps as per Fig 9.1.
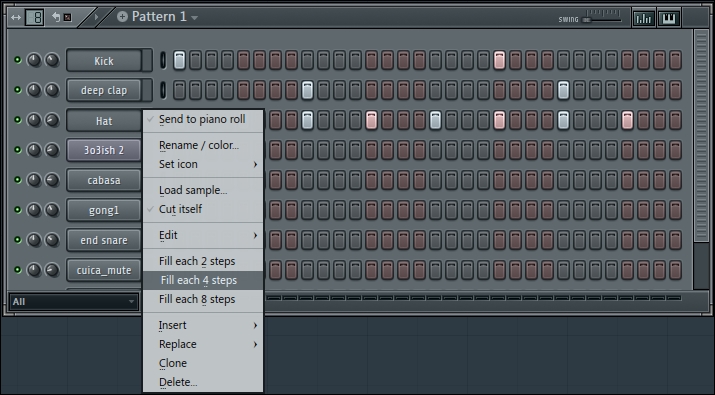
Fig 9.1
- Click on the Hat channel (making sure the small green slit is engaged) to open up Channel settings and click on the FUNC tab as per the following screenshot:
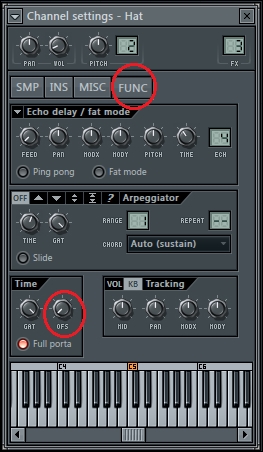
Fig 9.2
- Click-and-drag the OFS knob (fine time shift) to the right as per the following screenshot:
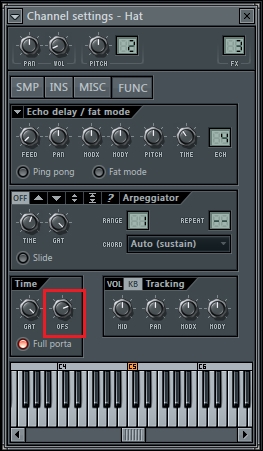
Fig 9.3
- You will find that the timing of your sound will be extremely off when the OFS button is turned farthest to the right. You will want to turn the knob slowly, starting from the farthest left, while holding Ctrl for incremental control. Observe the following screenshot for the position of the OFS button, which will usually work to humanize your percussion sound:

Fig 9.4
When you click-and-drag the OFS button to the right, you will notice that the timing of your sound will shift to the right and be totally off beat. This helps you understand the function of the OFS button. After realizing that turning it all the way to the right makes things totally off beat, we will slowly turn it to the right while holding down the Ctrl key. How far you turn this knob is up to your personal taste and the vibe you are going for. It all depends on the existing sounds in your project and the mood you want to establish.
Adding a human feel is also directly correlated to adjusting the velocity/volume. When working with a hi hat or any type of percussion, you can adjust the volume of the individual steps. You can do this using the Piano roll or Graph editor menu as reviewed in Chapter 3, Working with the Step Sequencer and Channels. For a more global change on all of the channels within a pattern, review the swing slider, which was also reviewed in Chapter 3, Working with the Step Sequencer and Channels. You can also add a touch of reverb sometimes, as discussed in Chapter 6, Using send tracks in the mixer, or any type of effect on the FL Studio Mixer in your mixer chain.
- The Working with Graph editor recipe in Chapter 3, Working with Step Sequencer and Channels
- The Using the Piano roll recipe in Chapter 4, Building Your Song
- The Using send tracks in the mixer recipe in Chapter 6, Using the FL Studio Mixer and Recording Audio
- The Adding effects and your effects chain recipe in Chapter 6, Using the FL Studio Mixer and Recording Audio
- The Fine tuning your sample recipe in Chapter 7, Sampling Using Edison